

Page 1
COLOR TELEVISION
M 72-315 IDTV/Reference
Page 2
r
Connecting the TV set with the mains
r
Switching the set on/off
Press the
¢
IO
button on the set.
Ń
!
If the set is not to be used for a long period of time
(e.g. during the night), switch if off with this button.
You will save energy.
ķ
10
r
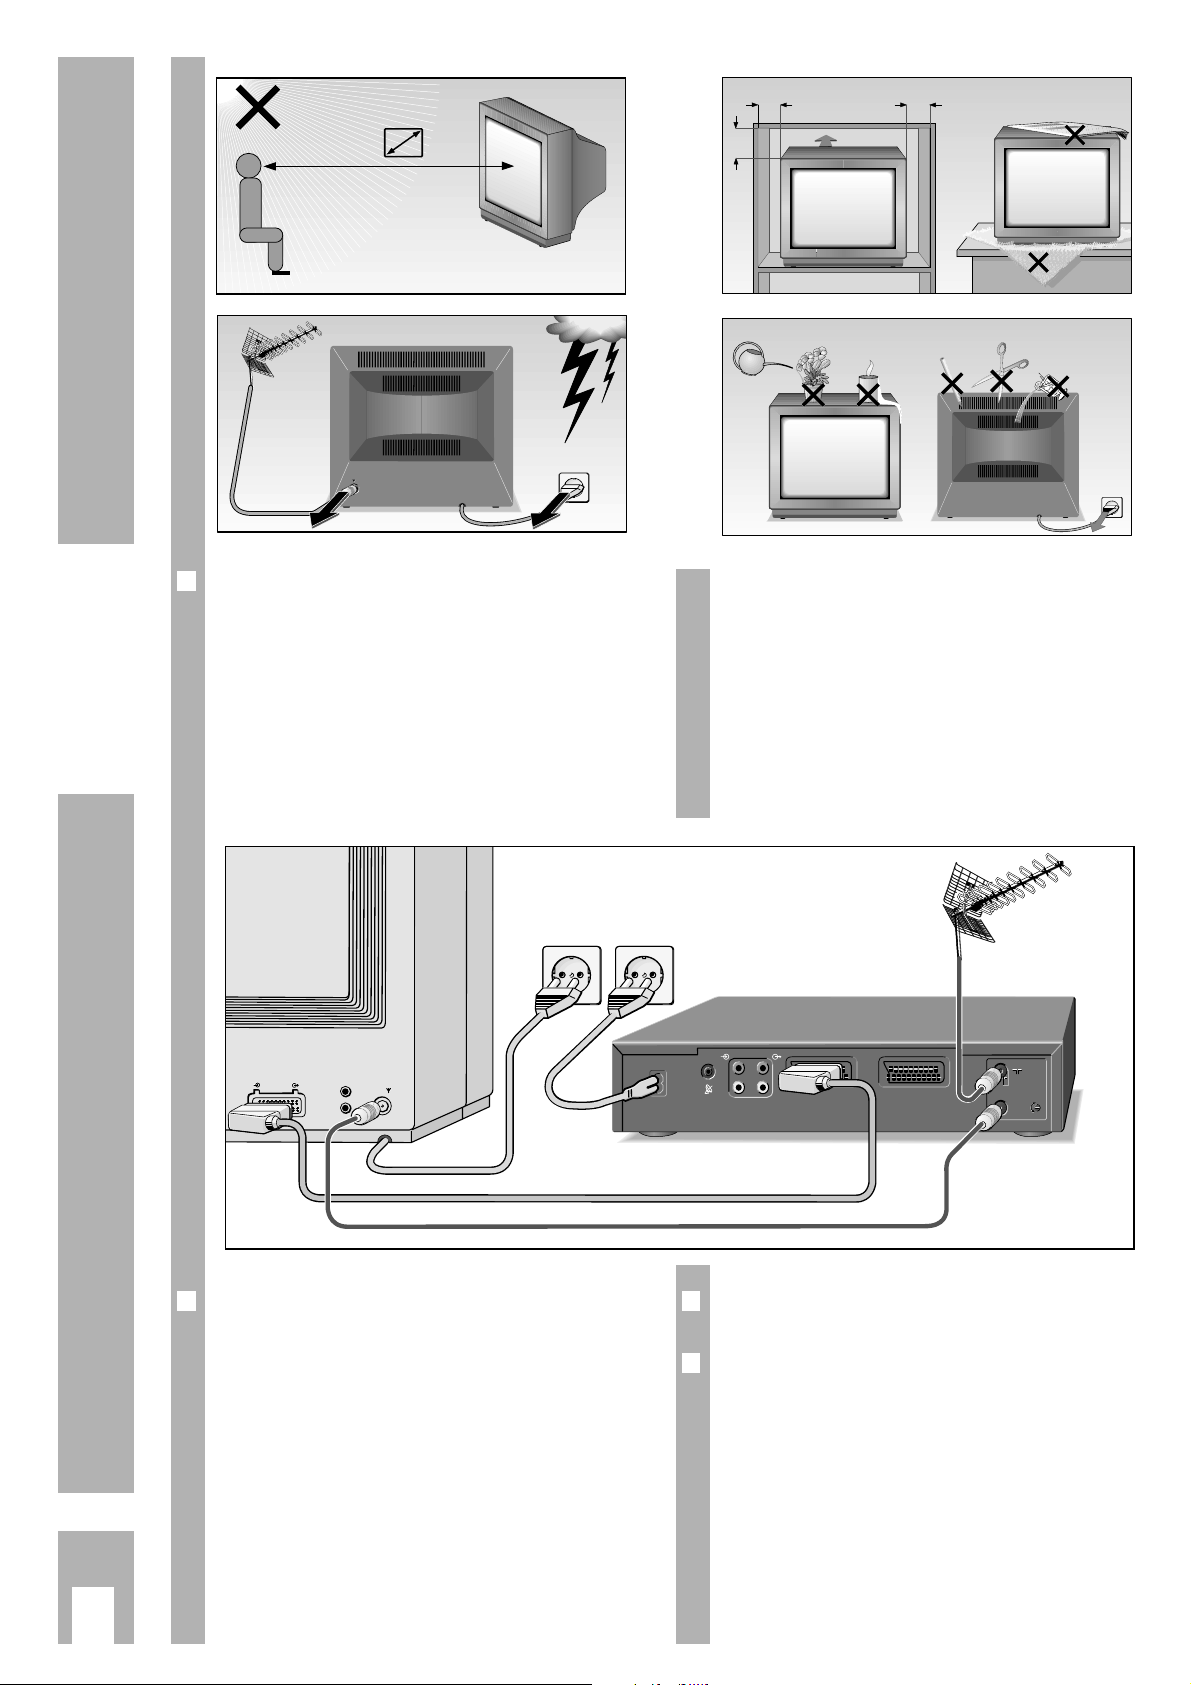
Please avoid:
Ń
!
Damage to the set due to electrical storms by disconnecting the mains and aerial cables.
Ń
!
Opening of the set and interventions by incompetent persons.
Ń
!
Heat build-up, moisture, and penetration of dust
and foreing objects into the set.
Ń
!
Obstruction of the ventilation slots.
Ń
!
Too little distances inside cabinets.
Ń
!
Damage to the mains lead.
Ń
!
Scratching and rubbing the picture screen.
Clean the picture screen only with a moistened and
soft cloth. Use clear and clean water only.
Ń
!
Magnetic fields (loudspeaker boxes) near the set.
Safety and Installation
Connecting and Putting into Operation
5 x
EURO-AV
r
Connecting the set to the aerial
Connect the aerial cable with the aerial socket É of
the TV set.
For TV/video recorder operation, connect as shown
in the figure.
This highly digitalized TV set assures optimum picture and sound quality.
Precondition for this is:
A properly working aerial system and an aerial
connecting cable with high screen factor (85 dB)
between the TV set and the aerial socket or the TV
set and the video recorder.
Avoid cable loops in the proximity of the TV set.
10
cm
20
cm
10
cm
20 cm
! SERVICE !
Krieg am Golf
AUDIO
R
R
L
L
EURO-AV A1
DECODER A2
L
L
H
H
+
+
ń
ń
–
–
Page 3

r
Assigning programme positions
This set is equipped with the automatic tuning
system ATS euro plus which performs the programme assignment for you.
Video recorder and television set have
been
purchased brand new
The video recorder may only be connected to the
mains after the automatic channel search has been
completed.
The channels on the video recorder are
already set
, the TV set is new
Connect the TV set and the video recorder using the
Euro-AV cable.
After switching on the set, confirm the »English«
dialogue language by pressing the
O
button.
If the »Select dialog language« page does not appear, press the .button and then the
O
button.
The dialogcenter appears on the screen.
Use the
] or | button to select the »Automatic programming« menu
line.
Press the
O
button.
Use the
] or | button to select the »Completely new programming«
line and then press the
O
button.
Confirm your country with the Obutton.
When the automatic programme allocation is completed, hints to the Easy Dialog System are displayed.
r
The Easy Dialog System
Your television is provided with the »Easy Dialog
System«.
With this system, all hints on operating the TV set
are no longer to be found in a printed instructions
manual but in dialog boxes which can be displayed
on the picture screen.
r
The Dialogcenter
The Dialogcenter is the control centre of your TV
set. It is called up by pressing the .button. Via
the displayed menu, you can make settings, call up
information and select precise help for operating your
TV set (for example an explanation of the remote control handset, an index, tips and tricks, etc.).
Simply try it out. You can do no harm!
r
Basic operation
The dialogue symbols indicate for each operating
step with which buttons the different functions can
be carried out.
]/| Yellow bar up/down
In two-page menus, selection of the second page.
xc
Set values.
O
Confirm selected function.
¢
TXT
Return to TV picture.
¢
?
Help.
AV
]
|
Continue …
xc
O
Call up
¢
?
Help
¢
TXT
TV
ķ
11
Easy Dialog System
P
OK
P
TXT
TV
Page 4

ķ
12
The Buttons on the Remote Control Handset
This is a brief explanation of the remote control buttons.
All functions will be explained in detail under
»Remote control« in the Dialogcentre.
Simply try out the functions.
1…0
Select programme and
0
AV
switch on from standby,
or
– select AV position,
– enter page number in
Teletext mode
¢
E
Switch picture format
4:3 ɫ 16:9
¢
D
Call up help information
h Access to DIALOGCENTER
P Switch on from standby. Select
programmes step by step
(1, 2, 3 ...).
p Select programmes step by
step (... 3, 2, 1).
Pressing and holding down the P or p
button causes the station names to scroll
on the picture screen. When releasing the
button, the set switches to the selected
programme position.
or
pP move cursor up, down
G Change and activate certain
functions.
FE Volume,
or
FE move cursor to the left, right.
™
Colour contrast
¢
VIDEO Remote control of a video
recorder (press and hold down
the
¢
VIDEO button).
A Switch to standby.
¢
PIP Picture-in-picture on/off.
¢
C Info about current broadcast.
¢
AUX Preselect button for certain fun-
ctions, e.g.
¢
AUX plus
¢
Ƿ
= »Program scan«.
¢
ʀ Sound mute.
ǵ
TXT
Teletext mode ɫ TV mode.
¢
F Sound settings.
Access to the »Sound settings«
menu
¢
Ƿ Freeze-frame.
¢
AUX
plus
¢
Ƿ
= »Program scan«
¢
Ȅ Time indication on/off
¢
B Picture settings.
Access to the »Picture
settings« menu.
®
Brightness
¢
SAT Remote control of a satellite
receiver (press and hold down
the
¢
SAT
button).
123
456
789
0
AV
TXT
P
PIP
AUX
TV
OK
VIDEO SAT
P
TP 771
Page 5

ķ
13
Specifications
r
Channels:
C01 … C99
Special channels S01 … S41
r
Norm:
PAL; SECAM; NTSC 4.43 MHz; BG,
NTSC 3.58 MHz via AV
r
Service hint for the specialist:
The mains cable is a plug-in type. For a replacement, order it at our after-sales service under the
number 8290-991-307.
This unit conforms to VDE safety regulations and
directives of the Deutsche Bundespost (German
Federal Post Office; see certification mark on the
type sticker on the rear of the unit), as well as all
relevant ordinances governing X-ray emissions.
The picture tube, which emits X-rays, is sufficiently
shielded and therefore represents no danger. Accelerating voltage is max. 34kV with a mean beam
current of 1.6mA.
Unauthorized tampering with the unit, in particular
making adjustments to the high voltage system, or
installing a different picture tube, can considerably
increase X-ray emissions. Units so altered no longer conform to applicable safety regulations and
may not be operated.
r
Mains voltage:
220-240V, 50/60Hz
(control range of the power supply unit 190 … 264V)
r
Power consumption:
Set in Set in Sound output Sound output
operation standby Music power Sine power
approx. 175 W 5 W 2 x 40 W 2 x 20 W
Subject to alterations.
E. and O.E.
rr
Pin assignment of EURO-AV socket
If you want to connect other devices to your television (for example, a computer or amplifier), your
dealer can provide you with a normed standard
connection by means of the following table:
Pin Signal
11 = Audio output, right
12 = Audio input, right
13 = Audio output, left
14 = Audio, earth
15 = Blue, earth
16 = Audio input left
17 = RGB blue input
18 = Switching voltage
19 = Green, earth
10 = Data line (MEGALOGIC)
11 = RGB green input
12 = –
13 = Red, earth
14 = Earth
15 = RGB red input
(S-Video = Chroma)
16 = RGB switching voltage
17 = Video, earth
18 = RGB switching voltage, earth
19 = Video output
20 = Video input
(S-Video = Luminanz)
21 Shielding/earth
220
21
119
Page 6

GRUNDIG AG ••D-90762 FÜRTH Printed in Germany
0 1 2 3 4 5 6 7 8 9
21511-941.01
!
GRUNDIG
+
P
+
P
-
Ķ
ƴ
ķ
ĸ
ń
 Loading...