

Page 1

COLOR TELEVISION
T 70-740/4 TOP
Page 2

2
Contents
Notes on Setting up and Safety......................................... 03
– Switching the set on and off and programme selection
The Buttons on the Remote Control - Short Description ... 04
– Operating a video recorder by remote control
Assigning Programme Positions....................................... 05
– Selecting a language
– Assigning TV channels to programme positions
Assigning Programme Positions....................................... 06
– Changing the sequence of the programmes
– Entering the station identification
Assigning Programme Positions......................................... 7
– By directly entering the channel number
Timer Functions .................................................................. 8
– Sleep timer
– Program functions
Special Functions ................................................................ 9
– Connecting a decoder or an external unit
– Turning the on-screen display on and off
– Adjusting a programme position’s volume
– Programmer HP
Adjusting the picture
Operating Teletext - Short description .............................. 10
Operating Teletext ............................................................. 11
– General
– TOP FLOF Teletext
Operating Teletext ............................................................. 12
– Operation
– Switching Teletext on / off
– Selecting language groups
– Operating TOP
– Calling up pages
– Programme guide
– Multiple pages
Operating Teletext ............................................................. 13
– Calling up sub-pages directly
– Calling up table of contents page
– Enlarging character size
– Answer release
– Watching TV while operating teletext
– Page catching
Connection Capabilities and Operation.............................. 14
– of headphones
– of camcorders
– of video recorders or Sat receivers
– Fine-tuning video recorder play
Technical data ................................................................... 15
ķ Page .............................................................................. 2
Į
Strona ........................................................................ 16
ə
Oldal............................................................................ 30
e
Strana ......................................................................... 44
s
С ................................................................. 58
Additional Information for Units sold in Great Britain
Units sold in GB are suitable for operation from a 240 V AC, 50 Hz mains
supply.
In case this appliance is supplied with a Safety Standard Approved mains
lead fitted with a non-rewireable 13 Amp mains plug which, if unsuitable
for your socket, should be cut off and an appropriate plug fitted by a
qualified electrician. The fuse and fuse holder must be removed from the
plug as accidental insertion of the redundant plug into a 13 Amp socket
is likely to cause an electrical hazard.
Note: The severed plug must be destroyed to avoid a possible shock
hazard should it be inserted into a 13 Amp socket elsewhere.
If it is necessary to change the fuse in the non-rewireable plug, the correct type and rating (5 Amp ASTA or BSI approved BS 1362) must be
used and the fuse cover must be refitted. If the fuse cover is lost or
damaged the lead and plug must not be used until a replacement is
obtained. Replacement fuse covers should be obtained from your dealer.
If a non-rewireable plug or a rewireable 13 Amp (BS 1363) plug is used,
it must be fitted with a 5 Amp ASTA or BSI approved BS 1362 fuse. If any
othe type of plug is used it must be protected by a 5 Amp fuse either in
the plug or at the distribution board.
Important:
The wires in the mains lead are coloured in accordance with the following code:
BLUE – NEUTRAL
BROWN – LIVE
As the colours of the wires in the mains lead of your appliance may not
correspond with the coloured marking identifying the terminals in your
plug, proceed as follows:
Connect the BLUE coloured wire to plug terminal marked with the letter
"N" or coloured black.
Connect the BROWN coloured wire to the plug terminal marked with a
letter "L" or coloured red.
In no circumstance must any of the wires be connected to the terminal
marked with a letter "E", earth symbol , coloured green or green and
yellow.
Replacement mains lead can be obtained from your dealer.
Page 3
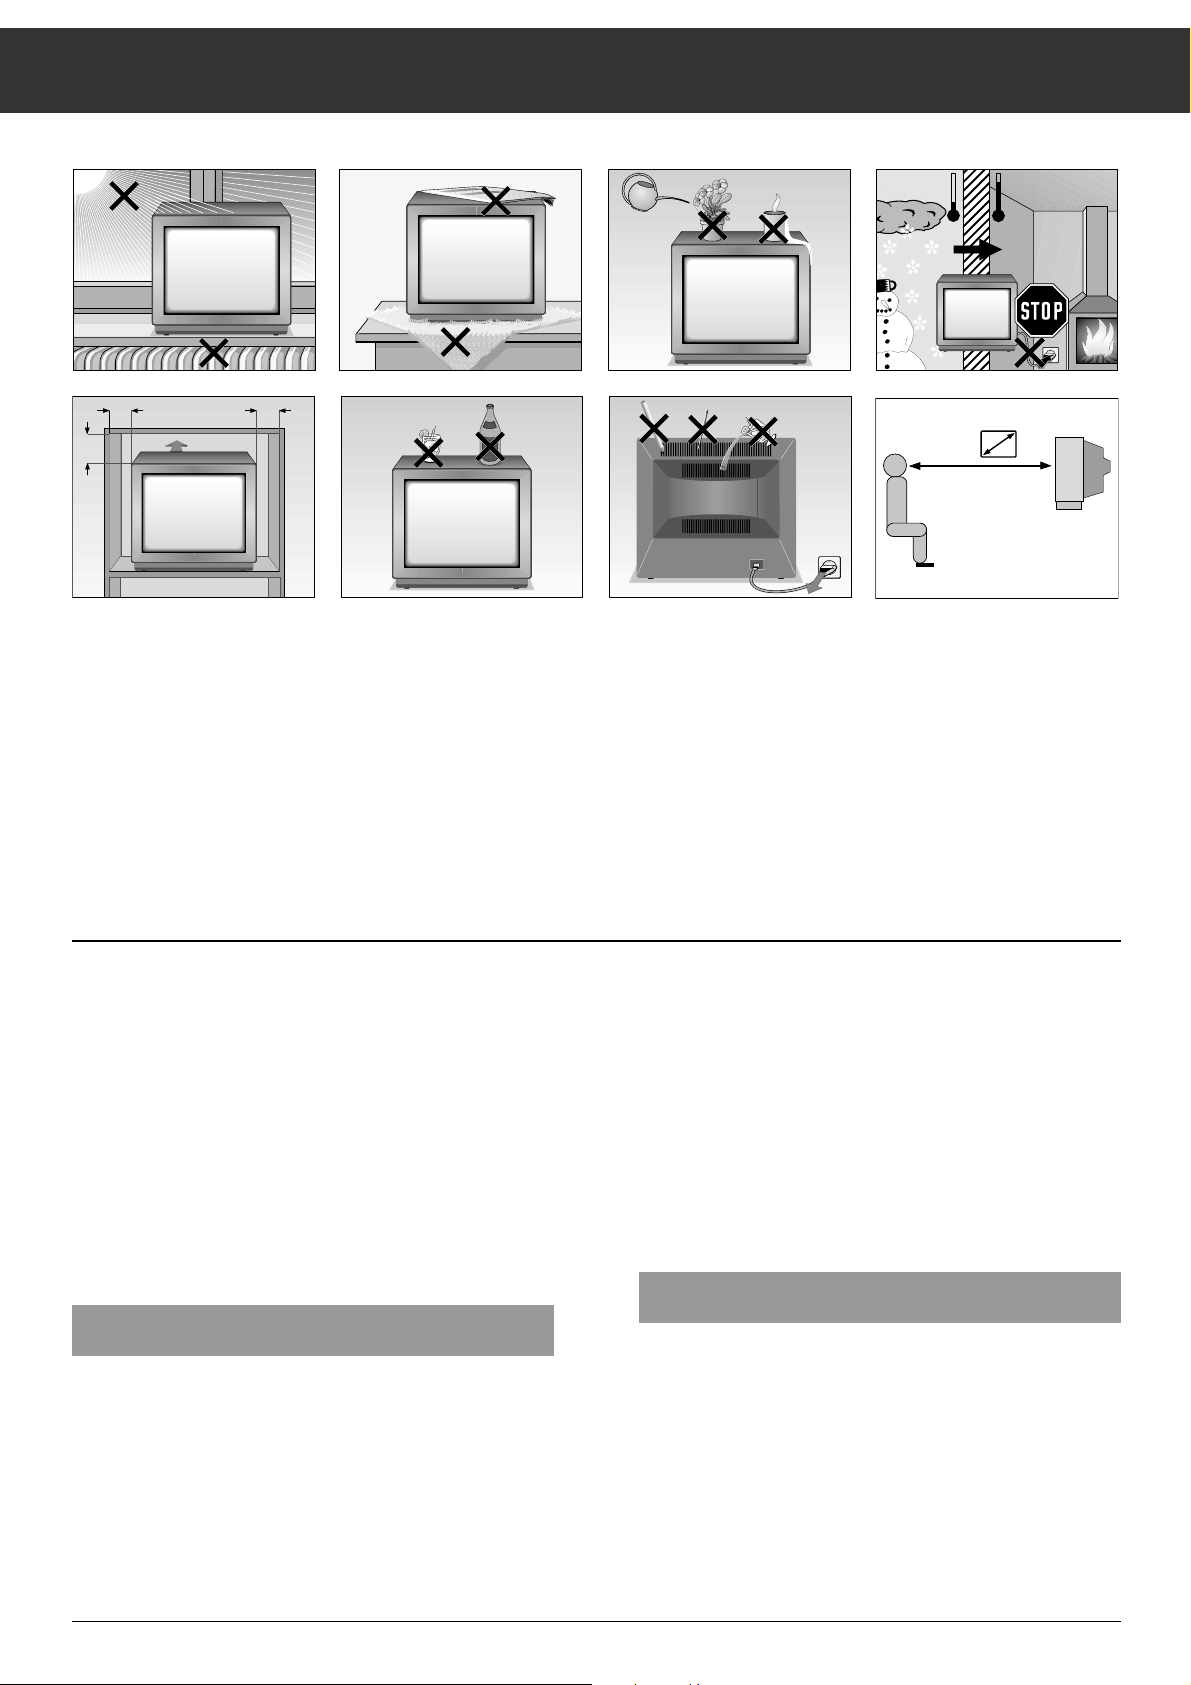
Notes on Safety and Setting up
3
Even while your television is switched off, it can be damaged
by a lightning strike in the power lines and/or the aerial cable.
For this reason, you should always disconnect your set from
the mains as well as from the aerial cable during thunderstorms.
Do not install loudspeakers next to the set.
When installing the set and while operating please insure that
the mains cable is accessible and cannot be pinched or
damaged in any way.
Do not install the set next to a heating source.
A heat buildup represents a source of danger and affects the
lifespan of the set.
When operating in a cabinet certain minimum clearances
must be observed.
Insure that the ventilation slots on the rear side of the set are
not obstructed.
Protect the set from humidity.
Do not insert any objects in the ventilation slots.
Danger, high voltage!
The remote control is the central control unit for your television set.
With it, all operating functions and basic adjustments may be
undertaken.
Install the battery which is enclosed. Observe the markings
inside the battery holder! Replace the cover.
When the battery has run down »BATTERY REMOTE CON-
TROL« will appear on the screen.
Replace used up batteries promptly. No responsibility will be
accepted for damage caused by leaking batteries.
Switching the set on and off
Turn the set on with the mains switch ǼǼ.
Programm position 1 is automatically selected, P1 briefly
appears in the screen along with the station identification.
When not viewing, the set can be switched to standby with
button
b.
Approximately ten minutes after closedown or after a transmission failure (if no test pattern appears) the set automatically switches to standby.
Switching the set on from standby is by pressing the number
buttons or P+.
If the set is not in use for a longer period of time (at night
also) switch off using the mains switch
¢
IO
.
This reduces power consumption and thus the effects on the
environment.
Selecting a programme
A programme can be selected using the number buttons or
P+ ,P-on the remote control, or on the set using P+ or P-.
If you keep pressing one of the buttons on the remote control
(P+ or P-) the programme positions and station identifications scroll rapidly on the screen.
The set switches to the selected programme when the button
is released.
Krieg am Golf
10
cm
20
cm
20 cm
10
cm
°C
°C
2 Std
5 x
! SERVICE !
Page 4
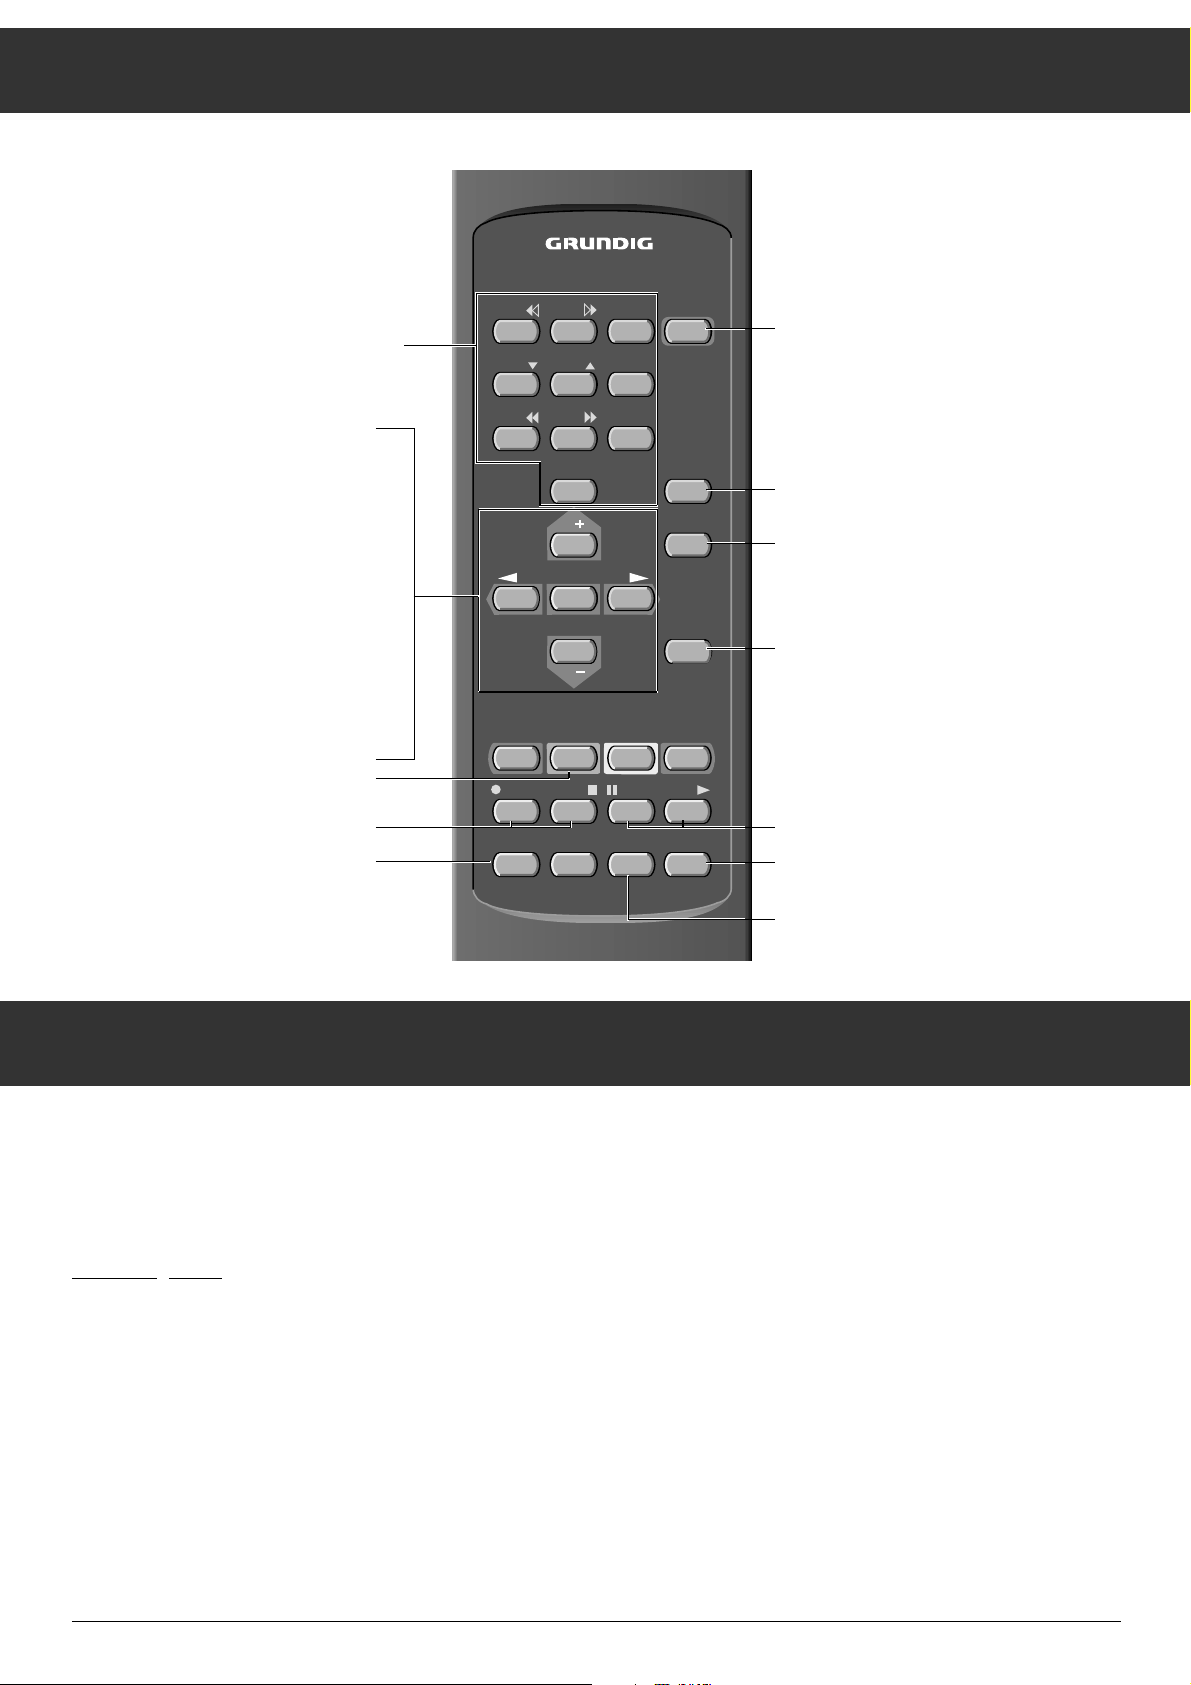
The Buttons on the Remote Control
4
The following list tells you which functions are supported.
ĵķ (Number button 1) = reverse scroll
ĶŁ (Number button 2) = forward scroll
l (Button –
i) = start recording
n (Button +
i) = stop
ĵĵ (Number button 7) = fast rewind
ŁŁ (Number button 8) = fast forward
II (Button–
v) = pause
ı (Button + v) = play
Ļ (Number button 4) = programme position–
ļ (Number button 5) = programme position +
Using the television remote control you may also operate
Video recorders. Personnel at your sales point can inform
you which ones may be operated.
How to operate:
Keep VIDEO depressed.
This switches the remote control to video operation. Next,
press the required function key.
Video Recorder Remote Control
1 … 9 Channel selection and switching on
the television from stand by
0/AV or – Selection of AV position
P+/P
-
Individually switch channels,
forward (1, 2, 3 …)
Individually switch channels,
reverse (… 3, 2, 1)
or
Cursor movement up and down
OK Changing and activating various
functions.
ņ
-
,+
ŀ
Volume adjustment (or the button
– z + on the set)
or
Move cursor to the left, to the right
Ȅ Time on/off
i
+/-Contrast
VIDEO Video recorder remote control
(keep VIDEO button depressed)
ǼǼ
Switch to stand byand switch on with last,
selected programme position.
ʀ
Ton on/off (mute)
Ǻ To enter the menu. When menu appears,
press the OK button
TXT Teletext mode ɫ TV mode
v
+/-Brightness
SAT S
atellite receiver remote control
(keep SAT button depressed)
P/C Return to the MENU
TP 712
123
456
89
7
AV
0
P
OK
–
+
P
Ȅ
Ǽ
ʀ
Ǻ
TXT
VIDEO AUX P/C SAT
+
–
iv
–
+
Page 5
Assigning Programme positions
5
Selecting the language
For the dialogue with your TV set you can choose among
several languages. All screen text will then be displayed in the
selected language. It is therefore advisable to first select the
dialogue language.
The language is factory-set to D (German). If you wish to
change the language, do so before going any further.
Press the
Ǻ button, then press the OK button.
The MENU is displayed.
You may leave the menu by pressing the
Ǻ button again.
Select the first line of the menu by pressing the P
-
button.
– The menu line – with the country code – is displayed on a
«light blue» background.
Press the OK button.
– The language selection is activated.
The selected country code is displayed in red.
Press the
ņ
-
or + ŀbutton in order to select the desired lan-
guage.
– Screen text will from now on be displayed in the selected
language.
Press the OK button.
– The country code of the selected language is stored and
displayed in yellow.
From this page you can move on to the next setting, see
chapter
«Assigning TV channels to programme positions».
Assigning TV channels to programme positions
Transmitters broadcast programmes on different channels.
The programmes must be assigned to the programme positions of the TV set.
It is only necessary to make these settings once, when you
set up your television set for the first time, or if reception
conditions change (for example, if you move to another location or if you are subsequently connected to a cable television
source).
Select the ATS line from the menu by pressing the P
-
button
and acknowledge by pressing OK.
The ATS page is displayed.
Starting ATS
Press the OK button.
ATS starts, the automatic channel search starts with C01 and
stops at each channel occupied by a broadcasting station.
This takes place independent of visual quality.
Programme P1 is automatically selected.
Storing channels
Please store alle channel numbers for programmes with good
visual quality by pressing the OK button.
In the case of programmes with bad visual quality, restart the
channel search by pressing the P+ button.
– If the channel number was stored, programme position P2
is automatically called up. The automatic channel search
continues until the next programme is found. All further
programmes may thus be stored.
Menu
selection possibilities
Dialogue line (Entries using indicated buttonns (symbols) only)
Dialo
gue lines:
Auto Tuning System
OK buttonn - starts ATS
P– button - sorts programme positions
I button - returns to normal viewing
e.g. P 1 and channel C 06 found using ATS
Dialogue lines:
OK button - stores
P+ button - do not store, search
P button - sorts programme positions
I button - returns to normal viewing
D - GB - PL - CZ - SQ
PICTURE - MENU
TIMER - FUNCTIONS
STATION TABLE
SPECIAL FUNCTION
AT S
OK
i
The menu
selection possibilities
Dialog line (inputs can
only be entered with
the displayed buttons
(symbols)
Dialogzeilen :
Auto - Tuning - System
Taste OK - startet ATS
Taste P _ - sortiert Progr.-Plätze
Taste i - ins TV-Programm zurück
i
FP000238
START
SORT
TV
AT S
OK
P 1
z. B. P 1 und der über ATS
C 06
gefunde Kanal C 06
Dialogzeilen :
AT S
STORE
SEARCH
SORT
TV
OK
Taste OK - speichern
Taste P+ - nicht speichern, suchen
Taste P _ - sortiert Prog.-Plätze
Taste i - ins TV-Programm zurück
i
FP000239
Page 6

Assigning Programme Positions
6
Changing the sequence of the programmes
You can sort the stored programmes in accordance with your
wishes so that the programme you most frequently watch,
for example, is stored at programme position P1.
If you have left ATS, you need to call it up again.
Press the P+ or P
-
button to select the programme position
you wish to move (line is displayed on «red» background).
Press the OK button, (line is displayed on »yellow« back-
ground).
now the programme position data can be moved by
pressing the P+ or P
-
button and the programme position
data are moved to the new desired pogramme position
(e.g. P1 = 01).
Press the OK button repeatedly until all programme position
data have changed from »yellow« to »red« – The data are
stored.
Entering the station identification
The station identification (initials, e.g. ZDF, RTL etc.) makes it
easier for you to find a particular station. You may enter the
station identification according to your own preference.
However, you can also use the preassigned station identification letters which your television set provides as a special
feature.
The following factory-provided station identification codes
are available:
ARD EURO NED2 RAI2 SRG TVE2
ARTE FILM NED3 RAI3 SR3 VERK
BBC F2 NRK RTL4 SUPE
WDR3
BRT1 HR3 N3 RTL SVT2 ZDF
BRT2 ITB ODR3 RTP1 SWF3 1PLU
BR3 LIFE ORF1 RTP2 TF1 3SAT
CANP MDR ORF2 SAT1 TV4 ---CNN MTV PRO7 SDR3 TV5
DSF NED1 RAI1 SPOR TVE1
Please take note of the dialogue text. You can make your
selections by using the displayed button symbols.
Select the programme position for which you wish to enter or
change the station identification by pressing button P+ or P-.
Press OK (line is displayed on «yellow» background).
Press OK again.
(The channel number is «red», the four entry characters are
displayed on a «yellow» background).
Press button P+ or P
-
, the first station identification appears.
Press button P+ or P
-
repeatedly (or keep pressed – it scrolls
through the table) until you have found the desired identification.
Press OK (the entire line is displayed on a «red» background), the line is stored.
If the provided list of station identifications does not contain
the identification you wish to use, you may enter it according
to your own preference.
Four characters are available for station identification for each
programme position.
These may be filled with letters (A-Z),digits (0-9) or with
spaces (----).
Select the programme position with button P+ or P
-
.
Press OK (line is displayed on a «yellow» background).
Press OK again (channel is displayed on a »red« back-
ground).
Search for the empty line ---- with button P+ or P
-
.
Press OK (The first entry position is displayed on a “red”
background).
Call up the desired letter or digit with button P+ or P
-
.
Select the next character with button +
ŀ
and repeat the pro-
cess until the desired station identificaiton is complete.
Press OK (the entire line is displayed on a »red« backgro-
und), the programme position data are stored.
Return to the TV-Programm with button Ǻ.
You may let the programme station identification appear
or disappear by briefly pressing buton Ǻ.
sorts programme positions for
Dialogue line
List of station names
Personal “symbols”
no entries
station identification (symbols)
ATS SORT
01
C06
02
C21
03
C30
04
C34
05
C36
06
C40
----
----
----
----
----
----
OK
sortierte Programmplätze
----
Plätze für Sender-
kennung (Kürzel)
Dialogzeile
i
FP000107
ATS SORT
01
02
03
04
05
06
C06
C21
C30
C34
C36
C40
ARD
VAT1
----
----
----
----
OK
-
Sendernamen Angebot
Eigene "Kürzel"-Bezeichnung
ohne Eingabe
i
FP000108
Page 7

Assignin Programm positions
7
By directly entering the channel number
This should only be done if you know the channel number on
which a station broadcasts.
Call up Menu
Press the Ǻ button
MENU ɮ OK appears.
During display press OK;
the MENU is displayed.
Selecting the programme position
Press button P-to select the line four in the menu.
– Menu line – PROGRAMMES – is displayed on a »light blue«
background.
Press OK.
– Data for the programme position in question are displayed.
– The position in question is displayed in red.
Select the programme position with button P+ or P
-
.
Entering the channel number
Press button + ŀ.
– You may now switch between “channel” and “special chan-
nel”, to do this
Press button P+ or P
-
.
– An S (S = special channel) is displayed.
– Pressing button P+ or P-takes you back to C (C = chan-
nel).
Press button +
ŀ
.
Using the number buttons enter the desired channel number
as a two di
git figure.
– If no further entries are required (e.g. station identification,
fine-tuning (FT)) then,
Press OK (store)
If the programme positions have been assigned using ATS
automatic channel search, then setting up in this way is
not required.
It is possible to enter the channel number step by step using
button P+ and P-. If button P+ or P-is kept depressed, automatic channel search begins. The channel search stops at
each program you are able to receive.
Entering the station identification
– Four entry field positions per programme position are avai-
lable for station identification (NAME). They can be randomly filled with letters, digits or other characters (e.g. »–«
for spaces).
Press button +
ŀ
.
– The first entry field position for station identification is sel-
ected.
Press button P+ or P
-
(P+ forward 0-9, A-Z, P-backwards
Z-A, 9-0, space), press until the desired character appears.
Press button +
ŀ
.
– This takes you to the next entry field position.
Repeat this procedure until the desired station identification
has been entered.
– If no
further entries are required (e.g. fine-tuning the pictu-
re), then press OK.
– The channel number and station identification are stored.
Standard
Your TV set will let you view programs in PAL BG and SECAM
DK standard. If you wish to occupy programme positions
with programmes broadcast using these standards, you need
to select the respective programme standard.
Call up the Menu.
With button P
-
call up line four of the menu.
– Menu line – PROGRAMMS – appears on a »light blue«
background.
Press OK.
Press button +
ŀ
repeatedly until S (for Standard) is selected.
Press button P+ or P
-
.
– The selected TV standard is displayed.
Press button P+ or P-.
– This selects the second TV standard.
By repeatedly pressing button P+ or P
-
you return to the sel-
ected TV standard.
If you do not wish to alter the TV standard setting you may
leave standard setting mode by pressing button
Ǻ.
Dialogue line
Fine-tuning
Standard
Station identification
Channel / special channel
Programmes
PR CH NAME FT
02 C21 PRO 7 S 00
OK
Dialog line
i
Fine-tuning
standard
station identification
channel
Programmes
/
special channel
STANDARD
PAL BG
OK
i
Page 8

Assigning Programme positions, Timer Functions
8
If you have changed the TV standard, then you must store
this by
Pressing OK.
– If fine-tuning the picture is not required, the entries can sto-
red by
pressing OK.
Fine-tuning the picture (FT = Fine-tuning)
The TV picture is automatically adjusted to maximum sharpness. If reception is difficult, it may necessary to adjust sharpness of the picture manually.
Press button
ņ
-
until the numbers under FT are green.
Press button P+ or P
-
to select best picture and sound. You
may select values from +63 to –64.
Press OK to store the values you have set.
– After storage, programme data for the next programme
position are displayed.
Return to TV viewing by pressing button
Ǻ.
SLEEP TIMER
Adjustment of the sleep timer automatically switches the TV
to standby after a pre-determined period from between 10 to
90 minutest.
Call up the Menu.
Press button P
-
to select menu item »TIMER FUNCTIONS«.
Press OK, menu »TIMER FUNCTIONS« is displayed.
Press the OK button
Enter the desired value (in steps of 10 minutes) by pressing
button P
-
.
Press OK to store. The main menu displays.
– The TV set switches to standby after the time period selec-
ted has elapsed.
– Entering »00 MIN.« terminates this sequence in advance.
Return to TV viewing by pressing button
ǺǺ
.
Programme lock
The programme lock prevents unauthorized use of the TV set.
Call up the Menu.
To select menu item »TIMER FUNCTIONS«, press button P
-
.
Press OK, menu »TIMER FUNCTIONS« is displayed.
Press button P
-
, menu line
ttt
is selected.
Press OK.
Enter a four-digit code using buttons 1 … 9 (e.g. 1111).
Press OK .
– The code is stored. The main menu appears.
– To delete the programme lock, enter the the code number
again.
Return to TV viewing by pressing button
Ǻ.
Be sure to memorize
your personal code number!
If you have forgotten your code number, a key (É) on the
last page (envelope) will offer you assistance.
Releasing the programme lock
If a TV which is locked is switched on, the following appears.
You are requested to enter your personal code number.
Enter the code number using number buttons 1 … 9 (hidden
entry XXXX).
– The TV set automatically switches to viewing mode.
OK
i
TIMER - FUNCTIONS
SLEEP - TIMER
0-9
00 MIN.
1111
TIMER - FUNCTIONS
SLEEP - TIMER
00 MIN.
_ _ _ _
OK
i
TIMER - FUNCTIONS
SLEEP - TIMER
00 MIN.
_ _ _ _
0-9
Page 9

Special functions
9
Connecting a decoder or an external unit (video
recorder)
Some stations – those whose programs are received via
cable or satellite dish – scramble their programmes to render
picture and sound unrecognizable. Programmes such as
these can be decoded using a decoder.
Procedure:
Connect the decoder/video recorder to the EURO-AV-socket.
Decoder:
Select the programme position which has been assigned to
the channel on which the encoded station broadcasts.
Video recorder:
Select the programme position you wish to use for video
recorder viewing
Call up the Menu.
Press button P
-
to select menu line – SPECIAL FUNCTIONS –.
Press OK.
– Menu – SPECIAL FUNCTIONS – is displayed.
Press button +
ŀ
.
– This switches the DECODER ON.
Pressing button +
ŀ
switches the DECODER OFF.
Return to TV viewing by pressing button
Ǻ.
– Screen display
P7
ň PREM
Turning the on-screen display on and off
You can choose between OSD ON and OSD OFF by selecting
OSD ON.
The on-screen bar graph display for volume, brightness,
colour intensity and the station identification is turned on and
off.
Adjusting a programme position’s volume
The volume can be adjusted using the remote control with
button ņ-
or + ŀor directly at the set using adjustment
button ņ-
or + ŀ. If you receive a programme whose volume
is noticeably different from others (too loud or too soft), this
feature allows you to adjust.
Call up the menu Special Functions.
Select menu line - VOL 00 PROG. 01. – by pressing button
P
-
.
Adjust the volume with button
ņ
-
or + ŀ(VOLUME). This will
only change the volume setting for the programme position
currently selected (e.g. PROG. 01).
Return to TV viewing by pressing button
Ǻ.
PROGRAMMER HP
The menu line – PROGRAMMER HP – can be used to automatically programme the TV set.
Only a TV specialist using an IR DATA-PROGRAMMER may
do this.
Adjusting the picture
All picture settings can be adjusted to suit your personal preferences.
To adjust the colour intensity and brightness, press the – or +
side of the button until the desired setting is reached
Color contrast
+
i
-
Brightness
+
v
-
To change contrast (black/white):
Call up the menu.
Press OK.
The PICTURE MENU is displayed.
Select the contrast with button P
-
.
Change the setting using button ņ-
or + ŀ.
– Alteration of the setting is indicated in the on-screeen
display.
SPECIAL FUNCTION
DESCRAMBLER OFF
OSD ON
VOL 00
PROGRAMMER
PROG. 01
HP
i
DESCRAMBLER OFF
OSD ON
VOL 00
PROGRAMMER
SPECIAL FUNCTION
PROG. 01
HP
i
Page 10

Operating Teletext – Short Description
10
1 … 9 Page selection
AUX Call up the dialog line
To call up the following:
Increase
character size
Bypass
waiting time
Direct call up
subpage
Give
answer
Page
STOP
Select functions with
ņ
-
or + ŀbutton.
Call up with
OK button.
ķ
ʄʄ
ķX /00 ķ? STOP
Ǻ Calls up overview page, selects language
group (keep button depressed approx.
3 sec.)
TXT Teletext mode ɫ TV mode
¶(red) Current page -1 page
Ȅ
(green) Current page +1 page
¶(yellow) no function
¶(blue) no function
P/C Teletext – Displayed the most previously
viewed page
Floftext
The colored buttons are for the topics
listed in the dialouge lines.
TP 712
123
Ǽ
456
89
7
AV
0
P
OK
–
+
P
ʀ
Ǻ
TXT
Ȅ
+
–
iv
VIDEO AUX P/C SAT
+
–
Page 11

Operating Teletext
11
General
Teletext is described as additional information which is
broadcast by the TV station together with the TV programme.
Using a Teletext decoder which is installed in your TV set,
you can let this additional information appear on the screen.
Teletext is transmitted as texts and graphics or as subtitles in
TV programmes.
Subtitles serve as an aid for those who are hard of hearing.
Your TV set offers easy operation via information pages and
dialgue lines. The information in the dialogue lines describes
functions and the buttons required for operation .
TOP FLOF Teletext
TOP and FLOF are new methods for quickly selecting Teletext
pages.
Using TOP and FLOF you may select Teletext pages without
previously looking for the page number. All Teletext page
broadcasts by a TV station are ordered according to theme –
described also as blocks –, as in a file cabinet.
For example, all news items are brought together in a »Topical« block. Other theme groups are, for instance, »Sport«,
»TV programmes« and »Service«. With TOP Teletext the
blocks are again subdivided into several groups, in the case
of »Topical« into politics, business, culture etc. Inside the
groups are normal pages.
The on-screen user guide means that operation is extremely
safe and easy. At the bottom end of the screen a comment
line appears with colour identifiers. The colours displayed are
to be found on the remote control.
When operating TOP, the yellow field indicates the next group
within the selected block. The blue field indicates the next
block.
You use the blue button on the remote control to switch from
one block to the next, the yellow button to switch from one
group to the next. Using the green button you scroll forwards
page by page. The red button scrolls backwards.
When operating FLOF, a selection of themes appears as
colour text lines. The colour buttons on the remote control
lead you to the themes in question.
TOP and FLOF take you quickly, easily and safely to your target – the desired Teletext page.
If the station does not broadcast TOP- or FLOF-Teletext a red
bar display appears – and a green bar with a + in the commment line.
Note
If the signal from the aerial is not one hundred percent, e.g.
producing interference, Teletext pages may display with
errors. If fine-tuning the TV set does not improve matters,
please have the aerial checked.
Useful information
In order to operate »TOP« Teletext, additional information is
required from the staion. Therefore, after switching on or
changing programs please allow for a slight pause during
which the TOP decoder reads information into its memory
which then becomes available.
Using button TXT you may exit any operating mode and
return immediately to normal TV viewing.
Please observe the respective user guide displayed at the bottom of the screen.
red green yellow blue
Next group
Next block
WeatherNewsSportTV Guide
gelbgrünrot
blau
- +
NACHRICHTEN
nächste Gruppe
SPORT
nächster Block
Page 12

Operating Teletext
12
Operation
Select the TV program for which you wish to call up Teletext
pages with number buttons 1 … 0.
Switching teletext on/off
Press button TXT on the remote control.
The table of contents page 100 or the Teletext page last displayed appears.
Press button TXT, Teletext is turned off.
Selecting language groups
You have select from three language groups for dialogue with
Teletext.
Press button TXT, Teletext is switched on.
Press button Ǻ and keep it depressed until the following display appears in the bottom line of your Teletext:
West + CZ, SQ EAST WEST + TR
The basic (factory) setting, West + CZ, SQ is on a »blue«
background.
Select the desired language group with button
ņ
-
or + ŀ.
Language selection is from the following country groups.
West + CZ, SQ EAST WEST + TR
GB / PO / GB /
D / NL / B / D / NL / B / D / NL / B /
S / N,DK / SF / H / S /N,DK / SF / H / S /N,DK / SF / H /
I / F / E / IS / I / F / YU / I / F / E / IS /
CS / CS / RO / TR / GB /
Press OK, the selected language group is stored.
Operating TOP
A red, green, yellow and blue text field are visible in the lower
half of the screen. The corresponding buttons are to be found
on the remote control.
Press button
¶ (red) to scroll backwards.
Press button
¶ (green) to scroll forwards to the next availa-
ble page (continuing on the next group).
Press button ¶ (yellow) to switch to the next group. After
the last group in the selected block you automatically enter
the next block.
Press button
¶ (blue) to switch from one block to the next.
Calling up pages
Enter a three-digit number for the desired page using the
number buttons 1 … 0.
– The page number is at the top edge of the screen and the
page presently appears.
Programme guide
You may switch directly to a particular station’s programme
guide.
Press button
Ǻ.
Page 100 appears.
Press button
Ǻ again.
A programme guide block appears.
Press button
Ǻ again.
The table of contents page 100 re-appears.
When operating FLOF this function leads to the table of contents page selected by the station.
Multiple pages/page stop
A page number may contain several sub-pages which are
automatically scrolled forwards by the station at certain intervals.
Sub-pages are indicated below the time display, e.g. 3/6
means that you are looking at page 3 of 6.
If you with to look at a sub-page for longer,
press button AUX.
The dialogue line is displayed.
To select the STOP press button
ņ
-
or + ŀ.
Press OK,
»STOP« is displayed at the top of the screen. The contents of
the page displayed are now “frozen”, no longer updated and
scrolling to further sub-pages no longer takes place.
Press OK,
the »STOP« function is cancelled, the sub-page in question
appears.
Page 13

Operating Teletext
13
Calling sub-pages directly
Press button AUX (the dialogue line is displayed).
To select symbol /00 press button
ņ
-
or + ŀ.
The selected page number appears in the info line e.g.
P155/----.
Using the number buttons enter a four-digit number for the
desired sub-page e.g. for the second page 0002. The system
will search for the desired sub-page and display it.
Press OK,
the function is cancelled.
Enlarging character height
Press AUX. (the dialogue line is displayed)
Press button
ņ
-
or + ŀto select symbol ķʄ.
Press OK repeatedly to
double character height in the following sequence:
top half of the screen,
lower half of the screen,
normal screen.
Answer release
Release on certain Teletextpages, e.g for crossword solutions
for VPS times when programming a video recorder.
Press AUX. (the dialogue line is displayed)
Press
ņ
-
or + ŀto select symbol ķ?.
Press OK,
hidden information becomes visible.
Press OK,
the “Answer” function is cancelled.
Watching TV while operating Teletext
Updating a page –
Bridging intervals
Teletext editors update certain Teletext pages For example,.
international money rates contain up to the minute information, the latest sports results or last minute news items are
added.
Let us assume you want to watch TV and still receive the
news. In this case, first select the page in question and
then press button AUX. (The dialogue line is displayed).
Press button
ņ
-
or + ŀto select symbol ķX.
Press OK.
The TV program appears and The Teletext logo is displayed at
the top end of the screen.
For example, P143 appears in the info line, then
Press OK.
The Teletext page appears with updated contents.
You may also use this function to bridge intervals while your
Teletext decoder is searching for a page. When the the page
has been found, the info line will contain, for example, P143.
Page catching,
This is where you select pages without entering the page
number. Using the cursor, you may directly selct the desired
Teletext page from contents pages-(pages with three-digit
page numbers). This function saves you entering the the respective three-digit page number.
Press button P+ or P
-
.
»Page Catching« is displayed at the top of the screen. on the
first or last page number of the contents (cursor).
Move the cursor to the desired page number with buttons
P+ or P
-
.
Press OK.
The page appears on the screen.
Page 14

Connecting capabilities and Operation ...
14
... of headphones
Connect headphones (3.5 mm ∅ jack) to socket ɧ.
(The internal speaker is switched off.)
Operation:
Adjust the volume setting with buttons ņ-
, + ŀ.
The setting adjustment is indicated in the on-screen display
(providing OSD ON has been selected).
... of video recorders and camcorders
Connecting a picture signal
connect the VIDEO IN socket with a suitable cable to the corresponding picture socket on the camcorder.
Connecting the audio signal
Connect the AUDIO IN socket to the audio socket on the camcorder.
Operating
Press button 0/AV.
Start the playback function on the camcorder.
The camcorder playback will appear on the screen. (No signal
must be present at the Euro AV socket.)
... of video recorders or satellite receivers
Connect the video recorder or SAT receiver to the EURO AV
socket using a suitable cable (universal connection, DIN en
50049 e.g. video) (on back of set) or using an aerial cable
(75Ω, coaxial, DIN 45325 IEC) to the aerial socket É (on
back of set).
Video recorder or SAT receiver to Euro AV socket
Press button 0/AV on the remote control.
AV is displayed in the top right hand corner of the screen.
Start playback on the recorder or switch on the SAT receiver.
(No signals are to be received at the cinch socket.)
… Video recorder or camcorder to aerial
socket É
Programme the preset playback channel for the recorder
(between 30 and 40) to any programme position on the TV
(refer to the instruction manual for the recorder).
If the playback channel for the recorder is not known, restart
playback on the recorder and look for the channel using the
automatic channel search on the TV.
EURO-AV
AUDIO
_
_
g
+
VIDEO IN AUDIO IN
+
P
y
_
_
g
+
VIDEO IN AUDIO IN
+
P
y
Page 15
Technical Data
15
Mains voltage:
220 – 240 V ~, 50/60 Hz
(Power supply control range 165 … 265 V)
“This device must only be operated with the supplied
power supply cable set. It prevents disturbances from the
mains power and is an integrated component of this unit’s
certification.
For replacement, order only the mains cable set with the
designation GWN 9.22/item number 8290.991-316”.
Power consumption:
Approx. 70 W
In standby approx. 6 W.
Reception range:
Channels 01 ... 69
Special channels S 01 … S 41
Sound output range:
8 W peak output (4 W sine wave)
This device conforms with VDE regulations and directives of
the Deutsche Bundespost (German Federal Post Office; see
certification on type sticker on the rear of the device), as well
as the relevant ordinances regarding X-ray emissions. The
picture tube which emits X-rays is sufficiently shielded and
therefore presents no danger. The maximum accelerating voltage is 27 kV with a main beam current of 1.5 mA. This device is equipped with an intrinsically safe cathode ray tube in
accordance with Appendix III of the German X-ray ordinances.
Tampering with the device, in particular changing the high
voltage or installing a different picture tube, can considerably
increase X-ray emissions. Devices thus altered no longer
conform with the applicable safety regulations and may not
be operated.
Subject to change without notice!
EURO AV socket pin assignment
if you want to connect other devices to your television (e.g. a
computer or an amplifier), your dealer can provide you with a
standardized connecting cable using the following assignments:
Pin Signal
01 = audio output, right
02 = audio input, right
03 = audio output, left0
4 = audio , earth
05 = blue, earth
06 = audio input, leftl
07 = RGB blue, input
08 = switching voltage
09 = green, earth
10 = –
11 = RGB green, input
12 = –
13 = red, earth
14 = earth
15 = RGB red, input
16 = RGB switching voltage
17 = video, earth
18 = RGB switching voltage, earth
19 = video, output
20 = video, input
21 = shielding, earth
+ ŀ– ņ-
– P-– P+
220
21
119
GRUNDIG
+
P
-
!
+
P
Page 16

GRUNDIG AG ••D - 90762 FÜRTH Printed in Austria
1 2 3 4 5 6 7 8 9
21426-941.04
 Loading...