

Page 1

COLOR TELEVISION VIDEORECORDER
TVR 3700
TVR 3710
Page 2

r
Installation and Safety Precautions 2-3
Fixing the aerial . . . . . . . . . . . . . . . . . . . . . . . . . .3
Inserting the battery into the remote control . . . 3
r
Connecting and Control Elements 4
r
The Remote Control 5
r
The User Guide 6
r
Settings 7-9
Switching the TVR on and off . . . . . . . . . . . . . . . 7
Tuning to TV stations . . . . . . . . . . . . . . . . . . . 7-8
Setting the time and date . . . . . . . . . . . . . . . . . . 9
r
Operating the TV 10
r
The Cassette 11
r
Playback 12-13
At a glance . . . . . . . . . . . . . . . . . . . . . . . . . . . . 12
Adjusting picture/sound quality . . . . . . . . . . . . 13
Locating a certain recording
(V
ideo Index Search System VISS) . . . . . . . . . 13
r
Recording 14-15
At a glance . . . . . . . . . . . . . . . . . . . . . . . . . . . . 14
Entering a stop time . . . . . . . . . . . . . . . . . . . . . 15
Assembling recordings
with clean joints . . . . . . . . . . . . . . . . . . . . . . . . 15
r
TIMER Recording 16-19
The options . . . . . . . . . . . . . . . . . . . . . . . . . . 16
Programming with the
VIDEO Plus+system, variant 1 . . . . . . . . . . . . . 17
Programming with the user guide
and manual data entry, variant 2 . . . . . . . . . . . 19
r
Copying … 20-21
… from a video recorder,
a CD-i player, a satellite receiver . . . . . . . . . . 20
… from a camcorder . . . . . . . . . . . . . . . . . . . . . 21
r
Special Functions 22-25
The child lock . . . . . . . . . . . . . . . . . . . . . . . . . .22
Selecting the language for the user guide . . . . . 22
Setting an automatic switch-off time
(SLEEP TIMER) . . . . . . . . . . . . . . . . . . . . . . . . 23
Setting an automatic switch-on time
(WAKE-UP TIMER) . . . . . . . . . . . . . . . . . . . . . . 23
Setting the OSD display function
(OSD – O
N SCREEN DISPLAY) . . . . . . . . . . . . . 23
Remote control of
GRUNDIG TV receivers . . . . . . . . . . . . . . . . . . . 24
Remote control of
GRUNDIG video recorders . . . . . . . . . . . . . . . . 24
Remote control of
GRUNDIG satellite receivers . . . . . . . . . . . . . . . 24
Teletext mode . . . . . . . . . . . . . . . . . . . . . . . . . . 25
r
Useful Information 26-27
Fixing faults yourself . . . . . . . . . . . . . . . . . . . . 26
Technical data . . . . . . . . . . . . . . . . . . . . . . . . . 27
r
Service 28-29
Channel and frequency table . . . . . . . . . . . . . . . 28
1
Contents TVR 3710 GB
Page 3
Ń
!
Your TVR is intended for the reception, recording,
and reproduction of TV picture and sound signals.
Any other application is expressly prohibited.
Ń
!
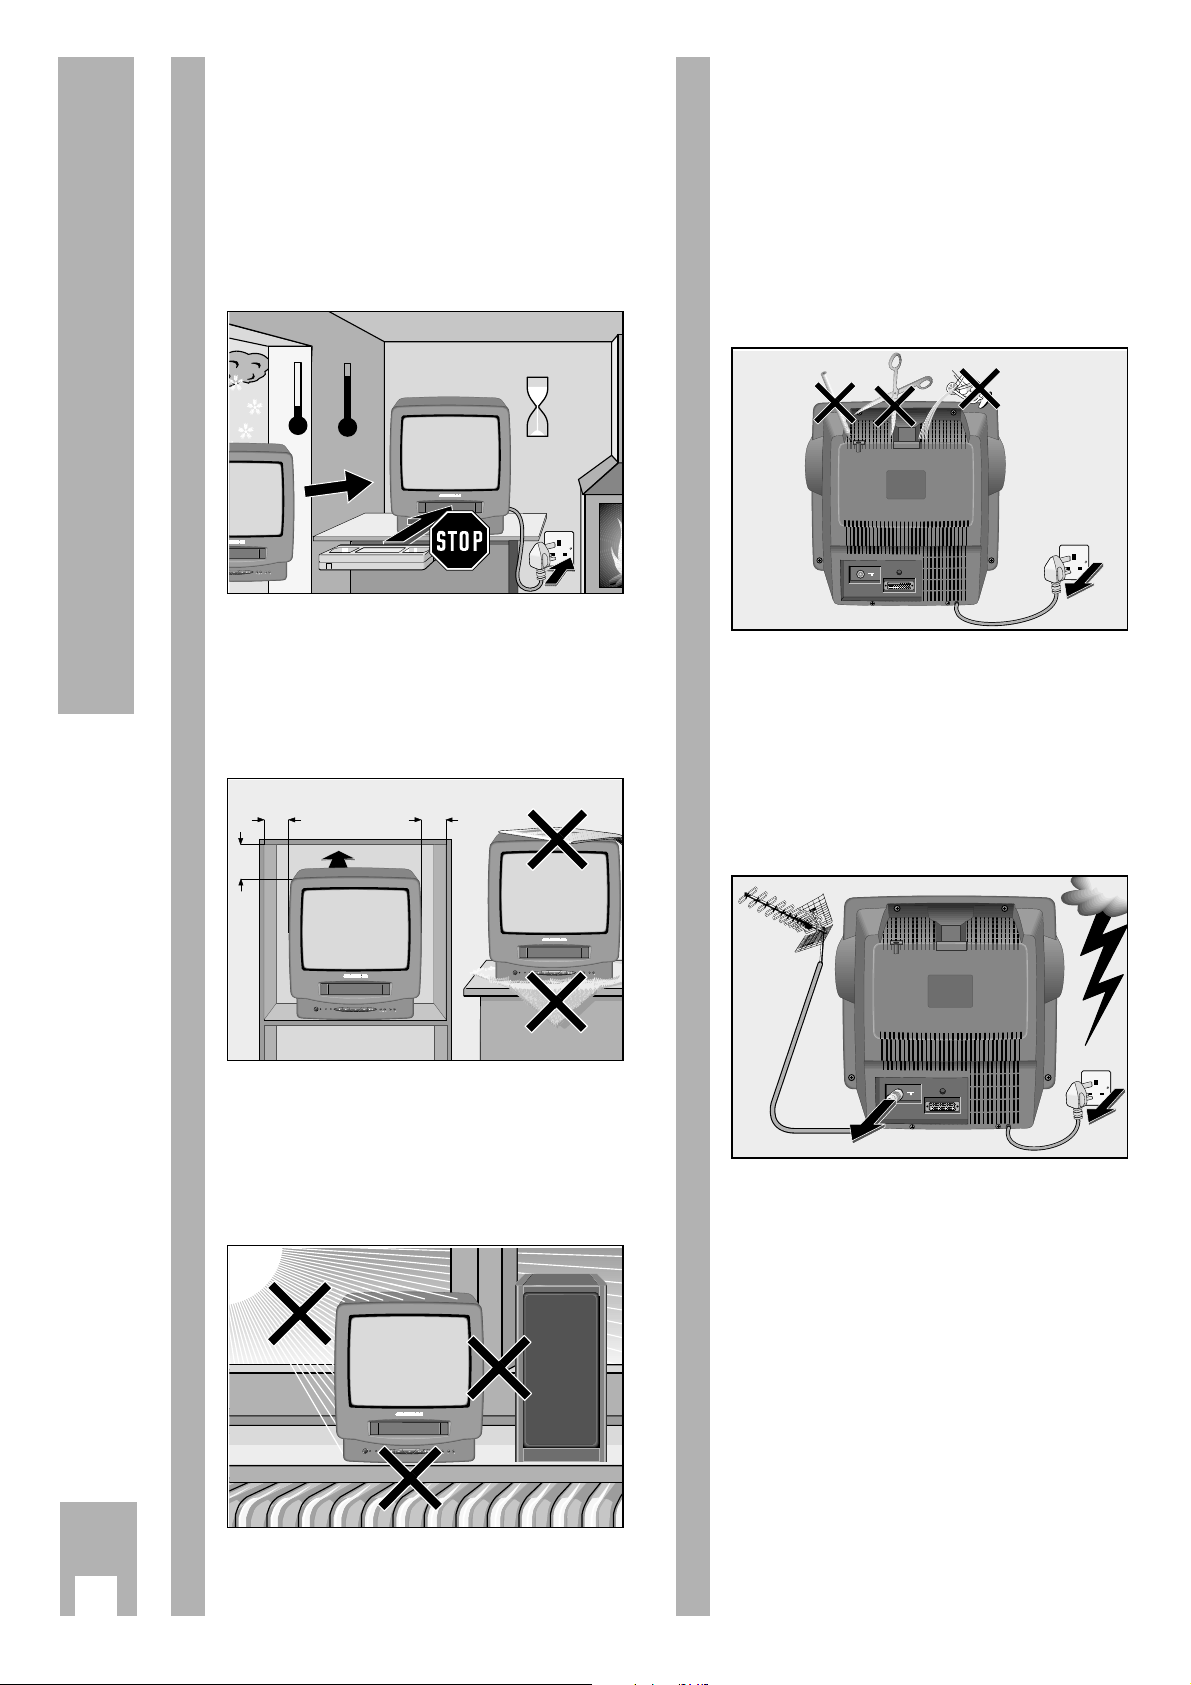
If the TVR is exposed to drastic temperature changes, for example taking it from a cold to a warm
place, connect the TVR to the mains supply and let
it stand at the new place for at least two hours without a cassette loaded.
Ń
!
Place the TVR on a flat and hard surface.
Do not place the TVR on a mat or anything soft. Do
not place any objects (e.g. newspapers) on the TVR
as this would cover the ventilation slots which must
not be obstructed.
Ń
!
Do not place the TVR in the immediate vicinity of a
heat source or in direct sunlight, as this would also
prevent appropriate cooling.
Keep the TVR away from magnetic fields
(e.g. loudspeakers).
10
cm
10
cm
20
cm
20 cm
Krieg am Golf
2h
°C
°C
P
Ń
!
Do not expose the TVR or the cassette to any moisture.
The TVR is intended for use in dry rooms.
If you wish to operate it in the open air, make absolutely sure that it is protected against moisture
(rain, splashes of water).
Do not place any object filled with water (vases and
similar) on the TVR. The object might fall over and
the liquid spilling into the unit would impair its electrical safety.
Ń
!
Thunderstorms are a danger for any electrical appliance. Even when switched off, the TVR might be
damaged by a lightning strike to the mains supply
and/or the aerial lead.
During a thunderstorm you should always disconnect the mains and aerial plugs.
For improved protection, your aerial system should
conform to BSI. CP 6330. 1983.
Ń
!
Never insert any foreign objects into the cassette
compartment or the ventilation slots. This might
damage the sensitive mechanism.
Ń
!
Never open the TVR.
Damage caused by unqualified work is not covered
by the manufacturer’s guarantee.
Ń
!
The ideal viewing distance is five times the diagonal
measurement of the screen.
! SERVICE !
2
Installation and Safety Precautions
·
Ǽ
R
E
C
O
T
R
I
M
D
E
R
P
EURO AV
Ǽ
R
E
C
O
T
I
R
M
D
E
R
Ǽ
R
E
C
O
T
R
I
M
D
E
R
P
Ǽ
R
E
C
O
T
R
I
M
D
E
R
P
P
EURO AV
Page 4

Fixing the aerial
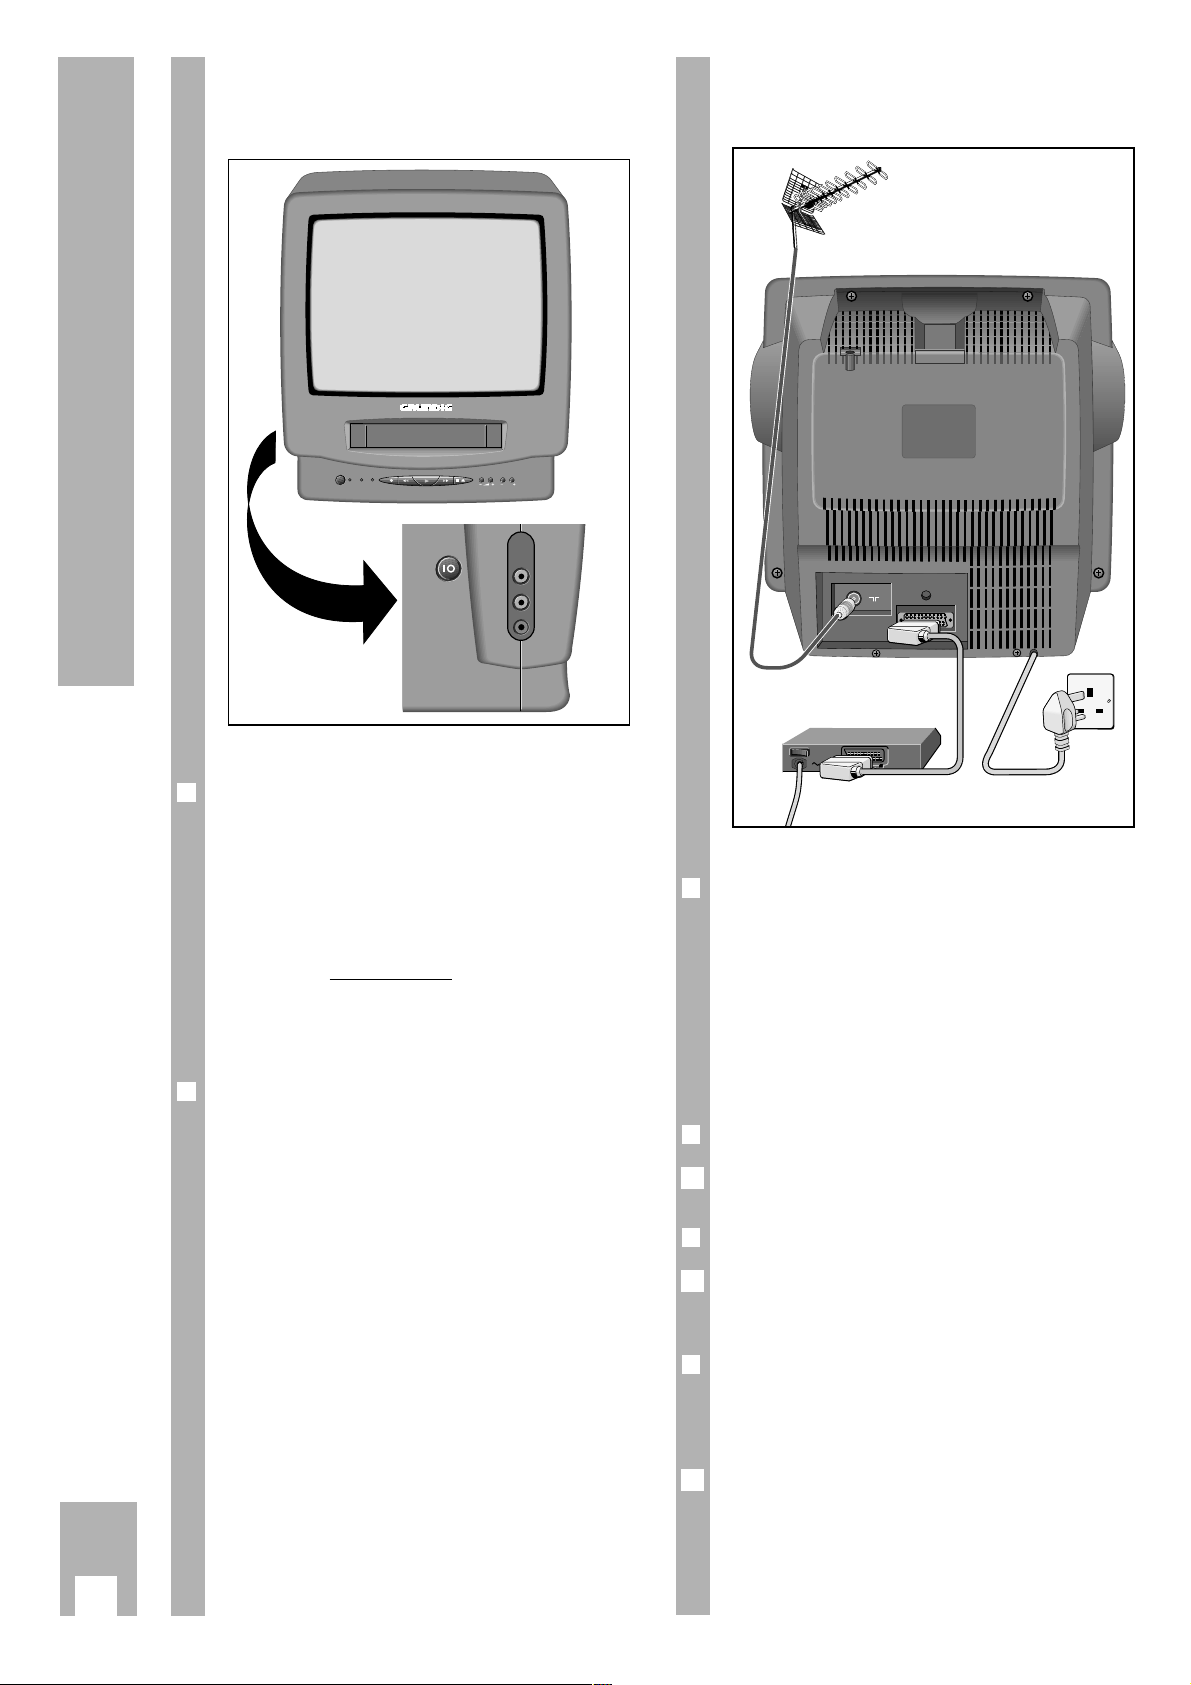
Insert the aerial supplied into the bracket provided
at the back of the set.
r
Information for Units sold in Great Britain
Units sold in GB are suitable for operation from a 230V
AC (± 10%), 50 Hz mains supply.
A non-rewirable 13 Amp (BS 1363) 3-pin plug is fitted
with a 3 Amp ASTA or BSI approved BS 1362 fuse. If any
other type of plug is used it must be protected by a 3
Amp fuse either in the plug or at the distribution board. If
this type of plug becomes defective ensure that the fuse
is removed, before disposal, to eliminate a potential
shock hazard.
If it is necessary to change the fuse in the non-rewirable
plug, the correct type and rating (3 Amp ASTA or BSI
approved BS 1362) must be used.
If your household is not equipped with a 13 A ring mains
supply, consult a qualified electrician before the value of
fuses are changed. The recommended fuse rating in normal cases is 5 Amps (ASTA approved).
Ń
!
Important:
The wires in the mains lead are coloured in accordance
with the following code:
BLUE – NEUTRAL
BROWN – LIVE
As the colours of the wires in the mains lead of your
appliance may not correspond with the colour code identifying the terminals in your plug, proceed as follows:
Connect the BLUE wire to the plug terminal marked with a
letter ”N” or word ”black”.
Connect the BROWN wire to the plug terminal marked
with a letter ”L” or word ”red”.
In no circumstance must any of the wires be connected
to the terminal marked with a letter ”E”, earth symbol
z,
”green” or ”green and yellow” colours.
If the mains lead/plug is damaged, it must be
replaced. Replacement mains leads can be obtained from
your dealer, or by contacting Grundig Consumer Relations on 01788 577155.
1
Inserting the battery into the
remote control
Press the catch and remove the cover from the
battery compartment.
Insert the battery (1 x 9 V, type GF 22 G).
Ń
!
Observe correct polarity; marked on the bottom of
the battery compartment.
Ń
!
If your TVR no longer responds correctly to the
remote control commands, the battery may be
exhausted.
An exhausted battery must be removed immediately.
The manufacturer cannot be held responsible for
damage resulting from battery leakage.
Exhausted batteries must be handed over to a
special waste collecting point (environmental
protection).
2
1
+
-
9V
3
Installation and Safety Precautions
EURO AV
Page 5
r
Sockets
–II–
Aerial socket
EURO AV EURO AV socket for connecting a
satellite receiver, a video recorder, a
Pay-TV decoder, etc.
Connecting
r
Connecting the TVR to the mains
Plug the mains cable into the wall socket.
r
Connecting the TVR to the aerial
Insert the plug of the aerial cable into the TVR aerial
socket –II–.
r
Connecting a "Pay-TV" decoder
If you want to receive and record scrambled TV
programmes from private TV stations, you need a
decoder. Contact a dealer for more information.
Connect the decoder using a EURO AV cable to the
EURO AV socket of the TVR.
1
1
1
Back of the TVRFront of the TVR
r
Controls and sockets on the side
ü Power switch
y Headphone socket 3.5 mm ø.
When connecting a headphone, the
built-in loudspeaker is automatically
switched off.
Behind the flap:
AUDIO Audio input sockets.
VIDEO Video input socket.
r
Controls on the front
A Ends all functions;
switches the TVR to standby.
L Starts recording.
o Picture search reverse in playback
mode;
rewind tape in stop mode.
R Starts playback.
p Picture search forwards in playback
mode;
tape fast forward in stop mode.
r Stops all functions;
ejects the cassette.
¢
– z + Volume
¢
– P + Programme selection
4
Connecting and Control Elements
EURO AV
PAY-TV
Ǽ
R
E
C
O
T
R
IM
D
E
R
P
AUDIO
VIDEO
y
Page 6
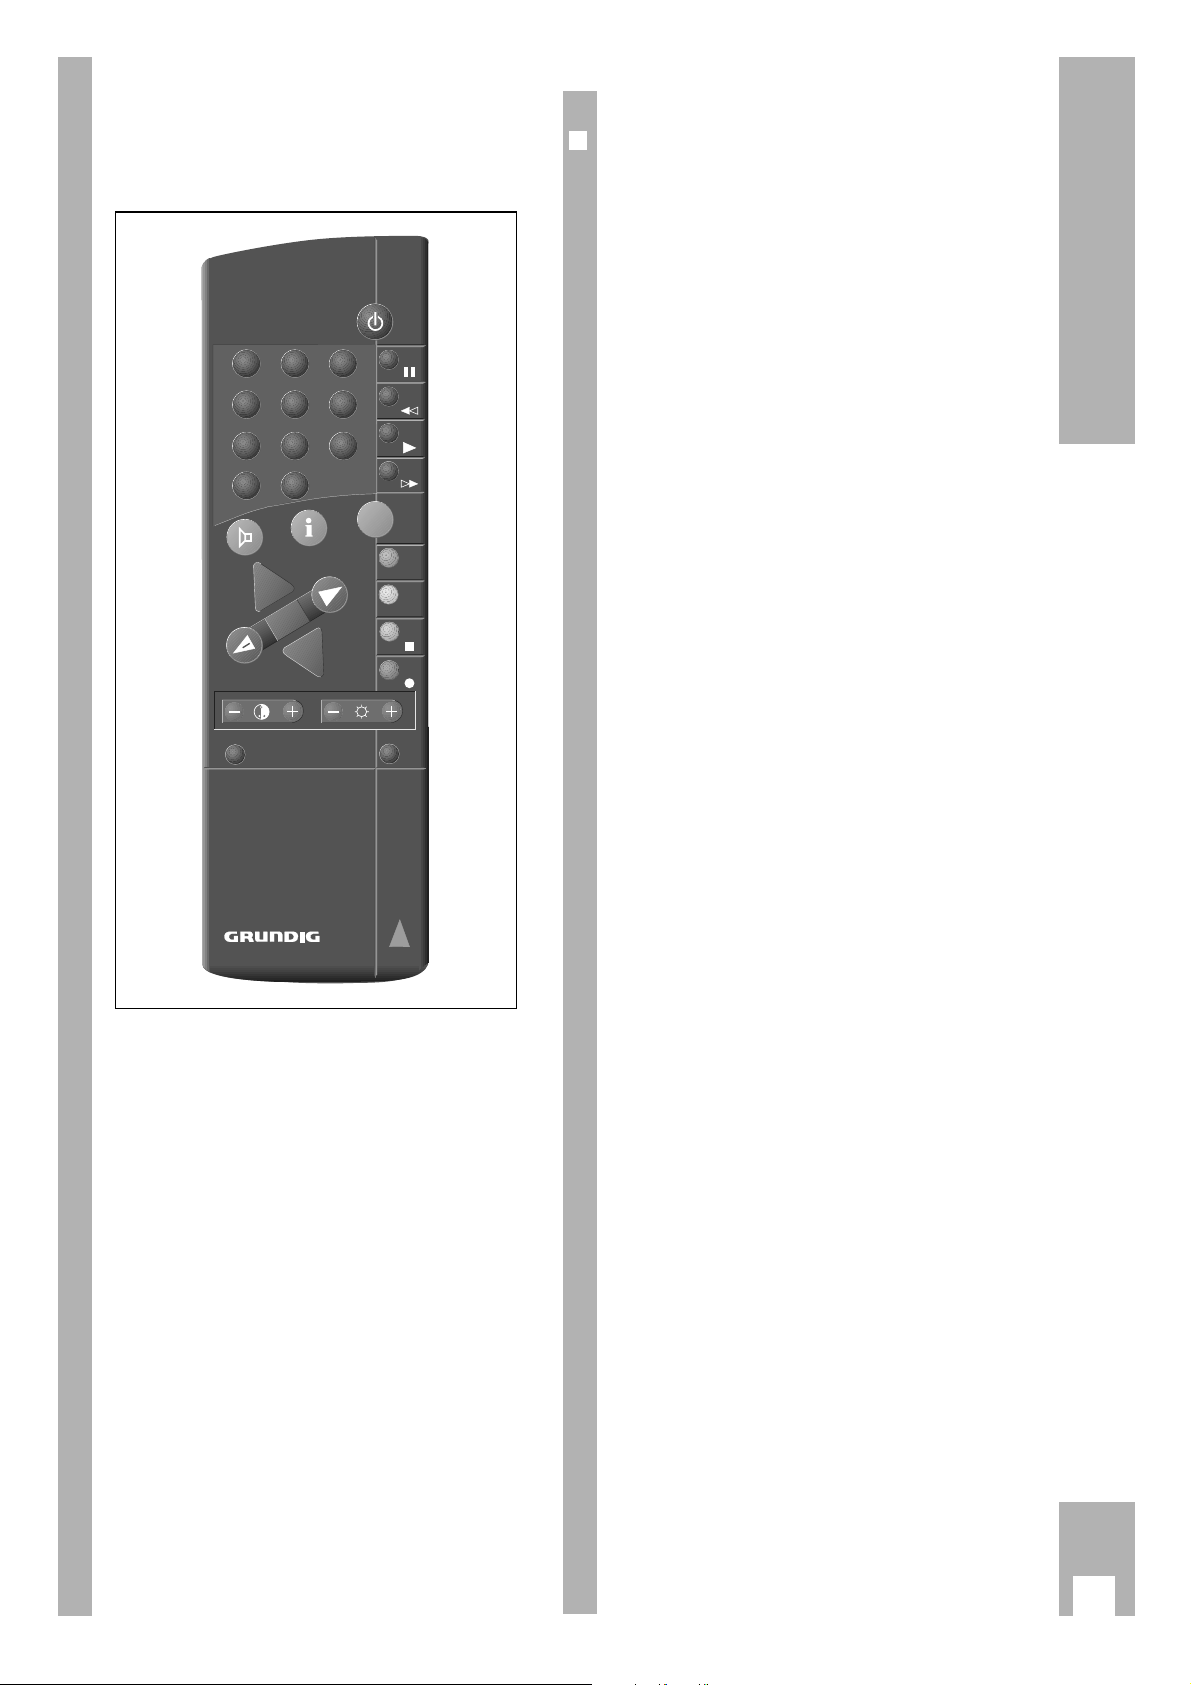
At a glance
The buttons on the remote control are explained
briefly on this page. For operation, please see the
respective chapter of these operating instructions.
r
The buttons on the remote control
0
...
9
AV
Numbered buttons for various
entries.
m
CL For manually tuning in stations;
clears entries.
¢
ʀ
Switches off the sound.
.
Displays information tables on the
picture screen.
|]
Selects programme positions (in
Stop position);
selects the various functions in the
info tables.
xc
Alter the volume setting;
select data in the info tables.
G Confirms data.
™ Alters the colour contrast setting.
® Alters the brightness setting.
¢VIDEO/TV Switches the remote control so that
it can be used for a GRUNDIG video
recorder or TV receiver.
¢SAT Switches the remote control so that
it can be used for a GRUNDIG satellite receiver.
¢
•
OTR
Starts recording.
¢
n
Ends all functions (stop) except
Timer recordings.
¢PREV.
Searches the beginning of the current recording.
¢NEXT Searches the beginning of the next
recording.
¢
TXT
Switches to Teletext mode.
¢
İı Picture search forwards in playback
mode;
tape fast forward in stop mode.
¢
ı Starts playback.
¢
ľIJ Picture search reverse in playback
mode;
rewind tape in stop mode.
¢
II Pause in recording mode,
freeze-frame in playback mode.
b
Switches the TVR to standby.
5
The Remote Control
321
4 5 6
7 8 9
P/C
0
AV
CL
TXT
+
P
+
OK
-
P
NEXT
PREV.
OTR
VIDEO/TV
SAT
TVP 762
Page 7
6
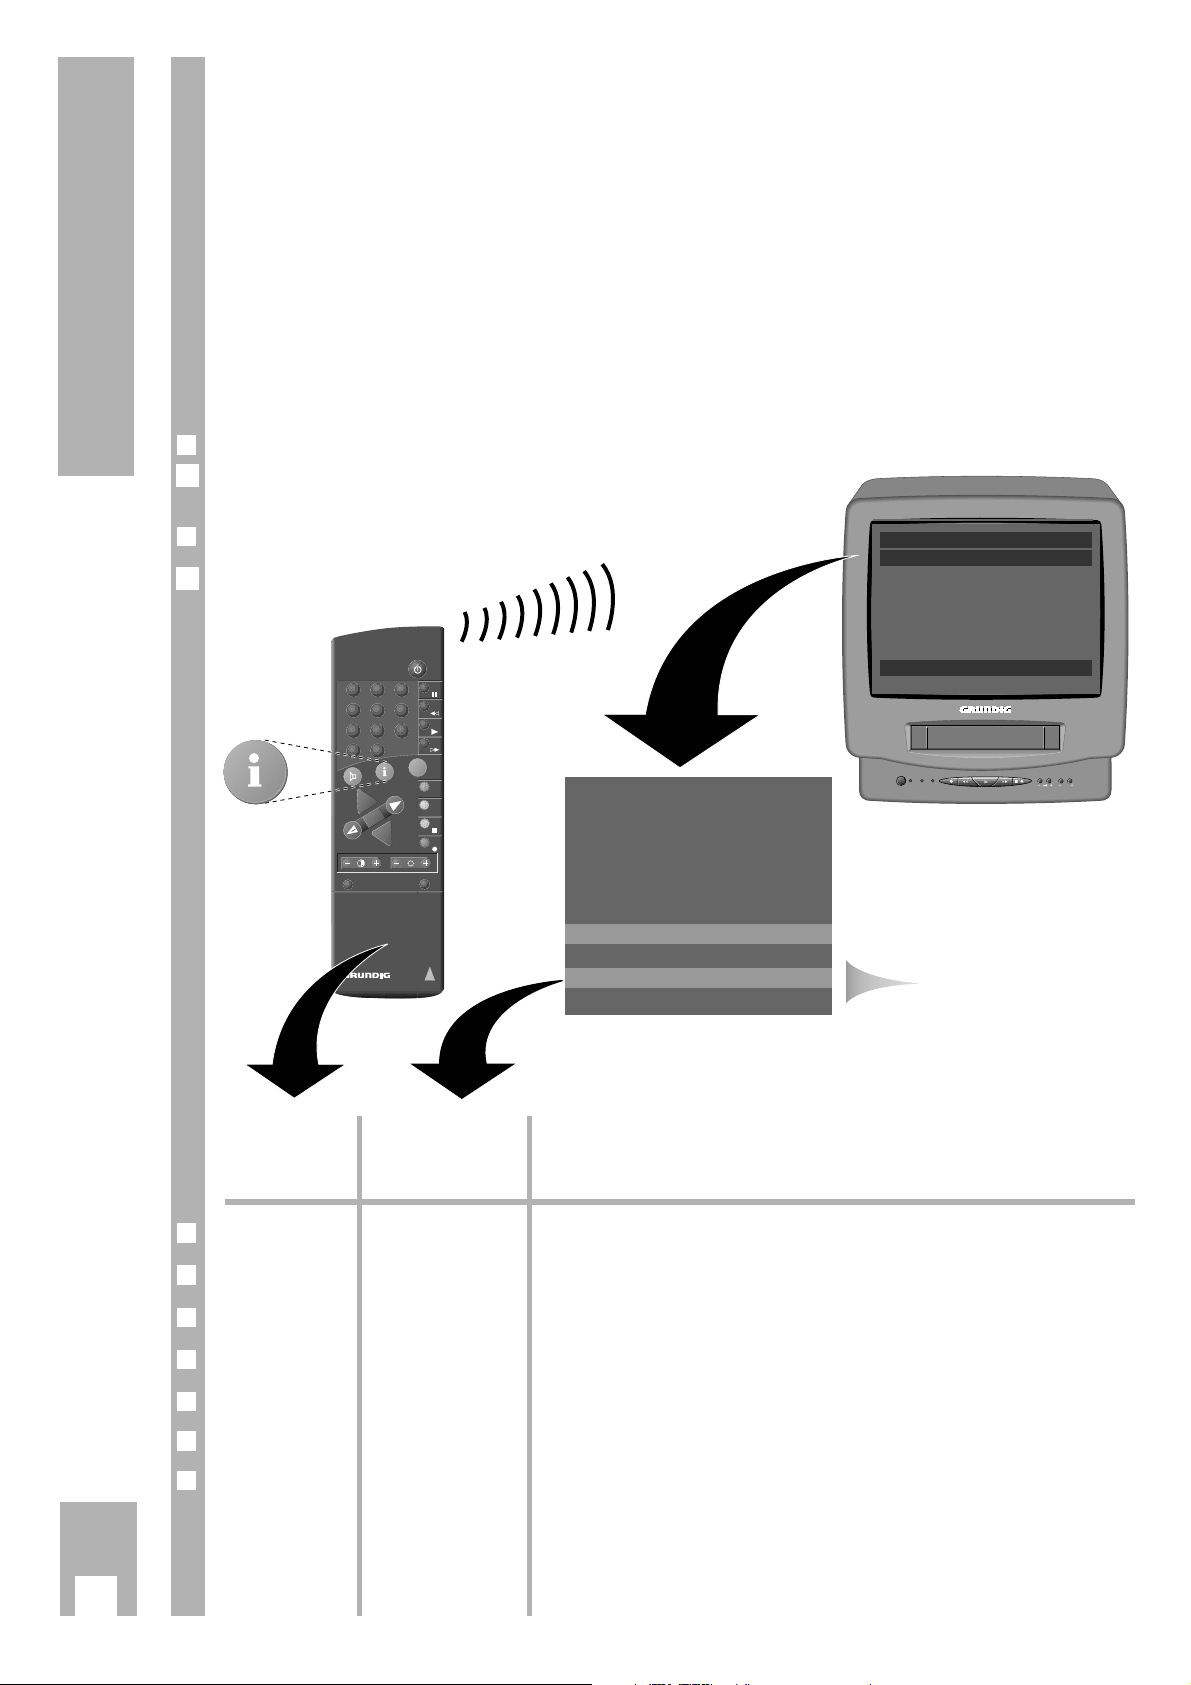
The GRUNDIG user guide on the
screen of the TV set
… offers a dialogue between you and the TVR.
The TVR responds to many functions which you
select using the remote control, with info tables and
dialogue lines on the screen of the TV set.
Button symbols for the remote control and dialogue
lines indicate the next operating step, and options.
You are guided step by step, simply and understandably.
The User Guide
VIDEO/TV
SAT
OK
P
+
P
-
AV
321
4 5 6
7 8 9
P/C
0
NEXT
+
PREV.
TXT
OTR
CL
TVP 762
Dialogzeilen
Button on the Representation in Function
remote control the info table and
the dialogue lines
r
h i
Calls up the info table and switches back to the TV picture.
r
1 2 … 90 0-9
For entering data directly.
r
|]
MN
For step by step selection of functions or lines in a table.
r
FE T Z
For switching between tables, for selecting data, and for altering settings.
r
G OK
For activating a function and for confirming data and settings.
r
m
CL CL For deleting data.
r
b
none To end info tables and settings at any time
.
This switches the TVR to standby.
INFO table
r
Preparation
Switch the TVR on.
r
Calling up the GRUNDIG-INFOCENTRE
Press the h button on the remote control.
1
1
GRUNDIG-INFOCENTER
VIDEO PLUS+
TIMER
PICTURE
SPECIAL CHILD LOCK
INSTALLATION
CLOCK
T Z OK
VIDEO Plus+
CODE - - - - - - - - - DAILY/WEEKLY ONCE
M N 0 – 9 CLEAR OK
Dialogue lines
Ǽ
RECO
TIM
R
D
ER
P
Page 8
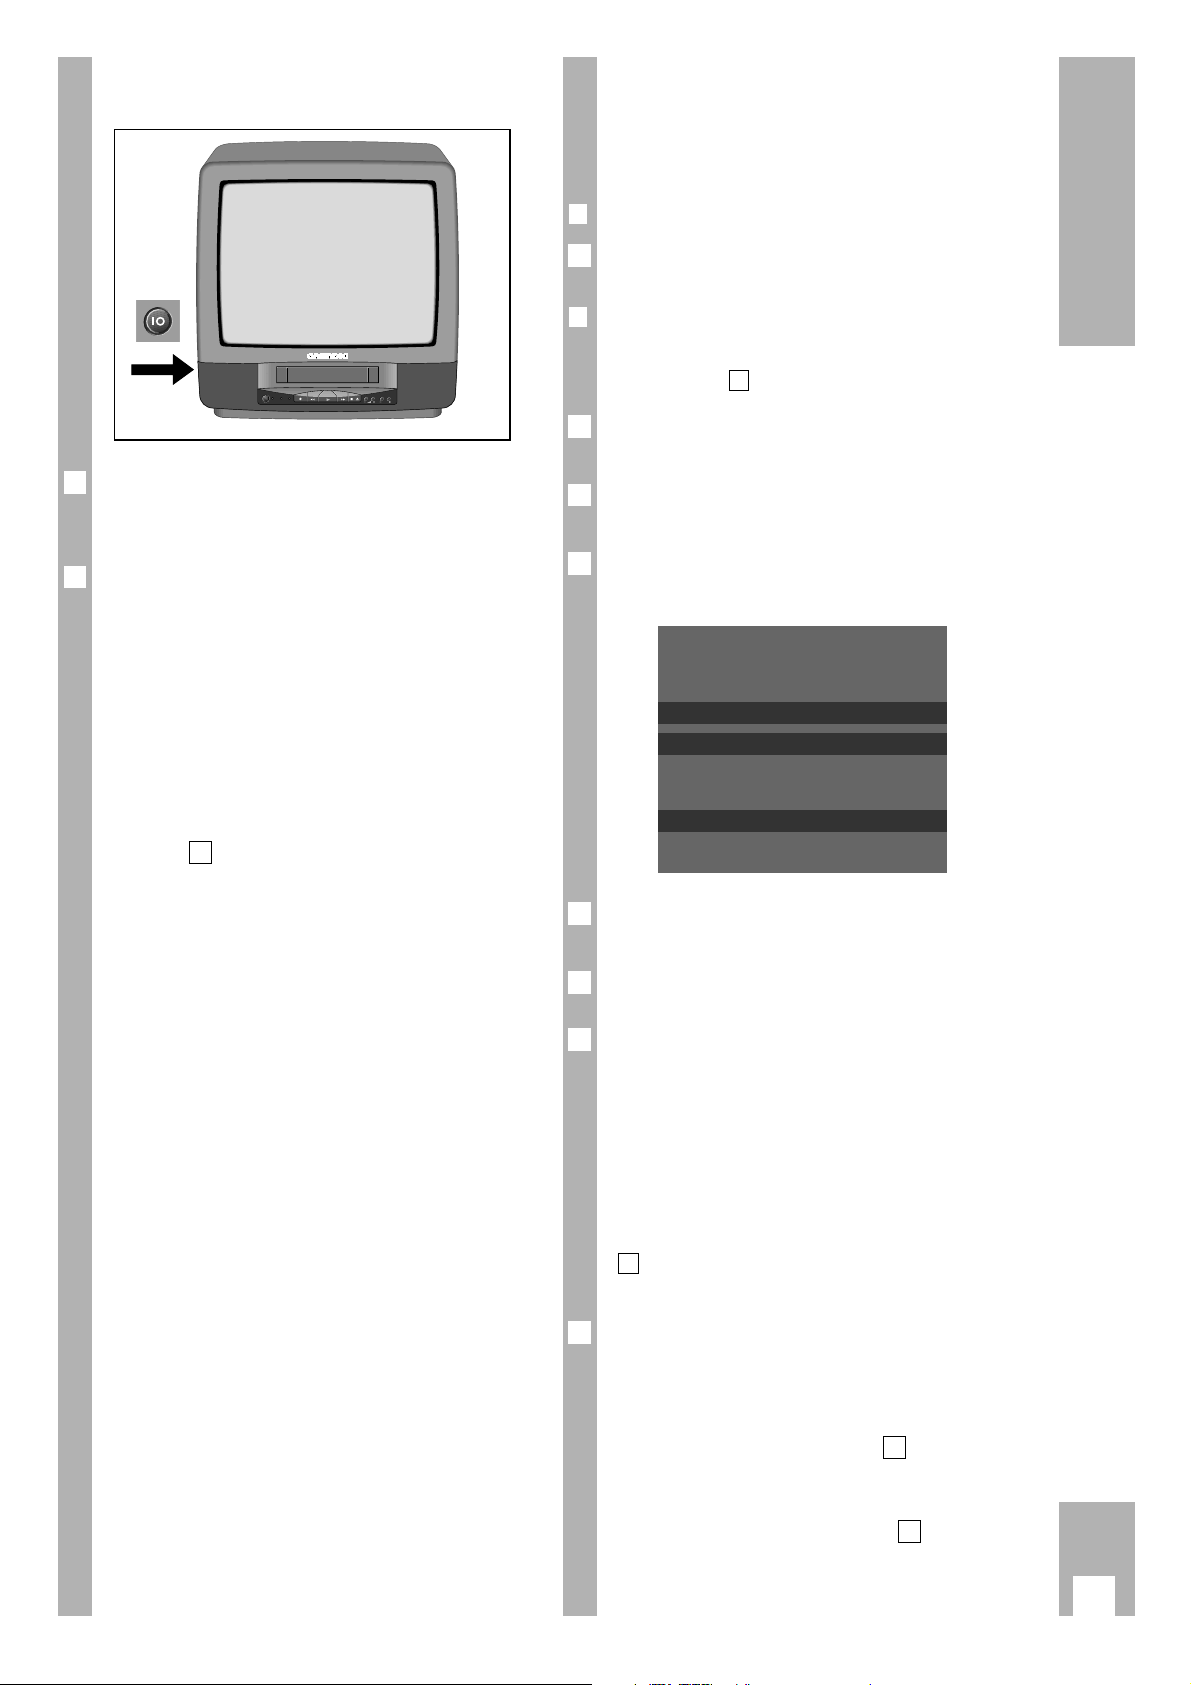
Switching the TVR on and off
Press the power switch located on the left of the
unit.
The red pilot lamp lights up.
The TVR can be switched on from standby:
using the numeric buttons
0… 9
,
or the ]button on the remote control,
or the ¢P+ button on the unit,
or by inserting a cassette,
or by starting playback (if a cassette is loaded).
Press the bbutton to switch the TVR to standby.
Ń
!
When switching the TVR on the first time, the
"LANGUAGE" menu is displayed. Perform the following settings described in the chapter "Tuning to TV
stations with the automatic tuning system" starting
with step .
Tuning to TV stations
Television stations broadcast programmes on different frequencies/channels.
To receive these programmes, you must tune your
TVR to the channels used by the different TV
stations.
69 programme positions are available. They can be
tuned as required to TV stations from the aerial or a
cable connection.
Two options are available for tuning:
1. With the automatic tuning system (ATS euro
plus/ACI). The TVR searches, sorts, and stores
all channels/special channels which can be received at its location.
This procedure depends on the language and
country you select, as well as the quality of
reception of the TV stations.
If you are not satisfied with the order in which
the TV stations are allocated, the order can be
changed later.
2. By entering data directly.
4
2
1
Tuning to TV stations with the
automatic tuning system
(ATS euro plus)
r
Preparation
Switch the TVR on.
r
Operation
Ń
!
When the TVR is operated for the first time, continue with step .
Call up the GRUNDIG-INFOCENTER using the h
button.
Select the "INSTALLATION" line with the
|
or
]
button and confirm with the G button.
Select "ATS EURO PLUS" and confirm with the G
button.
The "LANGUAGE" table appears.
Select the language for your location using the
|]
buttons and confirm with the G button.
Select the country (location) using the
|]
buttons.
Start the ATS euro plus search using the G
button.
– Display on TVR: "ATS-SEARCHING".
The TVR searches for TV stations, and sorts and
stores them.
– When the search has been completed, the
"INSTALLATION" table appears.
Ń
!
How to alter the sequence of TV stations is explained in the chapter "Resorting TV stations" from step
on (see next page).
or
End the setting using the h button.
Ń
!
If a new run of the ATS should be necessary (for
example, when you have changed your location or
are connnected to a cable system at a later date),
repeat the setting starting at step .
If your TVR is connected to a cable system which
offers the ACI function (Automatic channel Installation), select the "ACI" line after step . ATS then is
started immediately and the TVR takes the channel
numbers from the info table offered by the cable
provider and stores them in memory.
2
1
7
4
6
5
4
LANGUAGE
GB
D
F
M N OK
3
2
1
4
1
7
Settings
·
Ǽ
R
E
C
O
T
R
I
M
D
E
R
P
Page 9

Resorting TV stations
r
Preparation
Switch on the TVR with the power switch.
r
Operation
Call up the GRUNDIG-INFOCENTER using the h
button.
Select the "INSTALLATION" line with the
|]
buttons and confirm with the G button.
"Select RESORT PROG. NR." with the
|]
buttons and confirm with the G button.
– A table indicating the programme position and the
channel/frequency is displayed. The selected programme position is marked.
Select the programme position with the
|]
buttons and mark it with the G button.
Select the new programme position with the
|]
buttons.
Store the setting with the G button.
– The data of the marked programme position will
be transferred to the new programme position.
– The following TV stations are moved by one posi-
tion.
Ń
!
To sort further TV stations, repeat the procedure
starting at step .
End the setting using the h button.
7
4
6
5
4
RESORT PROG.NR.
01 C06
02 C34
03 C59
04 C40
05 C36
06 C21
M N OK
3
2
1
1
Entering data manually
r
Preparation
Switch the TVR on.
r
Operation
Press the
m
CL button.
– The "MANUAL STORE" table appears.
Select the desired item with the EF buttons.
The terms mean:
PR: Programme position.
C/F: C (= channel) or F (= frequency) of
the TV programme.
CH: Channel
F: Frequency
DEC: Activate programme position for
external decoder.
FT: Fine tuning of picture.
Ń
!
For further operating steps see the dialogue lines of
the table.
Ń
!
Instead of entering the channel number you can
enter the special channel number or the frequency
of the TV station. To do this, use the EFbuttons
to select "C/F" then select the desired item using the
|]
buttons.
– "C" = Channel entry.
"S" = Special channel entry.
"F" = Frequency entry.
Enter the desired channel/special channel number
as two digits or the frequency as three digits
using the 0 …9 buttons.
Ń
!
If both the channel number and the frequency are
unknown a search may be started. To do this press
the ] or |button.
Store the entry with the G button.
To enter data for the next programme position,
repeat the setting starting with step .
End the setting with the h button.
4
2
3
2
MANUAL STORE
PR C/F CH SYS DEC FT
01 C 06 BG ON 00
M N T Z OK
1
1
8
Settings
··
Page 10

Setting the time and date
Ń
!
The digital clock continues to operate even if the
TVR is disconnected from the mains (up to 7
hours).
r
Preparation
Switch the TVR on.
r
Operation
Call up the GRUNDIG-INFOCENTER using the h
button.
Select "CLOCK" with the
|]
buttons and
confirm with the G button.
Select the desired line with the
|]
button.
Enter the data with the EF or
0
... 9buttons.
End the setting with the h button.
5
4
3
CLOCK
TIME 11:09
YEAR 1996
MONTH 03
DATE 02
M N T Z 0-9
2
1
1
9
Settings
Page 11

Ǽ
T
IM
E
R
P
R
E
C
O
R
D
Further functions
r
Adjusting the contrast and picture
sharpness
Call up the GRUNDIG-INFOCENTER using the h
button.
Select the "PICTURE" line using the
|]
buttons
and confirm with the G button.
Use the
|]
buttons to select the desired function and use the F E buttons to set the desired
value.
Exit the "PICTURE" table using the h button.
r
Switching the sound on and off
It is possible to switch the sound on and off using
the
ǵ
ʀ button. On the picture screen appears the
" ı" symbol.
Pressing the
ǵ
ʀ , F or E button switches the
sound on again.
2
1
4
3
2
1
10
Operating the TV
r
Operation
Press the power switch (on the left side of the TVR)
to switch the TVR to standby. The red pilot lamp
lights up.
Switch the TVR on from standby using
the ],
0… 9
buttons on the remote control, or the ¢P+ button on the TVR.
– On the picture screen appear the programme
position and, for TV stations broadcasting the
VPS/PDC signal, in addition the station name
(BBC, for example).
Select the desired programme position
– either step by step using the
|]
buttons on
the remote control or the
¢
–P+ buttons on the
TVR;
Ń
!
It is not possible to select programme positions
which are not allocated to a TV channel.
Select the desired programme position
– or directly using the
0… 9
buttons on the
remote control.
For two-digit programme positions, press the
numeric buttons without delay one after the other.
The number of the programme position is displayed
at the top right on the picture screen.
Adjust the volume
using the F E buttons on the remote control or
the
¢
+z – buttons on the TVR.
Adjust the brightness
using the
® buttons on the remote control.
Adjust the colour contrast
using the
™ buttons on the remote control.
Switch the TVR to standby by pressing the
b
button.
After the broadcasting day ends (no test pattern is
broadcast), when broadcasting is interrupted or if
there is no aerial connected, the unit will automatically switch to standby after about 10 minutes.
To switch the TVR completely off, press the power
switch (on the left side of the TVR). The red poweron LED goes out.
8
7
6
5
4
3
2
1
At a Glance
7 4 2
3
5
2 3
4
4
56
2 3
321
4 5 6
7 8 9
P/C
0
AV
CL
TXT
+
P
+
OK
-
P
NEXT
PREV.
OTR
VIDEO/TV
SAT
TVP 762
Page 12

r
Inserting a cassette
Push the cassette with the window facing upwards
into the cassette compartment until it is automatically pulled in.
r
Cassette tape length indication
After a tape run function has been activated (such
as play-back), a five-digit cassette tape length indication appears on the screen for 5 seconds.
Use the G button to call up the display again.
Ń
!
The cassette tape length indication is automatically
set at » 0 : 00 : 00 « when a tape is inserted.
The cassette tape length indication can be set to
0 : 00 : 00 by pressing the
ß
button.
1
11
The Cassette
r
Ejecting a cassette
Press the r button on the TVR. The cassette is
ejected.
r
Protecting recordings against accidental
erasure
Whenever a recording is made on a cassette, any
recording already on the tape will automatically be
erased. To avoid this, it is possible to protect your
cassettes against accidental erasure/re-recording.
To do this, simply break out the tab on the cassette.
If you wish to use the cassette for recording again,
cover the opening with adhesive tape.
1
Ǽ
RECORD
TIMER
P
Page 13

12
Playback
r
Preparation
Switch the TVR on using the power switch.
Insert a recorded cassette into the cassette compartment.
Ń
!
If a video cassette with broken-out erase protection
tab is inserted, the video recorder switches automatically to Playback.
r
Operation
Start playback using the
¢
ı button on the remote
control or the R button on the TVR.
Ń
!
When playing back a long-play recording, the recorder automatically switches to long-play playback
mode.
When playing back NTSC recordings, the recorder
automatically adjusts to this system (chrominance
subcarrier 4.43 MHz).
Select pause/freeze-frame*. To do this, press the
¢
II button on the remote control.
Advance frame by frame. To do this, press the
¢
II
button on the remote control during the playback
pause.
Select various playback speeds – forward and
reverse. To do this, during playback, press the
¢
İı, ¢ľIJ buttons on the remote control or the
pobuttons on the TVR.
Ń
!
Return to normal playback from the pause/freezeframe function and other playback functions. To do
this, press the
¢
ı button on the remote control or
the R button on the TVR.
End playback using the
¢
n
button on the remote
control or the r button on the TVR.
5
4
3
2
1
2
1
At a glance
·
8
2 3
4
466
5
1
T
IM
E
R
Ǽ
P
R
E
C
O
R
D
8
461 465
7
Wind tape, fast forward/rewind. To do this, with the
stop function selected, press the
¢
İı, ¢ľIJ
buttons on the remote control, or the po
buttons on the TVR.
End fast forward/rewind using the
¢
n
button on
the remote control or the r button on the TVR.
Eject cassette. To do this, press the r button on
the TVR.
Switch the TVR off with the A button.
8
7
6
321
4 5 6
7 8 9
P/C
0
AV
CL
VIDEO/TV
+
P
OK
P
TXT
NEXT
+
-
PREV.
OTR
SAT
TVP 762
Page 14

13
Playback
Adjusting picture/sound quality
r
Adjusting picture/sound quality – automatic
After having inserted a cassette and started playback, the TVR adjusts automatically for the best
possible picture quality (Auto Tracking).
– During this adjustment the picture/sound quality
may change.
r
Adjusting picture/sound quality – manual
During playback, press the h button.
Select "TRACKING" using the |button.
Carry out tracking (track position) adjustment using
the
F E
buttons on the remote control.
Press the
m
CL button to select the centre position.
End the setting with the h button.
– The display disappears.
r
Optimising the freeze-frame picture
If the picture jitters or flickers during the freezeframe playback function it can be optimised.
Press the h button when the freeze-frame picture
is on the screen.
Select "JITTER" using the |button.
Use the
F E
button to adjust the picture to the
best subjective quality.
End the setting with the h button.
– The display disappears.
r
The cleaning function
If horizontal interference bars appear during playback on the picture screen and these cannot be eliminated using the tracking function, these bars can
be removed with the help of the "cleaning function".
Press the h button during playback.
Select the "SPECIAL" option with the
|]
buttons
and call it up with the
G
button.
"Select the CLEANING" function using the |button
and confirm with the G button.
– The video picture is switched off. "CLEANING"
appears for several seconds in the last menu line
then playback is continued.
Press the h button to exit the "SPECIAL" menu.
4
3
2
1
4
3
2
1
4
3
2
1
Locating a certain recording
V
ideo I
ndex Search S
ystem (VISS)
This system allows you to locate the beginning of
any of your own recordings quickly and accurately.
r
Marking a tape position – automatic
The “marks” are automatically placed on the tape –
at the beginning of each of your own recordings.
r
Locating a tape position
Press the
¢
PREV
button on the remote control to
select the previous mark.
On the picture screen appears "SEARCHING
PREVIOUS".
Press the
¢
NEXT button on the remote control to
select the next mark.
On the picture screen appears "SEARCHING NEXT".
– The tape is wound to the selected mark and play-
back is started there.
r
Repeat play
The cassette is played until the tape end is reached
or a "blank" is recognized on the tape which lasts
longer than 30 seconds.
The tape then is rewound to its beginning and the
operation is repeated.
Call up the GRUNDIG-INFOCENTER with the h
button.
Select the "SPEZIAL" option with the
|]
buttons
and call it up with the
G
button.
Select the "REPEAT PLAY" function with the
|]
buttons.
Select "ON" with the
F E
buttons and confirm
with the
G
button on the remote control.
Press the h button to exit the Info table.
Start playback using the
¢
ı button on the remote
control or the R button on the TVR.
To end the repeat play function, repeat the steps
- selecting "OFF" in step .
4
51
7
6
5
4
3
2
1
2
1
Page 15

14
Recording
r
Preparation
Switch the TVR on using the power switch.
Insert a cassette with sufficient playing time into
the cassette compartment.
r
Operation
Select the desired programme position
– step by step using the
|]
buttons on the
remote control or the
¢
– P+ buttons on theTVR;
– directly with the numeric buttons 0 ... 9 on the
remote control.
Ń
!
For two-digit programme positions, press the
second numbered button directly after the first.
Start recording. To do this, press the
¢
•
button
on the remote control or the L button on the
TVR.
Select recording pause using the
¢
II button on the
remote control.
Continue recording using the
¢
•
button on the
remote control or the L button on the TVR.
End recording using the
¢
n
button on the remote
control or the r button on the TVR.
Fast forward/rewind. To do this, with the stop
function selected, press the
¢
ľIJ or ¢İı button
on the remote control, or the o or p button
on the TVR.
End winding using the
¢
n
button on the remote
control or the r button on the TVR.
Eject the cassette. To do this, press the r button
on the TVR.
Press the A button to switch the TVR off.
7
6
5
4
3
2
1
2
1
At a glance
··
7
1
3
4
2
5
5
1
T
IM
E
R
Ǽ
P
R
E
C
O
R
D
7
2
5 5 4
6
1
321
4 5 6
7 8 9
P/C
0
AV
CL
+
P
OK
P
VIDEO/TV
TXT
NEXT
+
-
PREV.
OTR
SAT
TVP 762
Page 16

15
Recording
Long-Play Recordings
You can double the playing time of the cassette.
Call up the GRUNDIG-INFOCENTER with the h
button.
Select the "SPECIAL" option with the
|]
buttons
and call it up with the
G
button.
Select the "TAPE SPEED" function with the
|]
buttons.
Use the
x
or cbutton to select»LP« (Longplay)
or »SP« (Standardplay).
End the setting with the h button.
Entering a stop time
Ń
!
Recording continues to the end of the tape.
You can also enter an end time.
Press the
¢
•
button on the remote control or the
L button on the TVR while recording.
–The following menu appears on the picture screen:
Enter the desired end time in 30 minutes steps
using the FEbuttons on the remote control
(current time +5 hours at maximum).
Confirm the end time using the G button.
r
Changing the stop time
If the end time is to be changed while recording,
press the
¢
•
button on the remote control or the
L button on the VTR. Use the
F E
buttons to
enter the new end time and confirm using the G
button.
r
Clearing the end time
If you wish to clear the end time while recording,
press the
¢
•
button on the remote control or the
L button on the TVR.
Press the
m
CL button on the remote control to
clear the end time.
1
1
3
2
1
5
4
3
2
1
Switching of the TV picture while
recording
Press the A button while recording.
The TV picture is suppressed but recording is
continued.
Use the
|]
,
0…9
buttons on the remote
control or the ¢– P+ buttons on the TVR to display the TV picture again.
Assembling recordings with clean
joints (assembly editing)
Select the desired programme with the
|]
,
0…9
buttons on the remote control or the
¢
– P+ buttons on the TVR.
During playback, locate the tape position where you
wish to join the new recording. Then press the
¢
n
button.
Start the "new" recording using the
¢
•
button on
the remote control or the L button on the TVR.
– During playback you will see smooth joints with-
out any flaws. This is called assembly editing.
3
2
1
2
1
OTR
END TIME
T Z CLEAR OK
Page 17

16
TIMER Recording
The options for TIMER
programming
The TVR can be programmed to record at a later
date.
r
You can programme:
– Six broadcasts over a period of 31 days.
– Daily or weekly broadcasts with the same starting
time.
– With or without VPS/PDC control.
r
You can choose from two variants:
1. With the VIDEO Plus+ system.
2. With the user guide and manual data entry.
r
VPS/PDC – the Video Programme System
VPS/PDC control when programming recording
guarantees that your desired broadcasts are always
recorded completely.
Incorrect recording resulting from programme alterations no longer occurs.
r
Notes on TIMER programming with
VPS/PDC
Many TV stations broadcast an additional programme-related signal (VPS/PDC signal) which indicates
the start and duration of each individual TV programme.
It is therefore important when programming the
TVR to enter the switch-on and switch-off times to
the exact minute.
If TV programmes are altered or moved, special
VPS/PDC times are indicated in the programme
over-views. They must be entered instead of the
normal starting times.
The TVR recognizes these alterations and is switched on at the actual start of the programme and
switched off at the actual end of the programme.
r
TV programmes without VPS/PDC signal
When recording TV stations which do not broadcast a VPS/PDC signal, the recording is started by
the set switch-on time only and stopped by the set
switch-off time only.
This is independent of the fact whether the
VPS/PDC signal has been confirmed during Timer
programming or has been cleared.
r
Programming a number of TV
programmes on one day
If you wish to record a number of TV programmes
on one day, you must decide which one is to be
recorded completely if there is a risk of alterations
to timing.
Example:
You wish to record the 1st station from 20:15 to
21:45 Hrs and the 2nd station from 21:50 to 22:30
But the programme from the 1st station is extended
by 15 minutes. The TVR records this programme
until 22:00, controlled by the VPS/PDC signal. Only
then does it switch to the second station. So 10
minutes of the second programme are missing.
If the programme from the 2nd station is to be
recorded from the beginning you must delete
VPS/PDC control when programming the 1st station. The length of the recording is then controlled by
the switch-on and switch-off times.
Recording of the 1st station then ends at 21:45.
And recording of the 2nd station starts at 21:50.
r
Programming all evening programmes
on one day
You wish to record all the evening programmes
on BBC1 (for example Saturday starting at 20:15,
entertainment programme, winning Lottery numbers, film). In this case you must use a separate
TIMER position for each of these programmes.
Otherwise the TVR would stop recording at the end
of the first programme – controlled by the VPS/PDC
signal.
If you only wish to use one TIMER position for
all evening programmes (for example from 20:15
to 00:15) you must delete VPS/PDC control when
programming.
How to confirm and delete the VPS/PDC signal is
explained in the chapter "Erasing or altering the data
of a TIMER position", page 18.
·
Page 18

17
TIMER Recording
Programming with the VIDEO Plus+
system, variant 1
All you have to do is activate the VIDEO Plus+
system by pressing a button, enter the
VIDEO Plus+ number code – indicated in the TV
magazine – and confirm the entry.
VIDEO Plus + and Pluscode are trademarks of
Gemstar Development Corp. VIDEO Plus + system
is manufactured under license from Gemstar
Development Corporation.
Ń
!
When using the TVR with VIDEO Plus + programming for the first time you will need to “teach” the
TVR which programme position the TV station is on.
The TVR will store the location of the TV station.
How to do this is described in step of the programming example.
r
Preparation
Switch the TVR on with the power switch.
Insert a cassette with sufficient playing time, pay
attention to erase prevention
Ń
!
The time and date at the TVR must be correct.
r
Exemple
Call up the GRUNDIG-INFOCENTER using the h
button.
Select "VIDEO Plus+" with the
|]
buttons and
confirm with the G button.
Ń
!
If all TIMER positions are occupied you must erase
a TIMER position. See the chapter “Erasing or altering the data of a TIMER position” on page 18.
Use the numbered buttons 0 ... 9 to enter the
VIDEO Plus+ number of the desired TV programme.
Ń
!
If incorrect entries are made, the
m
CL button can
be used to delete the VIDEO Plus+ number.
Ń
!
If the programme is to be recorded daily or weekly
at the same time, use the |button to select the
"DAILY/WEEKLY" line then the
F E
buttons to
select the options "DAILY", "WEEKLY" or "ONCE".
The “daily” function is not available for recording
on Saturday or Sunday.
3
VIDEO Plus+
CODE - - - - - - - - - DAILY/WEEKLY ONCE
M N OK
2
1
2
1
4
Confirm the VIDEO Plus+ number using the G
button.
– The TVR converts the VIDEO Plus+ number into
the actual recording data.
Ń
!
When programming with VIDEO Plus+ for the first
time, the "PROGRAMME NR. AV1" line appears in
the menu.
Select the desired programme position using the
|]
buttons and confirm with the G button.
– The TVR will use this programme position num-
ber for the selected TV station for every future
programming with VIDEO Plus+.
Ń
!
If recording is programmed for an external
video/audio source (e.g., a satellite receiver), the
programme position number "AV1" is not allowed to
be changed.
You can select the data using the
F E
buttons and alter it using the
|]
buttons.
If the programme is to be recorded without
VPS/PDC control, select "VPS/PDC" and switch it off
using the
|]
buttons.
The (+) sign in the table indicates recording with
VPS/PDC control.
Confirm programming using the G button.
– The next free TIMER position is marked in colour
indicating you that you can programme a further
recording.
Ń
!
If you are programming other recordings or using
other info tables, the red Timer indication starts flashing five minutes before recording starts and the
following message appears on the picture screen:
"PLEASE PRESS STANDBY".
End Timer programming using the G button.
– The data of the broadcast is stored in the memory
position (TIMER).
– On the picture screen appears briefly the message
"TIMER READY".
Switch the TVR off using the
b
button.
The red TIMER indication is lit permanently.
8
7
6
5
TIMER MENU
DATE DW PR. START END
VPS
PDC
02 – 01 20:15 21:45 +
M N T Z OK
4
·
Page 19

18
TIMER Recording
r
TVR messages
These indicate various operating states and errors.
The messages appear on the screen of the TVR.
"NO CASSETTE"
There is no cassette in the TVR.
"PROTECTED CASSETTE CAN NOT
RECORD"
The cassette is protected against re-recording. It is
ejected automatically.
"CODE ERROR"
Indicates incomplete entry, or the VIDEO Plus+
number in the TV magazine is incorrect.
"DAILY ERROR"
A daily recording was selected for a Saturday or a
Sunday. This is not possible.
"PLEASE PRESS STANDBY"
If you are programming other recordings or using
other info tables, the red Timer indication starts
flashing five minutes before recording starts. Then
press the A button.
r
Erasing or altering the data of a TIMER
position
Switch the TVR on using the ]button.
Call up the GRUNDIG-INFOCENTER using the h
button.
Select the "TIMER" option using the |button and
confirm with the G button.
Select the desired TIMER position using the
|]
buttons.
Clear the TIMER position using the
m
CL button, or
select the data to be altered using the
F E
but-
tons and alter it using the
|]
buttons, or
store the setting with the G button.
Switch to record stand-by mode by pressing the A
button.
r
Interrupting the record stand-by mode of
the TVR
If you have programmed TIMER positions and wish
to use the TVR while it is in record stand-by mode,
or you wish to terminate the TIMER recording:
Press one of the
¢
ı,
¢
ľIJ, ¢İı buttons.
Ń
!
The record stand-by mode of the TVR is now interrupted.
Select the desired function.
r
Reactivating the record stand-by mode of
the TVR
Insert a cassette with sufficient playing time and press
the A button.
– The TVR is once again in the record stand-by
mode and the TIMER recordings will be made at
the programmed times.
– The TIMER indication on the TVR is on.
r
Terminating the current TIMER recording
on the TVR
Press the A button for more than 2 seconds. The current TIMER recording is terminated.
1
1
2
1
7
6
5
4
3
2
1
·
Page 20

19
TIMER Recording
Programming with the user guide
and manual data entry, variant 2
r
Preparation
Switch the TVR on using the power switch.
Insert a cassette with sufficient playing time, pay
attention to erase prevention
Ń
!
The time and date at the TVR must be correct.
r
Example
Ń
!
Operation can be terminated at any time using the
A button.
Call up the GRUNDIG-INFOCENTER using the h
button.
Select the "TIMER" option using the |button and
confirm with the G button.
– The "TIMER MENÜ" table appears.
Ń
!
If all TIMER positions are occupied you must erase
a TIMER position. See the chapter “Erasing or altering the data of a TIMER position” on page 18.
Programme a new recording. To do this press the
E
button.
– The following appear in the data line:
a TV programme position number, the current
date, the current time as start time, the current
time plus 1 hour 30 minutes as stop time.
TIMER MENU
DATE DW PR. START END
VPS
PDC
02 – 01 20:15 21:45 +
M N T Z OK
3
TIMER MENU
DATE DW PR. START END
VPS
PDC
– – – – – ––:–– ––:–– +
M N T Z OK
2
1
2
1
Ń
!
If the programme is to be recorded daily or weekly
at the same time, use the E
button to select
"DW"
then the
|]
buttons to select "D" (= daily) or "W"
(= weekly).
The option "D" (= daily) is not available for recording on Saturday or Sunday.
Enter the data step by step using the
F E
and
|
]
buttons, or enter it directly using the
0…9
buttons.
The VPS/PDC signal can be deactivated and reactivated using the
|]
buttons.
The "+" sign in the table indicates recording with
VPS/PDC control.
Ń
!
If the picture/sound signal from an external unit,
which is connected to the EURO-AV socket, is to be
recorded instead of a TV station, this programme
source must be selected.
"AV1" appears in the data line instead of the programme number, for example for a satellite receiver
connected to the EURO-AV socket.
The external unit must be switched on while programming the TIMER recording.
Confirm programming using the G button.
– The next free TIMER position is marked in colour
and you can programme a further recording.
Ń
!
If you are programming other recordings or using
other info tables, the red Timer indication starts
flashing five minutes before recording starts and the
following message appears on the picture screen:
"PLEASE PRESS STANDBY".
End Timer programming using the G button.
– The data of the broadcast is stored in the memory
position (TIMER).
– On the picture screen appears briefly the message
"TIMER READY".
Switch the TVR off using the
b
.
The red TIMER indication is lit permanently.
Ń
!
The TVR “messages” and their meaning, as well as
options for alteration can be found on
page 18.
7
6
5
4
Page 21

20
Copying …
… from a video recorder, a CD-i
player, a satellite receiver
r
Connecting
Connect the "EURO-AV" socket on the TVR to the
corresponding socket on the video recorder, the
CD-i player, or certain types of satellite receivers
using a standard EURO-AV cable.
r
Preparation
Switch the TVR on using the power switch.
Insert the cassette which is to be copied into the
playback recorder.
Insert a cassette with sufficient playing time into
the TVR.
3
2
1
1
r
Operation
Select the programme position for the video recorder or the CD-i player. To do this, press the
0
AV
button.
Start playback on the playback recorder or the CD-i
player.
Start recording using the
¢
•
button on the
remote control or the L button on the TVR.
Stop recording using the
¢
n
button on the
remote control or the r button on the TVR.
4
3
2
1
EURO AV
EURO-AV TV EURO-AV DECODER EURO-AV VCR
EURO-AV
EURO-AV
AUDIO
satellite receiver
video recorder
CD-i player
·
Page 22

21
Copying …
… from a camcorder
T
I
M
E
R
Ǽ
P
R
E
C
O
R
D
r
Connecting
Pull off the protective cap.
Connect the VIDEO socket (video signal) on the
VTR to the corresponding socket on the camcorder
using a standard cable.
Connect the AUDIO socket (audio signal) on the
VTR to the corresponding socket on the camcorder
using a standard cable.
For a stereo camcorder use a standard audio adapter cable.
r
Preparation
Switch the TVR on using the power switch.
Insert the cassette which is to be copied into the
camcorder.
Insert a cassette with sufficient playing time into
the TVR.
3
2
1
3
2
1
r
Copying
Repeatedly press the
0
AV button until "AV" (for
the VIDEO/AUDIO socket) appears on the picture
screen of the TVR.
With the TVR in playback mode, search the end of
the scene where the new recording is to be added
then press the
¢
n
button.
In playback mode of the camcorder, search the
beginning of the desired scene.
Start recording using the
¢
•
button on the
remote control or the L button on the TVR.
Interrupt recording using the
¢
II button on the
remote control.
End recording using the
¢
n
button on the remote
control or the r button on the TVR.
6
5
4
3
2
1
AUDIO
VIDEO
y
Page 23

22
Special Functions
r
De-activating the child lock
Press any button.
– The "CHILD LOCK" table appears.
Enter the four-digit code number using the numbered buttons 0 … 9 and confirm using the
G button.
– The TVR switches the table off, the lock is de-
activated.
Ń
!
If you forget or mislay the secret code, the key on
the last page of the operating manual will help you.
Selecting the language for the
user guide
It is possible to alter the language of the user guide.
r
Preparation
Switch the TVR on using the power switch.
r
Operation
Call up the GRUNDIG-INFOCENTER using the h
button.
Select the "INSTALLATION" line using the
|]
buttons and confirm with the G button.
Select the "LANGUAGE" option using the
|]
buttons and confirm with the G button.
– The "LANGUAGE" table appears.
– The selected language is marked.
Select the desired language using the
|]
buttons and confirm it using the G button.
From now on all info tables and dialogue lines
appear in the selected language.
Switch off the "LANGUAGE" table using the h
button.
5
4
LANGUAGE
GB
D
F
T Z OK
3
2
1
1
2
CHILD LOCK
ENTER NUMBER
TO UNLOCK
– – – –
OK
1
The child lock
It is possible to lock all functions using the child
lock.
Even a cassette which is inserted afterwards
remains in the TVR until it is unlocked.
r
Activating the child lock
Call up the GRUNDIG-INFOCENTER using the h
button.
Select the "SPECIAL" option using the
|]
but-
tons and confirm using the G button.
Select the "CHILD LOCK" option using the
|]
buttons and confirm using the G button.
– The "CHILD LOCK" table appears.
Enter a four-digit code number using the numbered
buttons 0 … 9 and confirm it using the G
button.
Ń
!
If the child lock is activated during playback, this is
continued till tape end, then the tape is rewound to
its beginning and the TVR switches to standby.
Ń
!
If the "SLEEP TIMER" is activated (see page 23), the
TVR switches automatically off when the switch-off
time is reached and activates the child lock.
Ń
!
A programmed TIMER recording will be executed
even with the child lock activated.
Switch the TVR off using the
b
button.
Ń
!
The TVR is locked and switched off.
5
4
CHILD LOCK
ENTER NUMBER
TO LOCK
– – – –
0 9 OK
3
2
1
·
Page 24

23
Special Functions
The Sleep Timer
You can programme your TVR so that it switches
off automatically after a certain time (up to 180
minutes).
r
Operation
Call up the GRUNDIG-INFOCENTER using the h
button.
Select the "SPECIAL" option using the
|]
but-
tons and confirm it using the G button.
Select the "SLEEP TIMER" option using the
|]
buttons.
Alter the switch-off time in steps of 15 minutes
using the EFbuttons.
Pressing the
m
CL button resets the switch-off time
to "0".
Switch off the "SLEEP TIMER" table using the h
button.
– When the programmed time has elapsed, the TVR
switches automatically off.
Ń
!
When entering "0" as switch-off time, the SLEEP
TIMER is switched off.
The Wake-Up Timer
You can programme your TVR so that is switches
on automatically at a certain time.
r
Operation
Call up the GRUNDIG-INFOCENTER using the h
button.
Select the "SPECIAL" option using the
|]
buttons and confirm it using the G button.
Select the "WAKE UP" option using the
|]
buttons.
Ń
!
If the clock display of the TVR is not switched on,
the "CLOCK" table will appear automatically.
Set the time and date as described on page 9.
Use the numeric buttons 0 … 9 to enter the
desired wake-up time.
Select the "WAKE UP" option using the
|]
buttons then select "ON" using the EFbuttons.
Switch off the "WAKE UP" table using the h button.
Select the programme position with which you wish
the TVR to be switched on at the programmed time.
Switch the TVR to standby using the
b
button.
To switch off the "WAKE UP" function, repeat the
steps – but select "OFF" in the step .
561
9
8
7
6
5
4
3
2
1
5
4
3
2
1
·
Setting the function display
(OSD – O
N SCREEN D
ISPLAY)
When operating the TVR, important information
is displayed on the picture screen, such as:
– Programme position and station name when
selecting another programme.
– Bargraphs when adjusting the pictue and sound
settings.
– Tape run functions and tape length indications in
video recorder mode.
These information displays can also be called up
using the G button.
It is possible to select from different display modes.
r
"AUTO"
In TV and video recorder mode, the on-screen displays appear for a short time then are switched off.
r
"COUNTER"
In TV mode, the display appears and is switched off
after a short period of time.
In video recorder mode the tape run functions and
tape length indications are displayed.
The display of the tape run functions disappears
after a short time.
The display of the tape length is retained.
r
"OFF"
No automatic display.
Pressing the G button activates briefly the OSD
function. Tape run functions are not displayed.
r
Operation
Call up the GRUNDIG-INFOCENTER using the h
button.
Select the "INSTALLATION" line using the
|]
buttons and confirm it using the G button.
Select the "OSD MODE" option using the
|]
buttons then use the EFbuttons to select the
desired function "AUTO", "COUNTER" or "OFF".
Switch off the "OSD MODE" table using the h
button.
4
3
2
1
Page 25

24
Special Functions
Remote control of
GRUNDIG TV sets
With the remote control TVP 762 you can also control GRUNDIG colour TV sets that use the remote
control TP 590 onwards.
Ń
!
The functions that can actually be operated depend,
of course, on the technical features of your
GRUNDIG TV set.
r
Preparation
Press and hold down the ¢VIDEO/TV button while
pressing the numeric buttons 2 and 3 and confirming with the G button.
Switch the TV set on using its power switch.
Point the remote control at the TV set.
r
Operation
Press and hold down the ¢VIDEO/TV
button.
Switch on from standby using the | or ]button
or the numeric buttons 0… 9.
Select the desired programme position
- step by step from 1 to 99 with the
|]
buttons
- directly with the numeric buttons 0… 9.
Select the programme positions A1, A2, etc. by
repeatedly pressing the
0
AV
button.
Adjusting the volume:
Press the F
button = the volume decreases.
Press the E button = the volume increases.
Adjusting the brightness:
Press the
®button.
Adjusting the colour contrast:
Press the
™button.
Calling up the Menu:
Press the h button.
Use the
|
or
]
button to select a function and
the G button to call it up.
Activating Teletext:
Press the
¢
TXT
button.
Switching off:
Press the
b
button.
Ń
!
After operating the TV set it is necessary to reset
the remote control to normal operation. To do this,
press the ¢VIDEO/TV and ¢ SAT buttons at the
same time.
9
8
7
6
5
4
3
2
1
3
2
1
Remote control of
GRUNDIG video recorders
With the remote control TVP 762, you can also control GRUNDIG video recorders. Your specialized
dealer can tell you which video recorders are suited.
r
Preparation
Press and hold down the ¢VIDEO/TV
button while
selecting the video level 1 by pressing the numeric
button 3 and confirming with the G button.
For video level 2, press the numeric button 4 and
confirm with the G button.
Direct the remote control at the video recorder.
r
Operation
Press and hold down the ¢VIDEO/TV button.
It follows a listing of the video recorder functions
which can be controlled using the remote control
buttons.
ľIJ İı = Picture search reverse/forward
= Fast forward wind/rewind
•
OTR = Recording start
n
= Stop
II = Pause
ı = Playback
] |
= Programme position +/-
Ń
!
After operating the video recorder it is necessary to
reset the remote control to normal operation. To do
this, press the ¢VIDEO/TV
and
¢SAT
buttons at the
same time.
Remote control of
GRUNDIG satellite receivers
With the remote control TVP 762, you can also control GRUNDIG satellite receivers. Your specialized
dealer can tell you which receivers are suited.
r
Preparation
Switch on the satellite receiver using its power
switch.
Ń
!
Direct the remote control at the satellite receiver.
r
Operation
Press and hold down the
¢
SAT button.
Switch on from standby using the |or ]buttons
or the numeric buttons 0 … 9.
Select the desired programme position
- step by step using the
|]
buttons,
- directly with the numeric buttons 0 … 9.
Switch off using the
b
button.
4
3
2
1
1
1
2
1
·
Page 26

25
Special Functions
Press the G button.
– The programme is still visible for viewing and at
the top of the screen, the Teletext symbol
appears.
When the page number of the selected Teletext
page apears at the top of the picture screen, press
the G button.
The updated Teletext page appears.
r
Calling up subpages directly
Using the FEbuttons, select the /00 symbol.
Press the G button.
– At the top left in the picture screen appears ----.
Using the numeric keys 0 … 9, enter the desired
subpage as four digits, for example, 0002 for the
second page. The desired subpage is searched.
Pressing the G button cancels the entry.
– When the page is found or updated, it is displayed
on the picture screen.
r
Reveal hidden information
Certain Teletext pages may contain hidden information, such as quiz answers or the VPS/PDC times
for programming a video recorder.
Using the FEbuttons, select the
ķ ? symbol.
Press the G button once to reveal the hidden
information.
Press the G button once again to conceal the
information.
r
Multiple pages
Certain page numbers may contain several subpages which are automatically scrolled by the
broadcasting station.
These multiple pages can be recognized by an
insert below the time indication.
Using the FEbuttons, select the STOP symbol.
Press the G button if you wish to view a subpage
a longer time.
Pressing the G button once again cancels this
function.
r
Ending Teletext
Press the
¢
TXT
button to switch back to the TV
programme.
1
3
2
1
3
2
1
3
2
1
3
2
Teletext mode
Teletext is a service offered by TV stations free of
charge. It is transmitted together with the TV signal,
processed by the TVR and then finally made visible
on the picture screen.
Teletext consists of a large number of text pages
containing information such as sports and political
news, stock market prices, weather forcasts, and
much more.
The Teletext information offered, as well as the
organization and set-up of the individual pages
differ from TV station to TV station.
r
Preparation
Switch the TVR on using the power switch.
Select the TV programme the Teletext pages of
which you wish to see using the
|]
, 0… 9
buttons on the remote control, or the
¢-P+
buttons on the TVR.
r
Normal Teletext mode
Press the
¢
TXT
button.
– The Teletext page 100 (= Teletext summary)
appears.
Select the desired Teletext pages by entering the
page numbers as three digits using the numbered
buttons 0… 9.
– The page appears after a few moments.
Further functions in Teletext mode
Press the h button.
At the bottom of the Teletext page a dialogue line is
displayed which allows you to select the following
functions.
r
Enlarging the character size
Normal character hight = basic setting.
Using the FEbuttons, select the ķ э symbol.
– Repeatedly pressing the G button selects:
double character size in the upper half of the
page,
double character size in the bottom half of the
page,
normal character size in the entire page.
r
Updating pages/bypassing waiting times
Certain Teletext pages are constantly updated, such
as stock market reports and sporting events, as
well as the latest news.
Using the FEbuttons, select the
ķ X symbol.
1
1
1
2
1
2
1
Page 27

26
Useful Information
Fixing faults yourself
Not all picture and sound faults mean a defect in
your TVR.
Disturbed reception can also be caused by a cable
which is accidentally pulled out, or failure of the
transmitter or the TV aerial system.
Fault Cause Remedy
No display on the TVR/ Mains switch not pressed. Press mains switch.
the cassette is not pulled in. Mains plug disconnected or defective Insert mains plug or use a different
contact. supply socket.
The TVR cannot be operated, The child lock is activated. De-activate the child lock.
the mains voltage supply is o.k.
Recording of TV programmes Aerial cable not connected. Connect aerial cable.
not possible (only blue background
visible on picture screen). Station to be recorded is not Tune to station.
tuned in on the TVR.
Failure of the TV transmitter or Check by selecting the station to be
aerial system is defective. recorded on the TV set or ask your
neighbour if he can receive this station.
Recording not possible. The cassette is protected against Cover the opening with adhesive tape.
a new recording.
Timer recording was not Timer incorrectly programmed.
carried out.
For VPS/PDC-controlled recordings,
the wrong VPS/PDC-time has been entered.
The
b
button has not been Press the bbutton.
pressed after an interruption of
the record stand-by mode.
Poor picture quality during The video heads are dirty. Clean the video heads using the
video playback. cleaning function (see page 13).
The video heads are worn. Contact your dealer.
Operation with the remote control The batteries in the remote control Insert new batteries.
is not possible. are exhausted.
The remote control is not directed Direct the remote control at the TVR.
at the TVR.
·
Page 28

27
Useful Information
Technical Data
This TVR complies with the VDE 0860 safety regulation and consequently also with the international safety specifications IEC 65 and
CEE 1.
Under no circumstances should you open the TVR
yourself.
Damage which is caused by unqualified work is not
covered by the manufacturer’s guarantee.
The video recorder meets the requirements
of the 89 / 336 / EC and 73 / 23 / EC guidelines.
TV standard: PAL I, 625 lines
System: VHS
Mains voltage: 220 V
~
– 240 V~, 50 Hz
Weight: approx. 13 kg
Power consumption:
– in TV mode: approx. 70 W
– in stand-by approx. 10 W
– when recording
(screen switched off): approx. 25 W
Operating position: horizontal
Ambient temperature: +10°C to +35°C
Relative humidity: up to 80%
Wind time
forward/reverse: with E 180 cassette
typical 170 seconds
Euro-AV socket: 21-pin
(DIN/EN 50049)
Aerial socket: coaxial B, input 75 Ω
(DIN 45325)
Supplied accessories:
Remote control TVP 762
1 batterie, 9 V–, type GF 226
Antenna
Operating instructions
The complete accessories programme is shown
in the "GRUNDIG-REVUE" which you can obtain
from your specialized dealer.
Subject to errors and omissions.
Page 29

28
SERVICE
Channel and frequency table
CCIR/OIRT
chann. norm band frequency*
(MHz)
– L' VHF 55,8
– L' VHF 60,0
– L' VHF 63,8
– L VHF 176,0
– L VHF 184,0
– L VHF 192,0
– L VHF 200,0
– L VHF 208,0
– L VHF 216,0
B L VHF 116,8
C L VHF 128,8
D L VHF 140,8
E L VHF 152,8
F L VHF 164,8
G L VHF 176,8
H L VHF 188,8
I L VHF 200,8
J L VHF 212,8
K L VHF 224,8
L L VHF 236,8
M L VHF 248,8
N L VHF 260,8
O L VHF 272,8
P L VHF 284,8
Q L VHF 296,8
R1 VHF 49,8
R2 VHF 59,3
R3 VHF 77,3
R4 VHF 85,3
R5 VHF 93,3
R6 VHF 175,3
R7 VHF 183,3
R8 VHF 191,3
R9 VHF 199,3
R10 VHF 207,3
R11 VHF 215,3
R12 VHF 223,3
I A VHF 53,8
I B VHF 62,3
I C VHF 82,3
I D VHF 175,3
I E VHF 183,8
I F VHF 192,3
I G VHF 201,3
I H VHF 210,3
I H 1 VHF 217,3
I H 2 VHF 224,3
– VHF 69,3
– VHF 76,3
– VHF 83,3
– VHF 90,3
– VHF 97,3
– VHF 104,3
chann. norm band frequency*
(MHz)
CH61 UHF 791,3
CH62 UHF 799,3
CH63 UHF 807,3
CH64 UHF 815,3
CH65 UHF 823,3
CH66 UHF 831,3
CH67 UHF 839,3
CH68 UHF 847,3
CH69 UHF 855,3
CA01 VHF 105,3
CA02 VHF 112,3
CA03 VHF 119,3
CA04 VHF 126,3
CA05 VHF 133,3
CA06 VHF 140,3
CA07 VHF 147,3
CA08 VHF 154,3
CA09 VHF 161,3
CA10 VHF 168,3
CA11 VHF 231,3
CA12 VHF 238,3
CA13 VHF 245,3
CA14 VHF 252,3
CA15 VHF 259,3
CA16 VHF 266,3
CA17 VHF 273,3
CA18 VHF 280,3
CA19 VHF 287,3
CA20 VHF 294,3
CA21 HYP 303,3
CA22 HYP 311,3
CA23 HYP 319,3
CA24 HYP 327,3
CA25 HYP 335,3
CA26 HYP 343,3
CA27 HYP 351,3
CA28 HYP 359,3
CA29 HYP 367,3
CA30 HYP 375,3
CA31 HYP 383,3
CA32 HYP 391,3
CA33 HYP 399,3
CA34 HYP 407,3
CA35 HYP 415,3
CA36 HYP 423,3
CA37 HYP 431,3
CA38 HYP 439,3
CA39 HYP 447,3
CA40 HYP 455,3
CA41 HYP 463,3
chann. norm band frequency*
(MHz)
CH02 VHF 48,3
CH03 VHF 55,3
CH04 VHF 62,3
CH05 VHF 175,3
CH06 VHF 182,3
CH07 VHF 189,3
CH08 VHF 196,3
CH09 VHF 203,3
CH10 VHF 210,3
CH11 VHF 217,3
CH12 VHF 224,3
CH21 UHF 471,3
CH22 UHF 479,3
CH23 UHF 487,3
CH24 UHF 495,3
CH25 UHF 503,3
CH26 UHF 511,3
CH27 UHF 519,3
CH28 UHF 527,3
CH29 UHF 535,3
CH30 UHF 543,3
CH31 UHF 551,3
CH32 UHF 559,3
CH33 UHF 567,3
CH34 UHF 575,3
CH35 UHF 583,3
CH36 UHF 591,3
CH37 UHF 599,3
CH38 UHF 607,3
CH39 UHF 615,3
CH40 UHF 623,3
CH41 UHF 631,3
CH42 UHF 639,3
CH43 UHF 647,3
CH44 UHF 655,3
CH45 UHF 663,3
CH46 UHF 671,3
CH47 UHF 679,3
CH48 UHF 687,3
CH49 UHF 695,3
CH50 UHF 703,3
CH51 UHF 711,3
CH52 UHF 719,3
CH53 UHF 727,3
CH54 UHF 735,3
CH55 UHF 743,3
CH56 UHF 751,3
CH57 UHF 759,3
CH58 UHF 767,3
CH59 UHF 775,3
CH60 UHF 783,3
* Ŀfréquency = - 0,05 MHz
Page 30

29
SERVICE
r
GRUNDIG Germany
r
GRUNDIG Europe
4
.
GRUNDIG
Kundendienst Nord
Kolumbusstraße 14
Hamburg
22113
0 40/7 33 31-0
GRUNDIG
Kundendienst West
Horbeller Straße 19
Köln
50858
0 22 34/95 81-2 51
GRUNDIG
Kundendienst Mitte
Dudenstraße 45-53
Mannheim
68167
06 21/33 76-70
VGA00063
GRUNDIG
Kundendienst Ost
Wittestraße 30e
Berlin
13509
0 30/4 38 03-21
GRUNDIG
Kundendienst Süd
Beuthener Straße 65
Nürnberg
90471
09 11/7 03-0
GRUNDIG BELUX N.V.
Deltapark, Weihoek 3, Unit 3G
Zaventem
B-1930
00 32/2-
7 16 0
4 00
GRUNDIG UK LTD.
Elstree Way, Borehamwood, Herts, WD6 1RX
GB
Großbritannien/Great Britain
00 44/1 81-3 24 94 00
Technical Service
Unit 35, Woodside Park, Wood Street
Rugby, Warwickshire, CV21 2NP
Großbritannien/Great Britain
00 44/1 78-8 57 00 88
GRUNDIG IRELAND LTD.
2 Waverley Office Park, Old Naas Road
EIR
Dublin 12
0 03 53/1-4 50 97 17
GRUNDIG FRANCE S.A.
5 Boulevard Marcel Pourtout
F-92563
Rueil Malmaison Cedex
00 33/1-41 39 26 26
GRUNDIG SCHWEIZ AG
Steinacker Straße 28
CH-8302
Kloten
00 41/1-8 15 81 11
GRUNDIG PORTUGUESA
Comércio de Artigos Electrónicos, Lda.
Rua Bento de Jesus Caraça 17
P-1495
Cruz Quebrada, Lisboa
0 03 51/1-4 19 75 70
GRUNDIG NORGE A.S.
Glynitveien 25, Postboks 23
Ski
N-1401
00 47/64 87 82 00
GRUNDIG DANMARK A/S
Lejrvej 19
Værløse
DK-3500
00 45/44 48 68 22
GRUNDIG OY
Luoteisrinne 5
Espoo
SF-02271
0 03 58/9-8 04 39 00
GRUNDIG SVENSKA AB
Albygatan 109 d, Box 4050
S-17104
Solna
00 46/8-6 29 85 30
GRUNDIG POLSKA SP.Z.O.O
Ul. Czéstochowska 140
PL-62800
Kalisz
00 48/62-7 66 77 70
GRUNDIG AUSTRIA Ges.m.b
Breitenfurter Straße 43-45
A-1120
Wien
00 43/1-81 11 70
GRUNDIG NEDERLAND B.V.
Gebouw Amstelveste
Joan Muyskenweg 22
NL-1096
CJ Amsterdam
00 31/20-5 68 15 68
Page 31

GB
3103 166 15451
TVR 3710 GB
6451/004
!B&3`YV"
GRUNDIG
+
!
P
+
P
 Loading...