

Page 1

COLOR TELEVISION
P 37-070
P 37-730 text/ICN
Page 2

r
Notes on safety
Ń
!
If the television is to be built into a compartment or similarly enclosed,
minimum distances must be maintained (10 cm at the sides, 20 cm on the
top).
Ń
!
Do not obstruct the ventilation openings at the back.
Heat build-up can reduce the service life of your television, and can also be
dangerous. Never place the television near heat sources.
Ń
!
When setting up and using this unit, please make sure that the mains
connection wire is free and not jammed in order to avoid damage.
Ń
!
Even if your television is switched off, it can still be damaged by lightning
striking the mains and/or aerial cables.
For this reason, you should always disconnect your television from the
mains and the aerial system during thunderstorms.
Ń
!
Never expose the unit to moisture.
Ń
!
Do not insert foreign objects into the ventilation openings at the back.
Caution! High voltage!
r
Connecting the unit and switching on/off
Insert the plug of the aerial lead into the aerial socket É of the TV set.
Connect the mains lead to the wall socket.
Press the
¢
IO
button on the unit.
The unit is now in standby position.
r
The dialogue line as user’s guide
The line which is displayed at the bottom of the menus shows you which
buttons on the remote control handset are to be used to change settings.
Ń
!
The ɦ, ɼ,
ʺʺ, ɶɶ
signs on the picture screen are symbols for the following
buttons on the remote control handset:
ʺʺ, ɶɶ
= P- and P+ buttons (cursor movement up/down and func-
tion selection).
ɦ, ɼ = – ņ and + ŀ buttons (cursor movement to the left/right and
function selection).
In the following text, the illustrations of the buttons instead of the symbols
will be shown.
3
2
1
Safety and Installation
ķ
7
Page 3
Assigning Programme Positions
1st possibility
r
The Automatic Tuning System ATS
This automatic tuning system scans the entire reception range and automatically stores all found programmes.
How to proceed:
Switch the TV set on from standby with one of the buttons 1...9 .
Press the AUX button for approx. 4 sec. until the ATS menu appears.
Start the tuning system with the OK button.
The station search procedure may last one minute and longer.
When the station search is completed, the televsion is ready for operation.
Have a good time with your new television set!
If you are not satisfied with the automatic assignment of the programme
positions, you can change the order of the programmes stored in the
station positions according to your personal preferences.
r
Exchanging programme positions
Example: The channel stored in programme position 5 is to be moved to
programme position 2.
Select programme position 2.
Press the AUX button. The programme menu is displayed.
Under »PR«, enter the new programme position 05 with the buttons 1...9.
Press the OK button. The procedure is completed.
Press the i button to return to TV mode.
2nd possibility
r
Assigning programme positions manually
Press the AUX button. The programme menu is displayed.
Under »PR« select the programme position to be assigned with the
P+/P- button.
" »CH« enter the channel number (in the case of a special
channel, enter »C« instead of »S« with the P+ button).
If the channel number 00 is entered on a programme
position, all further positions can no longer be selected
with the P+ and P- buttons.
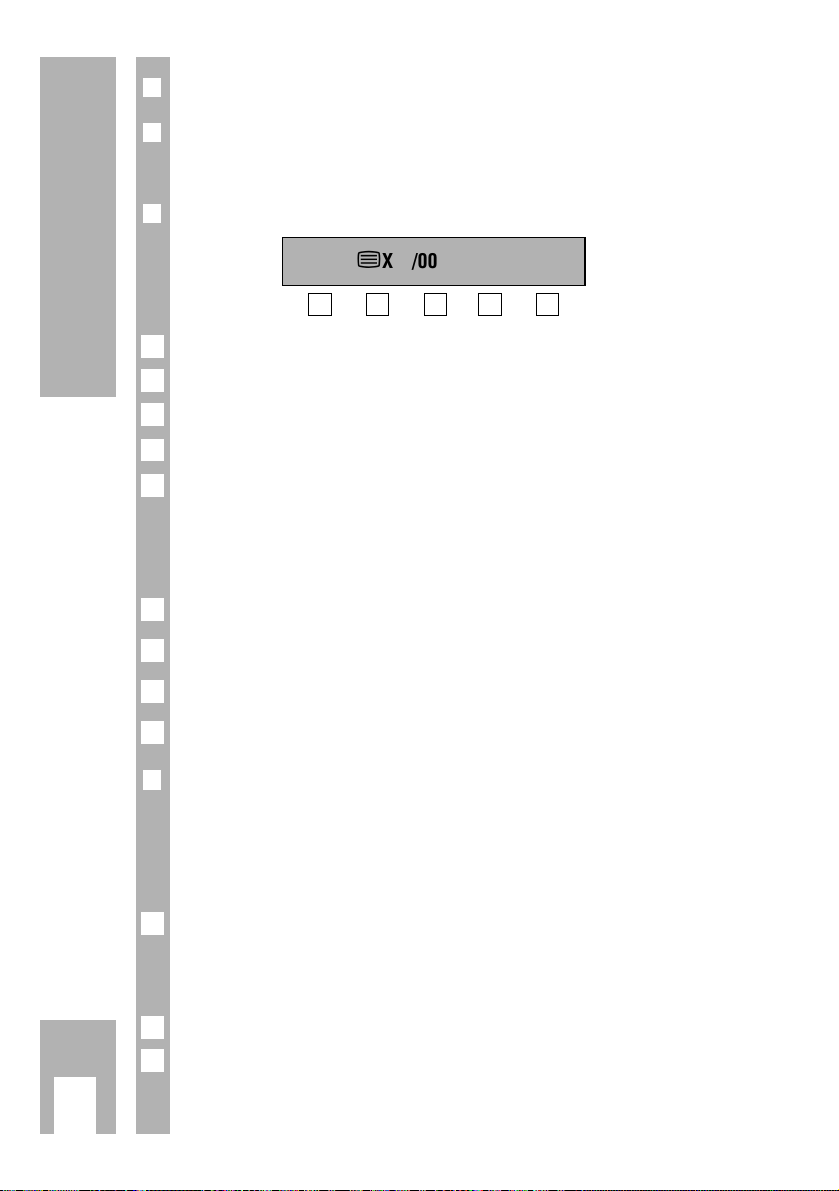
2
PR CH S DEC FT
22 S06 BG ON 00
0…9
ɶɶʺʺ
ɼɦ OK i
1
5
4
3
2
1
3
2
1
ķ
8
ĵ
dialogue line
Page 4
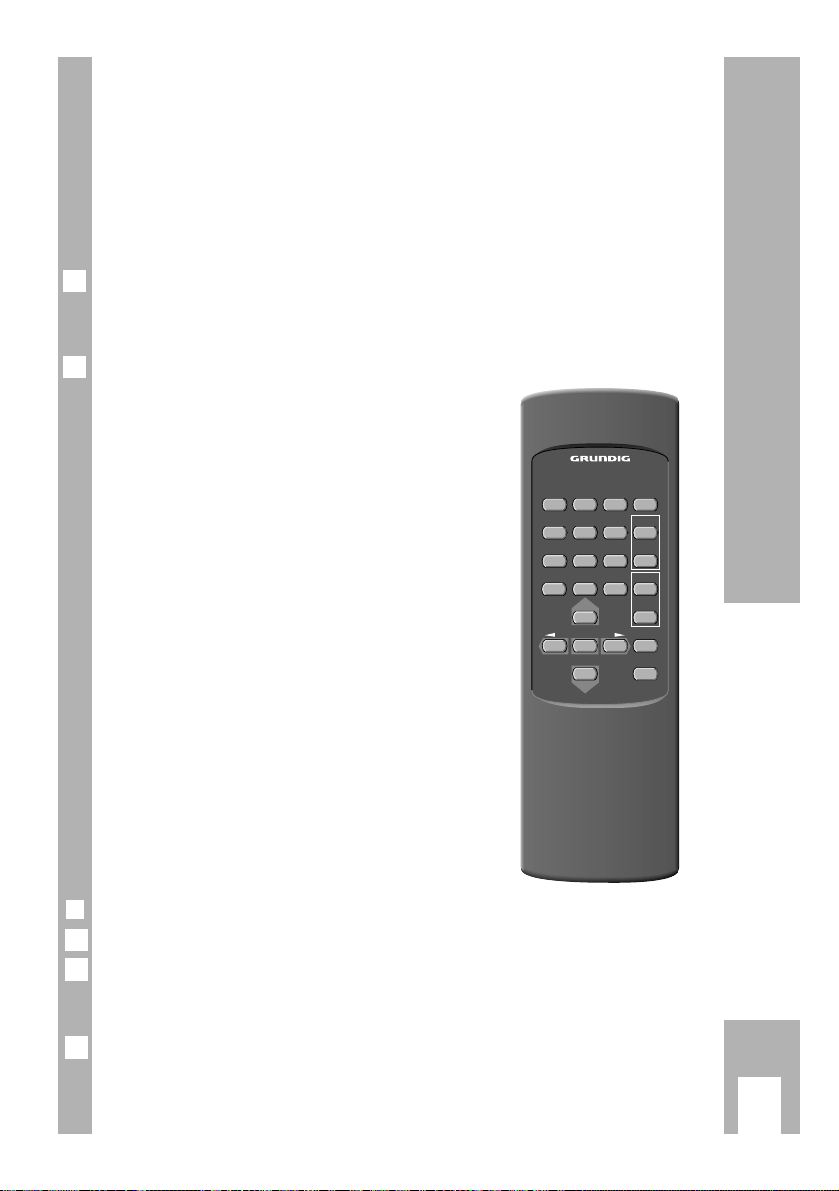
The Remote Control Handset
ķ
9
The remote control buttons
1…9 (0/AV)Select programme pos. (also AV);
switch on from standby.
Ǽ
Switch to standby or on again.
v
Brightness.
TXT Teletext on/off.
i
Colour contrast.
i
Program position number fade
in/fade out.
Display Teletext overview.
ʀ Sound on/off (muting).
P+, P–
Select programme positions;
move cursor.
OK
Change and activate certain functions.
– ņ,+ ŀ Volume;
move cursor.
AUX Call up programme data;
hold down for 4 sec. to call up the
ATS tuning system.
" » S« Only » BG« is possible.
" »DEC«If an encoded programme is assigned to this programme posi-
tion and an appropriate descrambler (decoder) is connected,
then select »ON«.
" »FT« If fine tuning is necessary after programme assignment, press
the ľ – button until the figures below FT get green.
Press the P+ or P– button until the best picture quality is
obtained.
Press the OK button to store the modified settings.
When storing is completed, the programme data of the next programme
position is displayed.
Press the i button to return to the TV programme.
4
3
r
Further functions
Change b/w contrast: press i, OK, – ņ, or + ŀ.
Programme Sleep Timer
(switch-off time 01…99 min.) :
press
i, OK, i and numeric buttons 1…9. Press the i button to return to the TV
programme.
Automatic frequency fine tuning on/off:
press
i, OK, i, i, then select with – ņ.
Ń
!
Every changed value (volume, etc.) is stored after approx. 8 sec.
Ń
!
Pressing the OK button twice recovers the factory pre-settings.
3
2
1
12
4
56
789
AUX
0/AV TXT
P+
OK
P–
Ǽ
3
+
v
–
+
i
–
Ǻ
+–
ʀ
TP 711
Page 5
Teletext Mode
r
Calling up Teletext: Press the TXT button.
r
Select pages directly with the buttons 1…9
(Available pages: 100-899)
r
Calling up the dialogue line: Press the AUX button.
= Enlarge character hight.
= Bypass waiting time (actual mode).
= Directly call up subpages.
= Reveal answer.
= Stop pages.
Select the function with the
ņ – or + ŀ button and call it up with OK.
The functions 1, 3, 4, and 5 can be executed without calling up the dialogue
line as follows:
Enlarge character height: Press the +
i button.
Directly call up subpages: Press the –
i button.
Reveal answer: Press the + ŀ button.
Stop pages: Press the
ņ – button.
r
Selecting pages with the cursor (page catching)
You can select pages without entering the page numbers. You can select the
desired Teletext page in overview pages (pages containing three-digit page
numbers). This function saves you entering the three-digit page numbers.
How to proceed:
Press the P+ or P– button.
»Page Catching« appears on the bottom border of the picture. A rectangular
cursor is flashing at the position of the fist or last page number in the overview page.
Use the P+ or P– button to move the cursor to the desired page number.
Press the OK button.
The page appears on the picture screen.
3
2
1
5
4
3
1
5
4
3
2
1
54321
ķ
ʄʄ
ķX /00 ķ? STOP
ķ
10
Page 6

Connecting a video recorder or satellite receiver
r
Connection
Connect the video recorder or satellite receiver with an AV cable to the AV
socket at the back of the set.
r
Operation of each connected device
Starts video cassette recorder playback function or switches on satellite
receiver.
When connecting a decoder (descrambler), pay attention to the chapter on
page 8: »Manual setting of program positions.«
In the menu, the “ON” setting must be used at the corresponding program
position under » DEC«.
Connecting external loudspeakers
r
Connection
Connect loudspeaker (min. 8 ohms nominal impedance) to the loudspeaker
socket (at back of device).
Changing volume with the – ņ, + ŀ.
Ń
!
This unit conforms to VDE safety regulations and directives of the Deutsche
Bundespost (German Federal Post Office; see certification mark on the type
sticker on the rear of the unit), as well as all relevant ordinances governing
X-ray emissions. The picture tube, which emits X-rays, is sufficiently shielded and therefore represents no danger. Accelerating voltage is max. 25 kV
with a mean beam current of 0,8 mA.
Unauthorized tampering with the unit, in particular making adjustments to
the high voltage system, or installing a different picture tube, can considerably increase X-ray emissions. Units so altered no longer conform to applicable safety regulations and may not be operated.
220-240V, 50/60Hz (power supply control range 165 – 265V)
Power consumption approx. 40 W; in standby 11 W.
Sound output: 2 W music power (1 W sine power).
The mains cable is a plug-in model. Please give order no. 8290-991-220 to
customer service if a replacement is needed.
Subject to alterations. E. and O.E.
2
1
1
1
Connection Possibilities
ķ
11
Page 7
Connection Possibilities
ķ
12
Additional Information for Units sold in Great Britain
Units sold in GB are suitable for operation from a 240 V AC, 50 Hz mains
supply.
In case this appliance is supplied with a Safet
y Standard Approved mains lead
fitted with a non-rewireable 13 Amp mains plug which, if unsuitable for your
socket, should be cut off and an appropriate plug fitted by a qualified electrician.
The fuse and fuse holder must be removed from the plug as accidental insertion
of the redundant plug into a 13 Amp socket is likely to cause an electrical
hazard.
Note: The severed plug must be destroyed to avoid a possible shock hazard
should it be inserted into a 13 Amp socket elsewhere.
If it is necessary to change the fuse in the non-rewireable plug, the correct type
and rating (5 Amp ASTA or BSI approved BS 1362) must be used and the fuse
cover must be refitted. If the fuse cover is lost or damaged the lead and plug
must not be used until a replacement is obtained. Replacement fuse covers
should be obtained from your dealer.
If a non-rewireable plug or a rewireable 13 Amp (BS 1363) plug is used, it must
be fitted with a 5 Amp ASTA or BSI approved BS 1362 fuse. If any othe type of
plug is used it must be protected by a 5 Amp fuse either in the plug or at the
distribution board.
Important:
The wires in the mains lead are coloured in accordance with the following code:
BLUE – NEUTRAL
BROWN – LIVE
As the colours of the wires in the mains lead of your appliance may not correspond with the coloured marking identifying the terminals in your plug, proceed
as follows:
Connect the BLUE coloured wire to plug terminal marked with the letter "N" or
coloured black.
Connect the BROWN coloured wire to the plug terminal marked with a letter "L"
or coloured red.
In no circumstance must any of the wires be connected to the terminal marked
with a letter "E", earth symbol , coloured green or green and yellow.
Replacement mains lead can be obtained from your dealer.
Page 8

GRUNDIG AG ••D-90762 FÜRTH Printed in Austria A
1 2 3 4 5 6 7 8 9
21639-941.01
Ķ = Seite 2-6
ķ = Page 7-12
Ņ = Side 13-17
ɾ = Sidan 18-22
ї = Página 23-27
 Loading...