

Page 1

LCD-TV
LCD 38-9210 TOP
ǵ
ENGLISH
72011-700.2100
Page 2

2
CONTENTS
__________________________________________________________________________
4 Safety and installation
5 At a glance
The TV set controls
Connections to the TV set
Remote control
7 Connection and preparation
Connecting the aerial and mains cable
Inserting batteries into the remote control
8 Settings
The menu, selecting the language
Setting TV channels automatically
Picture settings
Sound settings
13 Television mode
Switching on/off
Selecting channel positions
Sound settings
Picture settings
Zap function
16 Teletext mode
TOP text or FLOF text mode
Normal text mode
Additional functions
Page 3

ENGLISH
3
CONTENTS
__________________________________________________________________________________
18 Convenience functions
Automatic switch-off (SLEEP TIMER)
Childproof lock
19 Operating with external appliances
Decoder, VHS video recorder or Satellite receiver
VHS video recorder and Satellite receiver
VHS video recorder or Satellite receiver and Decoder
VHS video recorder and Satellite receiver and Decoder
S-VHS video recorder or Camcorder
24 Operation as a PC monitor
28 Special functions
Setting the TV channels manually
Fine-tuning TV channels
Information about the set channel position
30 Customer information
31 Correcting Problems Yourself
Page 4

4
SAFETY AND INSTALLATION
_______________________________
Please observe the following information when installing and connecting the TV set:
This set has been designed for the reception and reproduction of picture and
sound signals.
Any other use is explicitly forbidden.
The ideal viewing distance from the screen is 5 times the diagonal width of the
screen.
External light shining on the screen adversely affects picture quality.
The TV set is designated for operation in dry rooms. Should you nevertheless
wish to operate the TV outside, make absolutely sure that it is protected against
moisture (rain, splashing from water). Never expose the TV set to moisture of
any kind.
Do not place the TV set close to the heating or in direct sunlight, as it could
overheat.
Heat buildup can be dangerous and is detrimental to the service life of the
equipment. From time to time, have a technician come to remove deposits from
the inside of the set.
Keep the TV set away from magnetic fields (for example, stereo speakers).
Do not open the TV set under any circumstances. The manufacturer accepts no
liability for damage resulting from unauthorised tampering.
Make sure that the mains cable is not damaged.
The TV set may only be operated using the mains unit supplied.
Electrical storms represent a danger for every type of electrical device. Even if
the set is switched off, it could be damaged by a lightning strike hitting the
mains and/or the aerial lead. Therefore, always disconnect the mains plug and
aerial plug when there is an electrical storm.
When cleaning the screen, use only a soft, damp cloth.
Use clean water only.
ǵ
V
O
L
U
M
E
C
H
A
N
N
E
L
D
O
W
N
U
P
D
O
W
N
U
P
S
E
L
E
C
T
M
E
N
U
5 x
ǵ
D
O
W
N
U
P
D
O
W
N
U
P
S
E
L
E
C
T
M
E
N
U
Krieg am
Golf
! SERVICE !! SERVICE !
OUTPUT
INTPUT
HEAD PHONE
TV R
DC IN L -AUDIO- RVIDEOL -AUDIO- RVIDEOS-VIDEOSCART
VGA PC-AUDIO-IN
! SERVICE !
VGA PC-AUDIO-IN
OUTPUT
INTPUT
HEAD PHONE
DC IN L -AUDIO- RVIDEOL -AUDIO- RVIDEOS-VIDEOSCART
Page 5
ENGLISH
5
AT A GLANCE
___________________________________________________________________
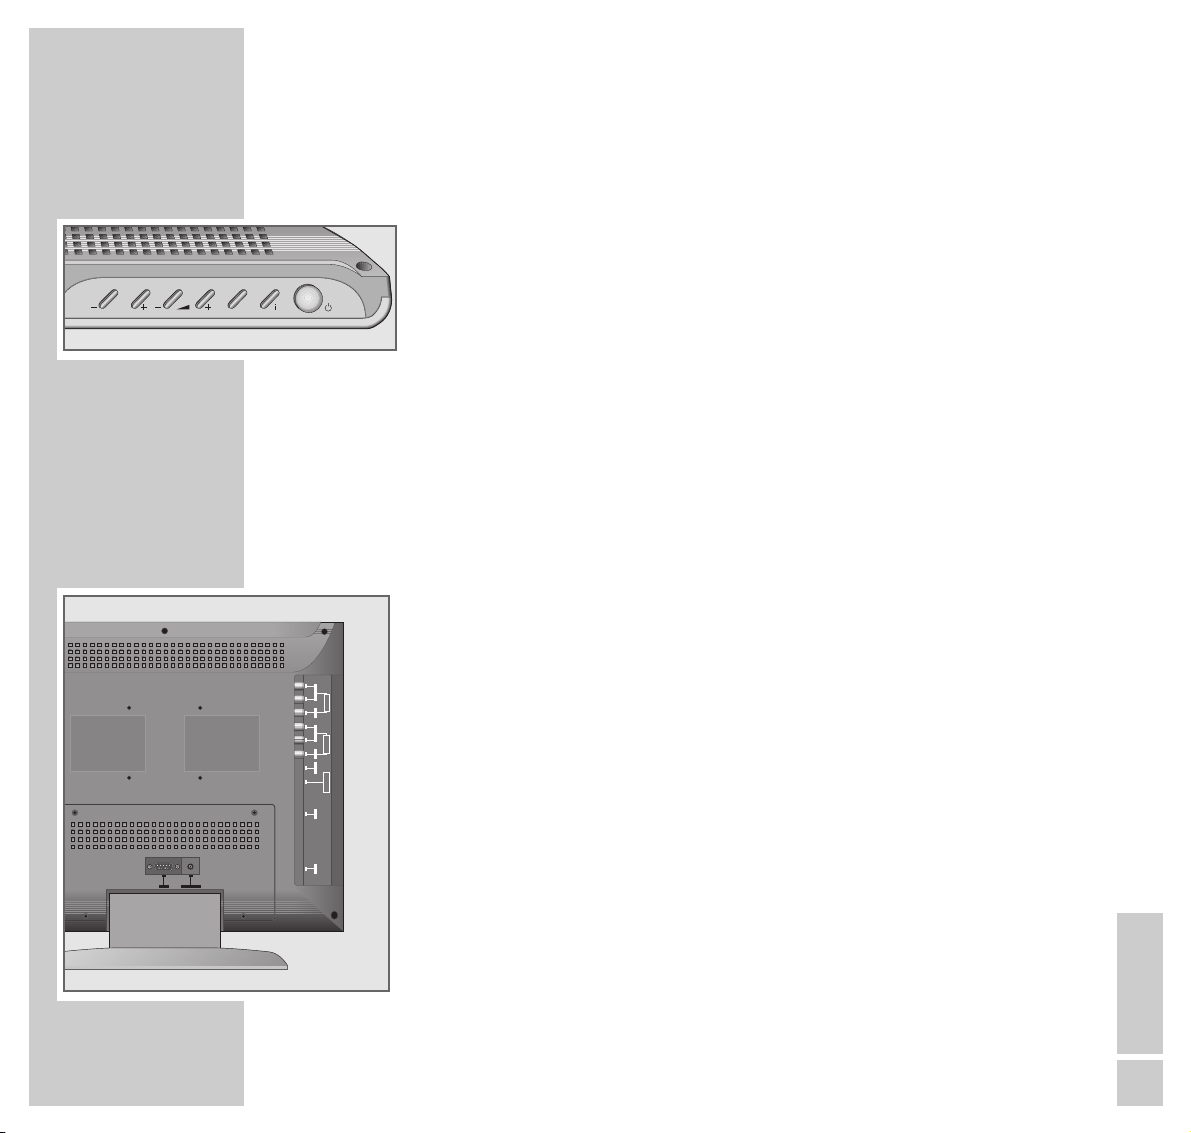
The TV set controls
–
P
+
Channel selection
Switches on the TV set from standby
–
zz
+ Volume
AV/OK
Selects between TV mode, AV mode,
SVHS mode, PC monitor mode;
activates functions in the menu
i
Calls up the TV set menu
ǼǼ
Switches the TV set on/off (standby)
Connections to the TV set
DC IN Connection socket for mains unit
Euro AV Euro/AV jack (CSCC)
yy
Headphone socket
S-VIDEO SVHS input
IN VIDEO Picture input
IN L AUDIO R Sound signal input
OUT VIDEO Picture output
OUT L AUDIO R Sound signal output
PC IN AUDIO Sound signal input for PC
PC IN VGA VGA connection for PC
P
AV/OK
OUTPUT
INTPUT
HEAD PHONE
VGA PC-AUDIO-IN
DC IN L -AUDIO- RVIDEOL -AUDIO- RVIDEOS-VIDEOSCART
Page 6
6
AT A GLANCE
____________________________________________________________________________
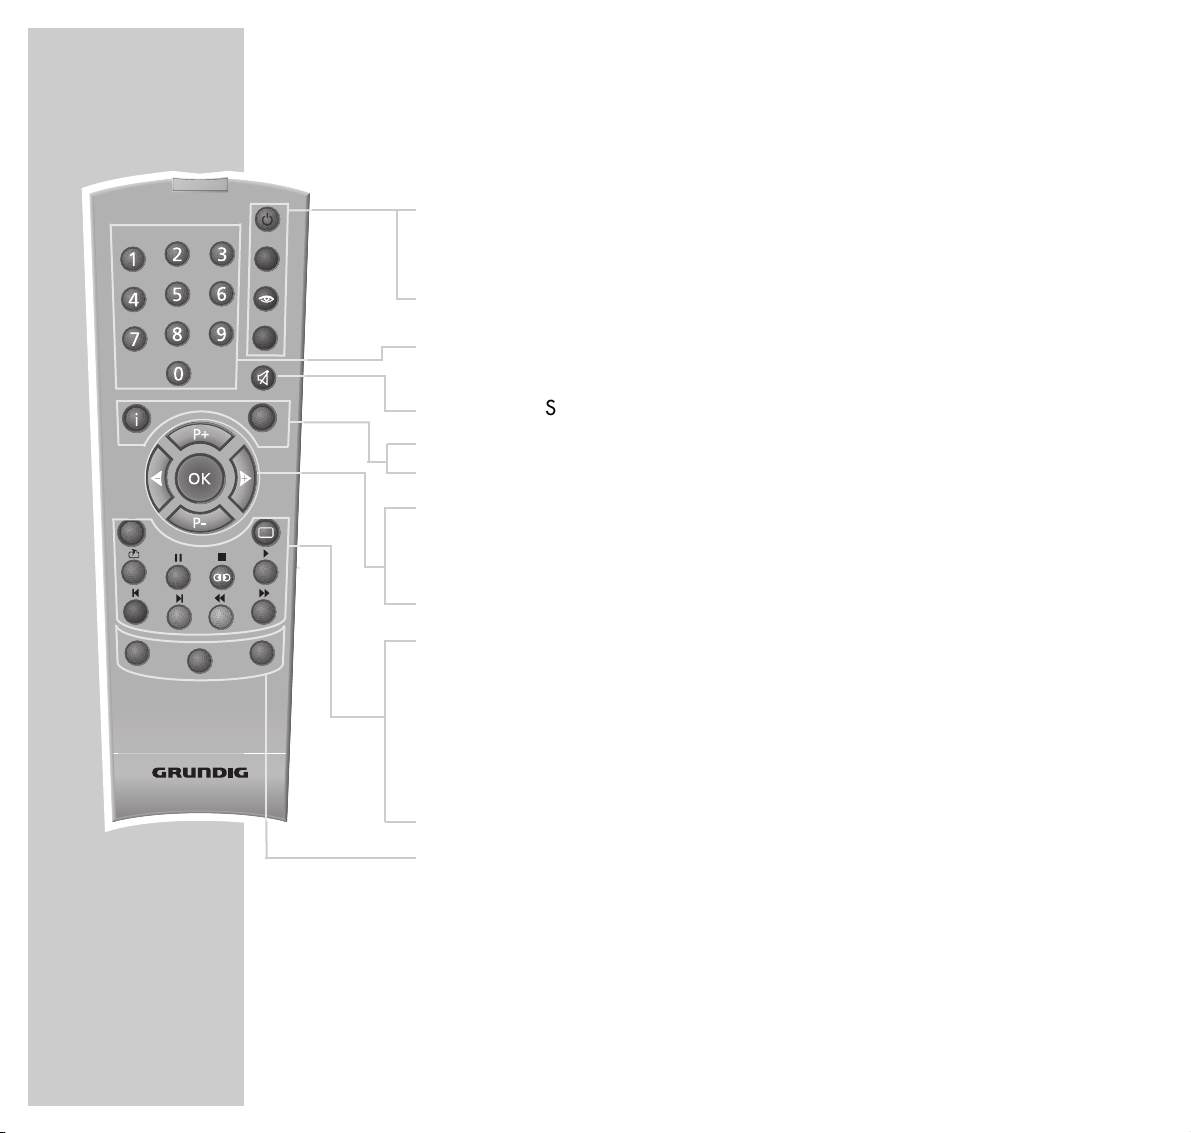
Remote control
ǼǼ
Switches the TV set on and off (standby)
FF
Selects different sound settings
zz
Selects different picture settings
AV Switches between TV mode, AV mode, SVHS mode operation as a
PC monitor
1 … 0 Channel selection and switch on from standby,
input of teletext page numbers
ĭĭ
Sound on/off (mute)
i Calls up the screen menu
Z Zap function
P+, P – Switches on the TV set from standby,
channel advancing, cursor moves up/down
ǸǷ Volume, cursor moves left/right
OK Changes and activates different functions
TXT Teletext on
IJ
Teletext off
ї
Page stop for multiple pages
O
Sleep Timer
K
Spatial on/off
Ƒ
Answer release for teletext
ǵǵǵǵ
Coloured keys for teletext mode
VCR/Sat/ To operate the basic functions of a GRUNDIG video recorder,
DVD satellite receiver or DVD player, press the »VCR«, »SAT« or
»DVD« keys and hold down. Then press the desired button.
The functions that are possible depend on the features of your
appliance. Just try it out.
Tele Pilot 155 C
Audio
Subtitle
Angle
Return
TitleDisc Menu
VCR
DVD
SAT
wt
љ
AV
z
TXT
d
Page 7
ENGLISH
7
CONNECTION AND PREPARATION
_______________
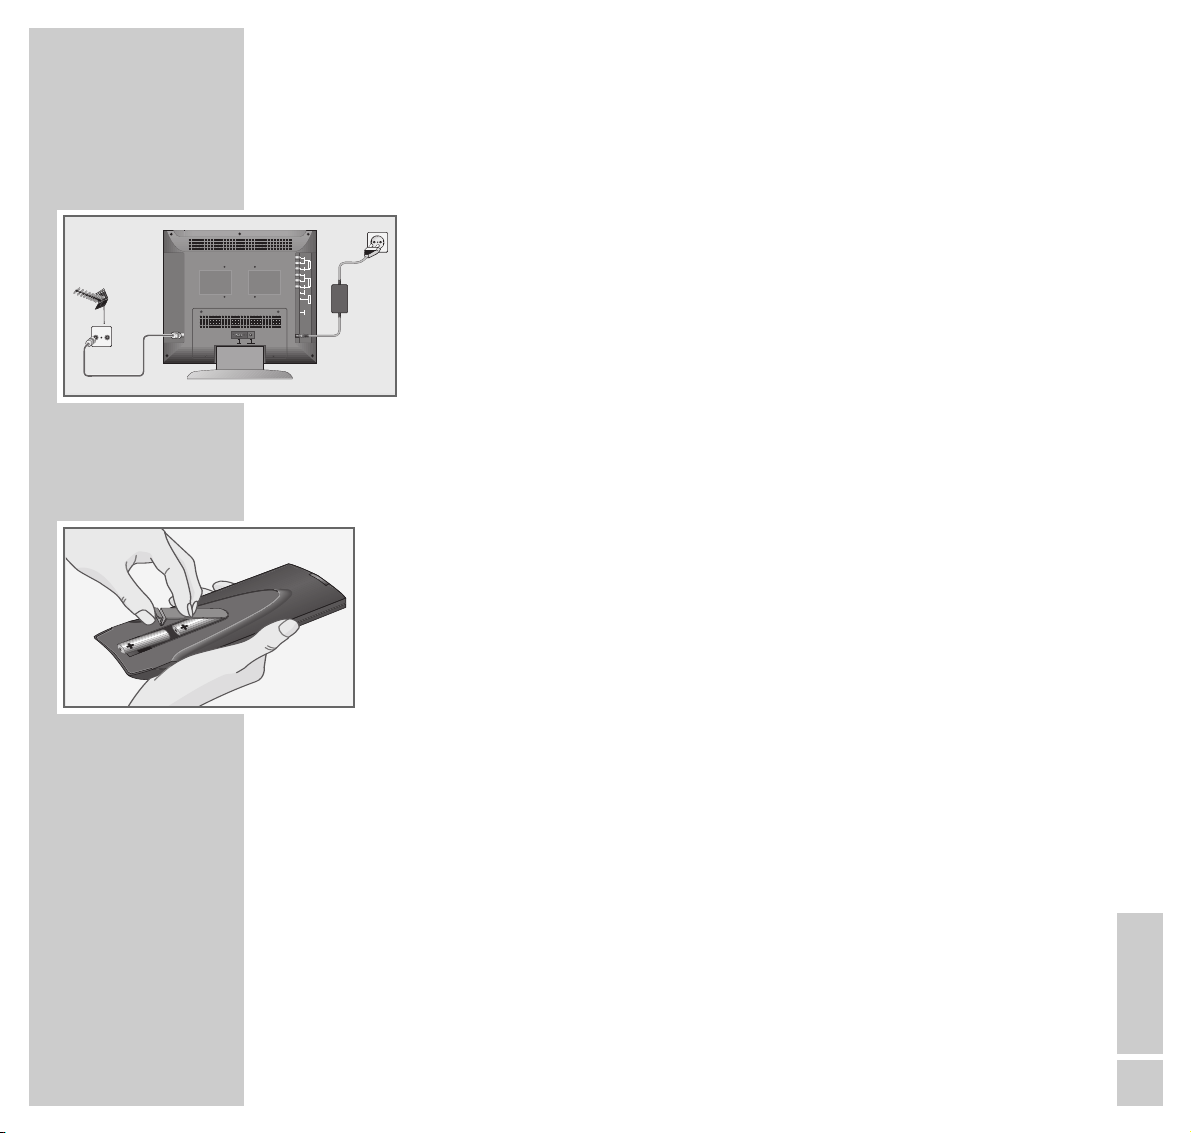
Connecting the aerial and mains cable
1 Insert the aerial cable of the house aerial into aerial socket »
ÉÉ
« on the TV
set.
2 Insert the mains cable supplied into the jack on the power unit.
3 Insert the power cable of the mains unit into the »DC IN « jack of the TV set.
4 Insert the mains cable plug into the mains socket.
Inserting batteries into the remote control
1 Open the battery compartment by pulling off the cover.
2 Insert batteries (UM-3 or AA, 2 x1.5 V).
Observe correct polarity when inserting the batteries.
Note:
If your television does not react to the remote control commands correctly, it
could mean that the batteries are used up. Always remove empty batteries.
No liability will be accepted for damage caused by dead batteries.
Environmental note:
The batteries – even those free of heavy metals – must not be disposed of in
normal household rubbish. Used batteries must be disposed of in used battery collection containers in shops, or be taken to public waste disposal facilities.
OUTPUT
INTPUT
HEAD PHONE
TV R
VGA PC-AUDIO-IN
DC IN L -AUDIO- RVIDEOL -AUDIO- RVIDEOS-VIDEOSCART
Page 8
8
The menu
The menu is the control centre for your TV set.
Here, you can make a variety of different settings.
You can operate the menu with the buttons on the TV set or with the remote
control. Operating the menu using the remote control is described later in the
operating instructions.
Below, you will find an overview of how to operate the menu using the buttons
on the TV set or the remote control.
TV set Remote control Function
iiCalls up the menu.
– P + – P +
Selects lines or functions
on one menu page.
–
zz
+
ǸǷ Changes settings.
AV/ OK OK Confirms the functions.
Note:
– If no operating command is received by the TV set while the menu is on the
screen, the menu disappears automatically after approx. 25 seconds.
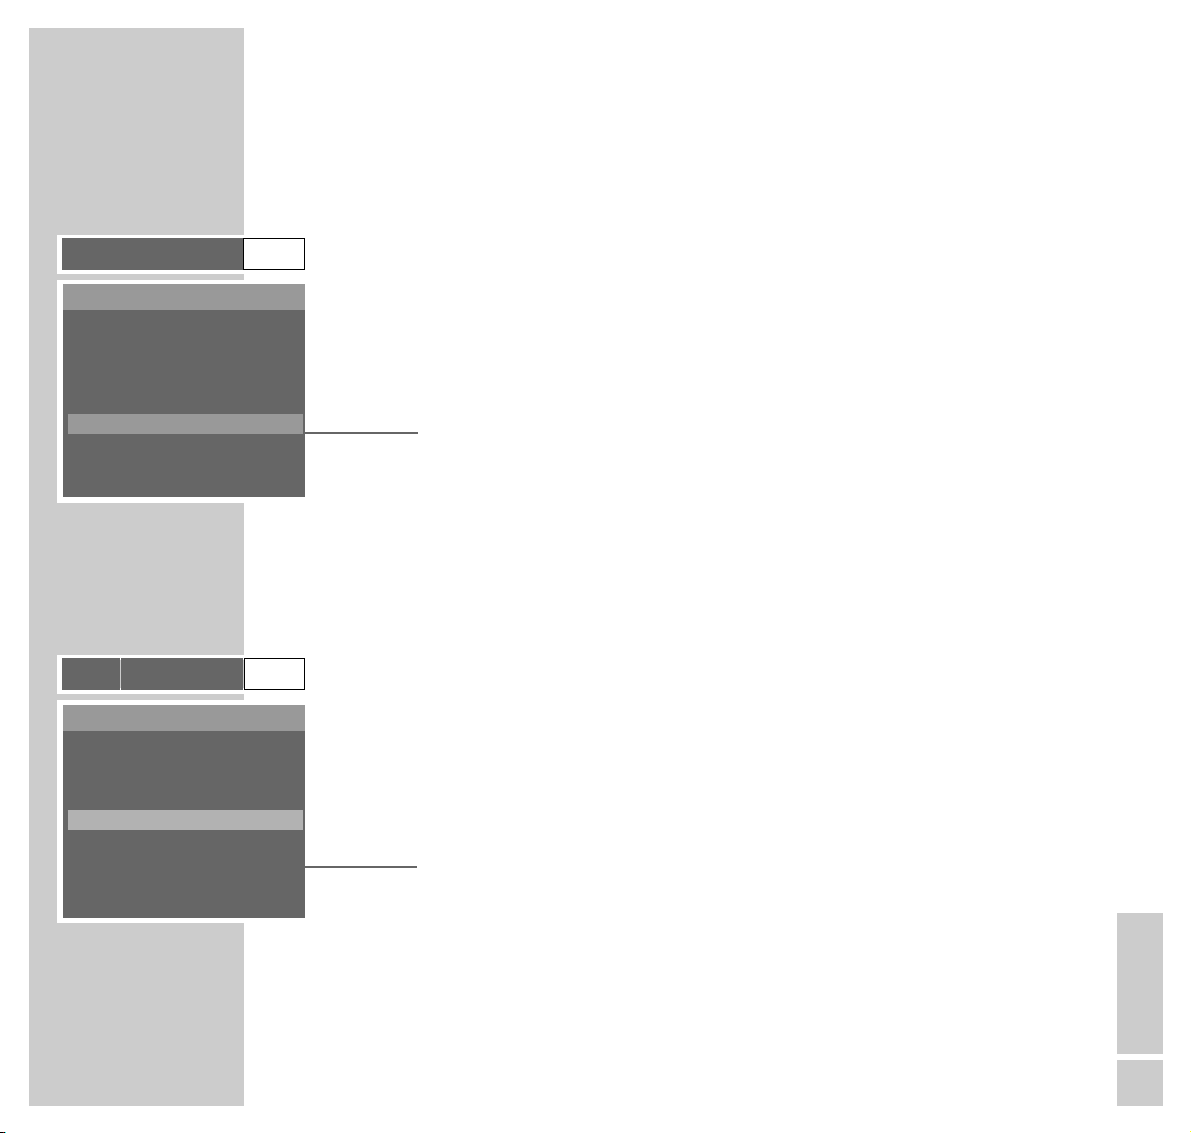
SETTINGS
______________________________________________________________________________
PICTURE
CONTRAST
BRIGHTNESS
SHARPNESS
COLOR
PICTURE
z
F
M
L
Page 9
ENGLISH
9
Selecting the language
For the TV set, you can select between several dialogue languages.
1 After switching on the TV set, call up the menu with »i«.
2 Select menu item »L« with »Ƿ « and call up with »OK«.
3 Select the »LANGUAGE« line with »P–« and call up with »OK«.
4 Select the language required with »Ƿ « or »Ǹ «.
Setting TV channels automatically
The TV set is fitted with an automatic channel position search.
You start the search and can then sort the television channels in an order of your
choice.
There are 99 channel positions available, which can be assigned to television
channels from the aerial or from the cable connection as desired.
1 Call up the menu with »i«.
2 Select menu item »L« with »Ƿ « and confirmd with »OK«.
3 Select »TUNING« with »P–« and confirm with »OK«.
SETTINGS
______________________________________________________________________________
TRACKING
INFORMATION
TUNING
LANGUAGE
z
F
M
L
FUNCTION
TRACKING
INFORMATION
TUNING
LANGUAGE
z
F
M
L
FUNCTION
Page 10

10
4 Select »AUTO TUNING« with »P–« and confirm with »OK«.
5 Select standard »PAL/SECAM« or »SECAM L« with »P–« and confirm with
»OK«.
– The »AUTO TUNING« menu appears on the screen and the search is started.
– Depending on the number of channels received, the search may take
one minute or longer.
– Following the search, the TV set will switch to channel position 1 and the
»SORT« menu appears on the screen.
Sorting TV channels
1 Select the channel required in the »FROM« line with »Ǹ « or » Ƿ «.
2 Select »TO« mit »P–« and select the required channel position for the chan-
nel with »Ǹ « or »Ƿ«.
3 Select »STORE« with »P–« and saved the channel position with »Ǹ« or »Ƿ «.
Notes:
– To sort additional TV channels, repeat steps 1 to 3.
– If no operating command is received by the TV set, the menu disappears
after approx. 25 seconds. The »SORT« menu can then be called up again
manually. To do this, press »i «, select » TUNING« with »P–« and call up
»SORT« with »OK«.
4 Finish the setting, by repeatedly pressing »i« until the menu disappears.
SETTINGS
____________________________________________________________________________________
SORT
AUTO-TUNING
MANUAL TUNING
FINE TUNING
CH SKIP
TUNING
FROM : 1
TO : 1
STORE :
ǸǷ
: CH SELECT
SORT
AUTO-TUNING
PAL/SECAM
VHF-L
MENU : STOP
Ǹ
Ƿ
Page 11

ENGLISH
11
SETTINGS
____________________________________________________________________________________
Picture settings
Setting contrast, brightness, sharpness and color
1 Call up the menu with »i«.
2 Select menu item »z « with » Ƿ « and call up with »OK«.
– The »Picture« menu appears.
3 Select the »CONTRAST«, »BRIGHTNESS«, »SHARPNESS« or »COLOR« line
with »P–« or »P+« and call up with »OK«.
4 Set the required value with »Ǹ « or »Ƿ «.
5 Finish the setting by repeatedly pressing »i« until the menu disappears.
Note:
This manual setting corresponds to the »USER« setting and can be called up
with »z« (see page 15).
CONTRAST
BRIGHTNESS
SHARPNESS
COLOR
PICTURE
BRIGHTNESS 23
❚
Ǹ
Ƿ
Page 12

12
SETTINGS
____________________________________________________________________________________
Sound settings
Changing treble, bass and balance
1 Call up the menu with »i«.
2 Select menu item »F« with »Ƿ « and call up with »OK«.
– The »SOUND« menu appears.
3 Select the line »TREBLE«, »BASS«, or »BALANCE« with »P–« or »P+« and
call up with »OK«.
4 Set the required value with »Ǹ « or »Ƿ «.
5 Finish the setting by repeatedly pressing »i« until the menu disappears.
Note:
This manual sound setting corresponds to the »USER« setting and can be call
up with »F« (see page 14).
TREBLE
BASS
BALANCE
S.MODE
SOUND
BASS 23
❚
Ǹ
Ƿ
Page 13

ENGLISH
13
TELEVISION MODE
_______________________________________________________
Switching on/off
1 Switch on the TV set with »
ǼǼ
« »1…0« or »P–«, » P+« on the remote con-
trol, or with »ǼǼ«, »– P +« on the TV set.
2 Switch off the TV set with »
ǼǼ
« on the TV set, or the remote control (standby).
Note:
To disconnect the TV set from the power supply completely, the power unit
plug must be pulled out.
Selecting channel positions
1 Select channel positions directly with »1…0«.
2 Select channel positions one by one with »P–« or »P+«.
Sound settings
Adjusting the volume
1 Adjust the volume with »Ǹ « or »Ƿ «.
Note:
Each adjusted value will be automatically stored.
Switching sound on/off
1 Switch sound on or off (mute) with »d«.
Tele Pilot 155 C
Audio
Subtitle
Angle
Return
TitleDisc Menu
VCR
DVD
SAT
wt
љ
AV
z
TXT
d
Page 14

14
TELEVISION MODE
____________________________________________________________________
Sound settings
You can select the »STANDARD«, »MUSIC«, »MOVIE«, »SPEECH« and
»CUSTOM« sound settings one by one.
»STANDARD«, »MUSIC«, »MOVIE« are “fixed” sound settings, which cannot
be changed. Select the appropriate sound setting for each TV programme.
1 Press »F« repeatedly until the required sound setting has been selected.
Stereo/mono
If the device receives two-channel transmissions – e.g. a film in the original on
sound channel B (display: »DUAL II«) and the dubbed version on sound channel A
(display: »DUAL I«) – you may then select the required sound channel.
If the set receives stereo or NICAM transmissions, it automatically switches to
stereo sound (display: »Stereo«).
If stereo sound reception quality is bad, you can switch the sound to »Mono«.
1 Call up the menu with »i«.
2 Select menu item »F« with » Ƿ « and call up with »OK«.
– The »SOUND« menu appears.
3 Select the »S.MODE« line with »P–« or »P+« and call up with »OK«.
4 Select the required sound type with »Ǹ « or »Ƿ «.
5 Finish the setting by repeatedly pressing »i« until the menu disappears.
S.MODE :FM STEREO
ǸǷ
: SELECT
TREBLE
BASS
BALANCE
S.MODE
SOUND
MUSIC
Page 15

ENGLISH
15
TELEVISION MODE
____________________________________________________________________
Surround sound
Improves the sound quality.
1 Switch »SURROUND« on or off with »K«.
»SURROUND ON« or » SURROUND OFF« appears on the screen.
Picture settings
You can select the »STANDARD«, »STRONG«, »MOVIE«, »SOFT« and
»CUSTOM« picture settings one after the other.
»STANDARD«, »STRONG«, »MOVIE« and »SOFT« are “fixed” picture settings,
the individual values of which (contrast, brightness, sharpness and colour) cannot be changed. Contrast and brightness settings are made in the factory by selecting these fixed picture settings.
1 Press »z « repeatedly until the required picture setting has been selected.
Zap function
You can use this function to switch between TV channels (zap).
1 Select your required TV channel with »1…0« or »P–« or »P+«.
2 You can switch to another channel with »1…0 « or » P–« or » P+«.
3 You can now switch (zap) between these two TV channels »z«.
SURROUND
OFF
MOVIE
Page 16

16
Tele Pilot 155 C
Audio
Subtitle
Angle
Return
TitleDisc Menu
VCR
DVD
SAT
wt
љ
AV
z
TXT
d
TELETEXT MODE
______________________________________________________________
TOP text or FLOF text mode
1 Switch to teletext with »TXT«.
An information line consisting of a red, green and channel dependent yellow
and blue lettering field is located at the bottom of the screen. The remote control has corresponding colour-coded buttons.
2 Flip back to a page with »
ǵ
« (red).
3 Flip to the next page with »
ǵ
« (green).
4 Select the required chapter with »
ǵ
« (yellow).
5 Select the required topic with »
ǵ
« (blue).
6 Switch off teletext with »
IJ
«.
Note:
Telext pages can also be selected directly with »1…0«.
Normal text mode
1 Switch to teletext with »TXT«.
2 Teletext pages can be selected directly with »1...0«.
3 Flip back to a page with »
ǵ
« (red).
4 Flip to the next available page with »
ǵ
« (green).
5 Switch off teletext with »
IJ
«.
Page 17

ENGLISH
17
Additional functions
Revealing an answer
Some teletext pages contain “hidden answers” or information. These can be
called up.
1 Fade in information »
Ƒ
«.
2 Fade out information with »
Ƒ
«.
Holding a page
A multi-page display can contain several sub-pages which are automatically
paged forward by the broadcasting station.
1 Hold the sub-page with »
ї
«.
2 Cancel the function with »
ї
«.
TELETEXT MODE
_________________________________________________________________________
Tele Pilot 155 C
Audio
Subtitle
Angle
Return
TitleDisc Menu
VCR
DVD
SAT
wt
љ
AV
z
TXT
d
Page 18

18
Automatic switch-off (SLEEP TIMER)
A switch off time can be entered for the TV set. The TV set switches itself off after
the set time has passed (max. 180 minutes).
1 Enter the switch off time, pressing »
O
« repeatedly until the switch off time
has been reached. The switch off time increases with each press of the button
as follows: 10 mins, 20 mins, 30 mins, 60 mins, 90 mins, 120 mins,
150 mins, 180 mins, off.
Childproof lock
You can block individual channel positions. The blocked channel positions can
then only be selected with »1…0« on the remote control.
If you keep your remote control in a place to which your children do not have
access, the channels can only be selected with »– P +« on the TV set. The
blocked channel positions are skipped over.
1 Call up the menu with »i«.
2 Select menu item »L« with »Ƿ « and confirm with »OK«.
3 Select »TUNING« with »P–« and confirm with »OK«.
4 Select »CH SKIP« with »P–« and confirm with »OK«.
5 Select the TV channel which is to be skipped with »P–« or » P+«.
6 Exclude the TV channel with »Ǹ «.
Note:
If you wish to include the TV channel again, repeat steps 1-5 and in step 6
press »Ƿ «.
The blocked channels can also be selected with »P–« or »P+« on the remote control.
CONVENIENCE FUNCTIONS
_________________________________
STANDBY
30
SORT
AUTO-TUNING
MANUAL TUNING
FINE TUNING
CH SKIP.
TUNING
CH SKIP
P1 ADDED
Ǹ
:
SKIPPEDǷ:
NO SKIP
PED
Page 19

ENGLISH
19
Decoder
A decoder is required if the TV set is to receive coded channels from private broadcasting companies.
Connection
1 Connect the »EURO-AV« socket of the TV set to the corresponding socket
on the decoder with a EURO-AV (Scart) cable.
Operation
1 Press »AV« repeatedly until »VIDEO« appears on the screen.
2 Select the channel position on which the encoded channel is stored.
3 Return to normal TV mode, pressing »AV« repeatedly until the channel
position appears on the screen.
VHS video recorder or satellite receiver
Connection
1 Connect the »EURO-AV« jack on the TV set and the corresponding jack of
a video recorder or satellite receiver with a EURO/AV (Scart) cable.
Operation
1 Press »AV« repeatedly until »VIDEO« appears on the screen. The image of
the video recorder or satellite receiver appears.
2 Return to normal TV mode, pressing »AV« repeatedly until only the
channel position appears on the screen.
OPERATION WITH EXTERNAL APPLIANCES
_____
VIDEO
P 2
P 2
VIDEO
P 2
OUTPUT
L -AUDIO- RVIDEO
INTPUT
S-VIDEO
HEAD PHONE
SCART
DC IN L -AUDIO- RVIDEO
PAY-TV
OUTPUT
L -AUDIO- RVIDEO
INTPUT
S-VIDEO
HEAD PHONE
SCART
DC IN L -AUDIO- RVIDEO
2 EXTERNAL / DEC. - AV 2
AUDIO
L
L
O
I
1 EXTERNAL / EURO - AV 1
U
N
T
R
R
ń
Page 20

20
VHS video recorder and satellite receiver
Connection
1 Connect the »EURO-AV« socket of the TV set to the corresponding socket
on the video recorder with a EURO-AV (Scart) cable.
2 Connect the »AV jack 2« on the video recorder and the corresponding VCR
jack on the satellite receiver with a EURO/AV cable.
Playback
1 Press »AV« repeatedly until »VIDEO« appears on the screen.
2 Select the satellite channel on the satellite receiver. The image of the satellite
receiver appears on the screen.
Start video recorder playback. The record image appears on the screen.
3 Return to normal TV mode, pressing »AV« repeatedly until only the
channel position appears on the screen.
Note:
Depending on the video recorder, it may be necessary to select channel
position AV 2 on the video recorder for satellite operation.
Recording
1 Select the »AV jack 2« on the video recorder.
2 Select the required satellite channel on the satellite receiver.
3 Start record on the video recorder.
4 Return to normal TV mode, pressing »AV« repeatedly until only the
channel position appears on the screen.
OPERATION WITH EXTERNAL APPLIANCES
_____
VIDEO
P 2
P 2
OUTPUT
L -AUDIO- RVIDEO
INTPUT
S-VIDEO
HEAD PHONE
SCART
DC IN L -AUDIO- RVIDEO
INPUT-SAT
950-2150 MHz
14/18 V 450 mA
2 EXTERNAL / DEC. - AV 2
AUDIO
L
L
O
I
1 EXTERNAL / EURO - AV 1
U
N
T
R
R
R
AUDIO OUT
L
ń
220-240 V
~
EURO AV VCREURO AV DECODEREURO AV TV
50-60 Hz
Page 21

ENGLISH
21
VHS video recorder or satellite receiver and
decoder
Connection
1 Connect the »EURO-AV« jack on the TV set and the corresponding jack on
a VHS video recorder or satellite receiver with a EURO/AV (Scart) cable.
2 Connect the decoder to the decoder jack of the video recorder or satellite
receiver with a EURO/AV (scart) cable.
Operation
1 Press »AV« repeatedly until »VIDEO« appears on the screen.
2 Select the channel position on the video recorder or satellite receiver on
which the encoded channel is stored.
3 Return to normal TV mode, pressing »AV« repeatedly until only the
channel position appears on the screen.
OPERATION WITH EXTERNAL DEVICES
________________________________
VIDEO
P 2
P 2
OUTPUT
L -AUDIO- RVIDEO
INTPUT
S-VIDEO
HEAD PHONE
SCART
DC IN L -AUDIO- RVIDEO
2 EXTERNAL / DEC. - AV 2
AUDIO
L
L
O
I
1 EXTERNAL / EURO - AV 1
U
N
T
R
R
PAY-TV
ń
Page 22

22
VHS video recorder and satellite receiver and
decoder
Connection
1 Connect the »EURO-AV« jack on the TV set and the corresponding jack on
a VHS video recorder with a EURO/AV (Euro-av) cable.
2 Connect the satellite receier to the »AV jack 2« on the video recorder with a
EURO/AV (Scart) cable.
3 Connect the decoder to the decoder jack of the satellite receiver with a
EURO/AV (Scart) cable.
Operation
1 Press »AV« repeatedly until »VIDEO« appears on the screen.
2 Select the satellite channel (including encoded channels) on the satellite
receiver. The image of the satellite receiver appears on the screen.
Start video recorder playback. The record image appears on the screen.
3 Return to normal TV mode, pressing »AV« repeatedly until the channel posi-
tion appears on the screen.
Note:
– Depending on the video recorder, it may be necessary to select channel
position AV 2 on the video recorder for satellite operation.
– The encoded satellite channel can be recorded on the video recorder. To do
this, see page 20 »Recording«.
OPERATION WITH EXTERNAL APPLIANCES
________________________
VIDEO
P 2
P 2
OUTPUT
L -AUDIO- RVIDEO
INTPUT
S-VIDEO
HEAD PHONE
SCART
DC IN L -AUDIO- RVIDEO
2 EXTERNAL / DEC. - AV 2
AUDIO
L
L
O
I
1 EXTERNAL / EURO - AV 1
U
N
T
R
R
R
INPUT-SAT
AUDIO OUT
950-2150 MHz
L
14/18 V 450 mA
PAY-TV
ń
220-240 V
~
EURO AV VCREURO AV DECODEREURO AV TV
50-60 Hz
Page 23

ENGLISH
23
SVHS video recorder or camera recorder
Connection
SVHS video recorder
1 Connect the »SVIDEO«, »IN L AUDIO R« and »OUT L AUDIO R«
jacks on the TV set and the corresponding jacks on a SVHS video recorder/camcorder with a cinch cable.
SVHS/VHS camcorder
1 Connect the »SVIDEO« (SVHS camcorder) or »IN VIDEO« (VHS camcor-
der) and the »IN L AUDIO R« jacks on the TV set and the corresponding
jacks on the camcorder with a cinch cable.
Operation
1 Start playback on the video recorder or camcorder.
2 Press »AV« repeatedly until »SVIDEO« or »VIDEO« appears on the screen.
– You will see and hear the picture and sound information from the video or
camcorder on the TV set.
3 Return to normal TV mode, pressing »AV« repeatedly until the
channel position appears on the screen.
Hifi system
The TV set can be connected to your hifi system.
1 Connect the hifi system to the cinch sockets »OUT L AUDIO R«.
OPERATION WITH EXTERNAL APPLIANCES
________________________
SVIDEO
P 2
OUTPUT
L -AUDIO- RVIDEO
INTPUT
S-VIDEO
HEAD PHONE
SCART
DC IN L -AUDIO- RVIDEO
OUTPUT
L -AUDIO- RVIDEO
INTPUT
S-VIDEO
HEAD PHONE
SCART
DC IN L -AUDIO- RVIDEO
2 EXTERNAL / DEC. - AV 2
AUDIO
L
L
O
I
1 EXTERNAL / EURO - AV 1
S–VIDEO
U
N
T
R
R
ń
Page 24

24
Power management
The monitor is equipped with a power management system. After a specific
period of time has passed without a signal, this system switches the screen to
standby. This is only possible with a graphic card which is compatible with the
VESA standard. The function must be activated in the operating system of the
computer.
If the computer monitor is switched to standby, the screen goes dark and the LED
display on the front side of the monitor blinks.
1 Switch the monitor back on from standby by moving the mouse or pressing
a key on the keyboard.
Note:
Before the monitor switches to standby, the message »INVALID MODE
CHECK CABLE or SIGNAL« appears.
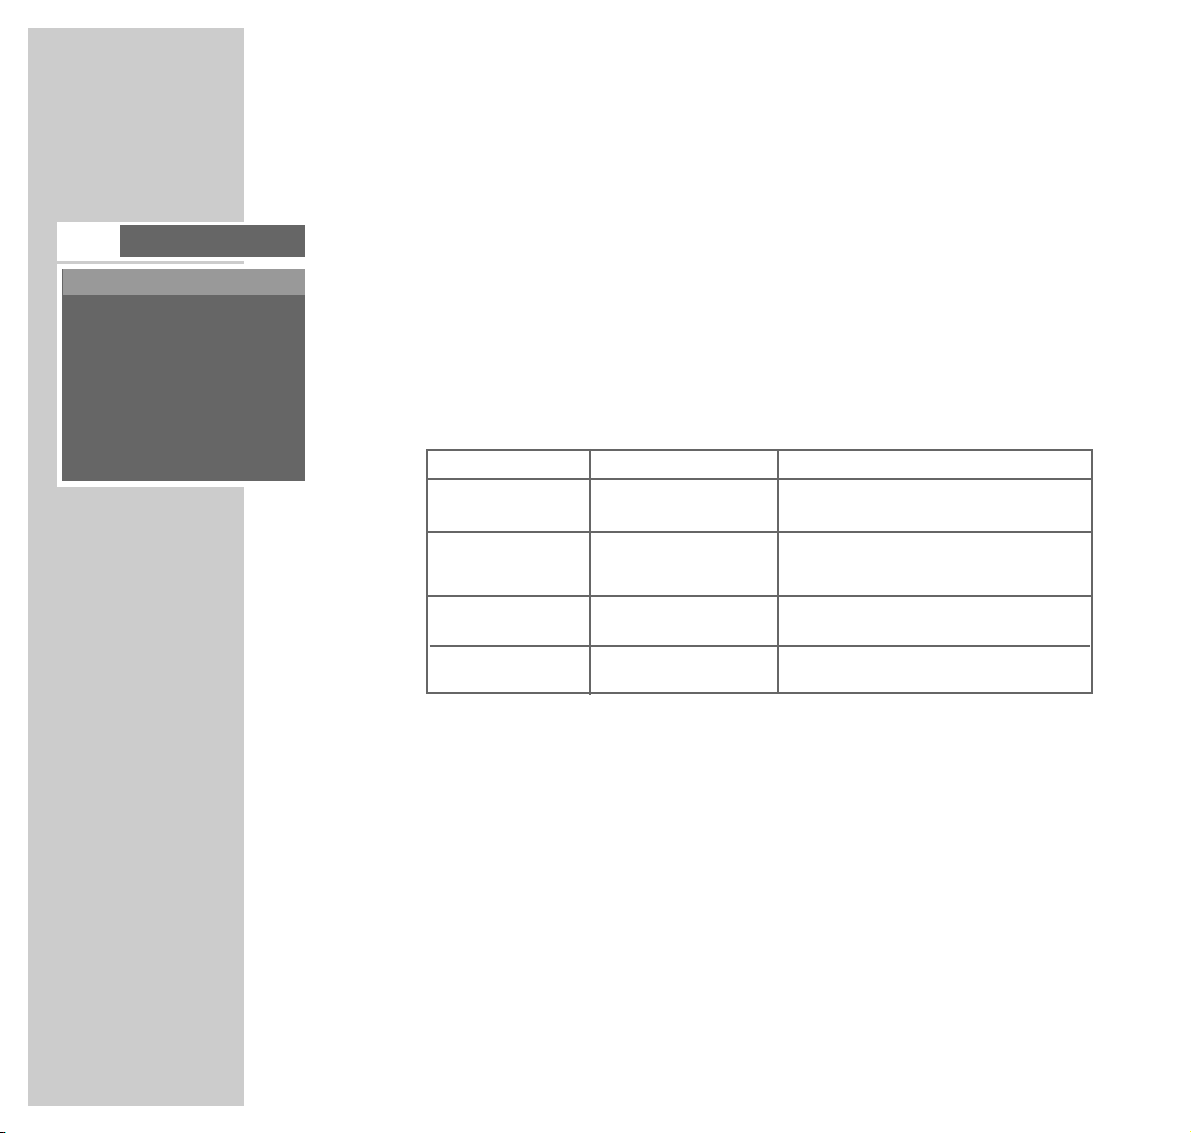
Picture repetition frequency and resolution
The monitor is suitable for use with the following picture repetition frequency
and resolution.
Note:
If an invalid picture repetition frequency has been set, the indication
»INVALID MODE« appears on the monitor.
OPERATION AS A PC MONITOR
_____________________
Graphic card Resolution Hor. frequency Vert. frequency Sync polarity
kHz Hz H/V
720 x 400 31,469 70,087 -/+
VGA
640 x 480 31,469 59,940 -/640 x 480 37,500 75,000 -/640 x 480 43,269 85,008 -/-
SVGA
800 x 600 46,875 75,000 +/+
800 x 600 53,674 85,061 +/+
1024 x 768 48,363 60,004 -/-
XGA 1024 x 768 60,023 75,029 +/+
1024 x 768 68,677 84,997 +/+
Page 25

ENGLISH
25
Connection
1 Connect the »VGA« jack and the PC monitor connection with a VGA cable.
2 Connect the »PC AUDIO IN« jack and the audio output of the PC with a
normal audio cable, available in most electrical stores.
Adjusting the picture geometry
1 Call up the menu with »i«.
2 Select menu item »M« with »Ƿ « and call up with »OK«.
3 Select »AUTOPOSITION« with »P–« and call up with »OK«.
The picture is automatically positioned correctly.
4 Finish the setting, by repeatedly pressing »i« until the menu disappears.
Note:
The position can also be set manually. To do this, select the »H. POSITION«
or »V. POSITION« line after point 2, call up with »OK« and correct the
position with »Ǹ « or »Ƿ «.
Setting the picture size and sharpness
1 Call up the menu with »i«.
2 Select menu item »L« with »Ƿ « and confirmd with »OK«.
3 Select »SETTING« with »P–« confirm with »OK«.
OPERATION AS A PC MONITOR
___________________________________________
H. POSITION
V. POSITION
AUTO POSITION
GEOMETRY
TRACKING
INFORMATION
TUNING
LANGUAGE
FUNCTION
Page 26

26
4 Select »AUTO TRACKING« with »P–« and confirm with »OK«.
The picture size and sharpness are set automatically.
5 Finish the setting by repeatedly pressing »i« until the menu disappears.
Note:
The setting can also be made manually. To do this, select the line »CLOCK«
(= horizontal picture size) or »PHASE« (= picture sharpness) after point 2,
call up with »OK« and correct the setting with » Ǹ « or »Ƿ «.
Setting brightness and contrast
1 Call up the menu with »i«.
2 Select menu item »z « with » Ƿ « and call up with »OK«.
– The »PICTURE« menu appears.
3 Select the »CONTRAST«, »BRIGHTNESS«, or »COLOUR TEMPERAT« line
with »P–« or »P+« and call up with »OK«.
4 Set the required value with »Ǹ « or »Ƿ «.
OPERATION AS A PC MONITOR
___________________________________________
CONTRAST
BRIGHTNESS
COLOR TEMPERAT
PICTURE
AUTO-TRACKING
CLOCK
PHASE
TRACKING
Page 27

ENGLISH
27
Setting the colour temperature
1 Call up the menu with »i«.
2 Select menu item »z« with »Ƿ « and call up with »OK«.
– The »PICTURE« menu appears.
3 Select »COLOUR TEMPERAT« with »P–« or »P+« and call up with »OK«.
The colour temperature can be set by calling up fixed values or by setting
manually.
Select the fixed colour temperature settings
1 Select the »9300 K«, »STANDARD«, or
»6500 K« setting with »Ǹ « or »Ƿ « 9300 K = blue picture, STANDARD =
standard setting, 6500 K = red picture).
Setting the colour temperature manually
1 Select the »USER« setting with »Ǹ « or »Ƿ «.
2 Call up the menu with »i«.
3 Select the colour to be modified with »P–«, modify with »Ǹ « or »Ƿ « and
confirm with »i«. Repeat the setting for all colours.
Note:
The modified values can be set back again with »RESET«.
OPERATION AS A PC MONITOR
____________________________________________
MODE :STANDARD
PICTURE
CONTRAST
BRIGHTNESS
COLOR TEMPERAT
PICTURE
MODE: USER
RED GAIN
BLUE GAIN
GREEN GAIN
RED BIAS
BLUE BIAS
GREEN BIAS
RESET
COLOR TEMPERAT
Page 28

28
Setting TV channels manually
1 Call up the menu with »i«.
2 Select menu item »L« with »Ƿ « and confirmd with »OK«.
3 Select »TUNING « with »P–« and confirm with »OK«.
4 Select »MANUAL TUNING« with »P–« and confirm with »OK«.
The »MANUAL TUNING« menu appears.
5 Select the required colour standard norm »AUTO«, »PAL« or »SECAM«
with »P–«.
6 Select the required audio standard »BG«, »DK«, »I« or »L« with »P–«.
7 Start the channel search with »Ǹ « or » Ƿ «.
– The »MANUAL TUNING« menu appears and the search is started.
– If a TV channel is found, the »MANUAL TUNING« menu appears. If the TV
channel is correct, continue with point 8. If it is not the correct channel,
start the search again.
8 Select »PROG. NO« with »P–« and enter the channel position required
with »Ǹ « or »Ƿ «.
9 Save the channel position, selecting »STORE« with »P–« and saving the TV
channel with »Ǹ « or »Ƿ «.
10 Finish the setting, pressing »i« repeatedly until the menu disappears.
SPECIAL FUNCTIONS
__________________________________________________
MANUAL TUNING
P 1 UPWARDS
VHF-L
ǸǷ
: TUNING
Ǹ
Ƿ
COLOR : AUTO
SOUND : BG
SEARCH : -/+
PROG. NO. : P 1
STORE :
ǸǷ
: SELECT
MANUAL TUNING
COLOR : AUTO
SOUND : BG
SEARCH : -/+
PROG. NO. : P 1
STORE :
ǸǷ
: SELECT
MANUAL TUNING
Page 29

ENGLISH
29
Fine-tuning TV channels
1 Select the TV channel for which you wish to change the fine-tuning.
2 Call up the menu with »i«.
3 Select menu item »L« with »Ƿ « and confirm with »OK«.
4 Select »TUNING« with »P–« and confirm with »OK«.
5 Select »FINE TUNING« with »P–« and confirm with »OK«.
– The »FINE TUNING« menu appears.
6 Call up the menu with »i«.
7 Fine-tune the TV channel with »Ǹ « or »Ƿ «.
8 Finish the setting, pressing »i« repeatedly until the menu disappears.
Information about the set channel position
1 Call up the menu with »i«.
2 Select menu item »L« with »Ƿ « and confirm with »OK«.
3 Select »INFORMATION« with »P–« confirm with »OK«.
The information regarding the channel position is shown on the screen
(For the »PC« channel position, the set screen resolution).
SPECIAL FUNCTIONS
________________________________________________________________
SORT
AUTO-TUNING
MANUAL TUNING
FINE TUNING
CH SKIP
TUNING
FINE TUNING
P 1
VHF-L
ǸǷ
: TUNING
Ǹ
Ƿ
INFORMATION
1024X768 48,4 KX60.0 HZ
Page 30

30
CUSTOMER INFORMATION
__________________________________
Technical data
Service notes for the authorised dealer:
The TV set may only be operated using the mains unit supplied.
The product conforms to the following RU guidelines:
73/23/EEC guideline on electrical equipment for use within certain voltage limits. 89/336/EEC
guideline on electromagnetic compatibility.
This appliance complies with standards: EN 60065, EN 55013, EN 55020
Contact assignment EURO-AV socket 1
Pin Signal Pin Signal
11 = Audio output right 12 = –
12 = Audio input right 13 = Red earth
13 = Audio output left 14 = Earth
14 = Audio earth 15 = RGB red input (S-Video = Chroma)
15 = Blue earth 16 = RGB switching voltage
16 = Audio input left 17 = Video earth
17 = RGB blue input 18 = RGB switching voltage earth
18 = Switching voltage 19 = Video output
19 = Green earth 20 = Video input (S-Video = Luminanz)
10 = – 21 = Screen/earth
11 = RGB green input
Operating power: DC 12 V, 5 A with 100 –
265 V network adapter,
5 A, 50/60 Hz,
Power requirement: in operation 30 W, on
standby approx. 3 W
Final sound stage: 2 x 1.5 Watt music
(2 x 1 Watt sine)
Frequency areas: C01 … C99,
special channels S01 … S41
Screen size: 307.2 mm x 230.4 mm
Pixel distance: 0.3 mm x 0.3 mm
Angle of view: 120° hor./90° vert.
Contrast relation: 350:1
Brightness: 400cd/ß≥
Max. resolution: XGA 1024 x 768 (@85 Hz)
Hor. frequency: 31~69 kHz
Vert. frequency: 56~85 Hz
21
220
119
Page 31

ENGLISH
31
CORRECTING PROBLEMS YOURSELF
____________
If the remedies below do not lead to a good result, contact an authorised GRUNDIG
dealer.
Please consider that problems can also be caused by external appliances, such as video
recorders and satellite receivers.
Error Possible cause Remedy
Bright picture (disturbance) Aerial cable Aerial cable connected?
but no channel visible Check aerial cable?
Poor picture contrast Picture settings repositioned Adjust settings for brightness,
contrast or color
Problem is with the transmitter Test another channel
No color Color intensity set to mininum Raise the color setting
TV standard setting Select the correct color standard
(if setting options available)
Problem is with the transmitter Test another channel
Wrong colors, colored flecks Strong magnetic field from Increase the distance between the
speakers or similar speakers and the TV set
and if colored spots remain,
turn the TV set off at the mains
and turn on again in 10 minutes
Earth magnetic field error Change appliance position
Unclear sound Sound setting Correct the sound setting
Ghosting, reflection Channel setting Automatic or manual
channel setting/fine tuning
Aerial Have aerial cable or aerial
system checked
Poor picture, poor sound Picture and sound values Picture and sound settings
repositioned
Page 32

32
CORRECTING PROBLEMS YOURSELF
____________________________________
Error Possible cause Remedy
Picture visible, no sound Volume is at minimum or speaker Increase/switch on volume
has been switched off
Problem is with the transmitter Test another channel
Picture visible, no sound The TV channel has no VT Test another channel
or aerial system changing the ghost image or
reflection or fine tuning
Transmission signal too weak Check aerial system
(grainy picture)
Remote control not working No optical connection Direct remote control at the TV set
Remote control batteries
Check or replace batteries,
noting polarity
When switching to PC mode, VGA cable not connected, Connect VGA cable or switch
the message »CABLE« or »CHECK or PC not switched on on PC
SIGNAL« appears
No picture in PC mode, LED blinks The monitor was switched to Move the mouse on the PC or
standby by the PC press a key on the keyboard
In PC mode, the picture is not Resolution or picture repetition Set the resolution and picture
stable and flickers requency incorrectly set on the PC repetition frequency/on the PC.
No sound in PC mode PC audio cable not connected, Connect the audio cable;
volume on PC not set set the volume on the PC
Grundig AG • Beuthener Str. 41 • D-90471 Nürnberg • http://www.grundig.com
 Loading...