

Page 1

FINE ARTS VISION TABLE
MFW 82- 725/9 DVD
DEUTSCH
ENGLISH
22294-941.0100
Page 2

ENGLISH
1
INTRODUCTION
______________________________________________________________
Dear customer,
In order to make it easier for you to use your television, we have divided the operating manual
into different sections.
The symbols on the page edges of the operating manual will direct you to the appropriate
chapter.
Television mode
This section explains the operation of the television set.
Start at page 6 of the operating manual.
DVD mode
This section explains how to operate the DVD player.
Start at page 37 of the operating manual.
/
Page 3

2
CONTENTS
__________________________________________________________________________
Television mode
6 Packing contents
7 Special features
8 Set-up and safety
10 Preparation
The back of the TV set
Fitting the glass pane and the control unit cover
Putting batteries into the remote control
14 Overview
The front of the television set
The connections on the back of the television
The remote control
19 Easy Dialog System
The Easy Dialog System
20 Settings
Setting television channels
21 Additional functions
Zap function
sound selection
Alphanumeric channel selection (letter entry)
Remote controlling additional devices
Page 4

ENGLISH
3
CONTENTS
__________________________________________________________________________
24 Connecting loudspeakers
Dolby Surround ProLogic, Dolby Digital
Connecting external loudspeakers
Loudspeaker and Dolby configuration
30 Operation with External Equipment
Connecting AV devices (video recorder, decoder etc.)
Connecting a computer (VGA)
32 Information
Technical data, general instructions for laser devices
Service information for dealers
contact assignments of EURO-AV socket 1
Rectifying minor problems
Page 5

4
CONTENTS
__________________________________________________________________________
DVD-Player
37 The DVD player
Special features
Cleaning DVDs and CDs
38 Overview
The remote control
40 DVD/VIDEO CD playback
DVD and video CD features, special DVD features
Before playback
Playback
Removing the DVD/video CD
Switching back to television mode
Additional playback functions
Selecting and playing scenes
49 MP3 CD playback
MP3 CD features
Before playback
Playback
Removing an MP3 CD
Switching back to television mode
52 Audio CD playback
Audio CD features
Before playback
Playback
Removing an audio CD
Switching back to television mode
/
Page 6

ENGLISH
5
CUSTOMER INFORMATION
__________________________________
Additional Information for Units sold in Great Britain
Units sold in GB are suitable for operation from a 240 V AC, 50 Hz mains supply.
In case this appliance is supplied with a Safety Standard Approved mains lead
fitted with a non-rewireable 13 Amp mains plug which, if unsuitable for your
socket, should be cut off and an appropriate plug fitted by a qualified electrician. The fuse and fuse holder must be removed from the plug as accidental insertion of the redundant plug into a 13 Amp socket is likely to cause an electrical hazard.
Note:
The severed plug must be destroyed to avoid a possible shock hazard should it
be inserted into a 13 Amp socket elsewhere.
If it is necessary to change the fuse in the non-rewireable plug, the correct type
and rating (5 Amp ASTA or BSI approved BS 1362) must be used and the fuse
cover must be refitted. If the fuse cover is lost or damaged the lead and plug
must not be used until a replacement is obtained. Replacement fuse covers
should be obtained from your dealer.
If a non-rewireable plug or a rewireable 13 Amp (BS 1363) plug is used, it must
be fitted with a 5 Amp ASTA or BSI approved BS 1362 fuse. If any other type of
plug is used it must be protected by a 5 Amp fuse either in the plug or at the distribution board.
Important:
The wires in the mains lead are coloured in accordance with the following code:
BLUE – NEUTRAL
BROWN – LIVE
As the colours of the wires in the mains lead of your appliance may not correspond with the
coloured marking identifying the terminals in your plug, proceed as follows:
Connect the BLUE coloured wire to plug terminal marked with the letter "N" or coloured black.
Connect the BROWN coloured wire to the plug terminal marked with a letter "L" or coloured
red.
In no circumstance must any of the wires be connected to the terminal marked with a letter "E",
earth symbol , coloured green or green and yellow.
Replacement mains lead can be obtained from your dealer.
Page 7
6
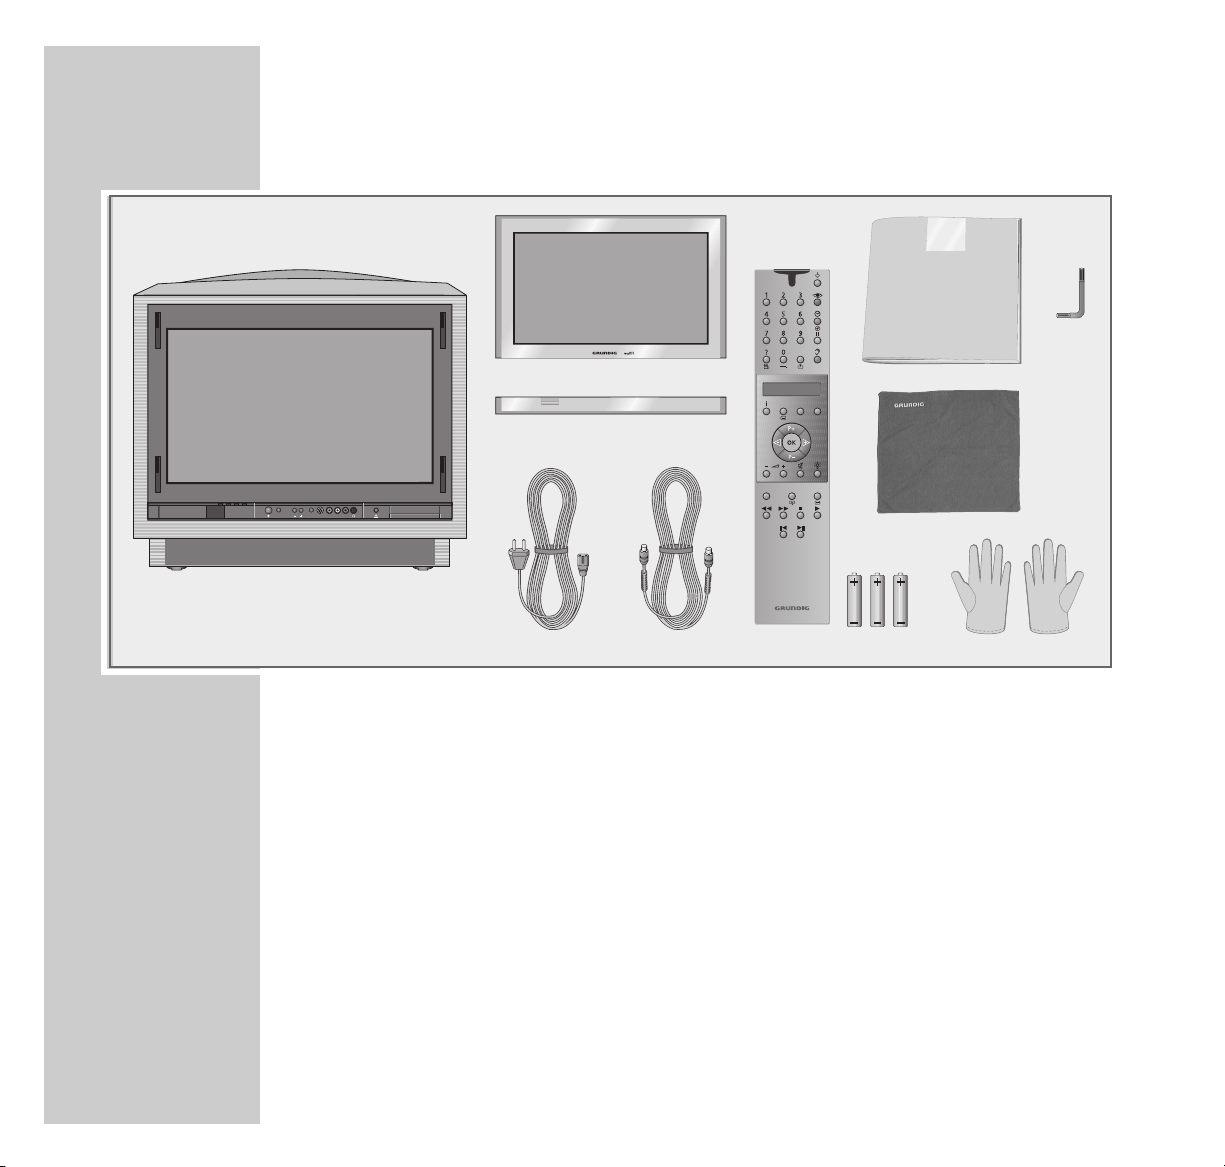
PACKING CONTENTS
_________________________________________________
1 TV set Fine Arts Vision
2 Glass pane and control unit cover
3 Mains cable
4 Aerial cable
5 Remote control Personal Remote 10
6 User manual
7 Cleaning cloth for glass pane
8 3 batteries, 1.5 V–, Micro type
9 1 pair of cloth gloves for mounting the glass pane
10
1 screwdriver
C
Bedienungsanleitung
MFW 82-725/9 DVD
COLOR TELEVISION
ǵ
Personal Remote 11
ModeTV +TXT
Menu
PIP Format Z
SP/LP Timer on/off
ABC DEF Title
GHI JKL MNO
PQRS TUV WXYZ
S-VHS
Video in
SliderMode
A
ud
io in
LR
1
2
3
8
4
5
9
10
7
6
Page 8

ENGLISH
7
SPECIAL FEATURES
_______________________________________________________
Technology
82 cm colour picture tube (visible picture 76 cm).
100 hertz technology.
GRUNDIG Megalogic
Megalogic options:
– Perfect communication with the megalogic video recorder. No troublesome
channel position alignment.
– Starting playback on the video recorder automatically selects the video chan-
nel position on the television.
Equipment
DVD player
VGA interface for connecting a computer
Dolby Digital (5.1)*
PIP - Picture in Picture
Megatext Level 2.5
TeleWeb
TV Guide
Easy Dialog System
Alphanumeric channel position selection
Retrofitting options
Internal satellite receiver (analog or digital)
* Under license from Dolby Laboratories Licensing Corporation.
DOLBY and the Double-D symbol ij are registered trademarks of the Dolby Laboratories Licensing Corporation.
Page 9
8
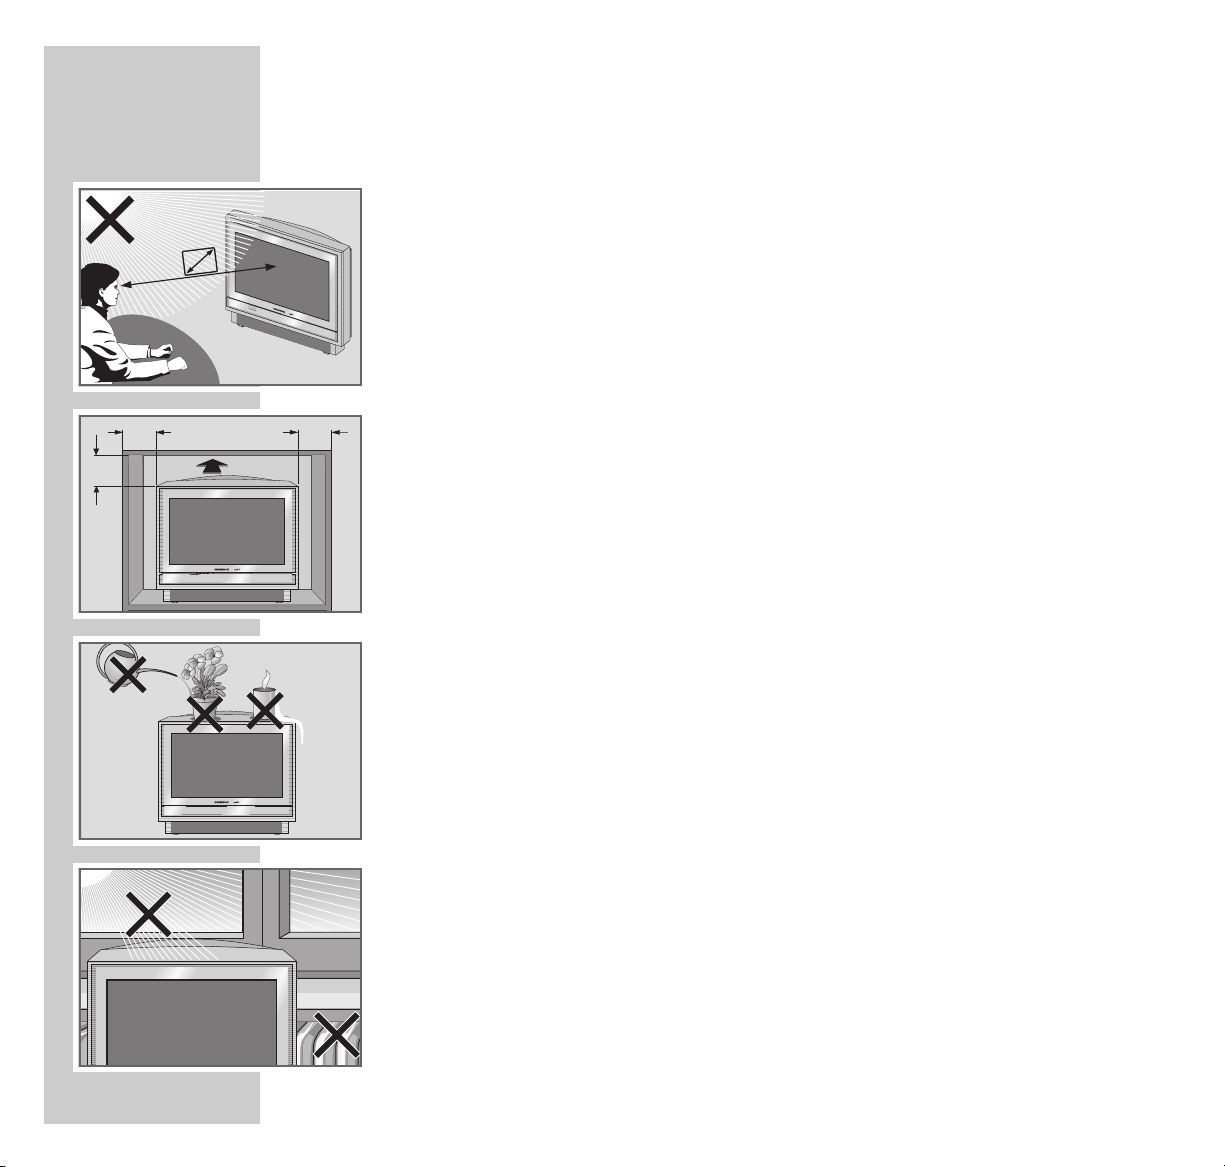
In order that this quality, easy-to-use television set continues to provide you with
satisfaction and entertainment, please observe the following when setting it up.
This television set is designed to receive and display video and audio signals.
Any other use is expressly prohibited.
The ideal viewing distance is 5 times the screen diagonal.
External light falling on the screen impairs picture quality.
Ensure sufficient clearance between the TV and the wall cabinet.
The television set is designed for use in dry rooms. If you do use it in the open,
please ensure that it is protected from moisture, such as rain or splashing water.
Do not expose the television set to any moisture.
Do not place any vessels such as vases on the television, as they may spill liquid,
thus presenting a safety risk.
Place the television set on a solid, level surface. Do not place any objects such as
newspapers on the television set or cloth or similar items beneath it.
Do not place the television set close to heating units or in direct sunlight. This will
impair cooling.
Heat build-up can be dangerous and shortens the operating life of the television
set. For reasons of safety, have a specialist remove any dirt deposits (dust) in the
set from time to time.
Keep the television set away from magnetic fields (loudspeaker boxes, for example).
10
cm
10
cm
20
cm
20 cm
S
-
V
H
S
V
id
e
o
i
n
S
l
i
d
e
r
V
o
l
u
m
e
P
r
o
g
r
a
m
A
u
d
i
o
i
n
LR
5 x
SET-UP AND SAFETY
___________________________________________________
Page 10
ENGLISH
9
SET-UP AND SAFETY
_________________________________________________________________
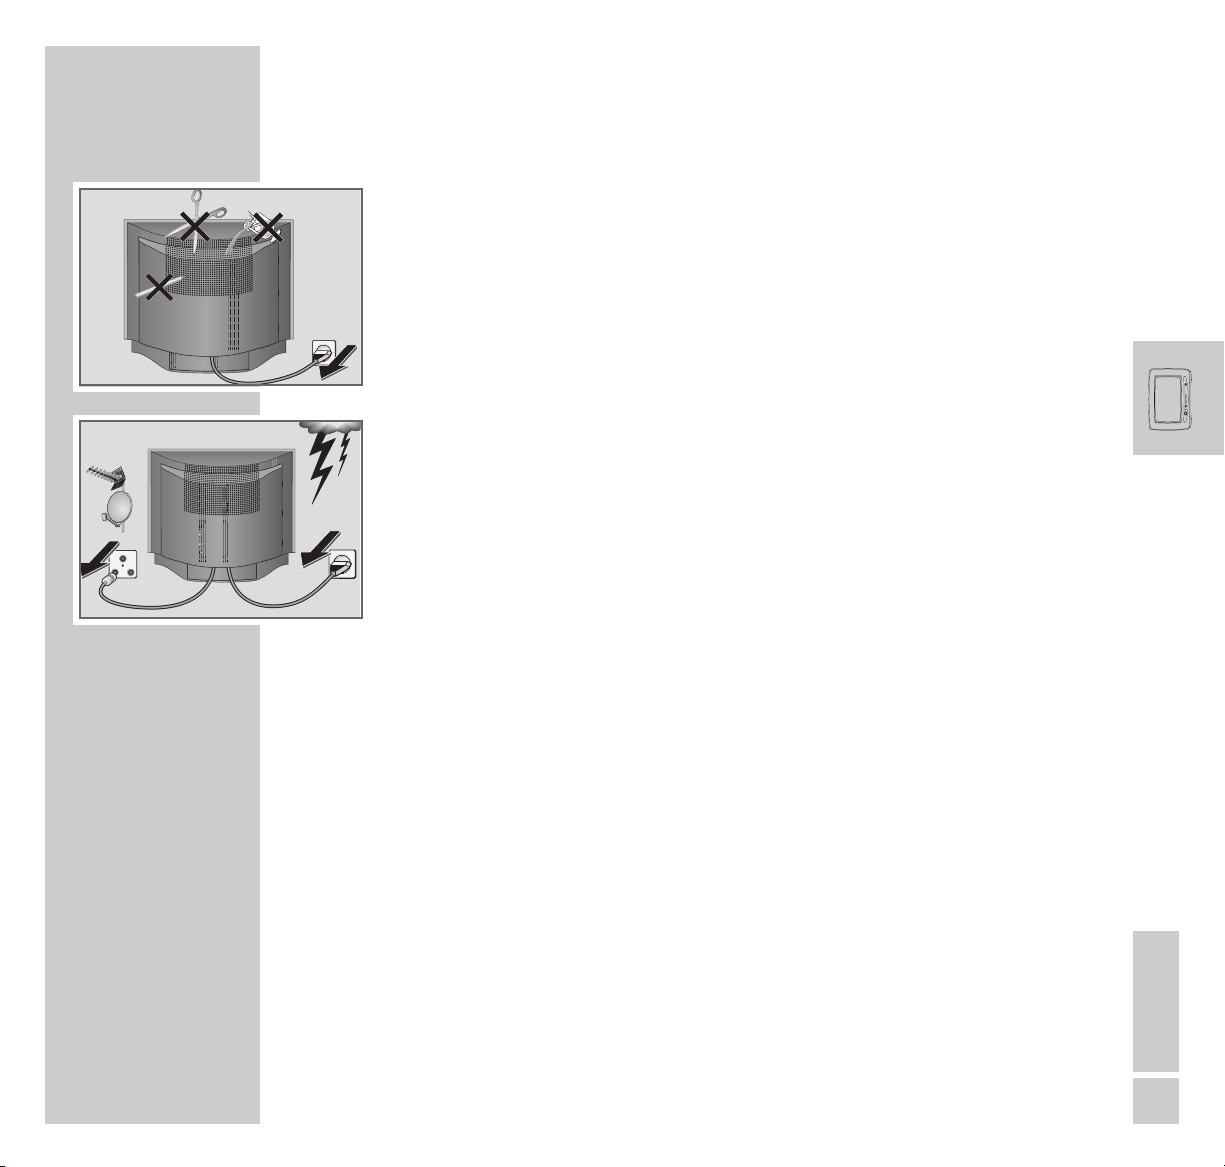
Do not open the television set under any circumstances. The manufacturer
accepts no liability for damage resulting from improper handling.
Ensure that the mains cable is not damaged.
Thunderstorms are a danger to all electrical devices. Even if the television set is
switched off, it can be damaged by a lightning strike to the mains or the antenna cable. Always disconnect the mains and antenna plugs during a storm.
Clean the screen with a soft, damp cloth. Only use plain water.
This television set successfully fuses technology and environmental friendliness
into a coherent package. Only ecologically compatible, high-quality materials
have been used. The packaging consists of almost 100% recycled paper and the
amount of plastic used has been reduced to a minimum. The batteries included
are free of mercury and cadmium. The range of materials used has been deliberately restricted and all the larger plastic parts have been labelled. This television set is easily disassembled to make servicing easier and optimise recycling.
AV2 AV1
AUDIO
L
R
SURR
AUDIO OUT
AV3
INT
CENTRE
EXT
INT
SUBW
EXT
AUDIO
SURR
EXTERN
CENTRE
SUBW
L
R
L
R
AUDIO IN
VGA
OUT
IN
Aux
TV
S-Video
Video outAudio out
Digital out
RL
optical coax
220-240V
~
50-60Hz
D-Sub
RS 232
12V 12V
! SERVICE !! SERVICE !! SERVICE !
TV R
SAT
AV2 AV 1
AUDIO
L
R
SURR
AUDIO OUT
AV3
INT
CENTRE
EXT
INT
SUBW
EXT
AUDIO
SURR
EXTERN
CENTRE
SUBW
L
R
L
R
AUDIO IN
VGA
OUT
IN
Aux
TV
S-Video
Video outAudio out
Digital out
RL
optical coax
220-240V
~
50-60Hz
D-Sub
RS 232
12V 12V
Page 11
10
PREPARATION
__________________________________________________________________
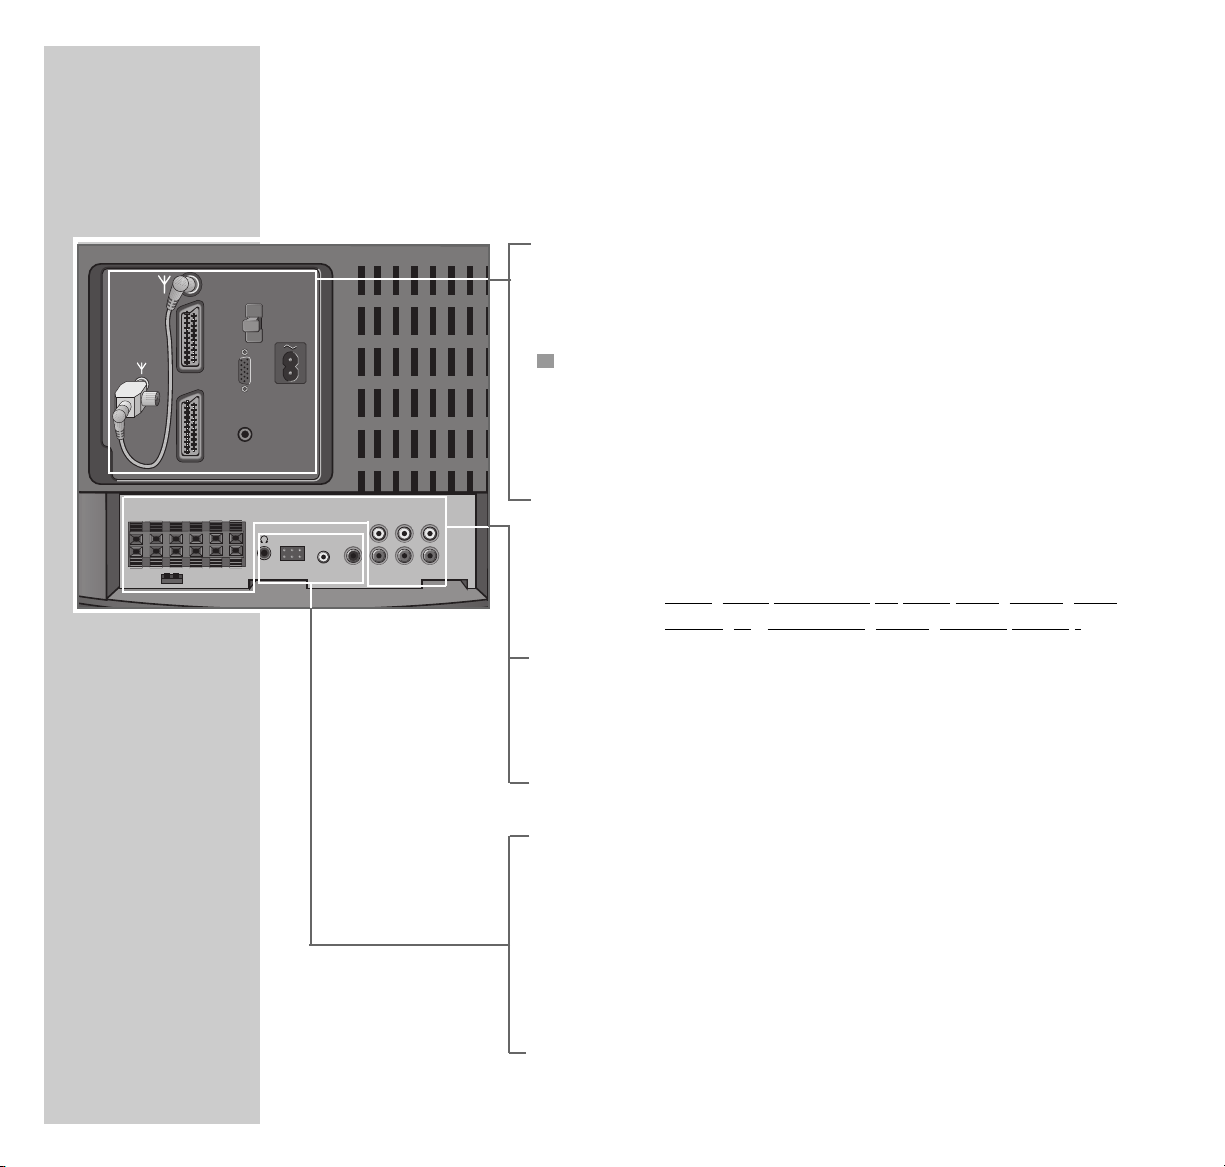
The back of the TV set
Removing the rear panel
In order to get access to the connecting sockets of the TV set, it is necessary to
remove the rear panel (see Figure).
1 Remove the rear panel by pulling it off in backward direction.
AV2 AV1
AUDIO
L
R
SURR
AUDIO OUT
AV3
INT
CENTRE
EXT
INT
SUBW
EXT
AUDIO
SURR
EXTERN
CENTRE
SUBW
L
R
L
R
AUDIO IN
VGA
OUT
IN
Aux
TV
S-Video
Video outAudio out
Digital out
RL
optical coax
220-240V
~
50-60Hz
D-Sub
RS 232
12V 12V
Page 12
ENGLISH
11
PREPARATION
____________________________________________________________________________
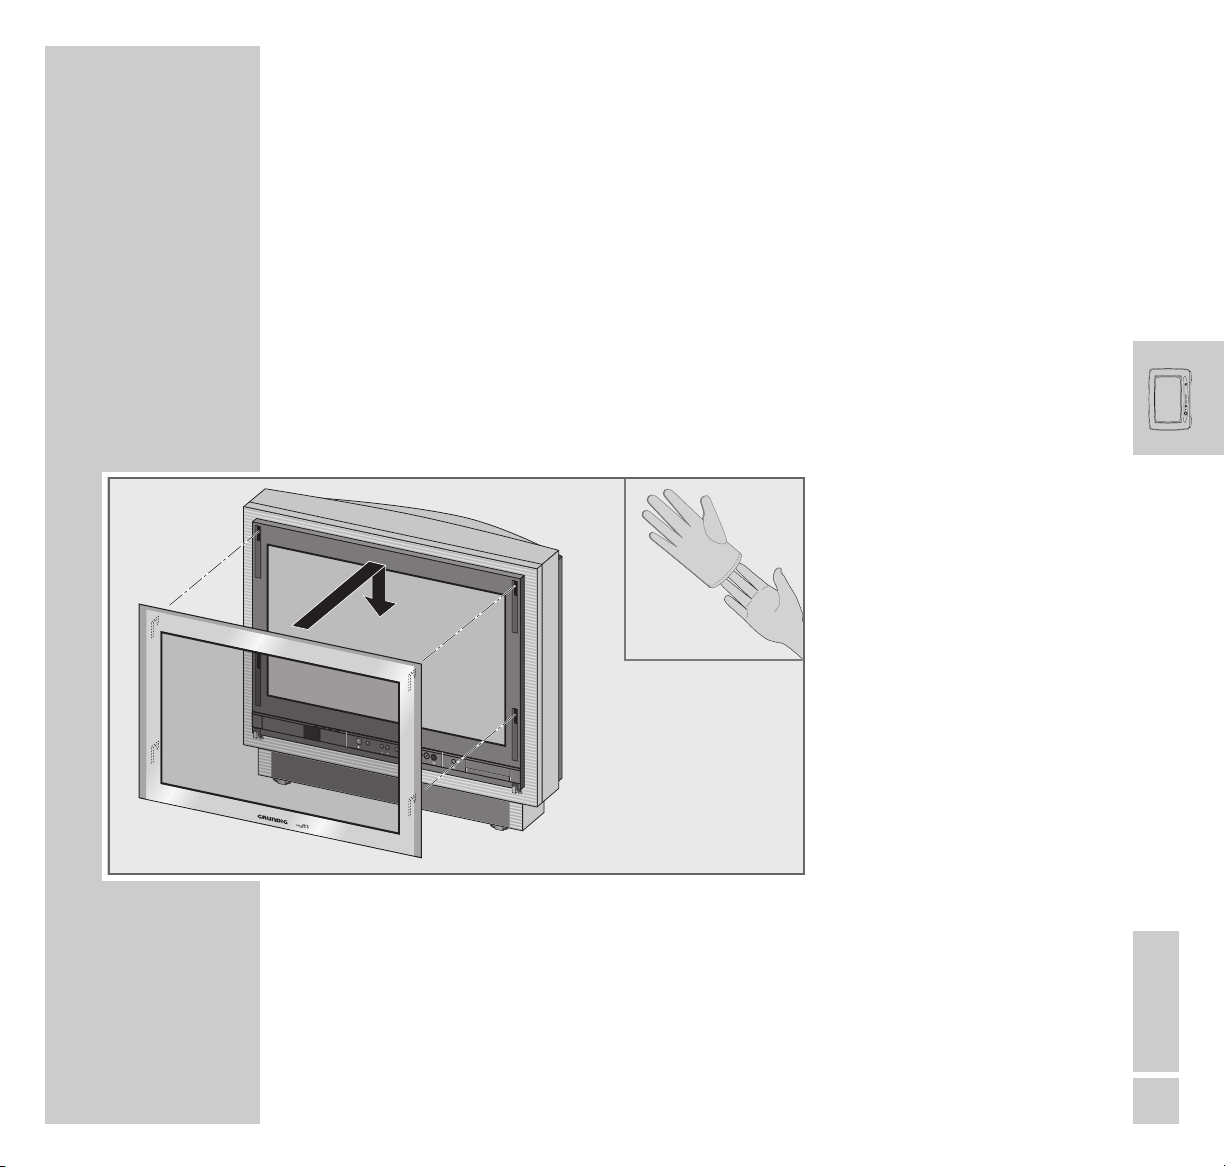
Fitting the glass pane and the control unit cover
Fitting the glass pane onto the picture tube
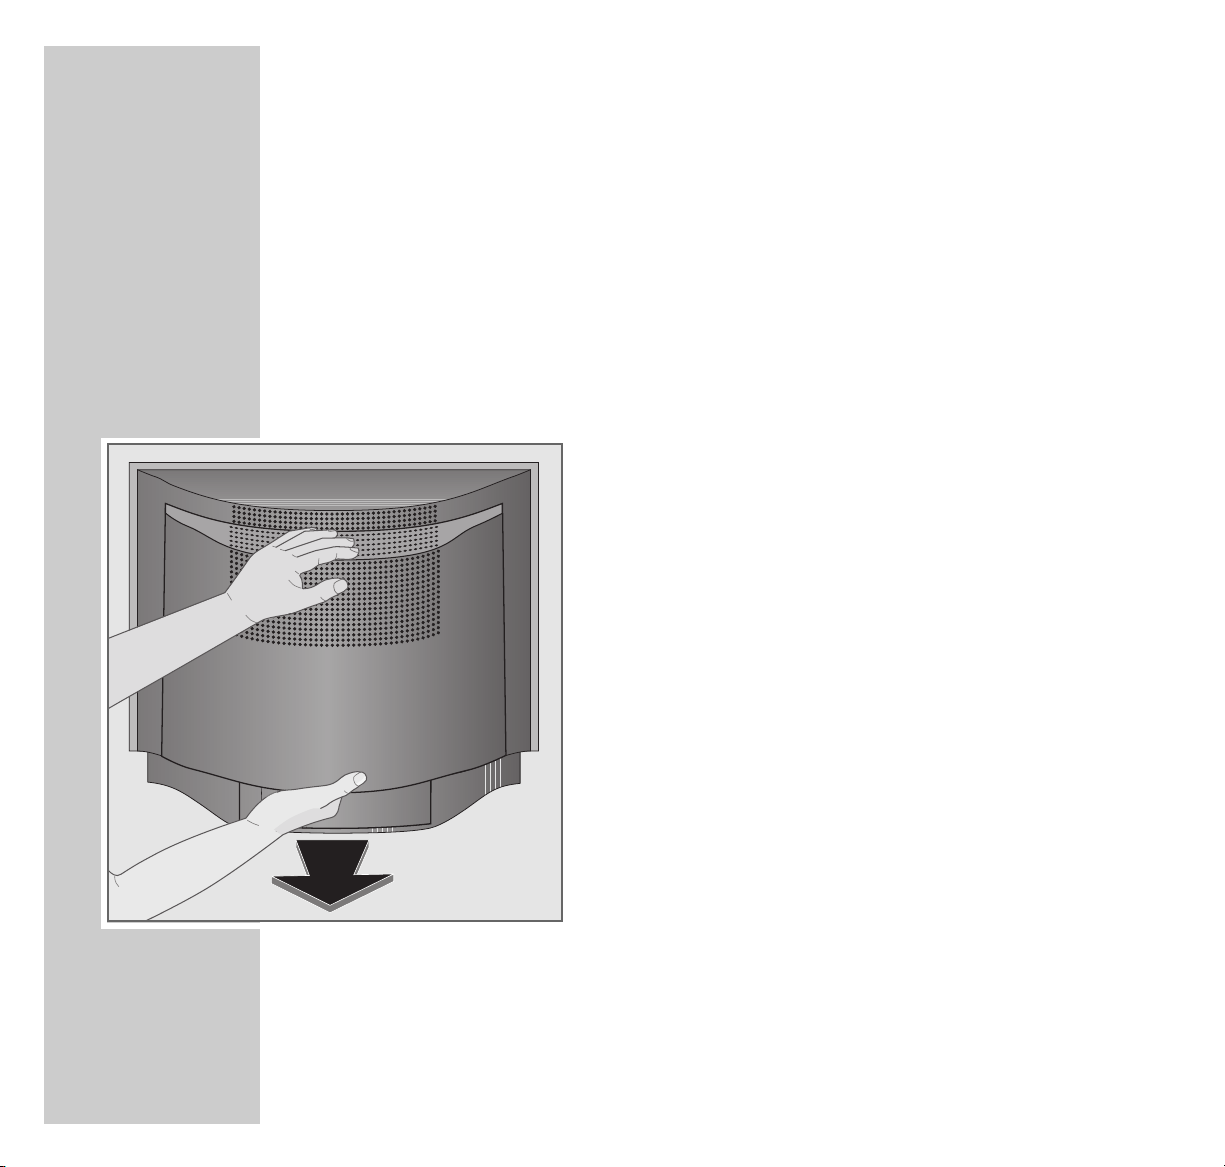
1 Pull on the cloth gloves supplied (this avoids fingerprints on the glass pane).
2 Insert the glass pane into the slots in the front frame then push it down until it
locks in place with an audible click.
S
l
i
d
e
r
M
o
d
e
M
o
d
e
S
l
i
d
e
r
S
-
V
H
S
V
i
d
e
o
i
n
LR
A
u
d
i
o
i
n
Page 13
12
PREPARATION
____________________________________________________________________________
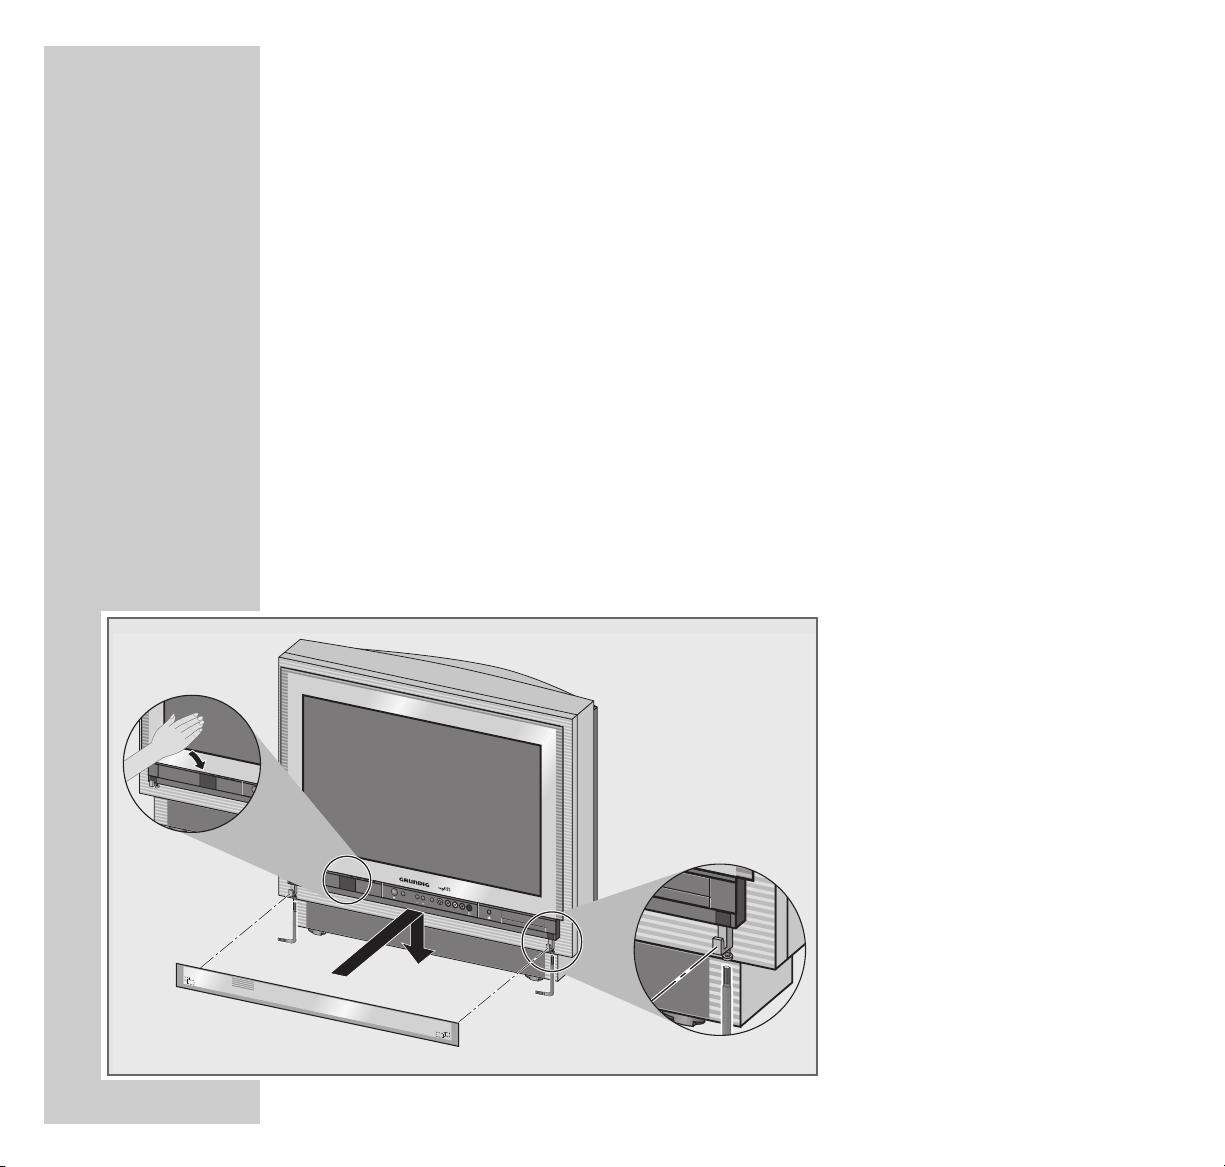
Installing the operating panel cover
1 Connect TV set to mains.
2 Let holding devices for the operating panel cover slide downwards,
approach sensor with hand to do so.
3 Press »Slider« button.
4 Insert operating panel cover into the holding devices on the TV set.
5 Press »Slider« button and wait until the operating panel cover moves to the
top.
6 Retirez la prise secteur ; placez le cache de protection de l’élément de com-
mande au même niveau que la glace et vissez.
7 Insert mains plug into the socket again.
M
o
d
e
S
l
i
d
e
r
S
V
H
S
V
i
d
e
o
i
n
LR
A
u
d
i
o
i
n
Page 14
ENGLISH
13
PREPARATION
____________________________________________________________________________
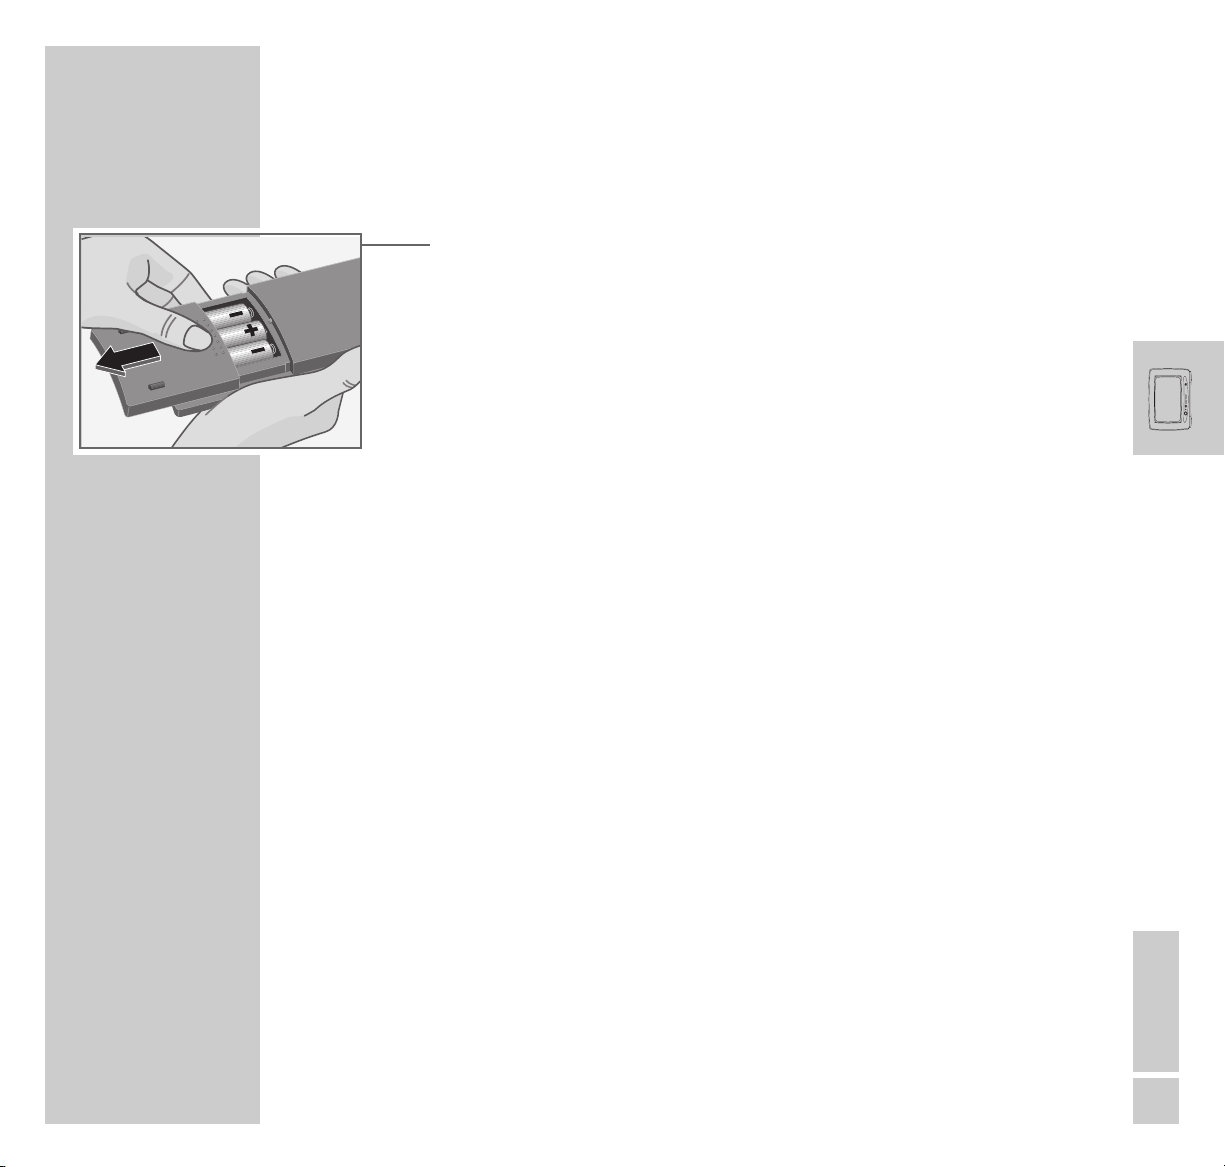
Putting batteries into the remote control
1 Open the batery compartment (pull off cover).
2 Insert the batteries (Micro type, e.g. R03P, 3 x1.5 V).
Observe the polarity when inserting the batteries.
Note:
If your TV set does not react to the remote control commands correctly, then
the batteries could be used up. Remove empty batteries. There is no
liability for damage caused by leaking batteries.
Environmental note:
The batteries – even those free of heavy metal – cannot be disposed of in
normal household rubbish. Used batteries must be disposed of in used
battery collection containers in businesses or be taken to public waste
disposal facilities.
Page 15
14
OVERVIEW
__________________________________________________________________________
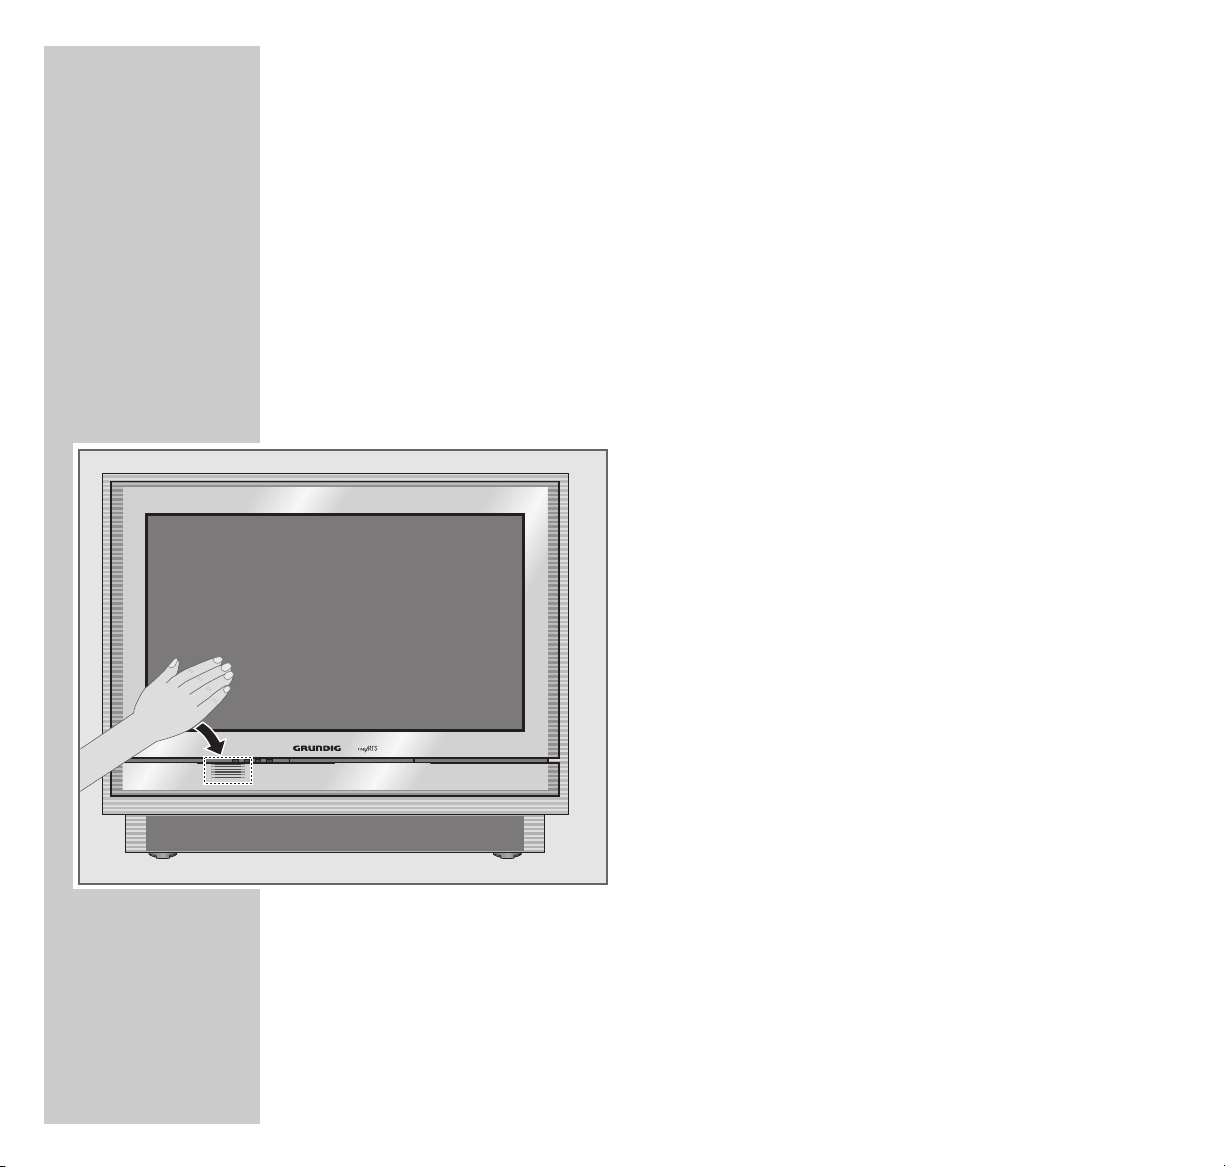
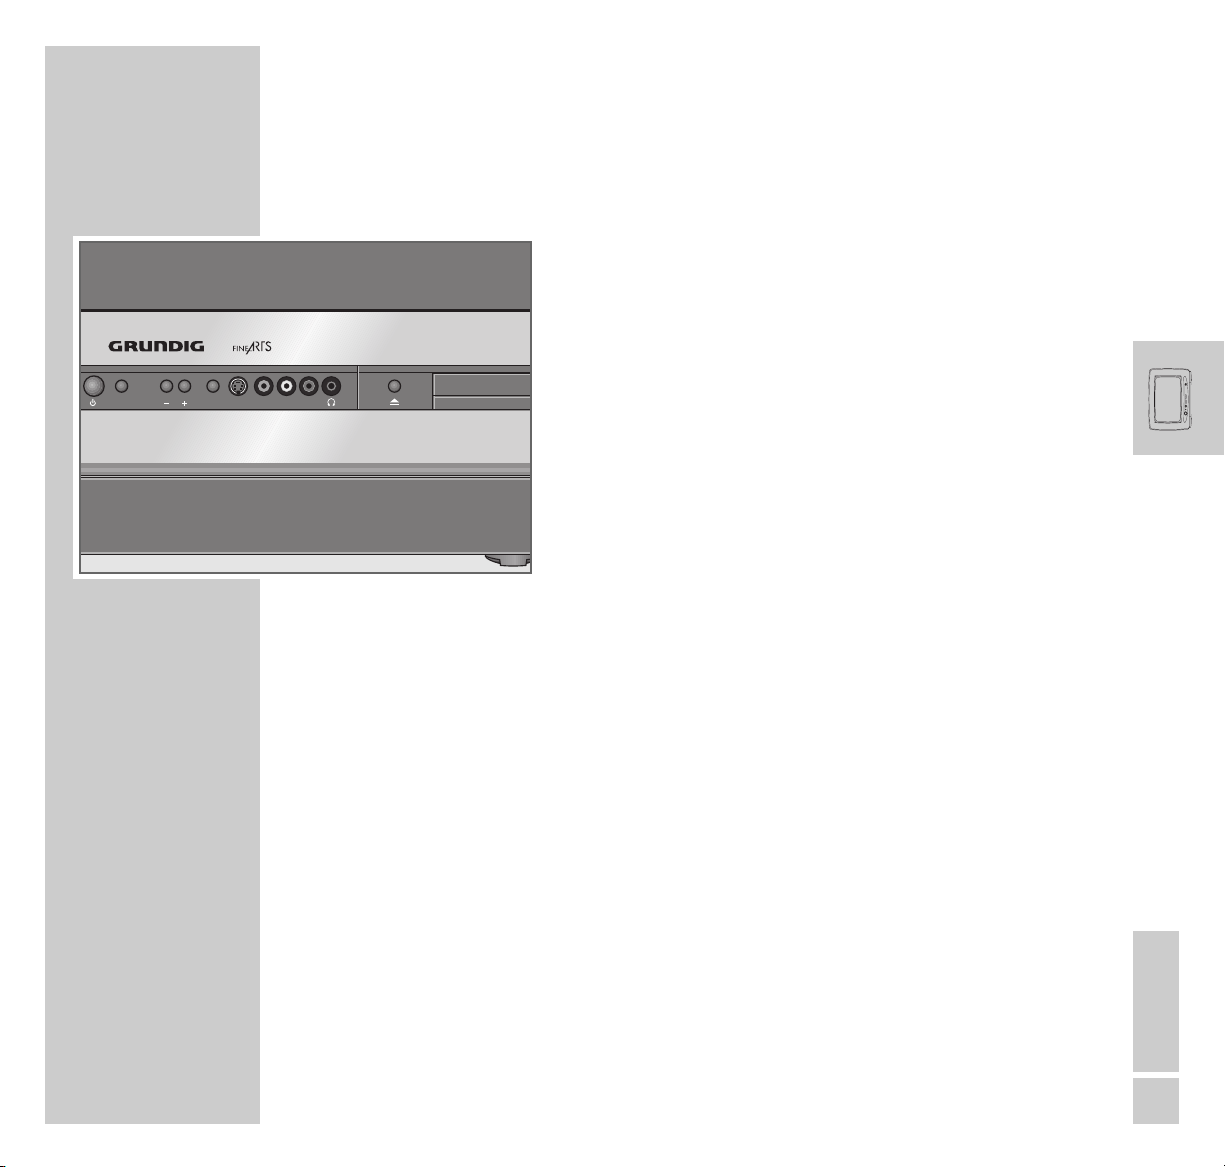
The front of the TV set
Automatic opening of the control unit cover
When moving your hand towards the cover of the control unit, this slides
automatically downwards and reveals the control elements.
After a few moments, the glass pane slides up again.
Note
If a camcorder, video recorder or headphones
are connected to the sockets at the front of the TV
set, the cover of the control unit does not close
automatically.
Page 16
ENGLISH
15
OVERVIEW
__________________________________________________________________________________
Control elements
ǼǼ
Switches the television on/off.
An indicator light shows the current operating
mode.
Green= In operation;
Yellow= Stand-by (TV Guide mode,
Copy mode, Timer mode);
Red = Stand-by (Energy-saving mode,
timer programmed).
Mode Preselection for
volume or channel selection
–
+ Volume/channel selection.
Slider Switches the automatic close function of the control
unit on and off.
S-VHS S-VIDEO camcorder video input.
Video in Video signal input.
L Audio in R Audio signal input.
yy
Headphone jack.
əə
Opens/closes the disc tray of the DVD player.
After the TV set has been switched on, the tray of
the DVD player can only be opened once the channel position display disappears from the screen
Mode
Slider
S-VHS
Video in
Audio inLR
Page 17
16
OVERVIEW
__________________________________________________________________________________
The Connections on the back of the television
É Antenna socket
AV 1 Euro/AV socket
AV 2 Euro/AV socket
Service socket for dealers (under the cover panel).
VGA Connection for computer.
AUDIO IN Audio connection for computer.
ʋ Socket for mains cable.
Louds
peaker connections for active loudspeakers (cinch
sockets) or passive loudspeakers (terminal sockets):
FRONT L R Output socket for front loudspeakers.
SURROUND L R Output socket for surround loudspeakers.
CENTER Output socket for center loudspeakers.
SUBWOOFER LFE Output socket for subwoofers.
I E S Jumper for passive subwoofers.
DIGITAL OUT Digital audio output (for connecting an external Dolby
Digital amplifier).
DIGITAL IN Digital audio input (combination socket for jack plug
3.5 mm ø or optical cable) for connecting external
Dolby Digital devices.
WT2 Connection for station WT 2 (for Grundig, for active
loudspeakers LSP2 and LSP3).
y Headphone jack (for WST 864 or wireless headpho-
nes).
IN
SUB-
WOOFER
CENTER LFE L R L RFRONT
S
AV 1
AV 2
E
I
VGA
AUDIO IN
SURROUND
LL
CENTER
DIGITAL IN
COAX/
WT 2
OPTICAL
DIGITAL
SUBWOOFER
SURROUNDRFRONT R
OUT
LFE
Page 18

ENGLISH
17
The remote control
In addition to the television, you can also operate a Grundig video recorder, an
external Grundig DVD player and an external Grundig satellite receiver with the
Personal Remote 11 remote control.
The remote control must be set up for use with an external DVD player and satellite receiver. (See Page 25)
Operating the TV set
For the operation of the TV set, »TV« must be visible in the display of the
remote control. If this is not the case, press the »Mode« button repeatedly until
»TV« is visible in the display.
ǼǼ
Switches off the television (stand-by).
zz
Calls up »Picture« menu.
ȄȄ
Time and channel position information on/off.
II Freeze-frame
FF
Calls up »Sound« menu.
1…0 Channel selection and switching on from stand-by;
Alphanumeric channel selection;
Entry of teletext page numbers.
D
Calls up A–Z index.
Display
Personal Remote 11
ModeTV
+
TXT
Menu
PIP Format Z
SP/LP Timer on/off
ABC DEF Title
GHI JKL MNO
PQRS TUV WXYZ
OVERVIEW
__________________________________________________________________________________
TV
TV
Page 19

18
i Calls up the »EASY DIALOG« menu.
TXT Teletext mode, TV mode
TV+ TV Guide, information about the current programme;
Returns to TV mode from DVD or TeleWeb mode.
Mode Switch to operate the basic functions of an external Grundig
DVD player (AUX), video recorder (VCR), digital video
recorder (PDR) and an external Grundig satellite receivers (SAT).
The functions available to you depend on the model of the
device you are using. Simply try it out.
P+ P– Switch on the television from stand-by
Channel tuning, cursor up/down
ǸǷ Move cursor to the left/right.
OK
Modifies and activates various functions.
–
}+ Volume
d Sound on/off (mute).
R Display illumination on/off. After some time, the illumination
switches off automatically.
PIP In teletext mode: double window function (TV picture and tele-
text in two screen windows;
in TV mode: picture-in-picture mode.
Format Changes picture format.
Z Zap function.
OVERVIEW
__________________________________________________________________________________
Personal Remote 11
ModeTV
+
TXT
Menu
PIP Format Z
SP/LP Timer on/off
ABC DEF Title
GHI JKL MNO
PQRS TUV WXYZ
TV
Page 20

ENGLISH
19
EASY DIALOG SYSTEM
_____________________________________________
The EASY DIALOG System
Your television is equipped with the GRUNDIG »EASY DIALOG« System.
This means that all the operating instructions are not contained in a printed
manual as is customary, but are found in dialog boxes which can be displayed
on the screen.
The »EASY DIALOG« menu
The »EASY DIALOG« menu is the central control of your television.
It enables you to select many different settings, call up information and view specific help texts on using your television (for example, remote control functions,
A to Z index).
Just try it out. You can’t do anything wrong.
– The dialog area shows at every step which buttons can be used to operate
particular functions.
Functions of the EASY DIALOG System
Calls up and exits the EASY DIALOG system.
Directly call up the menu items.
Menu item selection, cursor up/down.
For setting values.
Calls up or confirms the selected function.
Displays help texts.
Switches back one level.
i
1 ... 0
P+, P –
ǸǷ
OK
D
F
Page 21

20
SETTINGS
______________________________________________________________________________
Setting television channels
The television is equipped with the ATS euro plus automatic station search,
which assigns preset stations for you.
1 After switching on the television set, select the menu language with »P+« or
»P–« and press »OK« to confirm.
2 Select the device location with »P+« or »P–« and press »OK« to confirm.
– The automatic station search begins. The procedure may last a minute or
lonfger, depending on the number of television stations received.
Note:
After the automatic station assignment is completed, the »Easy Dialog tips«
menu appears.
This gives you the opportunity to view the functions of the television set.
Select the desired function with »P–« and press »OK« to call it up.
3 To switch to TV mode, select the »To TV station« line with »P+« or »P–«
and confirm by pressing »OK«.
Horizontal picture position
Depending on the location of your TV set, the earth’s magnetic field may affect
the position of your TV picture.
Should the picture of your TV set be slightly inclined, proceed as follows:
1 Call up »EASY DIALOG« with the »i« button.
2 Select the »Installation« line with »P+« or »P–« and press »OK« to con-
firm.
3 Select the »Special functions« line with »P+« or »P–« and press »OK« to
confirm.
4 Select the line »Rotation« with » P+«or»P-«
5 Correct “inclination of the picture” with »
Ǹ
« or »Ƿ« and end setting with
»TXT«.
Page 22

ENGLISH
21
ADDITIONAL FUNCTIONS
______________________________________
Zap function
This function allows you to save the television station which you are currently
watching and switch to other stations (zapping).
1 Select the station you want to save in the zap memory with »1 ... 0« or
»P+«, »P–« (e.g. Channel 7, PRO7) and save by pressing »Z«.
– »Z 7 PRO7« (for example) is displayed on the screen.
2 You can now switch to another station using »1 ... 0 « or »P+«, »P «.
3 You can now use »Z« to switch between the saved station (in the example,
PRO7) and the station you were watching before.
4 Exit the function by pressing »i«.
– The display disappears.
Sound selection
1 Call up the »Sound« menu by pressing the »
F
« (blue) button.
2 Select the »Sound mode« line with »P+«or»P–« and press »OK« to
confirm.
3 Select the desired setting using »P+«or»P–« and press »OK« to confirm.
4 Press »i« to conclude the setting.
›
Z 7 PRO7
Page 23

22
ADDITIONAL FUNCTIONS
_______________________________________________________
Alphanumeric channel selection (letter entry)
You can call up preset stations directly by entering the station name (e.g. ARD).
For this purpose, letters are assigned to the numerical buttons »2 ... 0«. A
maximum of four letters can be entered.
1 Use »2 ... 0« to enter the first three letters of the station name (e.g. »2« for
the letter A).
– On the screen, a list of all the television stations beginning with the letters
»A«, »B«, or »C« appears.
Each further entry of a letter narrows down the list of displayed stations.
2 Selected the desired station from the list using »P+« or »P–« and activate it
by pressing »OK«.
Note:
There are three options for selecting channel positions:
Letter
entry off: Television stations can only be selected by entering digits.
Letter
entry on: Television stations can only be selected through alphanumeric
entry.
Mix:
After a number is entered, the television automatically switches to the
selected station and a list for letter assignment is displayed.
Example: Press »3«. The television switches to the third station position (e.g.
BR3) and a list of all stations beginning with »D«, »E«, or »F« is displayed.
The option for selecting station positions is set in the »Installation« menu
under the item »Special functions«. Also see the instructions in the EASY
DIALOG System.
Page 24

ENGLISH
23
ADDITIONAL FUNCTIONS
_______________________________________________________
Remote controlling additional devices
A code must be entered into the remote control to operate an external Grundig
satellite receiver and an external Grundig DVD player. There are two codes for
the DVD player. The code »123« is programmed at the factory. If your Grundig
DVD player does not respond to the remote control, enter the code »456«.
Note:
The DVD players GDV 120 and GDV 130 cannot be operated with the
remote control Personal Remote 11.
Entering a code
1 Press and hold »Mode «.
2 Enter the code with »1... 0 «.
– The remote control is not ready to operate additional devices.
Operation
1 Press »Mode« so many times until »AUX« (for DVD player) or »SAT« (for
satellite receiver) appears on the display.
2 Select desired function.
The functions that are possible depend on the features of your appliance. Just
try it out.
Device DVD-player Satellite receiver Satellite receiver off
Codenumber 123 or 456 424 859
Page 25

24
Dolby Surround ProLogic, Dolby Digital
These sound techniques were developed in order to make the viewer feel that he
or she is present at the events taking place on the screen. This is achieved via
additional sound channels for reproducing dialogue (middle channel), atmospheric sounds and special effects (rear channel). In general, one must distinguish between Dolby Surround and Dolby Digital (also referred to as 5.1).
With Dolby Surround ProLogic the surround sound is obtained from the stereo
signal. This system transmits three front audio channels (front left, front centre,
front right) and one rear channel (which is why it is sometimes referred to as
System 3/1). However, this method has the disadvantage that, for technical
reasons, the rear channel consists of a mono channel and must be limited in its
frequency range and dynamic range, i.e. the trebles of the rear channel are
reduced.
Dolby Di
gital
, on the other hand, is a digital sound system designed for completely independent multi-channel audio playback. With this process, five highvalue audio channels are transmitted (front left, front centre, front right, rear left
and rear right) and one low frequency channel (LFE) (hence the designation
5.1). Unlike Dolby Surround ProLogic, Dolby Digital has two surround sound
channels for stereo surround sound, and thus a distributed surround sound
which provides for a full, life-like playback.
The five playback channels enable to a dynamic range which guarantees a new
and exciting form of audio enjoyment. The precise spatial characteristics bring
out the film’s full reality value.
The 5.1 Dolby Digital channels can also be distributed onto fewer channels
according to the loudspeaker configuration.
CONNECTING LOUDSPEAKERS
_________________________
Page 26

ENGLISH
25
CONNECTING LOUDSPEAKERS
______________________________________________
Connecting external loudspeakers
Either passive or active loudspeakers can be connected.
Passive loudspeakers are connected to the terminal sockets, active loudspeakers
to the cinch sockets.
1 Connect Surround loudspeakers to the »SURROUND L R« sockets.
2 Connect the center loudspeaker to the »CENTER« socket.
Instead of an external center loudspeaker, it is also possible to use the built-in
front loudspeaker of the television as a center loudspeaker. In this case,
external front loudspeakers must be connected.
3 Connect front loudspeakers to the »FRONT L R« sockets.
4 Connect the subwoofer to the »SUBWOOFER LFE« sockets.
When connecting a passive sub-woofer, you must place the jumper next to
the terminal socket in the »E« position.
Notes:
To insert the speaker cable, press the spring button on the terminal.
Insert the »–« wire of the cable into the black (–) terminal. Insert the »+« wire
(marked or coloured wire) of the cable into the red terminal.
The connected loudspeaker must be adjusted in the EASY DIALOG System in
the »Installation/Speaker configuration« menu.
Instead of active loudspeakers, it is also possible to connect your own output
amplifier with passive loudspeakers.
Active loudspeakers
Passive loudspeakers
LL
DIGITAL
OUT
CENTER LFE L R L RFRONT
SUB-
WOOFER
S
SUBWOOFER
AV1
IN
AV2
SUB-
WOOFER
S
CENTER
E
I
LFE
VGA
SURROUND
E
SURROUNDRFRONT R
AUDIO IN
WT 2
I
DIGITAL IN
COAX/
OPTICAL
SURROUND
GITAL IN
OAX/
PTICAL
CENTER LFE L R L RFRONT
LL
CENTER
DIGITAL
SUBWOOFER
SURROUNDRFRONT R
OUT
LFE
Page 27

26
CONNECTING LOUDSPEAKERS
______________________________________________
Loudspeaker and Dolby configuration
In order to receive optimal sound from Dolby Digital/Dolby Surround ProLogic,
various settings must be made.
Loudspeaker configuration
1 Call up »EASY DIALOG« with the »i« button.
2 Select the »Installation« line with »P+« or »P–« and press »OK« to
confirm.
– The relevant menu items are located on the second page of the »Installati-
on« menu.
3 Select the »Speaker configuration« line with »P+« or »P–« and press
»OK« to confirm.
4 Select the loudspeaker to be set with »P+«or»P–« and confirm with
»OK« (e.g. front left/right).
5 Select the »Connection« line with »P+«or»P–« and press »OK« to con-
firm.
Note:
The following settings are available for all loudspeakers:
»External passive« – Connect passive loudspeakers to the terminal sockets.
»External active« – Connect active loudspeakers to the cinch sockets.
The following additional setting options are available:
Fr
ont L/R
»internal« – The built-in loudspeakers are used.
Center
»internal« – The built-in front loudspeakers are used as center
loudspeakers.
Page 28

ENGLISH
27
CONNECTING LOUDSPEAKERS
______________________________________________
Subwoofer
»internal« – The built-in subwoofer is used.
Note:
When using a passive subwoofer, you must place the jumper next to the terminal socket in the »E« position.
6 Select the »Type« line with »P+«or»P–« and press »OK« to confirm.
– This sets the loudspeaker size to the appropriate frequency range. Depen-
ding on the selected setting, the television distributes the frequency range
optimally among the connected loudspeakers. This setting is not necessary
when a subwoofer is connected.
Note:
The following options are available:
»groß« – The loudspeakers are not suited for audio signals under
120 Hz.
»klein« – The loudspeakers are not suited for audio signals under
120 Hz.
7 To conclude the setting, press »
F
« (blue) twice.
Page 29

28
CONNECTING LOUDSPEAKERS
______________________________________________
Dolby level
When using Dolby Digital or Dolby Surround ProLogic, all loudspeakers must be
adjusted to the same volume.
1 In the »Speaker configuration« menu, select the »Dolby Level« item with
»P+« or »P–« and press »OK« to confirm.
– The menu for setting the loudspeaker volume appears.
You will hear a hissing sound from the loudspeakers (= test signal).
2 Adjust the volume with »Ǹ«or»Ƿ«.
– The cursor indicates which loudspeakers are presently emitting the test
signal. As long as the cursor is against a white background, the volume of
the loudspeaker in question can be adjusted.
The hissing is emitted from the connected loudspeakers in the following
order:
»Volume« – Volume of hissing;
»F balance« – Balance between the left and right front loudspeakers;
»Center« – Volume of the center loudspeaker;
»Subwoofer« – Volume of the subwoofer;
»Rear« – Volume of the surround loudspeakers;
»S balance« – Balance between the left and right surround loudspeakers.
3 Press »
F
« (blue) to conclude the setting.
Page 30

ENGLISH
29
CONNECTING LOUDSPEAKERS
______________________________________________
Dolby processing times
In a home entertainment system, the surround loudspeakers are usually positioned closer to the viewer than the front loudspeakers. This is why Dolby Digital
and Dolby ProLogic decoders are electronically delayed by a fraction of a
second. This synchronises the time at which the sound reaches the listener.
1 In the »Speaker configuration« menu, select the »Seating position« item with
»P+« or »P–« and press »OK« to confirm.
2 Select the desired loudspeaker with »P+«or»P–« and activate it by pres-
sing »OK«.
3 Enter the distance from the listener as four digits with the numeric keys
»1...0« and confirm by pressing »OK«.
4 Press »i« to conclude the setting.
Page 31

30
OPERATION WITH EXTERNAL EQUIPMENT
______
Connecting AV devices
(video recorder, decoder etc.)
The devices to be connected must be selected in the »Installation« menu
under the menu item »Devices«.
For operation of the Easy Dialog System, see page 19 onwards.
If your video recorder is equipped with Megalogic functions, it must be
connected to the »AV 1« socket with the supplied EURO-AV cable.
For Dolby Digital operation with external playback devices (digital satellite
receivers, digital video recorders, etc.), the digital audio output of this
playback device must be connected to the »DIGITAL IN« socket on the
television set with an optical cable* or coax cable.
The device must be assigned to the corresponding AV socket in the »Installation/Devices« menu under menu item »Manual AV settings/Digital audio
input for«.
Note
If the television has been fitted with a digital SAT module (accessories), no
additional digital playback device can be connected to the »DIGITAL IN«
socket.
* We recommend FREITAG Electronic optical cables
(order nos. 0426141006 – 1 m long, 0426141008 – 2 m long,
0426141010 – 3 m long)
Page 32

ENGLISH
31
OPERATION WITH EXTERNAL EQUIPMENT
_________________________
Connecting a computer (VGA)
Your television can be used as a PC monitor.
The television can be set to the following input signals:
640 x 480 pixels, 60 Hz/31.5 kHz
640 x 400 pixels, 70 Hz/31.5 kHz
640 x 350 pixels, 70 Hz/31.5 kHz
1 Connect VGA source (e.g. computer, game console) to the »VGA« socket
using a standard VGA cable.
2 Connect the audio output of the computer (if there is one) to the »AUDIO IN«
sockets with a standard audio cable (cinch terminal plug 3.5mmø).
Note:
One of the above-mentioned resolutions must be set on the PC (see PC control system).
If a laptop is connected, its display must be switched off (via the keyboard or
control system; see the operating manual of the laptop).
When connecting a laptop, first connect the laptop and then switch it on.
AV1
AV2
AUDIO IN
VGA
IN
Page 33

32
INFORMATION
________________________________________________________________
Technical data
Television set
Mains voltage: 220 – 240 V, 50/60 Hz,
(power pack control range 190 ... 265 V)
Power consumption: during operation 140 W, in stand-by ca. <2 W
Sound output (music/sine): Front 2 x 20W/10W, Center 20W/10W,
Subwoofer 40W/20W, Surround 2 x 20W/10W
Reception ranges: C01 ... C99, special channels S01 ... S41
DVD player
Playback norm: PAL, 50 Hz, 625 lines, NTSC, 60 Hz, 525 lines
Playback system: DVD video, video CD, S-video CD, MP3 CD,
audio CD, CD-R, CD-RW, DVD-R
Laser: 2 semiconductor lasers,
wavelength 650 nm for DVD
wavelength 780 nm for CD
Audio format: Digital:
MPEG2/Dolby Digital, PCM, DTS
Analog:
Stereo sound, Dolby ProLogic
Audio: Scanning frequency: Analog
DVD: 48/96 kHz
4 Hz–22/44 kHz
Video CD: 44.1 kHz 4 Hz–20 kHz
Audio CD: 44.1 kHz 4 Hz–20 kHz
Signal-to-noise ratio: 95 dB (at 1 KHz)
Sound volume: 95 dB (at 1 KHz)
Page 34

ENGLISH
33
INFORMATION
__________________________________________________________________________
General instructions for laser devices
Your system is a CLASS 1 LASER PRODUCT. This means that the laser is
designed in such a way as to ensure that the maximum permissible emission
value cannot be exceeded under any circumstances.
Caution:
If operating devices or methods other than those specified here are employed, it
may lead to dangerous exposure to emissions.
This device emits laser radiation. Because of the danger of eye injuries, the unit
may only be opened or serviced by trained personnel.
If settings other than those specified here are employed or OTHER
PROCEDURES are carried out, this may lead to dangerous radiation exposure.
During playback of DTS-coded CDs and DVDs, a high noise level is produced at the
analog stereo outputs. In order to avoid possible damage to the audio system, the user
should take appropriate preventive measures when the stereo outputs of the DVD
player are connected to an amplification system. For DTS Digital Surround playback,
an external 5.1-channel DTS Digital Surround decoder must be connected to the digital
output (DIGITAL OUT) of the television.
DTS and DTS Digital Surround are trademarks of Digital Theater Systems, Inc. All rights
reserved.
Manufactured with permission from Dolby Laboratories. The ”Dolby” label and the
double-D logo ”
ij ” are trademarks of Dolby Laboratories. Confidential unpublished
material.
©1992-1997 Dolby Laboratories, Inc. All rights reserved.
This product contains components which are covered by certain U.S. patents or for
other reasons are considered intellectual property of the Macrovision Corporation and
other proprietors. Use of this protected technology must be approved by the
Macrovision Company and is only permissible for private presentation at home or for
other limited applications, where no special permission has been granted by
Macrovision. Reproduction or disassembly of the device is prohibited.
CLASS 1
LASER PRODUCT
Page 35

34
21
Service information for dealers
The television set may only be operated with the mains cable set supplied. It
prevents problems from the mains supply and is part of the device certification.
Please order only replacement mains cable sets with the designation
»GWN 9.22/Item No. 8290.991-316« from customer service locations.
The product complies with the following EU directives:
73/23/EEC directive for electrical equipment to be used within defined voltage
ranges. 89/336/EEC directive on electromagnetic compatibility.
The device complies with the following standards: EN 60065, EN 55013,
EN 55020.
Unauthorised handling, in particular modification of the high-voltage or installation of a picture tube of a different type may result in X-ray emissions of inadmissible strength. Devices modified in this way no longer conform to this certification and may not be used.
Contact assignments of EURO-AV socket 1
Pin Signal Pin Signal
11 = Audio output right 12 = –
12 = Audio input right 13 = Red ground
31 = Audio output left 14 = Ground
14 = Audio ground 15 = RGB red input, (S-Video = Chroma)
15 = Blue ground 16 = RGB switch voltage
16 = Audio input left 17 = Video ground
17 = RGB blue input 18 = RGB switch voltage ground
18 = Switch voltage 19 = Video output
19 = Green ground 20 = Video input, (S-Video = luminance)
10 = Data line (MEGALOGIC) 21 = Shielding/ground
11 = RGB green input
INFORMATION
__________________________________________________________________________
220
119
Page 36

ENGLISH
35
INFORMATION
__________________________________________________________________________
Rectifying minor problems
Not every picture or sound problem is caused by a defect in the device. Impaired functioning can also be the result of worn-out batteries in the remote control or damaged
DVDs/CDs. If the remedies below are not successful, please consult an authorised
GRUNDIG dealer.
Please bear in mind that malfunctions can also be caused by external devices such as
video recorders or satellite receivers.
Remedy
ATS RESET: Switch off the device at
the main power button. Press button
+ and the main power button at the
same time, switch on the television
and switch off again.
Then switch on the device again.
Is antenna cable connected?
Check antenna system
Adjust brightness, contrast or -colour
setting
Test with another channel
Turn colour up
Select proper colour norm
Test with another channel
Increase distance between television
set and speakers; if colour spots
remain, switch off television set at
mains and switch on again after 10
minutes
Move the devices
Correct sound setting
Automatic or manual channel setting/fine tuning
Have antenna cable or system
checked
Possible cause
Television stations are already
set
Antenna cable
Picture settings incorrectly set
Problem at station
Colour intensity at minimum
TV norm setting (if
setting option is available)
Problem at station
Strong magnetic field due to for example, loudspeaker units
Earth’s magnetic field
Sound setting
Channel setting
Antenna
Fault
The language selection menu does not
appear after the television is switched
on
Screen lit (snow or blue)
but no transmission visible
Poor picture contrast
No colour
Inappropriate colour, colour spots
Sound indistinct
Ghosting, reflection
Page 37

36
INFORMATION
__________________________________________________________________________
Fault
Picture but no sound
Poor picture and sound quality
Teletext missing or faulty
Remote control does not function
After switching on the television,
the parental lock menu appears
Menu language incomprehensible
No picture/distorted picture during
DVD-operation
DVD/CD cannot be played
Remedy
Turn up/switch on loudspeaker
Select sound output via loudspeaker
Test with another channel
Adjust picture and sound,
Call up factory setting with key combination »i«, »z«, »OK«
Test another station for ghosting or
reflection or fine-tuning
Check antenna system
Point the remote control at the television set
Check or replace the batteries
Observe polarity
Switch off the television with the main
power button for ca. 2 min.
Enter secret number or number
combination 7038580.
Call up the »Menu language« menu
with »i«, »5«, »1« and set the
correct language.
Clean the DVD.
Observe the cleaning instructions for
DVDs.
Make sure the DVD/CD is laying in
the disk tray with the label facing
upwards.
Clean the DVD.
Observe the cleaning instructions for
DVDs.
Check the DVD, insert another
DVD/CD.
Possible cause
Volume set to minimum or loudspeaker
switched off
Volume control via audio cinch socket
active (if provided)
Problem at station
Picture and sound values incorrectly
adjusted
Station has no teletext or aerial system
Station signal too weak
(picture interference)
No optical connection
Remote control batteries
Operating condition undefined
Parental lock was activated
Incorrect menu language set
Fingerprints on the DVD,
DVD dirty
DVD/CD incorrectly positioned in the
tray
Fingerprints on the DVD,
DVD dirty
DVD/CD damaged
Page 38

/
ENGLISH
37
THE DVD PLAYER
__________________________________________________
Special features
Your DVD player gives you perfect digital video playback with studio quality.
Since your television is equipped with a multi-channel decoder for Dolby Digital
and DTS Digital, it provides superb cinema-quality audio playback – in stereo
or with digital multi-channel sound, depending on the type of DVD.
Other features of DVD video include the choice of audio channel and language,
choice of subtitle language, and various camera recording angles.
The ”language-related settings” for the DVD player, such as the language of the
DVD menu or the dubbed language, are determined by the language selection
of the television.
However, these ”pre-settings” can be changed with the press of a button.
Your DVD player is suitable for DVDs with regional code 2.
In addition to DVDs, your DVD player can also play MP3 CDs, video CDs and
audio CDs.
It is also possible to use CD-ROMs and rewritable CD-RWs.
Cleaning DVDs and CDs
Wipe the dirty DVD/CD with a cloth from the centre outwards in a straight line.
Do not use any solvents such as benzene, thinners, conventional cleaner or antistatic spray for vinyl records.
Page 39

38
OVERVIEW
________________________________________________________________________
The remote control
To operate the DVD player, push the »8« button; playback begins.
Switch back to television mode by pressing »TV+«
Title Calls up the title menu of the DVD/video CD during playback
(depends on the DVD being used).
. Calls up the disc menu of the DVD/video CD during playback
(depends on the DVD being used).
!
Freeze-frame for DVDs and video CDs; pause for audio CDs.
d Switches between the original and the dubbed language during DVD
playback.
1 … 0 Numeric keys for various inputs
n Selects various camera angles for certain scenes or passages on the
DVD during playback
c Marks scenes on a DVD.
y For selecting and displaying subtitles on the DVD during playback.
TV+ Switches back to television mode.
Personal Remote 11
ModeTV
+
TXT
Menu
PIP Format Z
SP/LP Timer on/off
ABC DEF Title
GHI JKL MNO
PQRS TUV WXYZ
TV
Page 40

/
ENGLISH
39
OVERVIEW
__________________________________________________________________________________
P+ P- Select various functions in the menus.
ǸǷ
select various functions in the DVD menus.
OK Displays various information on the television screen during play-
back, such as the title, chapter number or playing time.
Confirms the functions selected in the menus.
v Zooms in on scenes during playback
x Exits the DVD menu or switches to the super-ordinated DVD menu
item.
3 Switch to backwards frame search at various speeds during play-
back.
4 Switch to forwards frame search at various speeds during playback.
7
Pressing once interrupts or resumes playback;
pressing twice stops playback.
8
Starts playback;
if playback was interrupted (»7« pressed once), it is resumed from
the point at which it was interrupted.
5
Selects the previous title or section during playback.
6
Selects the next title or section during playback.
Personal Remote 11
ModeTV
+
TXT
Menu
PIP Format Z
SP/LP Timer on/off
ABC DEF Title
GHI JKL MNO
PQRS TUV WXYZ
Page 41

40
DVD/VIDEO CD PLAYBACK
____________________________
DVD and video CD features
You can recognise DVDs, S-video CDs and video CDs by the logo on the label.
Depending on the contents of the DVD, S-video CD or video CD (films, video
clips etc.), the discs may carry one or more titles.
Each title may contain one or more chapters. Titles and chapters can be selected
easily and conveniently.
You can control and direct playback of a DVD, S-video CD or video CD using
the menu of the DVD player on the television screen.
Some of the functions of the DVD player, such as slow motion, cannot be selec-
ted during playback of a video CD. This depends on the video CD.
Special DVD features
DVDs have a title menu which provides an overview of the available titles and
the passages they contain.
Some of the DVD player's functions, such as slow motion, freeze-frame and
auto-play, can also be controlled by the DVD itself. It is therefore possible that
the freeze-frame function, for example, cannot be selected during certain scenes.
Many DVDs have audio tracks recorded in up to eight languages.
This enables you to select the language you prefer.
Many DVDs are recorded by the manufacturer with subtitles in several languages.
You can select subtitle superimposition from up to 32 different languages.
Since films are released in different parts of the world at different times, all DVD
players world-wide are given a regional code. Your DVD player has been given
regional code 2.
DVDs may also be given a supplementary regional code. If you insert a DVD
with a code different to that of the DVD player, a reference to the regional code
appears on the television screen. The DVD player will not be able to play back
the DVD.
Page 42

/
ENGLISH
41
PLAYBACK OF A DVD/VIDEO CD
__________________________________________
Before playback
Preparation
1 Switch on the television.
Inserting a DVD/video CD
1 Press »
ə
« on the television.
– The disc tray opens.
2 Insert the DVD/video CD in the disc tray with the label facing upwards.
3 Press »
ə
« on the television.
– Playback starts automatically, depending on the DVD/video CD being
used.
Note:
When a DVD/video CD is in the disc tray, playback can be started by pressing »8«.
If there is no DVD/video CD in the disc tray, this message appears: »no
disc«.
no disc
ə
S-VIDEO VIDEO INL AUDIO IN R
Page 43

42
PLAYBACK OF A DVD/VIDEO CD
__________________________________________
Playback
1 After the disc compartment closes and the DVD is scanned, playback starts
automatically.
If this does not occur (as a result of the DVD/video CD being used), start
playback by pressing »
8
«.
Note:
Depending on the DVD/video CD you are using, you may have to select a
title or chapter from the DVDs/video CDs table of contents.
Use the »1 ... 0«, »P+«, »P-«, »
Ǹ
« or »Ƿ« buttons to select it and then
press »OK« to confirm.
If the »
-
« symbol appears on the television screen, then the selected func-
tion is not possible with this DVD/video CD.
2 To pause playback (freeze-frame), press »
!
«.
3 Press »
8
« to resume playback.
Interrupting and resuming playback
The playback of a DVD/video CD can be interrupted at any point and then
resumed from the same place.
1 Press »7« to interrupt playback.
2 Resume playback at the same point by pressing »8«.
ľ
II
5
ľ
■
ı
.
Ø
Page 44

/
ENGLISH
43
PLAYBACK OF A DVD/VIDEO CD
__________________________________________
Calling up information
You can call up information on the title, chapter and playing time for display on
the screen.
1 During playback, press »OK« to display the Info line.
– The following information is displayed:
Type of disc, current title number, current chapter number,
playing time, remaining playing time,
audio system, language options, subtitle language,
camera position, bitrate.
2 Press »OK« to conceal the Info line.
Selecting titles or chapters
If a DVD or video CD contains several titles and/or chapters, you can select
from among them. The boxes »T« and »C« in the info line will tell you whether a DVD contains more than one title or chapter.
1 Call up the contents of the DVD/video CD by pressing »
Ȅ
.«.
– If the DVD/video CD possesses a title menu, it will appear on the screen.
2 If the selection options are numbered, select the desired title and section
directly with »1 ... 0« and activate by pressing »OK«.
3 If the options are not numbered, select titles and sections using »P+«, »P-«,
»Ǹ« or »Ƿ«, and activate by pressing »OK«.
– Playback of the selected title/chapter begins.
C
C
2
T
Einstellungen
DVD T 1/2 C 33/45 01:35:55 00:26:28
F
1/3 de=5.1y1 /14en
n
2 /4
Mbit/s
3
Einstellungen
DVD T 1/2 C 33/45 00:20:43 01:22:21
F
1/3 de
=
5.1
y
1/14en
n
2 /4
Mbit/s
3
Page 45

44
PLAYBACK OF A DVD/VIDEO CD
__________________________________________
Selecting chapters
1 During playback, select the desired chapter using »1 ... 0« and press
»OK« to confirm.
– Playback begins with the selected chapter.
Ending playback
Playback of a DVD or video CD automatically stops at the end of a title.
You can stop playback at any point by pressing »7« twice.
Removing the DVD/video CD
1 Press »
ə
« on the television to open the disc tray.
Switching back to television mode
If the DVD/video CD is not removed from the disc tray, you can switch to the
most recently watched television station by pressing »TV+«.
ə
7
C
2
_
Page 46

/
ENGLISH
45
PLAYBACK OF A DVD/VIDEO CD
__________________________________________
Additional playback functions
Note:
When the ”frame-search”, ”slow-motion” and ”freeze-frame” functions are
employed, the sound is muted.
Some functions may not be selected, depending on the DVD/video CD being
used.
Video search
You can choose from among various speeds (forwards or backwards).
1 During playback, select the desired playback speed with » §« or » $«.
– You can select a speed which is two, four, eight or twenty times faster than
the normal playback speed, forwards or backwards.
2 Resume playback by pressing »
8
«.
Slow motion
You can choose from among various speeds (forwards or backwards).
1 During playback, press »
!
«
2 Select the desired slow motion speed (1/20, 1/8, 1/4, 1/2) by pressing
» §« or » $«.
3 To resume playback, press »
8
«.
ľ
e
X 2
e
X 4
e
X 8
e
X 20
ľ
ľ
I
1/20
ľ
I
1/ 8
ľ
I
1/ 4
ľ
I
1/ 2
Page 47

46
PLAYBACK OF A DVD/VIDEO CD
__________________________________________
Frame-by-frame playback
1 During playback, press »
!
«.
2 Advance frame-by-frame by pressing »
!
«.
3 To resume playback, press »
8
«.
Selecting the camera angle for particular scenes or
passages
Many DVDs contain scenes or passages which were filmed several times from different camera angles.
You can choose from among these different angles.
When this function is available on a DVD, it is indicated on the screen in the info
line by the display of, for example, »n 1/4«.
1 During playback, select the camera angle function by pressing »n«.
– The camera angle »n 2/4« appears in the display, 2 from 4 in this
example.
2 Select a different camera angle by pressing »n«.
Enlarging the picture (Zoom)
1 During playback or pause, press »
v
«.
– Display: »k X2«, the DVD player enlarges a section of the screen.
– You can select to enlarge the image by a factor of 2, 4 or 8.
2 You can move the screen section with »P+«, »P-«, »
Ǹ
« or »Ƿ«.
3 To switch to a “normal” picture size, press »
v
again.
II
!s
ľ
Einstellungen
DVD T 1/2 C 33/45 01:35:55 00:26:28
F
1/3 de=5.1y1 /14en
n
1 /4
Mbit/s
3
v
X 2
Einstellungen
DVD T 1/2 C 33/45 01:35:55 00:26:28
F
1/3 de=5.1y1 /14en
n
2 /4
Mbit/s
3
Page 48

/
ENGLISH
47
PLAYBACK OF A DVD/VIDEO CD
__________________________________________
Selecting the dubbed language
If several languages are available on the inserted DVD, you can select the language in which the sound is played back.
1 Press »d« during playback.
– Display: for example, »d 2/3 de =5.1« appears briefly, and the cur-
rent dubbed language is displayed.
2 To set the desired language, press »d« repeatedly.
Selecting and displaying subtitles
If a DVD provides subtitles, they can be displayed on your TV screen.
When subtitles in several languages are available, you can select the language
you prefer.
1 Press »y« during playback.
– Display: for example, »y 2/14 de « appears briefly, and the current
dubbed language is displayed.
2 To set the language for the subtitles, press »y« repeatedly.
Note:
To switch off the subtitles, keep pressing »y« until »y 2/14 –« appears
in the display.
Einstellungen
DVD T 1/2 C 33/45 01:35:55 00:26:28
F
1/3 de=5.1y2/14de
n
2 /4
Mbit/s
3
Einstellungen
DVD T 1/2 C 33/45 01:35:55 00:26:28
F
1/3 de=5.1y1 /14en
n
2 /4
Mbit/s
3
Einstellungen
DVD T 1/2 C 33/45 01:35:55 00:26:28
F
2/3 de=5.1y1 /14en
n
2 /4
Mbit/s
3
Einstellungen
DVD T 1/2 C 33/45 01:35:55 00:26:28
F
1/3 en=5.1y1 /14en
n
2 /4
Mbit/s
3
Page 49

48
Selecting and playing scenes
You can mark a scene on the DVD, which you can then select directly during
playback. The bookmark is retained when you remove the DVD. You can give
up to 5 DVDs a bookmark.
Setting a mark
1 During playback, press »c«.
Note:
This mark is deleted automatically when you set a new mark.
Playing selected scenes
1 During playback, press and hold down »c«.
– Playback starts at the point marked.
c
c
8
PLAYBACK OF A DVD/VIDEO CD
__________________________________________
Page 50

/
ENGLISH
49
MP3 CD PLAYBACK
_____________________________________________________
MP3 CD features
An MP3 CD is identified by this logo.
MP3 CDs contain music recordings which can be assembled with the use of a
PC.
MP3 data can be played with a sampling rate of 32 kHz, 44.1 kHz or 48 kHz.
Before playback
Preparation
1 Switch on the television.
Inserting an MP3 CD
1 Press »
ə
« on the television.
– The disc tray opens.
2 Insert the MP3 CD in the disc compartment with the label facing upwards.
3 Press »
ə
« on the television.
– A menu appears on the screen displaying the content of the MP3 CD.
Note:
When an MP3 CD is in the disc tray, playback can be started by pressing
»8«.
If there is no MP3 CD in the disc tray, this message appears: »no disc«.
ə
no disc
S-VIDEO VIDEO INL AUDIO IN R
Page 51

50
MP3 CD PLAYBACK
__________________________________________________________________
Playback
1 Select the folder or track required with »P+« or »P-«.
Note:
A folder can contain tracks which can be called up by pressing »OK«.
From each folder you can select up to 30 tracks using »P+« or »P-«.
2 Start playback of a track by pressing »
8
«.
3 To pause playback, press »
!
«.
4 To resume playback, press »
8
«.
Calling up information
You can display information from the MP3 CD on the screen.
1 To call up information about the MP3 CD, press »Title«.
2 Press ».« to see the contents menu (file browser) of the MP3 CD.
Selecting a different track directly
1 Press »Title« to call up the Info menu of the MP3 CD.
2 To select a track directly, enter the one or two-digit number of the track you
want to hear using »1 ... 0« and press » OK« to confirm.
Note:
Incorrect entries can be deleted by pressing »
x«.
3 Press ».« to quit the Info menu.
CD-Rom File: 7 /23 00:03:23 00:00:17
F
MP3 2.0 MP3_TEST – 163840 Bit/s
Type: MP3
Title: Mambo No.5
Artist: Lou Bega
Comment: come.to/mp3mtvhits
Album: Upped by Joll
Year:
Genre:
Page 52

/
ENGLISH
51
MP3 CD PLAYBACK
__________________________________________________________________
Selecting a different folder and other tracks
This can be done if the MP3 CD contains several folders.
1 Press ».« to call up the Contents menu (file browser).
2 Press »
7
« to end playback.
3 If the Contents menu displays tracks, press »
Ǹ
« to switch back one level.
4 Select the folder by pressing »P+« or »P-«.
Note:
If you want to play all the tracks in a folder, press »8«.
5 Press »
Ƿ
« to see the tracks in the folder.
6 Press »P+« or »P-« to select the track you want to hear and then »
8
« to
start playback.
Ending playback
1 End playback by pressing »
7
«.
Removing an MP3 CD
1 Press »
ə
« on the television set to open the disc tray.
Switching back to television mode
If the MP3 CD is not removed from the disc tray, you can switch to the most
recently watched television station by pressing »TV+«.
ə
7
Page 53

52
AUDIO CD PLAYBACK
________________________________________________
Audio CD features
An audio CD is identified by this logo.
Audio CDs contain only music recordings. They can be played in the normal
manner on a HiFi system.
Before playback
Preparation
1 Switch on the television.
Inserting an audio CD
1 Press »
ə
« on the television.
– The disc tray opens.
2 Insert the audio CD in the disc compartment with the label facing upwards.
3 Press »
ə
« on the television.
– Playback starts automatically, depending on the audio CD being used.
Note:
When an audio CD is in the disc tray, playback can be started by pressing
»8«.
If there is no audio CD in the disc tray, this message appears: »no disc«.
no disc
ə
S-VIDEO VIDEO INL AUDIO IN R
Page 54

/
ENGLISH
53
AUDIO CD PLAYBACK
______________________________________________________________
Playback
1 After the disc compartment closes and the CD is scanned, playback starts
automatically.
If this does not occur (depending on the CD being used), start playback by
pressing »
8
«.
– Playback stops automatically at the end of the CD.
2 To pause playback, press »
!
«.
3 To resume playback, press »
8
«.
Calling up the info line
1 Press »OK« to call up the info line.
– The info line is displayed. It contains the following information about the
CD: the number of tracks, the playing time of the tracks, the remaining
playing time, the audio system and the data flow.
Selecting a different track
1 Press »
Ƿ
« during playback to select the next track.
2 To return to the beginning of the track, press »
Ǹ
« once.
3 Press »
Ǹ
« twice to select the previous track.
– Playback begins with the selected track.
Note:
To select a track directly, enter the one or two-digit number of the track using
»1 ... 0« and press » OK« to confirm.
ľ
II
ľ
T
2
_
T
1
_
T
2
_
T
5
_
Einstellungen
CD-DA T 1/18 00:00:01 00:03:24
F
PCM 2.0
Mbit/s
1
Page 55

54
AUDIO CD PLAYBACK
______________________________________________________________
Searching for a passage within a track
1 During playback, press »§« or »$« and hold it down until you find the
passage you want to hear.
Playback begins as soon as you let go of the »§« or »$« button.
Interrupting and resuming playback
The playback of an audio CD can be interrupted at any point and then resumed
from the same place.
1 Press »7« to interrupt playback.
2 Resume playback at the same point by pressing »8«.
Ending playback
Playback of the audio CD stops automatically at the end of the final track.
You can stop playback at any point by pressing »7« twice.
Removing an audio CD
1 Press »
ə
« on the television set to open the disc tray.
Switching back to television mode
If the audio CD is not removed from the disc tray, you can switch to the most
recently watched television station by pressing »TV+«.
ə
ľ
7
■
ı
w
4
e
4
Page 56

Grundig AG • Beuthener Str. 41 • D-90471 Nürnberg • http://www.grundig.com
 Loading...