

Page 1

COLOR TELEVISION
ELEGANCE 70 Flat
MFW 70-3201 NIC/DOLBY
ǵ
ENGLISH
;
22279-941.0200
Page 2

2
CONTENTS
_________________________________________________________________________
4 Scope of Delivery
5 Installation and Safety
7 At a Glance
The front of the TV set
The rear of the TV set
The remote control
10 Connection and Preparation
Connecting the aerial and the mains power cable
Putting batteries into the remote control
12 Settings
Setting TV channels - automatically (with ATS searching)
The Dialog Center
Picture settings
Sound settings
18 TV Operation
Basic functions
Picture format switching
21 Teletext Operation
TOP text or FLOF text mode
Normal text mode (Basictext)
Additional functions
Additional functions - from the symbol bar
25 Convenience Functions
Convenience functions via the »Special functions« menu
Entering a switch-off time in the »Sleep timer« menu
Convenience functions via the »Service« menu
Page 3

CONTENTS
__________________________________________________________________________________
ENGLISH
3
29 Parental Lock
30 Operation with External Equipment
Decoder or satellite receiver
Video recorder or SET-TOP box
Headphones
36 Special Settings
Limiting channel selection
Setting TV channels
39 Information
Technical data
Service notes for the specialized dealer
Pin assignment of the EURO-AV socket
Customer information
43 Correcting Problems Yourself
Page 4
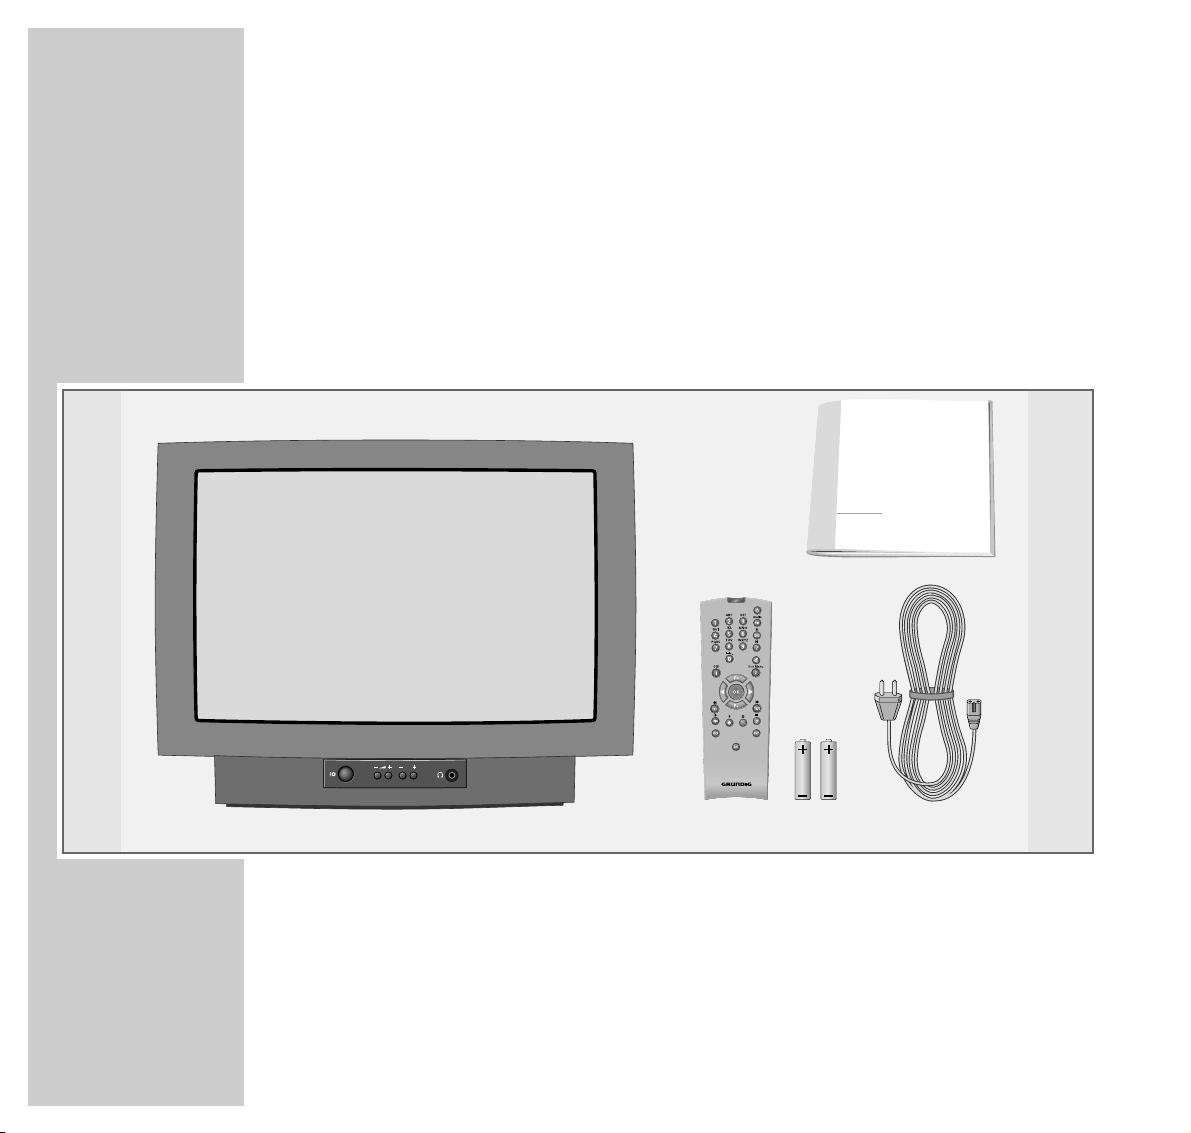
4
SCOPE OF DELIVERY
___________________________________________________
1 TV set ELEGANCE 70 Flat MFW 70-3201 NIC/DOLBY
2 Remote control
3 2 batteries, 1.5 V–, Mignon (AA)
4 Mains power cable
5 Operating manual
1234
5
ǵ
COLOR TELEVISION
@
P
Tele Pilot 150 C
Page 5
ENGLISH
5
INSTALLATION AND SAFETY
_______________________________
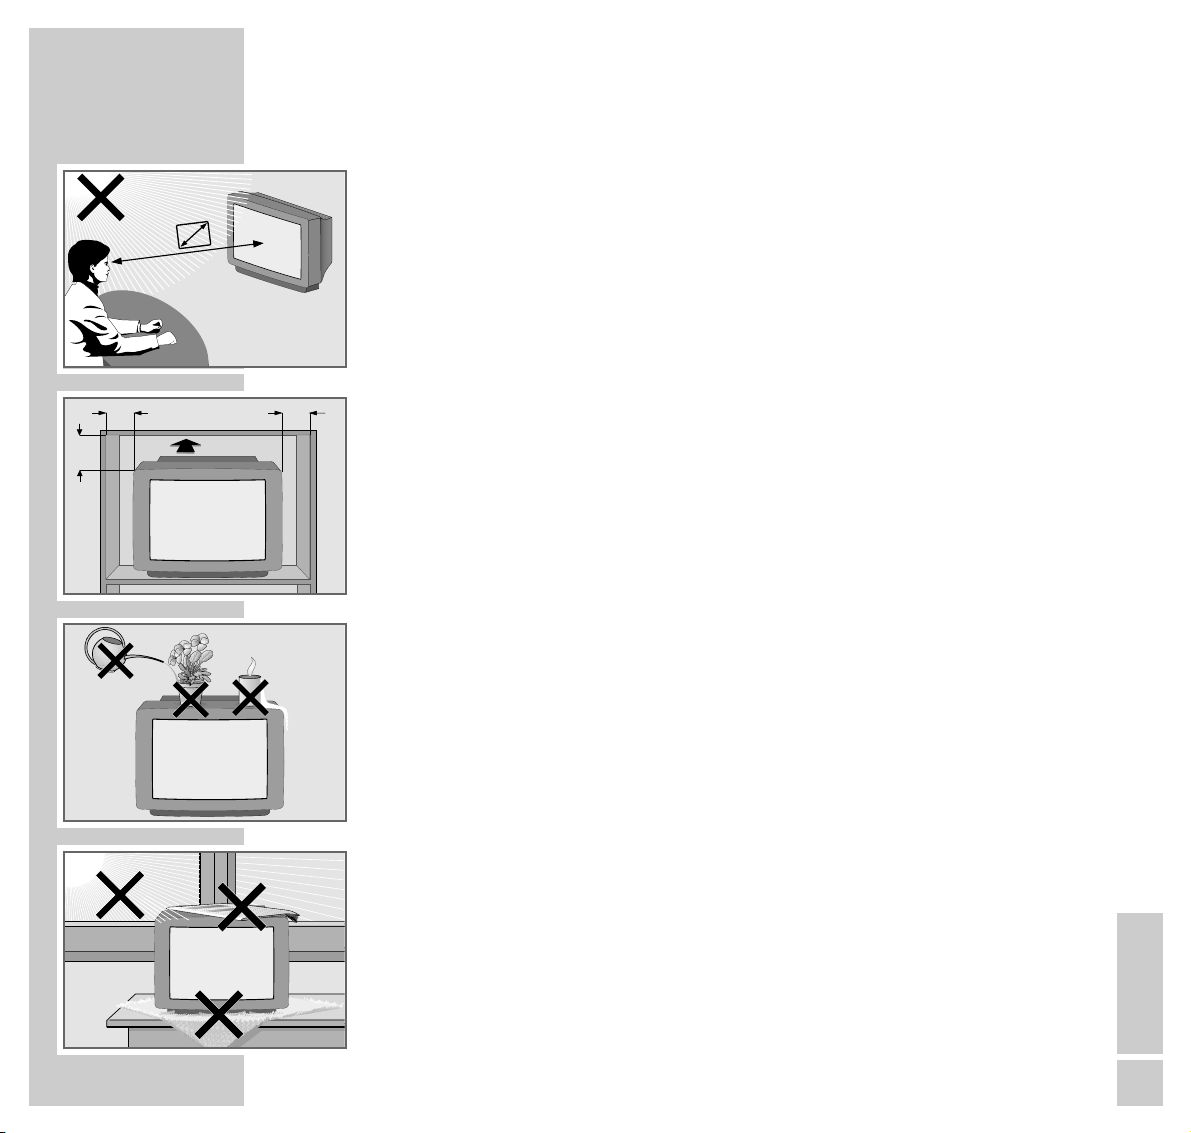
In order to assure that this high-quality and easy-to-use TV set will be able to
provide you with good service and pleasure for a long time to come, it is important that you observe the following points when installing the set.
This set has been designed for the reception and reproduction of picture and
sound signals.
Any other use is explicitly forbidden.
The ideal viewing distance from the screen is 5 times the diagonal width of the
screen.
External light shining on the screen adversely affects picture quality.
Assure that there is enough space inside the cabinet.
Assure that there is enough space inside the cabinet.
The TV set is designated for operation in dry rooms. Should you nevertheless
operate it outside, make absolutely sure that it is protected against dampness
(rain, water splashes). Never expose the TV set to any sort of moisture.
Do not place vessels filled with fluid (vases or similar things) on the TV set.
The vessel may tip over and the fluid may adversely affect electrical safety.
Put the TV set on an even and hard surface. Do not place objects (for example,
newspapers) on the TV set or place the set on a cloth cover, etc.
Do not place the TV set close to the heating or in direct sunshine as it could
overheat.
Heat build-up can be dangerous and is detrimental to the service life of the
equipment. From time to time, have a technician come to clean the inside of the
set.
Keep the TV set away from magnetic fields (for example stereo speakers).
10
cm
10
cm
20
cm
20 cm
Krieg am Golf
5 x
Page 6
6
INSTALLATION AND SAFETY
___________________________________________________
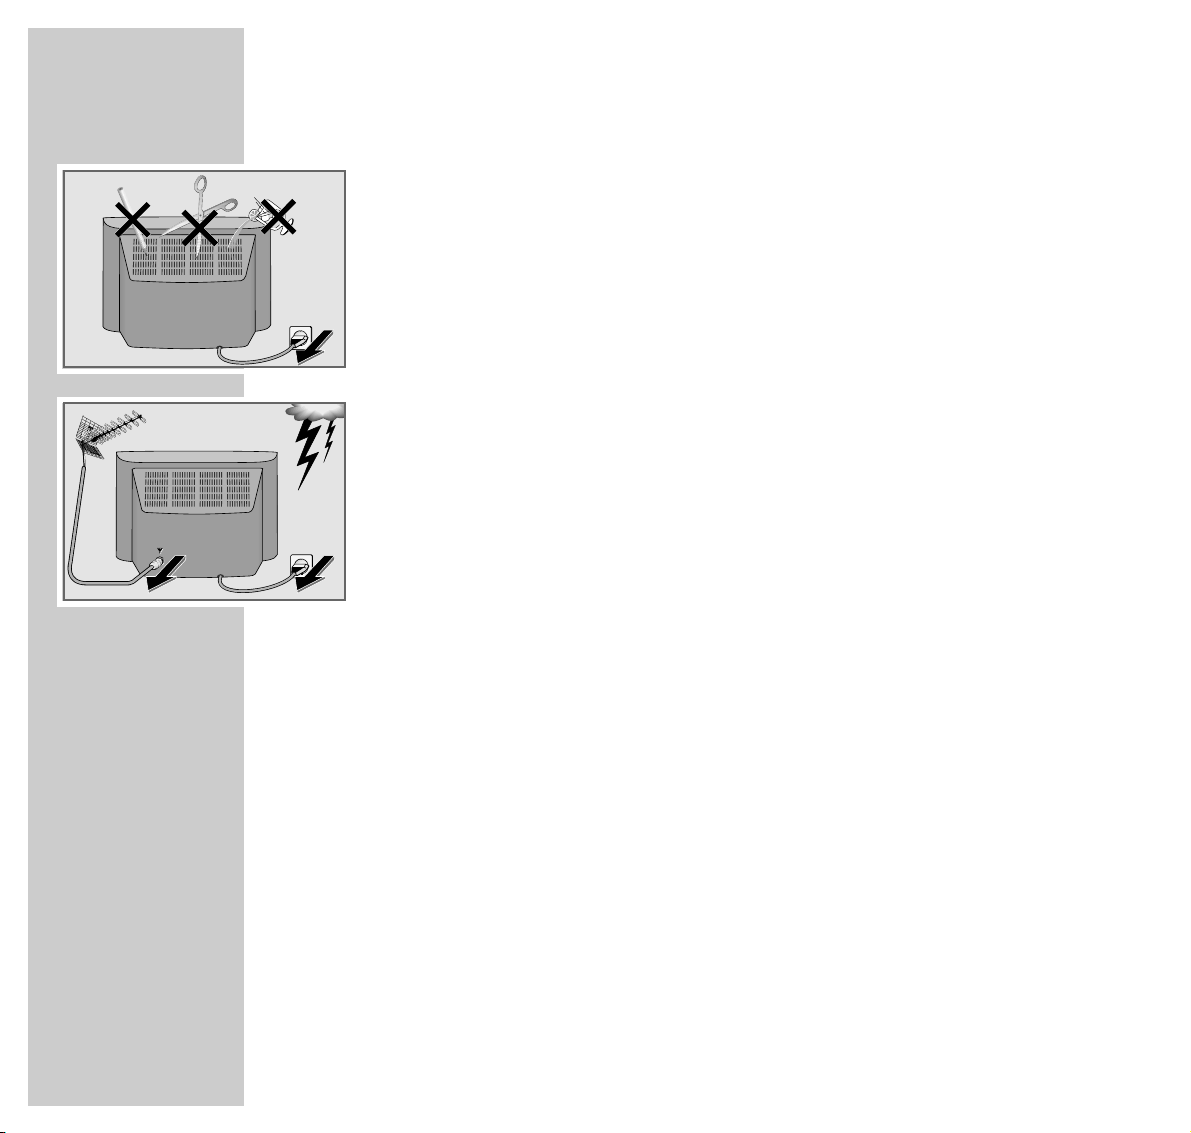
Do not open the TV set under any circumstance. The manufacturer will offer no
liability for damage resulting from unauthorized tampering.
Be sure that the mains cable is not damaged at any time.
Use only the mains power cable supplied for connecting the TV set to the mains.
Storms represent a danger for every type of electrical device. Even if the set is
switched off, it could be damaged by a lightning strike hitting the mains and/or
the aerial lead. Therefore, always disconnect the mains plug and aerial plug
when there is a storm.
When cleaning the screen, use only a soft, damp cloth. Use only clean water.
This television set sucessfully fuses technology and environmental friendliness
into a coherent package. Predominantly ecologically compatible, high quality
materials have been used. A high proportion of the casing is of recycled plastic
and it is painted with ecologically sound water-based laquers including recycled
laquer. Optimum design obviates the need for flame retardants in the casing.
The range of materials used has been deliberately reduced to a minimum and
all the larger plastic parts have been labelled to enable effective recycling at the
end of the set´s service life. This television set is easily disassembled to make servicing easier and optimise recycling.
! SERVICE !! SERVICE !! SERVICE !
Page 7
ENGLISH
7
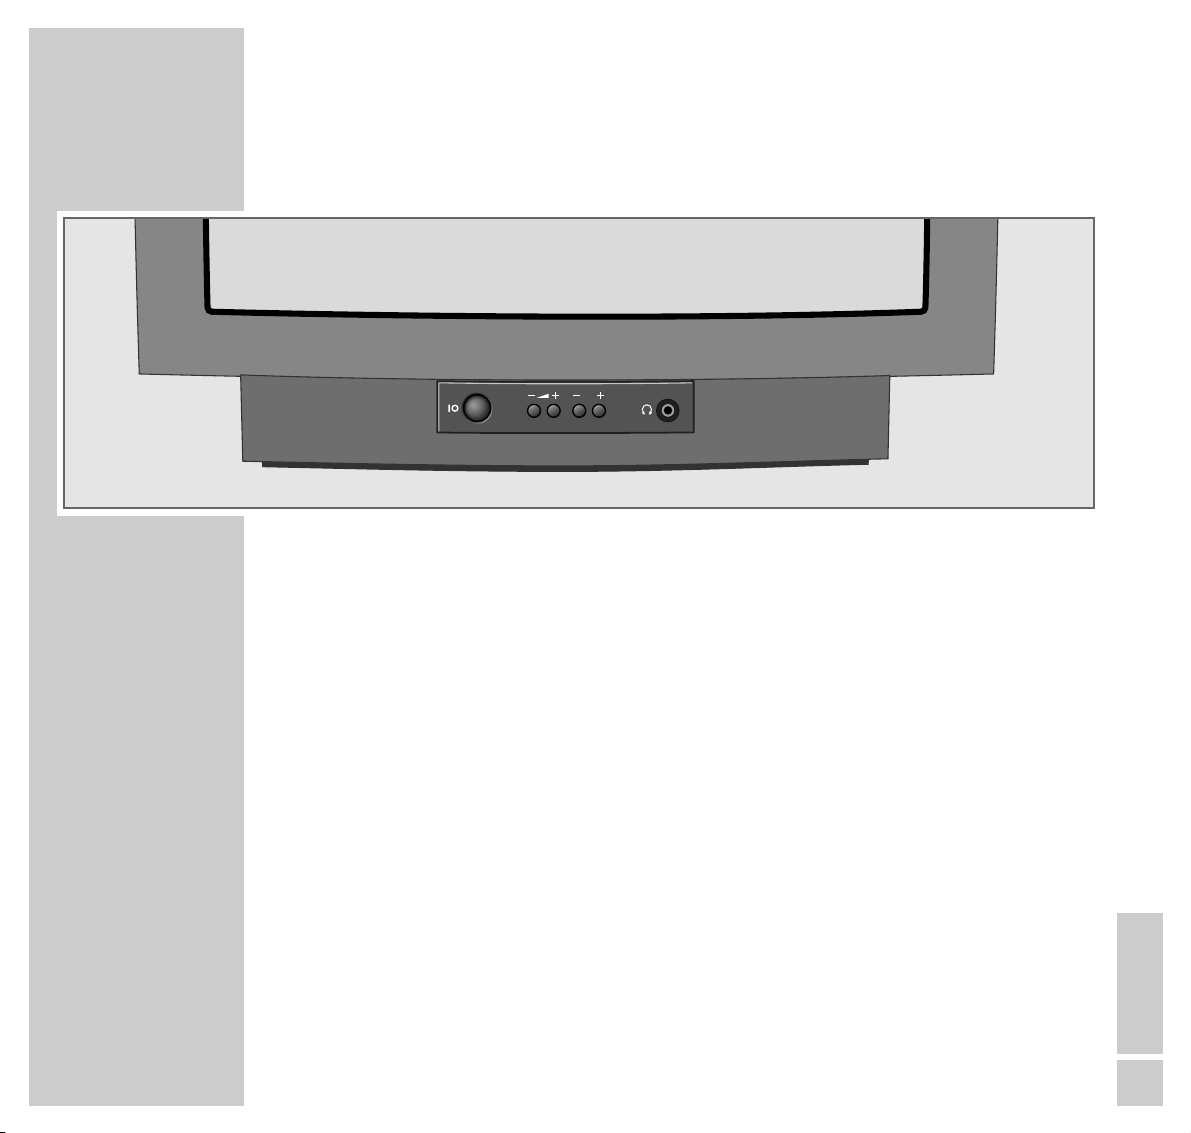
AT A GLANCE
___________________________________________________________________
The front of the TV set
–
z + Volume
–
P +
Select channel up/down.
IO
Switch the TV set on/off.
yy
Headphones connector
P
Page 8
8
AT A GLANCE
_____________________________________________________________________________
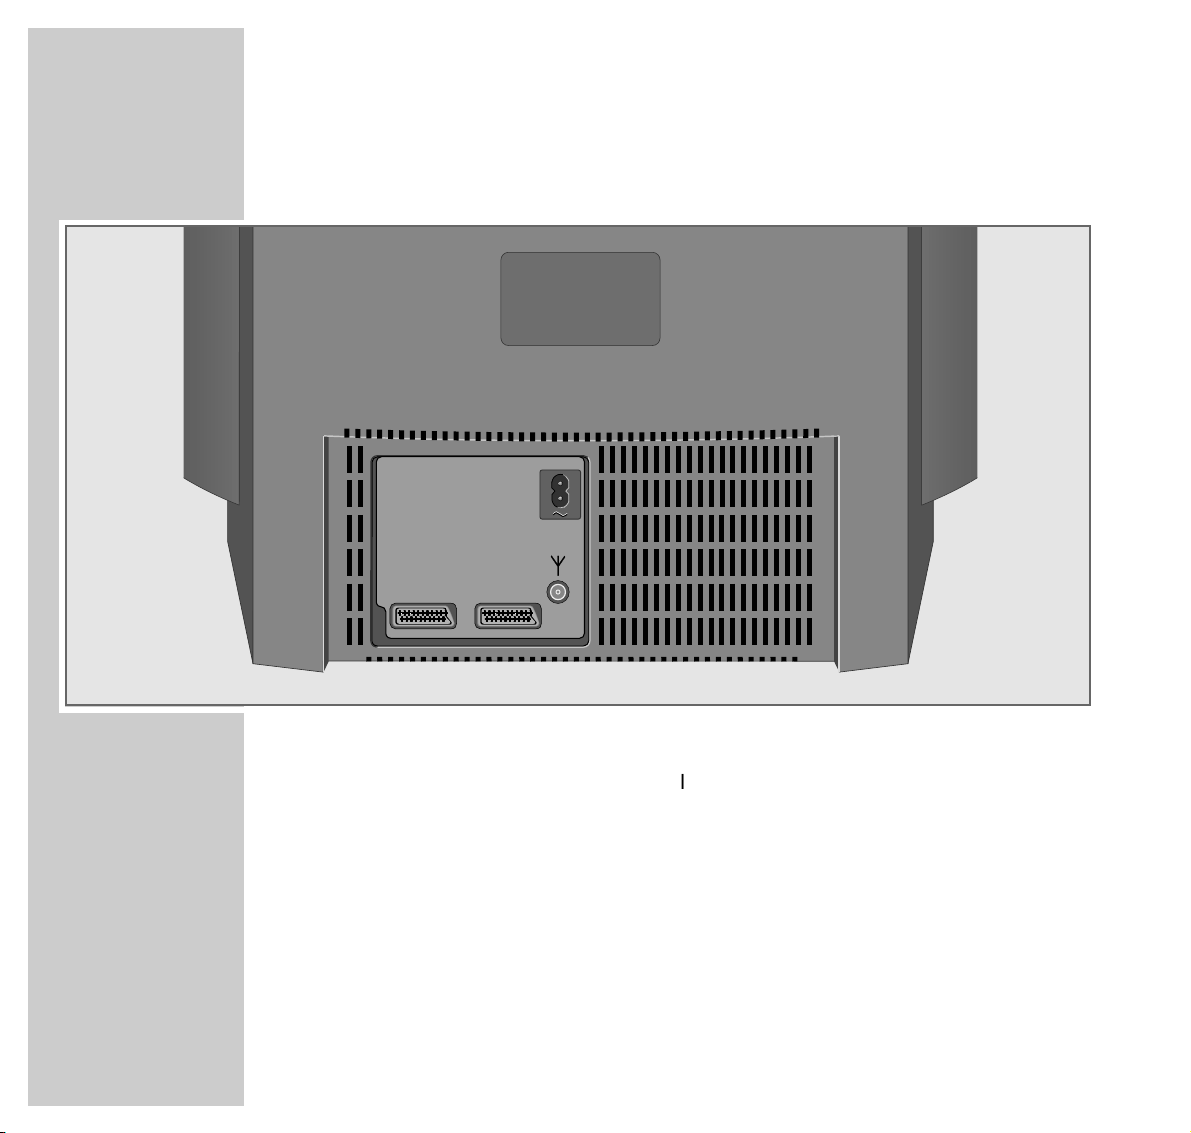
The rear of the TV set
ʋʋ
Mains cable to mains socket.
ÉÉ
Input for house aerial.
AV 1 Euro/AV socket (CSCC, S-VHS).
AV 2 Euro/AV socket (CSCC, S-VHS).
AV1 AV2
Page 9
ENGLISH
9
AT A GLANCE
_____________________________________________________________________________
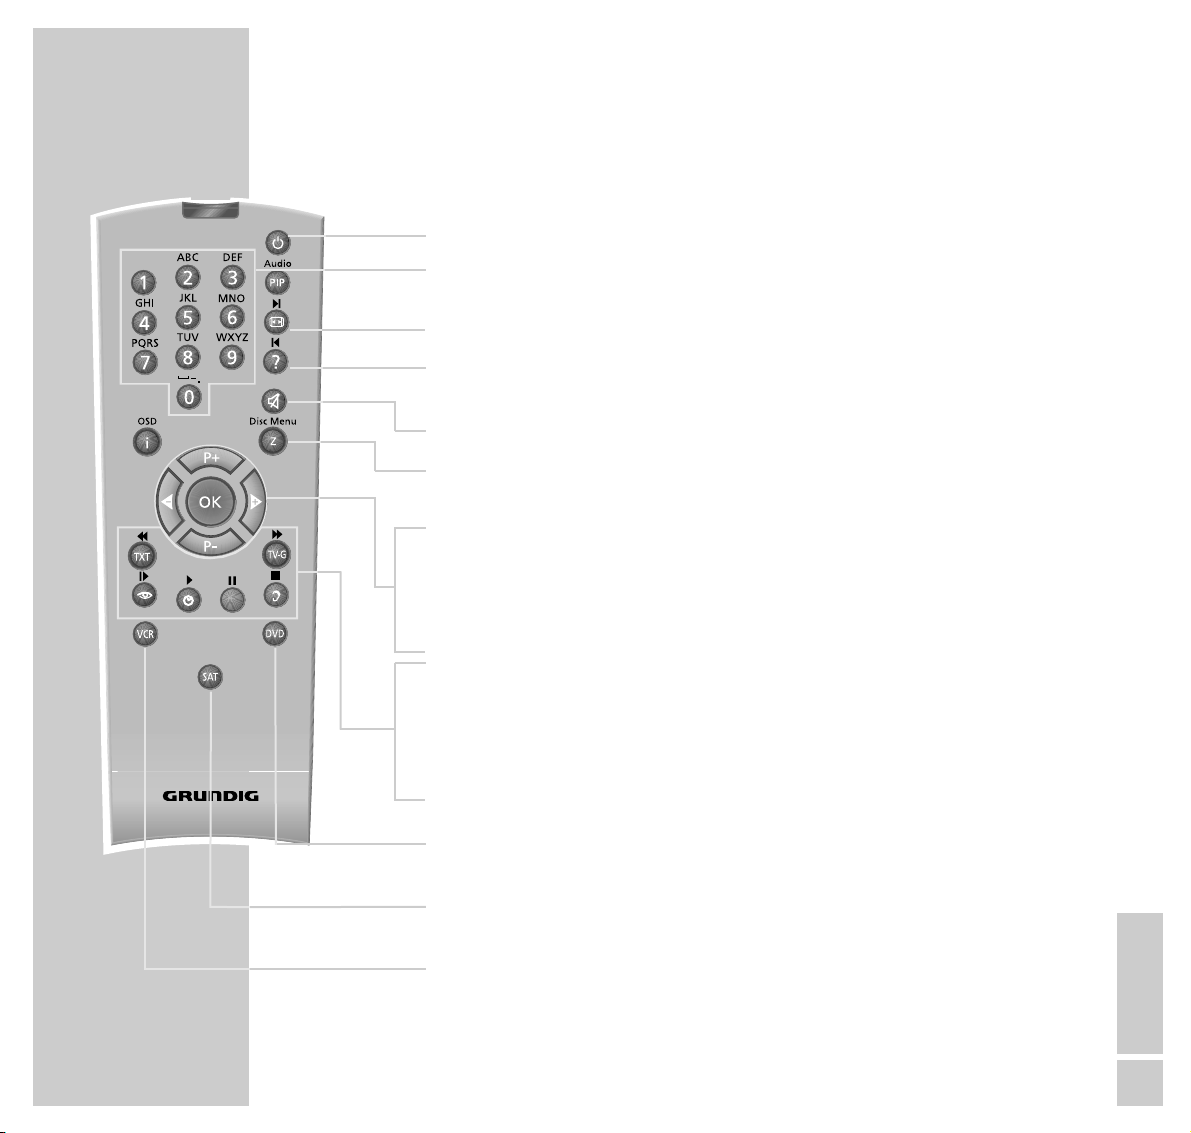
The remote control
Ǽ Switches off the TV set (standby).
0…9 Switches on the TV set from standby mode;
selects channels and AV channel positions directly.
E
Switches the picture format
D
Displays/hides channel symbols (status display);
calls up the symbol bar in teletext mode, deletes channels
d Sound on/off (mute).
z Surf function (see page 19).
i Calls up the »Dialog Center«; selects preceding menu page
P+, P- Switches the TV set on from standby mode (only »P+«);
selects channel one by one.
ǸǷ Change the volume.
OK Calls up the channel selection list; activates various functions.
TXT Switches between teletext mode and TV mode.
z
Calls up the »Picture«.
Ȅ Time on/off.
F
Calls up the menu »Sound«;
selects desired topic in teletext.
DVD Switches to the operation of a GRUNDIG DVD player
Hold down »DVD«. Then press the desired function button.
SAT Switches to the operation of a GRUNDIG satellite receiver
Hold down »SAT«. Then press the desired function button.
VCR Switches to the operation of a GRUNDIG video recorder
Hold down »VCR«. Then press the desired function button.
Note:
Which functions can actually be controlled depends of course of the equipment of the connected unit. Just try it out.
Tele Pilot 150 C
@
Page 10
10
CONNECTION AND PREPARATION
_______________
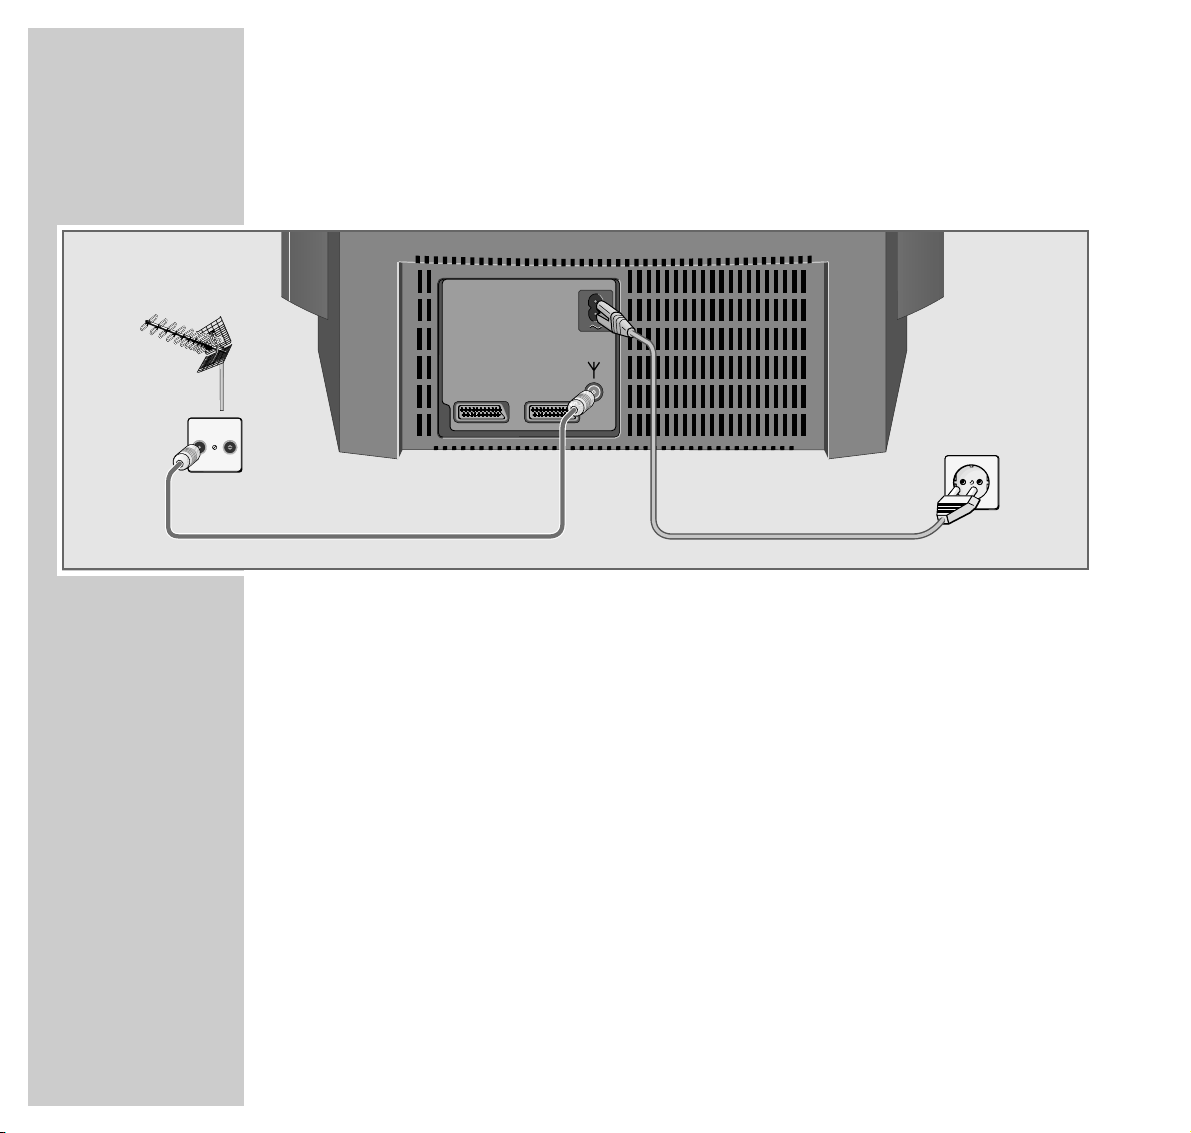
Connecting the aerial and the mains power cable
1 Connect the cable from the house aerial with the »
ÉÉ
« socket on the TV set.
2 Connect the small plug of the mains power cable supplied with the »
~
«
socket on the TV set.
3 Connect the large plug of the mains power cable with the mains socket (wall
outlet).
TV R
AV1 AV2
Page 11
ENGLISH
11
CONNECTION AND PREPARATION
_______________________________________
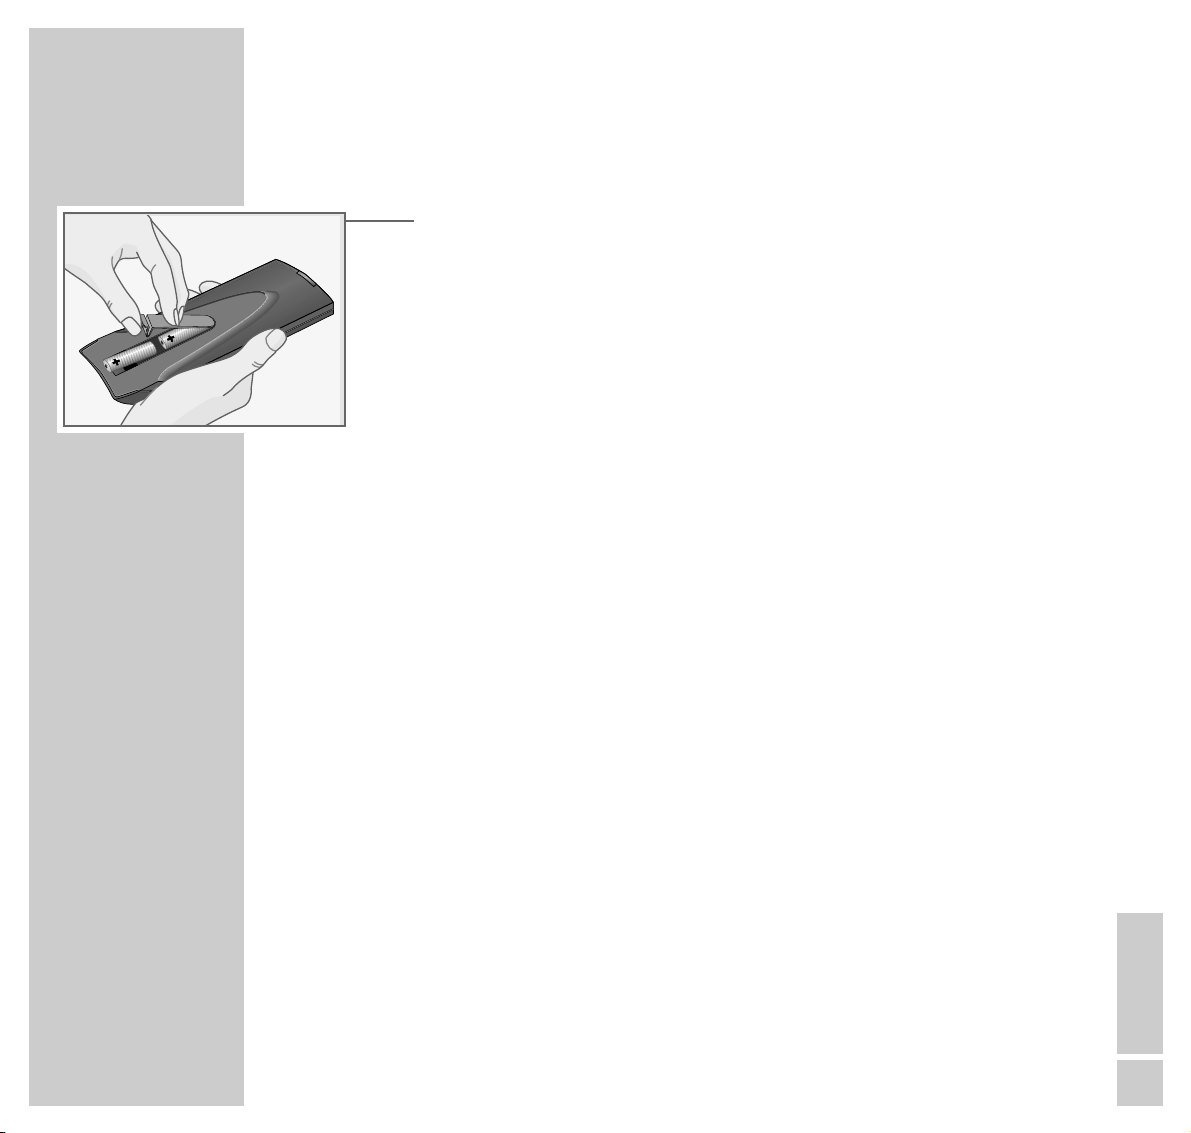
Putting batteries into the remote control
1 Open the battery compartment by pulling off the cover.
2 Insert the batteries (Mignon, i.e. UM-3 or AA, 2 x1.5 V).
Observe the polarity when inserting the batteries (marked on base of battery
compartment).
Note:
If the batteries are used up, »Battery« is displayed on the picture screen.
If your television does not react to the remote control commands correctly,
then the batteries could be used up. Remove empty batteries. There is no
liability for damage caused by leaking batteries.
Page 12
12
SETTINGS
______________________________________________________________________________
Setting TV channels –
automatically (with ATS searching)
The set is equipped with an automatic channel search system.
You start the ATS search and can then sort the television channels into an order
of your choice.
There are 99 channel positions available, which can be assigned to television
channels from the aerial or from the cable connection as desired.
You can also delete from the channel list television channels which are found
more than once, or which have poor reception.
1 Switching on the TV set with »IO« on the TV set.
– The »Language selection« menu will be displayed.
2 Select a language with »P+«or»P-« and confirm with »OK«.
– The »Location« menu will be displayed.
3 Select a country with »P+«or»P-« and confirm with »OK«.
Note:
If your country is not displayed in, select the line »Others«.
The »Manual tuning« menu will be displayed.
Using »P+«or»P-«, select either »Cable (frequency sel./MHz)
«
or
»Cable/aerial (channel sel.)«, and confirm with »OK«.
– The »Automatic Tuning System« menu will be displayed, and the automatic
channel search will begin.
– Depending on the number of channels received, this may take a minute or
longer.
– Following the search, the TV set will switch to channel position 1 and the
menu »Sort« will be displayed.
Language selection
OK
ĵ
––––––––––––––––––––––––––––––
Ł
D Deutsch
DK Dansk
E Español
F Français
FIN Suomi
GB English
GR Hellinika
I Italiano
N Norge
NL Nederlands
P Portuguêsa
PL Polski
S Svenska
TR Türkçe
Location
OK
A Austria
B Belgium
CH Switzerland
CZ Czech Republic
D Germany
DK Denmark
E Spain
F France
FIN Finland
GB Great Britain
GR Greece
1/2
ĵ
–––––––––––––––––––––––
Ł
Automatic Tuning System
Please wait ...
■–
_–_–_–_–_–_–_–_–_–_–_–_–_–_–_–_–_–_
Page 13

ENGLISH
13
SETTINGS
____________________________________________________________________________________
Deleting TV channels
1 In the »Sort« menu, select the TV channel to be deleted with »P+«or»P-«.
2 Delete the TV channel with »
D
«.
Note:
To delete further TV channels, repeat points 1 and 2.
Sorting TV channels
1 In the »Sort« menu, select the TV channel to be moved with »P+«or»P-«.
2 Mark the TV channel with »OK«.
3 Select a new channel position with »P+«or»P-«.
4 Save the setting with »OK«.
Note:
To sort further TV channels, repeat points 1 to 4.
Completing the settings
1 Complete the settings with »TXT«.
Sort
OK Sort
D Delete
Ǻ Return
TXT TV
P 01 ARD
P 02 ZDF
P 03 RTL
P 04 SAT1
P 05 PRO7
P 06 BR 4
P 07
P 08
P 09
P 10
ĵ
–––––––––––––––––
Ł
Sort
OK Sort
D Delete
Ǻ Return
TXT TV
P 01 ARD
P 02 ZDF
P 03 RTL
P 04 SAT1
P 05 PRO7
P 06 BR 3
P 07
P 08
P 09
P 10
ĵ
–––––––––––––––––
Ł
Page 14

14
SETTINGS
____________________________________________________________________________________
The Dialog Center
The »Dialog Center« is the control centre for your TV set.
Here you can make a variety of settings, call up information, and get specific
help for operating your television.
1 Call up the »Dialog Center« with »i«.
– Button symbols and dialogue lines display possible operating steps.
– The characters on the screen are symbols for the following buttons on the
remote control:
Symbol Button Function
Ǻ i Calls up the »Dialog Center« and switches back to the
»Dialog Center« when you are on an individual page.
Ń P+ P- Call up rows or functions on a page.
Ľ
ľı
ǸǷ
Change settings.
OK OK Confirms functions.
TXT TXT Ends settings.
2 Press »TXT« to exit the »Dialog Center«.
Dialog Center
OK TXT
ĵ
–––––––––––––––––––––––––––
Ł
Language selection
Sleep timer
Child lock
Special functions
Program sort
Manual tuning
Automatic Tuning System
Service
Page 15

ENGLISH
15
SETTINGS
____________________________________________________________________________________
Picture settings
Setting brightness, colour, contrast, definition and tint
1 Call up the »Picuture« menu with »z«.
– The »Picuture« menu appears.
2 Select the line »Brightness«, »Color«, »Contrast«, »Sharpness« or »Tint« with
»P+«or»P-« and set the value desired with »Ǹ«or»Ƿ«. (With transmissions in NTSC standard, »Tint« will appear in addition in the picture menu
and can be adjusted.)
Note:
The set has been tested with maximum contrast in order to control the reliability of all modules. Depending on the location of the set and the light level in
the room (ambient light) it is nevertheless a good idea to reduce the contrast
slightly for optimum picture quality.
3 Complete the setting with »TXT«.
Picture
TXT
Brightness ľ ■■■■■■■■■–
_–_–_
ı
Color ■■■■■■■–
_–_–_–_–_
Contrast ■■■■■■■ –
_–_–_–_–_
Sharpness ■■■■■■■–
_–_–_–_–_
n
ĵ
––––––––––––
Ł
Page 16

16
SETTINGS
____________________________________________________________________________________
Sound settings
Stereo depth
Widens the acoustic pattern for stereo programmes and improves it for mono
programmes.
1 Call up the »Sound« menu with »
F
«.
2 Select the »
ʀ. ǁ
» lines with »P+«or»P-«.
3 Select »
ʀ
.......
ǁ
« with »Ǹ«or»Ƿ«.
4 Complete the setting with »TXT«.
Dolby Surround*
Dolby Surround is an electronic solution which is fully integrated in the TV and
requires only 2 additional speakers to create Dolby Surround effects.
1 Call up the »Sound« menu with »
F
«.
2 Select the »
ʀ. ǁ
» lines with »P+«or»P-«.
3 Select »Dolby Surround« with »
Ǹ
«or»Ƿ«.
4 Complete the setting with »TXT«.
* Under license from Dolby Laboratories Licensing Corporation.
DOLBY and the double-D symbol
ij are trademarks of Dolby Laboratories Licensing
Corporation.
Sound
TXT
ĵ
––––––––––––––––––––––
Ł
ʀǁ
TV ľ
ʀ
. . . . . .
ǁ
ı
ʀ P01 Stereo
y Stereo
y
u
ɼ
ɦ
Sound
TXT
ĵ
––––––––––––––––––––––
Ł
ʀǁ
TV ľ Dolby Surround ı
ʀ P01 Stereo
y Stereo
y
u
ɼ
ɦ
Page 17

ENGLISH
17
SETTINGS
____________________________________________________________________________________
Changing the balance, the bass and the treble
1 Call up the »Sound« menu with »
F
«.
2 Select the lines required »
u
« – balance, »ɼ « – bass or »ɦ« – treble with
»P+«or»P-« and set the required value with »Ǹ«or»Ƿ«.
3 Complete the setting with »TXT«.
Stereo (two-channel), mono
If the device receives two-channel transmissions – e.g. a film in the original on
sound channel B (display: »Mono B«) and the synchronised version on sound
channel A (display: »Mono A«) – you can select your preferred sound channel.
If the device receives stereo broadcasts, it automatically switches to stereo sound
playback (display: »Stereo«).
The sound setting last selected will be stored according to the channel.
1 Call up the »Sound« menu with »
F
«.
2 Select line »
ʀ
P01« with »P+«or»P-«.
3
If the sound reproduction of a particular channel is constantly mono, select the
lines »ʀP..« with
»P+«or»P-«
and confirm with »OK«.
4 Complete the setting with »TXT«.
Note:
Repeat the setting to cancel this function.
Sound
TXT
ĵ
––––––––––––––––––––––
Ł
ʀ. ǁ
ʀ
..
ǁ
ʀ P01 Mono
y Mono
y
u
ɼ
ɦ
ľı
Sound
OK auto TXT
ĵ
––––––––––––––––––––––
Ł
ʀ. ǁ
ʀ
..
ǁ
ʀ P01 ľ Mono fix ı
y Mono fix
y
u
ɼ
ɦ
Page 18

18
TV OPERATION
_______________________________________________________________
Basic functions
Switching on and off
1 Turn on the TV set with »IO« on the TV set.
If only the LED illuminates, the set is in standby mode.
Turn on the TV set with »1…0« or »P+«.
2 Press »
ǼǼ
« to switch the TV set to standby.
Press »1…0« or » P+« to switch the TV set on from standby.
3 Press »IO « on the TV set to switch definitely off.
This saves energy.
Selecting channel positions
1 Select channel positions (including AV) directly with » 1…0«.
or
2 Select channel positions one by one with »P+«or»P-«.
Adjusting the volume, brightness and colour contrast
1 Adjust the volume with »
Ǹ
« or »Ƿ«.
Note:
Every changed setting is saved after several seconds.
Switching sound on/off
1 Switch sound on or off (mute) with »d«.
Tele Pilot 150 C
@
Page 19

ENGLISH
19
TV OPERATION
__________________________________________________________________________
Displaying/hiding the clock
1 Display or hide the time with »Ȅ « (only for TV channels with teletext).
Surf function
With this function you can memorise the TV channel you are watching at the
moment and switch (surf) to other TV channels.
1 Select the TV channel, which is to be stored in the surf memory (e.g. TV
channel 7, PRO7) with »1…0« or »P+, P -« and save with »z«. The indication »Z 7 PRO7«, for example, then appears on the screen.
2 »1…0 « or »P+, P- « can now be used to switch over to other TV channels.
3 With »z« you can switch back (surf) to the saved TV channel (PRO 7 in this
example) and then back to the last viewed TV channel.
4 Finish surfing with »i«. The indication disappears.
Tele Pilot 150 C
@
Page 20

20
TV OPERATION
__________________________________________________________________________
Picture format switching
In digital mode the TV set automatically is in „16:9“ picture format. When in
analoge mode the reception conditions are poor, it may happen that the picture
format changes between 16:9 and 4:3. In this case the „automatic picture format switchover “ should be switched off. See chapter “Service – Picture format
switchover” on page 28 for information about how this is done. When in digital
mode the digital signal will automatically select the correct viewing mode. You
now are able to change the format by pressing »E«. If digital channels are
changed, the picture format returns automatically back to „16:9“ picture format.
1 Press »
E
« to select the picture format. The selected picture format, e.g.
»16:9«, appears on the picture screen.
– You may switch between the following picture formats:
Automatic format
In the case of 16:9 programmes, the TV set automatically switches to the “16:9”
picture format. In the case of 4:3 programmes, the TV set automatically switches
to full screen mode. This setting is only possible if the picture format switchover is
set to «manual». See chapter “Service – Picture format switchover” on page 28
for information about how this is done.
Format 16:9
In the case of 4:3 broadcasts and with the function “Format 16:9” selected, the
picture is horizontally enlarged. The picture geometry is stretched in the horizontal direction. In the case of real 16:9 signal sources delivered by an add-on
decoder connected to the Euro-AV socket, the picture screen is fully filled and the
picture geometry is correct.
Cinema
This mode is especially appropriate for broadcasts in 16:9 picture format.
The advantage of this mode is that the black stripes at the top and the bottom of
the picture are no longer visible. The pictures are enlarged and picture information is lost at the top and the bottom, but the picture geometry is maintained.
Panorama
This mode is especially suited for cinema fims with extreme width/height relations. In the case of 4:3 broadcasts and with the function “Panorama” selected,
the picture is horizontally enlarged. The picture geometry is streched in the horizontal direction.
Page 21

ENGLISH
21
Tele Pilot 150 C
@
TELETEXT OPERATION
________________________________________________
TOP text or FLOF text mode
1 Switch to teletext with »TXT«.
Either the contents page 100 or the teletext page last viewed will appear.
2 The teletext pages can also be selected directly with »1...0« (return to con-
tents page 100 with »i«).
Note:
An information line consisting of a red, green, yellow and blue lettering field
is located at the bottom of the screen. The remote control has corresponding
colour-coded buttons.
3 Turn back one page or select the chapter desired using »
z
« (red).
4 Turn forward one page or select the topic desired with »Ȅ « (green).
5 Select the chapter desired with »
@
« (yellow).
6 Select the topic desired with »
F
« (blue).
7 Switch off teletext mode with »TXT«.
Normal text mode (Basictext)
1 Switch to teletext with »TXT«.
– Either the contents page 100 or the teletext page last viewed will appear.
2 The teletext pages can also be selected directly with »1...0« (return to con-
tents page 100 with »i«).
3 Turn back one page with »
z
« (red).
4 Turn to the next page available with »Ȅ« (green).
5 Switch off teletext mode with »TXT«.
Page 22

22
Additional functions
Selecting teletext pages directly (page catching)
Several contents pages contain three-digit page numbers which can be selected
directly.
1 Select the desired page number with »P+«or»P-«.
– »Page-Catching OK« appears at the top of the picture and a cursor is posi-
tioned on the first or last page number.
2 Confirm the page number with »OK«.
– The page appears after a short time.
Selecting a language group
You can choose between language groups for the dialogue with the teletext.
The individual countries are stored in three European language groups:
Western Europe, Eastern Europe and Europe + Turkey.
Most European countries are contained in the Western European language
group (WEST).
First select Eastern Europe (EAST) if you wish to call up teletext from broadcasting stations in Poland, the Czech Republic, Romania or from Yugoslavia. For
Turkey or Greece, select WEST + GR + TR.
1 Select the desired TV channel.
2 Select »Dialog Center« with »i«.
3 Select the »Service« bar with »P+«or»P-«.
4 Select the »Telet. language« with »P+«or»P-«.
5 Select the required setting for a channel position with »
Ǹ
«or»Ƿ«.
6 Switch off teletext mode with »TXT«.
TELETEXT OPERATION
______________________________________________________________
Tele Pilot 150 C
@
Page 23

ENGLISH
23
Selecting functions – from the symbol bar
1 Switch to teletext mode with »TXT«.
2 Call up the “symbol bar” with »
D
«.
– The symbol bar appears at the bottom of the screen.
3 Select the function with »
Ǹ
« or »Ƿ« and call it up with »OK«.
4 Switch off teletext mode with »TXT«.
The symbol bar has the following functions:
Increasing the character size
1 Press »OK« repeatedly in order to increase the character size of a teletext
page.
Making use of waiting time
1 Enter the number of the teletext page with »0...9«.
2 Switch to the current TV channel with »OK«.
– You can see the TV picture with an »X« at the top.
– A page number appearing instead of »X«, means that the page has been
found.
3 Switch to the teletext page with »OK«.
TELETEXT OPERATION
______________________________________________________________
X
Page 24

24
Calling up a sub-page directly
1 Call up the sub-page with »OK« (not in normal text mode).
2 Select the four digits of the desired sub-page with »0...9«.
– The selected sub-page appears after a short time.
Revealing an answer
Some teletext pages contain “hidden answers” or information. These can be called up.
1 Reveal the information with »OK«.
2 Hide the information with »OK«.
Holding a page
A multi-page display can contain several sub-pages which are automatically
paged forward by the broadcasting station.
1 Hold the sub-page with »OK«.
2 Cancel the function with »OK«.
TELETEXT OPERATION
______________________________________________________________
00
D
STOP
Page 25

ENGLISH
25
Convenience functions via the
»Special functions« menu
1 Call up the »Dialog Center« by pressing »i« and then »OK«.
2 Select the »Special functions« row from the »Dialog Center« with »P+«or
»P-« then confirm with »OK«.
Note:
See the following chapters for further operation.
Switch sound scales on/off
When adjusting volume the corresponding scale appears on the screen. This
scale can be switched off.
1 Select the line »Sound scale« with »P+«or»P-« and select »off« with »
Ǹ
«
or »Ƿ«.
2 Complete the setting with »TXT«.
Equalise volume
The volume of normal TV broadcasts and commercials may be different. This
volume fluctuation can be equalised.
1 Select the line »Volume Limiter« with »P+«or»P-« and select »on« with
»Ǹ«or»Ƿ«.
Note:
The line »Volume Limiter« will not appear when »Dolby Surround« has been
selected in the »Sound« menu.
2 Complete the setting with »TXT«.
CONVENIENCE FUNCTIONS
_________________________________
Dialog Center
OK TXT
Language selection
Sleep Timer
Child lock
Special functions
Program sort
Manual tuning
Automatic Tuning System
Service
ĵ
–––––––––––––––––––––––––––
Ł
Special functions
Ǻ TXT
Sound scale ľ on ı
Volume Limiter off
Decoder P01 off
Switch on with auto
Copy on/off off
ĵ
–––––––––––
Ł
Special functions
Ǻ TXT
Sound scale on
Volume Limiter ľ off ı
Decoder P01 off
Switch on with auto
Copy on/off off
ĵ
–––––––––––
Ł
Page 26

26
Switch on with...
Select what the television shold do after being switched on: If you select preset
station 1 the television always switches on with that station. If you select »auto«,
the television witches on in the mode it was in when sitched off. (Preset station or
standby mode).
1 Select the line »Switch on with« with »P+«or»P-« and select »P 1« or
»auto« with »Ǹ«or»Ƿ«.
2 Complete the setting with »TXT«.
Setting switch-off time with the »Sleep Timer« menu
A switch-off time can be entered for the TV set using the »Sleep Timer« menu.
The TV set switches to standby mode when the set time has elapsed.
1 Call up »Dialog Center« by pressing »i«.
2 Select the line »Sleep Timer« with »P+«or»P-« and confirm with »OK«.
3 Enter the switch-off time desired with two digits (from 01 to 99 minutes) with
»1… 0«.
Note:
The switch-off time can be deleted with »00« (Complete the setting with
»Standby«).
4 Complete the setting with »TXT«.
CONVENIENCE FUNCTIONS
___________________________________________________
Special functions
Ǻ TXT
Sound scale on
Volume Limiter off
Decoder P01 off
Switch on with ľ auto ı
Copy on/off off
ĵ
–––––––––––
Ł
Sleep Timer
Ǻ 0-9 TXT
Ȅ
–– ––
Ȅ
min.
Page 27

ENGLISH
27
CONVENIENCE FUNCTIONS
___________________________________________________
Convenience functions via the »Service« menu
Note:
The »Service Code « and » IDP2 HP« functions are provided for the specialized dealer only.
1 Call up the »Dialog Center« by pressing »i«.
2 Select the »Service« row from the » Dialog Center« with »P+« or »P-« then
confirm with »OK«.
Note:
See the following chapters for further operation.
Switching the station name display on and off
Several TV stations broadcast their name. This is briefly displayed on the picture
screen when changing the channel position. You may switch off this display.
1 Select the »Station name« row with »P+« or »P-« then use »
Ǹ
«or»Ƿ« to
select »off«.
2 End the setting by pressing »TXT«.
Adjusting manually the colour norm
The colour norms are automatically assigned when allocating the channel position with the automatic station search. You do not need to carry out this setting if
the colour is already well adjusted on the different channels.
1 Select the »Color P..« row with »P+« or »P-« then select the required colour
norm using »Ǹ«or»Ƿ«.
2 End the setting by pressing »TXT«.
Service
Ǻ OK TXT
ĵ
––––––––––––––––––
Ł
Preset
Color P 01 auto
Blue Screen on
Black Screen off
IDP2 HP
Format switch-over auto
Station name on
Telet. language West
Service Code ––––
Service
Ǻ TXT
ĵ
––––––––––––––––––
Ł
Preset
Color P 01 auto
Blue Screen on
Black Screen off
IDP2 HP
Format switch-over auto
Station name ľ on ı
Telet. language West
Service Code ––––
Service
Ǻ TXT
ĵ
––––––––––––––––––
Ł
Preset
Color P 01 ľ auto ı
Blue Screen on
Black Screen off
IDP2 HP
Format switch-over auto
Station name on
Telet. language West
Service Code ––––
Page 28

28
CONVENIENCE FUNCTIONS
___________________________________________________
Selecting a blue picture screen
With this function, a grainy image is switched to a blue image.
1 Select the »Blue Screen« row with »P+« or »P-« then use »
Ǹ
«or»Ƿ« to
select »on«.
2 End the setting by pressing »TXT«.
Selecting a black picture screen
With this setting, it is possible to avoid distracting flickering of channels whilst
switching channel positions.
1 Select the »Black Screen« row with »P+« or »P-« then use »
Ǹ
«or»Ƿ« to
select »on«.
2 End the setting by pressing »TXT«.
Factory settings
All picture and sound values are preset at the factory. This pre-setting can be
called up via the »Service« menu.
1 Select »Preset« with »P+«or»P-«.
2 Confirm the pre-set values with »OK«.
Picture format switch-over
If recpetion conditions are poor, you may switch off the automatic picture format
switchover.
1 Select the »Format switch-over« row with »P+«or»P-« then use »
Ǹ
«or
»Ƿ« to select »manual«.
2 End the setting by pressing »TXT«.
Service
Ǻ TXT
ĵ
––––––––––––––––––
Ł
Preset
Color P 01 auto
Blue Screen ľ on ı
Black Screen off
IDP2 HP
Format switch-over auto
Station name on
Telet. language West
Service Code ––––
Service
Ǻ TXT
ĵ
––––––––––––––––––
Ł
Preset
Color P 01 auto
Blue Screen on
Black Screen ľ off ı
IDP2 HP
Format switch-over auto
Station name on
Telet. language West
Service Code ––––
Service
Ǻ OK TXT
ĵ
––––––––––––––––––
Ł
Preset
Color P 01 auto
Blue Screen on
Black Screen off
IDP2 HP
Format switch-over auto
Station name on
Telet. language West
Service Code ––––
Page 29

ENGLISH
29
Activating child-proof lock
1 Call up »Dialog Center« by pressing »i«.
2 Select the line »Child lock« with »P+«or»P-« and confirm with »OK«.
3 Enter four-digit PIN »1...0 « and save with »OK«.
– The »PIN« symbol will appear in red.
4 Complete the setting with »TXT«.
– When the TV set has been turned off and turned on again, the child-proof
lock will be activated. The page »Child lock« will appear, and all functions
are locked.
Switching off child-proof lock briefly
1 Turn television set on and enter the four-digit PIN with »1...0 «.
– The set switches to the TV picture. When the set has been switched off and
then on once more, the lock reactivates.
Switching off child-proof lock
1 Switch TV set on.
2 Enter four-digit PIN with »1...0 «.
3 Call up »Dialog Center« by pressing »i«.
4 Select the line »Child lock« with »P+«or»P-« and confirm with »OK«.
5 Enter four-digit PIN with »1...0 «.
– The »PIN« symbol appears in black: the child-proof lock has been cleared.
6 Complete the setting with »TXT«.
Note:
If you have forgotten your PIN, you can use the digit combination given in
the section “Rectifying malfunctions” on page 44.
PARENTAL LOCK
____________________________________________________________
Dialog Center
OK TXT
Language selection
Sleep Timer
Child lock
Special functions
Program sort
Manual tuning
Automatic Tuning System
Service
Child lock
Ǻ 0-9 TXT
PIN
7
– – – –
ĵ
–––––––––––––––––––––––––––
Ł
Child lock
Ǻ 0-9 TXT
PIN
7
– – – –
Page 30

30
Decoder or satellite receiver
If you wish to receive encoded TV programmes from a pay-TV provider, you will
need an appropriate decoder.
Connecting a decoder or a satellite receiver to the
»AV 1« socket
1 Connect the »AV1« socket of the TV set and the corresponding socket on the
decoder with a EURO/AV (Scart) cable.
Note;
It is also possible to connect a satellite recceiver to this socket.
If you wish to connect a satellite receiver and a decoder, the decoder must be
connectedc to the satellite receiver.
OPERATION WITH EXTERNAL EQUIPMENT
______
AV1 AV2
PAY-TV
Decoder
Page 31

ENGLISH
31
Settings for decoder operation
1 Select the channel position on which the encrypted programme is received.
– The TV set switches automatically to channel position »AV1«.
2 Call up the »Dialog Center« by pressing »i«.
3 Select the »Special functions« row with »P+«or»P-« then confirm with
»OK«.
4 Select the »Decoder P ..« row with »P+«or»P-«.
– »P ..« shows the selected channel position.
5 Select the setting »ON 1«, »ON 2« or » ON 3« with »
Ǹ
«or»Ƿ« .
– The setting depends on the decoder connected.
– Select »off« if no decoder is connected.
6 Press »TXT« to end the setting.
OPERATION WITH EXTERNAL EQUIPMENT
_________________________
Special functions
Ǻ TXT
Sound scale on
Volume Limiter off
Decoder P01 ľ off ı
Switch on with auto
Copy on/off off
ĵ
–––––––––––
Ł
Page 32

32
Video recorder or SET-TOP box
Connecting a video recorder or SET-TOP box to the
»AV 1« or » AV2« socket
1 Connect the »AV1« or »AV2« socket on the TV set and the corresponding
socket on the video recorder or on the SET-TOP box with a EURO/AV (Scart)
cable.
OPERATION WITH EXTERNAL EQUIPMENT
_________________________
AV1 AV2
ń
R
L
AUDIO
R
L
I
N
O
U
T
2 EXTERNAL / DEC. - AV 2
1 EXTERNAL / EURO - AV 1
Page 33

ENGLISH
33
Set video standard (VHS or SVHS)
This setting depends on the video recorder connected.
1 Press »0« repeatedly until »AV 1« is displayed on the set.
2 Call up »Dialog Center« by pressing »i«.
3 Select the line »Special functions« with »P+«or»P-« and confirm with
»OK«.
4 Select the line »Video« with »P+«or»P-« and use »
Ǹ
«or»Ƿ« to
select »VHS « or » SVHS«.
5 Complete the setting with »TXT«.
Operating with a video recorder or SET-TOP box
1 Switch on the video recorder or SET-TOP box and select the function desired.
2 Select channel position »AV 1« with »0«.
– The picture and tone information from the video recorder or SET-TOP box
can be heard and seen via the TV set.
OPERATION WITH EXTERNAL EQUIPMENT
_________________________
Special functions
Ǻ TXT
Sound scale on
Volume Limiter off
Decoder P01 off
Switch on with auto
Copy on/off off
Video AV1 ľ VHS ı
ĵ
–––––––––––––
Ł
Page 34

34
Copying video recordings via the TV set
You may copy video recordings from a video recorder or a camcorder to
another video recorder.
Followin
g combinations ar
e possible:
– Video recorder (AV1) to video recorder (AV2)
– Video recorder (AV2) to video recorder (AV1)
Copying from an SVHS video recoder/camcorder to a VHS-video recoder/
camcorder is not possible.
During copying, you can watch television without affecting copying.
1 Select channel position »AV1« or »AV2« with »0«.
2 Call up the »Dialog Center« by pressing »i«.
3 Select the »Special functions« row with »P+«or»P-« then confirm with
»OK«.
4 Select the »Copy on/off« row with »P+« or »P-« then use »
Ǹ
«or»Ƿ« to
select »on«.
5 End the setting by pressing »TXT«.
6 Start playback/recording on the video recorder/camcorder.
– Copying is started. You can watch any desired programme on the TV set
without affecting copying.
Note:
To end copying, repeat the steps 1 to 5.
OPERATION WITH EXTERNAL APPLIANCES
________________________
Special functions
Ǻ TXT
Sound scale on
Volume Limiter off
Decoder P01 off
Switch on with auto
Copy on/off ľ off ı
Video AV1 VHS
ĵ
–––––––––––––
Ł
Page 35

ENGLISH
35
Headphones
Connecting headphones
1 Insert the headphone plug (3,5 mm ø jack plug) into the front of the TV set.
– The speaker is switched off.
Select Stereo (two-channel), mono for the headphones
1 Call up the »Sound« menu with »
F
«.
2 Select the line » y « with »P+«or»P-« and select the required sound type
with »Ǹ«or»Ƿ«; »Mono« or »Stereo« and for two-channel broadcasts,
select »Mono A« or »Mono B«.
3 Complete the setting with »TXT«.
Changing the volume of the headphones
1 Call up the »Sound« menu with »
F
«.
2 Select the lines » y « with »P+«or»P-« and press »
F
«.
3 Set the volume with »
Ǹ
«or»Ƿ«.
– The altered value is displayed on a scale.
OPERATION WITH EXTERNAL EQUIPMENT
_________________________
Sound
OK TXT
ĵ
––––––––––––––––––––––
Ł
ʀǁ
ʀ
..
ǁ
ʀ
P01 Mono A
y ľ Mono B ı
y
u
ɼ
ɦ
P
Page 36

36
SPECIAL SETTINGS
________________________________________________________
Limiting channel selection
The ATS search saves all television channels found and automatically “blocks”
the first non-assigned channel position. This means that only the television channels which were found can be selected using channel selection. This feature can
also be defined manually. In the example, all channels from channel position 6
have been “blocked”.
1 Call up »Dialog Center« by pressing »i«.
2 Select the line »Manual tuning« with »P+«or»P-« and confirm with »OK«.
3 Select the channel position (in the example, 6) with »
Ǹ
«, »Ƿ« or »1...0«.
4 Select the line »C/S« with »P+«or»P-« and use »
Ǹ
«or»Ƿ« to select the
»Channel« display.
Note:
The line »C/S« will not appear if the »Adjust country« preselection »France«
or »Others« and then »Cable (frequency sel./MHz)« were selected.
5 Select the line »Channel« with »P+«or»P-« and use »1...0« to enter »00«
or, in the case of frequency selection, »000« (dependent on the »Adjust
country« preselection).
6 Save the setting with »OK«.
– Now, only the first five channel positions (and the » AV« channel position)
can be selected.
– After the direct selection of the first blocked channel position »1... 0« (in
the example, 6), the “blocked” channel positions can be selected with
»P+«or»P-«.
7 Complete the setting with »TXT«.
Note:
If the blocked channel position is reallocated, the channel position limitation
set is cleared.
Manual tuning
Ǻ OK Store TXT
Program 06
C/S ľ Channel ı
Channel 34
Finetun. 00
Norm B/G (Universal)
Name RTL2
ĵ
–––––––––––––
Ł
Manual tuning
Ǻ OK Store •Tune 0-9 TXT
Program 06
C/S Channel
Channel ľ 00 ı
Finetun. 00
Norm B/G (Universal)
Name RTL2
ĵ
–––––––––––––
Ł
Page 37

ENGLISH
37
SPECIAL SETTINGS
____________________________________________________________________
Setting TV channels
This setting is only necessary if a new TV channel is added and you wish to
maintain your own particular order for the channel positions. The TV channel
can be set directly or via the automatic channel search.
1 Call up »Dialog Center« by pressing »i«.
2 Select the line »Manual tuning« with »P+«or»P-«, and confirm with
»OK«.
3 Select the channel position with »
Ǹ
«, »Ƿ« or »1...0«.
4 Select the line »C/S« with »P+«or»P-«, and use »
Ǹ
«or»Ƿ« to select the
display »Channel« or »S-channel«.
Note:
The line »C/S« will not appear if the »Adjust country« preselection »others«
and then »Cable frequency sel./MHz« were selected.
5 Select the line »Channel« with »P+«or»P-«, and use »
Ǹ
«
, »
Ƿ
« or
»1...0« to enter the channel number desired (or the frequency, dependent
on the »Adjust country« preselection);
or
Start the ATS search with »F« (blue).
Notes:
Repeat the automatic channel search until the channel desired appears.
Cancel the automatic channel search with »TXT«.
The colour and sound standards are allocated automatically. If the colour
and/or the sound are not correct, select the line »Norm« with »P+«or»P-«.
Select the setting required with »
Ǹ
«or»Ƿ«.
Manual tuning
Ǻ OK Store 0-9 TXT
Program ľ 06 ı
C/S Channel
Channel 34
Finetun. 00
Norm B/G (Universal)
Name RTL2
ĵ
–––––––––––––
Ł
Manual tuning
Ǻ OK Store •Tune 0-9 TXT
Program 06
C/S Channel
Channel ľ 00 ı
Finetun. 00
Norm B/G (Universal)
Name RTL2
ĵ
–––––––––––––
Ł
Page 38

38
SPECIAL SETTINGS
____________________________________________________________________
6 Select the line »Name« with »P+«or»P-«, and confirm with »
F
« (blue).
Select the position required with »Ƿ«, use »P+«or»P-« to select the letters or
digits required, and confirm with »F« (blue).
7 To fine tune the picture (when necessary), select the line »Finetun.« with
»P+«or»P-« and modify the fine tuning with »Ǹ«or»Ƿ«.
8 Save the setting with »OK«.
Note:
To set further TV channels, repeat points 3 to 8.
9 Complete the setting with »TXT«.
Resetting all TV channels
All the TV channels can be reset (e.g. when you move town).
1 Call up »Dialog Center« by pressing »i«.
2 Select the line »Automatic Tuning System« with »P+«or»P-« and confirm
with »OK«.
– The »Adjust country« menu will be blended in.
3 Select a country with »P+«or»P-« and confirm with »OK«.
– The ATS search will start.
Dialog Center
OK TXT
Language selection
Sleep Timer
Child lock
Special functions
Program Sort
Manual tuning
Automatic Tuning System
Service
ĵ
–––––––––––––––––––––––––––
Ł
Manual tuning
Ǻ OK Store •Change TXT
Program 06
C/S Channel
Channel 34
Finetun. 00
Norm B/G (Universal)
Name RTL2
ĵ
–––––––––––––
Ł
Page 39

ENGLISH
39
INFORMATION
________________________________________________________________
Technical data
Mains voltage:
220 – 240V, 50/60 Hz, (control range of the mains unit: 190… 265V)
Power consumption:
in operation about 85 W, in standby about 6 W
Sound output stage:
2 x 20 Watt music power
2 x 10 Watt sine power
Reception ranges:
C01 … C99, special channels S01 … S41
Channel positions:
99 plus 2 AV
Page 40

40
INFORMATION
__________________________________________________________________________
Service notes for the specialized dealer:
The TV set may be operated only using the mains cable set supplied
It prevents mains interference and is an integral part of the appliance approval.
For replacement purposes, please order only the mains cable set with the
designation “GWN 9.22/part number 8290.991-316” from an approved
service specialist.
The product complies with the requirements of the following EU guidelines: 73/23/EEC guideline on electrical equipment for use with certain
voltage limits.
89/336/EEC guideline on electromagnetic compatibility.
The appliance complies with the standards:
EN 60065, EN 55013, EN 55020
Page 41

ENGLISH
41
INFORMATION
__________________________________________________________________________
Pin assignment of the EURO-AV socket
If you want to connect an other appliance to the TV set (e.g. computer,
amplifier), your specialized dealer can establish a proper connection using the
following connection table:
Pin Signal
11 = audio output right
12 = audio input right
13 = audio output left
14 = audio ground
15 = blue ground
16 = audio input left
17 = RGB blue input
18 = switching voltage
19 = green ground
10 = –
11 = RGB green input
12 = –
13 = red ground
14 = ground
15 = RGB red input (S Video = Chroma)
16 = RGB switching voltage
17 = video ground
18 = RGB switching voltage ground
19 = video output
20 = video input, (S Video = luminance)
21 = shielding/ground
21
220
119
Page 42

42
CUSTOMER INFORMATION
_____________________________________________________
Additional Information for units sold in the UK.
Units sold in the UK are suitable for operation from a 240V ac, 50Hz mains supply.
The range of multi-system receivers is built to work in most European countries. However, the mains plug and
socket system for the UK differs from many European countries.
This appliance has been supplied with a fitted, non-removable, approved converter plug for use in the UK. This
converter plug is fitted with a 5A rated fuse.
In case this appliance is supplied with a moulded 2-pin Euro plug only, which is unsuitable for UK operation, this
must be cut off and immediately disposed of. An approved 13A, 3-pin UK plug should then be fitted by a
qualified electrician.
Note:
The severed Euro plug must be destroyed to avoid a possible shock hazard should it be inserted into a socket
elsewhere.
If a non-rewireable 3-pin plug or a rewireable 13A (BS1363) 3-pin plug is used, it must be fitted with a 5A ASTA
or BSI approved BS1362 fuse. If any other type of plug is used it must be protected by a 5A fuse either in the
plug, or at the distribution board. If this type of plug becomes defective, ensure that the fuse is removed before
disposal, to eliminate potential shock hazard.
If it is necessary to change the fuse in the non-rewireable plug, the correct type and rating (5A ASTA or BSI
approved BS1362) must be used and the fuse cover must be refitted. If the fuse cover is lost or damaged, the lead
and plug must not be used until a replacement is obtained. Replacement fuse covers should be obtained from
your dealer.
Important:
The wires in the mains lead are colour coded in accordance with the following code:
BLUE – NEUTRAL
BROWN – LIVE
As the colours of the wires in the mains lead of your appliance may not correspond with the coloured marking
identifying terminals in your plug, proceed as follows:
Connect the BLUE coloured wire to plug terminal marked with the letter “N” or coloured black.
Connect the BROWN coloured wire to the plug terminal marked with the letter “L” or coloured red.
In no circumstance must any of the wires be connected to the terminal marked with the letter “E”, earth symbol
“
z”, coloured green, or green & yellow.
Replacement mains lead sets can be obtained from your local dealer, or by contacting Grundig Consumer
Relations (01788 570088)
Moulded 2-pin Euro lead set, not suitable for UK use:
Ref: Leadset Euro 8290-991-316
Page 43

ENGLISH
43
CORRECTING PROBLEMS YOURSELF
____________
If the remedies below do not lead to a good result, contact an authorised GRUNDIG
dealer.
Please consider that problems can also be caused by external appliances, such as video
recorders and satellite receivers.
Problem Possible cause Remedy
No picture, no audio no mains voltage mains cable connected?
mains switch on?
TV set in standby switch on with remote control
TV set is not on a switch to another
occupied AV channel position channel position
Picture is bright (grainy or blue) aerial cable aerial cable connected?
but no program can be seen check aerial system?
no TV channel programmed start channel search
Picture contrast incorrect picture settings change brightness, contrast, or
color settings
problem is with the broadcaster test another channel
Poor picture and/or sound interference from other appliances change the position of the
(household appliances, mobile appliances
telephones etc.)
Double image, reflection channel setting automatic or manual
channel setting/fine tuning
aerial have aerial cable or device
checked
No colour colour intensity is on minimum adjust colour upward
TV standard setting select proper colour standards
(if setting possibility is available)
problem is with the broadcaster test another channel
Page 44

44
CORRECTING PROBLEMS YOURSELF
____________________________________
Problem Possible cause Remedy
Colors wrong, color spots strong magnetic field from increase distance of speaker
speakers (or other) to TV set
with permanent color spots,
switch off the TV set with the
mains switch and switch back
on after after 10 minutes
problem with terrestrial change appliance position
magnetic field
Picture is there, no sound volume at minimum or increase/switch on volume
speakers switched off
volume regulation activated select sound output
via audio cinch socket via speaker
(if this possibility is available)
problem is with the broadcaster test another channel
SAT mode check AV cable between
TV set and receiver
Sound unclear sound setting correct sound setting
Poor or no Teletext TV channel (has no Teletext) check with another channel,
or check aerial system possibly double image or
reflection or fine tuning
transmission signal too weak check aerial system
(picture grainy)
Remote control does not work no optical connection point remote control at the TV set
remote control batteries check or replace the batteries
pay attention to polarity
undefinable operating mode switch off TV set with the main
power button for about 2 minutes
After switching on, “parental lock” child lock is activated enter secret number or number
appears on the menu combination 7038.
Page 45

Grundig AG • Beuthener Str. 41 • D-90471 Nürnberg • http://www.grundig.com
 Loading...