

Page 1

ǵ
DIGITAL
SATELLITE
RECEIVER
DSR 2410
DEUTSCH
ENGLISH
ITALIANO
ESPAÑOL
POLSKI
Page 2

2
CONTENTS____________________________________________
4 General information
4 Packing contents
4 GRUNDIG accessories for satellite receivers
4 Digital satellite reception
5 Special features of your digital receiver
6 Set-up and safety
7-9 Overview
7 The front of the digital receiver
8 The back of the digital receiver
9 The remote control
10-11 Connection and preparation
10 Connecting the satellite antenna
10 Connecting the television
10 Connecting a video recorder
11 Connecting a hi-fi system
11 Connecting a digital multi-channel amplifier
11 Connecting the power cord
11 Inserting batteries in the remote control
12-21 Settings
12 The menu
13 Assigning preset stations
14 Editing the station list
15 Editing the list of favourite stations
16 Setting the local time
17-18 Adjusting the digital receiver to the television set
19 Adjusting the digital receiver to the LNB configuration of the satellite antenna
20-21 Audio settings
22-24 Basic functions
22 Switching on and off
22 Mode selection
22 Selecting preset channels
22 Adjusting the volume
23 Muting the sound
23 Selecting stations from lists
23 Switching from the current station to the previous one
24 TV Guide
24 Subtitles
25-30 Additional functions
25 Setting the menu language
25 Deleting stations automatically
26 Preset satellite stations
26 Automatic station search
27 Manual station search
28 Selecting the video channel
29-30 Timer functions
Page 3

ENGLISH
3
CONTENTS
_________________________________________________
31 Special settings
31 Resetting the digital receiver to its original state
31 Updating the digital receiver software
32-34 Information
32 Displaying station reception properties
32 Displaying device information
32 Connecting the digital receiver to a PC
33 Technical data
34 Troubleshooting
Page 4

4
Packing contents
1 DSR 2410 Digital Satellite Receiver
2 Tele Pilot 765 S remote control
3 Two batteries for the remote control (2 x 1.5 V, Mignon, e.g.
UM-3 or AA)
4 Euro/AV (Scart) cable
5 Power cord
6 Operating manual
GRUNDIG accessories for satellite receivers
Your specialist dealer will be happy to tell you about the comprehensive range of GRUNDIG accessories for satellite receivers.
Digital satellite reception
In order to use your new DSR 2410 digital receiver you need a
digital-compatible satellite antenna, which must be installed and
aligned to the required satellites (for example Astra and
EutelSat/Hotbird).
Unlike analogue satellite broadcasting, digital TV or radio stations
are not all assigned their own frequencies; instead, several TV
and/or radio are “transmitted” by a single transponder.
To help you with the choice and settings for satellite stations, a selection of TV and radio stations have already been programmed for
you. So that all the satellite stations that have since gone on air are
available to you, you can start a station search.
To find out how it works and what you have to do, read page 26 of
this manual.
Of course, you can easily program “new” stations yourself. You can
find the latest transponder information on the teletext pages of
various broadcasters, in a current satellite TV magazine or on the
internet.
GENERAL INFORMATION __________________
Page 5

ENGLISH
5
Special features of your digital receiver
The DSR 2410 digital receiver can receive and process all unencrypted digital satellite stations.
This digital receiver has a built-in digital receiver unit for satellite
stations. The receiver unit converts the signals from digital satellite
stations to provide outstanding audio and picture quality.
To ensure that your digital receiver always uses the latest station
information and operating software, you must first perform an
update.
Using the Astra 19.2° East satellite, you can update the device software of the satellite receiver.
To find out how it works and what you have to do, read page 31 of
this manual.
The TV guide also tells you of any schedule changes at short notice,
and provides an overview of all the stations’ schedules for the next
few hours.
You can call up detailed information on each TV programme at the
touch of a button.
This digital receiver has a very comprehensive, user-friendly menu
system.
The menu is displayed on the television screen, and the functions of
the remote control buttons are explained.
GENERAL INFORMATION
______________________________
Page 6
6
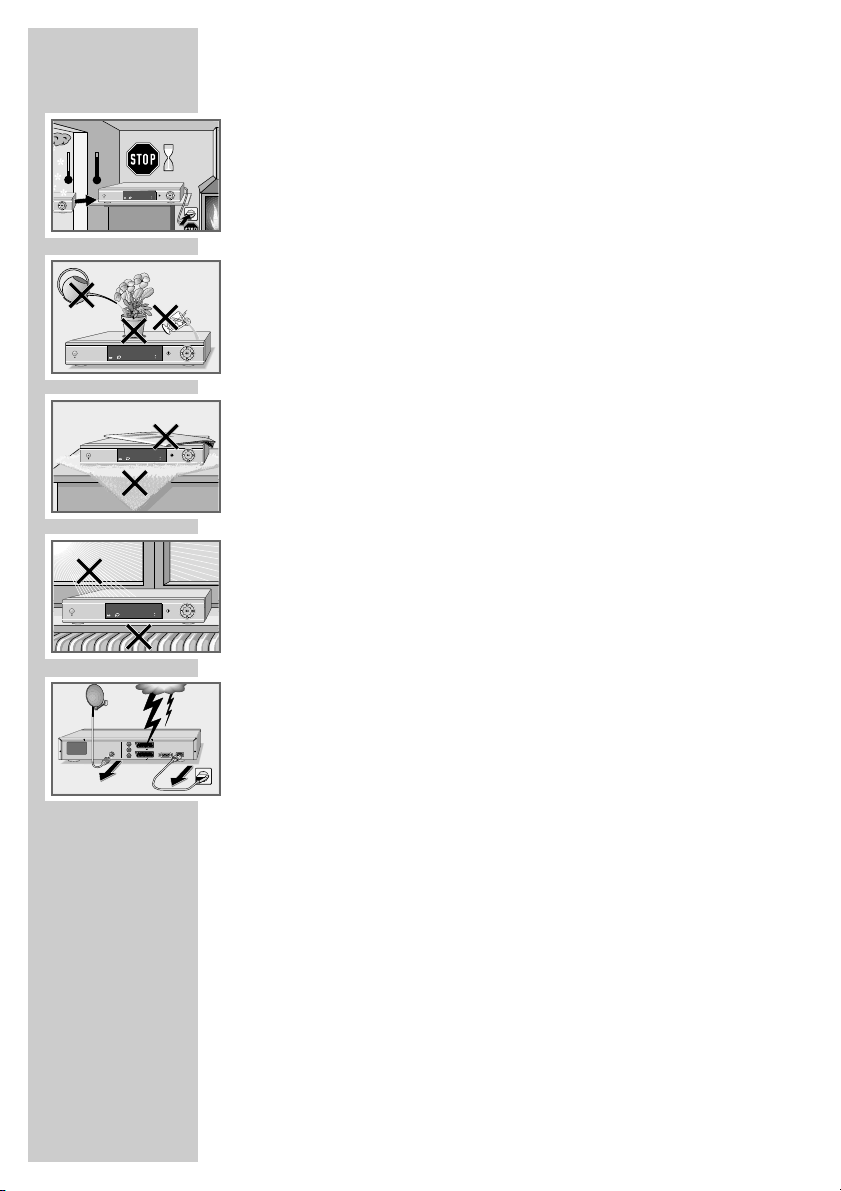
SET-UP AND SAFETY___________________________
To ensure that that this high quality, easy-to-use digital receiver
gives you lasting entertainment and enjoyment, please note the
following information.
This digital receiver is designed to receive, record and play back
video and audio signals. Any other use is expressly prohibited.
When setting up the digital receiver, make sure it is in a horizontal
position and that the mains socket is easily accessible.
Please note when setting up the digital receiver that furniture surfaces are coated with various types of paint and plastic, which often
contain chemical additives. These additives may cause corrosion to
the feet of the unit. This may leave stains on the surface of the
furniture which can be difficult or impossible to remove.
If the digital receiver is subject to a sudden change in temperature,
for example when brought in from the cold to a warm room, let
it stand for at least two hours before you connect it to the mains
supply.
Do not expose the digital receiver to any moisture.
The digital receiver is designed for use in dry rooms. If you do use it
outdoors, please ensure that it is protected from moisture, such as
rain or splashing water. Do not place any vessels such as vases on
the digital receiver. These may be knocked over and spill fluid on
the electrical components, thus presenting a safety risk.
Do not place the digital receiver close to heating units or in direct
sunlight, as this will impair cooling. Place the digital receiver on a
hard, level surface. Do not lay any objects such as magazines on
the digital receiver. When placed in a cabinet, make sure there is a
minimum space of 10 cm around it.
Thunderstorms are a danger to all electrical devices. Even if the
digital receiver player is switched off, it can be damaged by a
lightning strike to the mains or the antenna.
Always disconnect the mains and antenna plugs during a storm.
Never open the digital receiver casing under any circumstances.
Warranty claims are excluded for damage resulting from improper
handling.
°C
2h
ǵ
ON/OFF
DSR 2410 DIGITAL SATELLITE RECEIVER
RADIO
TV
- S
°C
ǵ
ON/OFF
ON/OFF
ON/OFF
RADIO
TV
- S
DSR 2410 DIGITAL SATELLITE RECEIVER
alkan
B
rieg im
K
ǵ
RADIO
TV
- S
DSR 2410 DIGITAL SATELLITE RECEIVER
ǵ
RADIO
TV
- S
DSR 2410 DIGITAL SATELLITE RECEIVER
DIGITAL
WITHOUT LNB
~ 50 Hz
950-2150MHz
14/18Vјmax 400mA
22kHz
INPUT SAT
230 V
EURO AV 2 VCR
10 W max.
R
RS 232
AUDIO OUT
L
EURO AV 1 TV
Page 7
ENGLISH
7
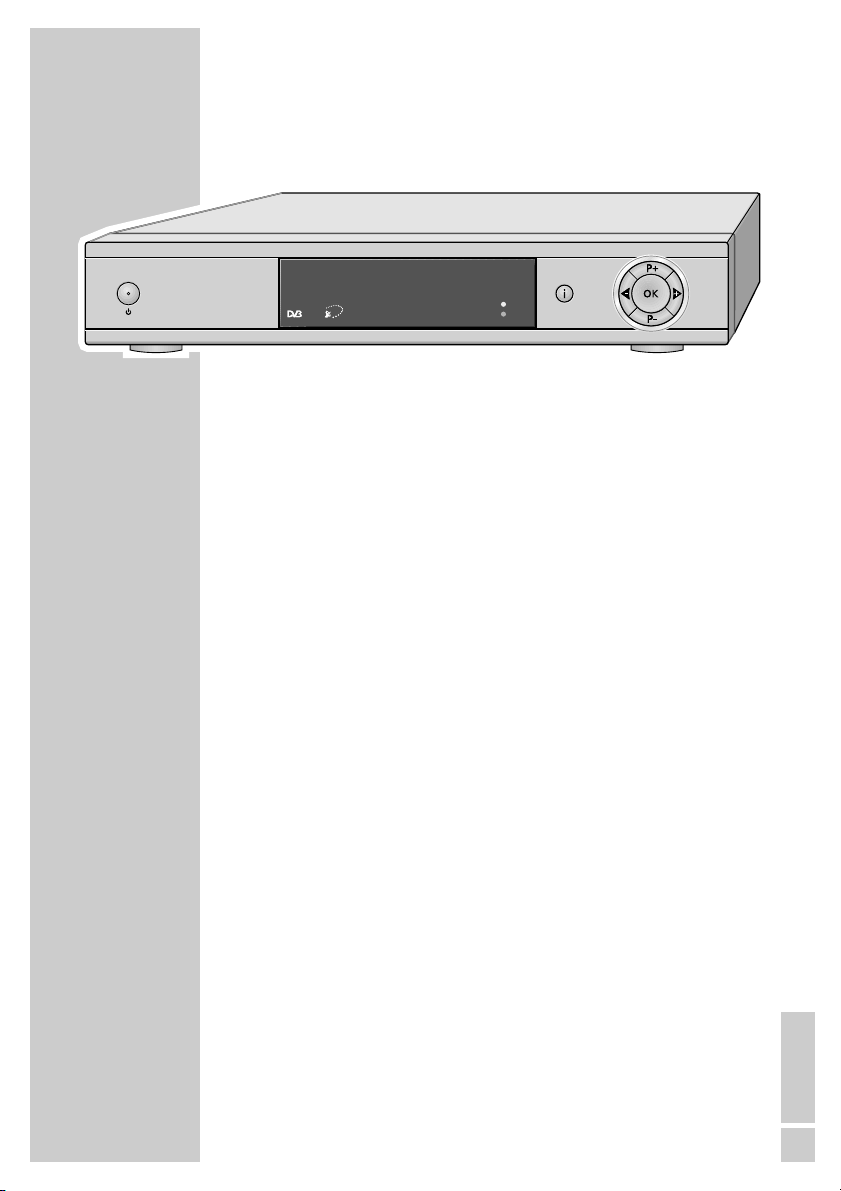
The front of the digital receiver
ON/OFF Switches the digital receiver to standby mode and
Ǽ off again.
•
(red) The digital receiver is in standby mode.
•
RADIO Lights up in radio mode.
•
TV Lights up in TV mode.
i Opens and closes the main menu.
P+, P- Switch channels up and down one by one.
Switch the digital receiver on from standby.
In the menus: move the cursor up/down, select and change
individual entries.
Ǹ, Ƿ Change the volume.
In the menus: move the cursor left/right, select and change
individual entries.
OK Opens the station list.
In the menus: confirms entries.
OVERVIEW____________________________________________
ǵ
ON/OFF
DSR 2410 DIGITAL SATELLITE RECEIVER
RADIO
TV
- S
Page 8
8
OVERVIEW
_________________________________________________
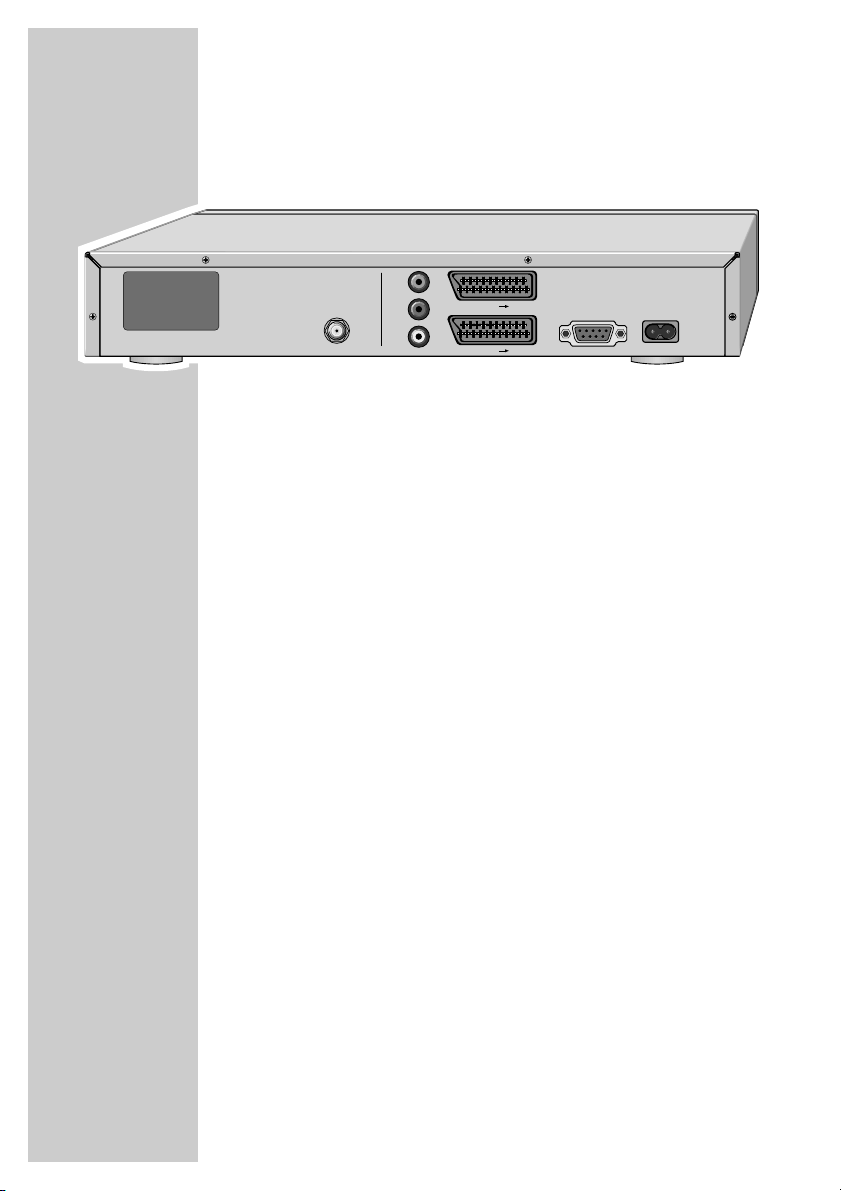
The back of the digital receiver
INPUT SAT Antenna socket for the satellite antenna.
AUDIO OUT Left/right stereo sockets (cinch) for hi-fi system.
R L
AUDIO OUT Audio output sockets for digital audio signal (cinch)
DIGITAL for digital multi-channel amplifier.
EURO AV 2 ɮ VCR Euro AV socket (input and output) for the video
recorder.
EURO AV 1 ɮ TV Euro-AV (output) socket for the television.
RS 232 Serial interface for connecting to a PC.
230 V
~/
50 Hz Connection socket for the power cord supplied.
10 W max.
Note:
The model designation can be found on the back
of the digital receiver.
EURO AV 1 TV
EURO AV 2 VCR
AUDIO OUT
DIGITAL
RS 232
L
R
WITHOUT LNB
230 V
~ 50 Hz
10 W max.
INPUT SAT
950-2150MHz
14/18Vјmax 400mA
22kHz
Page 9
ENGLISH
9
OVERVIEW
________________________________________________
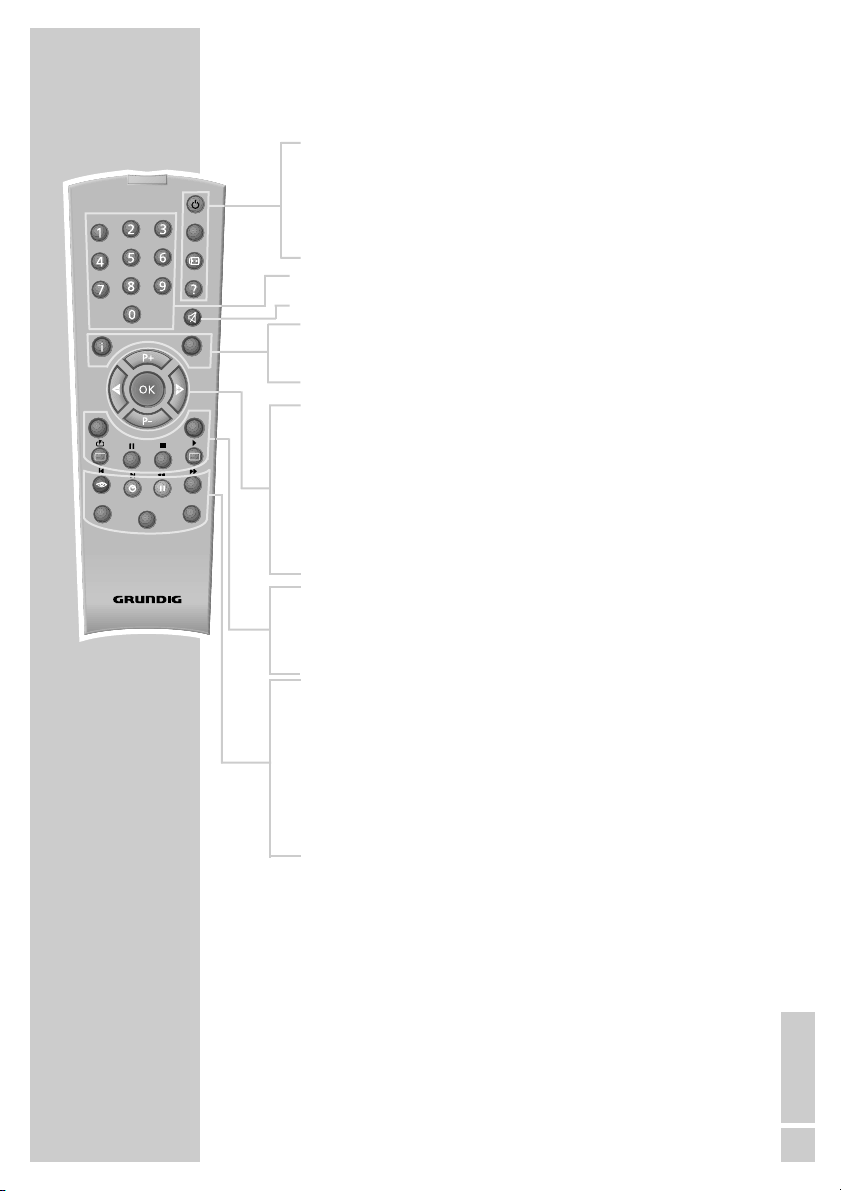
The remote control
Ǽ Switches the digital receiver to standby, and from
standby to the channel last selected.
E
Calls up the device connections menu.
? Displays programme information.
1 ... 0 Select stations.
d Switches the sound to mute and on again.
i Opens the main menu.
z Switches between the two most recently selected
channels.
Ǹ Adjust the volume.
Ƿ
P+ Switch channels up and down
P- one by one.
Switch the digital receiver from standby to the most
recently selected channel.
OK Opens the station list.
TV-G Calls up the TV guide.
TV
Switches to TV mode.
RADIO Switches to radio mode.
z
Opens the »Video« menu.
Ȅ Opens the »Record timer« menu.
ǷǷ
Opens the »Subtitles« menu.
F
Opens the »Sound« menu.
AVR, TV Switches to operating a GRUNDIG AV receiver,
DVD AV receiver, GRUNDIG television or
GRUNDIG DVD player.
Keep the appropriate button (»AVR«, »TV«, »DVD«)
pressed down. Then press the required button.
Note:
The functions available depend on the model of the
device you are using.
Just try it out.
PIP
z
TXT
TV
MHP
AVR
TV-G
Radio
A/B
d
DVD
TV
Tele Pilot 765 S
Page 10
10
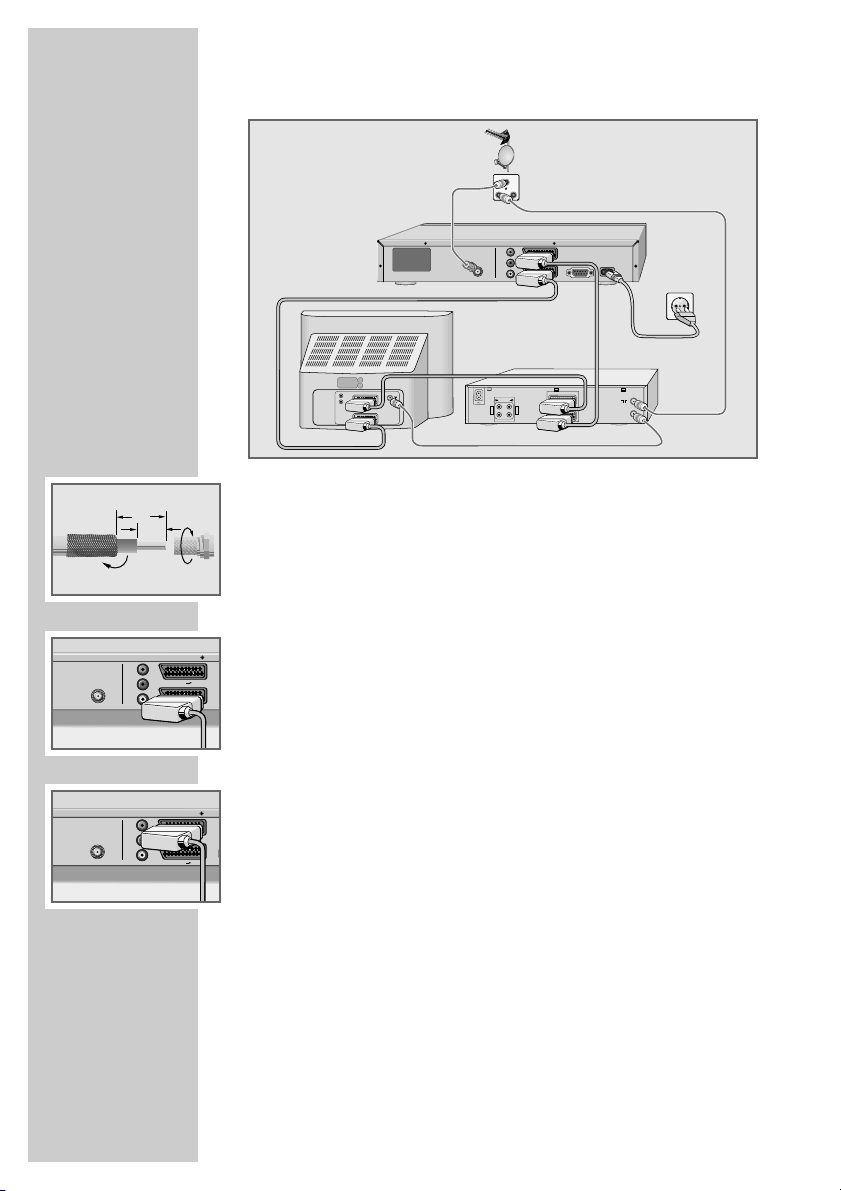
Connecting the satellite antenna
1 Connect the antenna cable of the satellite antenna to the »INPUT SAT«
socket on the digital receiver (screw connector, F connector).
Connecting the television
1 Plug the Euro-AV (Scart) cable supplied into the »EURO AV1 ɮ TV«
socket on the digital receiver and the corresponding Euro-AV socket
(e.g. EURO-AV, SCART) on the television.
Connecting a video recorder
1 Plug a standard Euro-AV (Scart) cable into the »EURO AV2 ɮ VCR«
socket on the digital receiver and the Euro-AV socket (e.g. EURO-AV,
LINE IN/OUT, EXT.1) on the video recorder.
Note:
When playing back a video recording, the video and audio signal from
the video recorder is automatically looped through to the television via
the »EURO AV1 ɮ TV« socket on the digital receiver.
The digital receiver must be in standby mode.
It may not be switched off by the power switch.
CONNECTION AND PREPARATION__
SAT
TV R
950-2150MHz
14/18Vјmax 400mA
22kHz
INPUT SAT
950-2150MHz
14/18Vјmax 400mA
22kHz
INPUT SAT
AUDIO OUT
AUDIO OUT
DIGITAL
950-2150MHz
14/18Vјmax 400mA
22kHz
INPUT SAT
AV2
L
R
AV1
12
7
EURO AV 2 VCR
R
AUDIO OUT
L
EURO AV 1 TV
AUDIO
L
L
O
I
U
N
T
R
R
DEC. - AV 2
EURO - AV 1
WITHOUT LNB
~ 50 Hz
230 V
10 W max.
RS 232
ń
DIGITAL
EURO AV 2 VCR
R
L
EURO AV 1 TV
DIGITAL
EURO AV 2 VCR
R
L
EURO AV 1 TV
Page 11
ENGLISH
11
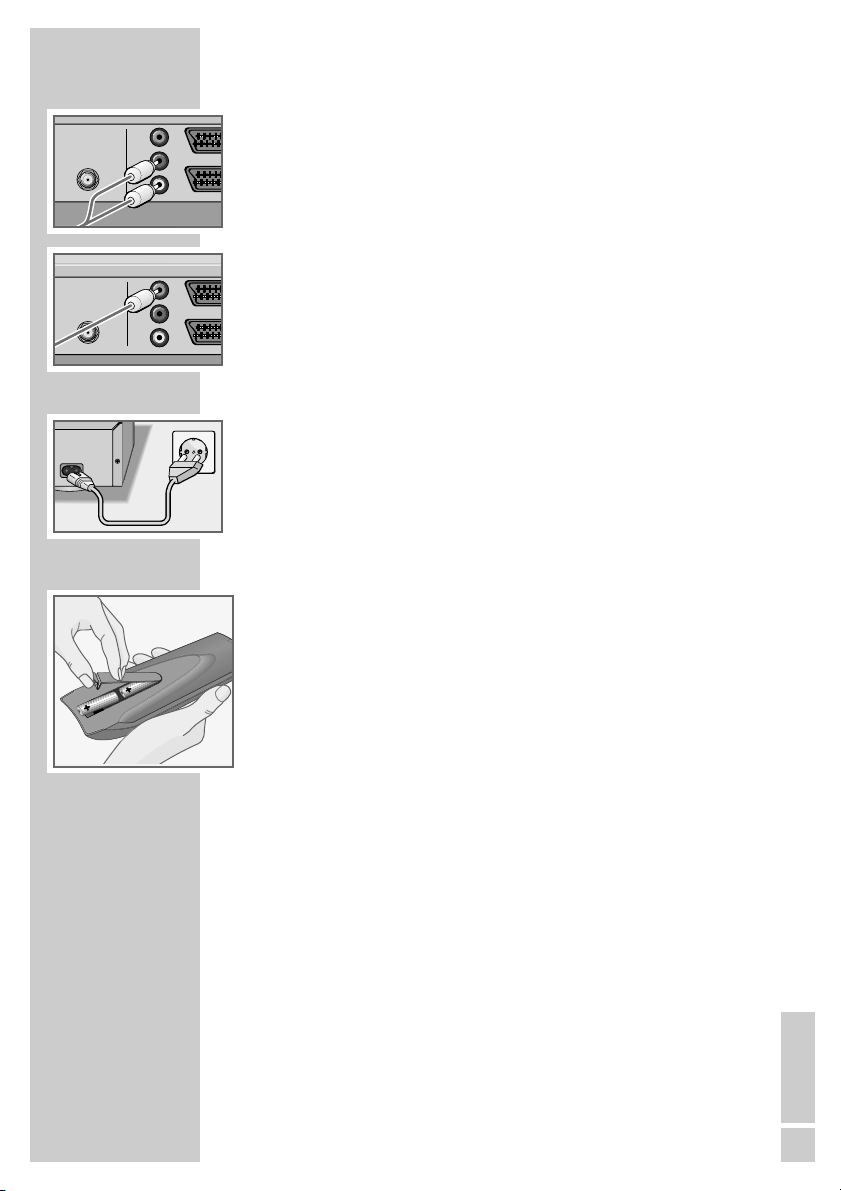
Connecting a hi-fi system
1 Plug a standard cinch cable into the »AUDIO L R« sockets (left/right)
on the digital receiver and the corresponding input sockets on the hi-fi
system.
Connecting a digital multi-channel amplifier
1 Plug a standard cinch cable into the »DIGITAL« socket on the digital
receiver and the corresponding socket on the digital multi-channel
amplifier.
Connecting the power cord
1 Plug the power cord supplied into the »230V~/50Hz« socket on the
digital receiver.
2 Plug the power cord into the wall socket.
Inserting batteries in the remote control
1 Open the battery compartment by removing the lid.
2 Insert the batteries (Mignon type, for example UM-3 or AA, 2 x 1.5 V).
Observe the polarity (marked on the base of the battery compartment).
3 Close the battery compartment.
Note:
If the digital receiver no longer reacts properly to remote control commands, the batteries may be flat. Be sure to remove used batteries.
The manufacturer accepts no liability for damage resulting from leaking
batteries.
Environmental note
Batteries, including those which contain no heavy metal, may not be
disposed of with household waste. Please dispose of used batteries in an
environmentally sound manner. Find out about the legal regulations
which apply in your area.
CONNECTION AND PREPARATION
_________________
V
V
T
V
V
T
50MHz
50MHz
ј
SAT
ј
SAT
max 400mA
max 400mA
WITHOUT LNB
~ 50 Hz
230 V
10 W max.
DIGITAL
AUDIO OUT
DIGITAL
AUDIO OUT
EURO A
R
L
EURO A
R
L
EURO A
EURO A
Page 12

12
The menu
This digital receiver has a very comprehensive, user-friendly menu
system. The menu is displayed on the television screen.
The digital receiver responds to many functions which you select on
the remote control with informative menus and icons on the television screen.
It enables you to select many different settings and contains information on using your digital receiver.
The buttons on the remote control for using the menu are explained
on the screen.
The main menu contains the most important controls for your digital
receiver. Its menu system controls the dialogue between you and the
digital receiver.
Press »i« to open the main menu. Press »P-« or »P+« to navigate
the menu and select items. The selected item is highlighted.
When you press »OK« to confirm your selection, a sub-menu
appears. Here too, you can navigate by pressing »P-« or »P+«
and select the item you want. The selected item is highlighted.
Press »OK« to confirm. Normally another menu then appears,
where you can use »P-« or »P+« to navigate and make the setting.
Make settings using »P-«, »P+«, »
Ǹ
« or »Ƿ«.
Press »z« to quit the current menu level.
Press »i« « to quit the menu entirely.
Note:
In menu mode, you cannot press »
Ǽ« to switch the digital receiver
to standby.
SETTINGS ______________________________________________
Main menu
Select Back Exit
and open
Settings
Preset list
Info
Timer
Installation
ǵ
Page 13

ENGLISH
13
Assigning preset stations
The digital receiver is already programmed with the stations from
the Astra 19.2° East, Eutelsat/Hot Bird 13° East and Turksat 1C
satellites.
The following settings allow you to select the menu language, the
country where you are operating the digital receiver and the main
satellites.
Selected stations from the chosen satellites are transferred to the list
of favourites. You can then sort the stations in the order you require.
1 Switch on the digital receiver by pressing »
Ǽ« on the receiver.
– The »Language« menu appears when the device is first
switched on.
2 Select your language using »P-« or »P+« and press »OK« to
confirm.
– The »Country« menu appears.
3 Press »P-« or »P+« to select the country and press »OK« to
confirm.
– The »Satellite« menu appears.
4 Select the main satellites with »P-« or »P+« and press »OK« to
confirm.
– The stations are added to the station list.
– The stations of the two other satellites are added to the station
list after you set the main satellite.
– After the data is transferred, the receiver switches to preset
station 1.
– You can change the order of the preset stations as required
and delete stations you do not need (see the section on editing
the station list on page 14).
SETTINGS
_________________________________________________
Menüsprache
Auswählen
und aufrufen
Deutsch
Türkçe
English Español
Suomi
Polski
Français
Italiano
ǵ
Country
Select Back
and change
Germany
Switzerland
Spain Poland
Italy
Austria
Satellite
Select Back
and change
Astra 19.2
Hot Bird
Turksat 1C
Page 14

14
SETTINGS
_________________________________________________
Editing the station list
You can change the order of preset stations as required and delete
stations you do not need.
1 In the main menu, select »Preset list« with »P+« or »P-« and
press »OK« to confirm.
2 Select »Sort« by pressing »OK«.
– The station list appears.
Deleting stations
1 Press »P-« or »P+« to select the station to delete and press
»OK« to confirm.
– The station is highlighted in orange.
2 Select the next station with »P-« or »P+« and press »OK« to
confirm.
3 Press »
z
« to delete the stations.
– The highlighted stations are deleted.
Moving stations
1 Press »P-« or »P+« to select the station to move and press
»OK« to confirm.
– The station is highlighted in orange.
2 Select the next station with »P-« or »P+« and press »OK« to
confirm.
3 Press »P-« or »P+« to select the channel in front of which the
station is to be inserted.
4 Press »
ǷǷ
« to move the stations.
Ending the settings
1 Press »i« and then »OK« to save the settings.
Preset list
Select Back Exit
and open
Sort
Edit bookmarks
Sort
Astra 19.2
1 Sat 1
2 ProSieben
3 KABEL1
4 NEUN LIVE Telev
5 DSF
6 HSE24
7SAT.1
8 N24
9 TELE 5
10 Das Erste
Select Back Exit
and open Delete Add
Page 15

ENGLISH
15
Editing the list of favourite stations
You can change the order of preset stations as required and delete
stations you do not need.
You can select your favourite stations and save them in the list of
favourites.
1 In the main menu, select »Preset list« with »P+« or »P-« and
press »OK« to confirm.
2 Select »Edit bookmarks« with »P+« or »P-« and press »OK«
to confirm.
– The »Edit bookmarks« page appears.
3 Press »P-« or »P+« to select the station to move and press
»OK« to confirm.
– The station is highlighted in orange.
4 Select the next station with »P-« or »P+« and press »OK« to
confirm.
5 To move the stations, press »A/B« and then press »OK« or
»
ǷǷ
« to confirm.
– You can switch between the station list and your favourites by
pressing »A/B«.
– You can change the order of the stations or delete ones you
do not need (see the section on editing the station list).
Note:
If you delete a station from the station list, it is also deleted from
your favourites.
6 Press »i« and then »OK« to save the settings.
SETTINGS
_________________________________________________
Preset list
Select Back Exit
and open
Sort
Edit bookmarks
Edit bookmarks
Select Back Exit
and open Delete Add
Change
Preset list
1 Sat 1
2 ProSieben
3 KABEL1
4 NEUN LIVE Telev
5 DSF
6 HSE24
7SAT.1
8 N24
9 TELE 5
Bookmarks
1 Sat 1
A/B
Page 16

16
Setting the local time
To ensure that the TV guide always shows the current programmes
at the right time, you must enter the difference between your local
time and GMT (Greenwich Mean Time at longitude “0”).
All times given by the TV guide are then converted to your local
time.
With clock changes (e.g. daylight saving time), you need to correct
the time difference.
1 In the main menu, select »Installation« with »P-« or »P+« and
press »OK« to confirm.
2 Select »Time« with »P-« or »P+« and press »OK« to confirm.
3 Select »Time difference« with »OK« and then use »P-« or
»P+« to enter the time difference in 30 minute increments.
Note:
The »Current time« item is for information only and cannot be
selected.
4 Press »OK« to confirm the setting.
5 Press »i« and then »OK« to save the settings.
SETTINGS
_________________________________________________
Installation
Select Back Exit
and open
Menu language
Station search
Video output
Time
Antenna connection
Special functions
Info
Time
Select Back Exit
and open
Ȅ
Current time
08:05 o’clock
+2.00 Hours
Time difference
Page 17

ENGLISH
17
Adjusting the digital receiver to the television set
Specifying the video signal at the Euro AV (TV)
output
You can choose between the settings »FBAS« (normal picture
quality), »RGB« (high picture quality) »Y/C« (S-Video signal) and
»YUV« (component signal). The default setting is »RGB«.
1 In the main menu, select »Installation« with »P-« or »P+« and
press »OK« to confirm.
2 Select »Video output« with »P-« or »P+« and press »OK« to
confirm.
3 Select »Signal type« by pressing »OK«.
4 Press »P-« or »P+« to select the setting and press »OK« to
confirm.
5 Press »i« and then »OK« to save the settings.
Selecting the television picture format
If you have a 4:3 format television or flat screen, select the »4:3«
setting.
If you have a 16:9 format television or flat screen, select the »16:9«
setting.
1 In the main menu, select »Installation« with »P-« or »P+« and
press »OK« to confirm.
2 Select »Video output« with »P-« or »P+« and press »OK« to
confirm.
3 Select »TV format« by pressing »P-« or »P+« and press »OK«
to confirm.
4 Press »P-« or »P+« to select the picture format and press
»OK« to confirm.
Note:
If picture format 4:3 is selected, you can also select picture
conversion.
5 Press »i« and then »OK« to save the settings.
SETTINGS
_________________________________________________
Installation
Select Back Exit
and open
Menu language
Station search
Video output
Time
Antenna connection
Special functions
Info
Video output
Select Back Exit
and open
Ȅ
TV format
Signal type
RGB
16:9
Video output
Select Back
and change
Ȅ
RGB
16:9
Signal type
4:3
16:9
TV format
Page 18

18
Selecting the television picture conversion
If you have a 4:3 format television or flat screen, the following
settings are available:
»Pan-Scan« for wide-screen playback without black bars on the top
and bottom edges of the screen.
»Letterbox« for wide-screen playback with black bars on the top
and bottom edges of the screen.
1 In the main menu, select »Installation« with »P-« or »P+« and
press »OK« to confirm.
2 Select »Video output« with »P-« or »P+« and press »OK« to
confirm.
3 Select »Picture conversion« with »P-« or »P+« and then press
»OK«.
4 Press »P-« or »P+« to select the conversion and press »OK« to
confirm.
5 Press »i« and then »OK« to save the settings.
SETTINGS
_________________________________________________
Video output
Select Back
and change
Ȅ
RGB
4:3
Signal type
Letterbox
Pan-Scan
TV format
Picture conversion
Page 19

ENGLISH
19
Adjusting the digital receiver to the
LNB configuration of the satellite antenna
The digital receiver has been factory set so that it is ready for
operation, without time-consuming adjustment, with most satellite
antennas and LNB configurations.
Changes in this menu have a direct effect on the reception characteristics of the digital receiver and should therefore only be made by
an expert.
1 In the main menu, select »Installation« with »P-« or »P+« and
press »OK« to confirm.
2 Select »Antenna connection« with »P-« or »P+« and press
»OK« to confirm.
3 Select the item with »P-« or »P+« and press »
Ǹ
«, »Ƿ« or
»1 ... 0« to make the setting:
– »LNB«: For selecting the satellites.
– »LNB supply«: For switching the LNB power supply on
and off.
– »LOW band«: To set the oscillator frequency for the
LOW band, select this item and press
»OK« to confirm. Enter the required
value using »1 ... 0«.
– »HIGH band«: To set the oscillator frequency for the
HIGH band, select this item and press
»OK« to confirm. Enter the required
value using »1 ... 0«.
– »DiSEqC switch«: If you want to receive up to four satel-
lites simultaneously, each LNB must be
assigned to its input on the DiSEqC
switch.
– »Tone burst switch«: If you want to receive two satellites at
the same time, each LNB is assigned to
its input on the tone burst switch.
4 Press »i« and then »OK« to save the settings.
5 Press »i« to finish the setting.
SETTINGS
_________________________________________________
Antenna connection
Select Back Exit
and open
LNB
LNB supply
LOW band
HIGH band
DiSEqC switch
Tone burst switch
1 Astra 19.2
On
9.750 GHz
10.600 GHz
A
A
Installation
Select Back Exit
and open
Menu language
Station search
Video output
Time
Antenna connection
Special functions
Info
Page 20

20
Audio settings
1 In the main menu, select »Settings« with »P-« or »P+« and
press »OK« to confirm.
2 Select »Sound« by pressing »OK«.
– The »Sound« menu appears.
Note:
Further operation is explained in the following sections.
Changing the audio channel of the television
Here you can find information on the number of audio channels
(i.e. the language of the current TV or radio program). You can
switch to a different language during programs broadcast in
several languages. In radio mode, you can switch to other programmes.
1 Select »Sound channel TV« with »P-« or »P+« and then press
»OK«.
2 Press »P-« or »P+« to select the setting and press »OK« to
confirm.
Sound settings
Here you can select the audio mode, such as stereo, mono (left) and
mono (right).
1 Select »Sound settings« by pressing »P-« or »P+« and press
»OK« to confirm.
2 Press »P-« or »P+« to select the setting and press »OK« to
confirm.
Volume adjustment
You can set the standard volume here. This is the volume of the
device after switching on.
1 Select »Volume adjustment« by pressing »P-« or »P+« and
press »OK« to confirm.
2 Press »
Ǹ
« or »Ƿ« to set the level and press »OK« to confirm.
SETTINGS
_________________________________________________
Sound
English
Stereo
❙
■■❙
■■■■■■
❙
Same as TV
Sound
Select Back Exit
and open
Sound channel TV
Sound settings
Volume adjustment
Sound channel Dig.
English
Stereo
❙
■■❙
■■■■■■
❙
Same as TV
Select Back
and change
Sound channel TV
Sound settings
Volume adjustment
Sound channel Dig.
Sound
Sound
Select Back
and change
Volume adjustment
English
Deutsch
❙
■■❙
■■■■■■
❙
Same as TV
Stereo
Mono (left)
Mono (right)
Sound settings
Sound channel Dig.
Sound channel TV
Select Back
and change
Sound channel TV
Sound settings
English
Stereo
❙
■■
■■❙
■■■■■■
❙
Same as TV
Sound channel Dig.
Volume adjustment
Page 21

ENGLISH
21
Selecting the audio channel for the digital output
You can choose the audio mode for the digital output (e.g. AC-3
Stereo). The choice of audio depends on the station and the current
programme.
1 Select »Sound channel Dig.« by pressing »P-« or »P+« and
press »OK« to confirm.
2 Press »P-« or »P+« to select the setting and press »OK« to
confirm.
– You can only change the setting if digital audio (AC-3) is
transmitted.
– The setting is automatically stored for the current station
(until you switch off the digital receiver using the main power
button).
Ending the settings
1 Press »i« and then »OK« to end the settings.
SETTINGS
_________________________________________________
Sound
Select Back
and change
Volume adjustment
English
Stereo
❙
■■❙
■■■■■■
❙
Wie Tonkanal TV
Same as TV
AC-3 Stereo
Sound channel TV
Sound settings
Sound channel Dig.
Page 22

22
Switching on and off
1 Press »Ǽ« to switch on the digital receiver from standby mode.
– The mode indicator lights up green (TV mode) or yellow
(radio mode).
2 Press »
Ǽ« to switch the digital receiver to standby mode.
– The mode indicator lights up red.
Mode selection
You can choose between TV and radio modes.
1 Press » « or » « to select the mode.
Note:
You can also change modes by selecting »Info« in the main
menu.
Selecting preset channels
1 Move up and down the channels by pressing »P+« or »P-« as
required.
2 To run through the channels, press and hold down »P+« or
»P-«.
3 Enter single-digit or multi-digit preset channel numbers by
pressing »1 ... 0« on the remote control.
– Channels with no stations assigned are ignored.
Note:
Every time you switch stations, the current channel number, the
name of the station, the time, and the titles, start and finish
times of the current and following programmes are shown on
the screen If there is another language or digital audio effects
for the current programme, you will also see this information. In
the »Sound« menu, you can choose the language or the
digital audio effects. Open the »Sound« menu by pressing »
F
«.
Adjusting the volume
You cannot change the volume in menu mode.
1 Adjust the volume by pressing »
Ǹ
« or »Ƿ«.
– A volume scale is shown on the television screen.
Note:
Volume changes adjust the audio signals at the »TV«, »VCR«
and »L AUDIO R« sockets on the digital receiver.
RadioTV
BASIC FUNCTIONS______________________________
Page 23

ENGLISH
23
Muting the sound
1 Press »d« on the remote control to mute the sound.
2 Press »
d« on the remote control to switch the sound on again.
– You can hear the sound at the volume previously set.
Selecting stations from lists
You can select stations from various lists (e.g. TV stations, favourites).
1 Press »OK« to open the station list.
– The most recently activated station list appears.
2 To change the station list, press »?« and press »P-« or »P+« to
select the list you want.
3 Press »
Ǹ
« or »Ƿ« to scroll through the lists.
4 Press »P-« or »P+« to select the station and press »OK« to call
it up.
5 Press »i« to quit the station list.
Switching from the current station to the
previous one
The digital receiver remembers the station which was last selected,
provided it was selected for at least one second.
1 Press »z« to switch from the current station to the previous one.
2 Press »z« to switch back to the current station.
Note:
You can only switch over when no menu is shown on the screen.
BASIC FUNCTIONS
______________________________________
Page 24

24
TV guide
The TV guide provides information on the current station such as the
title and descriptions of the current and next programmes.
1 Press »TV-G« to view the station information.
– All today’s programmes are shown.
Note:
The TV guide can also be found under »Info« in the main menu.
2 Press »P-«, »P+«, »
Ǹ
« or »Ƿ« to select the programmes.
3 Press »OK« to see the information on the selected programme.
4 Press »z« to return to today’s programmes.
5 Press »
Ȅ« to add the selected programme to the recording
timer.
– The »Record timer« menu appears.
(See the section on the recording timer on page 30).
6 Press »i« to quit the TV guide.
Subtitles
You can show or hide the subtitles. If subtitles are available in
several languages, you can select the language.
Showing subtitles
1 In the main menu, select »Settings« with »P-« or »P+« and
press »OK« to confirm.
2 Select »Subtitles« with »P-« or »P+« and press »OK« to
confirm.
– The »Subtitles« menu appears.
3 Select »Subtitles« with »P-« or »P+« and press »OK« to
confirm.
4 Press »P-« or »P+« to show or hide the subtitles and then press
»OK« to confirm.
Selecting the subtitle language
1 Select »Subtitle language« with »P-« or »P+« and press »OK«
to confirm.
2 Select your language using »P-« or »P+« and press »OK« to
confirm.
3 Press »i« to finish the setting.
BASIC FUNCTIONS
______________________________________
TV Guide Monday 10.05.2004
Select Back Exit
and open Timer
9:15 - 9:30 Börse&Wir tschaft
9:30 - 10:00 N24 Wissen
10:00 - 10:18 N24 Nachrichten
10:18 - 10:34 N24 Nachrichten Wirtschaft
10:34 - 11:00 Doku: Raketen
11:00 - 11:31 N24 Nachrichten
11:31 - 12:00 Doku: Raketen
12:00 - 12:20 N24 Nachrichten
12:20 - 12:39 N24 Nachrichten Wirtschaft
12:39 - 13:00 Doku: Von der Macht verführt
Subtitles
Select Back
and change
Ȅ
Deutsch
Off
On
Subtitle language
Subtitles
Subtitles
Select Back Exit
and open
Ȅ
Subtitle language
Subtitles
On
English
Page 25

ENGLISH
25
Setting the menu language
1 Press »i« to open the main menu.
2 Select »Installation« with »P-« or »P+« and press »OK« to
confirm.
3 Select »Menu language« with »P-« or »P+« and press »OK«
to confirm.
4 Select the »Menu language« setting with »OK«.
5 Select your language using »P-« or »P+« and press »OK« to
confirm.
6 Press »i« and then »OK« to save the settings.
Deleting stations automatically
You can delete stations from the station list and favourites list automatically.
1 In the main menu, select »Installation« with »P-« or »P+« and
press »OK« to confirm.
2 Select »Special functions« with »P-« or »P+« and press »OK«
to confirm.
3 Select »Delete lists« with »P-«« or »P+« and press »OK« to
confirm.
4 Press »P-« or »P+« to select the list to delete and press »OK«
to confirm.
– The message »Execute?« appears.
5 Press »
Ǹ
« or »Ƿ« to select »Yes« or »No«.
– If you select »Yes« for the station list, the station list and the
favourites are deleted, and the »Station search« menu appears
(see page 26).
6 Press »i« to finish the setting.
ADDITIONAL FUNCTIONS _________________
Menu language
Select Back
and change
Deutsch
English
Français
Italiano
Türkçe
Español
Suomi
Language
Special functions
Select Back
and change
Factory reset
Manuell
Nein
Bookmarks
Preset list
stop
Software update
Delete lists
Page 26

26
Preset satellite stations
This digital receiver has been programmed at the factory with most
digital TV and radio stations on the Astra 19.2° East, EutelSat/
Hotbird 13° East and Turksat 1C satellites.
You can see which stations have been preset by pressing »OK« to
call up the TV list for TV or radio.
New satellite stations are always going on air and the satellite data
is constantly changed. Therefore it is advisable to occasionally start
an automatic search on the digital receiver.
Automatic station search
During the automatic search, the system searches the transponders
in the list of stored stations for new channels.
1 In the main menu, select »Installation« with »P-« or »P+« and
press »OK« to confirm.
2 Select »Station search« with »P-« or »P+« and press »OK« to
confirm.
3 Select »Automatic search« with »P-« or »P+« and press »OK«
to confirm.
4 Select »Satellite« with »P-« or »P+« and press »OK« to
confirm.
5 Press »P-« or »P+« to set the satellite and press »OK« to
confirm.
6 Select »Encoded« with »P-« or »P+« and press »OK« to
confirm.
7 Use »P-« or »P+« to select »Yes« (also search for encrypted
stations) or »No«.
8 Press »
Ȅ« to start the search.
– The progress of the search is shown in the transponder info
line (for example »TP 10/41« means: 10 transponders of 41
completed).
– The search is complete when the »Status« line contains the
message »Finish«.
– At the end of the search, new TV or radio stations are
automatically added to the end of the station list.
9 Press »i« and then »OK« to save the settings.
ADDITIONAL FUNCTIONS
_____________________________
Installation
Select Back Exit
and open
Menu language
Station search
Video output
Time
Antenna connection
Special functions
Info
Automatic search
Select Back Exit
and open Start
Encoded
Level:254 Reception: ■
S/N:1.06 dB BER:0
Astra 19.2
No
Satellite
Ȅ
■■■■■■■■■■■■■■■■■■■■■■■■
■■■■■■■
Page 27

ENGLISH
27
Manual station search
If the station search does not find a particular station, you can look
for it using the manual search. Make sure you enter all the parameters of the station you are looking for correctly. You can find the
latest transponder information on the teletext pages of various
broadcasters, in a current satellite TV magazine or on the internet.
1 In the main menu, select »Installation« with »P-« or »P+« and
press »OK« to confirm.
2 Select »Station search« with »P-« or »P+« and press »OK« to
confirm.
3 Select »Manual search« with »P-« or »P+« and press »OK« to
confirm.
4 Press »P-« or »P+« to select the item and press »OK« to
confirm. Press »P-« or »P+« to make the setting and press
»OK« to confirm:
– »Satellite«: For selecting the satellite.
– »Encoded«: Select »Yes« (also search for encrypted
stations) or »No«.
– »Frequency«: Press »1 ... 0« to enter the five-digit
frequency of the channel.
– »Polarisation«: For setting the channel polarisation (»hori-
zontal« or »vertical«).
– »Symbol rate«: Use »1 ... 0« to enter the five-digit symbol
rate of the channel.
5 Press »
Ȅ« to start the search.
– At the end of the search, new TV or radio stations are
automatically added to the end of the station list.
Note:
If you do not find the station you are looking for, slightly change
the frequency (± 5 MHz) and start the search again.
A search will only be successful if the bit error rate (BER) is close
to 0 and the reception indicator is green.
6 Press »i« to finish the setting.
ADDITIONAL FUNCTIONS
_____________________________
Station search
Select Back Exit
and open
Automatic search
Manual search
Manuell search
Select Back Exit
and open Start
Level:70 Reception: ■
S/N:0.00 dB BER:>9000
Astra 19.2
No
12.480GHz
horizontal
27.500MS
Satellite
Ȅ
■■■■■■
■■■■
Encoded
Frequency
Polarisation
Symbol rate
Page 28

28
Selecting the video channel
Some stations (such as Pay-TV stations) provide viewers with the
choice of several stations or camera angles on the same preset position. This menu allows you to choose between the various stations.
1 In the main menu, select »Settings« with »P-« or »P+« and
press »OK« to confirm.
2 Select »Video« with »P-« or »P+« and press »OK« to confirm.
Note:
You can also select the »Video« menu by pressing the »
z
«
button.
3 Select »Video channel« by pressing »OK«.
4 Select the station you want with »P-« or »P+« and press »OK«
to confirm.
5 Press »i« to finish the setting.
ADDITIONAL FUNCTIONS
_____________________________
Settings
Select Back Exit
and open
Ȅ
Subtitles
Sound
Video
Video
Select Back Exit
and open
Ȅ
Video channel
Direkt Portal
Page 29

ENGLISH
29
Timer functions
You can set your digital receiver to switch off at a selected time or to
program a recording on a connected video recorder. A total of
10 recording timers are available.
Entering the switch-off time
1 In the main menu, select »Timer« with »P-« or »P+« and press
»OK« to confirm.
2 Select »Sleep timer« with »P-« or »P+« and press »OK« to
confirm.
3 Select »Switch off time« with »OK«.
4 Use »0« – »9« to enter the switch-off time.
5 Press »OK« to confirm the switch-off time.
6 Select »Status« with »P-« or »P+« and press »OK« to confirm.
7 Press »P-« or »P+« to select »On« (switch-off timer activated)
or »Off« (switch-off timer deactivated) and press »OK« to
confirm.
8 Press »i« to finish the setting.
– The digital receiver automatically switches to standby mode at
the set time.
ADDITIONAL FUNCTIONS
_____________________________
Timer
Select Back Exit
and open
Sleep timer
Record timer
Sleep timer
Select Back ... Input
and change
Switch–off time
Status
00:00 o’clock
Off
09
Page 30

30
Programming the recording timer
1 In the main menu, select »Timer« with »P-« or »P+« and press
»OK« to confirm.
2 Select »Record timer« with »P-« or »P+« and press »OK« to
confirm.
3 Select »Timer place (1...10)« with »P-« or »P+« and press
»OK« to confirm.
4 Press »P-« or »P+« to select the timer position and press »OK«
to confirm.
5 Select »Start at«, »Stop time« or »Day of recording« with
»P-« or »P+« and press »OK« to confirm.
6 Use »0« – »9« to enter the time and day in two digits.
7 Press »OK« to confirm the entry.
8 Select »Station« with »P-« or »P+« and press »OK« to
confirm.
9 Press »P-« or »P+« to select the station from the list and press
»OK« to confirm.
10 Select »Status« with »P-« or »P+« and press »OK« to confirm.
11 Press »P-« or »P+« to select »On« (timer activated) or »Off«
(timer deactivated) and press »OK« to confirm.
12 Press »i« and then »OK« to save the settings.
– The digital receiver switches to the selected station at the set
time.
Notes:
Your video recorder must also be programmed accordingly.
Do not switch off the digital receiver with the power switch.
If the receiver is in standby mode before the timer starts, it
switches back to standby when the timer has finished.
ADDITIONAL FUNCTIONS
_____________________________
Record timer
Select Back Exit
and open
Timer place (1...10)
Start at
Stop time
Day of recording
Station
Status
1
00:00 Uhr
00:00 Uhr
00.00.00
2
Off
Preset list
Select Back Exit
and open
Astra 19.2
1 Sat 1
2 ProSieben
3 KABEL1
4 NEUN LIVE Telev
5 DSF
6 HSE24
7SAT.1
8 N24
9 TELE 5
10
Page 31

ENGLISH
31
Resetting the digital receiver to its original state
This function enables you to delete the station lists and all custom
settings.
1 In the main menu, select »Installation« with »P-« or »P+« and
press »OK« to confirm.
2 Select »Special functions« with »P-« or »P+« and press »OK«
to confirm.
3 Select »Factory reset« with »P-« or »P+« and press »OK« to
confirm.
4 Press »P-« or »P+« to select »restore« and press »OK« to
confirm.
5 Press »
Ǹ
« or »Ƿ« to select »Yes« and press »OK« to confirm.
– All custom settings and station lists are deleted.
– The »Menu language« menu appears.
6 Reprogram the device as described on page 13.
Updating the digital receiver software
The receiver’s digital technology enables you to update the
operating software.
1 In the main menu, select »Installation« with »P-« or »P+« and
press »OK« to confirm.
2 Select »Special functions« with »P-« or »P+« and press »OK«
to confirm.
3 Select »Software Update« by pressing »OK«.
– The digital receiver automatically starts the search for its
download channel and then checks whether new data is
available. This can take several minutes. Please wait until the
search is finished.
4 Press »P-« or »P+« to select whether to update the data (»Yes«
or »No«) and press »OK« to confirm.
– If you select »Yes« the software download begins.
– After finishing the download, the receiver restarts and auto-
matically switches to preset station 1.
Note:
An interruption during the downloading process (for example
by pulling out the mains plug) can damage the operating
software of the digital receiver.
Read the instructions in the menus carefully.
SPECIAL SETTINGS ______________________________
Special functions
Select Back
and change
Delete lists
Manual
restore
stop
Software update
Factory reset
Software update
Download 36%
Back
Present software
Update software
V.0001
V.0101
Special functions
Select Back Exit
and change
Delete lists
Factory reset
Software update
Page 32

32
Displaying station reception properties
1 In the main menu, select »Installation« with »P-« or »P+« and
press »OK« to confirm.
2 Select »Info« with »P-« or »P+« and press »OK« to confirm.
3 Select »Reception parameters« with »P-« or »P+« and press
»OK« to confirm.
– The »Reception parameters« menu appears.
4 In the »Reception parameters« menu, press »P-« or »P+« to
change stations.
Notes:
The lower section of the menu shows the signal properties. The
lower the number of »Bit error« displayed (the optimum value is
»0«), and the further the »Signal level« bar extends to the right,
the better the reception signal.
The signal level not only depends on the settings of your
receiver unit, but also on the channel which is currently active.
Remember this when aligning your antenna using the signal
level display.
5 Press »i« to quit the menu.
Displaying device information
1 In the main menu, select »Installation« with »P-« or »P+« and
press »OK« to confirm.
2 Select »Info« with »P-« or »P+« and press »OK« to confirm.
3 Select »System information« with »P-« or »P+« and press
»OK« to confirm.
– It contains information on the product designation, the hard-
ware version and the software version.
4 Press »i« to quit the menu.
Connecting the digital receiver to a PC
The »RS 232« serial interface allows you to connect to a PC.
To do this, you need a serial cable with a 1:1 assignment, i.e. all the
pins are directly connected. Depending on the PC, the cable needs
either a 9- or a 15-pin D-SUB socket, and a 9-pin D-SUB plug for
connection to the receiver.
You can use this connection for software updates and for uploading
and downloading other data.
You can find more information on the internet at www.grundig.com.
INFORMATION_____________________________________
System Info
Manufacturer: GRUNDIG
Hardware: V.0100
Software: V. 0104
Remote control: TP 765S
Internet: http://www.grundig.com
Back Exit
DSR 2410
Reception parameters
Frequency: 12480 MHz
Symbol rate: 27500 kS
Polarisation: Vertikal
Bit error: 0
Reception: ok
S/N: 13 dB
Signal level: 254
Station Back Exit
select
7SAT.1
■■■■■■■■
■■■■■■■■■■■■■■■■■■■■■■■■
Page 33

ENGLISH
33
INFORMATION
___________________________________________
Technical data
This product complies with the following EU directives: 73/23/EEC
and 89/336/EEC.
It complies with the standards required for CE labelling, EN 55013:
1990 including A12: 1994, A13: 1996, A14: 1999, EN 55020:
1994 including A11: 1996, A12, A13, A14: 1999, EN 60065:
1998, EN 61000-3-2: 1995 including A14: 2000, EN 61000-3-3:
1995.
TV/radio stations: 4000 in total
Number of satellites: 30
Reception range: 950 – 2150 MHz
Input symbol rate: 2-45 megasymbols per
second
SAT IF input: 1 F connector
LNB supply: 14 V/18 V, max. 400 mA
LNB switching signal: 0/22 kHz, 0.5 Vss tone burst
DiSEqC: 1.0 control, tone burst A,
tone burst B
OSD: Display and programming
functions in 6 languages
Search: Automatic/manual
Last station memory: For the last station selected
Teletext, VPS: Is sent if present in the
received signal
Software download: Via Astra 19.2°East satellite,
via RS 232 socket
Mains supply: 230 V~, 50 Hz
Power consumption: In operation 10 W,
in standby 4 W
Ambient temperature: +5 °C to +40 °C
Dimensions: W x H x D:
360 x 60 x 266 mm
Weight: approx. 1.8 kg
Page 34

34
INFORMATION
___________________________________________
Troubleshooting
If a fault occurs, first refer to this information before you take the digital
receiver for repair.
If you are unable to rectify the fault using the information given here, contact
your local dealer or service specialist.
Under no circumstances should you attempt to repair the digital receiver
yourself, as this will invalidate the guarantee.
PROBLEM
No function, mode
indicator not lit
Message: »Short circuit or overload at
the antenna input«
No picture
No sound
Message »Faulty signal«
The remote control
does not work
The time is not
correctly displayed
Picture interference
on stations with a
frequency around
12480 MHz
POSSIBLE CAUSE
Power cord incorrectly
connected
Short circuit on the line
Euro-AV (Scart) cable not
properly connected,
incorrect settings in the
»Device connections« menu
The sound is muted, the
Euro-AV cable is incorrectly
connected or the receiver
volume is set to low
The satellite antenna is not
correctly installed, the satellite
cable is damaged, incorrect
settings in the »Reception
parameters« menu
No batteries are inserted, or
they are low, or the remote
control is not directed at the
infrared sensor
Deviation from local time
The interference may be caused
by DECT cordless telephones
near the receiver
REMEDY
Connect the power cord
correctly
Check the plug, cable and
LNB
Connect the Euro-AV cable
correctly, correct the menu
settings
Switch on the sound,
connect the Euro-AV cable
correctly, turn up the
volume
Install the satellite antenna
correctly, replace the
satellite cable, enter the
correct menu settings
Insert the batteries correctly,
put in new batteries, point
the remote control at the
infrared sensor
Correct the deviation
(see page 16)
Remove the DECT telephones away from the
receiver and the satellite
cable
 Loading...