

Grundig DSR 1773 CY User Manual
DIGITAL
SATELLITE
RECEIVER
DSR 1773 CY

2
CONTENTS
4-5 General information
4 Packing contents
4 Receiving digital stations
5 Special features of your digital receiver
6 Set-up and safety
7-8 Overview
7 The digital satellite receiver
7 The infrared receiver
8 The remote control
9-11 Connection and preparation
9 Connecting the antenna
9 Connecting the television
10 Connecting the infrared receiver
10 Connecting the power supply unit
10 Inserting batteries in the remote control
11 Inserting a Smart card
11 Connecting the Dolby Surround system
12-19 Basic settings
12 The menu
13 Initial setup
14 Settings stations, Option 1
15-16 Settings stations, Option 2
17-19 Editing favourites lists
20-22 Basic functions
20 Switching on and off
20 Mode selection
20 Selecting presets
20 Selecting stations from lists
21 Switching from the current station to the previous one
21 Adjusting the volume
21 Muting the sound
21 Displaying the time
21 Using options
22 Electronic TV Guide
23 Teletext mode
23 Teletext
23 Additional functions
24-31 Settings
24-25 Picture settings
26-27 Language settings
28-29 Menu settings
30-31 Miscellaneous settings

ENGLISH
3
CONTENTS____________________________________________
32 The recording timer
33-34 Additional functions
33 Security functions
34 Conditional access
35-39 Special settings
35-36 Searching for new stations
37 LNB settings
38 Resetting the digital receiver to its original state
38 Updating the digital receiver software
39 Changing remote control levels
40-42 Information
40 Displaying station reception properties
40 Displaying device information
41 Technical data
41 Environmental note
42 Troubleshooting

4
Packing contents
Digital Satellite Receiver DSR 1773 CY
Tele Pilot 766 S remote control with 2 batteries
SCART extension cable
Power supply unit
Infrared receiver
Operating manual
Receiving digital satellite channels
In order to use your new DSR 1773 CY digital receiver you need a
digital-compatible satellite antenna, which must be installed and aligned to the satellites (for example Astra and EutelSat/Hotbird).
Unlike broadcasts of analog satellite channels, not every digital TV or
radio station is assigned to one transmission frequency, but several TV
and/or radio stations are broadcast by one transponder.
To help you with the choice and settings for satellite channels, a
selection of TV and radio stations have already been programmed
for this device. You can start a channel search to ensure that any
new satellite channels are available on your device.
How this works and what you need to remember can be found on
page 35 of this operating manual.
Of course, you can easily program new satellite channels. You can
find the latest transponder information on the teletext pages of
various broadcasters, in a current satellite TV magazine or on the
internet.
GENERAL INFORMATION__________________

ENGLISH
5
Special features of your digital receiver
This digital receiver DSR 1773 CY has a built-in digital receiver unit for
satellite channels. The receiver unit converts the signals from digital
satellite channels to provide outstanding audio and picture quality.
The DSR 1773 CY digital receiver can receive and process encrypted
and all unencrypted digital channels.
So that your new digital receiver always works with the latest program
data and operating software, it is first necessary to conduct an update.
Using the Astra 19.2° East satellite, you can update the device software
of the satellite receiver. How this works and what you need to remember
can be found on page 40 of this operating manual.
The TV guide tells you of any schedule changes at short notice, and also
provides an overview of all the channels’ schedules for the next few
hours.
Detailed information on individual television programmes is available at
the touch of a button.
This digital receiver has a very comprehensive, user-friendly menu
system. The menu is displayed on the television screen, and the functions
of the remote control buttons are explained.
GENERAL INFORMATION__________________
6
SET-UP AND SAFETY___________________________
To ensure that this high-quality and user-friendly digital receiver
provides you with many years of entertainment, please observe the
following instructions:
This digital receiver set is designed to receive video and audio
signals. Any other use is expressly prohibited.
When setting up the device, make sure the mains plug is easily
accessible.
If the digital receiver is subject to a sudden change in temperature,
for example when brought in from the cold to a warm room, let it
stand for at least two hours before you connect it to the mains supply.
Do not expose the digital receiver to moisture of any kind.
The digital receiver is designed for use in dry rooms. If you do use it
outdoors, make sure it is protected from moisture such as rain or
splashing water.
Thunderstorms are a danger to all electrical devices. Even if the digital
receiver is switched off, it can be damaged by a lightning strike to the
mains or the antenna.
Always disconnect the mains and antenna plugs during a storm.
Never open the digital receiver casing under any circumstances.
Warranty claims are excluded for damage resulting from improper
handling.
Notes:
Do not connect any other equipment while the device is switched
on. Switch off the other equipment as well before connecting it.
Do not plug in the power supply of your device until you have
connected the external equipment and the antenna.
Make sure the power supply is freely accessible.
ENGLISH
7
OVERVIEW____________________________________________
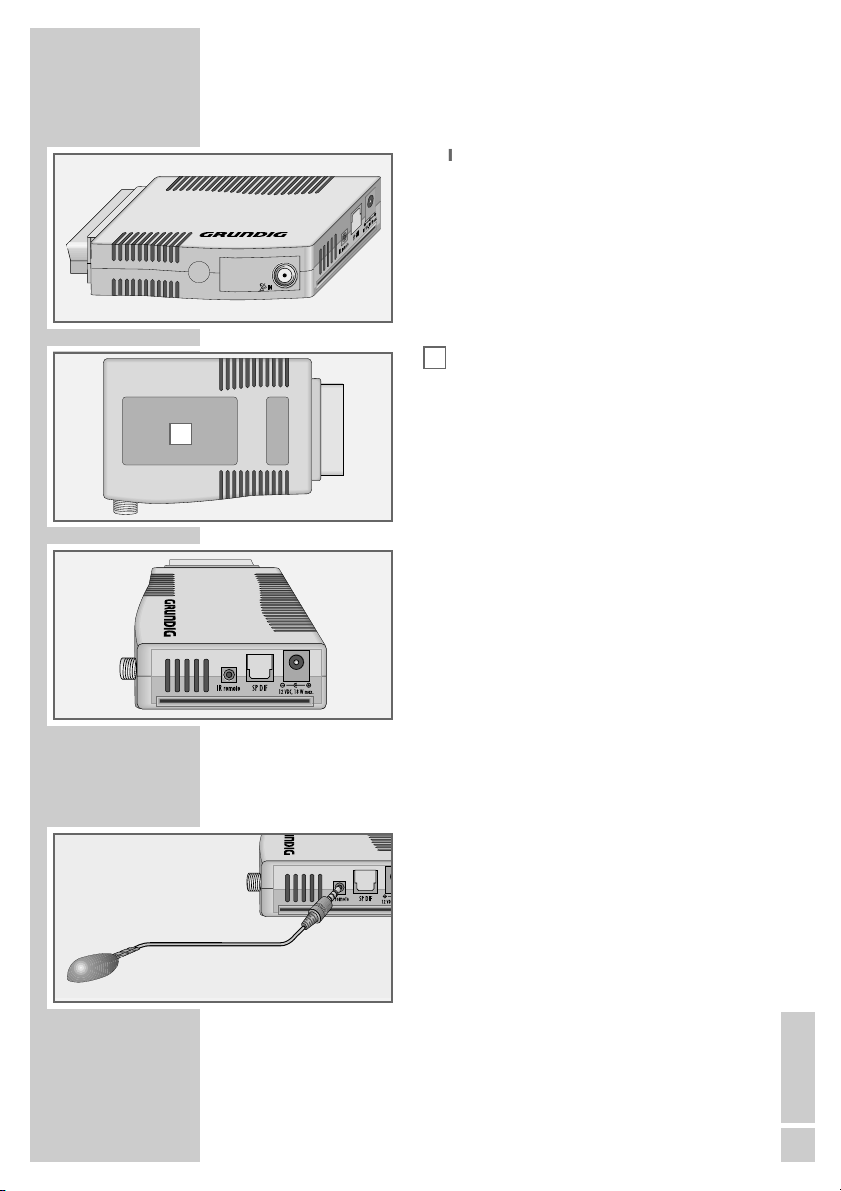
The digital satellite receiver
ʐʐ
IN Antenna socket for the satellite
antenna.
Smart card reader.
EURO AV SCART connector (output) for
connecting to TV.
IR remote Connection socket for infrared
receiver.
SP DIF Audio outputs (optical) for PCM/
Dolby digital/DTS signals.
For connecting to a digital multichannel audio/video amplifier or
AV receiver.
12 VDC Connection socket for the
18 W max. power supply unit supplied.
The infrared receiver
The infrared receiver receives the infrared signals
for the remote control and forwards the commands
by wire to the digital receiver. Position the infrared
receiver so that it can receive the remote control
commands.
When you switch on from standby, the receiver
switches to the last selected station (Last Station
Memory).
•
(red) The digital receiver is in standby
mode.
•
(green) The digital receiver is switched on.
A
A
8
OVERVIEW____________________________________________
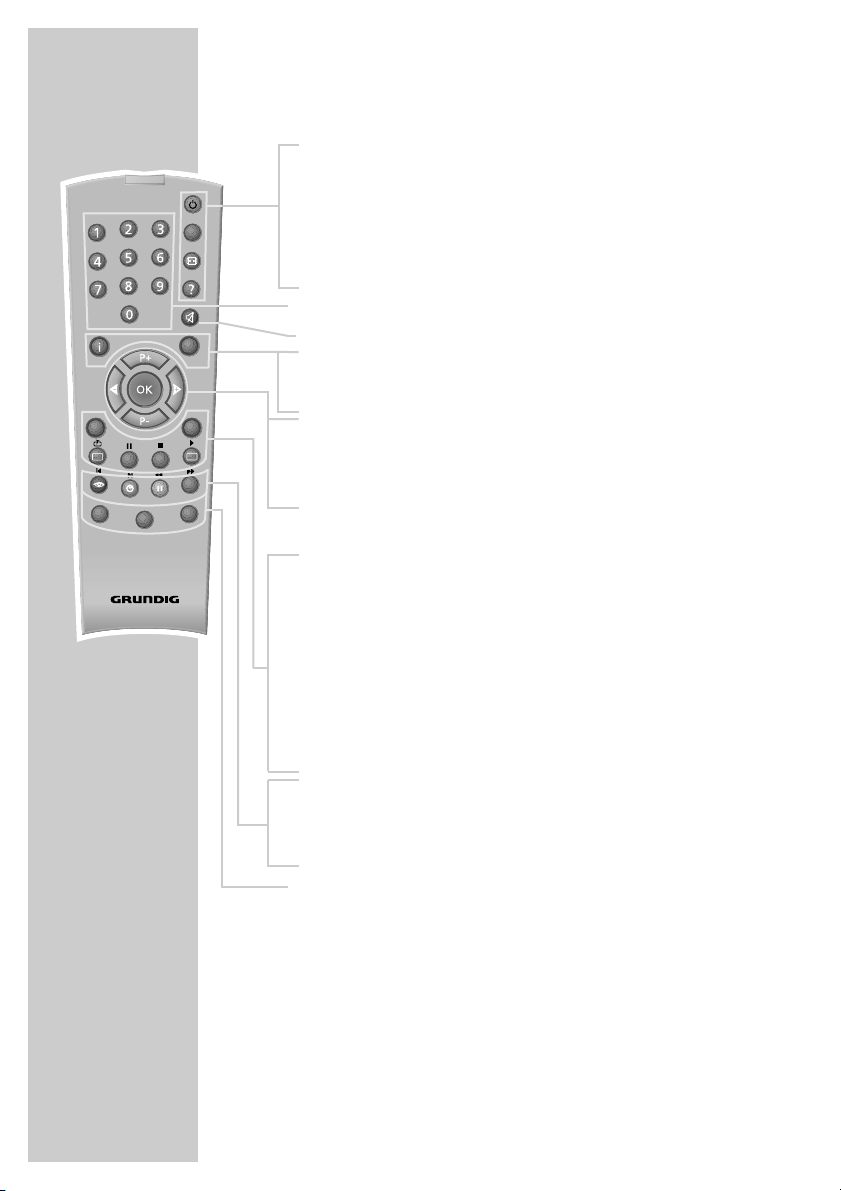
The remote control
Ǽ Switches the digital receiver to standby, and from
standby to the channel last selected.
PIP This has no function.
E
Displays the picture format and the audio information.
? Displays programme information.
1 … 0 Select stations.
d Switches the sound to mute and on again.
i Opens the main menu.
Z Switches the current menu level off.
ǸǷ Adjust the volume.
P+ P- Switch channels up and down one by one.
OK Opens the channel list.
Press
A/B
to switch from the channel lists to favourite
lists.
TXT Switches from TV mode to teletext mode, mix mode
and back to TV mode.
TV-G Opens the electronic TV guide.
TV
Switches to TV mode.
MHP
This has no function.
A/B
Switches between the two most recently selected
channels.
RADIO Switches to radio mode.
Ȅ Displays the time.
ǷǷ
Switches between audio channels.
F
Opens the options (not available for all stations).
DR, TV Switches to operating a GRUNDIG
DVD AV receiver, GRUNDIG television or GRUNDIG
DVD player.
Keep the appropriate button (»DR«, »TV«, »DVD«)
pressed down. Then press the appropriate button.
Note:
The functions available depend on the model of the
device you are using.
Just try it out.
PIP
z
TXT
TV
MHP
DR
Tele Pilot 766 S
TV-G
Radio
A/B
d
DVD
TV
ENGLISH
9
CONNECTION/PREPARATION __________
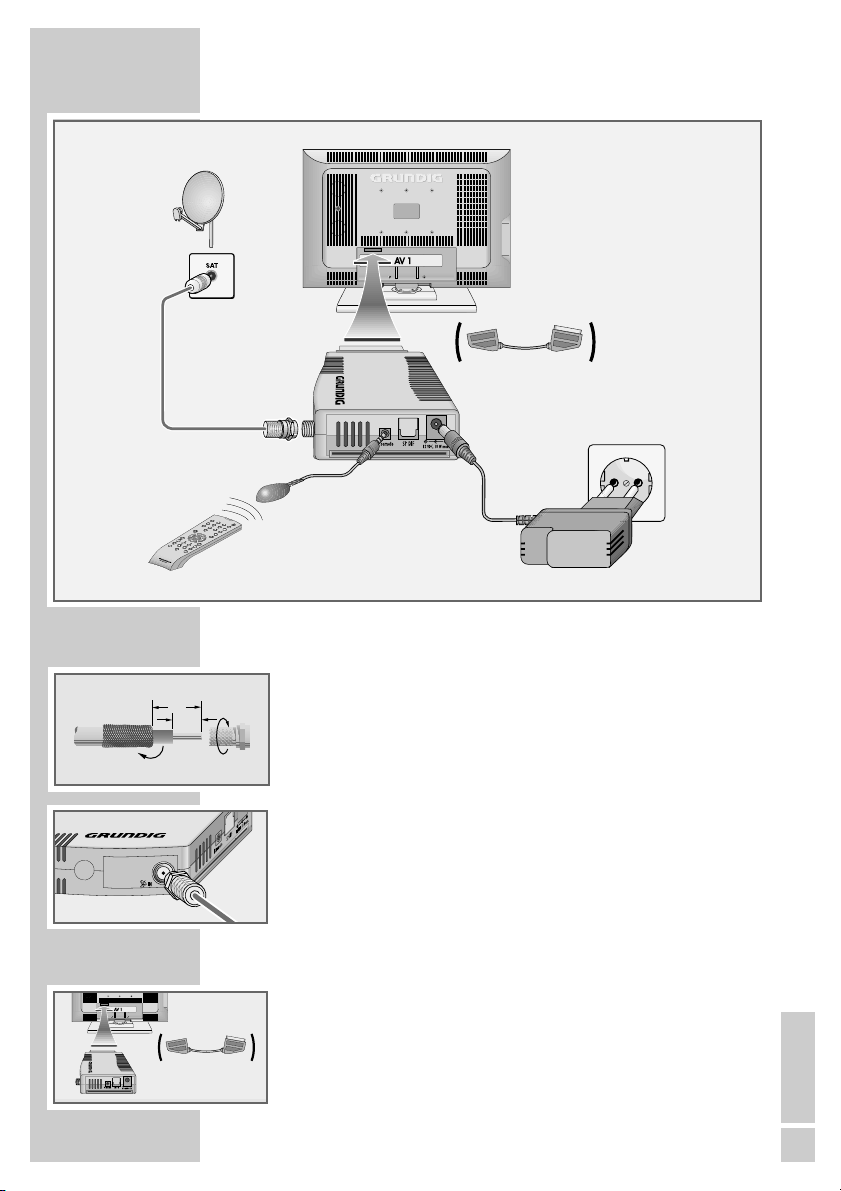
Connecting the antenna
1 Connect the antenna cable of the satellite antenna to the socket
»ʐʐIN« of the digital receiver (screw connector, F connector).
Connecting the television
1 Plug the digital receiver into the corresponding SCART socket
on the television.
If this is not possible for reasons of space, use the SCART
extension supplied.
12
7
10
CONNECTION/PREPARATION __________
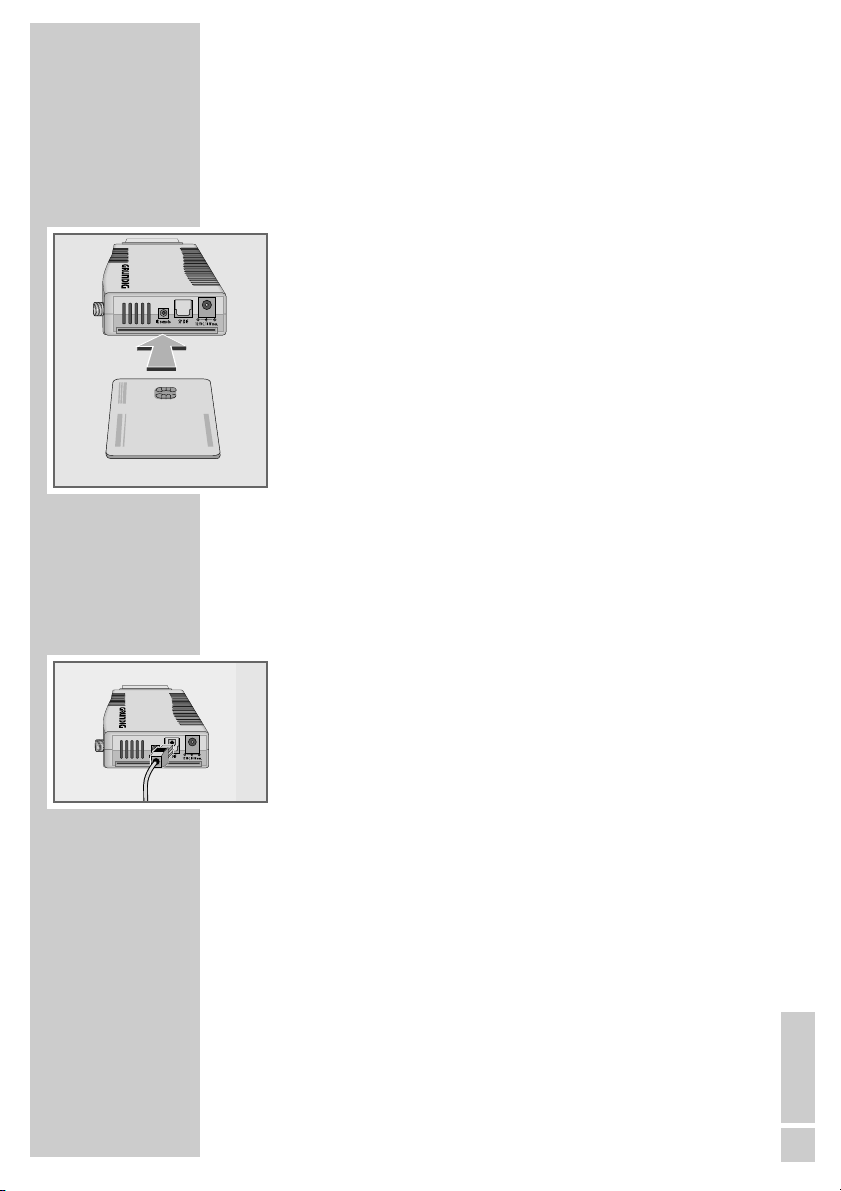
Connecting the infrared receiver
1 Insert the plug of the infrared receiver into the »IR remote«
socket of the digital receiver.
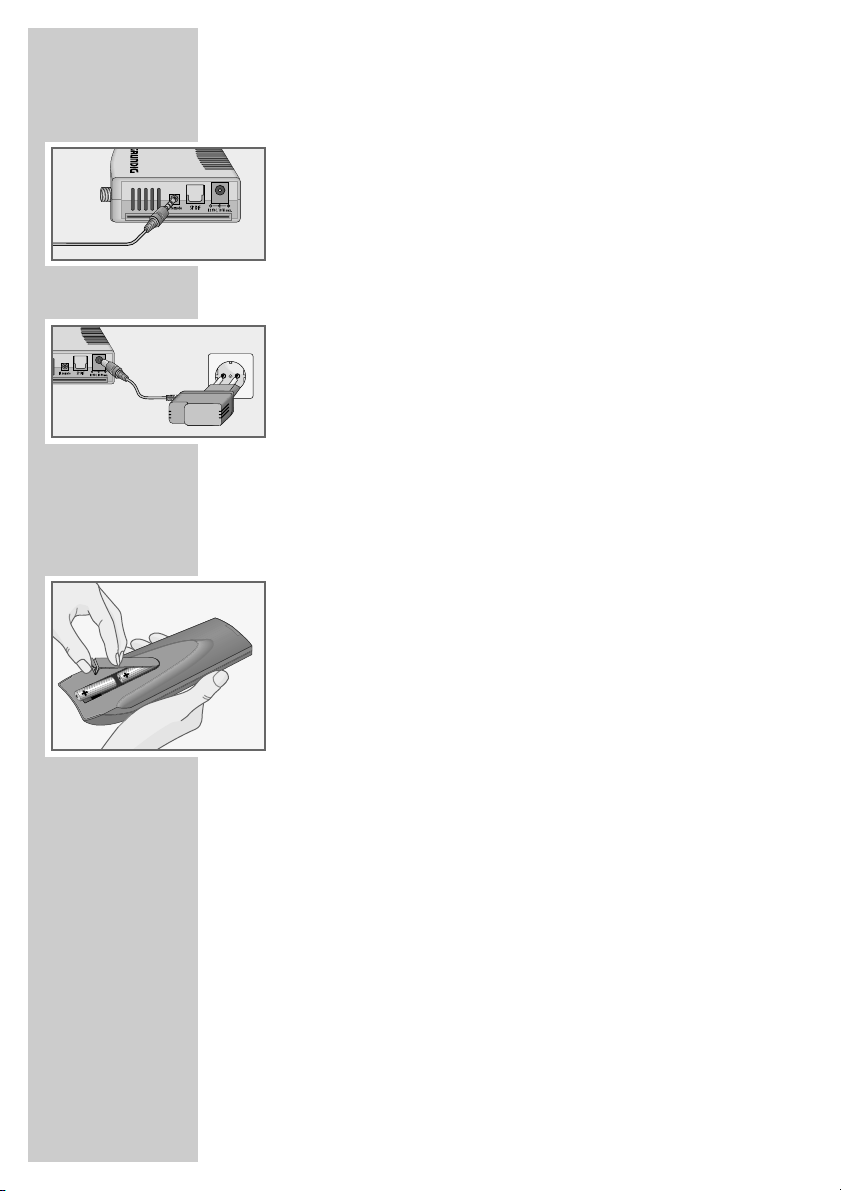
Connecting the power supply unit
1 Insert the plug of the power supply unit supplied into the
»12 VDC« socket of the digital receiver.
2 Insert the power supply unit into the wall socket.
Notes:
Do not insert the power supply unit of your device into the
socket until you have connected the television and the antenna.
The only way to fully disconnect the digital receiver from the
mains supply is to pull out the power supply.
Inserting batteries in the remote control
1 Open the battery compartment by removing the lid.
2 Put in the batteries (AA, 2 x 1.5 V). Make sure the polarity is
correct (as shown on the base of the battery compartment).
3 Close the battery compartment.
Note:
If the digital receiver no longer reacts properly to remote control
commands, the batteries may be flat. Always remove used
batteries.
The manufacturer accepts no liability for damage caused by
leaking batteries.
Environmental note
Batteries, including those which contain no heavy metal, should
not be disposed of with household waste. Please dispose of
used batteries in an environmentally sound manner. Find out
about the legal regulations which apply in your area.
ENGLISH
11
Inserting a smart card
You will need a smart card from your station provider to enable you
to receive encoded (Crypto Works) digital satellite stations.
1 Switch off the digital receiver by pressing »
Ǽ«.
2 Take the smart card out of the packet and insert it in the smart
card reader.
Note:
The smart card must be fully inserted all the way into the digital
receiver.
There might a slight resistance you will need to push past when
inserting the card.
3 Switch on the digital receiver by pressing »
Ǽ«.
4 Select a preset with the subscribed station and wait until the
connection is made and you have a picture.
Notes:
The chip on the smart card must be facing the digital receiver
and forwards towards the SCART socket.
Leave the smart card inserted the whole time after installation.
Connecting the Dolby Surround* system
You can enjoy sound in digital quality with this connection.
1 Plug a standard optical cable into the »SP DIF« socket on the
digital receiver and the corresponding socket on the Dolby Surround system.
Note:
The digital audio must be switched on, see page 31.
CONNECTION/PREPARATION __________
* Manufactured under licence from Dolby Laboratories Licensing Corpo-
ration. “Dolby”, “Dolby Pro Logic”, “Dolby Digital” and the double-D
symbol “
ij ” are trademarks of the Dolby Laboratories Licensing Cor-
poration. Copyright 1992 Dolby Laboratories, Inc. All rights reserved.
** DTS and DTS Digital Out are trademarks of Digital Theatre Systems,
Inc. All rights reserved.
1212
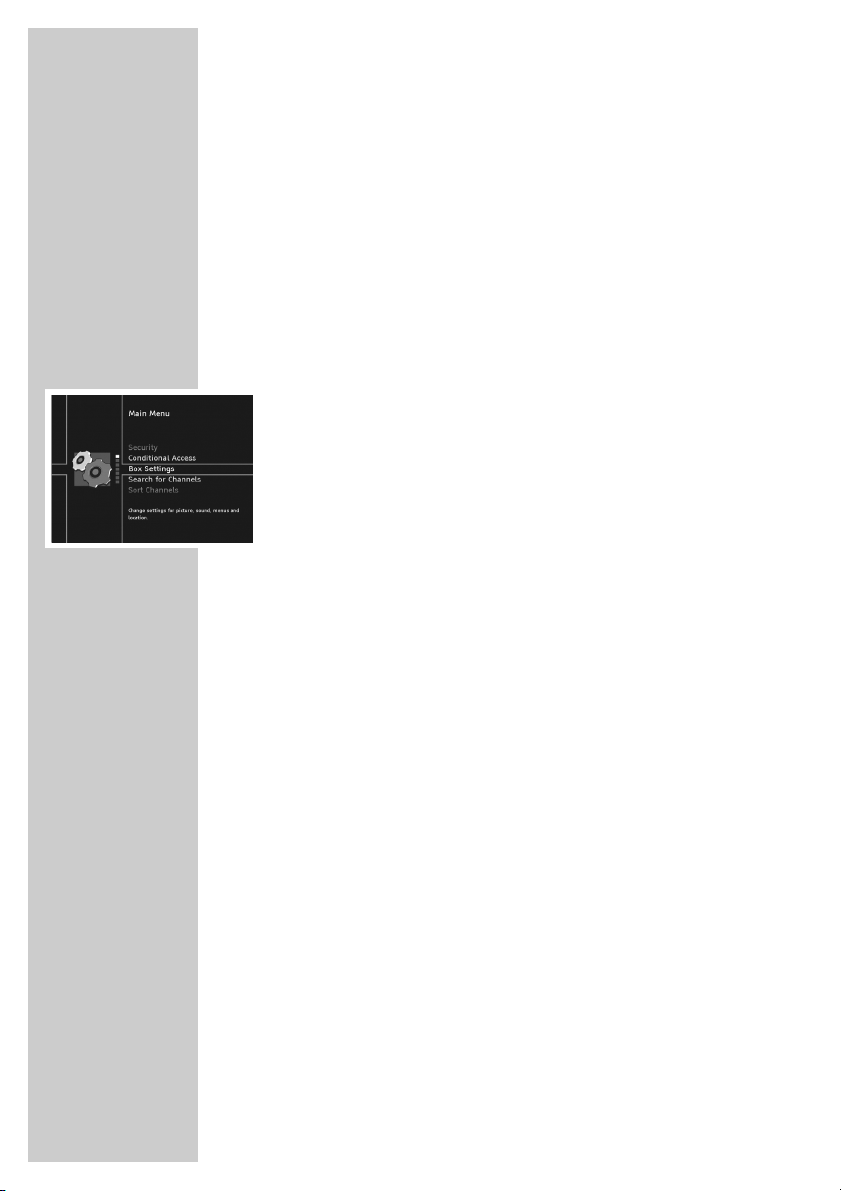
The menu
This digital receiver has a very comprehensive, user-friendly menu
system. The menu is displayed on the television screen.
The digital receiver responds to many functions which you select on
the remote control with informative menus and icons on the television screen.
It enables you to select many different settings and contains information on using your digital receiver.
The menu contains the most important controls for your digital
receiver. Its menu system controls the dialogue between you and the
digital receiver.
Press »i« to open the main menu. You can navigate in the menu by
pressing »P-« or »P+« and select the symbol. The selected symbol
is highlighted.
When you press »OK« to confirm your selection, a sub-menu
appears. You can also navigate here by pressing »P-« or »P+«
and select the item you want. The selected item is highlighted.
Press »OK« to confirm. Another menu usually appears, where you
can use »P-« or »P+« to navigate and make the setting. Make
settings using »P-«, »P+«, »
Ǹ
« or »Ƿ«.
Press »Z« to quit the current menu level.
Press »i« to quit the menu entirely.
BASIC SETTINGS __________________________________

ENGLISH
13
Initial setup
There are several way to set stations on your Digital Satellite
Receiver.
In option 1
you select the menu language for your device, the country in which
your digital satellite receiver is situated and any alterations required
for your TV device.
The digital satellite receiver is already pre-programmed with stations of
the Astra 19.2° East sattelite. No further settings are necessary.
The pre-programmed stations are transferred to the channel list.
Use option 2
if you wish to receive stations from various satellites and are familar
with the configuration of the reception system (antenna, LNB frequencies, multiswitch).
The settings are described on page 15.
Searching for new stations
New satellite channels are frequently added or satellite data is
changed. Therefore we recommend that you start an automatic
search from time to time on the digital receiver.
The settings are described on page 35.
If the station search does not find a particular station automatically,
it can search for it using the manual search. To do this all the parameters for the station must be correctly entered. You can find the
latest transponder information on the teletext pages of various broadcasters, in a current satellite TV magazine or on the Internet.
These settings are described on page 36.
BASIC SETTINGS __________________________________
14
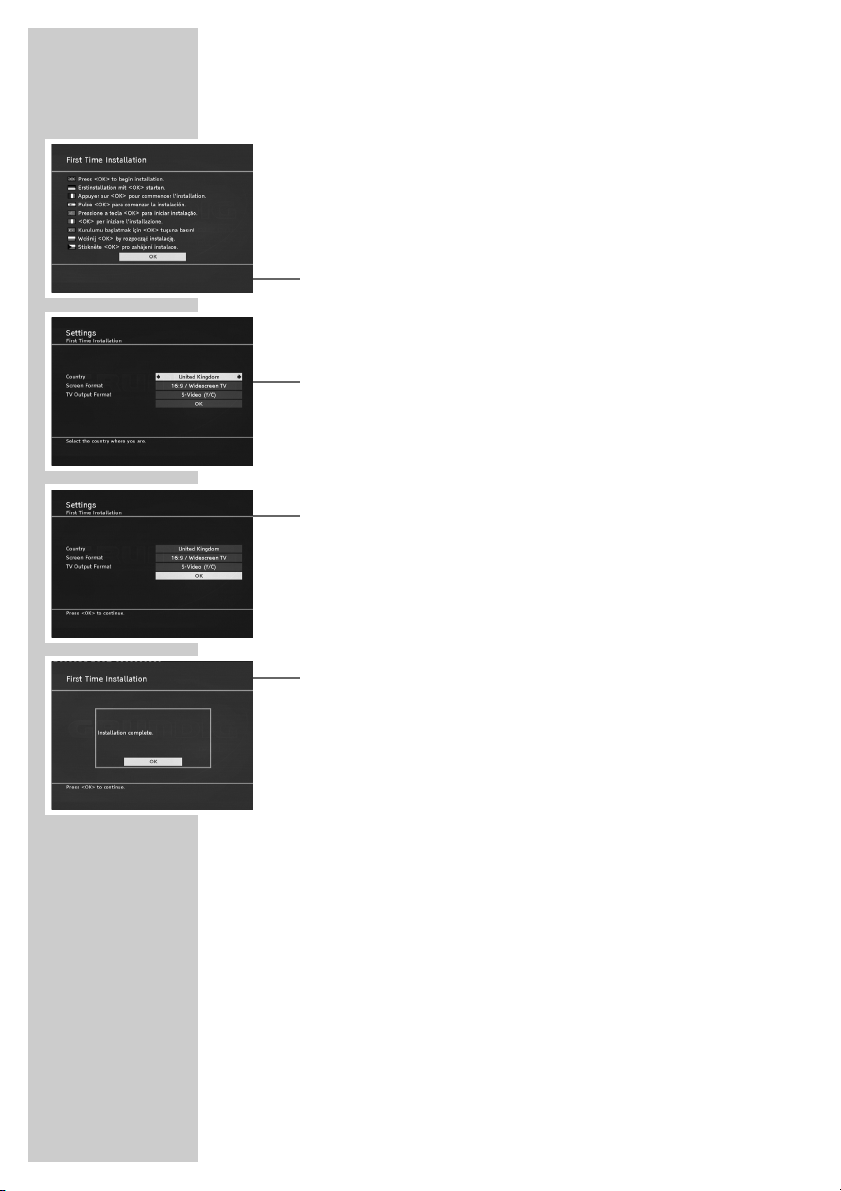
Setting stations, Option 1
1 Switch on the television and select the preset channel for the
digital receiver.
2 Switch on the digital receiver by pressing »
Ǽ«.
– The »Erstinstallation« (First Time Installation) page appears
when the device is first switched on.
3 Press »OK« to start initial setup.
4 Select your language using »
Ǹ
« or »Ƿ« and press »OK« to
confirm.
– The »Settings« menu appears.
5 Press »
Ǹ
« or »Ƿ« to select the country.
6 Press »P-« or »P+« to select the »Screen Format« line and press
»
Ǹ
« or »Ƿ« to select the screen format for your television.
7 Press »P-« or »P+« to select the »TV Output Format« line and
press »
Ǹ
« or »Ƿ« to select the video signal for your television.
8 Press »P-« or »P+« to select the »OK« button and press »OK«
to confirm the entries.
– The »LNB settings« menu appears and the sattelite Astra
19.2° East is set under »Position A«.
9 Confirm the settings with »OK«.
– The preprogrammed stations are transferred to the channel
list.
10 Press »OK« to conclude the setting.
Note:
From this list of channels, you can now copy your chosen stations into four favourites lists, arrange the order of the preprogrammed stations according your own wishes and delete any
channels you do not need (see pages 17 to 19).
BASIC SETTINGS __________________________________
 Loading...