

Grundig 55VLE5523BG User Manual

55 VLE 5523 BG
EN

CONTENTS
---------------------------------------------------------------------------------------------------------------
5 SET-UP AND SAFETY
7 GENERAL INFORMATION
7 Special features of your TV
7 Receiving digital channels
7 Grundig SCR system
8 Important notes on environmental protec-
tion
8 Notes on still images
9 PACKING CONTENTS
9 Standart accessory
9 Optional accessory
10 CONNECTION AND PREPARATION
10 Connecting the antenna and the power
adapter
11 Setting up or hanging
11 Setting up with stand
11 Preparing for mounting on the VESA
bracket
12 Inserting batteries into the remote control
13 OVERVIEW
13 Connections on the television set
14 Control elements
14 Turning the TV to standby
14 Adjusting the volume or changing the sta-
tion
15 The remote control – Main functions
16 The remote control – All functions
17 INITIAL SET-UP
17 Initial set-up and tuning channels
17 Selecting language, operating mode and
country
18 Tuning the channels from satellite (DVB-S/
S2)
20 Tuning terrestrial channels (DVB-T)
20 Tuning channels from the cable provider
(DVB-C)
21 Changing the program table for the digi-
tal channels
24 PICTURE /SOUND SETTINGS
24 Picture settings
24 Advanced picture settings
26 Sound settings
28 TV OPERATION – BASIC
FUNCTIONS
28 Switching on and off
28 Selecting channels
28 Selecting channels from lists
28 Selecting a preset AV channel
28 Adjusting the volume
28 Switching sound on/off
28 Displaying information
28 Freeze-frame
28 Audio language
29 Subtitles
29 Zapping function
30 TV OPERATION – ADDITIONAL
FUNCTIONS
30 Entering the switch-off time (sleep timer)
30 Zoom function
30 Eco mode
30 Audio settings
30 Picture settings
31 Changing the picture format
32 ELECTRONIC TV GUIDE
32 Electronic TV guide
33 TELETEXT OPERATION
33 TOP text or FLOF text mode
33 Additional functions
34 USB RECORDING
34 Information on recording and playing
television programmes
34 Possible limitations when using an exter-
nal data medium
35 Connecting external data media
35 Settings for USB recording
37 ″Pausing” time shift programmes
37 Recording programmes
38 Presetting programmes to be recorded
40 Playback
2
ENGLISH

CONTENTS
---------------------------------------------------------------------------------------------------------------
41 USB OPERATION
41 File formats
42 Connecting external data media
42 Removing the external data media
43 The media player
43 Settings in the USB setup menu
44 Basic playback functions
45 Additional playback functions
46 LANGUAGE SETTINGS
46 Opening the SETTINGS menu
46 Changing the menu language
46 Changing the audio language
47 ACCESSIBLED FUNCTIONS
47 Changing the subtitle language
and subtitle mode
47 Audio description (Audio subtitles)
48 DATE AND TIME SETTINGS
48 Opening the SETTINGS menu
48 Automatic setting
48 Manual setting
49 TIMER FUNCTIONS
49 Opening the SETTINGS menu
49 Entering the switch-off time (sleep timer)
49 Switch-on timer
50 Switch-off timer
50 Automatic switch-off (Auto Sleep)
51 PARENTAL SETTINGS
51 Opening the SETTINGS menu
51 Authorising programmes
51 Locking menus
52 Locking keys (Parental lock)
52 Changing the PIN code
52 Locking television channels
52 Watching a blocked television channel
53 SOFTWARE OF THE DEVICE
53 Opening the SETTINGS menu
53 Product information
53 Updating software
53 Software update (USB)
54 RESET FUNCTIONS
54 Restoring the television to the default set-
tings
55 OPERATION USING EXTERNAL
DEVICES
55 DIGI LINK
55 The DIGI LINK functions on your televi-
sion
56 Device operation
56 Switching the device to standby
57 High definition HD ready
57 Connection options
58 Connecting external devices
58 Using a DVD player, DVD recorder,
video recorder or set-top box
58 Headphones
59 Hi-fi system/AV receiver
60 OPERATION WITH A COMMON
INTERFACE
60 What is a Common Interface?
60 Inserting the CA module
60 Access control for CI module and
smart card
61 SETTING FURTHER CHANNELS
61 Update for digital channels from a satel-
lite automatically
62 Searching for digital channels from a
satellite manually on a transponder
63 Antenna settings and searching for digital
channels from a satel-lite automatically
64 Antenna settings, SCR system and search-
ing for digital channels from a satellite
automatically
65 Antenna settings for DiSEqC 1.0/1.1and
searching for digital channels from a
satellite automatically
67 Searching for channels from the cable
provider automatically
68 Searching for channels from the cable
provider manually
68 Searching for digital terrestrial TV chan-
nels automatically
ENGLISH
3

CONTENTS
69 Searching for digital terrestrial TV chan-
nels manually
69 Automatic service update
70 Tuning analogue television channels
71 Changing stored analogue channels
73 Displaying signal information
74 INFORMATION
75 Service information for dealers
75 Environmental note
75 Note for the Product Package
75 Cleaning the TV set
75 Explanation of the symbols which may be
present on back side of the television set
76 Troubleshooting
77 GLOSSARY
80 INDEX
---------------------------------------------------------------------------------------------------------------
4
ENGLISH

SET-UP AND SAFETY
-----------------------------------------------------------------------------------
About your TV set
7
With your TV set, you can receive and watch
digital TV programmes over DVB-S, DVB-T
and DVB-C, along with analogue TV.
7
The TV set can record programmes. For this
feature you need a USB storage device, such
as an external hard drive (not included). Recorded programmes can only be played on
the same TV set. After the TV st is repaired, it
is possible that recorded programmes may no
longer be able to be played back.
Intended use
7
The TV set is designed for use in dry rooms.
7
Use the TV set with the supplied stand or
a suitable VESA bracket.
7
The TV set is primarily intended for the play-
back of TV programmes, streaming content
and audio/video material from external devices. Any other use is strictly prohibited.
It is not intended as an information display or
for predominant use as a computer monitor. If
a still image or a non-full-format image is displayed for an extended period, visible traces
may remain on the screen for some time.
This is not a defect that can be used as the
basis for a warranty claim.
Safety
WARNING
Risk of electrical accident
7
Do not open the TV set. Safety risk may arise
and also the guarantee of the product can be
void if the television set is opened.
7
The TV set can only be operated with the
power cable or the AC/DC adapter supplied
with the product.
7
Do not operate the TV set with a damaged
power cord/AC/DC adaptor (if supplied).
7
If the plug on the TV set has an earthing con-
tact, only insert the plug into a socket with an
earthing contact.
7
Plug the TV set into the mains socket only after
you have connected the external devices and
the antenna.
7
Protect the TV set from moisture. Do not place
any vessels filled with water (such as vases)
on the TV.
Fire hazard
7
7
Do not cover the ventilation slots on the TV
set.
7
Always unplug the power plug and antenna
plug during a thunderstorm.
7
Keep candles or other open flames away
from the TV set.
7
Do not expose the batteries to extreme heat
such as sunshine, fire or the like.
7
Only use batteries of the same type (brand,
size, properties). Do not use used and new
batteries together.
To prevent the spread of fire,
keep candles or other open
flames away from this product at
all times.
ENGLISH
5

SET-UP AND SAFETY
-----------------------------------------------------------------------------------
WARNING
Injuries caused by falling TV set
Never place the TV set on an unstable surface.
The TV set may fall, causing serious injury, possibly leading to death in isolated cases.
Observe the following precautions:
7
Only use the manufacturer’s recommended
cabinets or stands.
7
Only use furniture that can safely support the
TV set.
7
Make sure that the TV set does not protrude
beyond the dimensions of the furniture on
which it is resting.
7
Do not place the TV set on tall furniture (such
as kitchen cabinets, bookshelves) without
securely anchoring the furniture and TV set.
7
Do not place the TV set on fabric or other
materials located between the TV set and
furniture.
7
Instruct children that there is danger associ-
ated with climbing on furniture when the TV
set is to be reached.
NOTICE
Shortened service life due to high operating temperature
7
Do not place the TV set next to heating units
or in direct sunlight.
7
To ensure adequate ventilation, maintain
clearance of at least 10 cm around the TV set.
Discolouration of furniture due to rubber feet
7
Some furniture surfaces may discolour when
they come in contact with rubber. To protect
furniture, you can place a sheet made of glass
or plastic under the stand. Do not use textile
underlays or mats such as doilies.
Environmental information
7
Do not dispose of batteries in
stores or public collection points. You help to
protect the environment in this way.
7
Be sure to dispose of packaging materials
for your product separately according to the
guidelines of local authorities so that they
can be recycled in an environmentally safe
manner.
7
If you are not using your TV set for a while,
turn it to standby mode. In standby mode, the
TV set uses very little energy (≤ 0.5 W).
If you do not use the TV set for an extended
period, turn it off with the power switch or
unplug the power cord from the socket. If you
turn off the device or disconnect it from the
power supply, the switch-on timer and programmed recordings will not work.
7
Select a location for the TV set so that no
direct sunlight falls on the screen. This allows
a lower backlight to be selected, which saves
energy.
7
for electrical and electronic equipment.
the household waste. Used batteries must be returned to retail
Do not dispose of the product
along with normal household
waste at the end of its service
life. Take it to a recycling centre
6
ENGLISH

GENERAL INFORMATION
-------------------------------------------------------------------
Special features of your TV
7
You can receive and watch digital TV channels using your television set (via DVB-S/S2,
DVB-T and DVB-C) – including High Definition
programmes (HD). However, the reception of
digital TV channels in HD is currently limited
to a few countries in Europe.
7
Although this television set complies with the
current DVB-S/S2, DVB-T and DVB-C standards (status: August 2012), the compatibility
with future DVB-S/S2 satellite transmissions
as well as terrestrial DVB-T and DVB-C cable
programmes cannot be guaranteed.
7
Your television set can receive and process all
analogue and non-encrypted digital TV channels. The television set is also equipped with
digital and analogue receivers.
7
The electronic TV guide (for digital channels only) informs you about any schedule
changes at short notice, and provides an overview of all the broadcasters' schedules for the
next few days. Detailed information on the
individual television programmes are – when
provided by the broadcasting station – are
also available in the electronic TV guide.
7
You can connect various data media, such as
an external hard drive, a USB memory stick or
a digital camera, to the USB socket. Using the
file browser, you can then select and play the
file formats of your choice (for example, MP4,
MP3 or JPEG data).
7
Using the time shift function, you can quickly
and easily pause a programme using the
remote control and resume it at a later stage.
The programme is recorded in an external
data medium.
7
You can record any digital TV channels you
choose.
The TV channels are converted by the television and saved on an external data medium
which is connected to the USB socket.
The saved programmes can be called up and
played from the archive on the external data
medium at any time.
You can also play a programme from the
archive while recording another.
More information on recording and playing
TV programmes can be found from page 34.
Receiving digital channels
7
You require a satellite antenna to receive
digital satellite channels (DVB-S/S2).
7
You require a digital roof antenna or indoor
antenna (passive or active indoor antenna
with its own power supply) to receive digital
television channels (DVB-T).
7
If you wish to receive digital television channels via your cable system (DVB-C), the antenna cable for your cable operator must be
connected to the television set.
7
Unlike analogue broadcasting, not every
channel has its own transmission frequency.
Instead, several channels are grouped into
what are known as bouquets on a regional or
national level. You can find the current transmission information on teletext from various
broadcasters, or by consulting a current TV
guide or the Internet.
7
Various digital television channels from private
broadcasters are encrypted (DVB-S/S2, DVBT and DVB-C). Watching these channels and
the recording and playback functions are only
possible with the appropriate CI module and
a SmartCard. Ask your specialist dealer.
The range of channels available from the
public broadcasting institutions (ARD with EinsExtra, EinsFestival or ZDF with ZDF Info and
all third party broadcasters) are not encrypted
and can be received without a SmartCard.
Grundig SCR system
7
Your TV supports SCR system (Satellite Channel Router). If your antenna installation is
equipped with an Single Cable Distribution
multiswitch, all television sets which are connected on this antenna can receive the television channels stand-alone.
ENGLISH
7

GENERAL INFORMATION
-------------------------------------------------------------------
Important notes on environmental protection
The following information will help you to save
resources – and money as well.
7
If you are not using your television set for
several days, you should pull out the mains
plug for environmental and safety reasons.
This way the television does not consume any
electricity.
7
If the device is equipped with a power switch,
switching it off using this switch will be sufficient. The energy consumed by the television
set is reduced to virtually 0 W.
7
In standby mode, the television set uses very
little energy. However, it may be necessary
to leave the television set in standby mode
for certain functions (for example automatic
switch-on and switch-off and for timer functions).
7
The television set uses less energy when the
brightness is reduced.
Notes on still images
Watching the same image for a long time on
the screen may cause a still image remains
feebly on the background. Feeble image(s) on
the background is originated from LCD/LED
technology and does not require any action
under guarantee. To avoid such cases and/or
minimize the impact, you may observe the tips
below.
7
Do not allow the same TV channel to stay on
the screen for a very long time. Channel logos
may cause this situation.
7
Do not allow the images, which are not full
screen, to constantly stay on the screen; if not
streamed in full screen format by the broadcaster, you can convert the images to full
screen by changing picture formats.
7
Higher brightness and/or contrast values will
lead this impact to appear faster; therefore,
you are recommended to watch your TV in
the lowest brightness and contrast levels.
8
ENGLISH
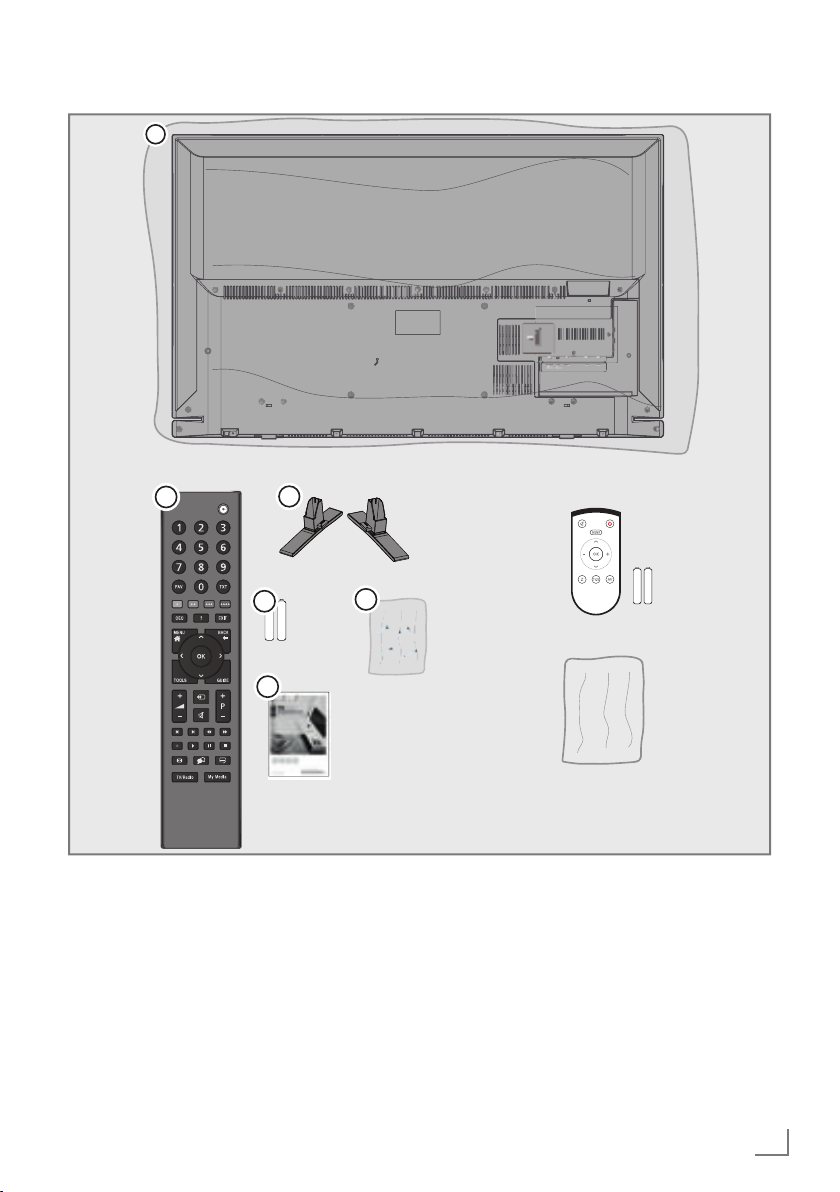
PACKING CONTENTS
1
-------------------------------------------------------------------------------
3
2
4
6
5
Standart accessory
1 TV
2 Stand
3 Remote control
4 Batteries for remote controls
5 Screws and mounting instructions for stand
Screws for VESA bracket
6
7 Brief Instruction
Optional accessory
Easy-Use Remote Control
Batteries for Easy-Use remote controls
Cleaning cloth
ENGLISH
9

CONNECTION AND PREPARATION
Connecting the antenna and the power adapter
---------------------------------------
3
1 To receive digital satellite channels (DVB-S/
S2), connect the satellite antenna cable to
the antenna socket SATELLITE on the television set.
And/or
2a To receive terrestrial digital broadcasters
(DVB-T) connect the cable for the rooftop
or indoor antenna (passive or active indoor
antenna with its own power supply) to the
antenna socket ANT IN on the television
set;
or
2b To receive digital cable channels (DVB-C)
connect the cable for the rooftop antenna
to the antenna socket ANT IN on the
television set;
or
2c To receive analogue TV channels, connect
the cable for the rooftop antenna to the
antenna socket ANT IN on the television set
Note:
7
When connecting an indoor antenna you
may have to try it out at different positions
until you get the best reception.
SERVICE
AV / S-VHS
SATELLITE
ANT-IN
Optic Out
USB2
HDMI2
13/18V
5V
max. 500mA
max. 50mA
21
3 Plug the power cord of the power adapter
into a wall socket.
Notes:
7
Do not plug in the power adapter until you
have connected the external equipment and
the antenna.
7
Do not use an adapter plug or extension
lead which does not meet the applicable
safety standards. Do not tamper with the
power cord.
10
ENGLISH
CONNECTION AND PREPARATION
Setting up or hanging
7
Select a location so that no direct sunlight falls
on the screen.
Setting up with stand
7
To mount the stand, refer to the installation
instructions included.
7
Place the TV set on a hard, level surface.
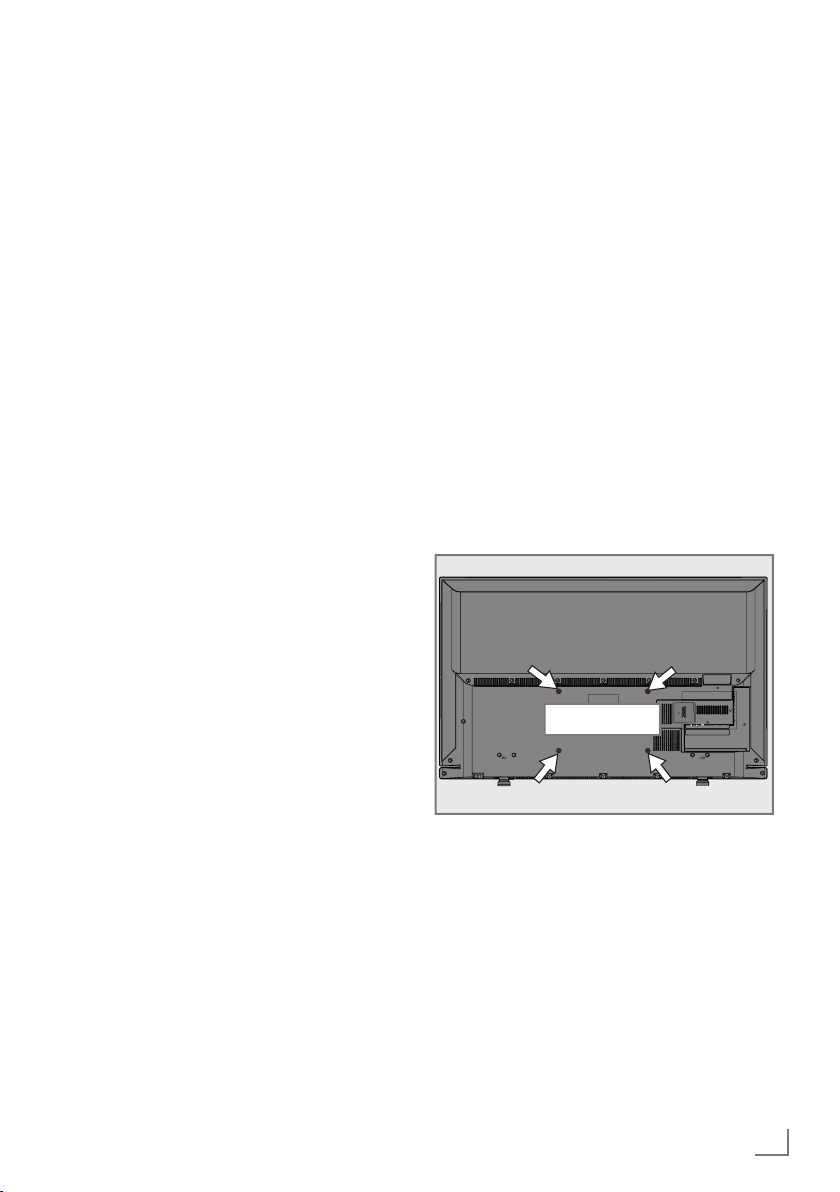
Preparing for mounting on the VESA bracket
You will need:
7
A pair of scissors,
7
A crosstip screwdriver.
Follow the installation instructions for the VESA
bracket.
1 Place the TV set in the film on a smooth
surface with the screen facing down.
2 Cut open the film on the back side using the
scissors.
3 Connect the required cables to the connec-
tors on the TV set. See the “Connections”
section in this manual.
4 Tie the cables so they do not hang down
onto the floor.
5 Screw the VESA bracket onto the TV set
and mount it according to its installation
instructions.
---------------------------------------
SERVICE
VESA
AV / S-VHS
SATELLITE
ANT-IN
Optic Out
USB2
HDMI2
13/18V
5V
max. 500mA
max. 50mA
ENGLISH
11

CONNECTION AND PREPARATION
---------------------------------------
Inserting batteries into the
remote control
1 Open the battery compartment by removing
the lid.
2 Insert the batteries (2 x 1.5 V micro, for
example R03 or AAA). Observe the polarity marked in the bottom of the battery
compartment.
3 Close the battery compartment.
Note:
7
If the television no longer reacts properly
to remote control commands, the batteries
may be flat. Always remove used batteries.
7
The manufacturer accepts no liability for
damage caused by leaking batteries.
Environmental note
7
able battery/battery may not be disposed
of with regular household rubbish. For
certain rechargeable batteries/batteries, this
symbol may be supplemented by a chemical
symbol. Symbols for mercury (Hg) or lead
(Pb) are provided if the rechargeable batteries/batteries contain more than 0.0005%
mercury or more than 0.004% lead.
Rechargeable batteries/batteries, including
those which do not contain heavy metal,
may not be disposed of with household
waste. Always dispose of used batteries
in accordance with local environmental
regulations.
Make enquiries about the applicable disposal regulations where you live.
This symbol on rechargeable batteries/batteries
or on the packaging indicates that the recharge-
12
ENGLISH

OVERVIEW
AV / S-VHS
SERVICE
SATELLITE
13/18V
max. 500mA
ANT-IN
5V
max. 50mA
Optic Out
USB2
HDMI2
AV / S-VHS
SERVICE
--------------------------------------------------------------------------------------------------------------
Connections on the television set
ENGLISH
13

OVERVIEW
--------------------------------------------------------------------------------------------------------------
SERVICE Service only.
AV / S-VHS SCART socket, audio/video
input and output;
S-VHS socket, audio/video
input for S-Video camera
using a SCART-S-VHS
adapter cable;
Component socket, audio/
video input (YUV signal) using a SCART-YPbPr adapter
cable.
SATELLITE For satellite antenna. Suit-
able for single-cable GSCR
system.
ANT IN For antenna cable (terres-
trial antenna, cable connection or analogue antenna).
Optic Out Optical audio output.
For digital multichannel
audio/video amplifier or
AV receiver connections.
USB2 Connect data media for re-
cording programmes, such
as an external hard disk.
HDMI2 Input for digital audio and
image data.
U Headphone jack or line
output via adapter.
External audio output (with
headphone-RCA converter).
USB1 USB socket for external
data medium and PVR function.
HDMI1 Input for digital audio and
image data.
CI For CA modules for receiv-
ing encrypted stations.
Control elements
+V/P-
Turning the TV to standby
1 »8/I« Switches the television on and back
into standby mode.
Adjusting the volume or changing the station
1 »V/P« Pre-selection for volume or channel
selection.
2 »–« Adjusts the volume;
Selects channels in steps.
3 »+« Adjusts the volume;
Selects channels in steps.
14
ENGLISH

OVERVIEW
--------------------------------------------------------------------------------------------------------------
The remote control – Main functions
Switches on from standby
selects channels directly
Selects the channel list (»All«,
»FAV 1« to »FAV 4«)
HDMI CEC Device List
Display information
Opens the main menu
Opens the channel list
Opens the TOOLS menu
mode;
Turns on and off the television
set (stand-by)
Switches between
teletext and TV mode
Exits TV guide
Zapping function;
switches back one menu
level in the menus
Opens the TV guide
Adjusts the volume
Muting
Record, play, pause and
stop (only digital television
channels) on/from an exter-
Navigation in the menus
nal data medium
Picture formats
Switches between
TV and Radio channel
(only for digital
television channels).
Moves the cursor up
and down in the menus.
Moves the cursor to the left and
right in the menus.
Activates various functions and
save functions/settings.
Signal source
Switches on from standby;
Selects channel – in steps
Next/previous image/ chapter, next/previous track
Select subtitle
Opens Media Player menu
Select audio channel
ENGLISH
15

OVERVIEW
--------------------------------------------------------------------------------------------------------------
The remote control – All functions
(red) Selects pages in teletext;
(green) Selects/activates various functions
(yellow) in the menus.
(blue)
5 Switches to double character size in
6 Refreshes a teletext page;
3
Stops scrolling through pages in
4
Reveals answers in teletext;
8 Starts playing a programme from an
! Freeze frame, if no external data
7 Ends playback of a programme from
teletext;
selects the previous title/previous
picture in the Media Player.
selects the next track/next picture in
the Media Player.
teletext;
starts a fast reverse search in the
Media Player.
starts a fast forward search in the
Media Player.
Starts the recording (only for digital
television channels, the recording is
made on an external data medium).
external data medium;
repeats a recorded programme;
starts playback in the Media Player.
medium is connected;
playback pause;
time shift mode (only for digital
television channels and when an
external data medium is connected);
Pauses the file executed in the Media Player.
an external data medium;
ends a recording or
playback in time shift mode;
splits the screen in teletext;
stops the file executed in the Media
Player.
Selects different audio languages
(only for digital television channels).
Selects different subtitles
(only for digital television channels).
16
ENGLISH

INITIAL SET-UP
---------------------------------------------------------------------------------------------------
Initial set-up and tuning channels
The television set is equipped with automatic
channel search, which searches for satellite
channels (DVB-S/S2), terrestrial channels (DVBT), cable channels (DVB-C) and analogue channels.
You start the search and the channels will be
stored into the different Program Tables. Following, you can sort the channels in the Program
Tables.
The various settings
Depending on the type of antenna connected,
you can decide which channels you would like
the television to search for.
7
DVB-S/S2 – Tunes digital channels from the
satellite, from page 18.
You have two options for this search:
–
the basic installation which presets a standard selection, e.g. the satellite Astra 19.2°
East; you need only start the search;
–
the professional installation, which allows
you to make all required settings and set
parameters for your receiver system.
7
DVB-T – Tunes digital terrestrial channels, on
page 20.
7
DVB-C – Tunes digital channels from the
cable provider, on page 20.
7
Tunes analogue television channels, in the
chapter “Special functions”, starting on
page 70.
7
Further settings for digital channels after the
initial set-up can also be found in the chapter
“Special Settings”, starting on page 61 .
Note:
7
Make the language and country selection for
all types, then continue reading the respective
chapter.
Selecting language, operating mode and country
1 Switch on the television set from standby
with »
8«, »1…0« or »P+« or »P-«.
–
During initial set-up, the »Installation
Guide« will be displayed.
Help:
7
If this menu is not displayed, restore the
television set to its default settings (see
page 54).
2 Select the menu language with »
»
V
« or »Λ« and press »OK« to confirm.
3 Select the mode with »
»OK« to confirm.
« or »>« and press
<
– The settings used in »Home Mode« help
to save energy.
–
Alternatively, the menu item »Shop Mode«
can be selected which the retailer can use
for demonstrating the device functions.
Note:
7
End the »Shop Mode« by restoring the
television set to its default settings (see
page 54).
4 Select the country in which the television
set is operated with »
and press »OK« to confirm.
«, »>«, »V« or »Λ«
<
– The »Source Setup« menu appears with
the »Connection Type« line marked.
Note:
7
You can find a description of how to tune
the channels of your choice – depending
on the antenna connected – in the following chapters.
«, »>«,
<
ENGLISH
17

INITIAL SET-UP
---------------------------------------------------------------------------------------------------
Tuning the channels from satellite (DVB-S/S2)
You have two options for tuning digital satellite
channels.
A The easy installation,
which pre-configures all antenna settings for
the satellite channels on Astra 19.2° East.
B The advanced installation
can be used if you wish to receive satellite
channels from various satellites. To do so, you
must make the antenna settings (Satellite, LNB
Power, LNB Type, DISEqC Mode, LNB Selection) for the satellites chosen.
Easy installation
1 In the »Source Setup« menu, in the »Con-
nection Type« line, select the option »Satellite« with »
confirm.
2 Select the line »Easy Installation« with »
or »
– Other menu options will be displayed,
the satellite Astra 19.2° East is preset.
3 Start the scan with »« (green).
– The »Search results« menu appears, and
the scan for channels begins.
– Depending on the number of television
channels received, this can easily take a
few minutes.
– The scan is complete as soon as the
»PROGRAM TABLE« appears.
Note:
7
You can abort the scan by pressing
»MENU«.
« or »>« and press »OK« to
<
Λ
« and press »OK« to confirm.
V
Advanced installation
1 In the »Source Setup« menu, in the »Con-
nection Type« line, select the option »Satellite« with »
« or »>«.
<
2 Select the line »Advanced Installation« with
V
« or »Λ« and press »OK« to confirm.
»
– The menu appears.
INSTALLATION
ANTENNA SETTINGS
Satellite
Transponder
LNB Type
LNB Power
DISEqC Mode
LNB Selection
«
Quality
Signal strength
MENU
Back
ASTRA 19.2°,E
Poor Normal Good
3 Select the line »Satellite« with »V« or »Λ«
and press »OK« to confirm.
– The »SELECT SATELLITE« menu appears.
Select the satellites with »
»
« and press »OK« to confirm.
>
V
«, »Λ«, »<« or
Note:
7
The setting in the line »Transponder« is not
required for this automatic scan.
4 Select the line »LNB Type« with »
»
Λ
«.
Select the type of LNB installed with »
or »
«.
>
5 Select the line »LNB Power« with »
»
Λ
«.
Depending on the type of LNB, set the LNB
power supply to »13/18 V« or »14/19 V«
with »
« or »>«.
<
11362 MHz H
Universal
13/18V
Off
Off
Auto Tuning
Manual Tuning
V
« or
V
xx.xx.xxxx
15:46
<
« or
«
18
ENGLISH

INITIAL SET-UP
---------------------------------------------------------------------------------------------------
6 Select the line »DISEqC Mode« with »
or »
Λ
«.
V
«
Select »DiSEqC 1.0« or »DiSEqC 1.1«
in accordance with the existing antenna
system with »
– DiSEqC 1.0 allows up to four satellites to
« or »>«.
<
be received simultaneously.
– DiSEqC 1.1 allows up to 16 satellites to
be received simultaneously.
V
7 Select the line »LNB Selection« with »
or »
Λ
«.
«
Select the setting for the respective satellites
with »
« or »>«.
<
8 Once the settings for the satellite have been
made, switch to the »AUTOMATIC CHANNEL SEARCH« menu with »« (red).
Satellite
All
All
Off
Start Search
xx.xx.xxxx
15:46
SOURCE SETUP
AUTOMATIC CHANNEL SEARCH
Connection Type
Country Other
Operator Selection
Select Satellite
Scan Mode
Service Type
Network Search
MENU
Back
Standard Mode
ASTRA 19.2°,E
Free + Scramble
9 Select the line »Scan Mode« with »V« or
»
Λ
«.
Select the scan mode with »
(for unencrypted channels, for encrypted
« or »>«
<
channels only, or for both).
V
10 Select the line »Service Type« with »
»
Λ
«.
Use »
« or »>« to select whether you
<
want to search for television channels only
« or
(TV), radio stations only (Radio) or both
(Radio + TV).
Note:
7
It is possible, that some TV channels (transponders) cannot be found. This is caused
by a change in satellite parameters made
by the broadcaster, e.g. new channels have
been added. Set the »Network Search«
option to »On«.
11 Start the scan with »« (red).
– The »Results« menu appears, and the scan
for channels begins.
– Depending on the number of channels re-
ceived, this can easily take a few minutes.
– The scan is complete as soon as the
»PROGRAM TABLE« appears.
Note:
7
You can abort the scan by pressing
»MENU«.
12 Press »MENU« to end the setting.
Note:
7
If other television channels are to be tuned
from a second satellite, proceed as follows:
Open the menu with »MENU«, select the
line »SOURCE SETUP« with »
V
« or »Λ«
and press »OK« to confirm. Then select the
»Automatic Channel Search« with »
»
Λ
« and press »OK« to confirm. Confirm
V
« or
the line »Select Satellite« with »OK« and
select the preferred satellite with »
»
« or »>«. Start the scan with »« (red).
<
Continue the adjustment by step 4 of the
V
«, »Λ«,
chapter.
Note:
7
Before recording HD channels, please
check signal quality and Strength, see
chapter "Displaying signal information" on
page 72. If the level is displayed in green,
you can record HD channels without any
problems.
ENGLISH
19

INITIAL SET-UP
---------------------------------------------------------------------------------------------------
Tuning terrestrial channels (DVB-T)
1 In the »Source Setup« menu, in the »Con-
nection Type« line, select the option »Air«
with »
« or »>«.
<
V
2 Select the line »Scan Type« with »
»
Λ
«.
Use »
– »DTV«, scan for digital television channels;
– »ATV«, scan for analogue television
– »ATV & DTV«, scan for analogue and
Caution:
7
3 Select the line »Active Antenna Power« with
Switch on the antenna power supply for the
4 Start the scan with »« (green).
– The »Search Results« menu appears, and
– Depending on the number of channels re-
– The scan is complete as soon as the
Note:
7
5 Press »MENU« to end the setting.
Note:
7
« or »>« to set the required scan
<
type:
channels;
digital television channels.
The antenna power supply (5V ) may
only be switched on if the antenna is an
active indoor antenna with a signal
amplifier and it is not already supplied with
a voltage via a mains plug (or similar
supply). Otherwise you may cause a short
circuit and irreparably damage your
antenna.
»
V
« or »Λ«.
antenna with »
the search for channels begins.
ceived, this can easily take a few minutes.
»PROGRAM TABLE« appears.
You can abort the scan by pressing
»MENU«.
Before recording HD channels, please
check signal quality and Strength, see
chapter "Displaying signal information" on
page 72. If the level is displayed in green,
you can record HD channels without any
problems.
« or »>« (»On«).
<
« or
Tuning channels from the cable provider (DVB-C)
1 In the »Source Setup« menu, in the
»Connection Type« line, select the option
»Cable« with »
2 Select the line »Scan Type« with »
»
Λ
«.
Use »
– »DTV«, scan for digital channels;
– »ATV«, scan for analogue television
– »ATV & DTV«, scan for analogue and
3 Select the line »Cabel Scan Type« with
– The search function »Quick« sets up the
– If the option »Full« is selected, the entire
Note:
7
4 Start the scan with »« (green).
– The »Search Results« menu appears, and
– Depending on the number of channels re-
– The scan is complete as soon as the
Note:
7
5 Press »MENU« to end the setting.
« or »>« to set the required scan
<
type:
channels;
digital television channels.
»
V
« or »Λ«. Select the preferred option
(»Quick« or »Full«) with »
channels according to the information
provided by your cable provider in the
transmission signal.
frequency range will be scanned. The
search can take a long time with this option. This option is recommended if your
cable provider does not support the scan
type »Quick«.
You can accelerate the search. To do this,
you need information about the frequency
and network ID. You are usually able to get
this data from your cable operator or find it
in forums on the Internet.
the search for channels begins.
ceived, this can easily take a few minutes.
»PROGRAM TABLE« appears.
You can abort the scan by pressing
»MENU«.
« or »>«.
<
« or »>«.
<
V
« or
20
ENGLISH

INITIAL SET-UP
---------------------------------------------------------------------------------------------------
Changing the program table for the digital channels
Channels which are found using the scan are
saved in the »PROGRAM TABLE«.
You can delete channels which are not required
from the programe table, you can change the
order of channels within the programe table and
lock individual channels (Parental control).
You can also add channels to the favourites list;
in addition, you can change the order of channels within the favourites list.
Switch to the next page in the programe table
with »P+« and to the previous page with »P–«.
With »
MANAGEMENT« within the programe table.
In this List Management you can create your
own favourites lists.
With »
according different criteria.
« (yellow) you can open the »LIST
« (blue) you can sort the channels
INSTALLATION
PROGRAM TABLE
1 Das Erste HD
Service ALL
Selecting channel lists
1 Open the menu with »MENU«.
2 Select the »SOURCE SETUP« menu with
V
« or »Λ« and press »OK« to confirm.
»
– The »SOURCE SETUP« menu appears.
3 Select the line »Programe Table« with »
or »
Λ
« and press »OK« to confirm.
– The menu »PROGRAM TABLE« appears.
Important:
7
Programe table and favourites lists are
saved separately according to the different
input sources (satellite, cable, air).
7
When opening the program table, the
respective channel list for the current input
signal appears.
Notes:
7
If in the program table appears added
to the name of the channel, you need a
CI module and a Smart-Card for watching
these channels.
7
As the received data channels are not
displayed in the program table, number
channels displayed in the program table
may be less than 6000.
Network ALL
ASTRA 19.2
V
«
MPEGHDDTV
°
1 Das Erste HD
DTV
6 EinsPlus
DTV
11 HD 1
DTV
16 TV Sport
DTV
Edit Add To Fav. Sort
MENU
Back
2 ZDF HD
DTV
7 arte
DTV
12 Life
DTV
17 Sat.8
DTV
3 arte HD
DTV
8 Phoenix
DTV
13 Film
DTV
18 SKY
DTV
Select Favorite
4 N24
DTV
9 Test-R
DTV
14 Promo
DTV
19 TV6
DTV
5 Einsfestival
DTV
10 ANIXE HD
DTV
15 Sport1
DTV
20 TV5
DTV
ENGLISH
21

INITIAL SET-UP
---------------------------------------------------------------------------------------------------
Deleting channels in the program table
1 In the »PROGRAM TABLE« menu, select the
Edit mode by pressing »« (red).
2 Select the television channel to be deleted
V
«, »Λ«, »<« or »>« and press
with »
»
« (yellow) to delete.
Note:
7
You can delete all channels with »
«
(blue).
3 Confirm the deletion process with »«
(green);
or
cancel the deletion process with »« (red);
4 Quit the program table with »MENU«.
Change the order of the channels in the
program table
(only satellite channels and digital television
channels from the cable provider)
1 In the »PROGRAM TABLE« menu, select the
Edit mode by pressing »« (red).
2 Select the channel which should be moved
V
«, »Λ«, »<« or »>« and mark it
with »
with »« (red).
3 Move the channel to its new position with
V
«, »Λ«, »<« or »>« and press »OK« to
»
confirm.
Note:
7
Repeat steps 2 and 3 if you would like to
change other channels.
4 Quit the program table with »MENU«.
Sorting channels in the program table
(only satellite channels and digital television
channels from the cable provider)
You can sort the order of the channels in the
program table according different criteria.
1 In the »PROGRAM TABLE« menu, select the
Sort mode by pressing »
« (blue).
2 Select the sort criteria for satellite chan-
nels with »« (red), »« (green) or »
«
yellow);
or
sort digital channels from the cable provider
with »
« (blue).
3 Quit the program table with »MENU«.
Skipping channels
You can mark channels which should be
skipped when selecting with »
Λ
« or »V«.
It is still possible to select them using the number
buttons.
1 In the »PROGRAM TABLE« menu, switch
over to the list view with »
2 Select the preferred channel with »
or »
Λ
«.
3 Select the column »Skip« with »
and use »OK« to mark the channel.
« (yellow).
V
« or »>«
<
«
– The channel is marked by »✔«.
4 Quit the program table with »MENU«.
Note:
7
Channels can also be reactivated. Select
the channel with »
V
« or »Λ«, then select
the column »Skip« and reactivate the channel with »OK«.
22
ENGLISH

INITIAL SET-UP
---------------------------------------------------------------------------------------------------
Creating lists of favourites
You can save your favourite channels in up to
four favourites lists (FAV 1 to FAV 4).
Notes:
7
Favourites lists must be created separately
for all input sources (satellite, cable, air).
7
You can select the favourites list by pressing
»FAV«.
1 In the »PROGRAM TABLE« menu, switch
over to the list view with »
2 Select the channel of your choice with »
or »
Λ
«.
« (yellow).
V
3 “Push” the channel into the favourites
lists 1 to 4 with »
to confirm.
« or »>« and press »OK«
<
– The position in the favourites list is marked
with »✔«.
– You can enter the same channel in more
than one favourite list.
–
Each favourite list can store up to 250
channels.
Notes:
7
Channels can also be deleted from the
favourites lists. Select the channel to be
deleted with »
V
«, »Λ«, »<« or »>« and
press »OK« to delete it.
7
When deleting a channel from the favourites list, the order within the favourites list
will be updated.
4 Quit the program table with »MENU«.
Sorting channels in the favourite list
You can change the order of channels in the
favourites list.
1 In the »PROGRAM TABLE« menu, select the
favourites list »1« to »4«.
2 Select the channel which should be moved
V
«, »Λ«, »<« or »>« and mark it
with »
with »« (red).
3 Move the channel to its new position with
V
«, »Λ«, »<« or »>« and press »OK« to
»
«
confirm.
Notes:
7
Repeat steps 2 and 3 if you would like to
change other channels within the same
favourites list.
7
Repeat steps 1 to 3 if you would like to
change channels in a different favourites
list.
4 MENU the current favourites list with »
(blue).
– The entire programe table will appear
again.
5 Quit the program table with »MENU«.
«
ENGLISH
23

PICTURE /SOUND SETTINGS
-----------------------------------------------------------
Picture settings
1 Open the menu with »MENU«.
2 Select the menu item »PICTURE SETTINGS«
– The »PICTURE SETTINGS« menu appears.
3 Select the line »Picture Mode«, »Brightness«,
Select the value with »
4 Select the line »DNR«, »Mpeg NR«,
Select the value with »
5 Press »MENU« to end the setting.
V
« or »Λ« and press »OK« to
with »
confirm.
PICTURE SETTINGS
Basic Tuning
Picture Mode
Brightness
Contrast
Sharpness
Colour
Colour Temperature
Advanced Tuning
DNR
MENU
Back
xx.xx.xxxx
User
50
100
75
65
Medium
Medium
»Contrast«, »Sharpness«, »Colour«, or
»Colour Temperature« with »
»OK« to confirm.
V
« or »Λ«.
« or »>« and press
<
Note:
7
In the »PICTURE SETTINGS« menu you can
also find other additional settings.
»Vibrant Colour«, »Perfect Clear«, »Film
Mode«, »Gamma«, »Dynamic Contrast«,
»Dynamic Backlight« or »Backlight« with
»
V
« or »Λ«.
« or »>« and press
»OK« to confirm.
<
15:46
Advanced picture settings
The “advanced picture settings” are in principal
digital image improvements which, however,
should be only used when necessary when picture quality and transmission is excellent. They
may well improve the display with poor material, but may adversely affect the display where
transmission and picture quality are excellent.
7
»Nois Reduction« – Reduces the visible
snow by displaying the picture a little less
sharply and creating a slight blurring.
Should therefore be used minimally with
good picture material.
7
»Block Noise Reduction« – This function
can only be selected with digital reception
sources and AV presets. It reduces any interference from artefacts (pixel blocks) from
digital programmes due to MPEG compression (such as from DVB-T receivers and
lower transmission rates or DVD players).
7
»Vibrant Colour« – Increases the colour
contrast and the contrast adjustment. This
setting is mostly too strong for use with normal pictures and should only be used where
necessary (low or off) otherwise nuances in
the image can be suppressed.
7
»Perfect Clear« – Improves the general image by means of a gentle blue hue (giving
the appearance of greater sharpness) and
improves the black level by setting this entirely to black from specific shade of back.
This reduces the visible grey values in the
dark areas of the picture.
7
»Film mode« detects and processes feature
films automatically for all channel sources.
This means you will always receive an
optimal picture.
This functions in the modi 480i, 576i and
1080i in TV playback and for other channel sources.
If the »Film mode« is switched on for programmes without a feature film signal, minor
problems such as picture freeze, defective
subtitles or fine lines in the picture could
occur.
24
ENGLISH

PICTURE /SOUND SETTINGS
7
»Gamma« – This setting establishes which
brightness value should be displayed for
which digital transmission value. Most
recordings are transmitted with a gamma
value of 2.2 (all Windows PCs and newer
PCs with a MAC operating system work
with this, older MAC systems and transmissions without colour profile mostly operate
with a gamma value of 1.8).
7
»Dynamic Contrast« – The function dynamically and optimally adjusts the contrast for
the respective picture content by analysing
images and then altering this depending in
a change in contrast. This increase the contract, however may also reduce the visible
brightness levels in the picture.
7
»Dynamic Backlight« – Here the device
optimally adjusts the back lighting for the
picture content by regulating the back
lighting depending on the average picture
brightness. If a picture has predominately
dark areas, then the black level displayed
is improved by downward adjustment of the
back lighting (in this case the display of the
dark areas is improved), and with predominantly bright picture material the back lighting is maximised in order to display these
areas more brightly.
7
»Backlight« – Manual setting for back lighting (only active if dynamic back lighting is
switched to “OFF”). This setting also directly
impacts power consumption.
-----------------------------------------------------------
ENGLISH
25
 Loading...