

Page 1

G100
GRUNDFOS INSTRUCTIONS
Installation and operating instructions
Page 2

Declaration of Conformity
We Grundfos declare under our sole responsibility that the products
Profibus-DP and Radio/Modem/PLC version, to which this declaration
relates, are in conformity with the Council Directives on the approximation of the laws of the EC Member States relating to
– Electromagnetic compatibility (89/336/EEC).
Standards used: EN 61000-6-2 and EN 61000-6-3.
– Electrical equipment designed for use within certain voltage limits
(73/23/EEC) [95].
Standard used: EN 61010-1.
Konformitätserklärung
Wir Grundfos erklären in alleiniger Verantwortung, dass die Produkte
Profibus-DP und Radio/Modem/PLC-Ausführung, auf die sich diese
Erklärung bezieht, mit den folgenden Richtlinien des Rates zur Angleichung der Rechtsvorschriften der EG-Mitgliedstaaten übereinstimmen
– Elektromagnetische Verträglichkeit (89/336/EWG).
Normen, die verwendet wurden: EN 61000-6-2 und EN 61000-6-3.
– Elektrische Betriebsmittel zur Verwendung innerhalb bestimmter
Spannungsgrenzen (73/23/EWG) [95].
Norm, die verwendet wurde: EN 61010-1.
Déclaration de Conformité
Nous Grundfos déclarons sous notre seule responsabilité que les produits Profibus-DP et version Radio/Modem/PLC auxquels se réfère
cette déclaration sont conformes aux Directives du Conseil concernant
le rapprochement des législations des Etats membres CE relatives à
– Compatibilité électromagnétique (89/336/CEE).
Standards utilisés: EN 61000-6-2 et EN 61000-6-3.
– Matériel électrique destiné à employer dans certaines limites
de tension (73/23/CEE) [95].
Standard utilisé: EN 61010-1.
Försäkran om överensstämmelse
Vi Grundfos försäkrar under ansvar, att produkterna Profibus-DP och
version Radio/Modem/PLC, som omfattas av denna försäkran, är i
överensstämmelse med Rådets Direktiv om inbördes närmande till EUmedlemsstaternas lagstiftning, avseende
– Elektromagnetisk kompatibilitet (89/336/EC).
Använda standarder: EN 61000-6-2 och EN 61000-6-3.
– Elektrisk material avsedd för användning inom vissa spännings-
gränser (73/23/EC) [95].
Använd standard: EN 61010-1.
Overensstemmelseserklæring
Vi Grundfos erklærer under ansvar, at produkterne Profibus-DP og
Radio/Modem/PLC-udgave, som denne erklæring omhandler, er i
overensstemmelse med Rådets direktiver om indbyrdes tilnærmelse til
EF medlemsstaternes lovgivning om
– Elektromagnetisk kompatibilitet (89/336/EØF).
Anvendte standarder: EN 61000-6-2 og EN 61000-6-3.
– Elektrisk materiel bestemt til anvendelse inden for visse spændings-
grænser (73/23/EØF) [95].
Anvendt standard: EN 61010-1.
Свидетельство о соответствии
требованиям
Мы, фирма Grundfos, со всей ответственностью заявляем, что
изделия Profibus-DP и исполнение с функциями радиосвязи/
модема/программируемого процессора, к которым и относится
данное свидетел ьст во, отвеча ют требованиям следующих указаний
Совета ЕС об унификации законодательных предписаний странчленов ЕС:
– Электромагнитная совместимость (89/336/ЕЭС).
Применявшиеся стандарты: Евростандарт EN 61000-6-2 и
EN 61000-6-3.
– Электрические машины для эксплуатации в
пределах
определенного диапазона значений напряжения
(73/23/ЕЭС)[95].
Применявшиеся стандарты: Евростандарт EN 61010-1.
Bjerringbro, 1st April 2006
Svend Aage Kaae
Technical Director
2
Page 3

3
G100
Installation and operating instructions 4
Montage- und Betriebsanleitung 18
Notice d'installation et d'entretien 34
Monterings- och driftsinstruktion 49
Monterings- og driftsinstruktion 63
Руководство по монтажу и эксплуатации 77
Page 4

4
CONTENTS
Page
1. General description 4
2. Installation 5
2.1 Electrical connection 5
2.2 Installation requirements 5
2.3 Master programming 5
2.4 Start-up 5
3. Description of function 6
3.1 Data communication 6
3.2 Service port 6
3.3 Data logging 6
3.4 Digital inputs 6
3.5 Automatic call-back and SMS messages
(G100 Radio/Modem/PLC only) 7
3.6 Other functions 7
4. Profibus-DP 7
4.1 Profibus-DP settings 7
4.2 Profibus-DP front cover 8
4.3 Common connectors 9
4.4 Profibus-DP connector 9
5. Radio/Modem/PLC 10
5.1 Radio/Modem/PLC settings 10
5.2 Radio/Modem/PLC front cover 12
5.3 Common connectors 13
5.4 Radio/Modem/PLC connectors 13
6. Fault finding chart 14
7. Technical data 16
7.1 Data applying to all versions 16
7.2 Profibus-DP expansion board 17
7.3 Radio/Modem/PLC expansion board 17
7.4 Emission (applies to the USA) 17
8. Disposal 17
1. General description
Definition
The G100 is a gateway enabling communicatio n
between units connected to a Grundfos GENIbus
and a main network.
Communication
The G100 functions as a master to the GENIbus.
Only one G100 can be installed on a GENIbus net-
work, and a maximum of 32 units can be handled.
Data logging
Besides functioning as a gateway, the G100 basic
and Radio/Modem/PLC versions provide data logging facilities.
Data logging enables continual storage of measured
values in the G100 with a resolution down to 4 seconds.
Digital inputs
As standard, the G100 has four digital inputs to be
used as required. It is up to the user to determine the
function of the digital inputs.
Status of digital inputs can be reafd via the communication to the main network and can be used to trigger
SMS messages.
Automatic call-back and SMS messages
The G100 with a modem connection can be configured for automatic call-back to one or more phone
numbers (central management system) when one of
the connected GENIbus units goes into alarm condition, e.g. blocked pump.
The G100 can also be configured to send SMS m essages in case of an alarm condition or other selectable events.
Other functions
• Stop of all pumps in case of failing communication
with the building mangement system (optional).
• Acces s code for mode m communication
(optional).
• Logging of the last 10 alarms with address, time
stamp and cause.
Software
A software package is supplied with the G100.
The package includes two programs:
• PC Tool G100 and
• PC Tool G100 Data Log.
PC Tool G100
The program PC Tool G100 is a combined configuration/analysis tool to be used by the system integrator.
The program offers the following functions:
• Showing the unit hierarchy of the GENIbus network.
• Showing/managing the data points of the individual units.
• Showing the status of the G100.
• Configuring the G100.
PC Tool G100 Data Log
The program PC Tool G100 Data Log enables the user
• to configure the data logging facility in a G100.
• to retrieve the logged data values from the G100.
• to visualize the units connected to the G100.
• to retrieve a logging status of a connected G100
at any time.
Prior to installation, read these installation
and operating instructions. Installation and
operation must comply with local regulations and accepted codes of good practice.
Page 5

5
Help menu
The software for the G100 includes a help menu to
be used in connection with the installation and operation of the G100.
Software downloading
The software in the G100 can be updated by downloading new software via the service port directly or
by modem using the PC Tool G100.
2. Installation
2.1 Electrical connection
The electrical connection should be carried out in
accordance with local regulations.
The operating voltage and frequency are marked on
the nameplate. Please make sure that the G100 is
suitable for the electricity supply on which it will be
used.
Use the plug supplied for the electrical connection.
Supply voltage: 1 x 110-240 V, 45-65 Hz.
2.2 Installation requirements
The G100 must be positioned in a way ensuring that
electromagnetic noise from contactors, relays and
electric devices does not influence the functioning of
the G100.
Distance to power cables
G100: Place the G100 at a distance of minimum
15 cm from power cables.
Cables: Cables for the connection of
• Profibus,
• radio, modem, PLC and direct,
• GENIbus,
• DI (digital inputs) and
• Service
must also keep a distance of minimum 15 cm to
power cables.
G100 on control panel
When positioning the G100 on a control panel, it is
recommended that the G100 be located as close to
the bottom of the panel as possible due to temperature conditions.
G100 in control cabinet
The G100 is designed for mounting in a control cabinet, directly on a mounting plate.
Fig. 1
2.3 Master programming
Master programming on the main network must be
carried out by the system integrator according to the
instructions given on the "G100 Support Files" CDROM supplied with the G100.
Handling G100 from the management system
The management system on the main network must
be prepared for communication with the G100.
This involves adding some software
• handling the transfer of data,
• using data for monitoring and control purposes.
Reference: The "G100 Support Files" CD-ROM sup-
plied with the G100 contains the necessary documentation.
2.4 Start-up
Before powering on the G100,
• complete the GENIbus wiring and
• assign a unique address to each unit conn ected
(via the Grundfos remote control R100 or via the
control panel on the unit).
Switch on the electricity supply and make sure that
the light-emitting diodes on
• mother board
(see section 4.2 Profibus-DP front cover) and
• expansion board, if any,
(see the relevant section)
light up correctly.
As a precaution, the G100 must be
earthed. It is recommended to fit the installation with an earth leakage circuit breaker
(ELCB) with a tripping current < 30 mA.
Never dismantle the G100 unless the electricity supply has been switched off.
TM01 1712 1602
B
u
s In
Bus
O
u
t
M
a
in
N
etwo
rk
C
on
n
ec
tio
n
P
O
W
ER
P
OW
E
R M
NC
P
O
W
E
R G
E
N
I
GE
N
I T
xD
G
E
NI
Rx
D
F
A
UL
T
R
B
D
A
TR
B
A
R
C
GE
N
Ibu
s
S
e
rv
ice
D
I
Page 6

6
3. Description of function
3.1 Data communication
It is possible to connect up to 32 units to the
GENIbus. A unit may be a UPE pump with GENIbus
connection, a CU 3 control unit, etc.
The main network may be
• another fieldbus,
• radio,
• modem,
•PLC,
• direct RS-232 connection.
Information retrieval
Information such as
• measured values,
• operating status,
• fault status,
• configuration parameters and more
can be retrieved from each individual unit via the
G100.
Remote configuration
• Setpoints,
• commands and
• configuration parameters
can be sent to the GENIbus units via the G100.
Reference: The "G100 Support Files" CD-ROM sup-
plied with the G100 contains an overview of the data
which can be communicated between the main network and the different types of Grundfos products
having a GENIbus connection.
3.2 Service port
The service port enables the connection of a PC
directly or via radio modem to the G100.
By means of the PC Tool G100, the following can be
read:
• status of the units connected to the GENIbus,
• internal error codes i n the G100.
The PC Tool G100 can also be used:
• to display the individual data points with their
actual values,
• to change setpoints, change configuration parameters and send commands.
3.3 Data logging
Description
The G100 basic and Radio/Modem/PLC versions
include data logging facilities. Data logging means
that the G100 stores data point values sampled over
a given period.
The data logging facility is configured by means of
the program PC Tool G100 Data Log.
Purpose
The logged data can be used for various analyses of
e.g. flow, head, energy consumption, etc. enabling
optimum pump control.
Subsequently, stored data may be transmitted to a
PC. For example, the stored data can be analysed in
a spreadsheet.
Logging data points
By configuring the data logging of the individual data
points, each value may continually be monitored/registered, each logging being time-stamped to indicate
the date/time of the value.
G100 logging capacity
The number of log data points and the logging frequency determine for how long the G100 can perform data logging.
The 2 Mb memory installed makes it possible to log
up to 350,000 values. For example 20 data points for
• 120 days at 10-minute resolution or
• 2 days at 10-second resolution.
Maximum logging resolution is 4 seconds.
3.4 Digital inputs
The G100 features four digital inputs for optional
use.
The four digital inputs should be considered data
points, and they can thus be referenced from the
main network in the same way as the other da ta
points.
Purpose
An example could be the monitoring of an Uninterruptable Power Supply (UPS) or the registration of
status, e.g. alarms.
Page 7

7
3.5 Automatic call-back and SMS messages (G100 Radio/Modem/PLC only)
A G100 with a modem connection can be configured
for automatic call-back to one or more phone numbers (central management system) when one of the
connected GENIbus units goes into alarm condition,
e.g. blocked pump. The advantage of this function is
that regular dial-ups, or a fixed online connection, to
the system to be monitored are unnecessary.
The G100 can also be configured to send SMS messages via a GSM data modem (or via a UCP server
when a fixed-line modem is used) in case of an
alarm condition or other selectable events.
SMS messages can be combined with automatic
call-back so that both functions are carried out or
one is carried out only if the other fails. It is possible
to call back to five different phone numbers and the
call-backs can be controlled by other events than
faults:
• A GENIbus unit goes into alarm condition.
• A GENIbus unit comes out of alarm condition.
• A GENIbus unit goes into warning condition.
• A GENIbus unit comes out of warning condition.
• The G100 loses connection with a GENIbus unit
or gets into contact with a new GENIbus unit.
• Change of digital input.
These events can be selected or deselected as
desired. In addition, the "heartbeat" SMS function
can be set to send a message at fixed intervals, indicating that the telephone modem connection is operational.
3.6 Other functions
The G100 is capable of monitoring the communication via the service port as well as the communication port to the main network. If the communication is
disconnected within a given configurable period, the
G100 will stop all connected GENIbus units using
bus commands. This function can be enabled or disabled for each of the two communication ports.
In a given application, this function can be used to
stop all pumps in case of failing communication with
the central management system.
The G100 has an access code option for modem
communication. If the access code is not written correctly, the transmission of data to the G100 and the
GENIbus units will not be allowed. In this way, unauthorized persons are prevented from causing damage to the system.
The G100 will log the last 10 ala rms w ith addres s,
time stamp and cause. The alarm log can be useful
in connection with fault finding. The log can be
deleted by giving a command to the G100.
4. Profibus-DP
Description
The Profibus-DP builds upon a master-slave-principle, where the bus master (PC or PLC) also functions as the link to an overlying management system
(SCADA system).
The G100 functions as a slave on the Profibus-DP
network.
G100 Profibus-DP address
When installing the G100, the G100 Profibus-DP
address must be set manually by the use of DIP
switches on the Profibus-DP expansion board.
See section 4.1 Profibus-DP settings.
4.1 Profibus-DP settings
The physical Profibus-DP address must be set on
the Profibus-DP expansion board, fig. 2. This should
be done before connecting the G100 to the ProfibusDP.
Fig. 2
The G100 must be assigned a Profibus-DP address
which is not already being used on the Profibus-DP
network.
Example: The Profibus-DP address is set to No. 3
on the DIP switches in fig. 3.
Fig. 3
It is possible to set the address from No. 1 to 255.
The address No. 0 is reserved.
TM01 1706 5097
TM01 1707 5097
Connection
to mother
board
Address
1
2
3
4
5
6
7
8
Page 8

8
Master configuration
The Profibus-DP master (e.g. PLC) must be configured according to the specifications of the ProfibusDP master in question.
Data transmission and system demands
As the DP protocol does not transmit data via
objects. Consequently, the G100 uses a superimposed telegram format for the DP protocol. This telegram format must be implemented in the ProfibusDP master by the system integrator.
Reference: The telegram format is described in the
"G100 Support Files" CD-ROM supplied with the
G100. The necessary GSD file for the DP master is
also available on the CD-ROM.
4.2 Profibus-DP front cover
Front cover
Light-emitting diodes:
Operating/fault indications
Colour
Normal
condition
POWER:
The G100 is powered.
Green
Permanently on
POWER MNC:
The network communication chip to the
main network is powered.
Green
Permanently on
POWER GENI:
The GENIbus RS-485 communication
chips are powered.
Green
Permanently on
GENI TxD:
Data is sent via GENIbus RS-485.
Yellow Flashing
GENI RxD:
Data is received from GENIbus
RS-485.
Yellow Flashing
FAULT:
Data memory fau lt.
Red Off
DES:
Data Exchange State.
Connection to DP network is OK.
Green
Permanently on
G100 connectors
• GENIbus
• DI
• Service
See section 4.3 G100 common connectors.
• Main Network Connection: See section 4.4 Profibus-DP
connector.
Power
Power MNC
Power Geni
Geni T xD
Geni RxD
Fault
DES
Genibus DI Service
Main
Network
Connection
G100 Gateway
Profibus
TM01 1705 1602
Page 9

9
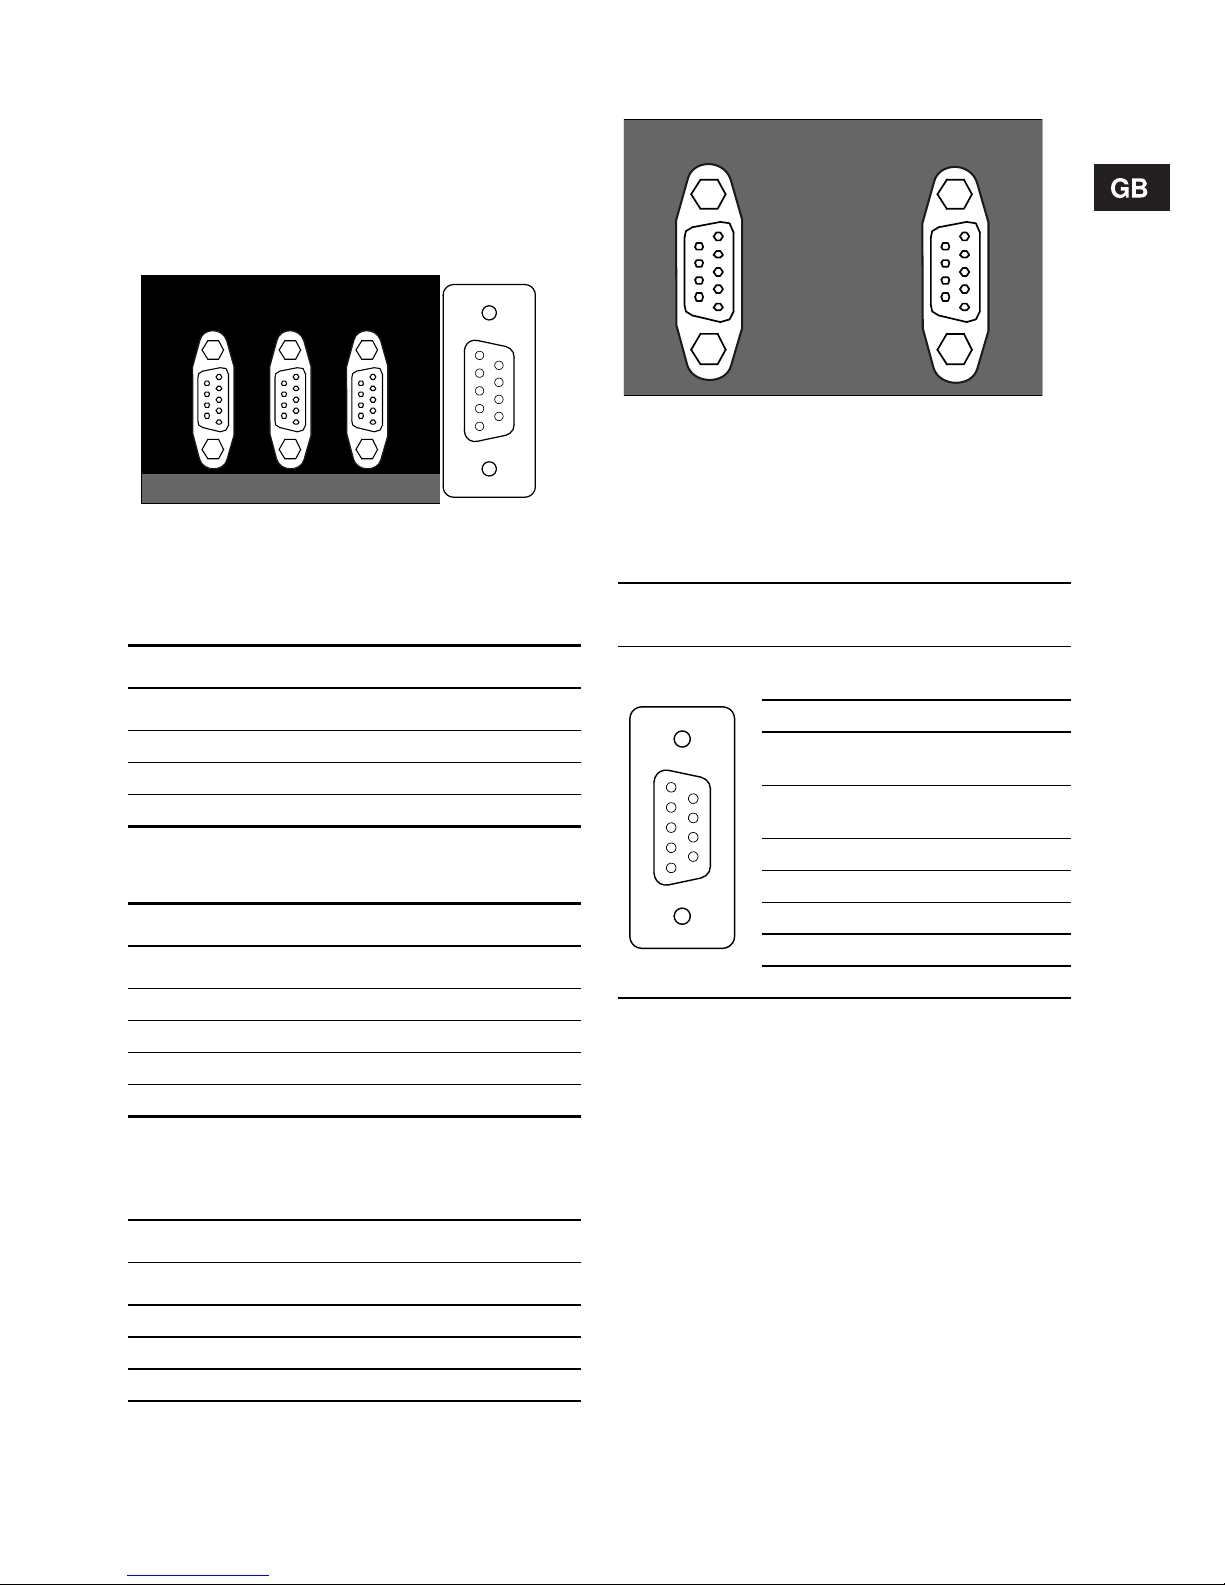
4.3 Common connectors
This section describes G100 connectors (male) for
• GENIbus,
• DI (digital inputs) and
• Service.
Figure 4 shows the three G100 male connectors and
a 9-pin D-sub female connector with pin numbers.
Fig. 4
GENIbus connector
The GENIbus is a serial RS-485 connection.
A, B and Y are placed as follows:
DI connector
The digital inputs are paired as follows:
Service connector
The service port is a serial RS-232 connection.
RxD, TxD and GND are placed as follows:
:
4.4 Profibus-DP connector
Fig. 5
The connection of the G100 to the Profibus-DP is
made by connecting the Profibus-DP cable to the
Profibus-DP connector shown in fig. 5.
The network topology on Profibus-DP is multidrop.
Pin configuration
The pin configuration of the connector is made
according to the Profibus-DP standard.
* The assignment of pin Nos. 1, 2, 7 and 9 corre-
sponds to that of the connected unit.
When connecting to Profibus-DP, a standard connector from Siemens should be used.
Example: 6ES7 972-OBA10-OXAO.
TM01 1700 1602 / 6904 3699
Connections
GENIbus Pin number
A2
B3
Y (screen) 5
Connections
DI Pin number
DI 1 1 + 6
DI 2 2 + 7
DI 3 3 + 8
DI 4 4 + 9
Connections
Service Pin number
RxD 2
TxD 3
GND 5
1
2
3
4
5
6
7
8
9
Genibus DI Service
TM01 1705 1602
Illustration
Pin
No.
Signal Description
1* – –
2* – –
3 RxD/TxD-P Data line B
4RTS
Request to
send
5M5V2
Data reference potential (from
station)
6P5V2
Supply plus
(from station)
7* – –
8 RxD/TxD-N Data line A
9* – –
Main
Network
Connection
Profibus
1
2
3
4
5
6
7
8
9
TM01 6904 3699
Page 10

10
5. Radio/Modem/PLC
Description
In addition to the GENIbus protocol, the G100 Radio/
Modem/PLC can communicate via the standard PLC
protocols COMLI and Modbus.
For all three protocols, direct connection (RS-232) or
connection via telephone modem or radio modem
can be used. The G100 usually functions as a slave
on the network.
When using direct connection or modem connection,
it is possible to multiplex the connection to the G100
(port 1, RS-232). This means that several G100 units
with different addresses can be connected to a single serial port of a PC, when the appropriate equipment is used, e.g. modem data splitter or radio
modems.
G100 address
When installing the G100, the physical bus address
must be set manually by the use of DIP switches on
the expansion board.
See section 5.1 Radio/Modem/PLC settings.
5.1 Radio/Modem/PLC settings
When the G100 is incorporated in a network together
with other G100 units, an address must be allocated
to each unit. Note that the address 0 is the "broadcast" address (default). All units will reply to this
address when asked.
The physical bus address must be set on the Radio/
Modem/PLC expansion board.
This should be done before start-up.
Fig. 6
The G100 must be assigned a bus address which is
not already being used on the network.
Example: The bus address is set to No. 3 on the DIP
switches in fig. 7.
Fig. 7
It is possible to set the address from No. 1 to 255.
The address 0 is reserved.
In Port 1, the switches 1 to 8 have the following purposes:
TM01 1711 5097
Address
Port 2
Port 2
Port 1
TM01 1707 5097
DIP switch Purpose
1 - 2 IO type
3 - 5 Protocol
6 - 8 Communication speed
1
2
3
4
5
6
7
8
Page 11

11
The following table shows how the DIP switches in
Port 1 should be set.
.
Data transmission
The data transmission itself is made via objects
(identified by means of an index No.).
Reference: The "G100 Support Files" CD-ROM
supplied with the G100 contains a description of the
objects available.
Note: The G100 is not supplied with a radio, modem
or PLC. They must all be acquired separately.
Port 1
Function
DIP switch setting
12345678
IO type
Direct 00––––––
Modem 1 0––––––
Radio 01––––––
PLC 11––––––
Protocol
Auto
detect
––000–––
G100 ––100–––
Satt Control
COMLI
––010–––
Communication speed
1200 baud –––––000
2400 baud –––––100
4800 baud –––––010
9600 baud –––––110
19200 baud – ––––001
Reserved –––––101
Reserved –––––011
Reserved –––––111
Page 12

12
5.2 Radio/Modem/PLC front cover
*) For explanation to Power, Power MNC, Power Geni, Geni TxD, Geni RxD, Fault, see section 4.2 Profibus-
DP front cover.
Front cover
Light-emitting diodes:
Operating/fault indications *)
Colour
Normal
condition
DCD:
Data Carrier Detect
DCD pin is active. Light diode indication according to the IO type selected:
Radio
DCD is on
when a unit in the radio system has asked for and received permission to send data.
Modem (G100 with modem (dial-up)
connection to main system. G100 can
make alarm dial-up).
DCD is on
when G100 is connected to
main system.
PLC
DCD is permanently on
when G100 is
powered.
Direct (G100 permanently connected to
main system).
DCD is permanently on
when G100 is
powered.
Direct (G100 with modem (dial-up) connection to main system. G100 cannot
make alarm dial-up).
DCD is on
when G100 is connected to
the main system.
Green
RTS:
Request To Send
RTS pin on line is active. Light diode indication according to the IO type selected:
Radio
RTS is o n
when G100 desires to send
data or data is actually being sent.
Modem, PLC or Direct
RTS is permanently on
when G100 is
powered.
Green
TxD1:
Data transmission on line 1.
Yellow Flashing
RxD1:
Data reception from line 1.
Yellow Flashing
TxD2:
Data transmission on line 2.
Reserved for future use.
––
RxD2:
Data reception from line 2.
Reserved for future use.
––
G100 connectors
• GENIbus
• DI
• Service
See section 4.3 G100 common connectors.
• Main Network Connection: See section 5.4 Radio/Modem/
PLC connectors.
TM01 1710 1602
Power
Power MNC
Power Geni
Geni T xD
Geni RxD
Fault
DCD
RTS
TxD1
RxD1
TxD2
RxD2
Genibus DI Service
Port 1 Port 2
Main
Network
Connection
G100 Gateway
Page 13
13
5.3 Common connectors
This section describes G100 connectors (male) for
• GENIbus,
• DI (digital inputs) and
• Service.
Figure 8 shows the three G100 male connectors and
a 9-pin D-sub female connector with pin numbers.
Fig. 8
GENIbus connector
The GENIbus is a serial RS-485 connection.
A, B and Y are placed as follows:
DI connector
The digital inputs are paired as follows:
Service connector
The service port is a serial RS-232 connection.
RxD, TxD and GND are placed as follows:
:
5.4 Radio/Modem/PLC connectors
Fig. 9
The connection of the G100 to radio, modem or PLC
is made by connecting the cable to the Port 1 connector shown in fig. 9.
Port 2 is not used.
Pin configuration
TM01 1700 1602 / 6904 3699
Connections
GENIbus Pin number
A2
B3
Y (screen) 5
Connections
DI Pin number
DI 1 1 + 6
DI 2 2 + 7
DI 3 3 + 8
DI 4 4 + 9
Connections
Service Pin number
RxD 2
TxD 3
GND 5
1
2
3
4
5
6
7
8
9
Genibus DI Service
TM01 1710 1602
Illustration
Pin
No.
Signal Description
1DCD
Data carrier
detect
2 RxD Received data
3TxD
Transmitted
data
4DTR
Data terminal
ready
5 GND Ground
6 DSR Data set ready
7 RTS Request to send
8 CTS Clear to send
9 RI Ring indicator
Port 1 Port 2
Main
Network
Connection
1
2
3
4
5
6
7
8
9
TM01 6904 3699
Page 14

14
6. Fault finding chart
Additional instructions for fault finding in the communication with the G100 can be found on the "G100 Support
Files" CD-ROM supplied with the G100.
G100 mother board
Indication Cause Remedy
1. POWER
off.
a) No electricity supply. • Check the electricity supply.
• Check that the G100 is OK by removing
connection to main network and to
GENIbus.
• Contact the system supplier.
b) Fault in components/fatal component
fault.
2. POWER MNC
faint or off.
a) Fault in main network or in the G100. • Check that the G100 is OK by removing
connection to main network. POWER
MNC must now be on.
• Check MNC cables for faults.
b) Cable fault, possibly short-circuit.
3. POWER GENI
faint or off.
a) GENIbus is overloading the G100. • Check that the G100 is OK by removing
connection to GENIbus. All POWER diodes must now be permanently on.
• Check the GENIbus connection and cabling.
• Contact the system supplier.
4. GENI TxD
not flashing.
a) The G100 is not communicating. • Disconnect/connect the electricity sup-
ply.
• Check the bus.
If this does not help, then replace the
G100.
b) GENIbus connection or cable may be
short-circuited.
5. GENI RxD
not flashing.
a) GENIbus connection or cable may be
short-circuited.
Check the GENIbus connection and
cabling.
b) No units are connected to GENIbus.
6. FAULT
permanently on.
a) RAM memory fault. Replace the G100.
Profibus-DP expansion board
Indication Cause Remedy
1. DES
off.
a) Cable fault. • Check the cable.
• Check that the master applies the correct maker’s ID No., address and ID
size.
- Maker’s ID No.
- Address: As set on DIP switch.
b) Configuration fault on master.
Page 15

15
Radio/Modem/PLC expansion board
Indication Cause Remedy
1. DCD
- Modem
off.
a) Wrong modem type. • Check that the modem initialization
commands are compatible.
• Make a redial.
b) Poor telephone line.
2. DCD
- Radio
permanently on.
a) Fault in a radio network unit. Reset or disconnect/connect the unit in
case of fault.
If this does not help, then replace the unit
in case of fault.
3. RTS
- Radio
permanently on.
a) The G100 is constantly attempting to
send.
• Disconnect/connect the electricity supply or
• reset the G100 using the PC Tool
G100.
4. RTS
- Direct/modem
not permanently on.
a) Fault in the G100. • Disconnect/connect the electricity sup-
ply or
• reset the G100 using the PC Tool
G100.
If this does not help, then replace the
G100.
5. TxD1
not flashing.
a) No communication with the G100. • Connect the G100.
• Check the cable.
• Check that the cable is connected correctly according to IO type (radio, modem, PLC or direct).
6. RxD1
not on
as expected.
a) Cable is connected incorrectly. Check that the cable is connected cor-
rectly according to IO type (radio, modem,
PLC or direct).
Page 16

16
7. Technical data
7.1 Data applying to all versions
Mains supply
Rated voltage 110-240 V AC.
Voltage tolerance –25%/+15% of rated voltage.
Mains frequency 45-65 Hz.
Power consumption 6 W.
Construction
• Number of slots
• Dimensi ons (W x H x D) in mm
• Weight (incl. expansion board)
• 2 (1 for the mother board and 1 for one expansion board).
• 73 x 227 x 165.
• 1800 g.
Operating range
• Ambient tempera ture during operation
• Transportation and storage temperature
• Relative air humidity
• –20°C to +60°C.
• –20°C to +60°C.
• Maximum 95% (without condensation).
Materials, housing Steel.
Enclosure class IP 20.
Approvals The G100 has been CE marked.
CPU
• Proce ssor
• Instruction size
• Proce ssor speed
• Intel 80251.
• 16-bit.
• 20 MHz.
Data logging
FLASH memory size 2 Mb ~ up to 350,000 time-stamped values.
Note: This feature applies to the G100 basic and Radio/
Modem/PLC versions.
GENIbus connection
•Bus
• Connection
• Electri cally separated
• Cable
• RS-485 up to 32 units.
• 9-pin D-sub male connector.
•Yes.
• 0.25 - 1 mm
2
screened 2-core cable.
Maximum cable length: 1200 m.
Connection for service/analysis
•Serial
• Connection
• Electri cally separated
• RS-232.
• 9-pin D-sub male connector.
•No.
Real time clock
• Accuracy
•Battery
• Battery durability
• ±5 min./year.
• DC 3 V, lithium battery for preservation of real time clock
during power off.
• When in use > 5 years, when stored > 10 years.
Dig i ta l i npu ts
• Number of inputs
• Input
• Logic "0"
• Logic "1"
• Connection
•4.
• External potential- free NO contact.
• Open (U > 3.2 V).
• Closed (U < 0.9 V).
• 9-pin D-sub male connector, screened cable.
Visual indication
Operating status 6 light-emitting diodes.
Page 17

17
7.2 Profibus-DP expansion board
7.3 Radio/Modem/PLC expansion board
7.4 Emission (applies to the USA)
8. Disposal
This product or parts of it must be disposed of in an
environmentally sound way:
1. Use the public or private waste collection service.
2. If this is not possible, contact the nearest
Grundfos company or service workshop.
Profibus-DP connection
• Communi cation chip
• Communication speed
• Connection
• SPC3.
• 9.6 kbaud to 12 Mbaud.
• RS-485, 9-pin D-sub male connector.
Visual indication
Operating status 1 light-emitting diode.
Radio/modem/PLC connectio n
•Port 1
• Connection
• Communication speed
• Modem type
• Radio type
• RS-232.
• 9-pin D-sub male connector.
• 1.2 to 19.2 kbaud.
• Zyxel or others.
• Radio modem or protocol -based Niros 2001.
Visual indication
Operating status 6 light-emitting diodes.
Radio/Modem/PLC
This equipment has been tested and found to comply with the limits for a Class B digital device, pursuant to Part 15 of the FCC Rules. These limits are designed to provide reasonable protection
against harmful interference in a residential installation.
This equipment generates, uses and can radiate radio frequency energy and, if not installed and
used in accordance with these instructions, may cause harmful interference to radio communications. However, there is no guarantee that interference will not occur in a particular installation.
If this equipment does cause harmful interference to radio or television reception, which can be
determined by turning the equipment off and on, the user is encouraged to try to correct the interference by one or more of the following measures:
• Reorient or relocate the receiving antenna.
• Increase the separation between the equipment and recei ver.
• Connect the equipme nt into an outlet on a circuit different from that to which the receiver is connected.
• Consult the dealer or an experienced radio/T V technician for help.
Profibus-DP
This equipment has been tested and found to comply with the limits for a Class A digital device, pursuant to Part 15 of the FCC Rules. These limits are designed to provide reasonable protection
against harmful interference when the equipment is operated in a commercial environment.
This equipment generates, uses, and can radiate radio frequency energy and, if not installed and
used in accordance with these instructions, may cause harmful interference to radio communications.
Operation of this equipment in a residential area is likely to cause harmful interference in which case
the user will be required to correct the interference at his own expense.
Subject to alterations.
Page 18

Denmark
GRUNDFOS DK A/S
Martin Bachs Vej 3
DK-8850 Bjerringbro
Tlf.: +45-87 50 50 50
Telefax: +45-87 50 51 51
E-mail: info_GDK@grundfos.com
www.grundfos.com/DK
Argentina
Bombas GRUNDFOS de Argentina S.A.
Ruta Panamericana km. 37.500 Lote
34A
1619 - Garin
Pcia. de Buenos Aires
Phone: +54-3327 414 444
Telefax: +54-3327 411 111
Australia
GRUNDFOS Pumps Pty. Ltd.
P.O. Box 2040
Regency Park
South Australia 5942
Phone: +61-8-8461-4611
Telefax: +61-8-8340 0155
Austria
GRUNDFOS Pumpen Vertrieb
Ges.m.b.H.
Grundfosstraße 2
A-5082 Grödig/Salzburg
Tel.: +43-6246-883-0
Telefax: +43-6246-883-30
Belgium
N.V. GRUNDFOS Bellux S.A.
Boomsesteenweg 81-83
B-2630 Aartselaar
Tél.: +32-3-870 7300
Télécopie: +32-3-870 7301
Belorussia
Представительство ГРУНДФОС в
Минске
220090 Минск ул.Олешева 14
Телефо н: (8632) 62-40-49
Факс: (8632) 62-40-49
Bosnia/Herzegovina
GRUNDFOS Sarajevo
Paromlinska br. 16,
BiH-71000 Sarajevo
Phone: +387 33 713290
Telefax: +387 33 231795
Brazil
GRUNDFOS do Brasil Ltda.
Rua Tomazina 106
CEP 83325 - 040
Pinhais - PR
Phone: +55-41 668 3555
Telefax: +55-41 668 3554
Bulgaria
GRUNDFOS Pumpen Vertrieb
Representative Office - Bulgaria
Bulgaria, 1421 Sofia
Lozenetz District
105-107 Arsenalski blvd.
Phone: +359 2963 3820, 2963 5653
Telefax: +359 2963 1305
Canada
GRUNDFOS Canada Inc.
2941 Brighton Road
Oakville, Ontario
L6H 6C9
Phone: +1-905 829 9533
Telefax: +1-905 829 9512
China
GRUNDFOS Pumps (Shanghai) Co.
Ltd.
22 Floor, Xin Hua Lian Building
755-775 Huai Hai Rd, (M)
Shanghai 200020
PRC
Phone: +86-512-67 61 11 80
Telefax: +86-512-67 61 81 67
Croatia
GRUNDFOS predstavništvo Zagreb
Cebini 37, Buzin
HR-10000 Zagreb
Phone: +385 1 6595 400
Telefax: +385 1 6595 499
Czech Republic
GRUNDFOS s.r.o.
Čajkovského 21
779 00 Olomouc
Phone: +420-585-716 111
Telefax: +420-585-438 906
Estonia
GRUNDFOS Pumps Eesti OÜ
Peterburi tee 44
11415 Tallinn
Tel: + 372 606 1690
Fax: + 372 606 1691
Finland
OY GRUNDFOS Pumput AB
Mestarintie 11
Piispankylä
FIN-01730 Vantaa (Helsinki)
Phone: +358-9 878 9150
Telefax: +358-9 878 91550
France
Pompes GRUNDFOS Distribution S.A.
Parc d’Activités de Chesnes
57, rue de Malacombe
F-38290 St. Quentin Fallavier (Lyon)
Tél.: +33-4 74 82 15 15
Télécopie: +33-4 74 94 10 51
Germany
GRUNDFOS GMBH
Schlüterstr. 33
40699 Erkrath
Tel.: +49-(0) 211 929 69-0
Telefax: +49-(0) 211 929 69-3799
e-mail: infoservice@grundfos.de
Service in Deutschland:
e-mail: kundendienst@grundfos.de
Greece
GRUNDFOS Hellas A.E.B.E.
20th km. Athinon-Markopoulou Av.
P.O. Box 71
GR-19002 Peania
Phone: +0030-210-66 83 400
Telefax: +0030-210-66 46 273
Hong Kong
GRUNDFOS Pumps (Hong Kong) Ltd.
Unit 1, Ground floor
Siu Wai Industrial Centre
29-33 Wing Hong Street &
68 King Lam Street, Cheung Sha Wan
Kowloon
Phone: +852-27861706/27861741
Telefax: +852-27858664
Hungary
GRUNDFOS Hungária Kft.
Park u. 8
H-2045 Törökbálint,
Phone: +36-23 511 110
Telefax: +36-23 511 111
India
GRUNDFOS Pumps India Private Limited
Flat A, Ground Floor
61/62 Chamiers Aptmt
Chamiers Road
Chennai 600 028
Phone: +91-44 432 3487
Telefax: +91-44 432 3489
Indonesia
PT GRUNDFOS Pompa
Jl. Rawa Sumur III, Blok III / CC-1
Kawasan Industri, Pulogadung
Jakarta 13930
Phone: +62-21-460 6909
Telefax: +62-21-460 6910/460 6901
Ireland
GRUNDFOS (Ireland) Ltd.
Unit A, Merrywell Business Park
Ballymount Road Lower
Dublin 12
Phone: +353-1-4089 800
Telefax: +353-1-4089 830
Italy
GRUNDFOS Pompe Italia S.r.l.
Via Gran Sasso 4
I-20060 Truccazzano (Milano)
Tel.: +39-02-95838112
Telefax: +39-02-95309290/95838461
Japan
GRUNDFOS Pumps K.K.
1-2-3, Shin Miyakoda
Hamamatsu City
Shizuoka pref. 431-21
Phone: +81-53-428 4760
Telefax: +81-53-484 1014
Korea
GRUNDFOS Pumps Korea Ltd.
6th Floor, Aju Building 679-5
Yeoksam-dong, Kangnam-ku, 135-916
Seoul, Korea
Phone: +82-2-5317 600
Telefax: +82-2-5633 725
Latvia
SIA GRUNDFOS Pumps Latvia
Deglava biznesa centrs
Augusta Deglava ielā 60, LV-1035, Rīga,
Tālr.: + 371 714 9640, 7 149 641
Fakss: + 371 914 9646
Lithuania
GRUNDFOS Pumps UAB
Smolensko g. 6
LT-03201 Vilnius
Tel: + 370 52 395 430
Fax: + 370 52 395 431
Malaysia
GRUNDFOS Pumps Sdn. Bhd.
7 Jalan Peguam U1/25
Glenmarie Industrial Park
40150 Shah Alam
Selangor
Phone: +60-3-5569 2922
Telefax: +60-3-5569 2866
Mexico
Bombas GRUNDFOS de Mexico S.A.
de C.V.
Boulevard TLC No. 15
Parque Industrial Stiva Aeropuerto
Apodaca, N.L. 66600
Mexico
Phone: +52-81-8144 4000
Telefax: +52-81-8144 4010
Netherlands
GRUNDFOS Nederland B.V.
Postbus 104
NL-1380 AC Weesp
Tel.: +31-294-492 211
Telefax: +31-294-492244/492299
New Zealand
GRUNDFOS Pumps NZ Ltd.
17 Beatrice Tinsley Crescent
North Harbour Industrial Estate
Albany, Auckland
Phone: +64-9-415 3240
Telefax: +64-9-415 3250
Norway
GRUNDFOS Pumper A/S
Strømsveien 344
Postboks 235, Leirdal
N-1011 Oslo
Tlf.: +47-22 90 47 00
Telefax: +47-22 32 21 50
Poland
GRUNDFOS Pompy Sp. z o.o.
ul. Klonowa 23
Baranowo k. Poznania
PL-62-081 Przeźmierowo
Phone: (+48-61) 650 13 00
Telefax: (+48-61) 650 13 50
Portugal
Bombas GRUNDFOS Portugal, S.A.
Rua Calvet de Magalhães, 241
Apartado 1079
P-2770-153 Paço de Arcos
Tel.: +351-21-440 76 00
Telefax: +351-21-440 76 90
România
GRUNDFOS Pompe România SRL
Bd. Biruintei, nr 103
Pantelimon county Ilfov
Phone: +40 21 200 4100
Telefax: +40 21 200 4101
E-mail: romania@grundfos.ro
Russia
ООО Грундфос
Росс ия, 109544 Москва, Школьная 39
Тел. (+7) 095 737 30 00, 564 88 00
Факс (+7) 095 737 75 36, 564 88 11
E-mail
grundfos.moscow@grundfos.com
Serbia and Montenegro
GRUNDFOS Predstavništvo Beograd
Dr. Milutina Ivkovića 2a/29
YU-11000 Beograd
Phone: +381 11 26 47 877, 11 26 47
496
Telefax: +381 11 26 48 340
Singapore
GRUNDFOS (Singapore) Pte. Ltd.
24 Tuas West Road
Jurong Town
Singapore 638381
Phone: +65-6865 1222
Telefax: +65-6861 8402
Slovenia
GRUNDFOS PUMPEN VERTRIEB
Ges.m.b.H.,
Podružnica Ljubljana
Blatnica 1, SI-1236 Trzin
Phone: +386 1 563 5338
Telefax: +386 1 563 2098
E-mail: slovenia@grundfos.si
Spain
Bombas GRUNDFOS España S.A.
Camino de la Fuentecilla, s/n
E-28110 Algete (Madrid)
Tel.: +34-91-848 8800
Telefax: +34-91-628 0465
Sweden
GRUNDFOS AB
Lunnagårdsgatan 6
431 90 Mölndal
Tel.: +46-0771-32 23 00
Telefax: +46-31 331 94 60
Switzerland
GRUNDFOS Pumpen AG
Bruggacherstrasse 10
CH-8117 Fällanden/ZH
Tel.: +41-1-806 8111
Telefax: +41-1-806 8115
Taiwan
GRUNDFOS Pumps (Taiwan) Ltd.
7 Floor, 219 Min-Chuan Road
Taichung, Taiwan, R.O.C.
Phone: +886-4-2305 0868
Telefax: +886-4-2305 0878
Thailand
GRUNDFOS (Thailand) Ltd.
947/168 Moo 12, Bangna-Trad Rd.,
K.M. 3,
Bangna, Phrakanong
Bangkok 10260
Phone: +66-2-744 1785 ... 91
Telefax: +66-2-744 1775 ... 6
Turkey
GRUNDFOS POMPA San. ve Tic. Ltd.
Sti.
Gebze Organize Sanayi Bölgesi
Ihsan dede Caddesi,
2. yol 200. Sokak No. 204
41490 Gebze/ Kocaeli
Phone: +90 - 262-679 7979
Telefax: +90 - 262-679 7905
E-mail: satis@grundfos.com
Ukraine
ТОВ ГРУНДФОС Укра ин а
ул. Владимирская, 71, оф. 45
г. Киев, 01033,
Украина,
Тел. +380 44 289 4050
Факс +380 44 289 4139
United Arab Emirates
GRUNDFOS Gulf Distribution
P.O. Box 16768
Jebel Ali Free Zone
Dubai
Phone: +971-4- 8815 166
Telefax: +971-4-8815 136
United Kingdom
GRUNDFOS Pumps Ltd.
Grovebury Road
Leighton Buzzard/Beds. LU7 8TL
Phone: +44-1525-850000
Telefax: +44-1525-850011
U.S.A.
GRUNDFOS Pumps Corporation
17100 West 118th Terrace
Olathe, Kansas 66061
Phone: +1-913-227-3400
Telefax: +1-913-227-3500
Usbekistan
Представительство ГРУНДФОС в
Ташк енте
700000 Ташк ент ул.Усм ан а Носира 1й
тупик 5
Телефо н: (3712) 55-68-15
Факс: (3712) 53-36-35
Addresses revised 18.04.2006
Page 19

www.grundfos.com
Being responsible is our foundation
Thinking ahead makes it possible
Innovation is the essence
96417298 0406
169
Repl. 96417298 0504
 Loading...