

OPERATION AND
MAINTENANCE OF THE
The GRS Diamond
Power Hone is designed for a
long, useful service life. The spindle is driven
by a smooth belt system at 240 RPM. The
diamond wheel supplied with your hone provides
true diamond performance. This means carbides,
hard metals, ceramics, and other exotic
materials are all within the capability of your
Power Hone. Replacement diamond wheels are
available from GRS Tools in several grits for a
wide range of applications.
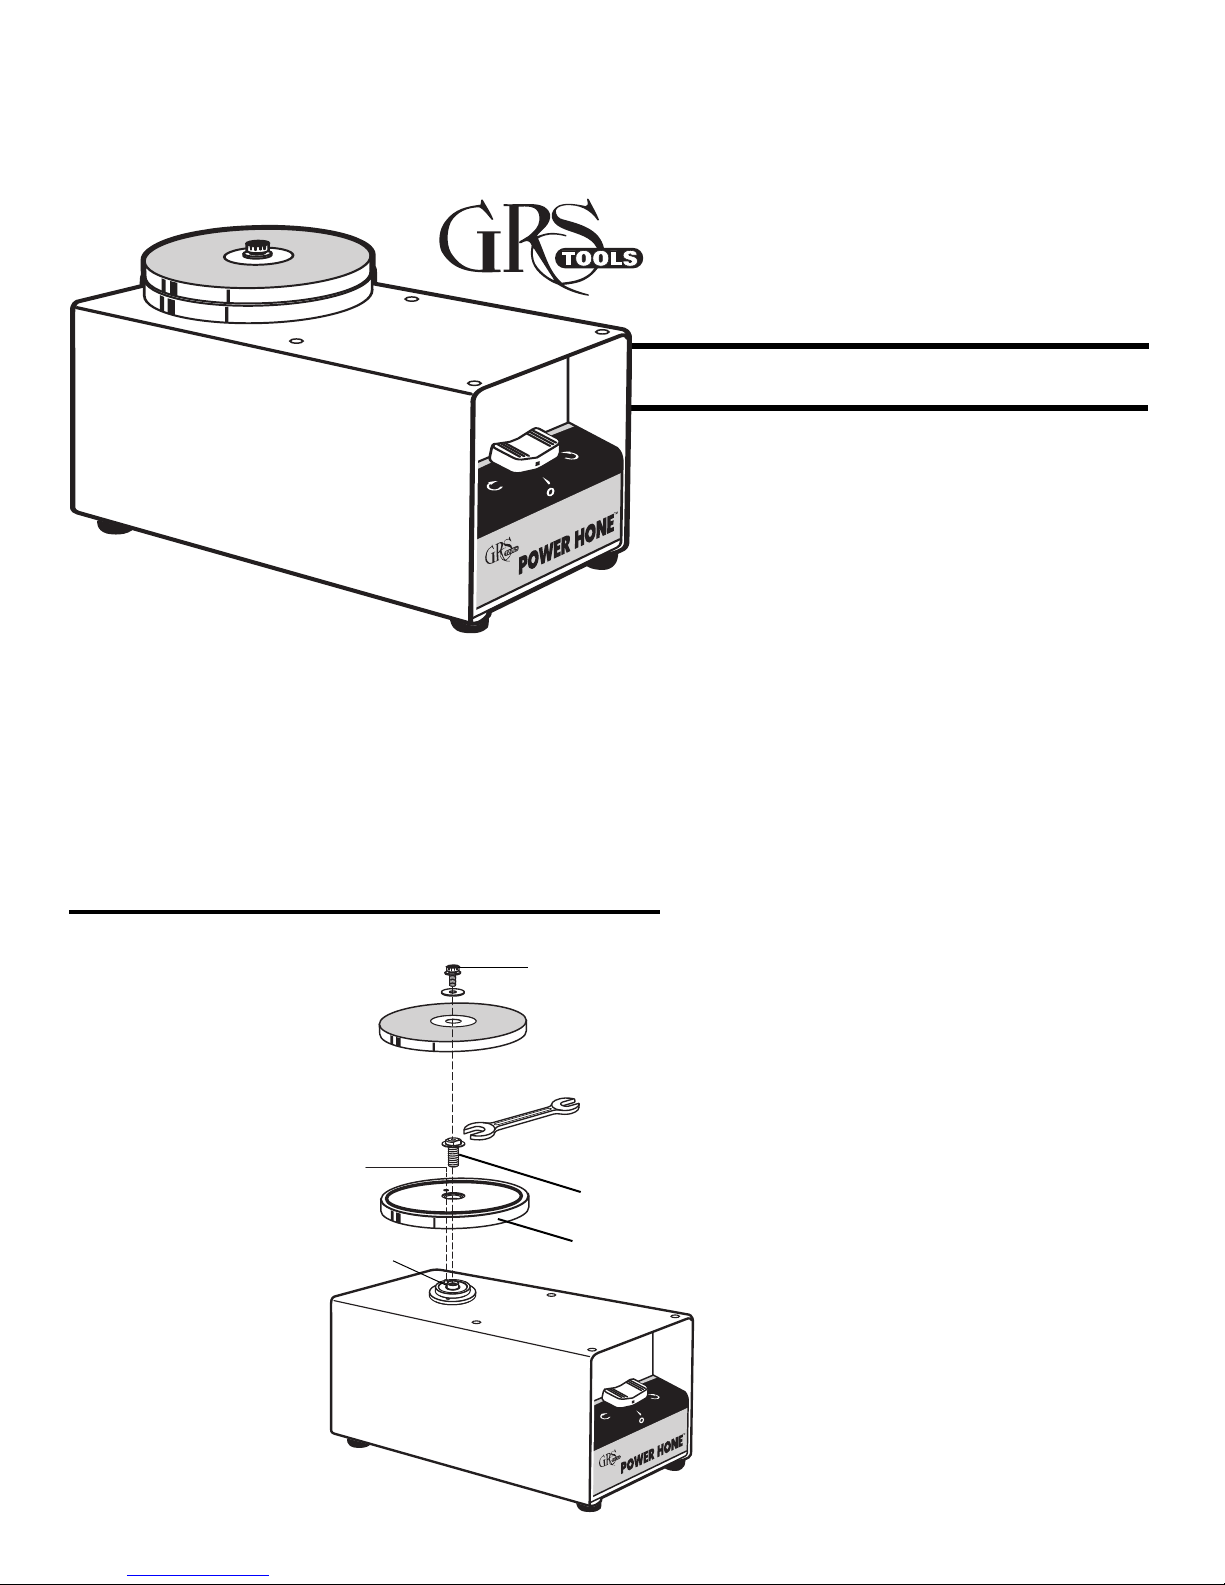
ATTACHING THE
QUICK CHANGE
DRIVE PLATE
FIRST - Align the pin located on
the spindle with hole in the QC
Drive Plate. Make sure plate
rests fully on spindle. Insert
Spindle Nut, tighten snug
with a 3/8" open end wrench.
(Do NOT
machine in, turn it on, check
to see if plate runs true and
does not wobble. If it wobbles,
turn of
the pin aligns with the hole
in QC plate and is seated
properly on spindle.
Place diamond wheel on
top of QC plate and insert
thumb screw/ washer into
spindle nut and finger tighten.
over tighten) Plug
SPINDLE
f, double check that
ALIGN
PIN IN
HOLE
PIN
Lit #193
FINGER
TIGHTEN ONLY
WRECH
3/8"
OPEN
END
SPINDLE
NUT
QC DRIVE
PLATE
POWER
TM
HONE
MODEL B
TOOL SHARPENING
When using the Power Hone, hold the
tool relatively stationary while the rotary
motion of the wheel sharpens the tool.
Sweep the tool slowly across the working
surface of the wheel. This extends wheel
life by using the entire cutting face and
prevents grooving. The Power Hone is
designed mainly for fine tool sharpening
and finishing. Use a bench grinder to rough
shape tool points, then give them a fine
finish on the Power Hone. This will save
time and extend diamond wheel life.
Engraving & Jewelry Tools
The Power Hone was originally
designed to sharpen engraving and jewelry
tools. Sharpening fixtures to hold the
gravers to the precision angles required
for fine engraving tools are available
from GRS Tools. See the “accessories”
section or the GRS Tools catalog for the
sharpening fixtures that are available.
NOTE:
For very delicate work such as heeling
small gravers, try using the diamond wheel
with the machine turned off. This will
prevent removing too much material.
Household & Shop Items
The Power Hone is useful around the
house and shop to sharpen items like;
scissors, knives, craft tools, hobby
tools, chisels, wood and metal lathe
tools, etc. With the ceramic lap wheel
you can even put an edge on a
razor blade.
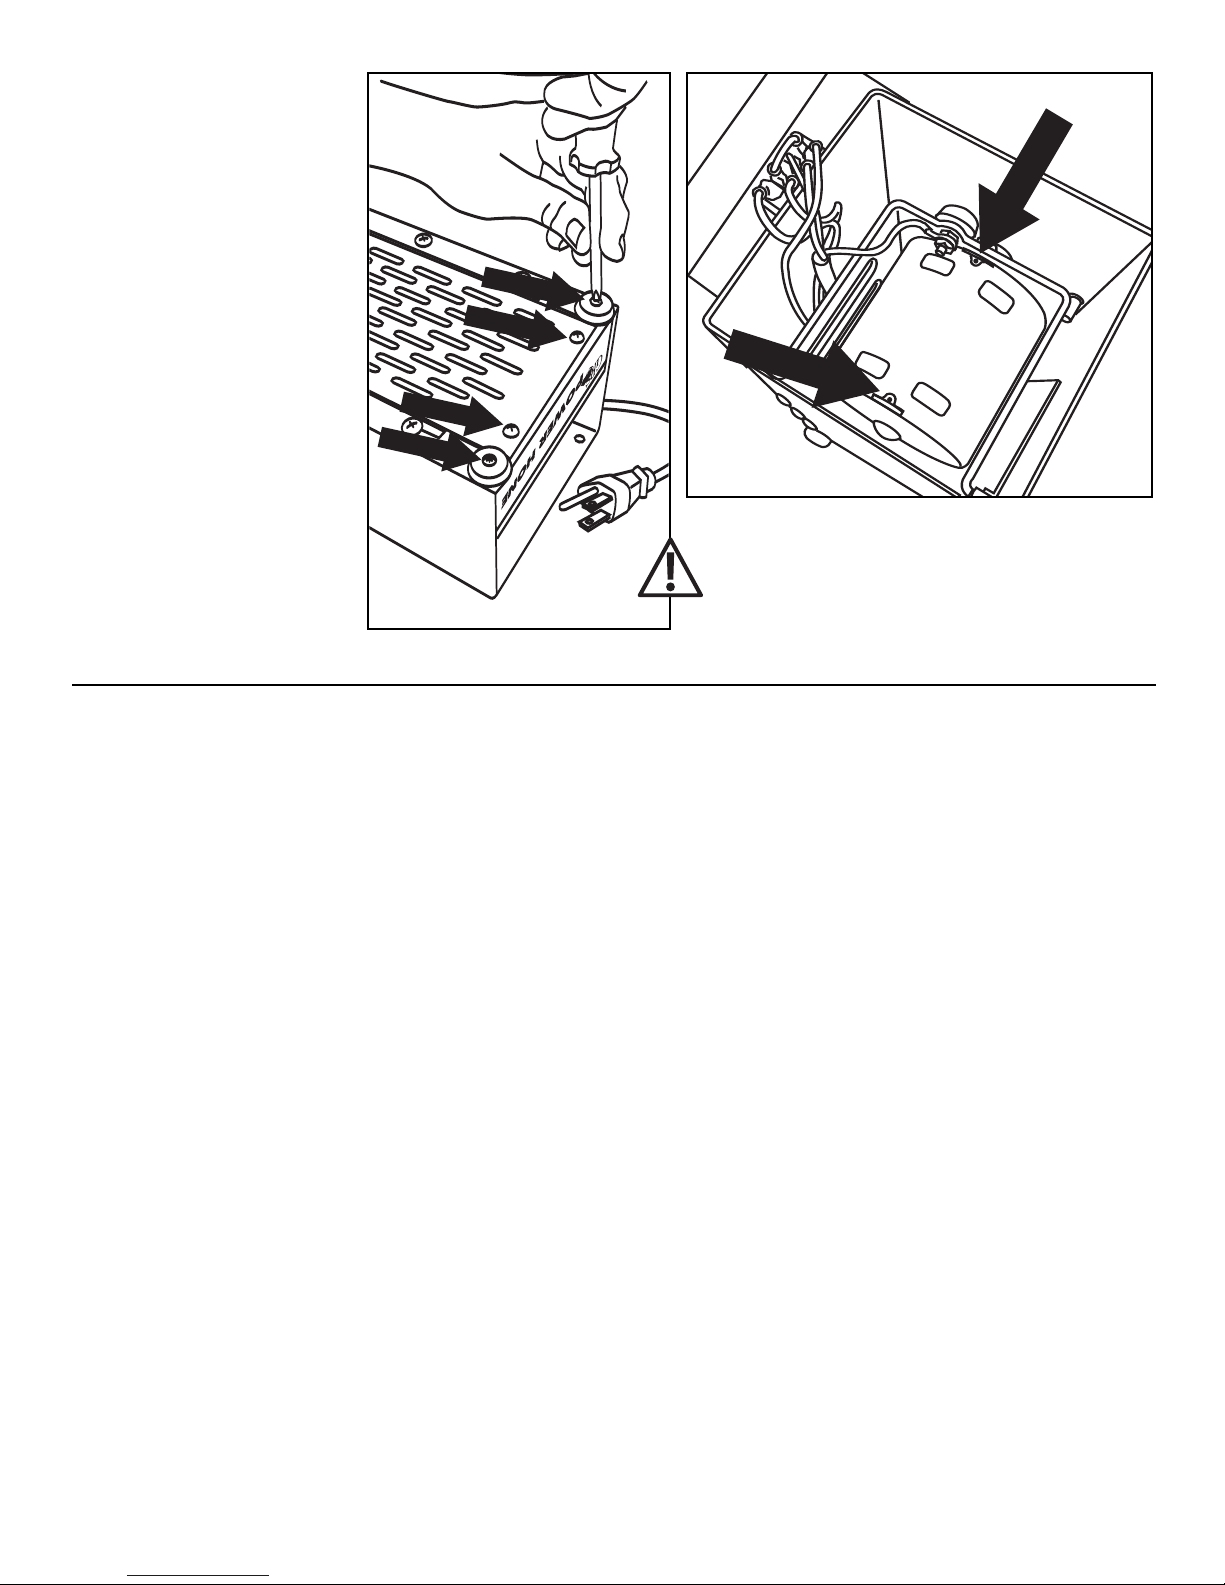
POWER HONE
MAINTENANCE
The GRS Power Hone
is virtually maintenance
free. For normal service,
yearly lubrication is
required. For extremely
heavy service, the motor
should be oiled every 6
months with several drops
of SAE 20 non-detergent
oil. Oil holes for the two
motor bearings are
accessible by removing
the front switch plate. Turn
machine upside down and
remove four screws: two
holding the front rubber
feet and the two between
them (See ILL A).
ILL A
OIL
OIL
Recommended Oil: SAE 20 weight non-detergent
Always unplug machine before
any service is done.
1 011-209 Rubber Foot Assy.
2 011-400 Yellow Common Jumper Assy.
3 011-401 Red Capacitor Lead Assy.
4 011-402 Blue Capacitor Lead Assy.
5 001-976 Bearing Bridge Assy.
6 001-975 Spindle Bearing Assy.
7 001-977 Hone Body
8 002-113 Quick Disconnect Terminal
9 022-568 2 Position Switch
10 022-530 115 Volt AC Motor
11 022-567 Capacitor for Motor
12 DIAMOND WHEEL (SEE BACK PAGE)
13 002-140 Drive Belt
14 001-641 Double Pulley Assy.
15 001-533 115 V Power Cord Assy.
16 022-576 Plastic 1/4-20 Set Screw
17 002-186 Pop Rivet
18 002-064 #8-32 X 1/2 SHCS
19 002-084 O-RIng 3/8 X 1/2 X 1/16
20 022-001 #8-32 X 1/2 SHCS
21 002-247 Washer
22 002-104 #8-32 Nut
23 002-289 #8-32 X 3/4 RHMS
24 002-063 #8 Lock Washer
25 002-568 #8-32 X 1/4 RHMS
26 022-572 10-32 X 1/2 Truss Head
27 002-108 #8-32 X 3/16 SSS
28 002-204 #10-32 Hex Nut
29 002-062 #8-32 X 1/2 RHMS
30 002-110 #8 Pltd. Washer
31 002-065 #10-32 X 3/8 RHMS
32 002-069 #10 Pltd. Washer
33 011-393 Motor Mount Bridge
34 011-396 Vented Bottom Panel
35 011-395 Cord End Panel
36 011-394 Switch End Panel
37 011-398 Spindle Nut
38 011-397 Quick Change Drive Plate
39 001-115 Motor Pulley 1/8"
40 011-399 Power Hone Spindle
41
42
43
44
45
46
47
48
49
50
51
1-289
01
1-403
01
002-137
022-056
002-300
002-279
002-780
002-036
002-770
022-571
1-270 Electrical Warning Label
01
Power Hone Label 115 Volt
Power Hone I.D. Decal
ire Tie
W
Thumbscrew Knob
Cord Retainer
Nylon W
O-Ring
Rubber Mounting Foot
Driv-Lok Pin
4.5" Cooling Fan
asher
230 VOLT UNIT #001-543B
10 022-547 230 Volt 50HZ PH Motor
11 022-578 Capacitor for 230V Motor
15 004-650 230 V Power Cord Assy.
41 011-290 Power Hone Label 230 Volt
45 002-955 Cord Retainer

UNPLUG THE MACHINE
BEFORE OPENING UNIT:
REPLACING THE DRIVE BELTS
These drive belts are made of a special elastic material
designed for this service. Regular belt inspections are
unnecessary. If you were to notice a drag or loss of power
while honing, it may be a broken belt. A spare set of belts is a
good item to have on hand (part #002-140 - two required).
Below are instructions for belt replacement.
Tools Required:
1/8" & 3/32" Hex Wrench, 3/8" Open End Wrench, #2
Phillips Screwdriver and Needle Nose Pliers.
UNPLUG THE MACHINE BEFORE OPENING UNIT:
Turning the switch off is NOT sufficient.
1. Turn the machine upside down and remove the bottom
cover (3 screws) -
2. Remove rear cover by removing the two rubber feet - ILL B.
Note: Power cord will limit cover movement.
ILL A.
ILL B.
ILL A.
3. Lay hone on its side and loosen the set screw for the fan
and pulley -
Pull the spindle out of the bearing. Use one hand to counter
4.
the sideward pull of the rubber belts. IMPORTANT: Make sure
to locate and save the nylon washer that is above the pulley
assembly - ILL D.
Remove the front panel by removing
5.
the front rubber feet. Disconnect the two
center wires on the switch using a pair
of needle nose pliers - ILL E.
Remove the ground (green/yellow stripe)
wire from the motor mount - ILL F.
Loosen the front two motor mount
6.
screws and slide them out of the
assembly using the slots cut in the
hone body Loosen - BUT DO NOT REMOVE the
rear motor mount screws. Slide the
motor mount out the front of the hone
body, guiding the pulley past the
threaded standoffs -
(CONTINUED ON BACK)
ILL C.
ILL G.
ILL H.
ILL
ILL C.
ILL E.
G.
ILL
WASHER
F.
IMPORTANT: DO NOT
LOOSEN THESE BOLTS
THEY HOLD THE LOWER SPINDLE
BUSHING PLATE THAT IS
PRECISION ALIGNED
AT THE FACTORY
www.GrsTools.com

CONTINUED -
7. Replace belts and slide motor pulley assembly
back into the housing, guiding the pulley past the
threaded standoffs - ILL I.
8. Stand the hone on its end and let the motor
mount seat all the way onto the rear mounting
screws. Snug but do not tighten these screws.
Replace the front motor mount screws by sliding
them into place through the slots cut in the hone
body. Tighten all 4 screws -
9. Insert the spindle into the bearing far enough that
you can place the nylon washer on it from inside the
hone body and slip the spindle into it far enough to allow the
fan to be slipped onto the shaft also -
ILL K. Pull the pulley assembly back
ILL J.
ILL L.
ILL I.
10. Slide the spindle all the way into the hone body.
Slide the pulley up and trap the nylon washer
between it and the bushing. With gentle pressure
remove any end play and tighten the set screw of
the pulley onto the flat, milled on the spindle. Slide
the fan up to the pulley and tighten it onto the
spindle also -
WASHER
11. Attach the ground wire to the motor mount and
the two wires to the switch center posts It will not matter if you turn these wires around.
12. Attach the end panels - ILLOand the bottom
panel -
ILL M.
ILL K.
ILLN.
ILL P.
ILL L.
ILL J.
POSITION FLAT
FOR SET SCREWS
N.
ILL
ILL M.
ILL O.
ILL
POWER
TM
HONE
P.

WIRING DIAGRAM
115V 60HZ (230V 50HZ)

DIAMOND WHEEL CARE
Diamond wheels provide long term economy and
performance in abrasive service if used correctly.
Although the diamond is the hardest material known,
the bonding which holds the diamond particles in
place can be damaged. Grooving the wheel by
gouging the bonding material is the biggest error.
The finer the grit, the easier it is to damage the wheel.
The user should not be afraid to apply moderate
pressure while honing, as the wheels are designed
for this. The following tips will provide valuable
information on using diamond wheels.
1. Approach the diamond surface carefully with the
tool. Apply cutting pressure smoothly. Be especially
attentive when first cutting sharp points.
2. Wet the diamond surface with a water soluble
wetting agent sprayed on with a spray bottle.
Occasional spraying to keep surface wet is all
that is required. A wet wheel will cut better, yield
superior tool finishes, and resist loading.
WHEELS AND ACCESSORIES
002-138 5" Dia. - 260 Grit Diamond Wheel
002-055 5" Dia. - 600 Grit Diamond Wheel
002-139 5" Dia. - 1200 Grit Diamond Wheel
002-415 6" Ceramic Lap Wheel
Make your own abrasive /strop wheel.
Simply adhere the desired grit of sandpaper
or leather to these blank wheels. Wheels are
machined to a perfectly flat surface.
002-537 Blank Wheel for Power Hone - 6"
002-129 Blank Wheel for Power Hone - 5"
002-752 Diamond Spray, 1/4 Micron
002-753 Diamond Spray, 1/2 Micron
002-754 Diamond Spray, 1 Micron
002-755 Diamond Spray, 3 Micron
Wheel Wetting Agent Concentrate
001-659 Pkg of 3 - makes 1 gal. per pkg
001-660 Pkg of 12
3. Remove and clean wheel when dirty. Usually
scrubbing with water, mild scouring powder, and
a clean cloth is sufficient. Our diamond wheel
cleaning sticks, #001-783, are designed for a
thorough cleaning. These soft abrasive sticks are
consumed while cleaning the wheel. Proper use
will extend wheel life. We do NOT normally
advise using solvents on wheels. If solvents are
used, NEVER dip or soak wheel in a solvent.
Only wipe top cutting surface and then immediately
wash with soap and water. Keep wheel out of
direct sunlight and away from excessive heat.
Use the entire face of the wheel for cutting.
4.
The 600 grit wheel is recommended for general
5.
use. It provides a good finish with an adequate
material removal rate. Finer grits are normally for
finishing operation after using a coarser wheel or
other abrasive.
001-783 Wheel Cleaning Sticks
001-694 Wheel Storage Rack
001-838 Quick Wheel Change Adapter
001-958 Power Hone Parts Kit
GRAVER SHARPENING FIXTURES
003-100 Standard Graver Sharpening Fixture
003-570 Dual Angle Sharpening Fixture
003-580 QC Sharpening Fixture
Other wheels available, contact your
dealer OR our sales department for
complete information.
1-800-835-3519
Fax: 620-343-9640
Tel: 620-343-1084
e-mail: GRS@GrsT
Or write: GRS Tools
900 Overlander Road
P.O. Box 1153
Emporia, KS 66801 USA
ools.com
www.GrsTools.com
 Loading...