

GRS Airtact Operation And Maintenance Manual
& Accessories
OPERATION AND MAINTENANCE MANUAL
WELCOME TO THE WORLD OF AIRTACT!
This is the most versatile control system ever developed with an
expandable range of actuation. The heart of the Airtact system is
the air control unit where the throttle command is processed. This
simple and robust system requires dry, clean, oil-free air, and
a GraverMate, GraverMax, GraverMax SC, or GraverMach as
engraving system. Hook up is easy; just follow these step-by-step
instructions and the instructions provided with the connection kit if
required for your machine.
TERMS USED IN THESE INSTRUCTIONS
Control box or air control unit: Airtact and Touch Elements
GETTING STARTED
Decide on a location for the control box. This needs to be a
place where you can easily access the front of the unit for hose
connections and air adjustments. If you are connecting your
Airtact to a GraverMax or GraverMate, an additional kit will be
required.
#004-971 GraverMax A/T Filter Hook Up Kit
#004-972 GraverMate A/T Filter Hook Up Kit
NOTE: The black hose (#044-136) is for connecting the HIGH
pressure air coming from your compressor. The clear hose
(#044-135) is for connecting LOWER pressure air from the
“THROTTLE CONNECTION” port to the Airtact.
Turn off the air supply to your engraving system and bleed off
any remaining air in the line. Depending on the engraving system
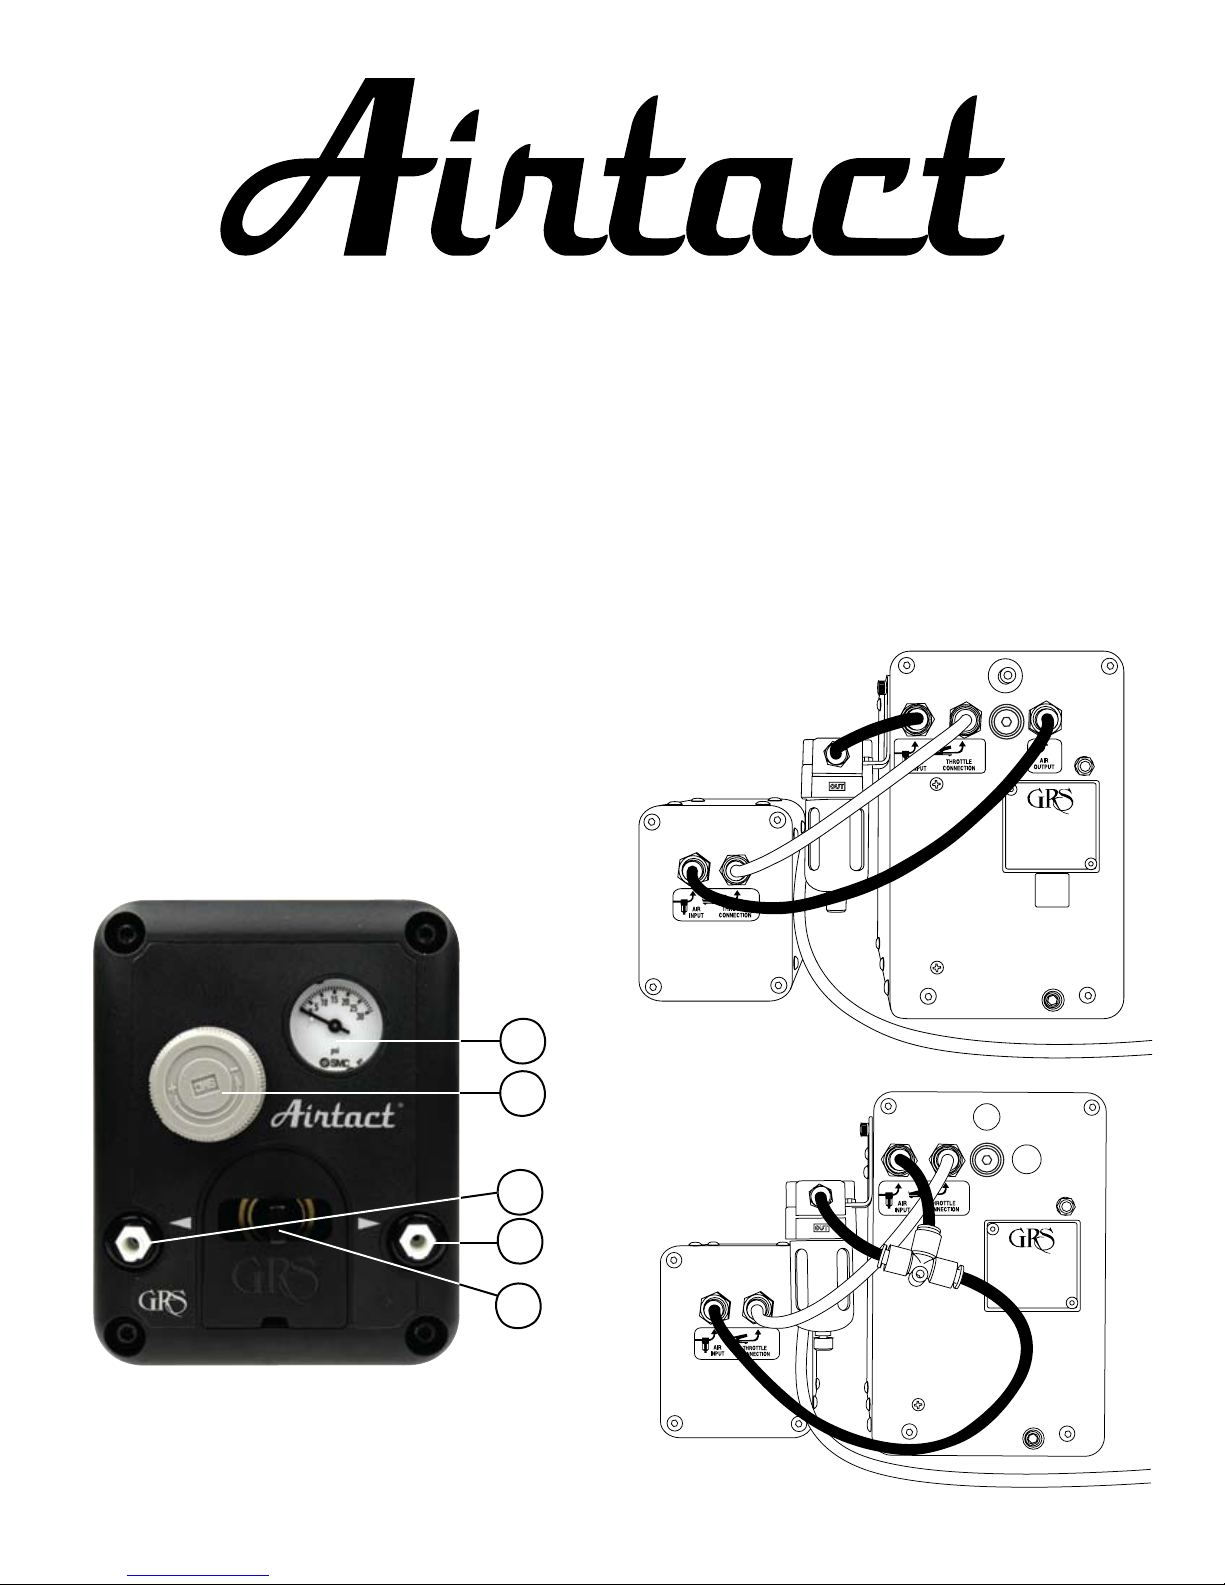
that will be used, install the hoses as shown in Fig. 1 or Fig. 2.
Make sure to press them into the quick connect fittings all the
1 Airtact pressure gauge
2 Airtact pressure regulator
3 Twist-lock control port #1
4 Twist-lock control port #2
5 Control port switch
1
Fig. 1: GraverMach to Airtact Hook-up
2
3
4
5
Fig. 2: GraverMax SC & older GraverMach to Airtact Hook-up

Fig. 3: Palm Pad Modifications
PALM PAD C2
Raised Bumps
Control Flap
Raised Ridges
Palm Pad C2 Style
If you find that you would like
a more sensitive touch the
raised ridges can be reduced
or removed by using an razor
knife or grinding with a flexshaft,
dremel, NSK E-Max, etc.
way. NOTE: When installing hoses, trim excess length. NOTE: It is
not possible to use the existing foot throttle with the Airtact system.
The original foot throttle must be completely disconnected for the
Airtact to work properly. If foot control is desired, use the FootPod
Touch Element.
#004-956 FootPod Touch Element Kit F1
You are now ready to hook up the touch element of your choice.
#004-952 Palm Touch Element Kit Monarch MI
#004-952-SS Palm Touch Element Kit Monarch MI Stainless Steel
#004-953 Palm Touch Element Kit 901 N1
#004-953-SS Palm Touch Element Kit 901 N1 Stainless Steel
#004-954 Thumb/Finger Touch Element Kit Monarch TM1
#004-955 Thumb/Finger Touch Element Kit 901 TN1
Connect the larger handpiece hose to the normal handpiece
air supply port on the GraverMach/MaxSC/Max/Mate. Take the
smaller hose and gently twist the hose end connector knob 1/2
turn clockwise until it stops to the left or right port on the front
of the Airtact. Turn the air supply pressure back on and check
carefully for leaks.
MODERATE
SENSITIVITY
PALM PAD C2
HIGHER SENSITIVITY
PALM PAD C2
Reduce or Remove
Moderate Sensitivity
(more sensitive)
Palm Pad C2 Style
Reduce or remove the raised
ridges that are illustrated with
a dotted line. This will give you
a more sensitive handpiece that
will allow for less hand force.
Reduce or Remove
Higher Sensitivity
(even more sensitive)
Palm Pad Style
Reduce or remove the raised
ridges that are illustrated with
a dotted line. This will give you
a very sensitive handpiece with
even less hand force.
AIR PRESSURE ADJUSTMENTS
Begin by turning the power switch on to the engraving system
and adjust the strokes per minute (SPM) knob to 2300 or 2400
SPM. On the GraverMax/SC/Mach, switch the handpiece selector
knob to the handpiece you wish to use.
The Airtact control unit has a regulator and gauge on the face
located above the paddle switch. This controls how much power
you want for the handpiece to have. The lower the pressure the
lighter the handpiece will stroke, and the more air pressure, up to
12psi (0.8 bar), the harder it strokes.
1. On the Airtact unit, move the paddle switch in the direction of
the handpiece connection you wish to use and increase the
Airtact air pressure to 12 psi (0.8 bar).
2. On the GraverMach/MaxSC/Max/Mate back the air pressure
off at the regulator knob by turning it counter-clockwise
until the gauge shows 5 psi (0.4 bar). Hold the handpiece
vertically next to your ear and slowly begin to increase the
air pressure by turning the regulator knob clockwise. You will
feel the handpiece begin to buzz, then vibrate, and knock
lightly. When the knocking stops on a GraverMach or SC, your
handpiece is considered “tuned.”
NOTE: If you are using a Generation 1 GraverMax or GraverMate,
add 2 psi (0.1bar) to the gauge reading where the handpiece
stops knocking.
Control Flap
Raised Bumps
Palm Pad D1 Style
D1 is overall more sensitive than
C2. To reduce its sensitivity,
reduce the thickness of the
control flap by using a razor
knife or grinding with a flexshaft,
PALM PAD D1
dremel, NSK E-Max, etc.
on the outside (top) surface.
Check for proper handpiece operation by placing the paddle
switch in the center position. This should immediately give full
handpiece power if your connections are correct, if not, find the
problem and correct. NOTE: The center paddle switch position
will also give you an automatic stroking feature that is designed
for stippling or other operations where multiple hits are desired
without the need for control inputs.
SUGGESTIONS
Airtact Touch Element:
• Atapproximately12psi,theAirtactwillgivefullpowerrange
for any handpiece. Less than 12 psi, you will have reduced
power. This can be very useful for shading because you can
lessen the pressure (try 4 or 5 psi) to limit the power for really
fine control. ALWAYS BE AWARE THAT AT LESS THAN 12
PSI you will NOT have full power.
• SwitchingtheGraverMach/MaxSC/Max/Matehandpiece
selector does NOT switch the handpieces connected to the
 Loading...