

GRS 003-570 Instructions Manual
Dual Angle Sharpening Fixture
INSTRUCTIONS • 003-570
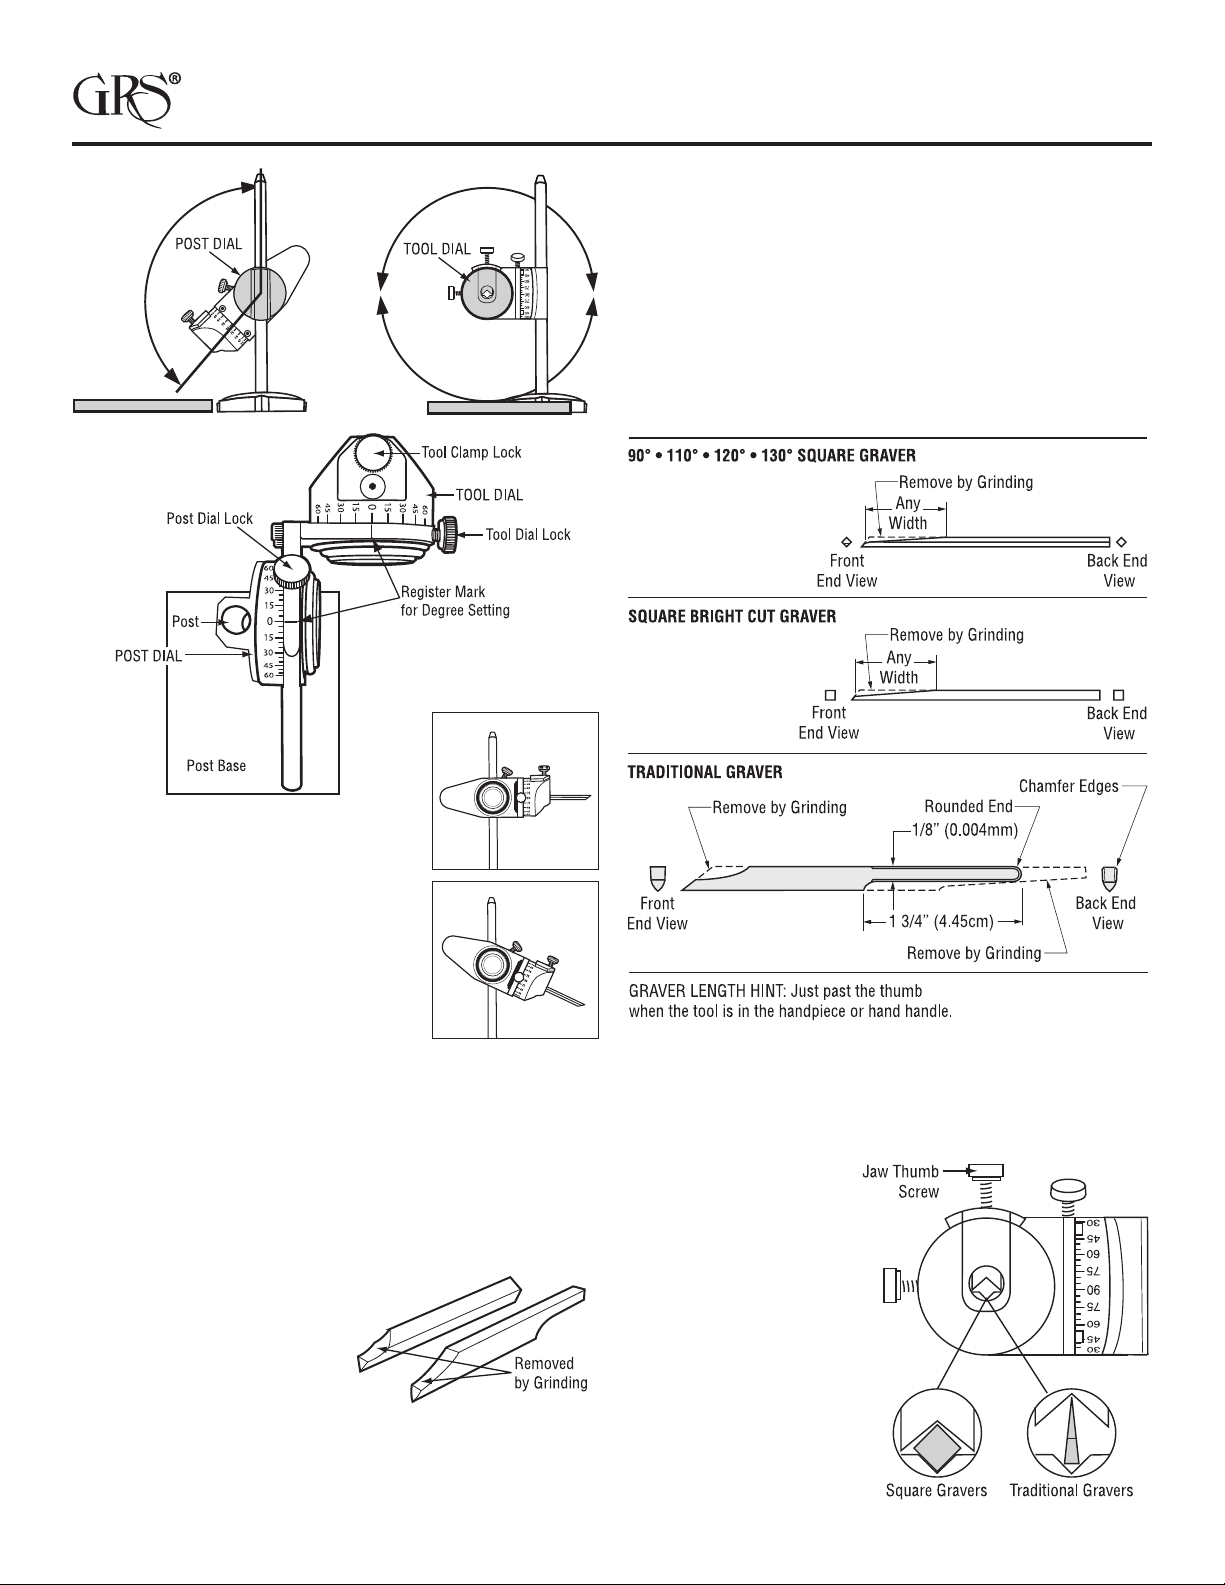
FIG. 1
WORN. A face mask should also be worn to prevent breathing
wheel dust.
Tools can easily be damaged while grinding. Do not let the tool
tip get hot and burn. Burning means the tool metal will turn blue,
which takes the temper or hardness out of the tool and it will not
hold a cutting edge. To avoid burning the tool, take your time and
do not press too hard against the wheel. Have a container of
water by your grinder and frequently dip the tool BEFORE it gets
warm in your hand.
SUGGESTIONS ON HOW TO PRE-SHAPE THE GRAVER
FIG. 5
FIG. 2
Set both dials at 0° to the register marks
(FIG. 1). Slide the xture onto the base post
and hold it out in front of you. Position the
xture so that it is square to your body and
the tool being sharpened is pointing “straight”
away from you (FIG. 2). As you change this
angle, the position of the xture will rotate
down (FIG. 3).
The TOOL DIAL can turn left or right 360°, but always use one
of the 0° as a reference point. After grinding the face angle, turn
the tool over (180°) by rotating from reference point 0° to new
reference point 0°. Now you can set the angles desired, left and
right, from the new 0° reference point.
GETTING THE GRAVER READY TO SHARPEN
Most tools need some type of preparation before sharpening.
Shank modication to t a hand handle or power handpiece,
or just shortened to t your personal needs. GRS Tools offers
gravers that are already modied
and ready to be sharpened.
Removal of excess metal from the
top/front of the tool tip makes it
quicker and easier to re-sharpen
(FIG. 4). It also allows a better
view of the tip when in use. You will need to use a bench grinder
or a Power Hone with a 260 grit wheel. Rough grind with a bench
grinder rst, then true the surface with the Power Hone if you
desire. When using a bench grinder, eye protection MUST BE
FIG. 4
FIG. 3
MOUNTING A TOOL IN THE TOOL DIAL
Open and close the jaws by turning the Jaw Thumb Screw. The
illustration below shows the correct placement for holding square
and traditional gravers. Properly position the graver squarely in
the jaws and tighten snugly
with your ngers, but do not
overtighten. A secure hold
prevents tool movement.
HINT: Use the 0° by the
Jaw Thumb Screw when
sharpening the FACE
ANGLE. Lock the dial into
position before inserting a
tool. When inserting the tool,
make sure its face angle is
facing down, away from the
Jaw Thumb Screw.
FIG. 6
Page 1 of 4 LIT-181
Square Gravers in Quick
Change holders (FIG. 7), must
be inserted into the jaws from
the back. DO NOT hold tool
by the Quick Change holder in
the jaw.
Hold Curved Traditional
Graver (FIG. 7) as shown.
NOTE: Because of the tool’s
curve, you will need to estimate
the angle needed to set the face
angle.
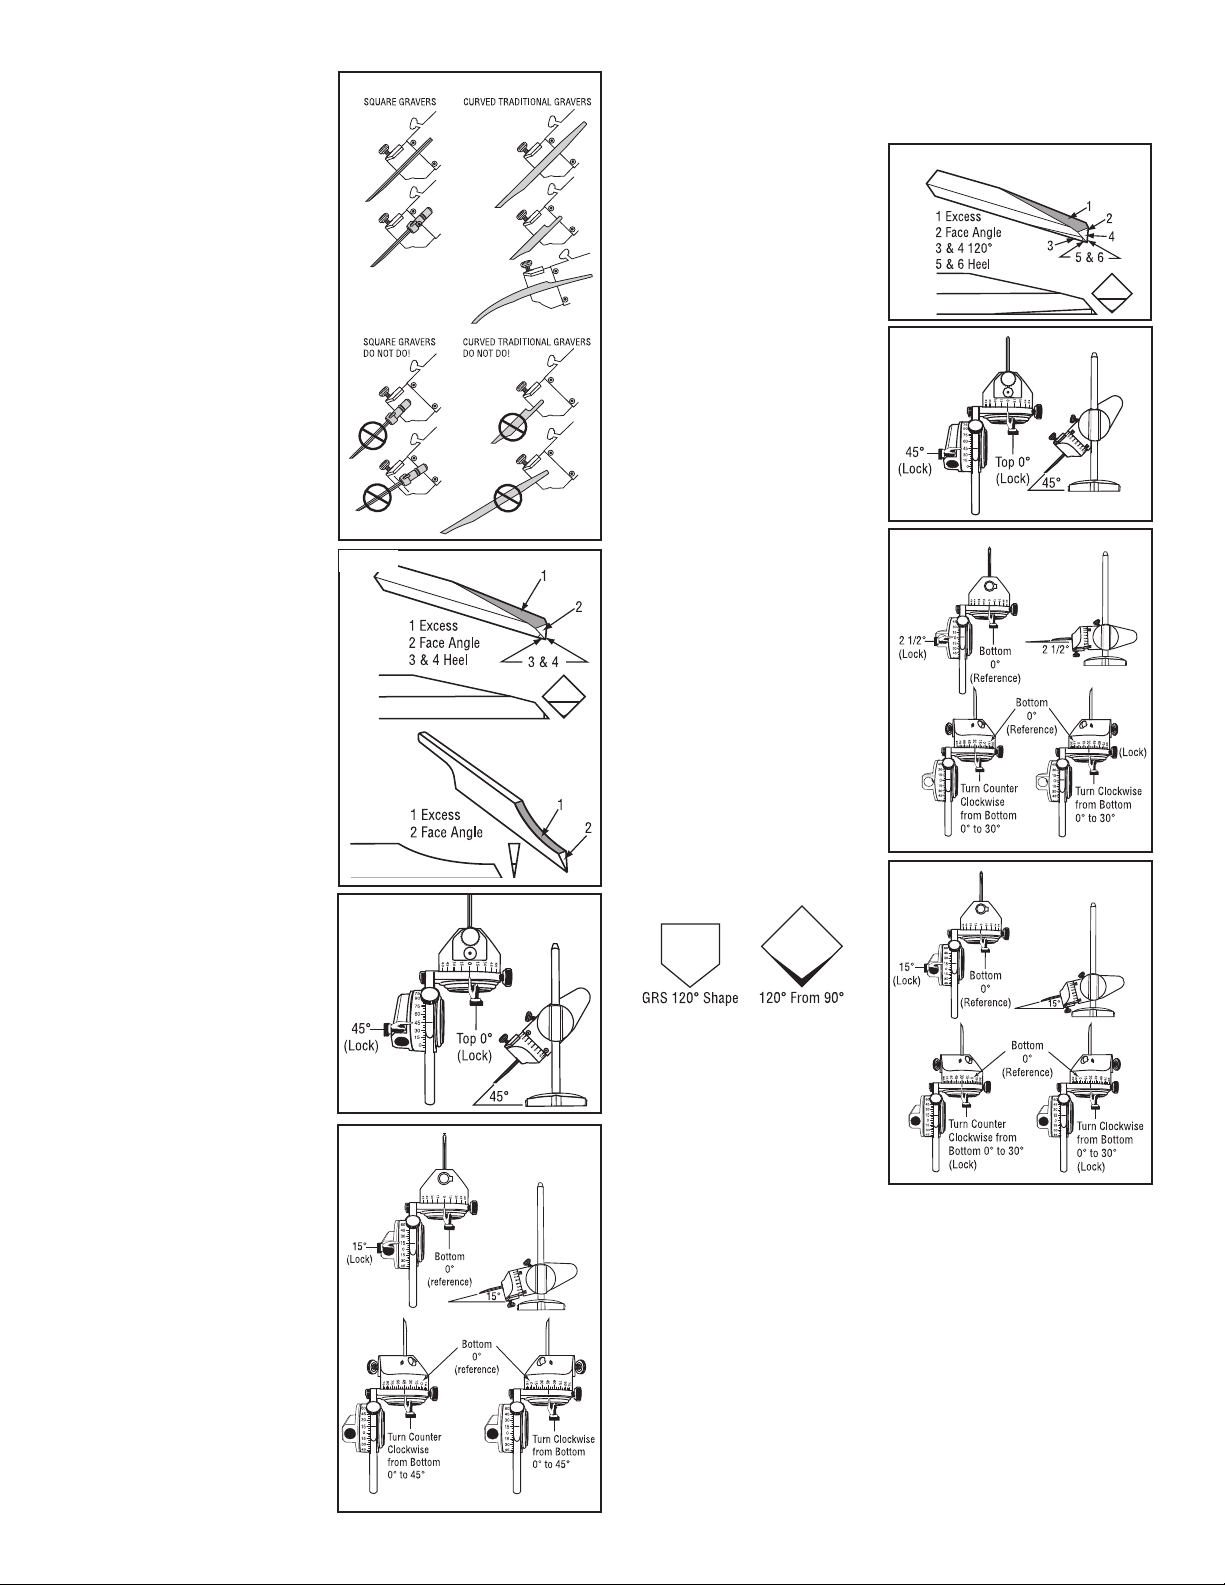
90 DEGREE SQUARE GRAVER
With the graver’s excess metal
removed — see getting the
graver ready to sharpen (FIG. 8)
— you are ready to make the
face angle (FIG. 9). With the tool
mounted, face angle down, and
the TOOL DIAL locked at 0°,
set the POST DIAL at 45°. This
is just an example, you may
change face angles to t your
needs. If you are using a square
blank graver, start your face
angle by using a 260 grit wheel
on the Power Hone. Finish the
face surface by stepping up to a
600 grit, then a 1200 grit. Once
you have nished the face, you
will only need to take these
steps again if the tip becomes
severely damaged. If you’re not
using a Power Hone, shape the
face as close as possible on a
bench grinder and nish with
this xture and a stone.
A 15° heel will be used for this
example (FIG. 10). Set the
POST DIAL at 15° and lock it.
Rotate the TOOL DIAL halfway
around or 180°, go from the top
0° setting until the bottom 0°
setting is on top. From the new
0°, tool pointing away from
you, turn dial clockwise, until it
reads 45° and lock. Sharpen
on a ceramic wheel, making
the heel about 1/32" long. If
you heel on a 1200 grit wheel,
use the xture and stroke the
graver a couple times without
turning the Power Hone on.
After forming this heel, turn the
dial counterclockwise, going
past the 0° until it reads 45° and
lock in position. Finish the heel
on this side using the same
method. It is important that both
heels are the same size and
symmetrical.
LIT-181 Page 2 of 4
FIG. 7
FIG. 8
FIG. 9
FIG. 10
Face Angle
MAKING A 120 DEGREE GRAVER FROM A SQUARE GRAVER
Refer to “SHARPENING A 90° GRAVER”, for details. With the
graver’s excess metal removed (FIG. 11) mount the tool face angle
down in the TOOL DIAL and
lock at 0°. Set the POST DIAL at
FIG. 11
45° (or desired face angle) and
grind the face (FIG. 12). Turning
the TOOL DIAL around 180° to
reference 0° and change the
POST DIAL to 2-1/2° (halfway
between 0° and 5°) and lock
in position. From reference 0°,
rotate dial clockwise to 30° and
FIG. 12
grind angle (FIG. 13). Make
this angle grind about 1/2" long.
Rotate TOOL DIAL counter
clockwise past reference 0°
to 30°, lock and grind angle
(FIG. 13). Make this side the
same length as the other side
(FIG. 13). TIP: To measure how
much you are grinding off, time
it or count while it’s grinding. It
FIG. 13
may be necessary to regrind
the other side to make both
sides equal. But it is important
that the sides are equal and
symmetrical.
Make the heel (FIG. 14) by
changing the POST DIAL to
15° (or desired heel angle).
The TOOL DIAL is already at
30° left, so make this heel and
rotate TOOL DIAL right, past
reference 0° to 30° and make
the other heel. The 120° graver
is complete.
FIG. 14
HOW TO MAKE A 110 DEGREE
& 130 DEGREE OUT OF A
SQUARE GRAVER
Basically, making a 110° or 130°
graver is the same as making
a 120° graver, just change the
TOOL DIAL angle for different
side angles.
110° graver (FIG. 13): The side angle POST DIAL is set at 2-1/2°,
but set the TOOL DIAL from reference 0° left 35° and make one
side, then right 35° from reference 0° to make the other side.
130° graver (FIG. 13): The side angle POST DIAL is set at 2-1/2°,
but set the TOOL DIAL from reference 0° left 25° and make one
side, then right 25° from reference 0° to make the other side.
How do you gure this angle setting? The sides of a 90° tool
mounted in a xture, dial set at 0°, are 45° from the wheel. Adding
all angles: 45° + 45° + 90° = 180° (a at plane). Using 180° minus
(desired tool angle) let’s say, 110° = 70°. There are two sides to
the tool, so you divide 70° by 2 which equals 35°, the setting to
make a 110° graver.
 Loading...