

USER GUIDE
CY3
Digital Timer
www.grozonecontrol.com

TABLE OF CONTENTS
SAFETY NOTICE
PRODUCT DETAILS
INSTALLATION & OPERATION
QUICK TROUBLESHOOTING GUIDE
COMPLETE TROUBLESHOOTING GUIDE
WARRANTY & CUSTOMER SERVICE
3
4
5-6-7
8-9
10-11-12
13-14

SAFETY NOTICE
SAFETY NOTICE
IMPORTANT SAFETY INSTRUCTIONS
SAVE THESE INSTRUCTIONS
DANGER
TO REDUCE THE RISK OF FIRE OR ELECTRIC SHOCK,
CAREFULLY FOLLOW THESE INSTRUCTIONS.
To reduce the risk of electric shock, disconnect power to the 120V
electrical outlet before installing or removing the unit. When removing
the electrical wall plate, it may fall across plug pins or become displaced.
To reduce the risk of electric shock, this product has a grounding type
plug that has a third (grounding) pin. This plug will only fit into a
grounding type power outlet. If the plug does not fit into the outlet,
contact a qualified electrician to install the proper outlet. Do not change
the plug in any way.
3

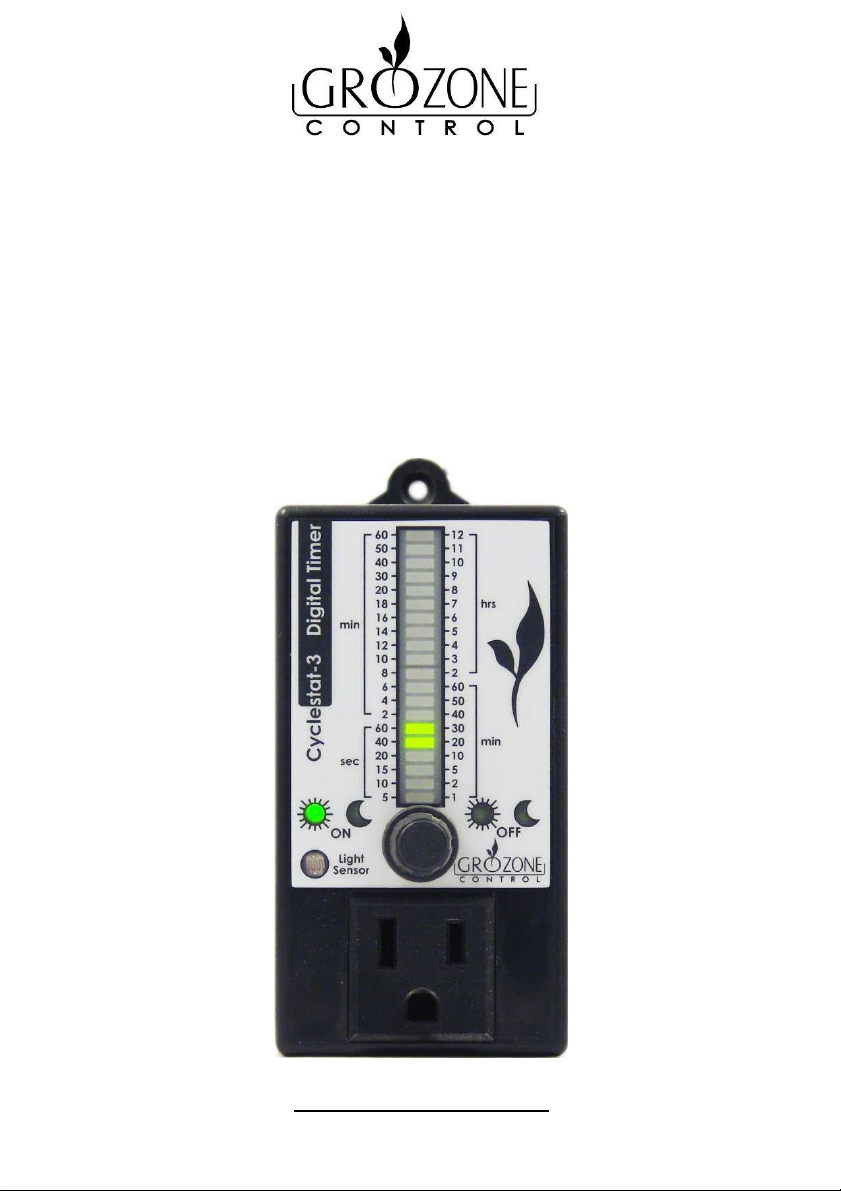
PRODUCT DETAILS
PRODUCT DETAILS
Operation and Specifications
Input/Output voltage: 120V.
Output current: rated 15A for general purpose load.
DAY or NIGHT ON times range from 5 seconds to 60 minutes.
DAY or NIGHT OFF times range from 1 minute to 12 hours.
Unit starts with ON time at power up in DAY condition. When unit switches
to NIGHT, Night OFF time is started. When the unit returns to DAY, Day ON
time is started.
Electrical specifications: See the rating label on your product.
4
INSTALLATION & OPERATION
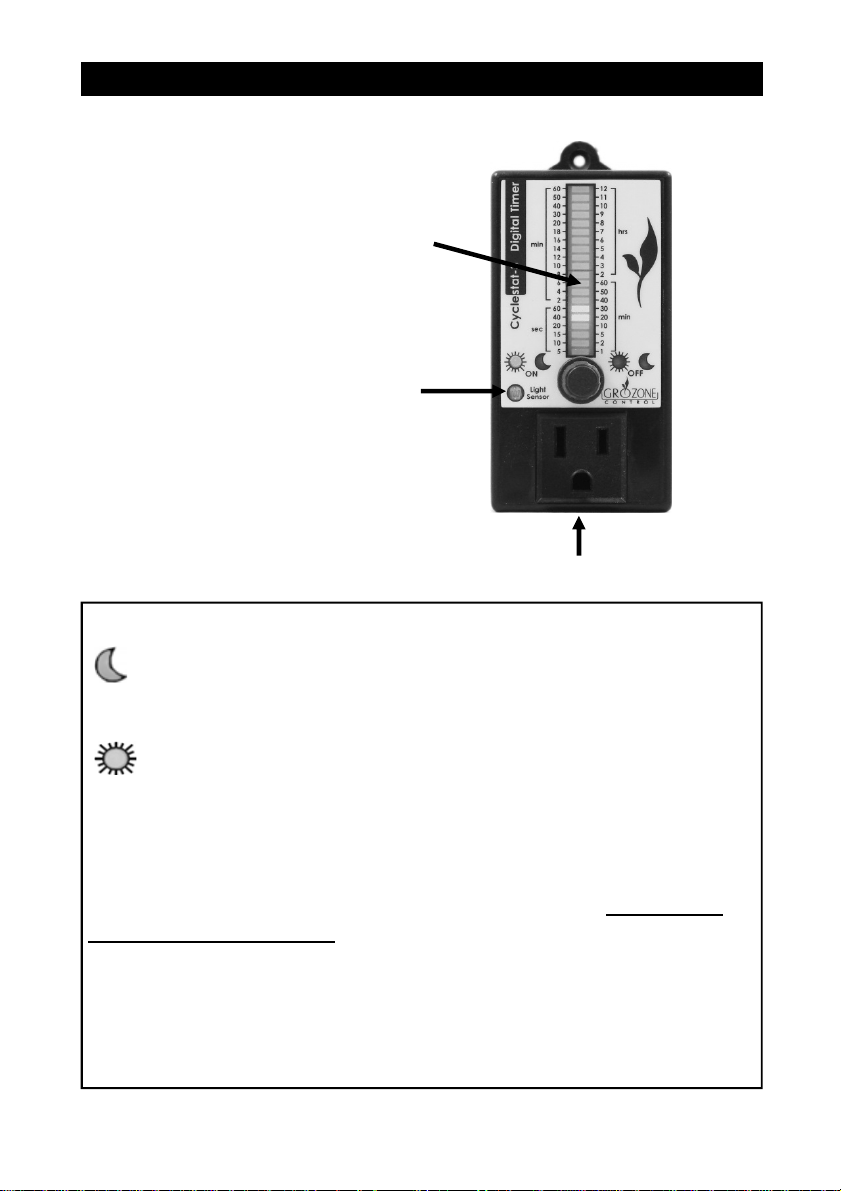
INSTALLATION & OPERATION
Bargraph Display
Use SCALE on LEFT SIDE for ON times
(5 seconds to 60 minutes)
Use SCALE on RIGHT SIDE for OFF
times
(1 minute to 12 hours)
Light sensor (photocell)
DAY AND NIGHT DETECTION
120V Output plug
The photocell detects a NIGHT condition when it senses darkness for
a minimum period of 8 seconds.
The photocell detects a DAY condition when it senses light for a
minimum period of 8 seconds
DISABLING OPERATION
In order to disable DAY or NIGHT operation, set corresponding ON time to
"zero" - turn knob counter clockwise until all bars are OFF when setting
DAY ON or NIGHT ON times.
BOTTOM BAR IS BLINKING
The bottom bar of display is flashing at the end of a cycle. The bar will
flash for 2 seconds at the end of an ON time, and for 30 seconds at the
end of an OFF time.
5
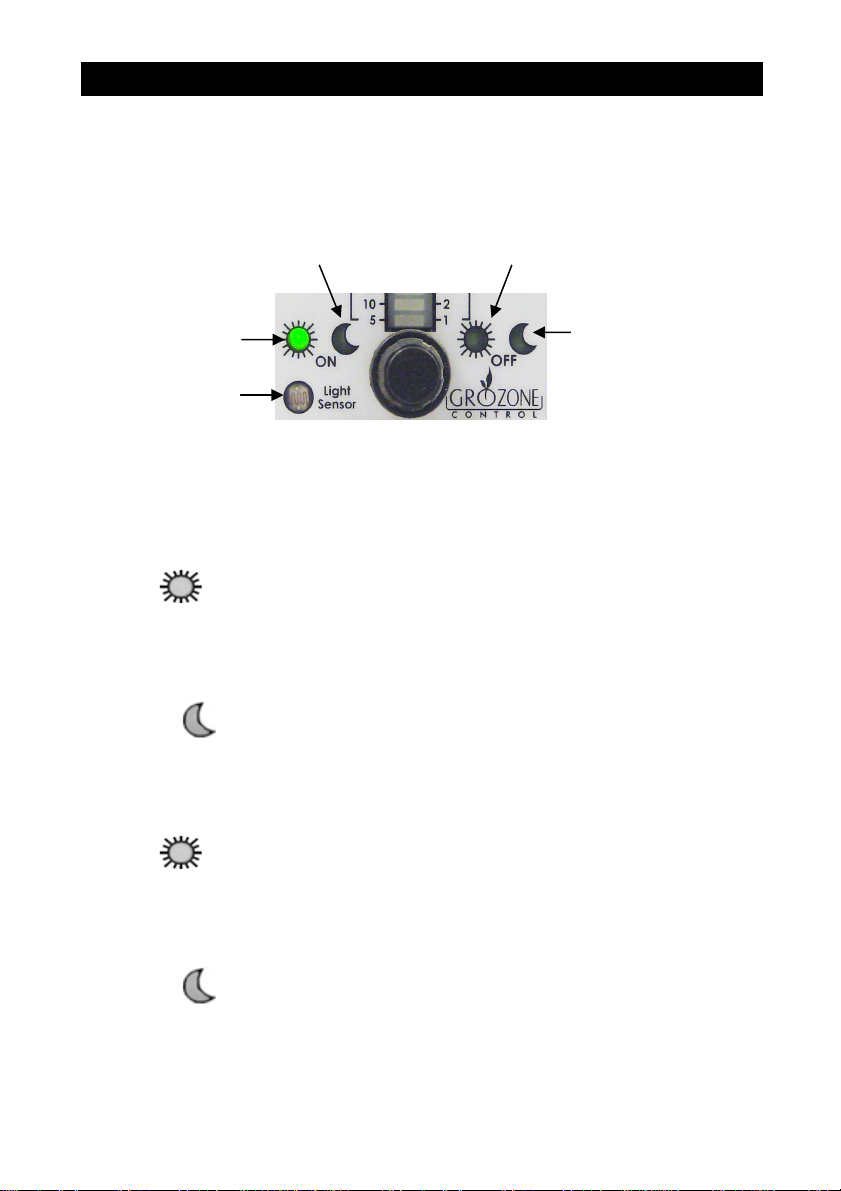
INSTALLATION & OPERATION
INSTALLATION & OPERATION
Set Values
Night ON Time
Indicator
Day ON Time
Indicator
Photocell
Day OFF Time
Indicator
Night OFF Time
Indicator
Click knob to select times and turn to set values in
this order:
•
DAY ON time: Indicator is steady lit (not blinking), rotate knob to
select from 5 seconds to 60 minutes (left side scale).
•
NIGHT ON time: Indicator is steady lit (not blinking), rotate knob
to select from 5 seconds to 60 minutes (left side scale).
•
DAY OFF time: Indicator is steady lit (not blinking), rotate knob
to select from 1 minute to 12 hours (right side scale).
•
NIGHT OFF time: Indicator is steady lit (not blinking), rotate knob
to select from 1 minute to 12 hours (right side scale).
6

INSTALLATION & OPERATION
INSTALLATION & OPERATION
Connect your equipment
Connect your pump or other equipment into the 120V outlet in front of
your timer.
BLINKING INDICATOR AND TIME COUNTDOWN
A blinking indicator shows you which "time" is currently running.
Countdown is shown on display at all times during normal cycle operation.
Exemple 1:
DAY ON Indicator is blinking.
Display bar "15" is lit (left scale).
DAY is detected and ON time will run for 15 more seconds before it
switches to OFF time.
Exemple 2:
NIGHT OFF Indicator is blinking.
Display bar "30" and "40" are lit (right scale).
The bargraph display
shows a remaining time
of 35 minutes.
The bargraph display
shows a remaining
time of 15 seconds.
NIGHT is detected and OFF time will run for 35 more minutes before it
switches to ON time.
7

QUICK TROUBLESHOOTING GUIDE
QUICK TROUBLESHOOTING GUIDE
No
Plug UNIT
Display bars
A B C D
bottom
will light On
top & top to
from bottom to
Product
Defective
Yes
NOT turn On
Day On Time LED DOES
once
Push knob
Product
Defective
BEFORE YOU START
Day On
turns On
Time LED
8
Quick Troubleshooting Chart
Perform test in a bright room • You will need a load to plug into UNIT*
•
CY3
Product Model:
= Steps
to 10 sec
sides to raise
and then back
time to 60 min
Turn knob both
Product
Defective
turn On
Night On Time
LED DOES NOT
down
light up &
Display bars
once
Push knob
light up & down
Display bars DOES NOT
Product
Defective
turn On
Night On
Time LED
QUICK TROUBLESHOOTING GUIDE
QUICK TROUBLESHOOTING GUIDE
On
Load
Load Off
UNIT
Plug load into
eration
to normal op-
UNIT goes back
twice
Push knob
1 min
Day Off Time set at
I
back to normal
UNIT DOES NOT go
On
Load
Off Time)
(UNIT in Day
complete cycle
Wait 1 min, for
load Off
After 1 min,
operation
Product
Defective
set at 1 min
Day Off Time NOT
J K
& wait 10 sec
with hand palm
Cover photocell
remains On
On Time LED
After 10 sec, Day
turns On
Night Time LED
After 10 sec, Off
remains On
Off Time LED
After 10 sec, Night
sec
cell & wait 10
Uncover photo-
Turn knob to
Time at 1 min
adjust Day Off
turns On
Day Off Time LED
Day Off Time LED
DOES NOT turn On
once
Push knob
Product
Defective
turns On
On Time LED
After 10 sec, Day
Good
Product
E F G H
*Before test, check if load is working properly.
9

COMPLETE TROUBLESHOOTING GUIDE
COMPLETE TROUBLESHOOTING GUIDE
Digital cycle timer with display
CY3
1 – Before you start
*IMPORTANT: READ AND FOLLOW THESE INSTRUCTIONS BEFORE
STARTING THE TEST.
•
DO NOT CONNECT UNIT
BEFORE STEP 1 OF THE TEST.
•
CONNECT A LOAD INTO THE
FRONT OUTLET
OF THE UNIT.
•
LIGHTHING
CONDITION:
perform this test in a room with
enough light for the unit to
detect a DAY condition.
NOTE: read ON times on the LEFT scale and OFF times on the RIGHT scale.
Day ON Time
Indicator
Photocell
Night ON Time
Indicator
Click knob to select and
turn to set values
Day OFF Time
Indicator
Night OFF Time
Indicator
STEPS
1
10
2 – Test
HANDLING AND TEST
DESCRIPTIONS
•
Plug unit into a power outlet.
EXPECTED RESULTS
When power is applied, each
bar of the display is lit
individually from bottom to
top and back to bottom.
DAY ON time Indicator is
BLINKING.
Load connected to 120V front
outlet is ON.

COMPLETE TROUBLESHOOTING GUIDE
COMPLETE TROUBLESHOOTING GUIDE
STEPS
2
3
4
HANDLING AND TEST
DESCRIPTIONS
•
Click knob once to enter Times
Settings
•
Turn knob to set DAY ON time
to 10 seconds (2nd bar is lit).
•
Click knob once
•
Turn knob to set NIGHT ON
time to 60 seconds (6th bar is
lit).
•
Click knob once
•
Turn knob to set DAY OFF time
to 1 minute (1st bar is lit).
EXPECTED RESULTS
DAY ON time indicator is
STEADY LIT.
2nd bar of display (from
bottom) is STEADY LIT.
The load connected to 120V
front outlet will remain in
the same state it was (ON or
OFF, when Times Setting was
entered). Time countdown is
suspended.
NIGHT ON time indicator is
STEADY LIT.
6th bar of display (from
bottom) is STEADY LIT.
DAY OFF time indicator is
STEADY LIT.
1st bar of display (from
bottom) is STEADY LIT.
5
•
Click knob once.
•
Turn knob to set NIGHT OFF
time to 10 minutes (4th bar is
lit).
NIGHT OFF time indicator is
STEADY LIT.
4th bar of display (from
bottom) is STEADY LIT.
11

COMPLETE TROUBLESHOOTING GUIDE
COMPLETE TROUBLESHOOTING GUIDE
STEP
6
7
HANDLING AND TEST
DESCRIPTIONS
•
Click knob once to resume
normal operation.
•
Cover the Light Sensor
completely with the palm of
your hand or black electrical
tape (a single finger will NOT
cover the sensor
appropriately) and wait 8
seconds until the NIGHT
condition is met.
EXPECTED RESULTS
DAY ON time or DAY OFF time
indicator is BLINKING,
meaning ON or OFF time
countdown is underway.
The unit will cycle 10 seconds
ON followed by 1 minute OFF.
Observe one complete ONOFF cycle and verify ON and
OFF times.
LOAD must be ON when
either DAY ON time or NIGHT
ON time indicator is lit.
DAY OFF time and DAY ON
time indicators (i.e. both
"Sun" icons) turn OFF.
NIGHT OFF time indicator
starts BLINKING and 4th bar
turns ON.
12
8
•
Uncover the Light Sensor and
wait 8 sec until DAY condition
is met.
4th bar turns OFF.
NIGHT OFF time and NIGHT
ON time indicators (i.e. both
"Moon" icons) turn OFF.
DAY ON time indicator starts
BLINKING and 2nd bar turns
ON.

WARRANTY & CUSTOMER SERVICE
WARRANTY & CUSTOMER SERVICE
DO YOU HAVE A PROBLEM WITH YOUR CONTROLLER ? PLEASE READ
THESE INSTRUCTIONS CAREFULLY AND SAVE THEM FOR FUTURE
REFERENCE.
1. I think my controller is damaged, or it simply does not work as
indicated in the user guide, what should I do?
•
Please refer to the troubleshooting steps. Follow these instructions
carefully, step by step. The controller should work as described in the
“Expected results” column of the Complete Troubleshooting Guide.
Do you need assistance on executing the Troubleshooting steps?
1. Contact us at 1-855-262-1800
2. Send us an EMAIL at service@grozonecontrol.com
3. VISIT our Technical Support Center at
www.grozonecontrol.com/techsupport.html
Technical Support is available Monday through Friday, from 8:00 AM to
8:00 PM, Eastern Time.
13

WARRANTY & CUSTOMER SERVICE
2. I’ve been through the troubleshooting steps. What do I do if I meet a
problem at any of these steps? Is my product covered by the
WARRANTY?
•
Grozone controllers are covered by a 3-year warranty (*). We will
replace any DAMAGED PRODUCT WITH A BRAND NEW PRODUCT.
•
Covered or not covered? We do not authorize the replacement of fully
working products nor altered (tampered) products. The Troubleshooting
steps will help you identify a damaged product. Do not hesitate to
contact us or contact your retailer to make sure the controller is not fully
working or damaged before returning it to the store.
•
My product is not fully working or damaged, I want a replacement unit:
in order to get a replacement product, you MUST return all modules
and applicable accessories to the retailer. To avoid being charged for
the accessories, be sure to include all pieces. Thanks for your
cooperation.
•
Any Grozone Control product that is returned with obvious signs of user
neglect will not be covered by the warranty. Grozone Control exercises
the right to make final decisions in these matters.
(*)
The warranty period begins from the date of purchase at the retail level. The
retailer/consumer must keep their proof of sale/purchase. Otherwise, Grozone
Control will consider the manufacturing date to apply the warranty coverage.
IMPORTANT MESSAGE TO RETAILERS
Retailers must call Grozone Control to get authorisation to replace the
defective product and a RMA number.
1-855-262-1800
14

NOTE
15


GUIDE DE L’USAGER
CY3
Séquenceur numérique
www.grozonecontrol.com

TABLE DES MATIÈRES
NOTICE DE SÉCURITÉ
FICHE DE PRODUIT
INSTALLATION & OPÉRATION
GUIDE DE DÉPANNAGE RAPIDE
GUIDE DE DÉPANNAGE COMPLET
SERVICE À LA CLIENTÈLE ET GARANTIE
3
4
5-6-7
8-9
10-11-12
13-14

NOTICE DE SÉCURITÉ
INSTRUCTIONS DE SÉCURITÉ IMPORTANTES
CONSERVEZ CES INSTRUCTIONS
DANGER
POUR RÉDUIRE LES RISQUES D'INCENDIE OU DE CHOCS ÉLECTRIQUES,
SUIVRE ATTENTIVEMENT CES INSTRUCTIONS.
Pour réduire le risque de chocs électriques, coupez le courant de la prise
de courant avant d'installer ou d'enlever l'unité. En enlevant la vis
retenant le couvercle de la prise 120V, celui-ci peut tomber sur les fiches
et les court-circuiter, ou encore la prise pourrait se déplacer.
Pour réduire le risque de chocs électriques, ce produit possède une fiche
dont la troisième broche sert à la mise à la terre. Cette fiche ne se
connecte uniquement que dans les prises possédant une mise à la terre.
Si votre prise ne possède pas cette mise à la terre, contactez un
électricien qualifié pour l'installation d'une prise appropriée. Ne modifiez
pas la fiche du produit.
3

FICHE DE PRODUIT
Fonctionnement et caractéristiques
Voltage entrant / sortant : 120V.
Ampérage de sortie : 15A pour charge à utilisation générale.
Temps ON de JOUR et de NUIT de 5 secondes à 60 minutes.
Temps OFF de JOUR et de NUIT de 1 minute à 12 heures.
Le contrôleur démarre avec le temps ON de JOUR. Lorsque l’unité détecte le
mode de NUIT, le temps OFF de NUIT est en vigueur. Lorsqu’il retourne de
JOUR, le contrôleur retombe en Temps ON de JOUR.
Spécifications électriques : Voir la plaque signalétique sur le produit.
4

INSTALLATION & OPÉRATION
AFFICHEUR
Utilisez l’échelle de gauche pour les Temps
ON (5 secondes à 60 minutes)
Utilisez l’échelle de droite pour les Temps
OFF (1 minute à 12 heures)
Photocellule
DÉTECTION JOUR / NUIT
Prise de sortie 120V
La photocellule détecte une condition de nuit suite à une absence de
lumière durant une période minimum de 8 secondes.
La photocellule détecte une condition de jour suite à la présence de
lumière durant une période minimum de 8 secondes.
DÉSACTIVATION DE L’OPÉRATION
Pour désactiver l’opération de jour (ou de nuit), ajustez à "zéro" le Temps
ON correspondant, i.e tournez le bouton dans le sens anti-horaire pour
éteindre toutes les barres lors de l’ajustement du Temps ON de jour (ou
de nuit).
LA BARRE DU BAS CLIGNOTE
La barre au bas de l’afficheur clignote durant 2 secondes à la fin du Temps
ON, et durant 30 secondes à la fin du Temps OFF.
5

INSTALLATION & OPÉRATION
Ajustement des délais
Temps ON
de nuit
Temps ON
de jour
Photocellule
Temps OFF
de jour
Temps OFF
de nuit
Cliquez pour choisir les temps et tournez
pour ajuster les valeurs de ceux-ci :
•
Temps ON de JOUR : L’indicateur « Temps ON de jour » est
allumé (ne clignote pas), tournez le bouton pour sélectionner une valeur
entre 5 secondes et 60 minutes (échelle de gauche).
•
Temps ON de NUIT : L’indicateur « Temps ON de nuit » est
allumé (ne clignote pas), tournez le bouton pour sélectionner une valeur
entre de 5 secondes et 60 minutes (échelle de gauche).
•
Temps OFF de JOUR : L’indicateur « Temps OFF de jour » est
allumé (ne clignote pas), tournez le bouton pour sélectionner une valeur
entre 1 minute et 12 heures (échelle de droite).
•
Temps OFF de NUIT : L’indicateur « Temps OFF de nuit » est
allumé (ne clignote pas), tournez le bouton pour sélectionner une valeur
entre 1 minute et 12 heures (échelle de droite).
6

INSTALLATION & OPÉRATION
Branchement de l’équipement
Branchez votre pompe ou autre équipement 120V dans la prise sur le
devant de la minuterie. La minuterie est maintenant opérationnelle.
INDICATEUR CLIGNOTANT ET DÉCOMPTE DU DÉLAI EN COURS
Un indicateur clignotant vous indique quel "temps" (parmi 4) est en cours.
Le décompte du délai (ON ou OFF) est affiché en tout temps durant
l’opération normale.
Exemple 1:
L’indicateur ON de JOUR clignote.
La barre "15" est allumée (échelle gauche).
L’afficheur indique les 15
secondes restantes.
Une condition de JOUR est détectée et le Temps ON se poursuit durant 15
secondes avant de passer au délai OFF.
Exemple 2:
L’indicateur OFF de NUIT clignote.
Les barres "30" et "40" sont allumées (échelle droite).
L’afficheur indique les
35 minutes restantes.
Une condition de NUIT est détectée et le Temps OFF se poursuit durant 35
minutes avant de passer au délai ON.
7

GUIDE DE DÉPANNAGE RAPIDE
Non
L’écran
d’affichage
haut en bas
en haut puis de
Branchez l’UNITÉ
A B
AVANT DE COMMENCER
Effectuez le test dans un endroit clair • Prévoyez une charge pour brancher dans l’UNITÉ*
•
= Étapes
de Jour
La DEL On
s’allume de bas
Oui
Produit
Défectueux
bouton 1 fois
Appuyez sur le
Jour ne
s’allume pas
La DEL On de
s’allume
8
ne change PAS
L’écran d’affichage
et ajustez le
ton dans les 2
sens pour aug-
Tournez le bou-
temps à 10 sec
menter le temps
La barre
s’allume pas
d’affichage ne
C
Produit
Défectueux
en bas
s’allume de haut
L’écran d’affichage
Produit
Défectueux
CY3
bouton 1 fois
PAS
La DEL On de
Guide de dépannage rapide
Modèle:
Nuit ne s’allume
D
Appuyez sur le
La DEL On de
Nuit s’allume

GUIDE DE DÉPANNAGE RAPIDE
On
Charge
On
Charge
J
Charge Off
l’UNITÉ
charge dans
Branchez une
tion normal
L’UNITÉ revient
en mode d’opéra-
bouton 2 fois
G H
Appuyez sur le
Jour est à 1 min
Le Temps Off de
Jour
à 1 min
Ajustez le
temps Off de
mode
L’UNITÉ ne
d’opération
revient PAS en
Attendez 1 min
I
la charge
Après 1 min,
PAS à 1 min
de Jour n’est
Le Temps Off
Off de Jour)
(UNITÉ en cycle
pour compléter
un cycle complet
Off
Produit
Masquez la
photocellule
de la main et
avec la paume
attendez 10 sec
à On
Après 10 sec, la DEL
On de Jour demeure
de Nuit est à On
Après 10 sec, la DEL Off
Défectueux
est à On
DEL On de Jour
Après 10 sec, la
10 sec
attendez
Démasquez la
K
photocellule et
demeure à On
Après 10 sec, la
DEL Off de Nuit
s’allume
Produit
Défectueux
La DEL Off de Jour
Produit
fonctionnel
bouton 1 fois
E F
Appuyer sur le
ne s’allume PAS
La DEL Off de Jour
*Vérifier préalablement que la charge fonctionne correctement.
9

GUIDE DE DÉPANNAGE COMPLET
Séquenceur numérique CY3
1 – Préparation avant le test
***IMPORTANT : LIRE ET APPLIQUER LES ÉTAPES DE PRÉPARATION
SUIVANTES AVANT DE COMMENCER LE TEST.
• NE PAS BRANCHER LEMODULE
AVANT L’ÉTAPE 1 DU TEST.
• BRANCHER UNE CHARGE (LAMPE,
POMPE) DANS LA
PRISE AVANT DU
CONTRÔLEUR.
• CONDITIONS D’ÉCLAIRAGE :
Indicateur Temps
ON de JOUR
Photocellule
ce test dans un endroit
suffisamment éclairé correspondant
Indicateur Temps
effectuer
ON de NUIT
Indicateur Temps
Appuyez pour sélec-
tionner et tournez pour
adjuster la valeur
OFF de JOUR
Indicateur Temps
OFF de NUIT
à une période de JOUR dans votre
pièce.
NOTE: assurez-vous de lire le Temps ON à gauche de la barre d’affichage
et le Temps OFF à droite.
2 – Test
ÉTAPE
1
MANIPULATIONS ET TESTS À
EFFECTUER
• Branchez le module dans une prise
de courant.
RÉSULTATS ATTENDUS
Chaque barre s’allume
individuellement de bas en
haut et de retour en bas, sitôt
que le module est branché.
L’indicateur lumineux «ON de
JOUR» CLIGNOTE.
La charge branchée dans la
prise avant du module est
ALLUMÉE.
10

GUIDE DE DÉPANNAGE COMPLET
ÉTAPE
2
3
4
MANIPULATIONS ET TESTS À
EFFECTUER
• Appuyez sur le bouton une fois
pour entrer dans le mode de
programmation des temps.
• Tournez le bouton pour ajuster le
temps ON de JOUR à 10 secondes
(2e barre du bas allumée).
• Appuyez sur le bouton une fois.
• Tournez le bouton pour ajuster le
temps ON de NUIT à 60 secondes
(6e barre du bas allumée).
• Appuyez sur le bouton une fois.
• Tournez le bouton pour ajuster le
temps OFF de JOUR à 1 minute.
(1ere barre en bas allumée).
RÉSULTATS ATTENDUS
L’indicateur lumineux «ON de
JOUR» est ALLUMÉ.
La barre du bas est ALLUMÉE.
La charge branchée dans la
prise avant du module reste
dans le même état (allumé
ou éteint) que lorsque le
bouton a été appuyé. Le
décompte du "temps" est
suspendu.
L’indicateur lumineux «ON de
NUIT» est ALLUMÉ.
La 6e barre du bas est
ALLUMÉE.
L’indicateur lumineux «OFF
de JOUR» est ALLUMÉ.
La 1ere barre à partir du bas
est ALLUMÉE.
• Appuyez sur le bouton une fois.
• Tournez le bouton pour ajuster le
5
temps OFF de NUIT à 10 minutes
(4e barre en bas allumée).
L’indicateur lumineux «OFF
de NUIT» est ALLUMÉ.
La 4e barre à partir du bas est
ALLUMÉE.
11

GUIDE DE DÉPANNAGE COMPLET
ÉTAPE
6
7
MANIPULATIONS ET TESTS À
EFFECTUER
• Appuyez sur le bouton une
fois pour retourner aux
opérations normales.
• Masquez le détecteur jour/
nuit (Light Sensor)
complètement, avec la
paume de votre main ou du
tape électrique noir (utiliser
un doigt uniquement ne
pourra couvrir la surface
suffisamment).
RÉSULTATS ATTENDUS
Les indicateurs lumineux «ON de
JOUR» ou «OFF de JOUR»
clignotent, indiquant quel
décompte est en cours.
Le module fera un cycle de 10
secondes ON et 1 minute OFF.
Assurez-vous que le module
effectue un cycle complet et
vérifiez la durée des temps pour
assurer leur exactitude.
La CHARGE doit être ALLUMÉE
lorsque l’indicateur «ON de
JOUR» ou «ON de NUIT» est
ALLUMÉ.
La barre du bas s’éteint.
Les indicateurs lumineux «ON de
JOUR» et «OFF de JOUR»
s’éteignent.
L’indicateur lumineux «OFF de
NUIT» clignote.
La 4e barre à partir du bas
s’allume.
12
• Démasquez le détecteur
8
jour/nuit (Light Sensor).
La 4e barre à partir du bas
s’éteint.
Les indicateurs lumineux «ON de
NUIT» et «OFF de NUIT» s’éteint.
L’indicateur lumineux «OFF de
JOUR» clignote.
La 2e barre du bas s’allume.

SERVICE À LA CLIENTÈLE ET GARANTIE
AVEZ-VOUS RENCONTRÉ UN PROBLÈME AVEC VOTRE CONTRÔLEUR ? SVP
LIRE CES INSTRUCTIONS AVEC ATTENTION ET CONSERVEZ-LES POUR Y
RÉFÉRER ULTÉRIEUREMENT
1. Je pense que mon contrôleur est endommagé ou encore il ne
fonctionne simplement pas comme décrit dans le manuel, que dois-je
faire ?
•
Référez-vous aux étapes de dépannage. Suivez ces instructions, étape
par étape. Le contrôleur doit fonctionner tel que décrit dans la section
“Résultat attendu” du guide de dépannage complet.
Avez-vous besoin d’assistance lors de l’exécution des étapes de
dépannage ?
1. Contactez-nous au 1-855-262-1800 ou
2. Envoyez-nous un courriel à service@grozonecontrol.com ou
3. Visitez notre Centre de Support Technique en ligne à
www.grozonecontrol.com/techsupport.html
Notre support technique est disponible du lundi au vendredi, de 8:00 à
20:00, heure de l’est.
13

SERVICE À LA CLIENTÈLE ET GARANTIE
2. J’ai suivi les étapes de dépannage, que dois-je faire si je rencontre un
problème à l’une ou l’autre des étapes ? Mon produit est-il couvert par
la garantie ?
•
Les contrôleurs Grozone Control sont couverts par une garantie de 3 ans
(*). NOUS REMPLAÇONS TOUT PRODUIT ENDOMMAGÉ PAR UN
PRODUIT NEUF.
•
Couvert ou non couvert ? Nous n’autorisons pas le remplacement de
produit entièrement fonctionnel ou modifié. Les étapes de dépannage
vous aident à identifier un produit endommagé. N’hésitez pas à joindre
votre détaillant, ou notre support technique, afin de vous assurer que le
produit est bel et bien endommagé ou encore non fonctionnel avant de
le retourner au magasin.
•
Mon produit est bien endommagé, je désire une unité de remplacement:
pour obtenir votre unité de remplacement, vous DEVEZ retourner le
produit et ses accessoires au magasin. Afin d’éviter d’être facturé pour
les accessoires manquants, assurez-vous de rapporter toutes les pièces
et tous les modules au magasin. Merci de votre collaboration.
•
Tout produit Grozone retourné après avoir été altéré, modifié ou encore
démontrant des signes évidents d’abus ou de négligence ne sera pas
couvert par la garantie, et il en revient à Grozone de prendre toutes
décisions finales à cet égard.
(*)La période de garantie débute à la date d’achat en magasin. Le
consommateur/détaillant est tenu de conserver les preuves d’achat/ventes
pour chaque produit. Sinon, Grozone appliquera le début de garantie au
moment de la date de fabrication du produit.
MESSAGE IMPORTANT AUX DÉTAILLANTS
Le détaillant doit contacter Grozone Control pour obtenir l’autorisation
d’échanger le produit défectueux et un numéro d’autorisation (RMA).
1-855-262-1800
14

NOTE
15

Rev. 4.0
www.grozonecontrol.com
 Loading...