


U.S. Patent #s: 7,210,697 & 7,441,792
Canada Patent #: 2,503,869
Other U.S. and Foreign Patents Pending
9/11
Owners
Manual
Model GW1370D-2
• Important Safety Instructions
• Assembly Instructions
• Parts and Hardware Identification
PRO SERIES
Utility Cart
For product inquiries:
Tricam
7677 Equitable Drive
Eden Prairie, MN 55344
800-867-6763
www.tricam.com
CAUTION: Read, understand and follow ALL instructions before using this product.
WARNING: Not for recreational use. Persons should never ride in the Dump Cart.
Questions, problems, or missing parts? Before returning to your retailer, visit us
online at www.tricam.com and complete the replacement parts submission form or
call our customer service department at 1-800-867-6763,
9 a.m. - 4 p.m., CST, Monday-Friday.
Replacement Parts List
For replacement parts, please visit us online at www.tricam.com to complete the replacement parts submission form or call our customer service
department at 1-800-867-6763, 9 a.m. - 4 p.m., CST, Monday - Friday.
B. Side Panels
C. Front Panel
D. Back Panel
E. Wheels
F Rear Axle Support
G. Front Axle Support
I. Handle
J. Hardware Kit
DO NOT EXCEED MAXIMUM OVERALL LOAD CAPACITY 1,200 LBS
(544 KG). PERSON SHOULD NEVER RIDE IN THE UTILITY CART.
WEIGHT RATING IS BASED ON AN EVENLY DISTRIBUTED LOAD.
CAUTION
B.
D.
C.
E.
F.
G.
B.
I.
J.
A. Bed (1)
B. Side Panels (2)
C. Front Panel (1)
D. Back Panel (1)
E. 13in (33cm) Wheels (4)
F. Rear Axle Support (1)
G. Front Axle Support (1)
H. Frame (1)
I. Handle (1)
J. Liner (1)
Parts List
A. Fence Assembly Pins (8)
B. M8 Washers (7)
C. M8 Lock Nuts (7)
D. Wheel Spacers (4)
E. M12 Washers (4)
F M12 Lock Nuts (4)
G. M6x16 Support Bolts (8)
H. M8x60 Internal Button
Head Bolt (1)
I. M8x15 Shoulder Bolts (2)
J. M6 Washers (2)
K. M6 Lock Nuts (10)
L. M8x20 Internal Button
Head Bolts (2)
M. M8x15 Internal Button
Head Bolts (4)
N. Allen Wrench
Hardware List
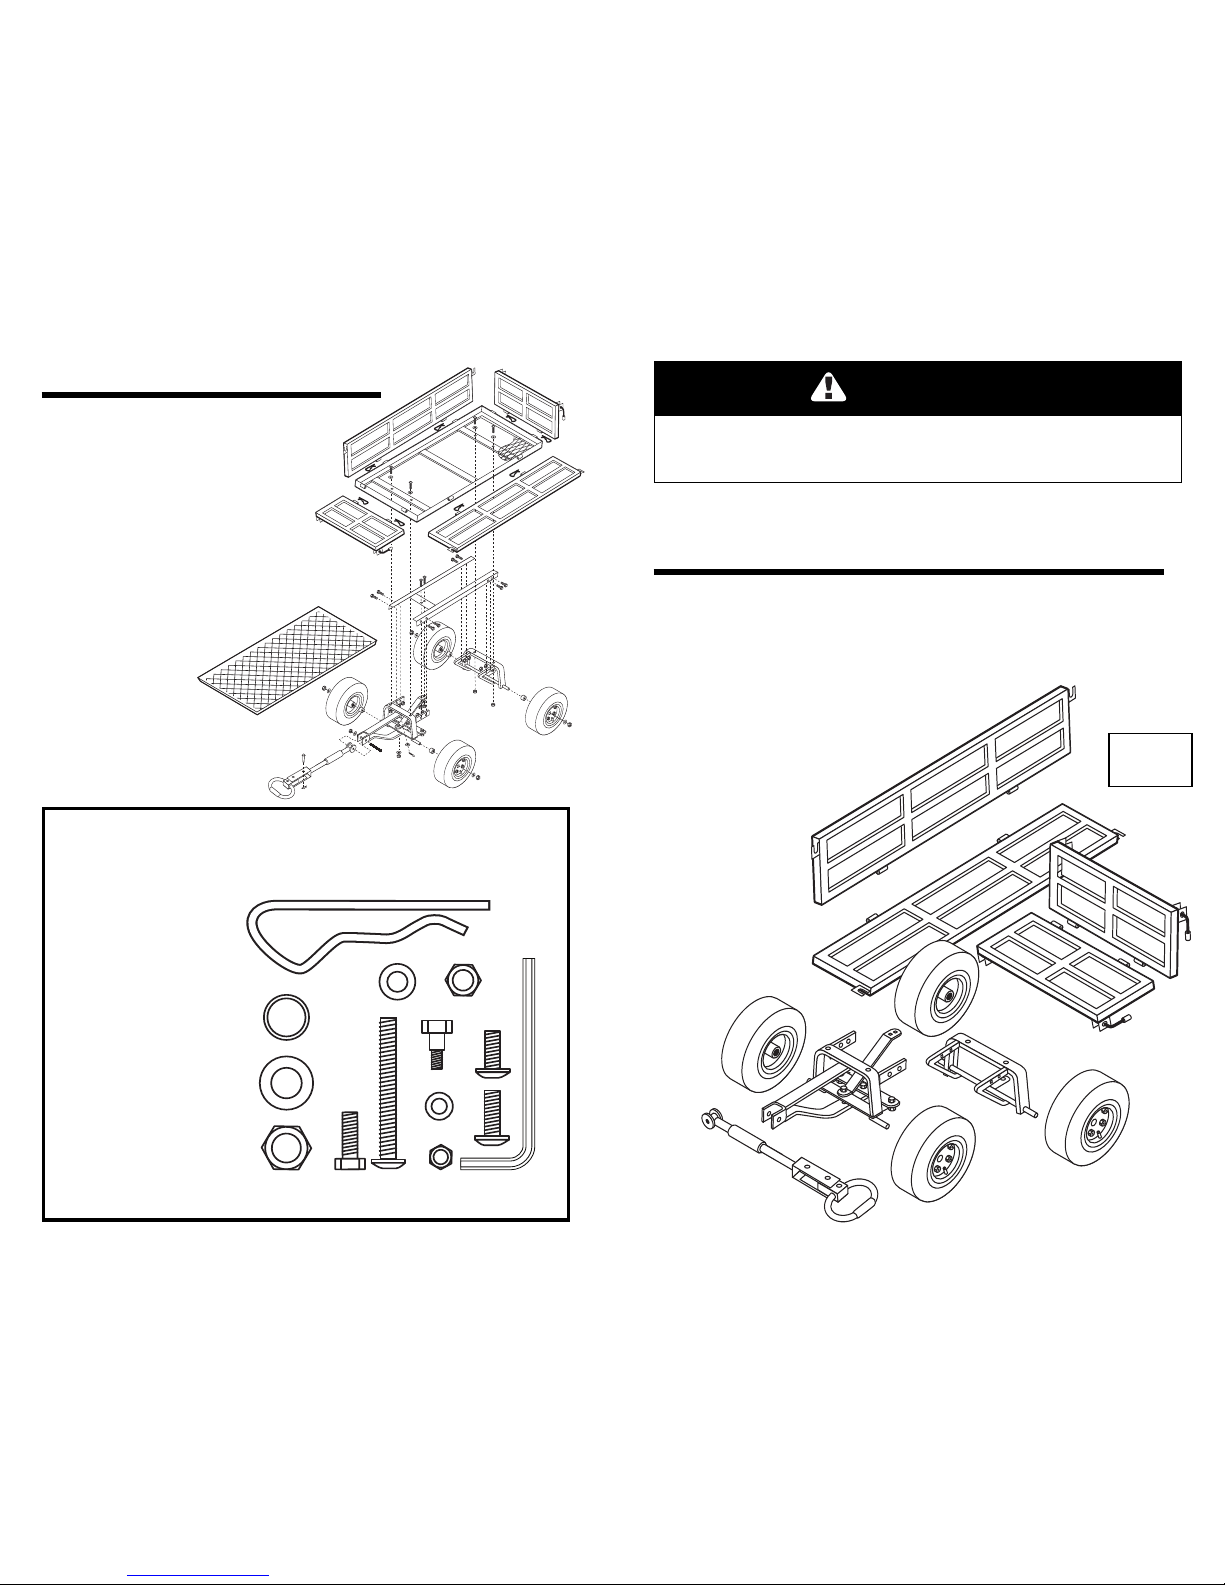
Drawings are not to scale
Exploded Drawing for Assembly
E.
G.
F.
A.
B.
D.
C.
B.
G.
H.
I.
J.
G.
H.
F.
C.
I.
J.
K.
M.
L.
E.
A.
B.
N.
D.

Swivel Handle Instructions
Step 1
Remove clips and cotter pins.
Step 2
Rotate the handle and insert cotter pin.
Secure by attaching the clip.
Step 3
The second cotter pin is used to attach the
handle to the trailer hitch.
Step 6
TThhee lloocckk hhaannddlleess aarree pprree--aasssseemmbblleedd oonnttoo tthhee ppaanneellss aatt tthhee ffaaccttoorryy..
NNOOTTEE:: DDoo nnoott ttiigghhtteenn tthhee llo
occkk nnuuttss oonn tthhee lloocckk hhaannddlleess uunnttiill tthhee eenndd ooff tthhiiss sstteepp..
Attach the front, back, and side panels (2) onto the
bed using the fence assembly pins. Latch the
front and back panels to the side panels
using the lock handles. Once all panels
are locked together in the upright
position, tighten the M8 lock
nuts on the lock
handles for smooth
operation without
being overly tight.
Step 7
Install the liner into the bottom
of the base.
1.
RREEAADD AALLLL IINNSSTTRRUUCCTTIIOONNSS CCAARREEFFUULLLLYY BBEEFFOORREE UUSSEE..
If you do not understand these
instructions, need clarification or further explanation, please call our toll free
answer line for assistance at
11--880000--886677--66776633
Monday through Friday 9:00 a.m. - 4:00 p.m., CST.
2. Do not exceed the overall maximum load capacity of 1,200 lbs (544 kg). The weight
rating is based on an evenly distributed load.
3. Do not load items on the top edges of the panels. Remove panels before loading
oversized items.
4. Do not allow children to use this cart without supervision. This cart is not a toy.
5. Do not use this cart to transport passengers.
6. This cart is not intended for highway use.
7. Do not exceed 5 mph.
8. If any parts become damaged, broken or misplaced, do not use the cart until
replacement parts have been obtained.
9. Do not use the cart on surfaces or for transporting objects that can cause damage
to the pneumatic tires or tubes.
DDoo nnoott iinnffllaattee tthhee ttiirreess t
too mmoorree tthhaann 3300 PPSSII ((22..0077 BBAARR))..
10. It is recommended that the cart be inspected for damage before each use.
11.
KKEEEEPP TTHHEESSEE IINNSSTTRRUUCCTTIIOONNSS FFOORR FFUURRTTHHEERR RREEFFEERREENNCCEE..
Your cart requires assembly. Account for all parts before beginning assembly. If any
parts are missing, damaged, or if you have any questions or need additional instructions,
DO NOT RETURN THIS PRODUCT TO THE RETAILER, visit us at www.tricam.com to
complete the replacement parts submission form or call our customer service
department at 1-800-867-6763.
Tools required for assembly: medium size slot screwdriver, wrenches and/or socket set.
TOOLS NOT INCLUDED.
Important Safety Instructions
Assembly Instructions
Step 1
Assemble the rear axle support
to the frame support using M6x16
support bolts (4) and M6 lock
nuts (4). Tighten all bolts and lock
nuts securely.
NOTE: During each step of assembly, assemble all hardware and
hand tighten. Once all the hardware is installed for that
particular step, tighten all hardware.

Step 4
Assemble the wheels by first placing the
wheel spacers (4) onto each axle, then
placing the wheels (4) onto each axle and
finally placing the M12 washers (4) and the
M12 lock nuts (4). Tighten nuts securely.
Step 3
Attach the frame support to the bed using M8x15
internal button head bolts (4), M8 washers (4),
and M8 lock nuts (4). Tighten securely.
Step 2
TThhee ffrroonntt aaxxllee ssuuppppoorrtt iiss mmoossttllyy
pprree--aasssseemmbblleedd aatt tthhee ffaaccttoorryy.. PPlleeaassee mmaakkee
ssuurree tthhaatt aallll ooff t
thhee bboollttss aanndd lloocckk nnuuttss
aasssseemmbblleedd aatt tthhee ffaaccttoorryy aarree ttiigghhtt..
A. Insert M8x15 shoulder bolts (2) into each
end of the steering link connector. Apply
M6 washers (2) and M6 lock nuts (2) and
tighten securely.
B. Attach the front axle support to the
frame support using M6x16 support bolts
(4) and M6 lock nuts (4).
C. Secure the center front axle brace to the
frame support using M8x20 internal
button head bolts (2), M8 washers (2)
and M8 lock nuts (2).
Step 5
Attach the swivel handle to the yoke and the plastic coupling using the M8x60 bolt (1),
M8 washer (1), and M8 lock nut (1).
 Loading...