

Ground Work GW1371D Owner's Manual
U.S. Patents: 7,210,697 & 7,441,792
Canada Patent: 2,503,869
Other U.S. and Foreign Patents Pending
Owners
Manual
Model GW1371D
• Important Safety Instructions
• Assembly Instructions
• Parts and Hardware Identification
PRO SERIES
Utility Cart
For product inquiries:
Tricam
7677 Equitable Drive
Eden Prairie, MN 55344
800-867-6763
www.tricam.com
CAUTION: Read, understand and follow ALL instructions before using this product.
WARNING: Not for recreational use. Persons should never ride in the Cart.
Questions, problems, or missing parts? Before returning to your retailer, visit us
online at www.tricam.com and complete the replacement parts submission form or
call our customer service department at 1-800-867-6763,
9 a.m. - 4 p.m., CST, Monday-Friday.
10/12
Patentes de los EE. UU. 7,210,697 y 7,441,792
Patente de Canadá: 2,503,869
Otras Patentes de EE. UU. o Extranjeras Pendientes
Manual del
Propietario
Modelo GW1371D
• Instrucciones Importantes de Seguridad
• Instrucciones de Ensamblaje
• Información de Piezas y Herrajes
SERIE PRO
Carrito Multiuso
Preguntas sobre el producto:
Tricam
7677 Equitable Drive
Eden Prairie, MN 55344
800-867-6763
www.tricam.com
PRECAUCIÓN: Leer, entender y seguir TODAS las instrucciones antes de usar este producto.
ADVERTENCIA: No usar para fines recreativos. Las personas nunca deben montarse en el carrito.
¿Preguntas, problemas o piezas faltantes? Antes de devolverlo al minorista, visí-
tanos en Internet en www.tricam.com y completa nuestro formulario de piezas de
repuesto o llama a nuestro departamento de servicio al cliente al 1-800-867-6763, de
9 a.m. a 4 p.m., Hora Estándar del Centro, de Lunes a Viernes.
10/12
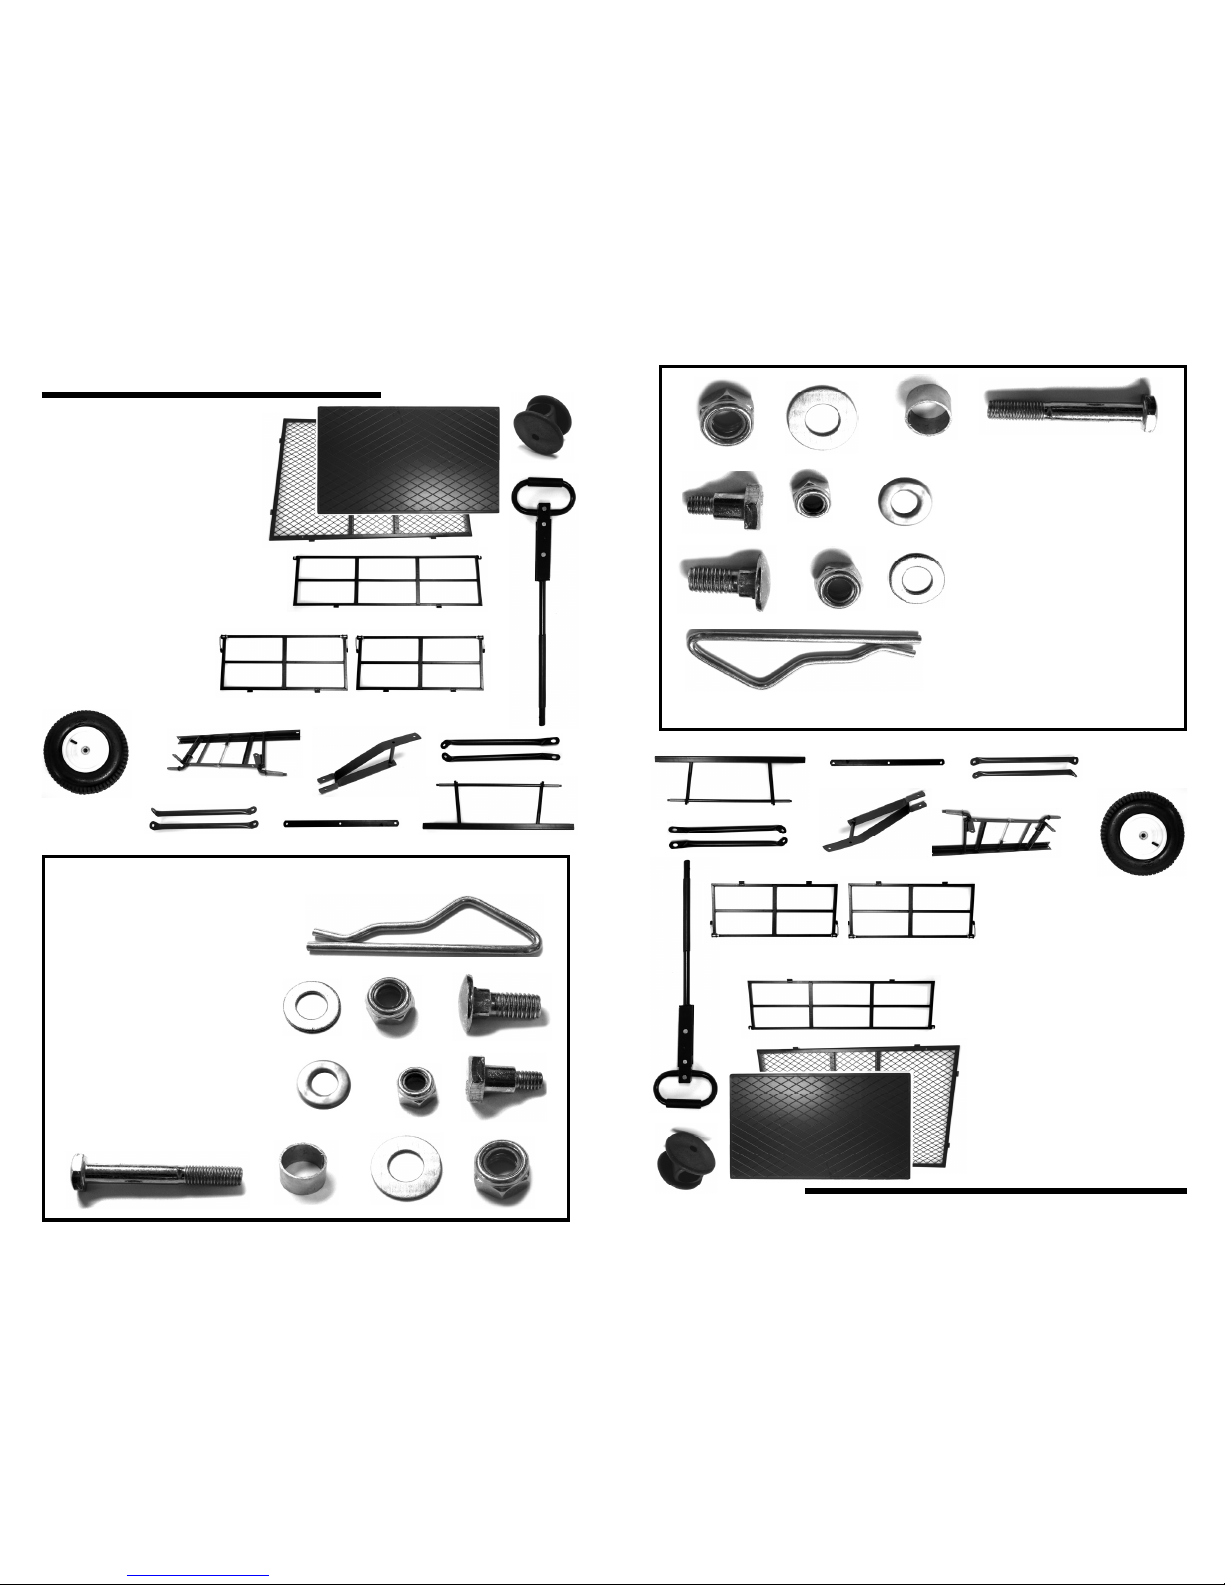
Parts List
A. Fence Assembly Pins (8)
B. M8 Washers (11)
C. M8 Lock Nuts (11)
D. M8x20 Carriage Bolts (10)
E. M6 Washers (3)
F M6 Lock Nuts (3)
G. M6x17 Shoulder Bolts (3)
H. M8x60 Hex Bolt (1)
I. Wheel Spacers (4)
J. M12 Washers (4)
K. M12 Lock Nuts (4)
Hardware List
Drawings are not to scale
Exploded Drawing for Assembly
A.
B.
D.
E.
F.
H.
I.
M.
A. Bed (1)
B. Side Panels (2)
C. Front Panel (1)
D. Back Panel (1)
E. 13in (33cm) Wheels (4)
F. Front Axle Sub-Assembly (1)
G. Yoke (1)
H. Front Struts (2)
I. Front Axle Connection Bar (1)
J. Rear Axle Sub-Assembly (1)
K. Rear Struts (2)
L. Handle (1)
M. Liner (1)
N. Handle Connector (1)
C.
G.
N.
A.
J.
D.
C.
E.
I.
B.
F.
H.
K.
K.
J.
L.
Lista de Piezas
A. Pasadores de Ensamblaje del
Protector (8)
B. Arandelas M8 (11)
C. Contratuercas M8 (11)
D. Pernos de Carro M8x20 (10)
E. Arandelas M6 (3)
F. Contratuercas M6 (3)
G. Pernos de Hombro M6x17 (3)
H. Perno Hexagonal M8x60 (1)
I. Espaciadores de Ruedas (4)
J. Arandelas M12 (4)
K. Contratuercas M12 (4)
Lista de Herrajes
Las imágenes no están a escala
Diagrama de Despiece para el Ensamblaje
A.
B.
D.
E.
F.
H.
I.
M.
A. Cama (1)
B. Paneles Laterales (2)
C. Panel Frontal (1)
D. Panel Posterior (1)
E. Ruedas de 33 cm (4)
F. Sub-Ensamblaje del
Eje Delantero (1)
G. Horquilla (1)
H. Amortiguadores Delanteros (2)
I. Barra de Conexión del Eje
Delantero (1)
J. Sub-Ensamblaje del Eje Trasero (1)
K. Amortiguadores Traseros (2)
L. Mango (1)
M. Bandeja de Plástico
N. Conectores del Mango (1)
C.
G.
N.
A.
J.
D.
C.
E.
I.
B.
F.
H.
K.
K.
J.
L.
G.
G.
1.
RREEAADD AALLLL IINNSSTTRRUUCCTTIIOONNSS CCAARREEFFUULLLLYY BBEEFFOORREE UUSSEE..
If you do not understand these
instructions, need clarification or further explanation, please call our toll free
answer line for assistance at
11--880000--886677--66776633
Monday through Friday 9:00 a.m. - 4:00 p.m., CST.
2. Do not exceed the overall maximum load capacity of 1,200 lbs (544 kg). The weight
rating is based on an evenly distributed load.
3. Do not load items on the top edges of the panels. Remove panels before loading
oversized items.
4. Do not allow children to use this cart without supervision. This cart is not a toy.
5. Do not use this cart to transport passengers.
6. This cart is not intended for highway use.
7. Do not exceed 5 mph.
8. If any parts become damaged, broken or misplaced, do not use the cart until
replacement parts have been obtained.
9. Do not use the cart on surfaces or for transporting objects that can cause damage
to the pneumatic tires or tubes.
DDoo nnoott iinnffllaattee tthhee ttiirreess ttoo mmoorree tthhaann 3322 PPSSII ((22..2200 BBAARR))..
10. It is recommended that the cart be inspected for damage before each use.
11.
KKEEEEPP TTHHEESSEE IINNSSTTRRUUCCTTIIOONNSS FFOORR FFUURRTTHHEERR RREEFFEERREENNCCEE..
Your cart requires assembly. Account for all parts before beginning assembly. If any
parts are missing, damaged, or if you have any questions or need additional instructions,
DO NOT RETURN THIS PRODUCT TO THE RETAILER, visit us at www.tricam.com to
complete the replacement parts submission form or call our customer service
department at 1-800-867-6763.
Tools required for assembly: pliers, adjustable wrenches and/or metric socket set.
For ease of assembly, refer to the parts list during assembly.
Important Safety Instructions
Assembly Instructions
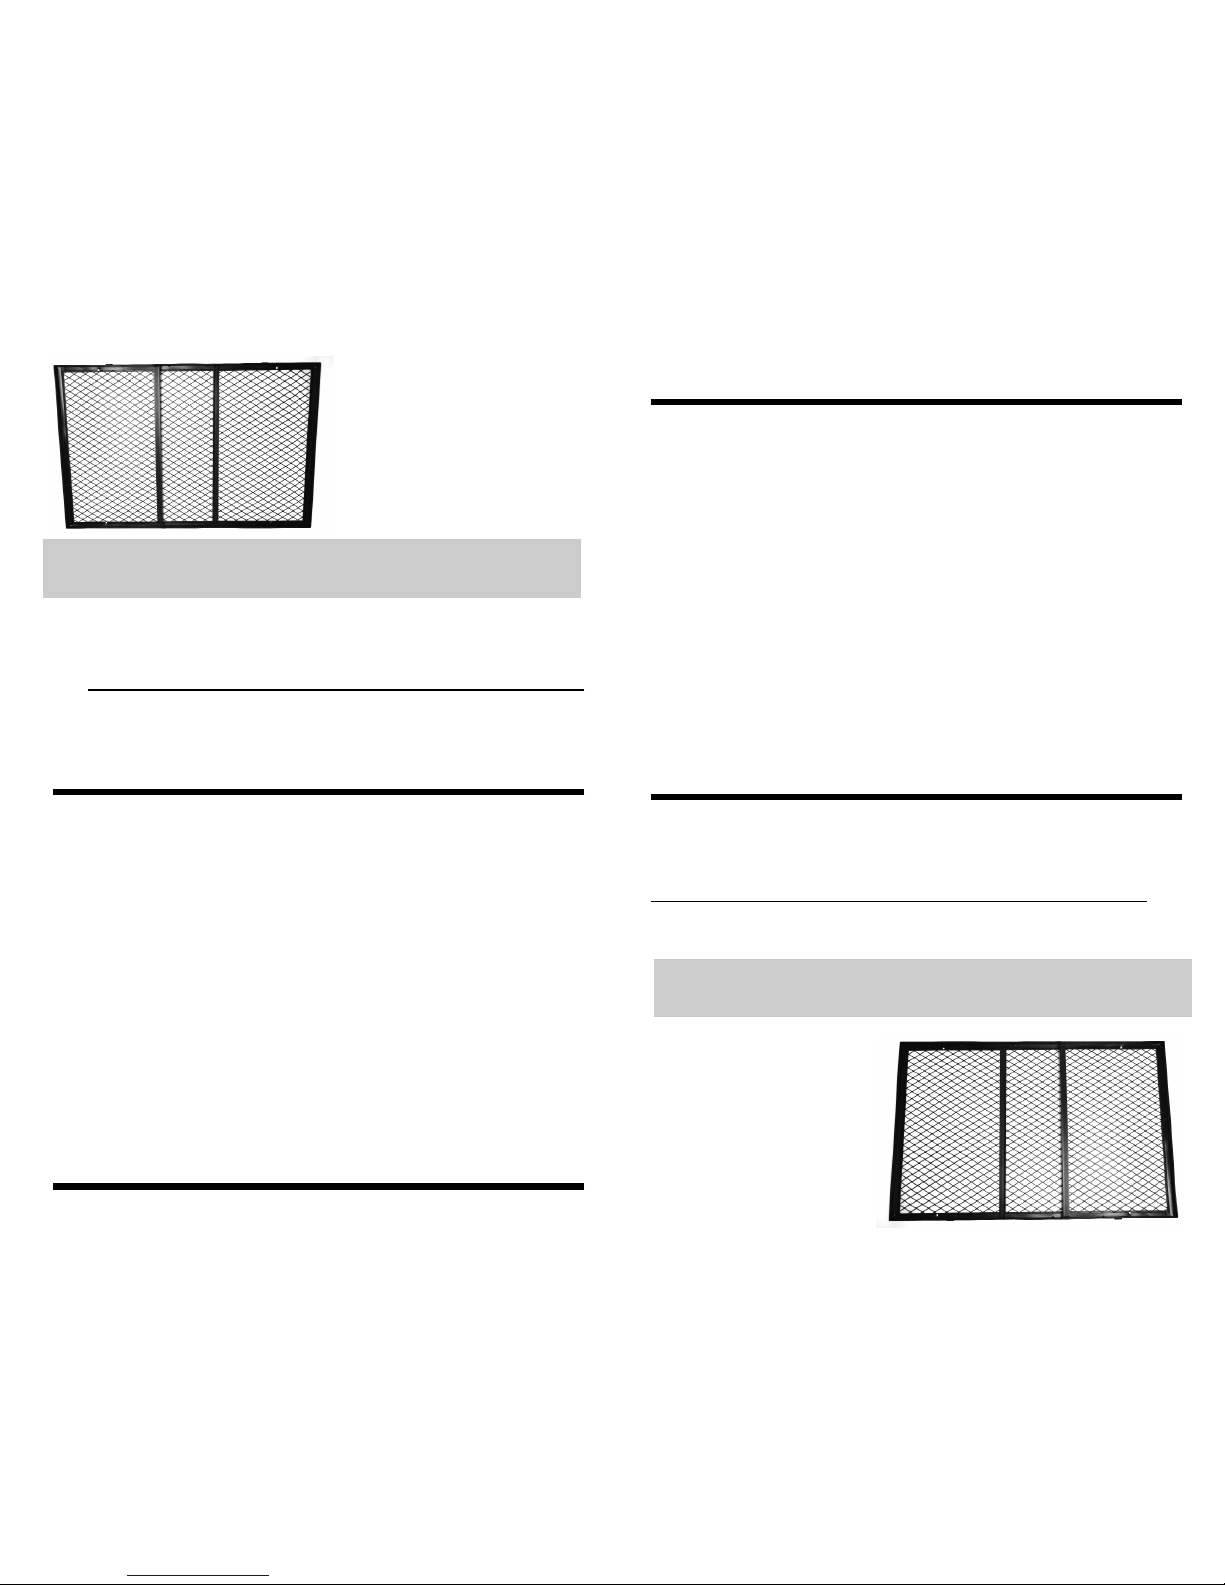
Step 1
Turn the cart bed upside down.
Use the cardboard from the
carton to keep from scratching or
damaging the finish.
NOTE: During each step of assembly, assemble all hardware and
hand tighten. Once all the hardware is installed for that
particular step, tighten all hardware.
1. LEE CON CUIDADO TODAS LAS INSTRUCCIONES ANTES DE USAR. Si no entien-
des estas instrucciones, o necesitan ser aclaradas o explicadas aún más, por favor, llama a
nuestra línea de asistencia gratuita al 1-800-867-6763, de Lunes a Viernes, de 9:00 a.m. a 4:00
p.m., Hora Estándar del Centro.
2. No sobrepases el límite máximo de carga total de 1,200 lbs (544 kg). La capacidad de peso
nominal está basada en una carga distribuida de manera uniforme.
3. No cargar artículos en los bordes superiores de los paneles. Quitar los paneles antes de car-
gar artículos grandes.
4. No permitas que los niños usen este carrito sin supervisión. Este carrito no es un juguete.
5. No lo uses para transportar pasajeros.
6. Este carrito no está diseñado para el tránsito por autopistas.
7. No sobrepases las 5 mph.
8. Si alguna de las piezas se daña, rompe o pierde; no usar el carrito hasta obtener la pieza de
repuesto.
9. No usar el carrito sobre superficies o para transportar objetos que puedan causar daños a los
neumáticos o la cámara. No infles los neumáticos a más de 32 PSI (2.20 BAR).
10. Se recomienda revisar el carrito antes de cada uso para detectar cualquier
daño.11.GUARDAESTAS INSTRUCCIONES PARAFUTURAS CONSULTAS.
El carrito necesita ensamblarse. Antes de empezar el ensamblaje, revisa si están todas
las piezas y herrajes. Si falta alguna pieza o si tienes preguntas o necesitas
instrucciones adicionales, NO DEVUELVAS ESTE PRODUCTO AL MINORISTA, visítanos
en Internet en www.tricam.com para llenar el formulario de piezas de repuesto o llama a
nuestro departamento del servicio del cliente al 1-800-867-6763.
Herramientas necesarias para el ensamblaje: alicate, llaves ajustables y/o juego de dados
métricos
Para facilitar el ensamblaje, consulta la lista de las partes mientras ensamblas.
Instrucciones de Seguridad Importantes
Instrucciones de Ensamblaje
Paso 1
Voltea la cama del carrito boca
abajo. Usa la caja de cartón para
evitar rayar o dañar el acabado.
NOTA: Durante cada paso del ensamblaje, ensambla todos los herra-
jes y ajústalos con la mano. Una vez que los herrajes estén instalados
para cada paso en particular, ajústalos todos.
 Loading...