

Page 1

DIGITAL METAL
5baksov.com.ua
DETECTOR
602 Fountain Parkway
Grand Prairie, TX 75050
800.847.8269
“Ground EFX” and “Stryker Lite” are TM trademarks of WGI Innovations, LTD.
“Sport Responsible” is a TM trademark of WGI Innovations, LTD.
User’s Manual
Model # MX400
Page 2

Table of Contents
Terms ……………………………… 3-4
Contents ……………………….… 5-6
Assembly ………………………… 7-10
Category Value ……………………… 11
Tech LCD Display…………………… 12
How it Works . . . .…………………… 13
Tech Display . . . . . ………………… 14-26
Tech: Shortcuts ………………… 27-28
Traditional LCD Display …………… 29
Traditional Display ……………… 30-32
Detector Modes ………………… 33-34
How to Detect ………………… 35-36
Courtesy …………………………… 37
Tips ………………………………… 38
Warning …………………………… 39
Audio Features ……………………… 40
Tone Recognition …………………… 41
Trouble Shooting …………………… 42
Warranty/Services ………………… 43
FCC Statement ……………………… 44
2
Page 3

TERMS TO KNOW
5baksov.com.ua
The terms below are standard words found within this manual and the
detector.
DISCRIMINATION
Discriminating allows you to choose the metals you want to detect and
the ones you want to “eliminate” or not look for. Discrimination makes it
easier to avoid trash or other undesirable objects. Once it detects a metal
it will categorize it to one of the metals you chose to detect for.
IRON
Iron is the most common metal used. It has been used since ancient times
because of how abundant it is. Ferrous metals are made up of iron. Objects that are ferrous metals are; nails, bolts, stainless steel and cast iron.
PINPOINT
A narrow detection that tells you the exact location of the object that
is buried.
PULL-TABS
Also known as “pop tops.” Discarded pull-tabs come from beverage cans.
They can be all dierent shapes and sizes. They are primarily made of aluminum, which can be bothersome to many treasure hunters.
GROUND GRAB
All soils contain minerals. Signals from ground minerals interfere with the
signals from metal objects. If metal is detected in this mode it will make
a sound. It doesn’t detect any of earth’s natural minerals so you can get a
more accurate reading on what you nd.
TWO DIGIT IDENTIFIER
The two digit number identies the buried obect with a specic number
to give you a more accurate idea of what you have found. With each pass
over the object, the distance between the object and the coil, and the
angle of the coil can change the two digit number.
3 4
Page 4
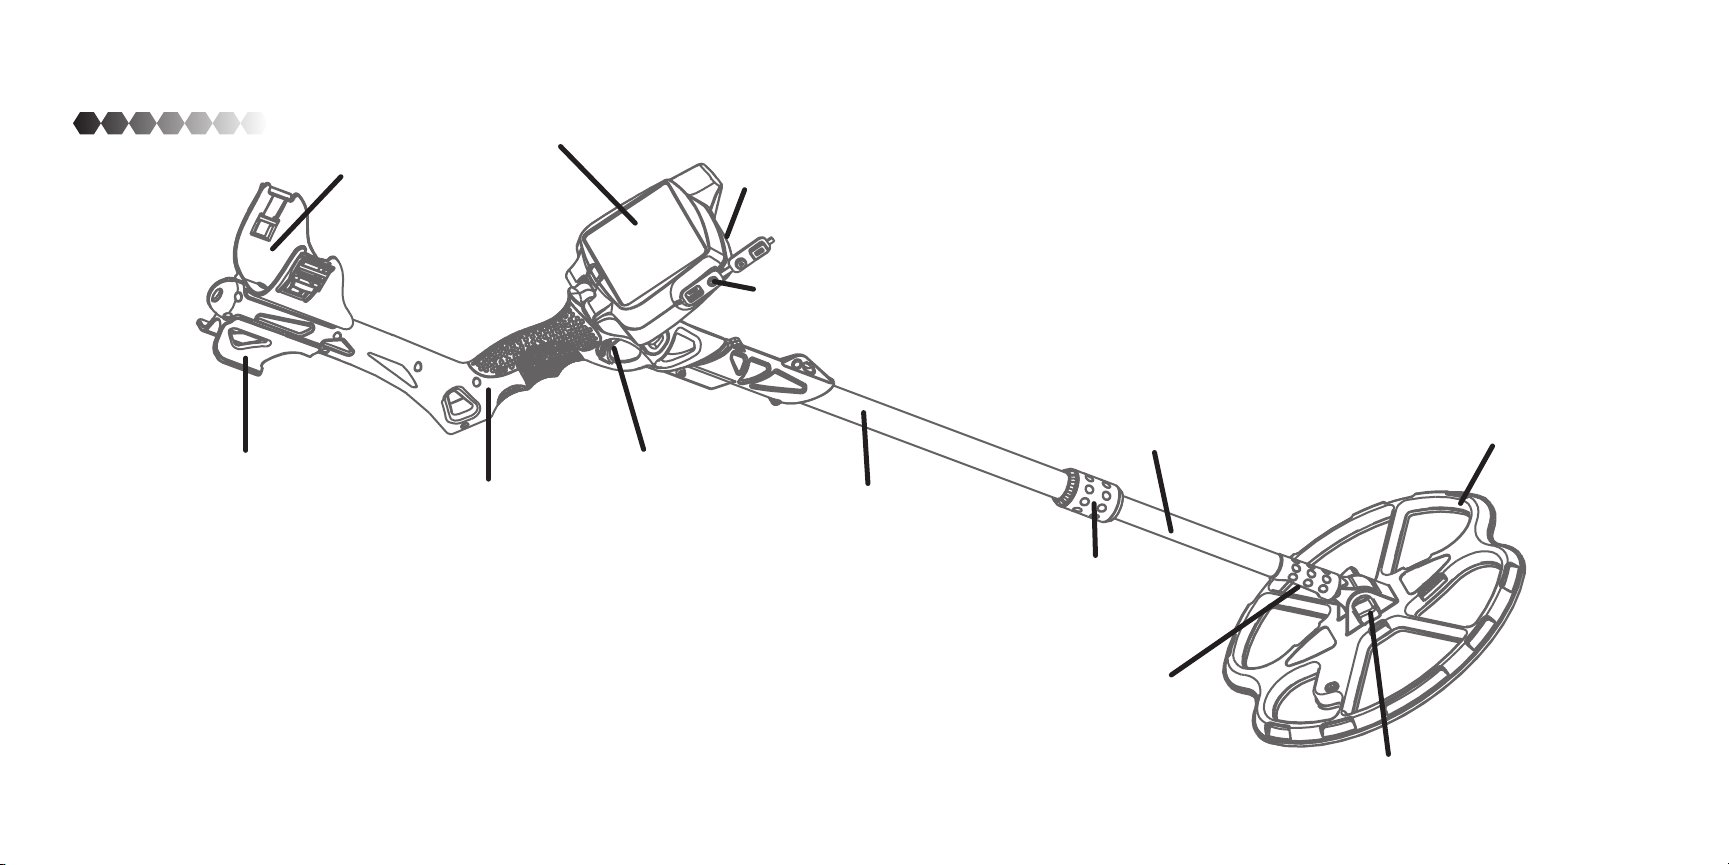
CONTENTS
LCD Display
Stand
Arm cu
with strap
Handle
Unit
Battery
Compartment
Headphone Jack
Pinpoint
Trigger
Top Rod
Bottom Rod
Lock Bracket
Wire
Coil
Bracket
5 6
Page 5
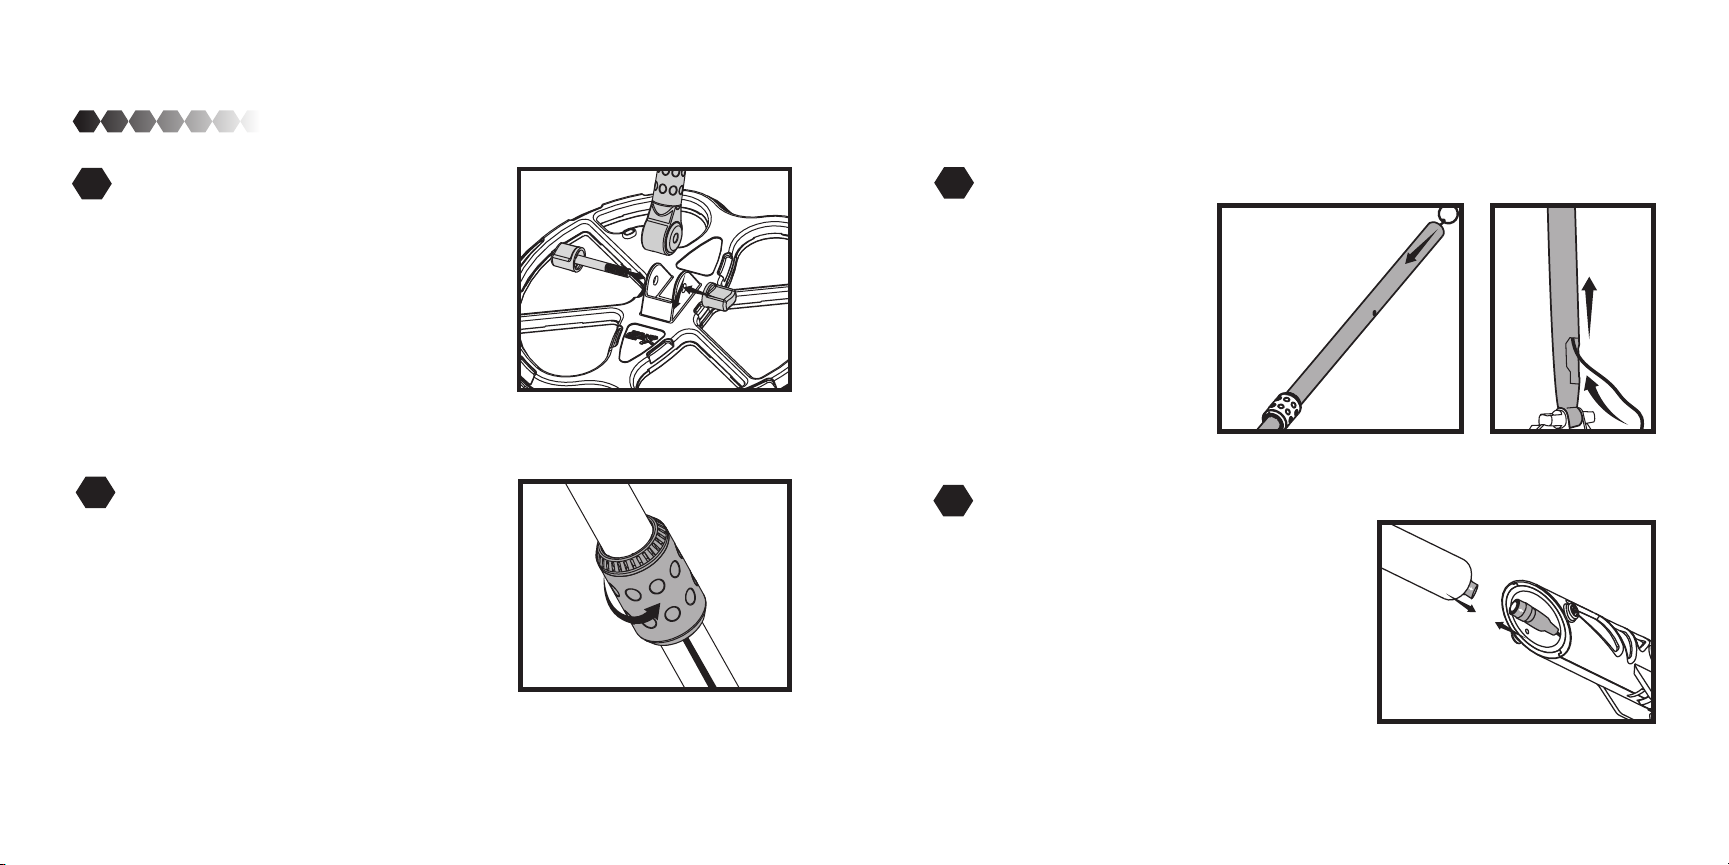
ASSEMBLY
1
Assembling the coil unit
Unscrew the bracket from the bottom rod.
Fit the bottom rod inside the coil and replace the bracket. Then tighten but do not
over tighten. NOTE: The large hole faces
down. This is where the cable will enter the
rod.
2
Connect The Rods
Connect the Top Rod to the Bottom Rod
by sliding the Top Rod with the Locking
Bracket end down. Note: The groove on the
Top Rod needs to face away from you. Align
grooves to one another to ensure rods stay
in place.
Slide the Top Rod to the desired length and
tighten the Locking Bracket by turning it to the Left.
3
Connecting the Wiring
Take the Cable Pull and
place it down the Rods.
Screw the end of the Cable
Pull to the end of the wire.
Place the connector in the
opening. Then pull the
hoop at the top to pull the
cable through the rods.
4
Connecting the Handle Unit
Disconnect the Cable Pull and connect the
wire head to the handles cable. Be careful
to align the white indicator arrow on the
wire head with the alignment arrow on the
handle units cable head to ensure proper
connection.
NOTE: Screw the silver piece to ensure the
cable is locked in place.
7 8
Page 6
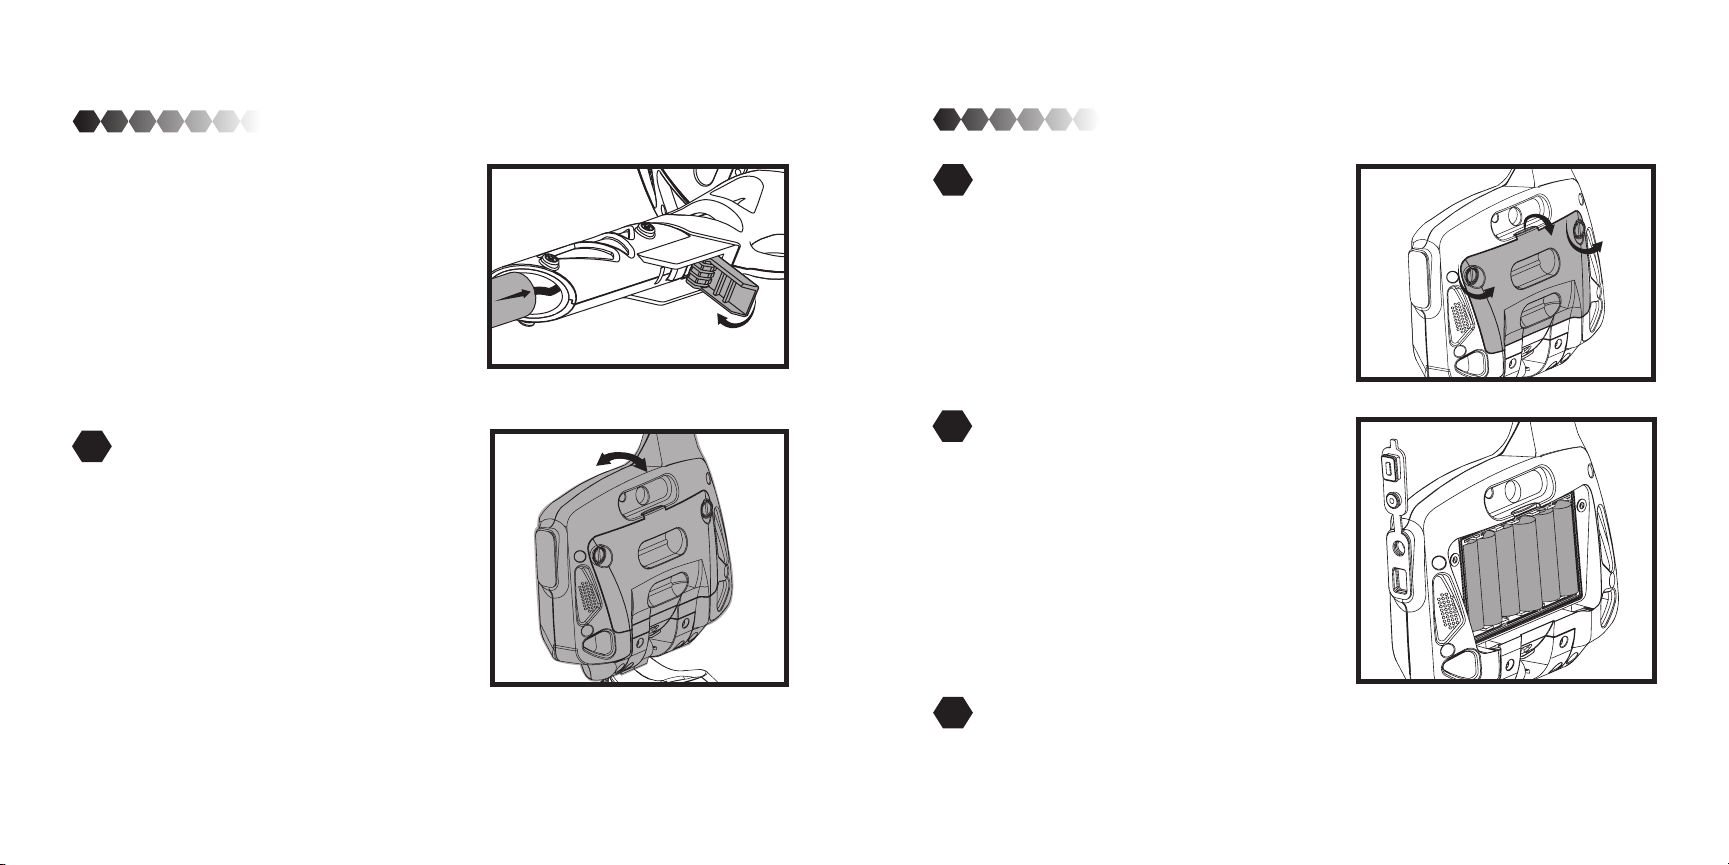
ASSEMBLY
Batteries
After the wire is locked in place, check
the handle unit to ensure the latch is in
unlocked. Then place the rod all the way
back into the handle unit and pull the
latch to lock the rod into place. Make
sure everything is secured into place
before use.
5
Adjusting the display
To adjust the display, tilt the display forward or back to your desired placement.
It should stay throughout use. The display may need additional adjustment in
very bright or very dark environments.
To open the Battery Compartment
1
door, unscrew the the two screws. Pull
the door towards you and up to take the
door o.
Insert 6 AA batteries according to the
2
markings within the compartment. Caution: Never mix old and new batteries. Never mix alkaline, carbon-zinc or rechargeable batteries.
Place the battery compartment back and
3
screw in the screws.
-
+
-
+
-
+
+
-
+
-
+
-
9 10
Page 7
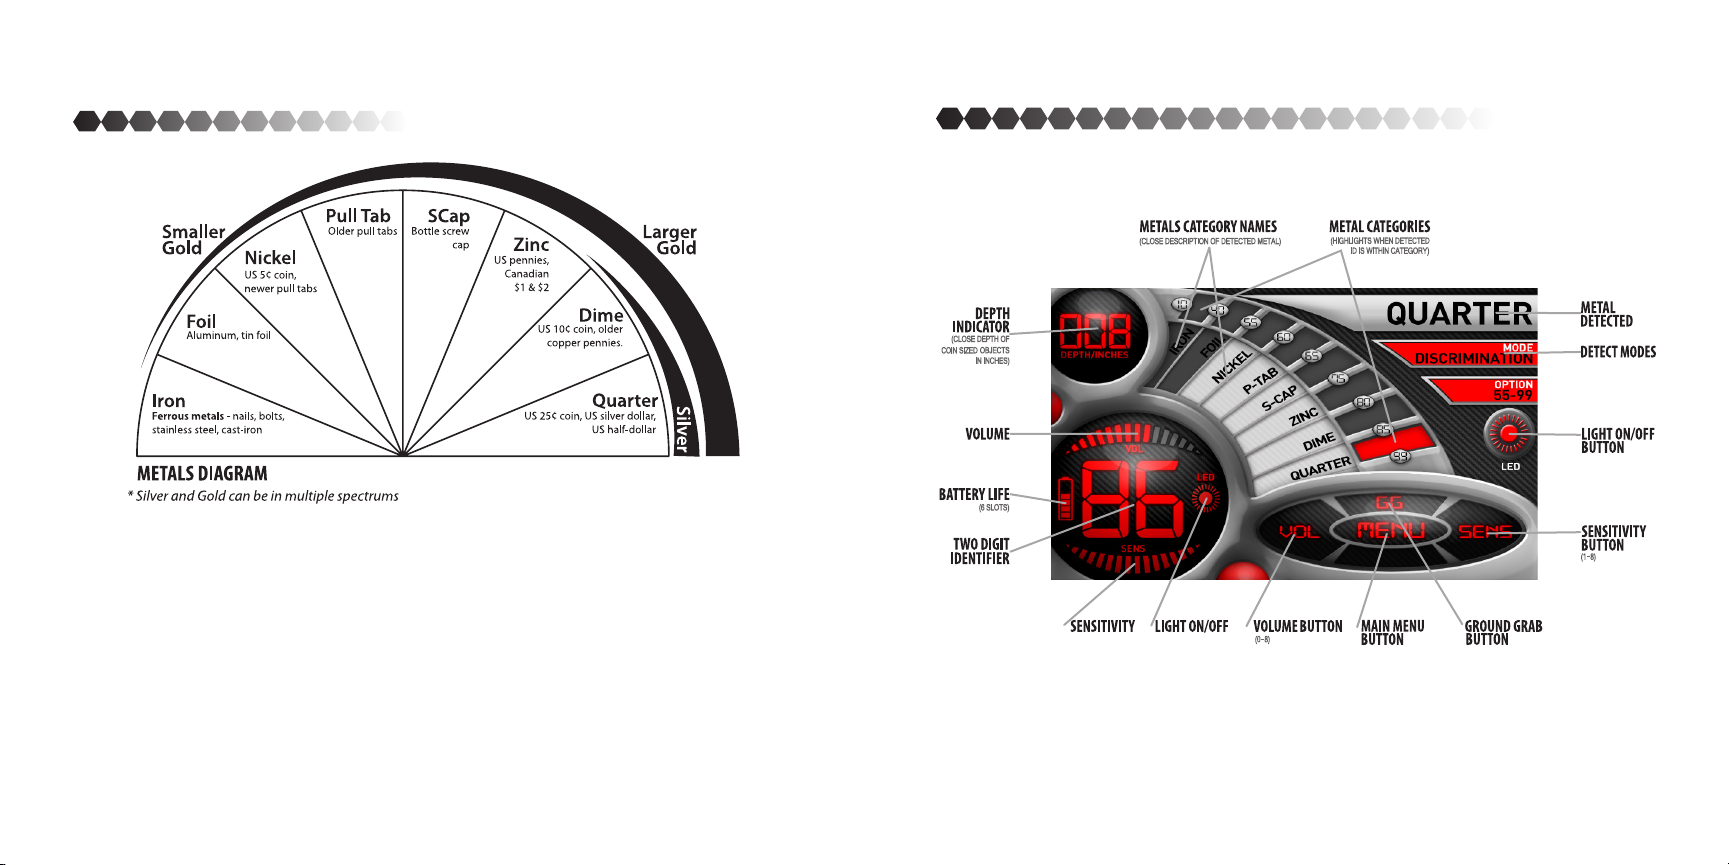
CATEGORY VALUE
TECH LCD NAVIGATION DISPLAY
60-64
55-59
40-54
10-39
The Category Value accurately provides specic categories to help identify a
buried object. Coins will most likely have a similar value with each pass with the
coil due to their round shape. Gold and silver can actually be detected in various
category values due to their metallic qualities. Smaller gold or silver objects will
have a dierent value than larger gold or silver objects. Trash objects can give
o a dierent value each time you pass over it. The angle of the detector can
aect the identication of an object as well. If you decide to test the detector
by waving a coin over the coil, wave it with the at side parallel to the coil; this
position is how you will nd most buried coins.
65-74
75-79
80-84
85-99
11 12
Page 8
HOW IT WORKS
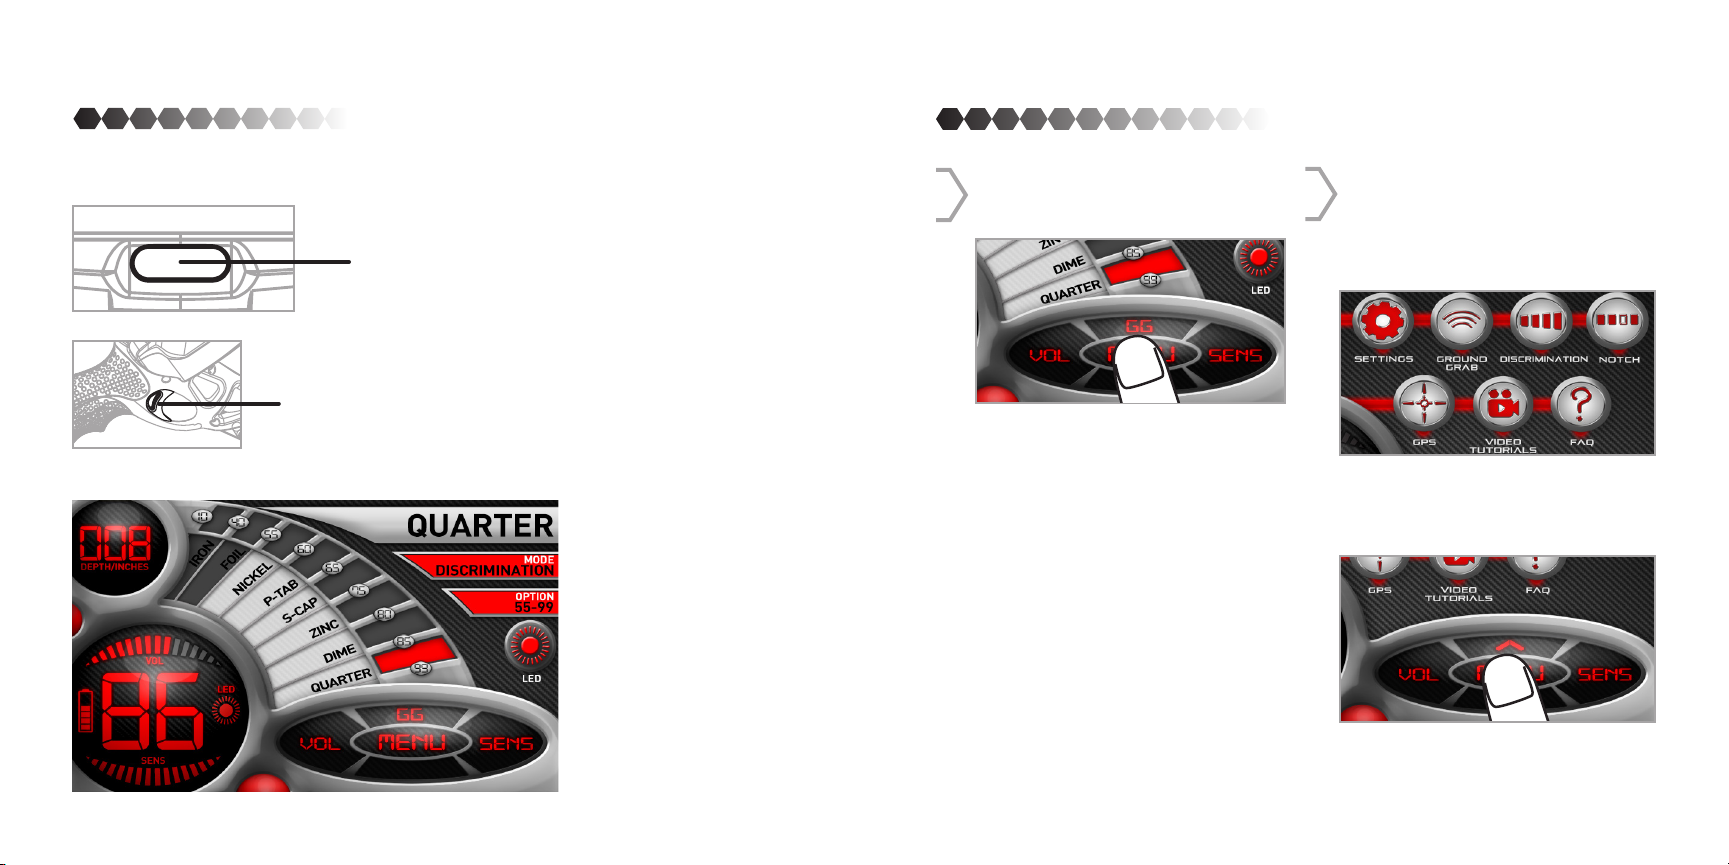
TECH: MAIN MENU
To turn on press and hold the Power Button for 5 seconds.
POWER Button
PINPOINT
Trigger
Once on it will begin detecting in Discimination Mode.
To enter the Main Menu page
1
press the MENU button.
From here you can change set-
2
tings, start Ground Grab, Discrimination, Notch, GPS, watch Video
Tutorials and read FAQ’S.
To go back to detecting in the settings already made press Menu
again.
13 14
Page 9
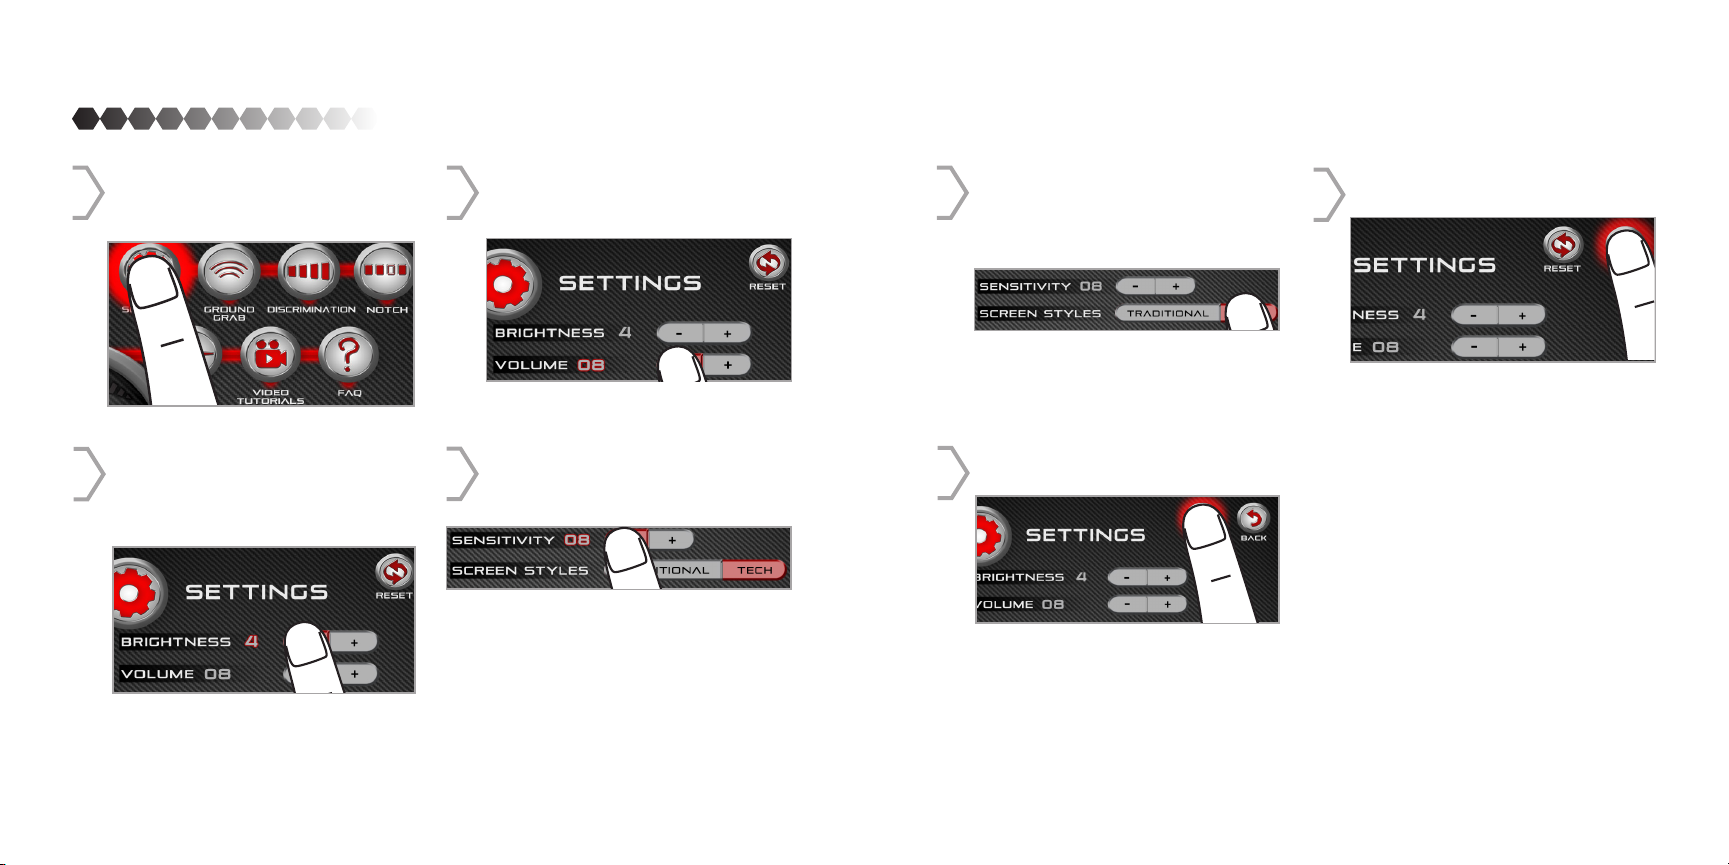
TECH: SETTINGS
Press the SETTINGS button to
1
change the settings.
To change the brightness of the
2
screen press the minus (-) or plus
(+) sign button.
To change the volume press the
3
minus (-) or plus (+) sign button.
To change the sensitivity of the
4
coil press the minus (-) or the plus
(+) sign button.
There are two choices for the
5
screen style; Traditional and Tech.
Press the button of the style you
want to use.
The RESET button will reset all the
6
settings back to default.
To return to the Main Menu press
7
the BACK button.
15 16
Page 10
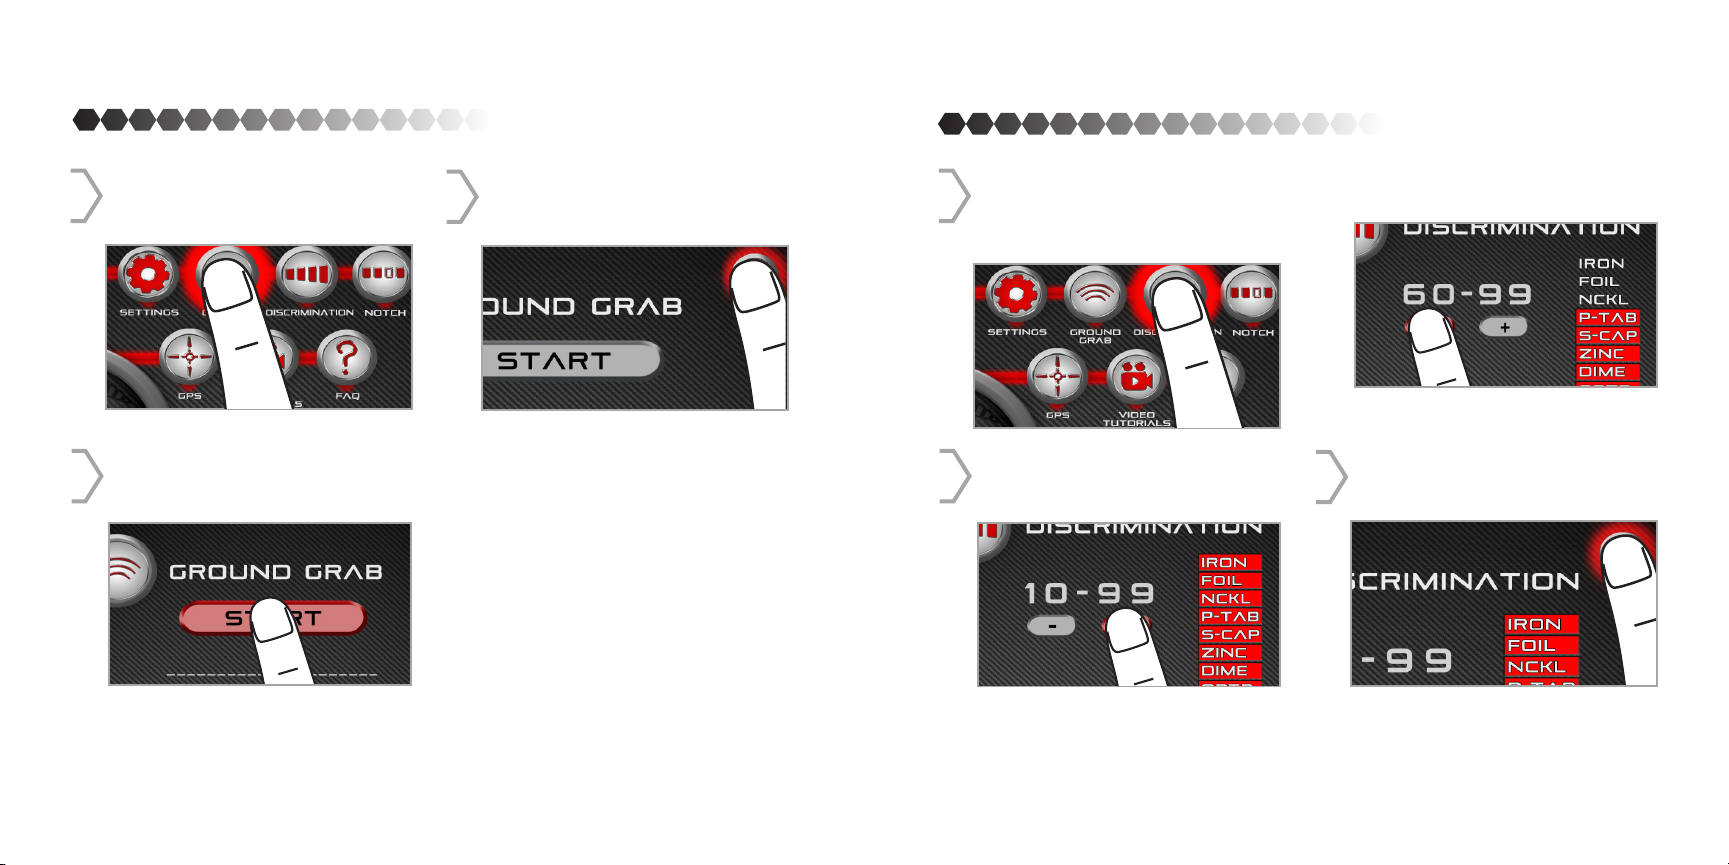
TECH: GROUND GRAB
TECH: DISCRIMINATION
Press the GROUND GRAB button
1
to enter ground grab menu.
Press START to begin ground
2
grab.
When it is nished Grabbing you will either see GRABBING OK or ERROR.
Press the BACK button to go back
3
to the main menu.
Press the DISCRIMINATION but-
1
ton to eliminate metals from detection.
To eliminate a metal press the
2
plus (+) sign button.
NOTE: Metals black out when they are eliminated.
To add a metal press the minus (-)
sign button.
Press the BACK button when you
4
are nished to start detecting.
17 18
Page 11
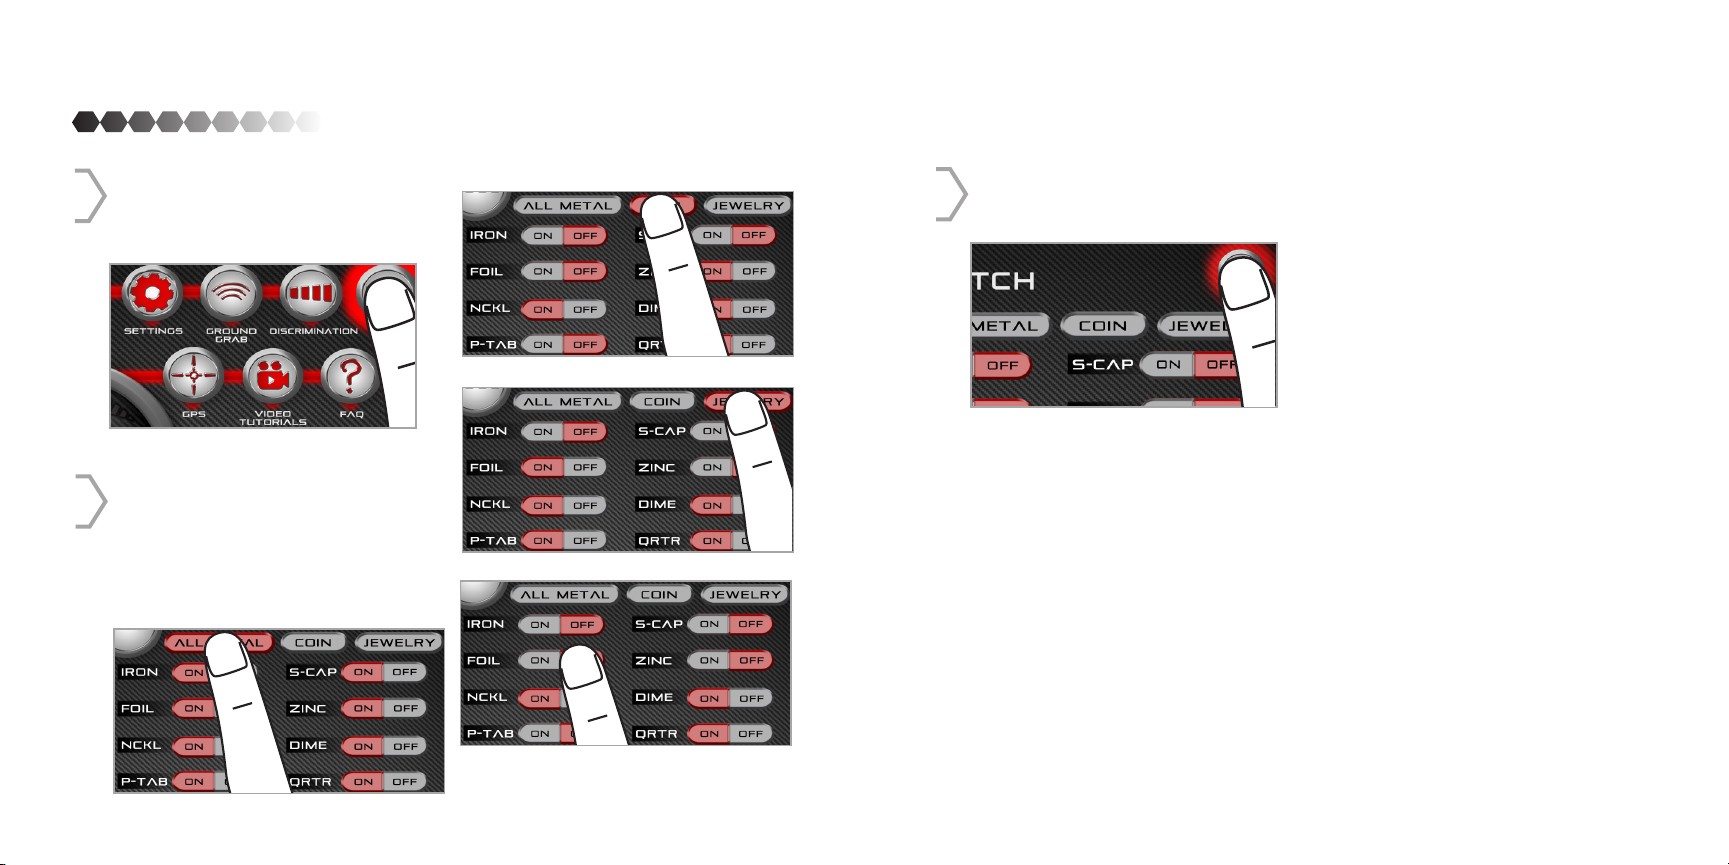
TECH: NOTCH
Press the NOTCH button to select
1
certain metals you want to detect.
There are three pre programed but-
2
tons that will eliminate metals that
are not found in what you are wanting to detect.
ALL METAL
COIN
JEWELRY
CUSTOM
NOTE: To customize what you are detecting just
press the ON or OFF button next to the metal listed.
Press the BACK button to begin
3
detecting.
19 20
Page 12
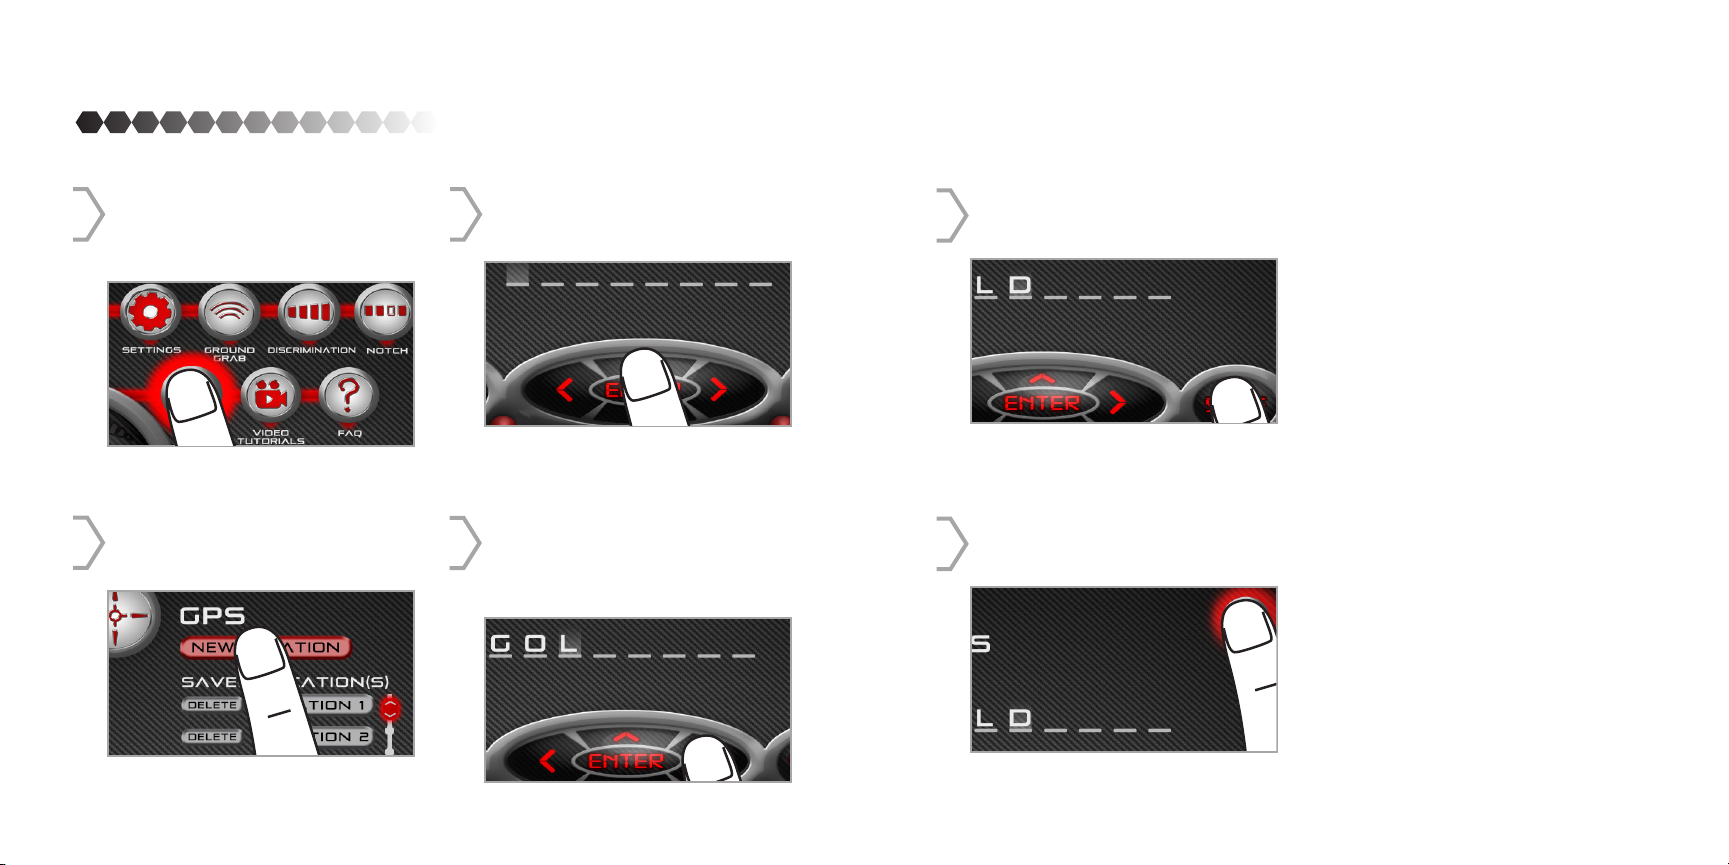
GPS: NEW LOCATION
Press the GPS button to save your
1
location or go back to a saved location.
To save a new location press the
2
NEW LOCATION button.
To change letters/numbers use
3
the up or down arrow buttons.
To move to the next character use
4
the left arrow, right arrow or ENTER buttons.
Press SAVE button to save your
5
location.
Press DELETE button to erase a character.
Press the BACK button to go back
6
to the main menu.
21 22
Page 13
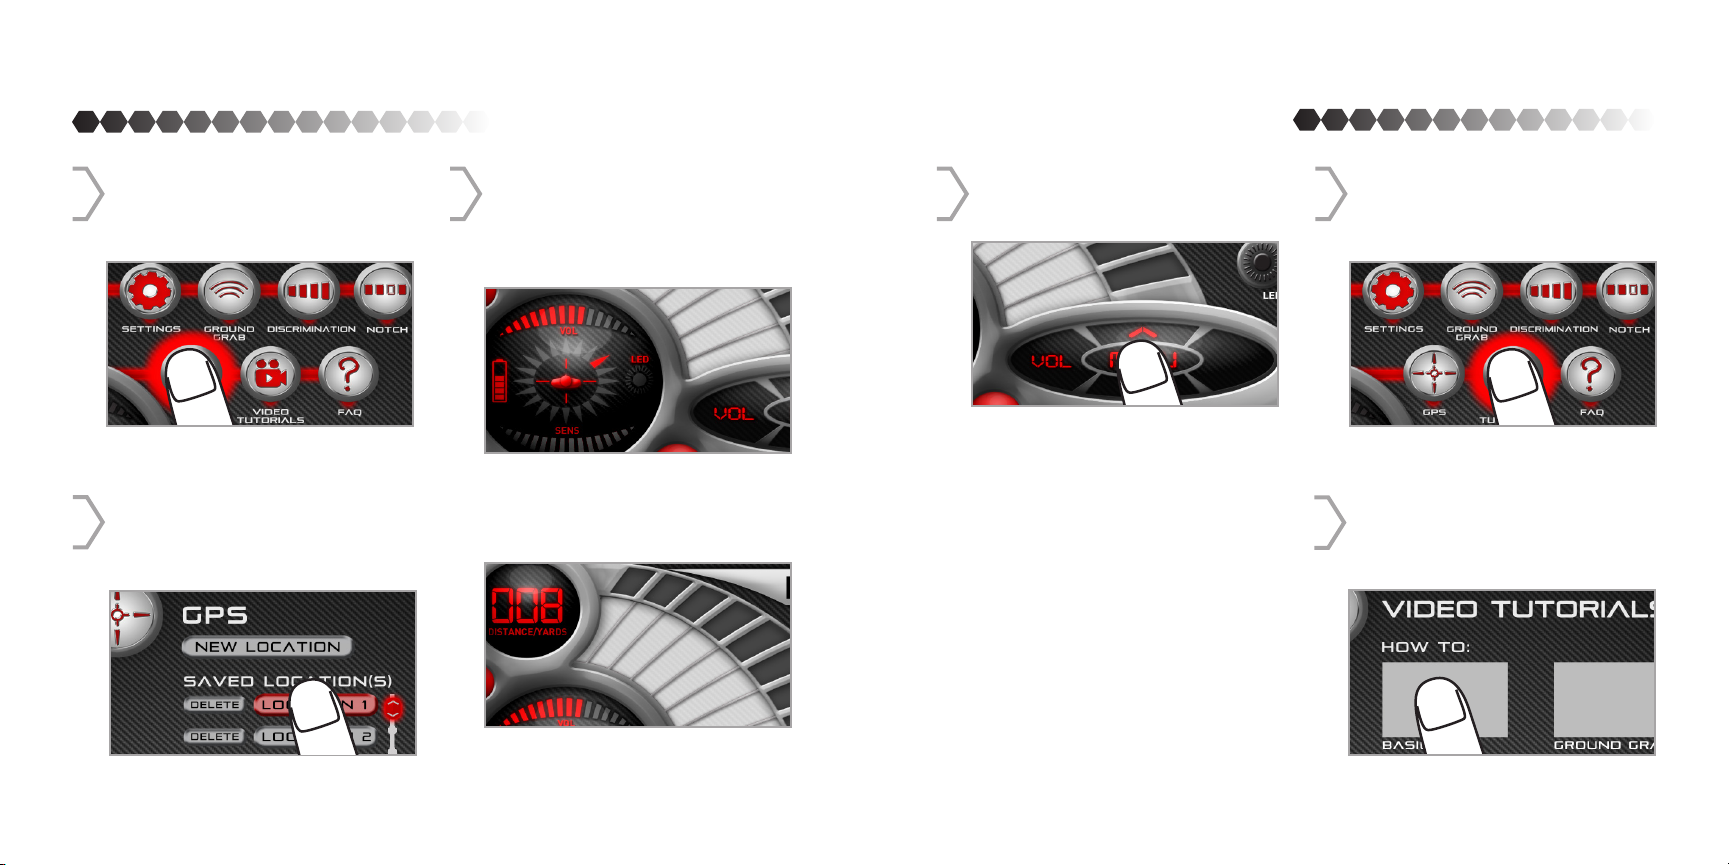
GPS: SAVED LOCATION
TECH: VIDEO TUTORIALS
Press the GPS button to save your
1
location or go back to a saved location.
To go back to a saved location
2
press the button with the name of
the saved location. Ie. LOCATION 1
The red arrow points you in the
3
direction of where you need to
go to reach the saved destination.
The smaller buble tells you how
far to go in a certain direction in
Yards.
Press the MENU button to return
4
to the Main Menu.
Press the VIDEO TUTORIALS but-
1
ton to watch videos on the metal
detector.
Press the video you would like to
2
watch or scroll down to the desired video.
NOTE: To scroll down or up press the scroll
area do not drag.
23 24
Page 14
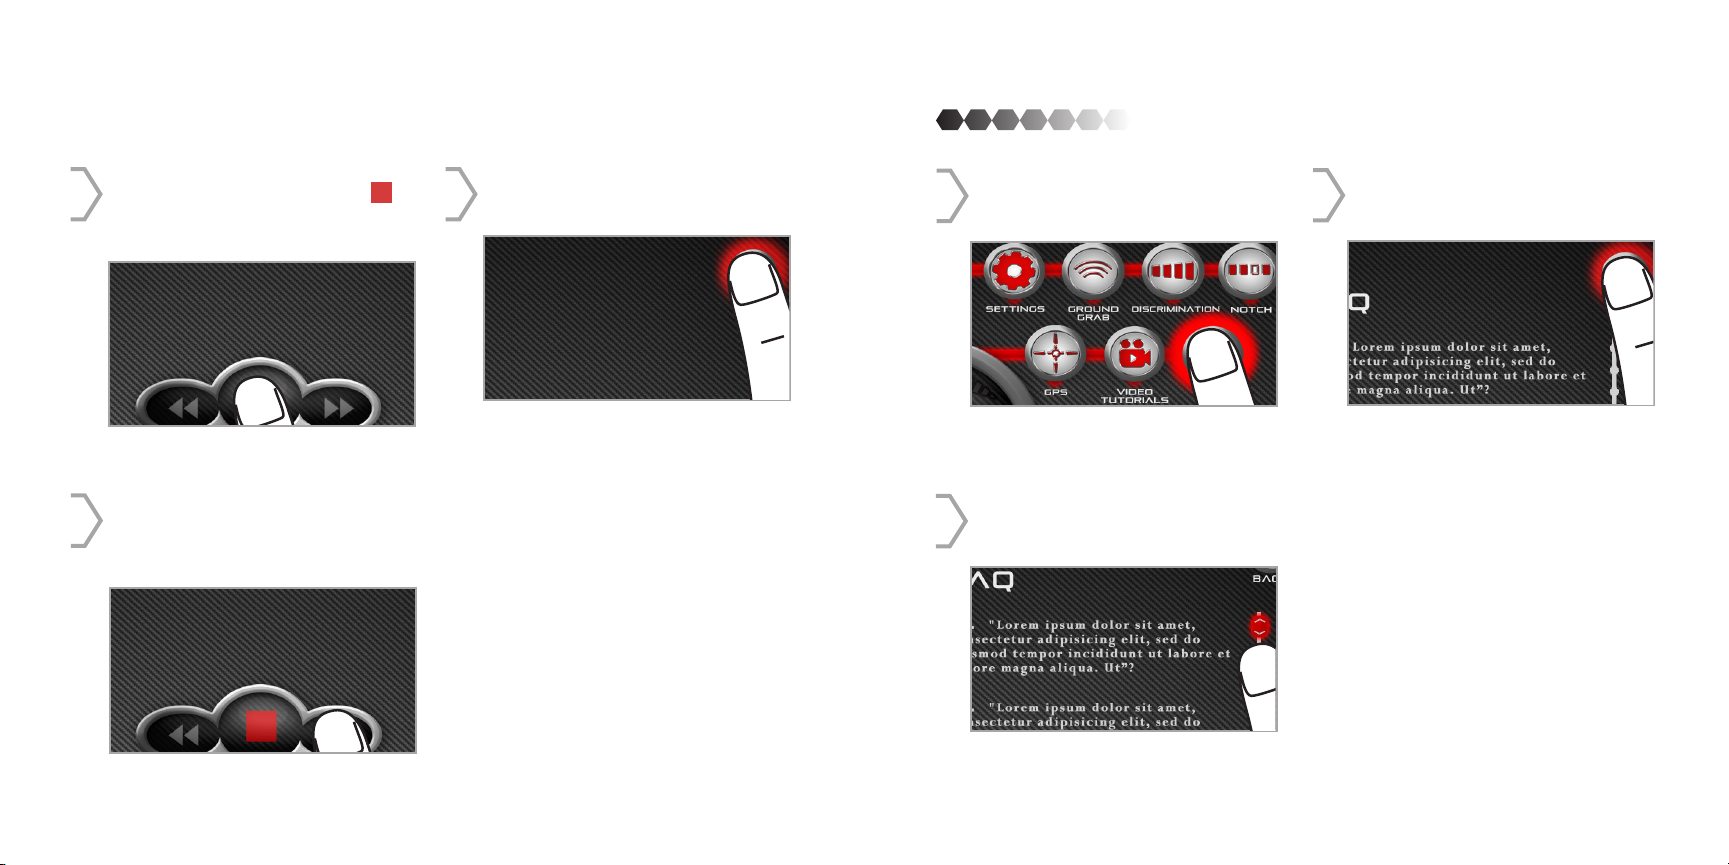
TECH: FAQ
To stop the video press the
3
button. Press the button again to
play the video.
NOTE: The videos will play continually till
you either press stop or back button.
To Fast foward press the >> but-
4
ton. Press the << button to Rewind.
NOTE: Holding the << or >> button will
make it fast forward or rewind faster.
Press the BACK button to return to
5
the Video Tutorial Menu.
Press the FAQ button to read fre-
1
quently asked questions.
Press the scroll area to scroll
2
down or up.
Press the BACK button to return
3
to the Main Menu.
25 26
Page 15
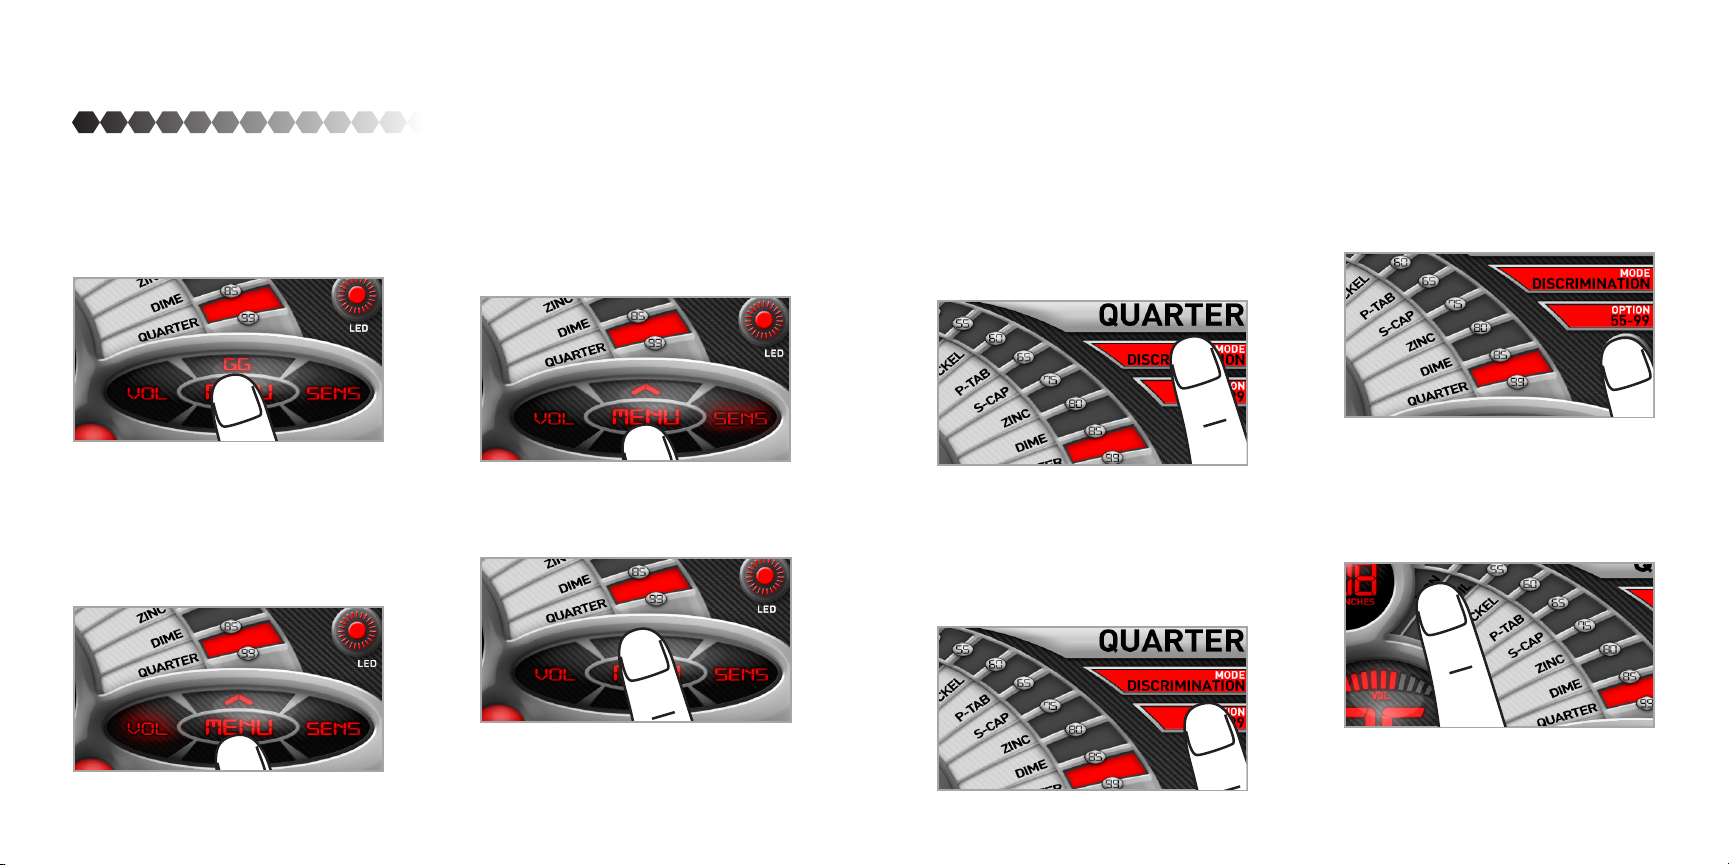
TECH: SHORTCUTS
MENU BUTTON
To enter the Main Menu page press
the MENU button. Press again to
return to detecting.
VOL BUTTON
To change the Volume press the
VOL button. An up ^ and down
will appear. Press either arrow to
your desired volume level.
^
SENS BUTTON
To change the Sensitivity press the
SENS button. An up ^ and down
will appear. Press either arrow to
your desired sensitivity level.
GG BUTTON
Press the GG button to begin
Ground Grab.
MODE BUTTON
^
When you press the MODE button
it will take you to the Main Menu
where you can choose Discrimination or Notch to detect in.
OPTION BUTTON
Takes you back to Discrimination
or Notch menu depending on
what Mode you are in. From there
you can change the metals you
want eliminated.
LED BUTTON
To turn ON the light press the LED
button. Press again to turn it OFF.
METAL CATEGORY BUTTON
Each metal category is it’s on button.
27 28
Page 16
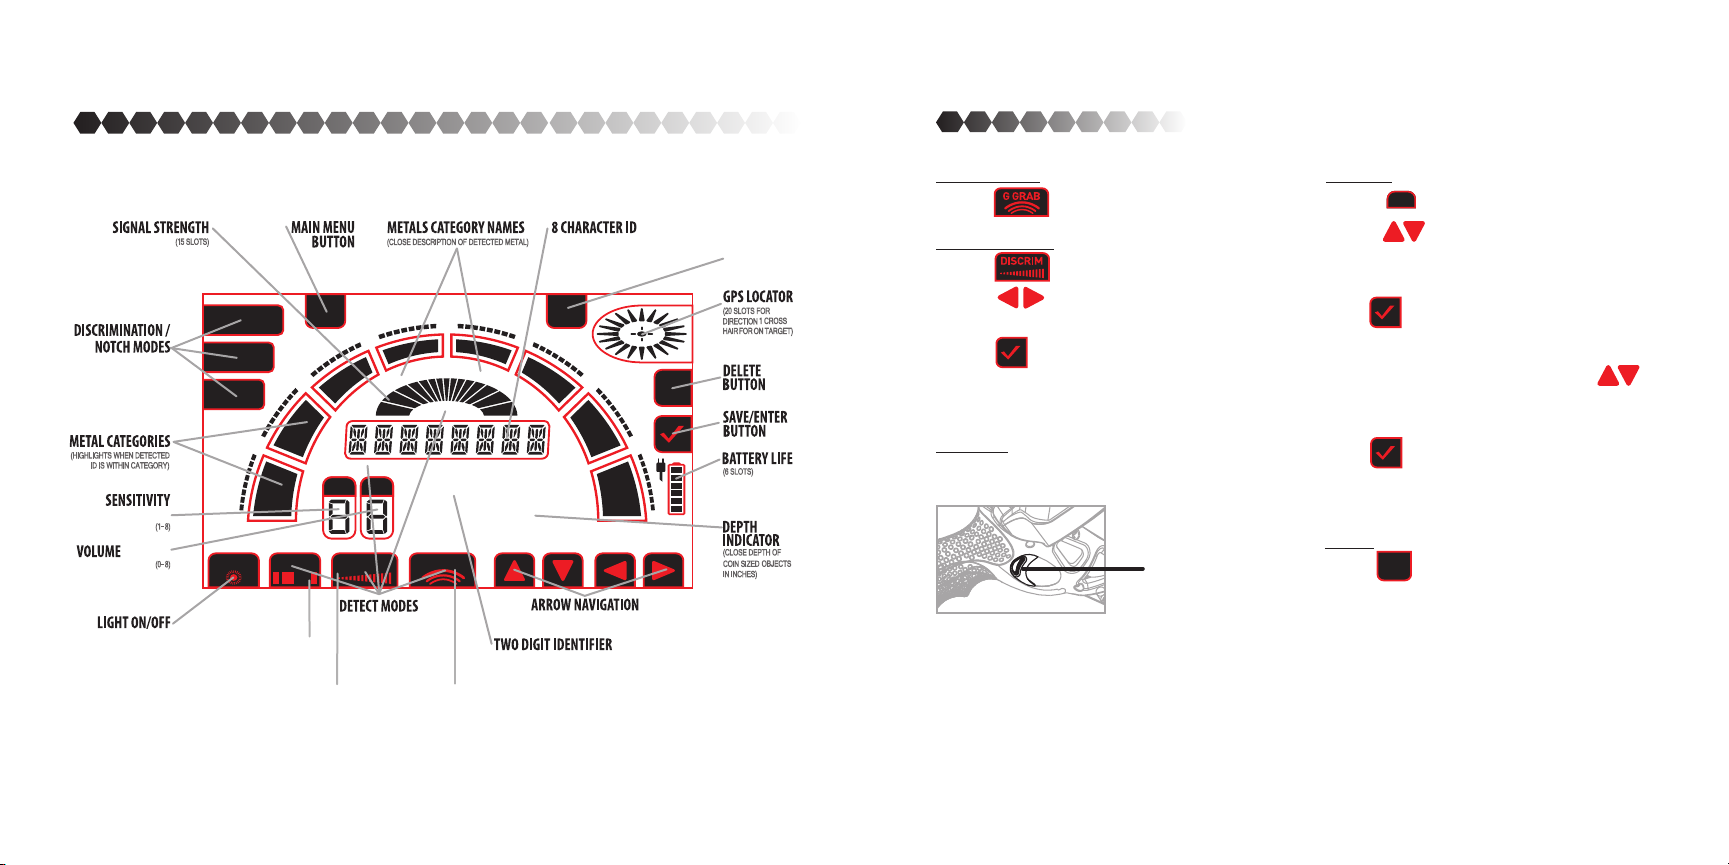
TRADITIONAL LCD NAVIGATION DISPLAY
TRADITIONAL
BUTTONS
CUSTOM MODE
BUTTON
BUTTON
BUTTON
BUTTON
ALL METAL
JEWELRY
COIN
40
10
NOTCH Button
DISCRIMINATION
NOTCH
Button
MENU
55
N
O
R
I
L
I
O
F
SENS VOL
DISCRIM
60
L
E
K
C
I
N
WAYPOINT
GRAB Button
65
B
A
T
-
P
PINPOINT
IDENTIFICATION
88
G GRABLIGHT
GROUND
S
-
C
A
P
888
75
Z
I
GPS
N
C
D
DEPTHYDS
BUTTONS
Ground Grab
- Press to enter “Ground Grab” Mode
Discrimination
GPS BUTTON
- Press to enter “Discrimination” Mode
- Press to eliminate metal starting
from left to right 10-99
- Press or wait for 2-3 seconds to detect in
80
X
I
M
E
85
Q
U
A
R
T
E
R
99
current settings
(This mode uses your last Settings to detect)
Pin Point
- Hold the trigger down to enter “Pin Point”
Mode
Settings
- Press to change volume setting
VOL
- Press while Volume is selected to
change Volume
- To save changes wait for 2-3 sec or press
the button
- Press “SENS” to change Sensitivity setting
- While Sensitivity is selected press
to change Sensitivity
- To save changes wait for 2-3 sec or press
the button
MENU
PINPOINT
Trigger
MENU
- Press to go to the Main Settings page.
*See page 16 for more details.
29 30
Page 17
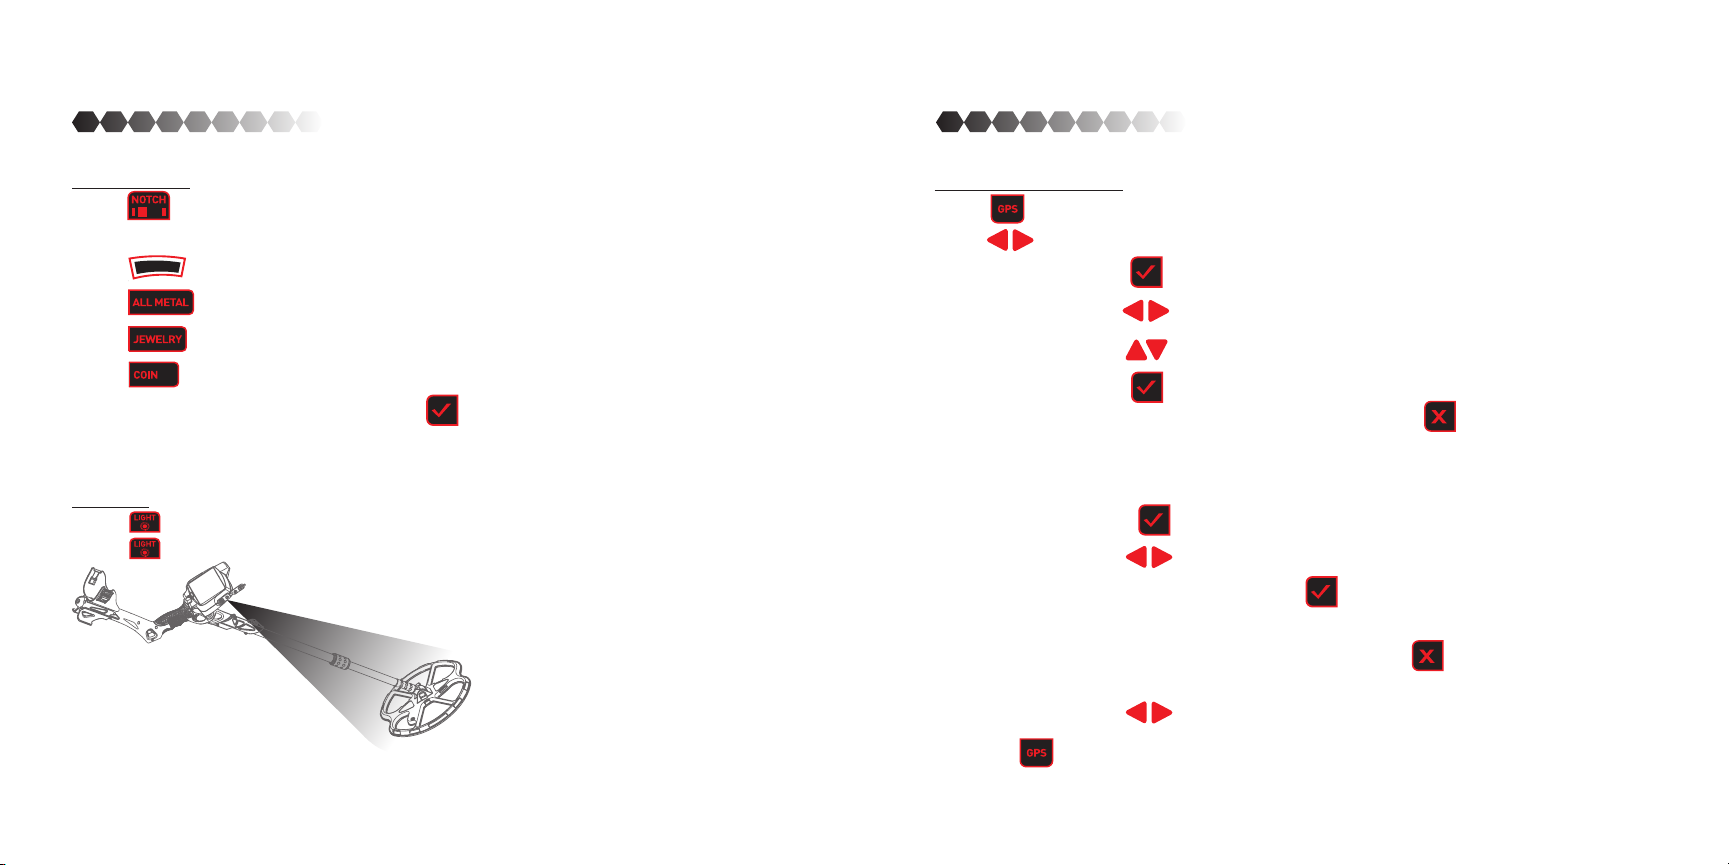
TRADITIONALTRADITIONAL
Notch Settings
- Press to enter custom mode to detect the metal of your choosing
*It will be set to whatever was selected last
- Press to deselect certain metals to customize detecting
- Press to detect all metals
- Press to detect only those metals found in jewelry
- Press to detect only those metals found in coins
- To save changes wait for 2-3 sec or press the button
LED Light
- Press to turn the light on.
- Press again to turn the light o.
GPS: SAVE - WAYPOINT
- Press to enter “GPS” Mode which defaults to the Save/Waypoint List
- Press to move Up and Down the Save/Waypoint List
SAVE: Press on Save
Press to move between letters
Press to change selected letter
Press to Save and you will see on the display “Save Ok” and then
returned to Save/Waypoint options or press to cancel the current
settings and return the Save options
You will then be returned to Save/Waypoint options
Waypoint: Press on a saved Location to activate GPS function
Press to the saved waypoint you would like to go to
On selected waypoint press and it will show you the Yard metter
that tells you how far it is to the desired location
To delete a waypoint press, hold down the button for 3 seconds to
Delete selected location
Press to switch to another Waypoint
- Press the button to exit out of the “GPS” Mode or press the “POWER” button to turn it
o.
31 32
Page 18
DETECTOR MODES
Ground Grab
All soils contain minerals. Signals from ground minerals interfere with the signals from
metal objects. All soils dier, and can dier greatly, in the type and amount of ground
minerals present. This detector incorporates ground balancing algorithms which eliminate interference caused by the ground minerals found in most soils. We therefore recommend that you use GROUND GRAB to most accurately calibrate the detector to the
specic ground conditions where you are hunting.
This process will maximize the detector’s target identication accuracy and depth detection capability.
The Steps is as follows:
1. Find a patch of ground which is free of metal. Use the DISCRIMINATION mode, with no targets discriminated out.
2. Hold the detector with the search coil about 6 inches above the ground ,then press G Grab button to activate ground
grab process, then lower the coil down to within 2 inches o the ground.
3. Repeat to lift up and lower down the search coil for several times until the LCD shows “GRAB OK”.
If ‘GRAB ER’ appears, maybe the ground is too dirty with metal trash or just wet salt soil. Find another clean place ground
grab again till it is grab ok. Ground grab results is crucial to the performance of PP mode.
Discrimination
Pick the discrimination mode you want to detect in. Keep the coil parallel to the ground
moving it from left to right with a stable speed. Out of the metals highlighted it will categorize the metal detected so you are aware of what metal is buried. It will inform you
in two ways; 1. by highlighting the metal detected and 2. a tone response.
Discrimination identication accuracy can be inuenced by moisture and temperature.
The coil sweeping speed can also aect discrimination, generally faster sweeping motion has a higher sensitivity.
Pinpointing
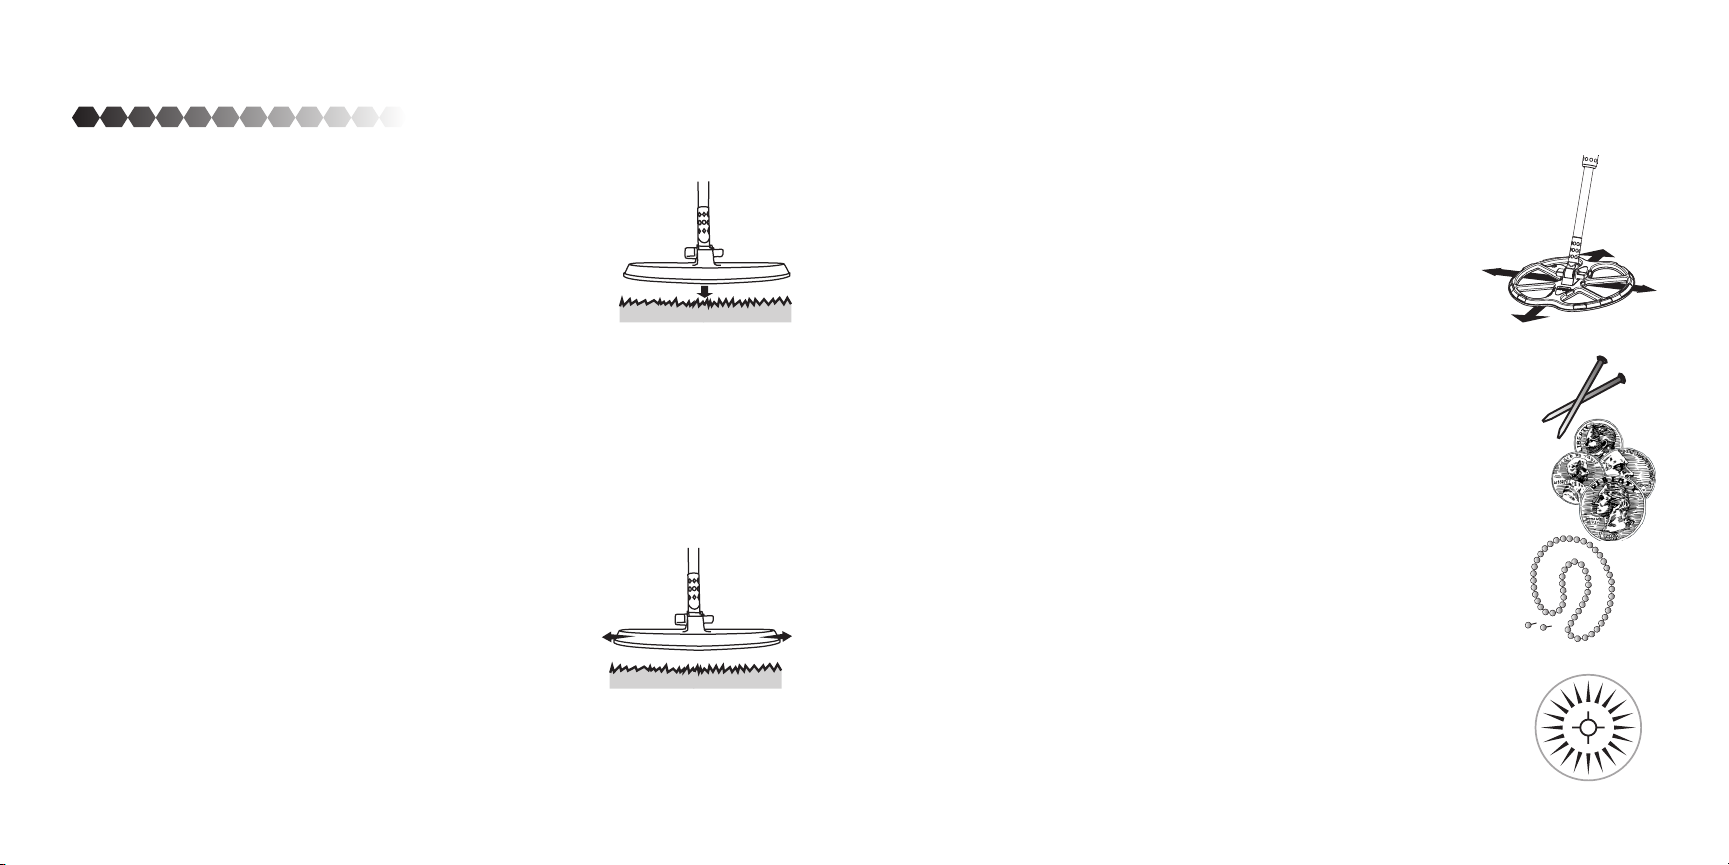
Pinpoint does a narrow search that will give you the exact location of a buried object. It will identify an object by a signal
and tone response. Hold the trigger to activate the pinpoint function. Once activated, sweep the coil over the target
area in an “X” pattern. Make a visual note of the place on the ground where the strongest signal is identied. Then dig
in the center of the “X.” When the trigger is released the metal detector will return back to
the previous mode. NOTE: Normally,the detector takes about 5 minutes to stabilize after it
powers on, it is not recommended to do pinpointing during this period of time. The sensitivity of detector will drift over time. If sensitivity drifts upward,the detector will sound o
spontaneously. If sensitivity drifts downward,the detector will become less sensitive. Drift
is exacerbated by the environment condition change especially the temperature change.
so, in case the sensitivity drifts , you can try Ground Grab again.
Notch Modes
When in Notch there are four options:
All Metals: Use this mode if you are looking for a wide range of objects. It is designed to
nd all metal objects.
Coin: When using this mode it will show you the metals found in coins. It is designed to nd
all types of coins and eliminate trash objects such as iron and foil.
Jewelry: When in this mode it will show you the metals common in jewelry. It is designed
to nd jewelry such as rings, bracelets, watches and necklaces.
Custom: Use this mode if you want to choose the specic metals to search for . It is designed
for you to nd certain metal objects that you programmed it to.
When an object is detected it will highlight the name of the metal found as well as use a tone
that identies the metal.
GPS
The GPS mode allows you to save certain locations that you are wanting to return to later. The
farthest it will read you from your saved location is 999 yds. The closer you get to the saved spot
the lower the number will go, 000 yds means you’ve reached your spot. NOTE: While in use, please
keep the control box away from metal objects or magnetic materials because those objects aect
the accuracy of its internal compass.
33 34
Page 19
HOW TO DETECT
Power ON by pushing the “POWER” button.
Use “SENS” or “ VO L” to change the Sensitivity and Volume (default is 6/4).
Use “ALL METAL”, “JEWELRY”, “COIN”, “NOTCH” or “DISCRIM”
to enter into corresponding mode.
Press the “G GRAB” button to activate Ground Grab Mode. Display will show “Grab ok” when ground grab is completed. If “Grab
ERROR” shows, there may be a metal object underground, nd
another clean area nearby to retry ground grab.
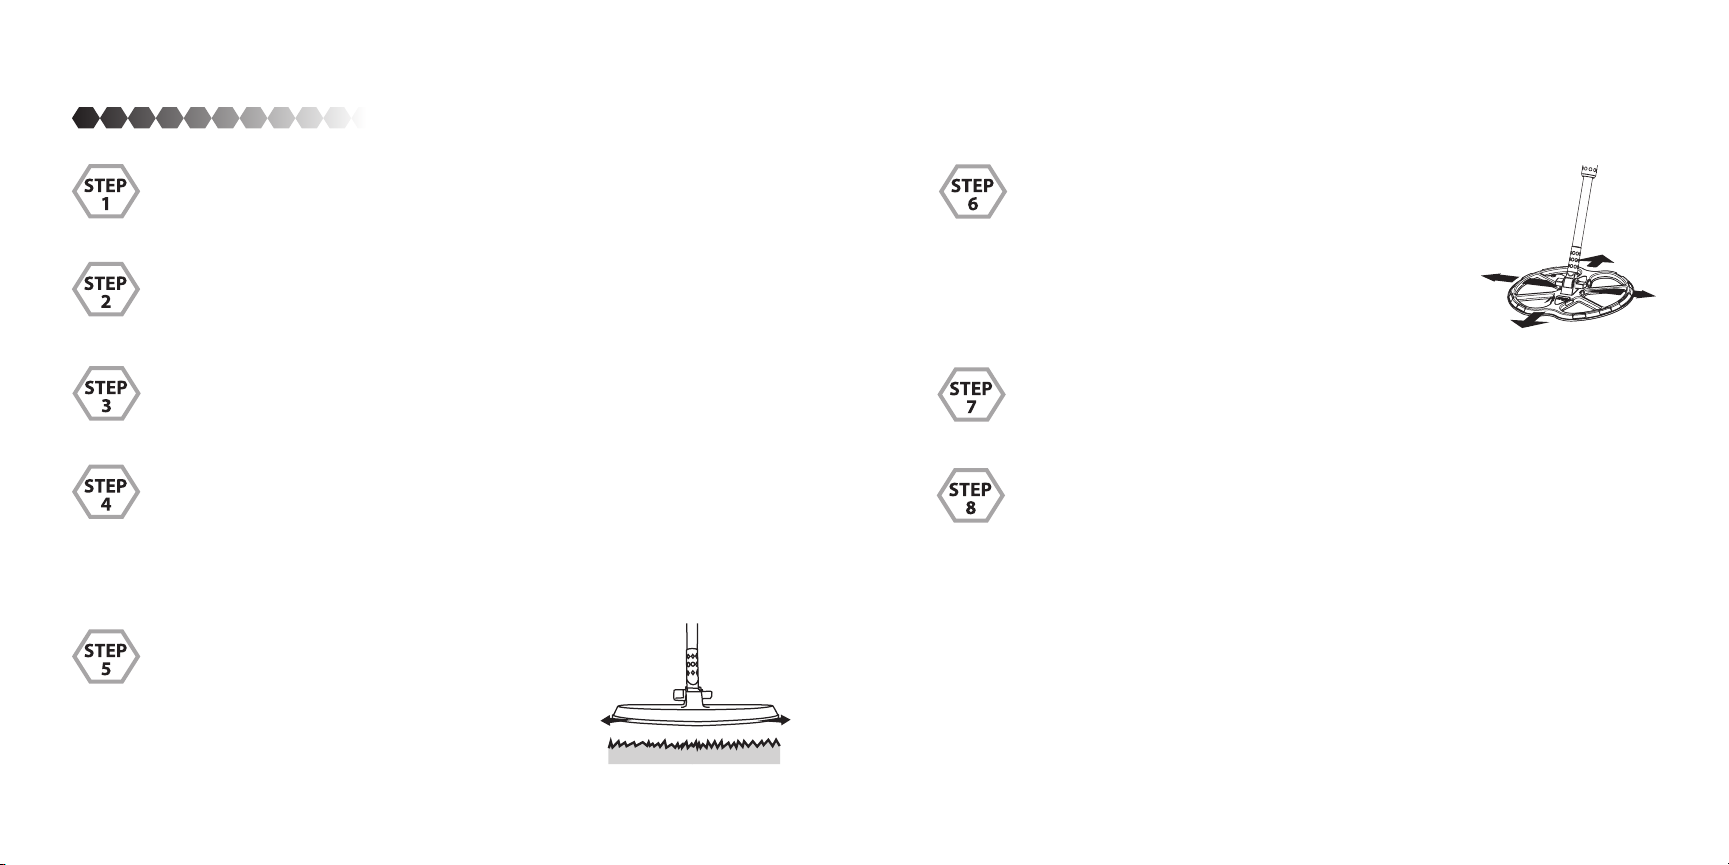
While in Discrimination/Notch Mode keep
the coil parallel to the ground moving it
from left to right with a stable speed. If it
nds something it will highlight the metal
found and give o a certain tone (refer to
page 27).
When a metal is detected hold the trigger
to activate Pinpoint function. Sweep the coil
over the target in an “X” pattern. While in PinPoint it will show you the depth of the metal
found. So you can accurately know how far
down to dig.
Dig object out.
Once the object is found, ll the hole back up to the way you
found it.
35 36
Page 20
COURTESY
TIPS
• Fill holes
• Obey NO TRESPASSING signs
• Respect private and public property
• Obey all laws
• Do not cause any willful damage to property
• Do not destroy property
• Pick up after yourself, do not leave trash
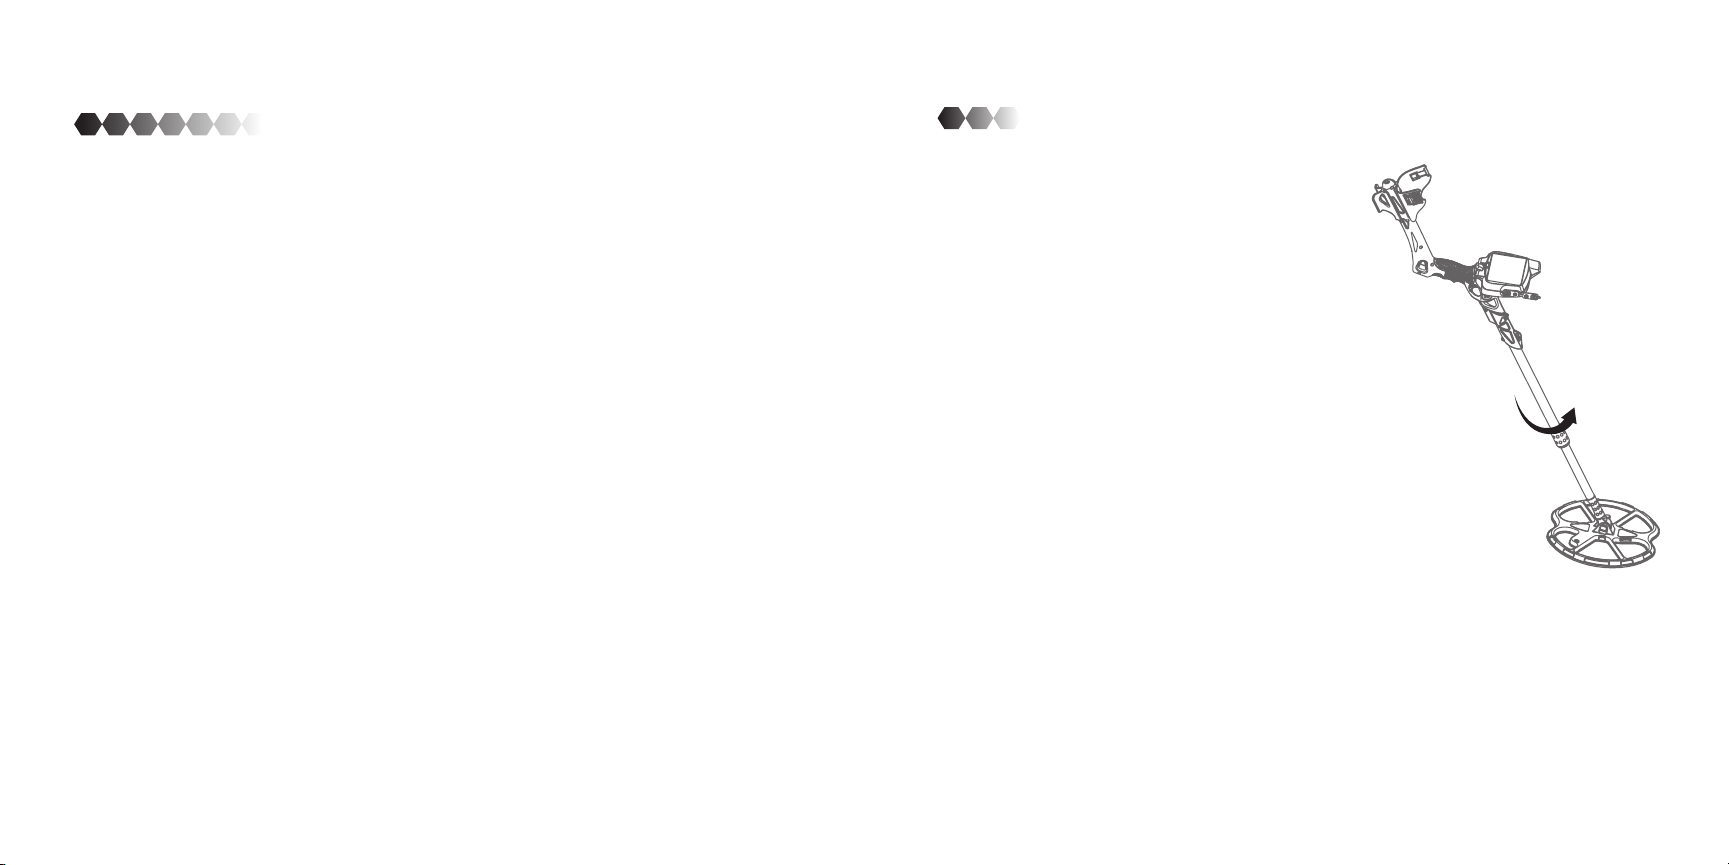
If you find that the compass is not so ac-
1
curate, or sometimes direct the wrong
way, please rotate it 3-5 circles like this:
NOTE: Keep the LCD Display horizontal.
In order to get the maximum accuracy
2
of the compass, we suggest rotating it
3-5 times in a circle to calibrate at the beginning of the GPS mode when you change
to a new environment.
The normal function of the product may be dis-
3
turbed by strong Electro-Magnetic Interference. If
so, simply reset the product to resume normal operation by following the instruction manual. In case the
function could not resume, please use the product in
another location.
37 38
Page 21
WARNING
All metal detector’s may discover objects that can cause personal injury if
struck. For example; power lines, explosives, gas lines, etc. When searching for treasure, rst observe these precautions:
Do not use detector where you think there might be electrical lines or
pipes buried below the surface.
Do not use detector in a military area where bombs or other explosives
were once buried.
Avoid striking any lines that are or could be electrically powered.
Keep away from pipelines they could be carrying ammable gas or liquid.
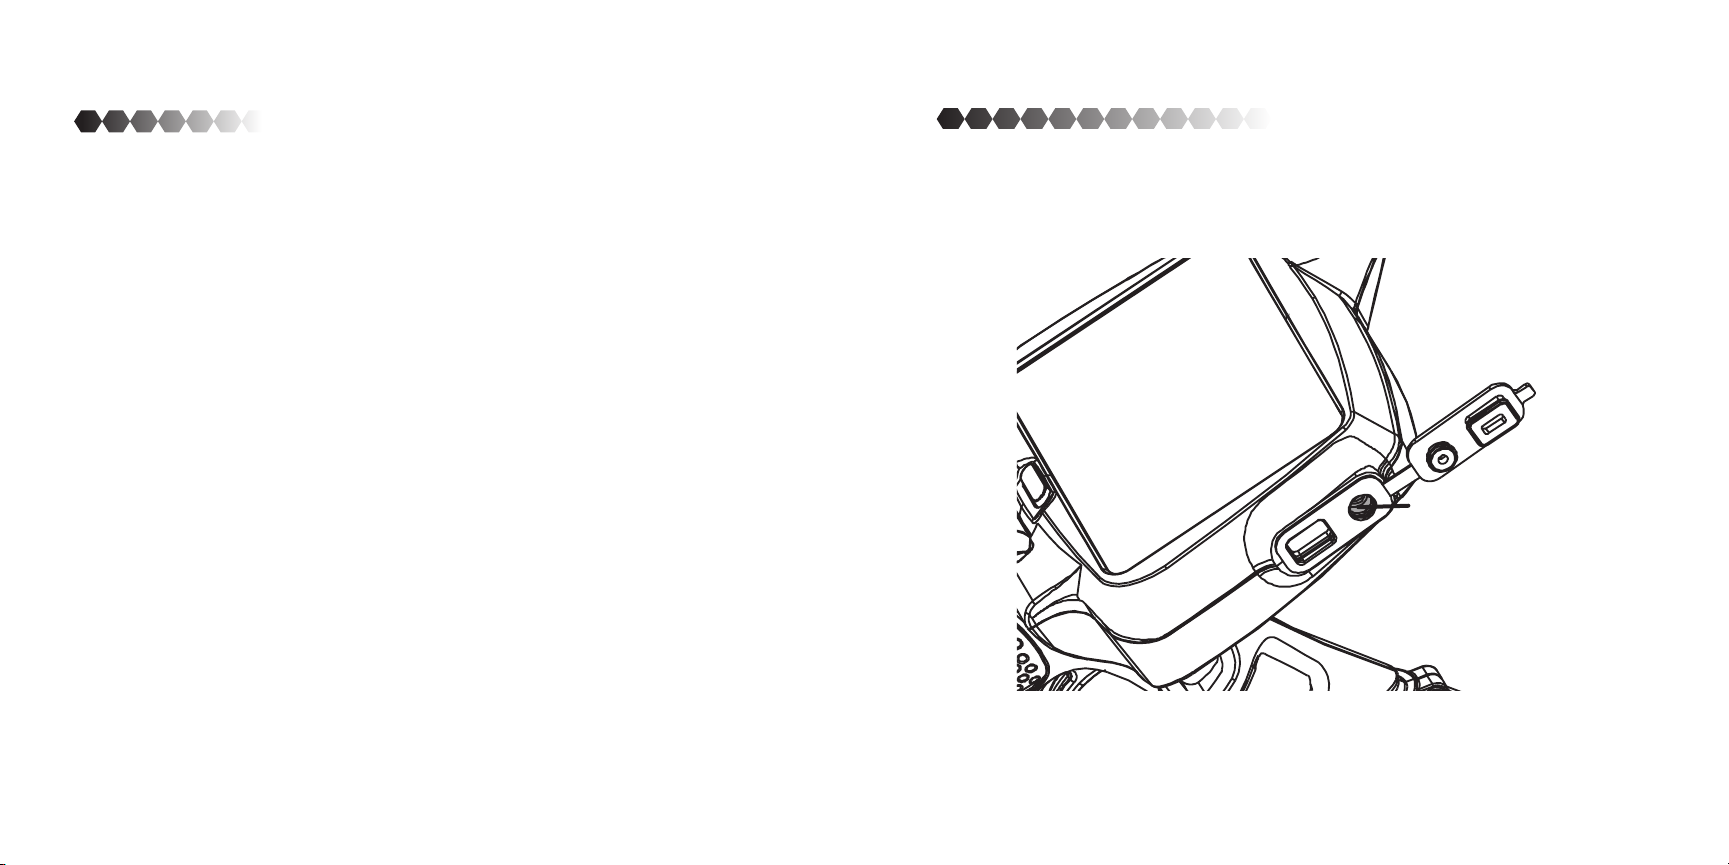
AUDIO FEATURES
Headphone Jack
Use for less disturbance
to others around you
as well as to drown out
distractions so you can
hear the tones better.
39 40
Page 22
TONE RECOGNITION
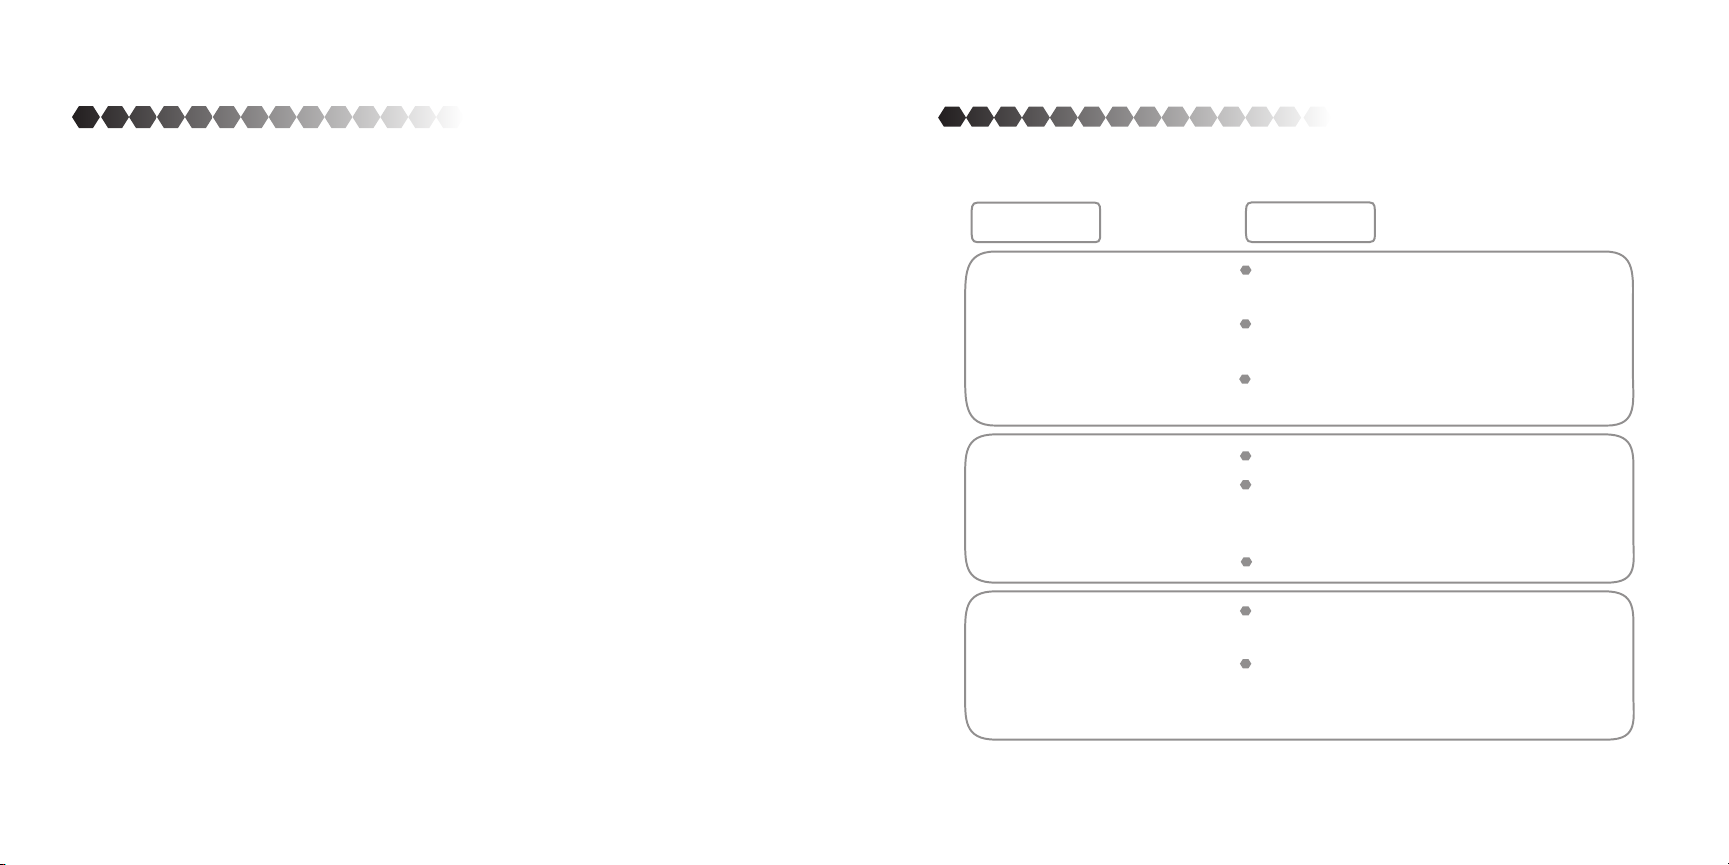
There are eight tones indicating 8 dierent metals (iron, foil, nickel, P-Tab,
S-Cap, Zinc, Dime and Quarter)that will help you to identify the material
the detector has found
TROUBLESHOOTING
PROBLEM
SOLUTION
Won’t turn ON,
there is no sound
Abnormal/erratic
Sounds
Abnormal/erratic
Sounds
41 42
Check to ensure that you are using
new batteries.
Check to see if the batteries were
placed in the correct positions.
Check the connection of the wire
from the rod to the handle unit.
Outdoor use only.
Stay away from power lines, benches,
wire fences and other metal detectors
that can cause false readings.
Reduce the sensitivity level.
Check that the Mode you wanted is
selected.
The All-metals mode allows you to
search for all metals so you will not
miss the one you are looking for.
Page 23

DISCLAIMERS
5baksov.com.ua
WGI Innovations, LTD. is not responsible for damage, expense or injury caused by the unauthorized use of,
alterations to, improper connection of and abuse or neglect of the WGI Innovations™ products.
WARRANTY
For the warranty to be in eect, you MUST completely ll out and mail the warranty card along with your
proof of purchase to WGI Innovations within (14) days after the date of purchase. As an alternative to mail, you
may also visit our website and register your product at (you are still required to mail WGI
Innovations your proof of purchase before the warranty is placed in eect.) Follow the onscreen directions to
complete the process.
WGI Innovations, LTD will replace all workmanship defects free of charge for ONE (1) YEAR after the date of
purchase as long as your warranty is in eect.
This warranty DOES NOT COVER damage, expense or injury caused by unauthorized repairs, alterations, improper connection, shipping, abuse, theft, accident, neglect or collateral loss.
When returning product(s) for service you MUST obtain a Return Merchandise Authorization (RMA) number
from WGI Innovations, LTD. Please include name, UPS address (No P.O. Box), telephone number, RMA number
and a complete description of the problem on all enclosed correspondence. When possible, pack product
carefully in original carton. Customers are responsible for any shipping cost to WGI Innovations. WGI Innovations will pay the shipping cost of replacement product to the customer. We are not responsible for damage
incurred in returning items for repair.
For product service send to:
WGI Innovations
602 Fountain Parkway
Grand Prairie, TX 75050
(800) 847-8269
Thank you for your purchase!
CUSTOMER SERVICE
WGI Innovations, LTD. stands behind every product we manufacture for a one year product workmanship
warranty and a strong commitment to customer service. If you are in need of customer service for missing
parts or need assistance with the operation or assembly of your product, we encourage you to call one of our
customer service representatives and let us assist you with your WGI Innovations product.
DISCLAIMER
WGI Innovations, LTD. reserves the right to make changes to product features, functionality and physical design at its sole discretion. As a result, such changes may not be reected in this version of the manual.
FCC STATEMENT
Product Name: Metal Detector
Trade Name: Ground EFX
Model# MX400
This device complies with Part 15 of the FCC Rules. Operation is subject to the following two
criteria: (1) This device may not cause harmful interference, and (2) This device must accept any
interference received, including interference that may cause undesired operation.
Warning: Changes or modications to this unit not expressly approved by the party responsible
for compliance could void the user’s authority to operate the equipment.
NOTE: This equipment has been tested and found to comply with the limits for a Class B digital
device, pursuant to Part 15 of the FCC Rules. These limits are designed to provide reasonable
protection against harmful interference in a residential installation. This equipment generates,
uses and can radiate radio frequency energy and, if not installed and used in accordance with the
instructions, may cause harmful interference to radio communications.
However, there is no guarantee that interference will not occur in a particular installation. If this
equipment does cause harmful interference to radio or television reception, which can be determined by turning the equipment o and on, the user is encouraged to try to correct the interference by one or more of the following measures:
-Reorient or relocate the receiving antenna.
-Increase the separation between the equipment and receiver.
-Connect the equipment into an outlet on a circuit dierent from that to which the
receiver is connected.
-Consult the dealer or an experienced radio/TV technician for help.
43 44
 Loading...