

Page 1
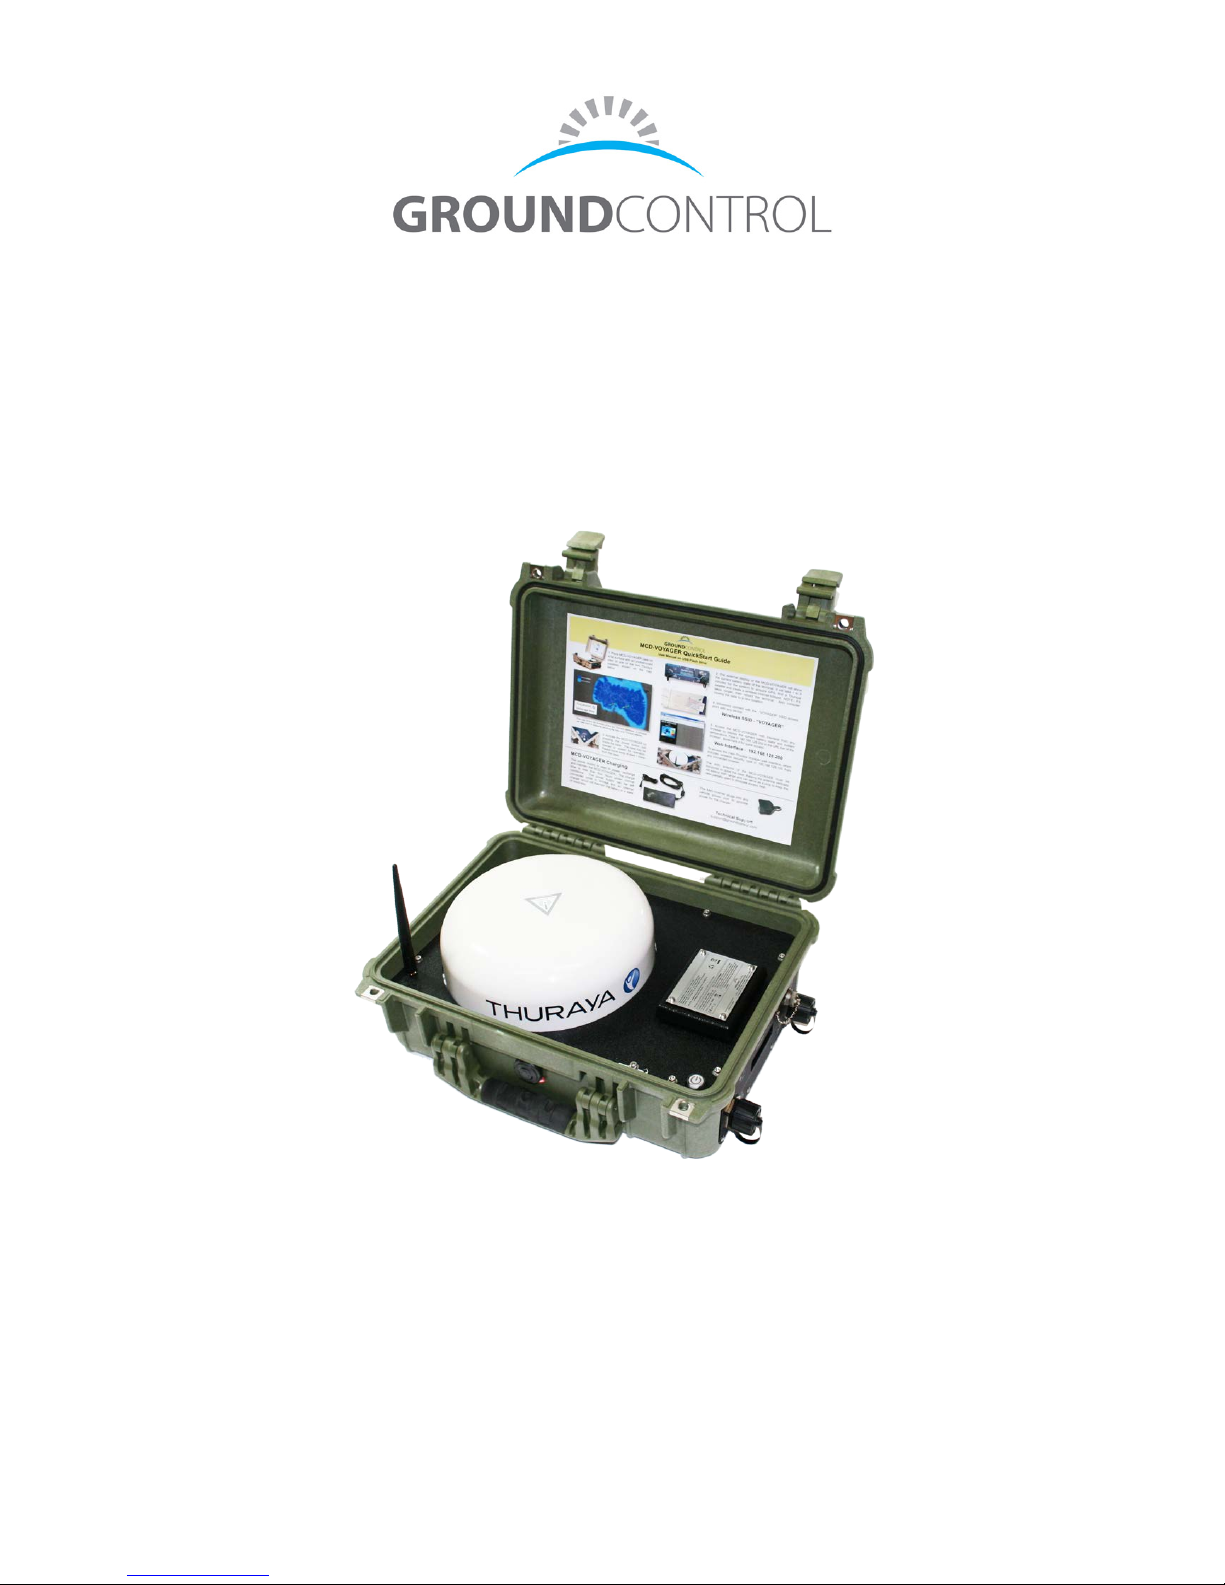
MCD-Voyager
User Manual
MCD-VOYAGER USER MANUAL
Ground Control
v1.3
Page 2

MCD-VOYAGER User Manual Ground Control
Contents
MCD-VOYAGER OWNER IDENTIFIERS ...................................................................................... 4
MCD-VOYAGER OVERVIEW......................................................................................................... 5
MCD-VOYAGER FEATURES.......................................................................................................... 5
MCD-VOYAGER SYSTEM CONTENTS ......................................................................................... 7
INSIDE THE MCD-VOYAGER ....................................................................................................... 8
SYSTEM OPERATION ................................................................................................................. 10
WIFI SECURITY ........................................................................................................................... 12
ACCESSING THE MCD-VOYAGER WEB INTERFACE ............................................................... 13
USING THE LAN PORT ............................................................................................................... 13
MONITORING USAGE ................................................................................................................ 14
CHARGING FACTS ...................................................................................................................... 15
MCD-VOYAGER ACCESSORIES.................................................................................................. 16
MCD-VOYAGER TECHNICAL SPECIFICATIONS ...................................................................... 19
TROUBLESHOOTING SYSTEM OVERHEATING ...................................................................... 21
2
Page 3
MCD-VOYAGER User Manual Ground Control
Safety Information
Important Safety Information for the
Ground Control MCD-VOYAGER System
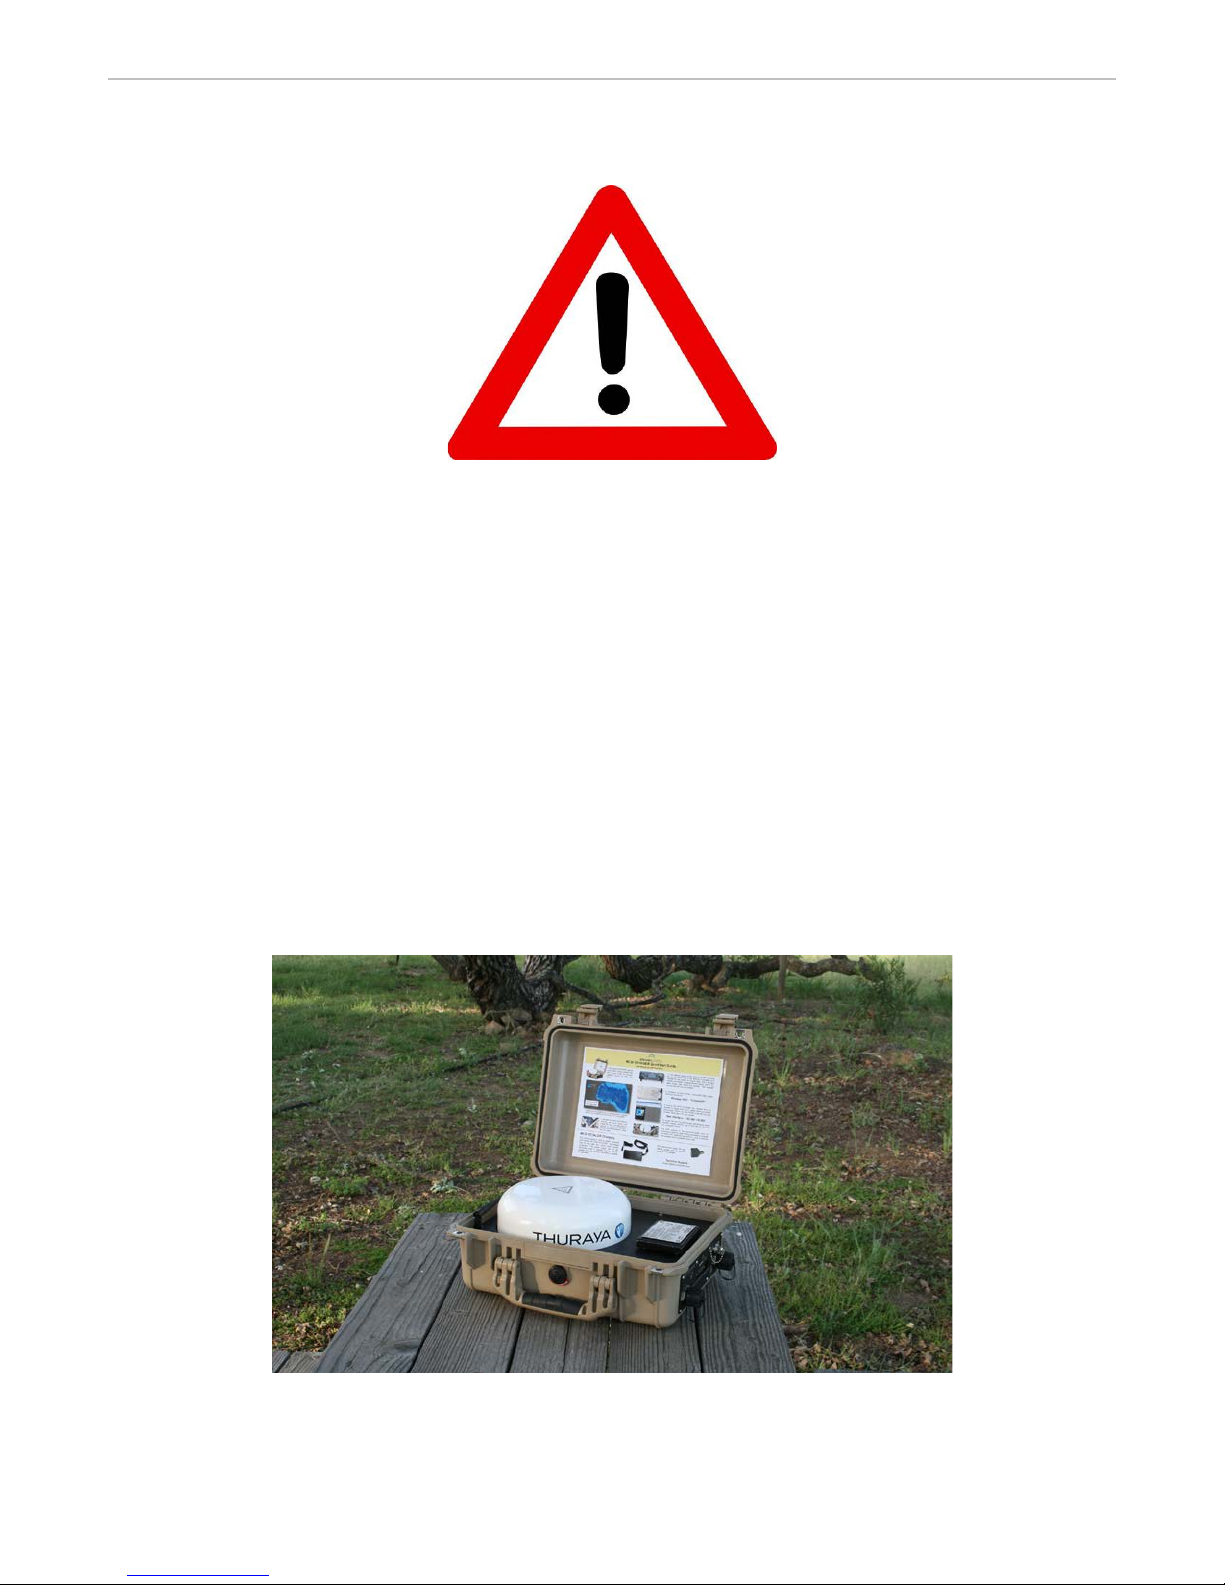
Like all Thuraya IP systems, the MCD-VOYAGER is a transmitting satellite device.
All persons should stay at least 1 meter from the case when it is operational.
If you have additional questions regarding connecting or operating your
system beyond the simple operations of the MCD-VOYAGER, please review
the User Manual for the Thuraya Voyager included USB flash drive or contact
your Thuraya IP service provider for more information.
3
Page 4

MCD-VOYAGER User Manual Ground Control
MCD-VOYAGER Owner Identifiers
Please fill out the information on this page with the account information supplied to you
from Ground Control and keep this manual available in the field.
Thuraya IP Service Provider: ______________________
MCD-VOYAGER Web Interface: 192.168.128.200
Voyager Web Interface: 192.168.128.100
Thuraya Static IP Address:
(if any) _______________________
SSID Wireless Broadcast MCD-VOY [Serial Number]
Wireless WEP Security Password:
_______________________
4
Page 5
MCD-VOYAGER User Manual Ground Control
MCD-VOYAGER Overview
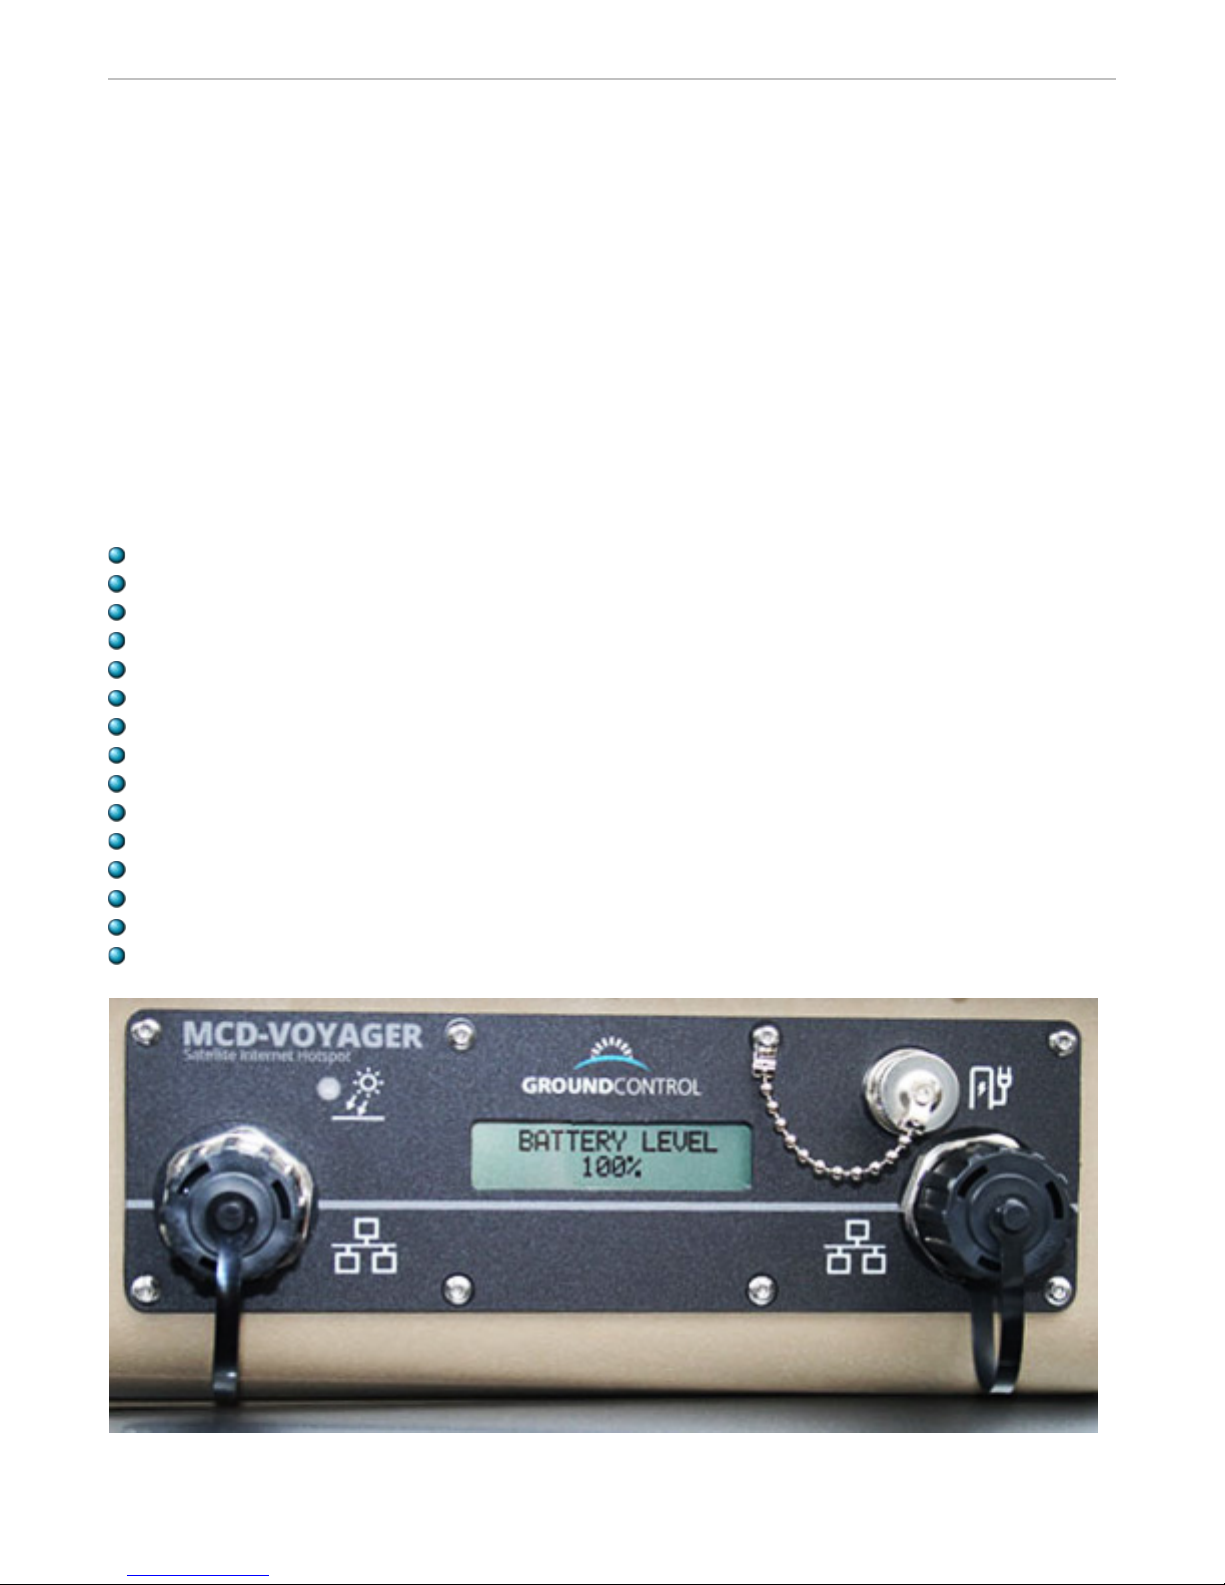
The MCD-VOYAGER "Mobile Communications Device", is an auto-pointing Thuraya IP
satellite terminal that requires no user training to operate. Simply place the weather-tight
case on the ground, or on a boat deck, or on any surface with a clear view of the sky, rain
or shine, anywhere in the world and turn it on - no pointing necessary. Within a minute,
the MCD-VOYAGER becomes a wireless hotspot for any wireless device up to 100 meters
from the case for up to 5 hours on the internal battery. The auto-pointing case uses the
auto-acquire in-motion Thuraya terminal integrated with our proprietary mobile
electronics for a ruggedized self-contained, in-field, user-friendly solution.
MCD-VOYAGER Features
No Aiming Required. Simply turn the unit on under an open sky.
Does Not Require User Interaction. No software to run. Establishes WiFi hotspot automatically.
Up to 100 meter range wireless access point for laptops, smartphones or other wireless devices.
Internet speeds up to 444Kbps down and 404 Kbps up.
Two external all weather RJ-45 ports (Ethernet) that are PoE capable (Power over Ethernet)
Up to 5 hour battery life for normal use.
May be plugged into a vehicle 12V power port for continuous operation.
Operates from -25˚ C to +70˚ C (-13°F to 158°F). Auto-shutoff at 70˚C/158°F Internal temperature.
Operates on top of moving vehicle roof, or boat, or any moving object.
Works well in heavy rain and will operate with 20mm of ice before transmission issues.
Watertight, crushproof, dustproof reinforced plastic case.
The MCD-VOYAGER operates in all locations supported by Thuraya IP service
Portable - Ships UPS, FedEx, DHL, carry-on luggage anywhere.
Full IP compatibility - Internet, Email, FTP, VPN…
The MCD-VOYAGER case is a Ground Control manufactured solution.
5
Page 6
MCD-VOYAGER User Manual Ground Control
Optional accessory cable adapters are
Power Supply is not connected to maintain its weatherproof
integrity.
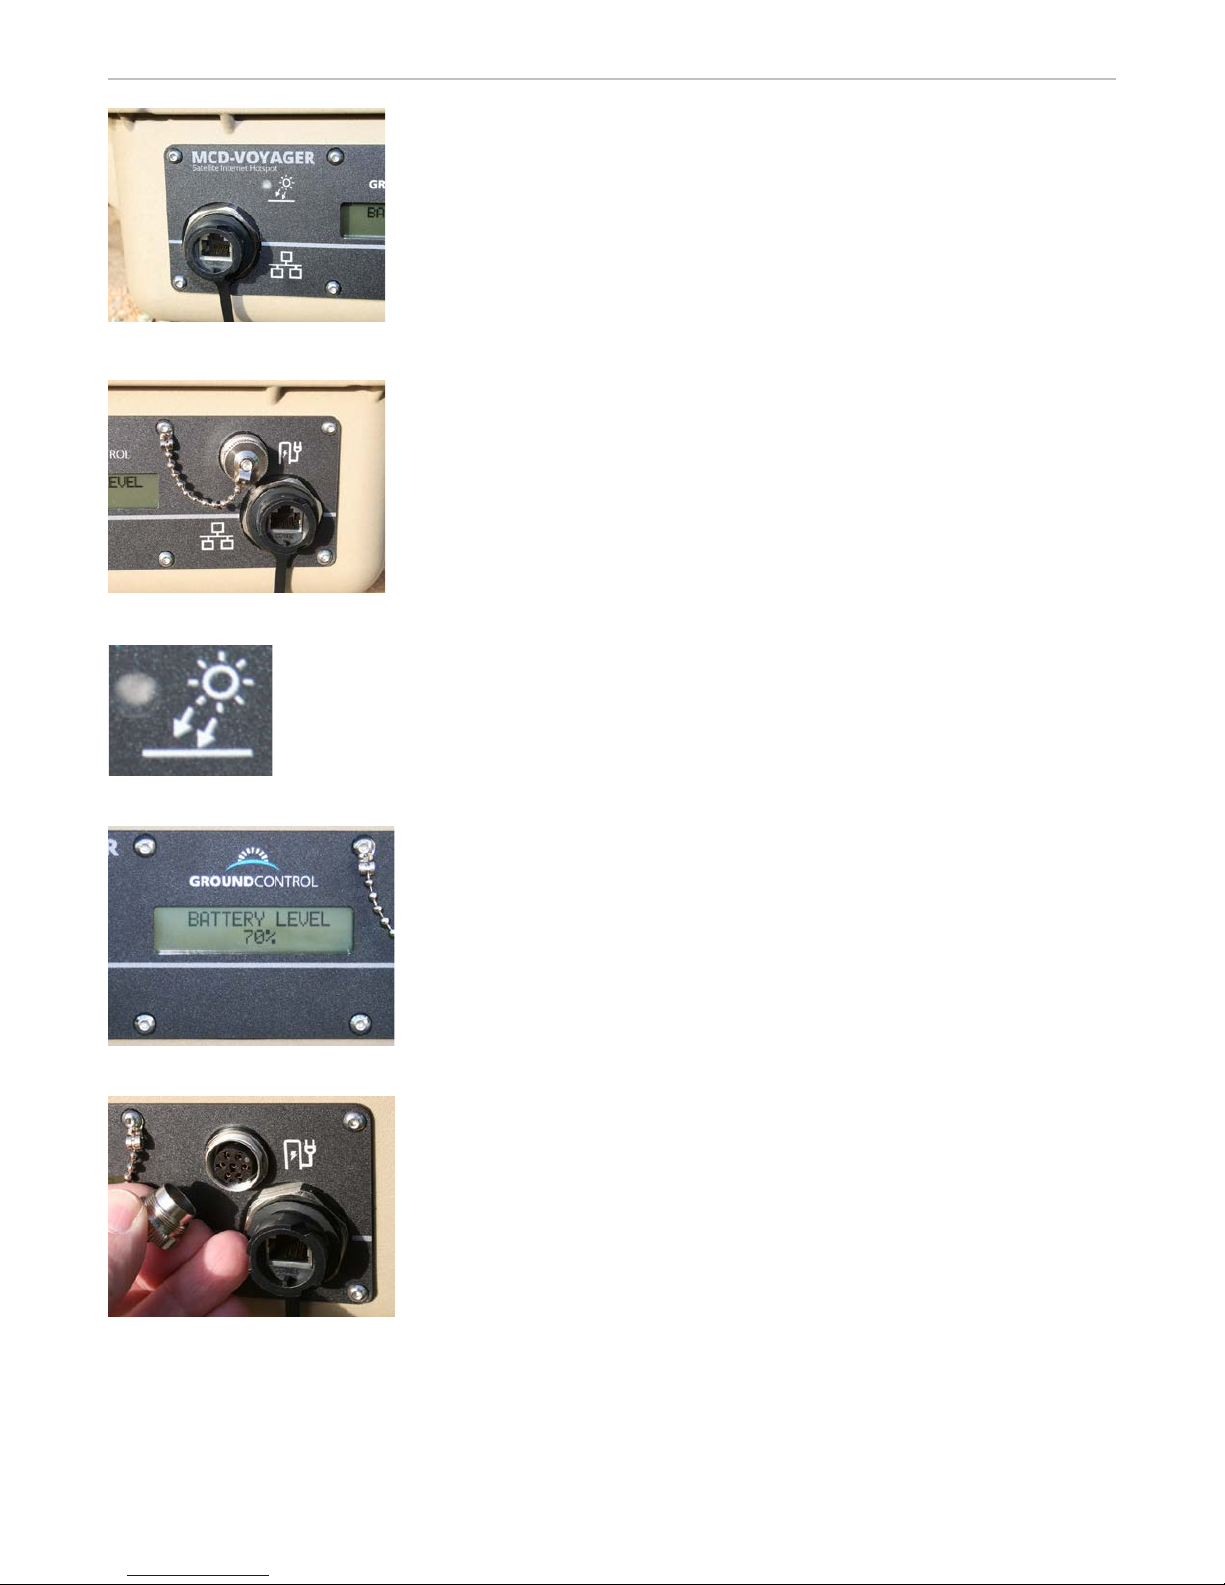
LAN PORT 1 – RJ-45 port for Ethernet connection. It is sealed covered
with a quick-disconnect water cap. This Ethernet port is PoE capable
(Power Over Ethernet).
available to keep a watertight seal for Ethernet cables.
LAN PORT 2 – The MCD-Voyager front panel has a 2
Ethernet connection that is also PoE capable. (Both PoE Ethernets
ports are rated PoE-IEEE 802.3af standard).
nd
RJ-45 port for
Light Sensor – This sensor will backlight the display in darkness so the display
can be read. From the MCD-VOYAGER control panel, the sensitivity of this
sensor can be set, including always off.
Display – Shows power up status and battery level.
Charge / Power Port – This port is used to connect the Power
Supply. The supply will power, recharge and maintain the MCDVOYAGER. Charging is automatic and based on the state of the
batteries. The charge system will work as necessary with the unit on
or off. Higher outside air temperatures may increase charge time if
the unit is on while charging. Always install the Port Cap when
6
Page 7
MCD-VOYAGER User Manual Ground Control
MCD-VOYAGER System Contents
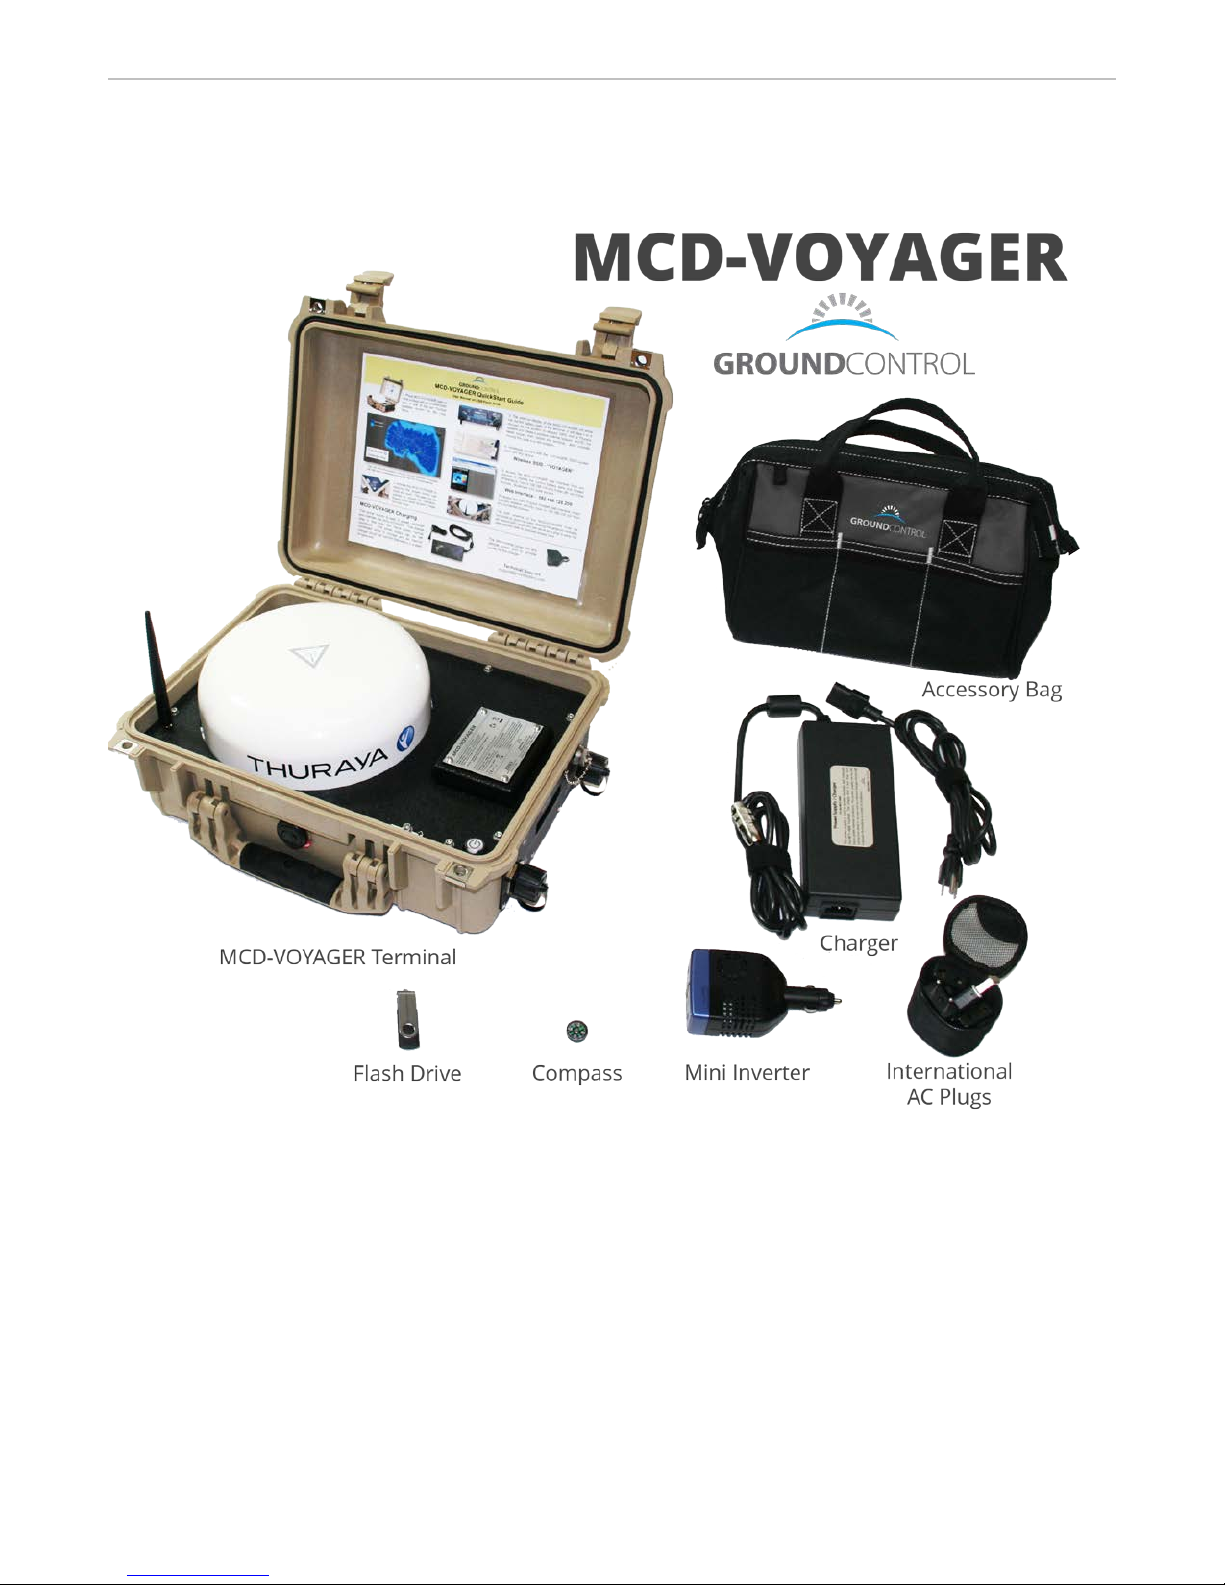
The MCD-VOYAGER includes the MCD-VOYAGER terminal, a USB flash drive with software and user
manuals, a miniature compass, a mini-inverter, an AC/DC power supply/charger, an international
plug kit that allows the MCD-VOYAGER to be charged from any country’s wall power, and
an accessory bag to hold all loose accessories.
7
Page 8
MCD-VOYAGER User Manual Ground Control
wireless connection. This
SMA type antenna and larger
higher gain antennas can easily be mounted. Note the
Inside the MCD-VOYAGER
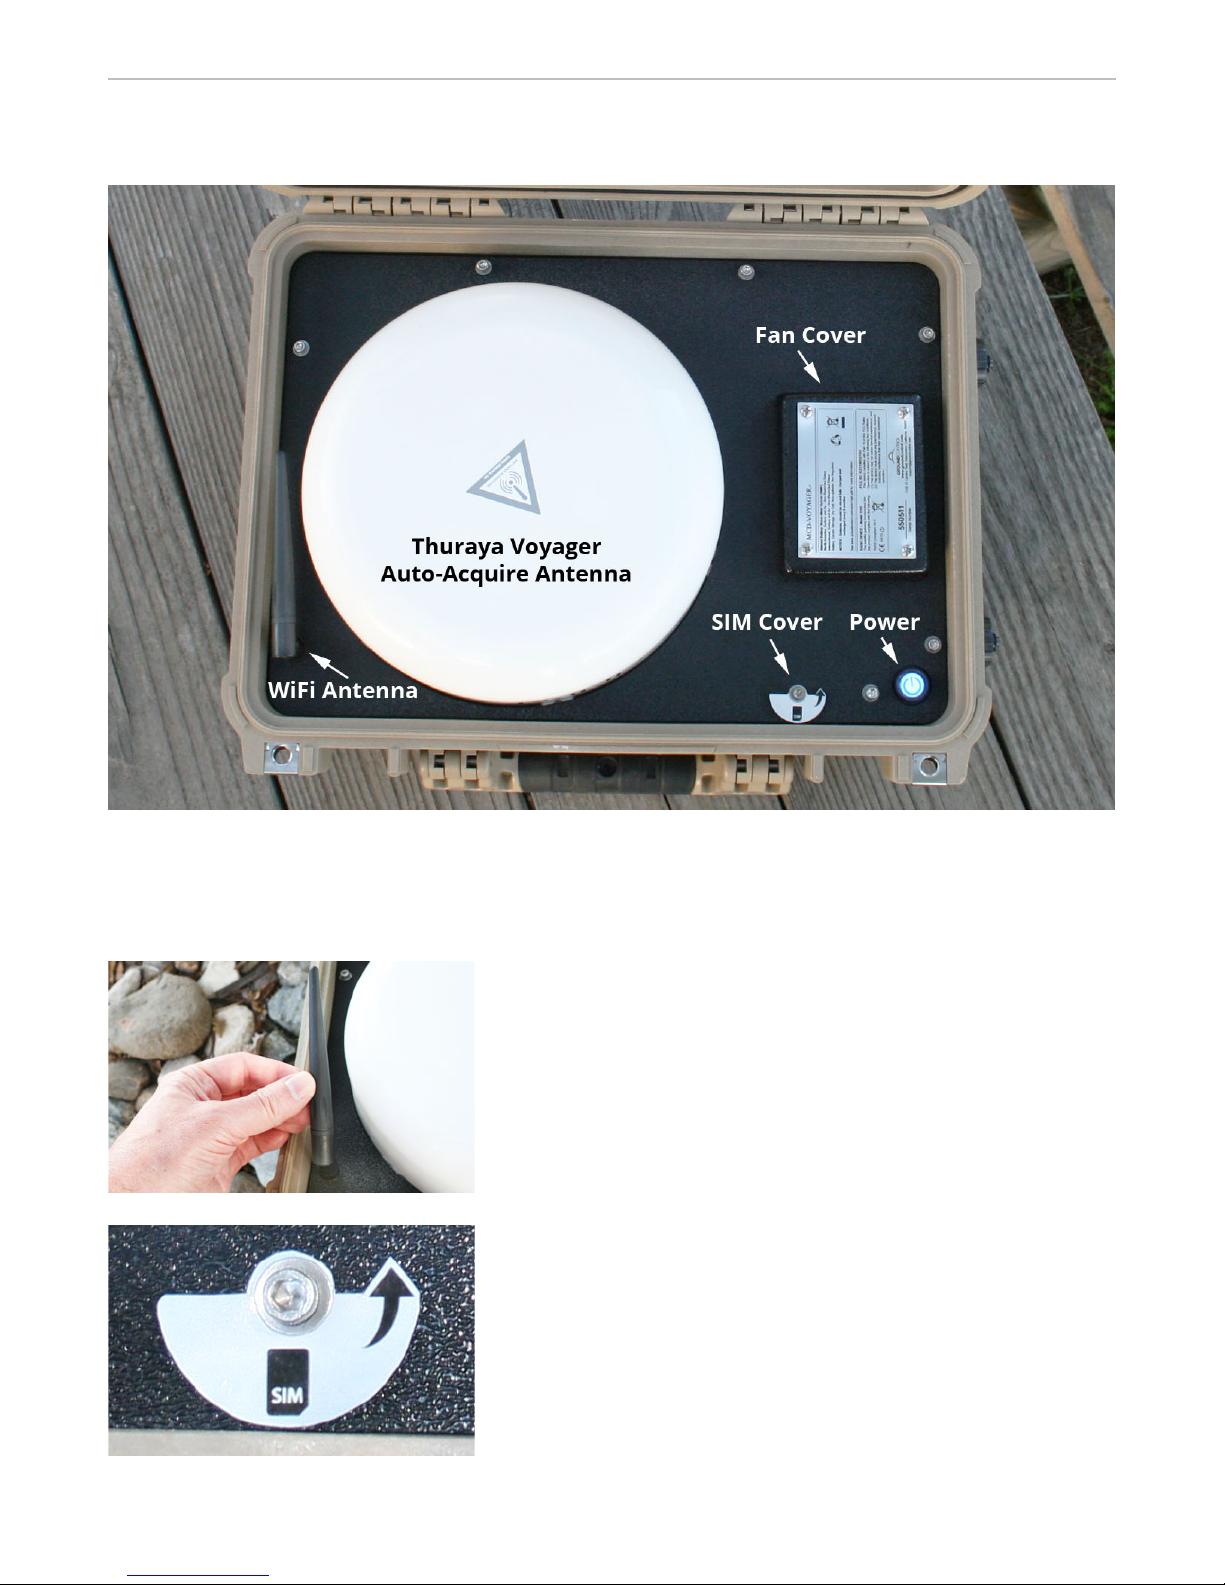
Inside the case (from left side moving right) is the WiFi antenna, the domed Thuraya satellite
antenna, the SIM cover, fan, and the LED power button. There is also an internal fan used to vent
electronics. We recommend having the case lid opened slightly in hot locations.
WiFi Antenna – When raised, the WiFi antenna adds extra
range to the MCD-VOYAGER
antenna is a standard RP-
antenna needs to be folded down in order to close the case
lid.
SIM Card Tray – Rotate the SIM cover to expose the SIM
tray. Insert the SIM with the notch side down, and to the
right. To insert a SIM, push it into the SIM slot until it “clicks”.
To remove SIM card, simply push it in until it clicks, and it
will self-eject when finger is removed.
8
Page 9
MCD-VOYAGER User Manual Ground Control
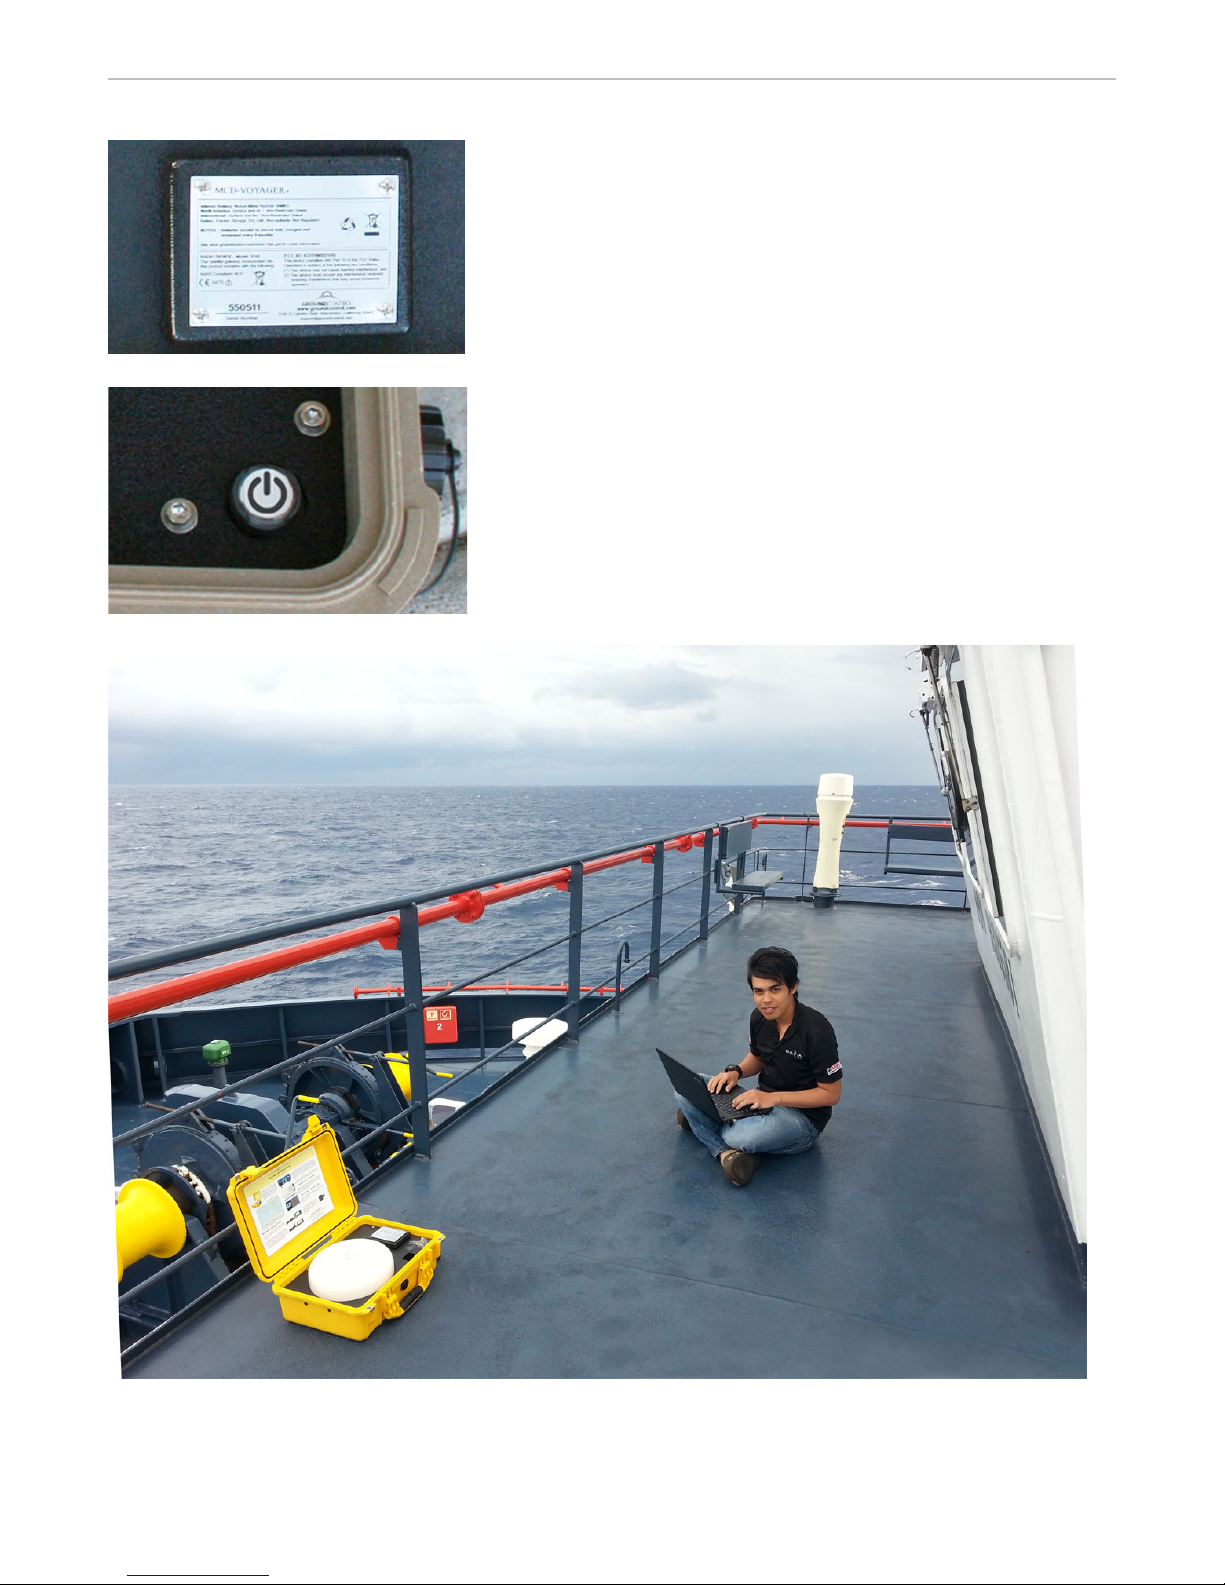
Fan & Fan Cover – The fan inside of the MCD-VOYAGER will
automatically start if the internal temperature becomes too
hot. It is advisable to run the case lid cracked open in hot
weather. The terminal will auto-shutoff when the internal
temperature reaches 70º Celsius (158º Fahrenheit).
Power – On/Off – When pressed, the power button will light
up when the terminal is turned on. To power the system off,
simple press the button again.
The MCD-VOYAGER may be used on a moving vessel, even during heavy seas.
9
Page 10
MCD-VOYAGER User Manual Ground Control
Lay the MCD-VOYAGER flat (top side up, as
satellites.
is possible, the terminal can be
System Operation
STEP 1 – FIND AN OPEN AREA
if to open the case), under an open sky.
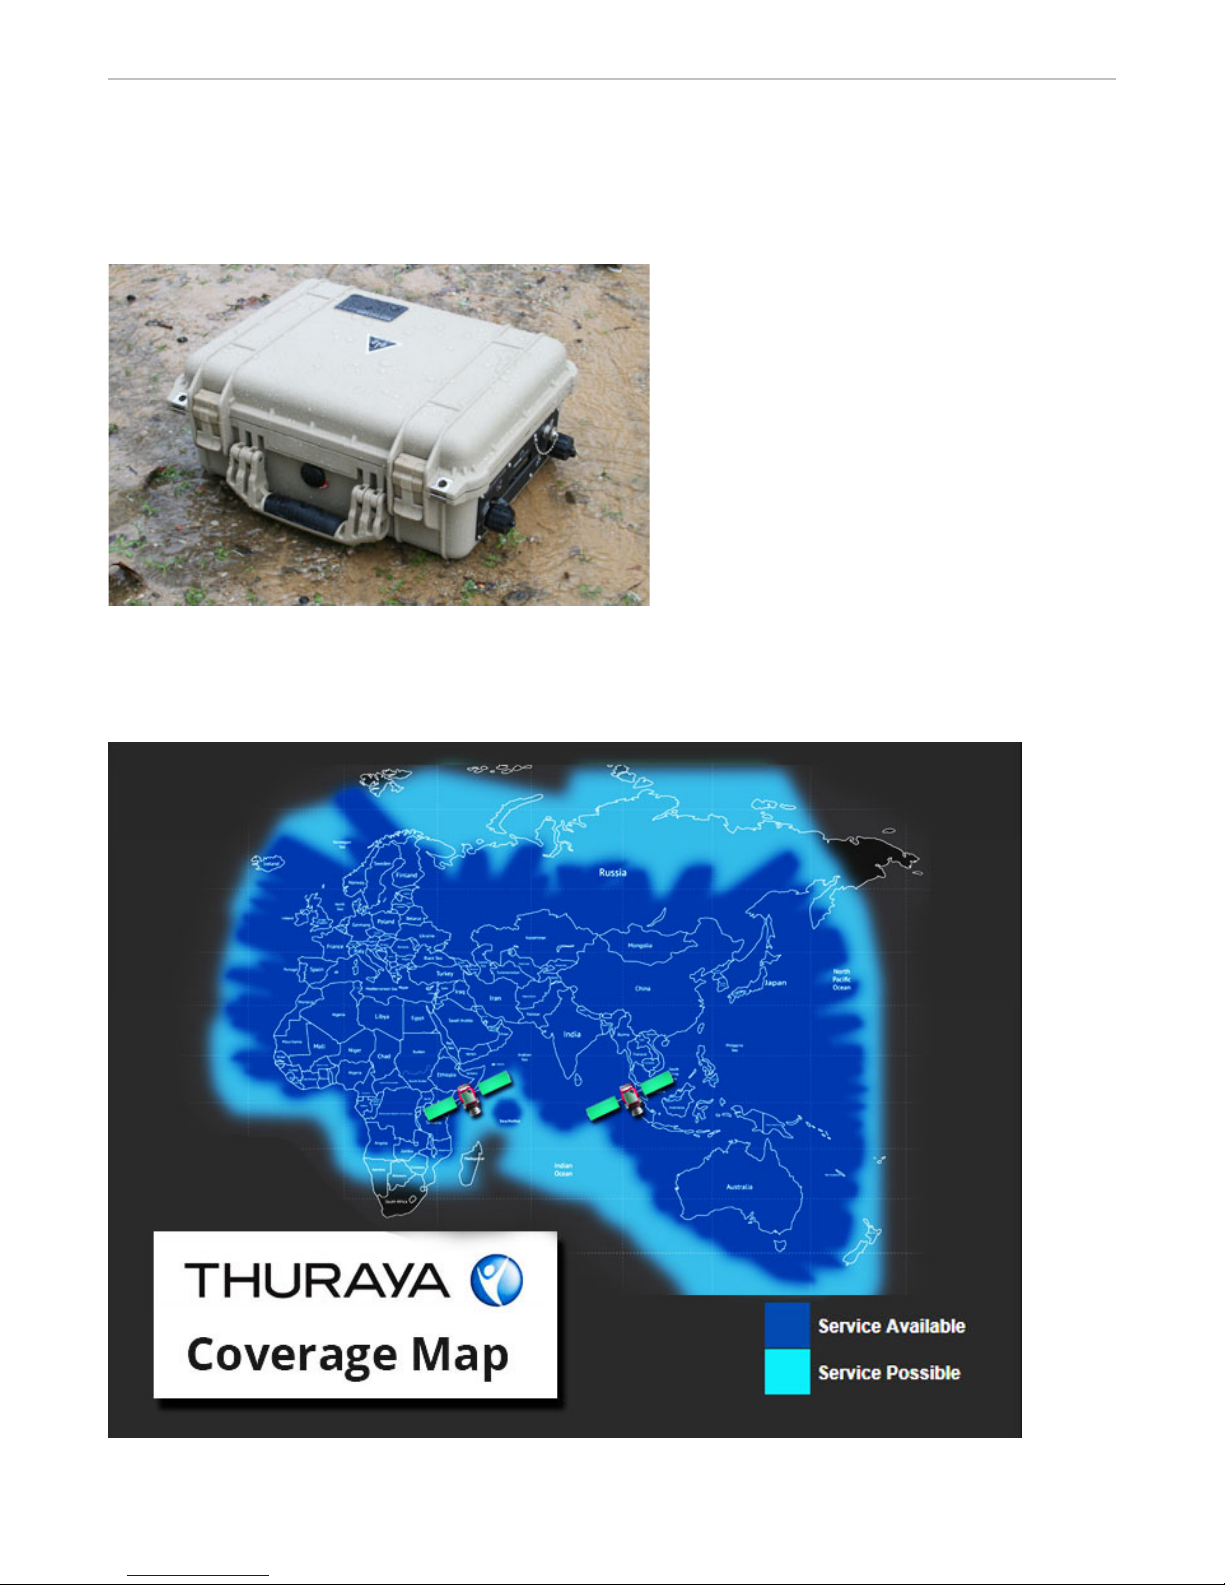
The terminal needs to have line-of-sight
with one of the two Thuraya
These satellites connect with stationary
satellites in the sky, so as long as line-ofsight
located next to a wall or tree.
The map below is very helpful to find what direction the closest Thuraya satellite is. Use the
included compass to help you quickly discern where a good location would be to place the
terminal to avoid visual obstacles like trees and buildings.
10
Page 11
MCD-VOYAGER User Manual Ground Control
The MCD-VOYAGER may also work through glass from inside a building or through a tent wall. If
possible, it is good to place the terminal on an elevated area, such as a vehicle roof, so that the
satellite signal is not interfered with when people walk by.
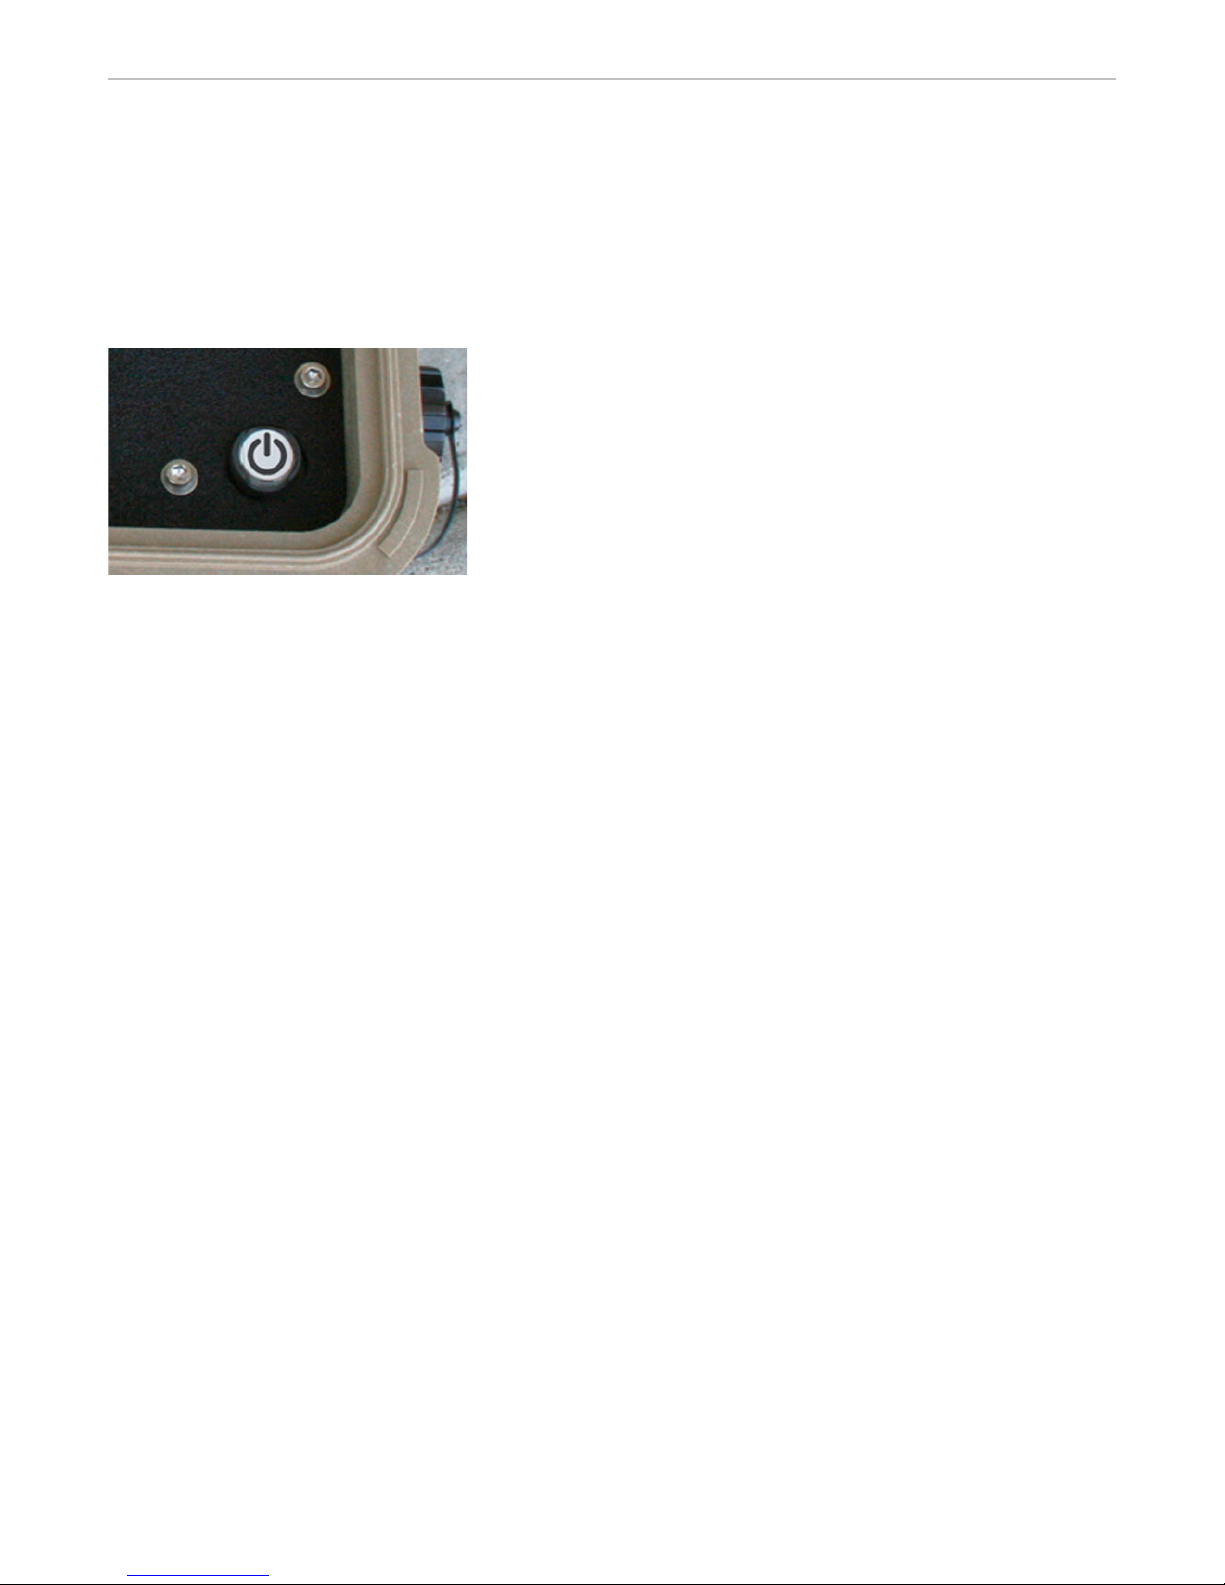
STEP 2 – TURN POWER ON
Open the MCD-VOYAGER to access the power button of the terminal.
Simply press the power button to turn it on. The button itself
will light up to show the system is active. The external display
will show the system status and current battery level.
Close the lid for a watertight seal. The MCD-VOYAGER operates just as well with the lid open or
closed. During hot weather, it is advised to keep the lid slightly open to vent internal heat.
Note, as with all Thuraya IP systems, all personnel should stay at least 1 meter from this device
while it is transmitting.
The MCD-VOYAGER will begin to search for a satellite, as well as attain a GPS location. A GPS signal
will be quickly acquired if there is a wide sky above the terminal, otherwise it make take up to 3
minutes for GPS to be found.
In about 1 minute, the system will be online (3 minutes if GPS hasn’t been found). If it is not online
in that time, simply reboot the system. You may need to move the MCD-VOYAGER to a new
location if it has not found a satellite.
STEP 3 – CONNECTING TO THE MCD-4000 WiFi HOTSPOT
The MCD-VOYAGER establishes a standard WiFi hotspot with the name of “MCD-VOY”. You may
connect a laptop or smart device to the MCD-VOYAGER using that device’s wireless access screen.
Up to 11 devices may connect to the WiFi hotspot. Once connected there is nothing else to
configure. Use the MCD-Voyager like any Internet hotspot connection.
That’s it... you are online!
11
Page 12
MCD-VOYAGER User Manual Ground Control
WiFi Security
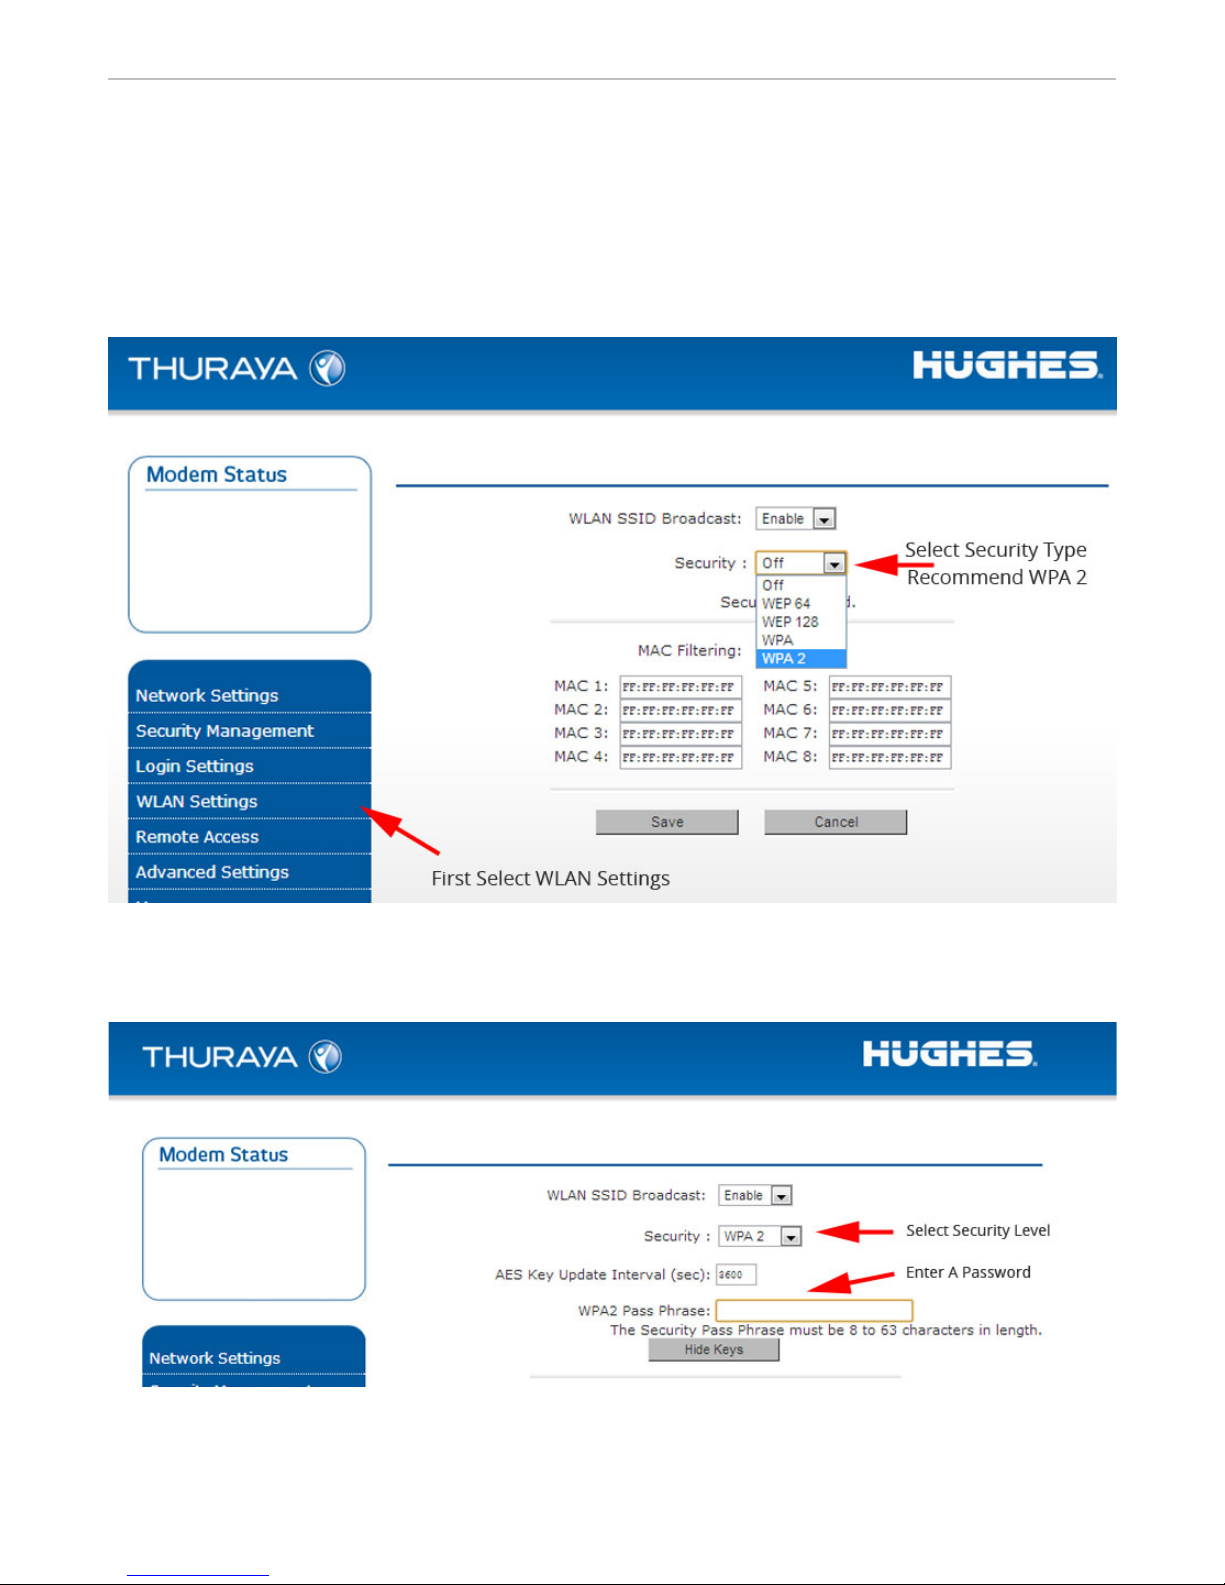
By default, wireless security is NOT enabled when the terminal is shipped. We recommend
enabling WiFi security as soon as possible to keep the terminal from being used by unauthorized
devices. To access the WiFi security screens, type in 192.168.128.100 into any connected browser
window. Next, select the “Settings” menu listing, and choose “WLAN Settings”
Select the type of security you wish to use from the pull down window (WPA2 is recommended).
Once selected, the below screen will appear.
Detailed wireless security information can be found on page 15 of the Thuraya Voyager User
Manual.
12
Page 13
MCD-VOYAGER User Manual Ground Control
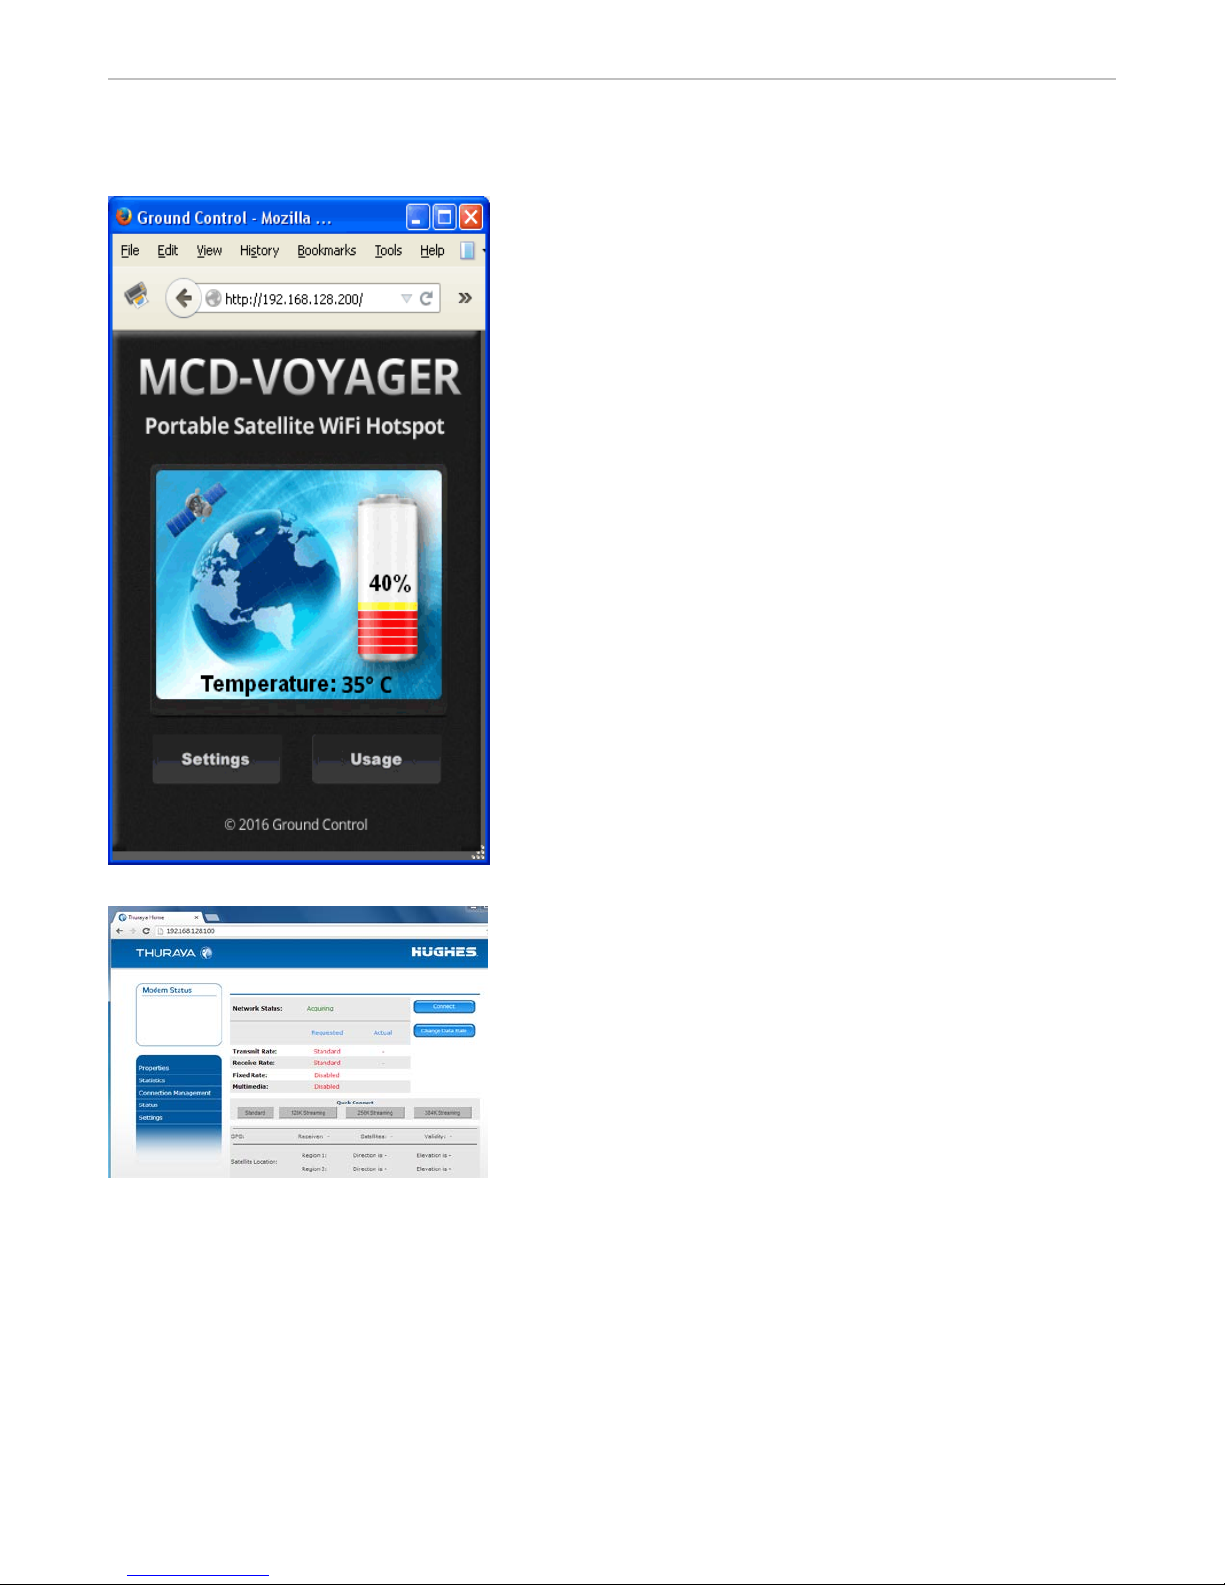
From any connected browser, type in 192.168.128.200 and
Button to be taken to the main
Here you can
to see how much data has been
from any connected browser
192.168.128.100
web interface screen
Accessing the MCD-VOYAGER Web Interface
press Enter. The MCD-VOYAGER main interface screen will
appear. This screen will show you the state of the battery
and give you access to changes settings of the system as
well as access usage totals.
Click on the Settings
interface window of the Thuraya Voyager.
set any parameter of the system.
Click on Usage
transferred. You may reset totals so that you can track
your current session.
Bookmark 192.168.128.200
so that you can monitor battery levels quickly at any time.
From any connected browser, type in
and press Enter. The Voyager
becomes available. These screens will allow a number of
parameter changes such as SSID broadcast name,
enabling/disabling WiFi, MAC filtering, usage totals, along
with a number of other status and parameter screens. For
more information regarding the terminal, please refer to
the Voyager User Manual.
Using the LAN Port
An Ethernet cable may connect to the waterproof jack on the external LAN port of the MCDVOYAGER. Twist off the weather cap and connect a standard Ethernet cable. The MCD-VOYAGER is
normally set to DHCP (Dynamic Routing), which means it will automatically issue an IP address to
any computer that connects to it. The LAN Port does provide PoE (Power Over Ethernet) for
devices that require this feature. A standard Ethernet cable is all that is needed. A crossover cable
is not required.
13
Page 14
MCD-VOYAGER User Manual Ground Control
Monitoring Usage
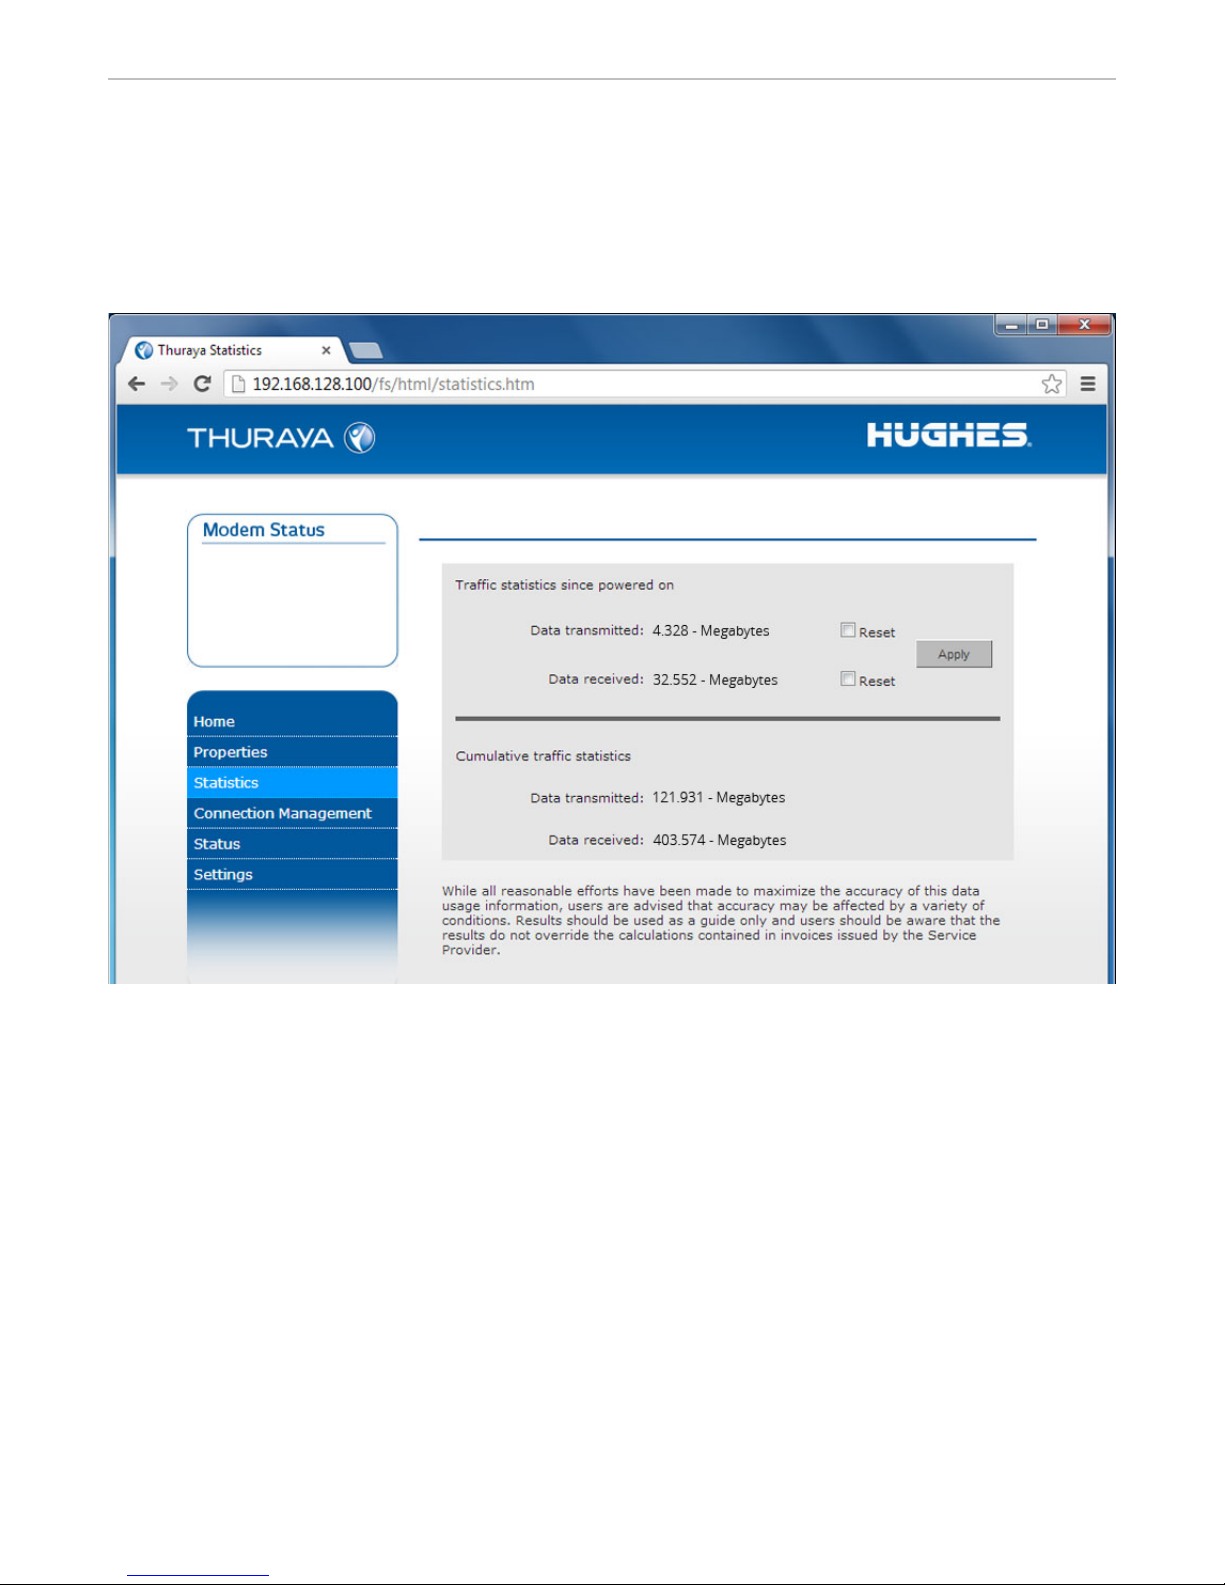
The amount of Megabytes transferred is shown on the Usage Statistics screen of the Voyager Web
Interface. This screen is reached by entering 192.168.128.100 into any connected browser and
selecting “Statistics” from the side menu.
The usage screen is divided into two parts, “Traffic statistics since powered on” are similar to the
trip counter on a vehicle, but this trip counter is reset each time the system is powered on. You
can also reset this counter at any time by selecting the “Reset” checkbox and pressing “Apply”.
The other part is the “Cumulative traffic statistics” which shows all Megabytes transferred over the
life of the terminal. This counter is much like a vehicle odometer and cannot be reset unless the
terminal is factory reset (and upgraded to the most recent firmware).
Note these totals are estimates and should only be used as a general idea of usage.
14
Page 15
MCD-VOYAGER User Manual Ground Control
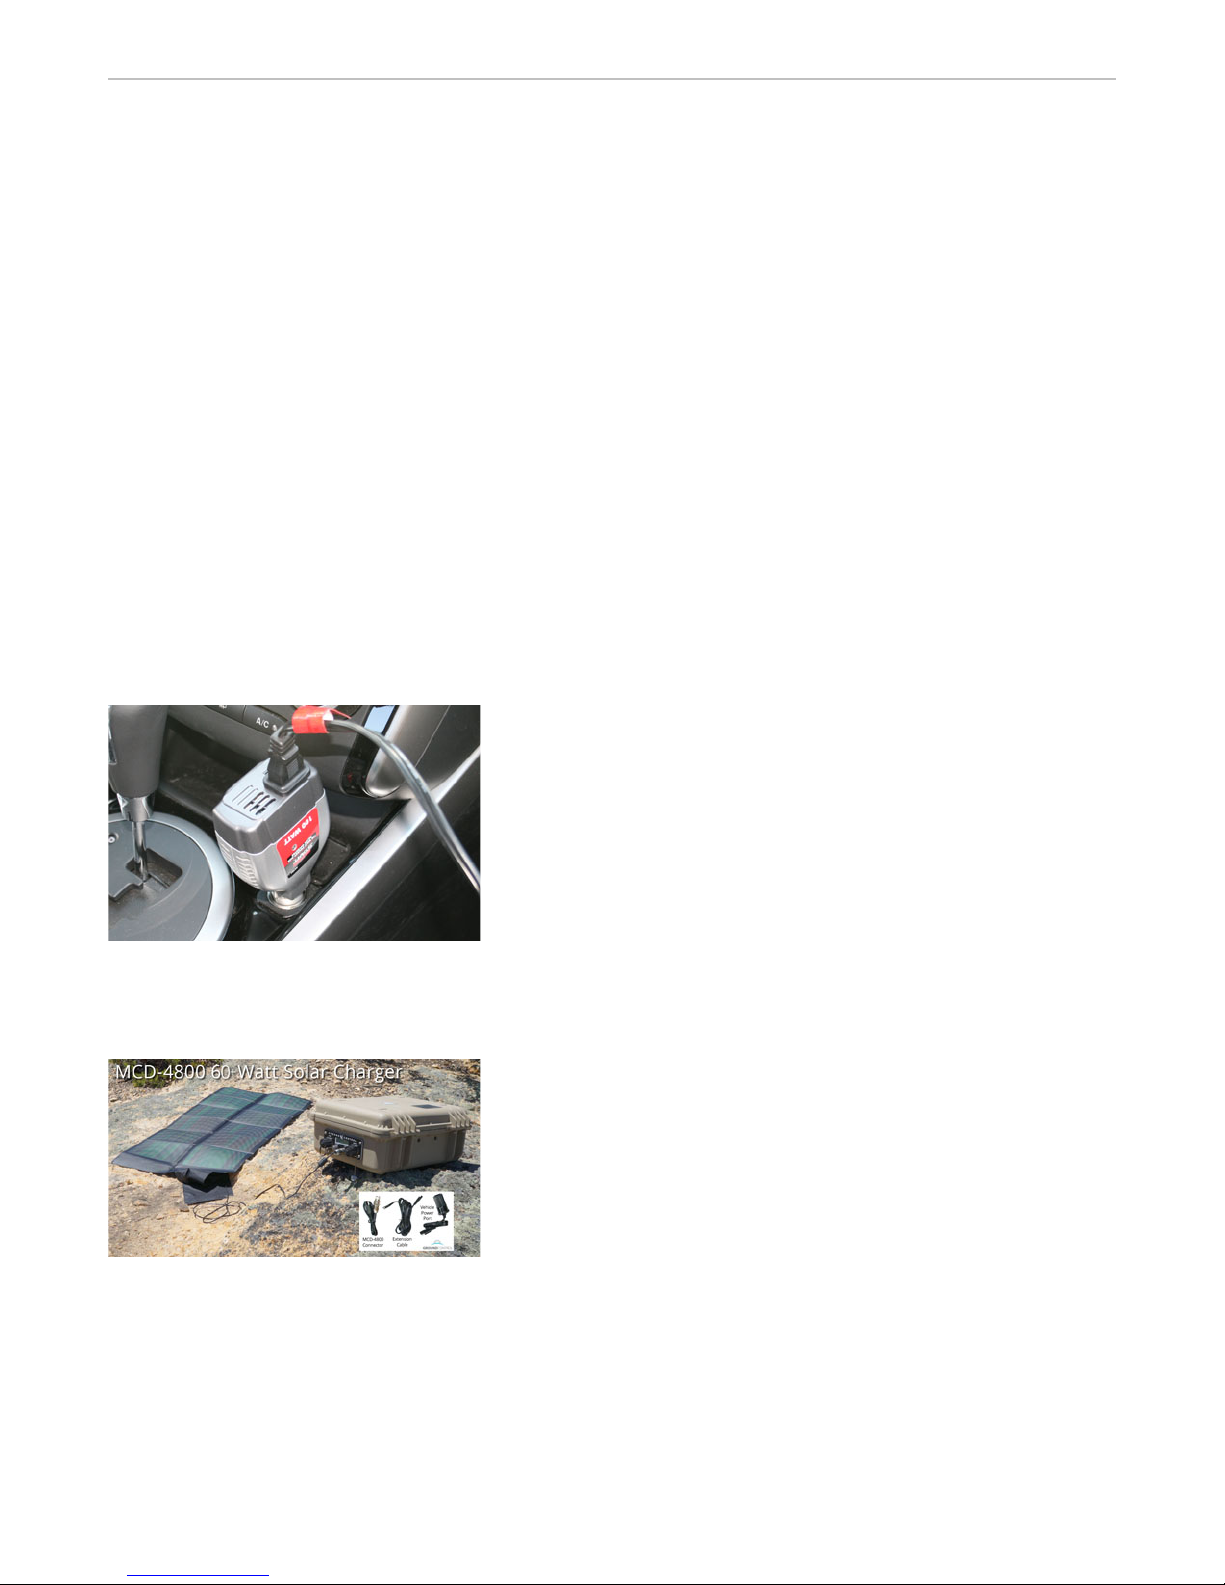
Inverter into any vehicle power port to provide
charger. Keep the vehicle
will be online for any
The optional foldable solar panel for the MCD-VOYAGER will
provide up to 75% of the power for operation, increasing
batteries in no power locations when power is off. Kit
Charging Facts
Recharging the MCD-VOYAGER Internal Batteries
The MCD-VOYAGER will operate about 5 hours on a single battery charge. To charge the system,
simply connect the charger to the system. Charge time will take less than four hours if fully
discharged.
Long Term Storage Charging
The charger may be left connected to the MCD-VOYAGER during storage to keep the MCDVOYAGER’s batteries in a state of readiness.
If you choose not to keep the system plugged in during storage, we recommend recharging every
month, and no less than every 6 months to avoid complete battery depletion.
Vehicle Power for Continuous Use & Charging
Plug the Minipower for the MCD-VOYAGER
running if the MCD-VOYAGER
significant period of time to avoid depleting the car battery.
Solar Charging for Continuous Use and Charging
run time by 300 to 400%. It will also recharge the internal
includes a universal 12 volt vehicle charge port to recharge
other equipment.
15
Page 16
MCD-VOYAGER User Manual Ground Control
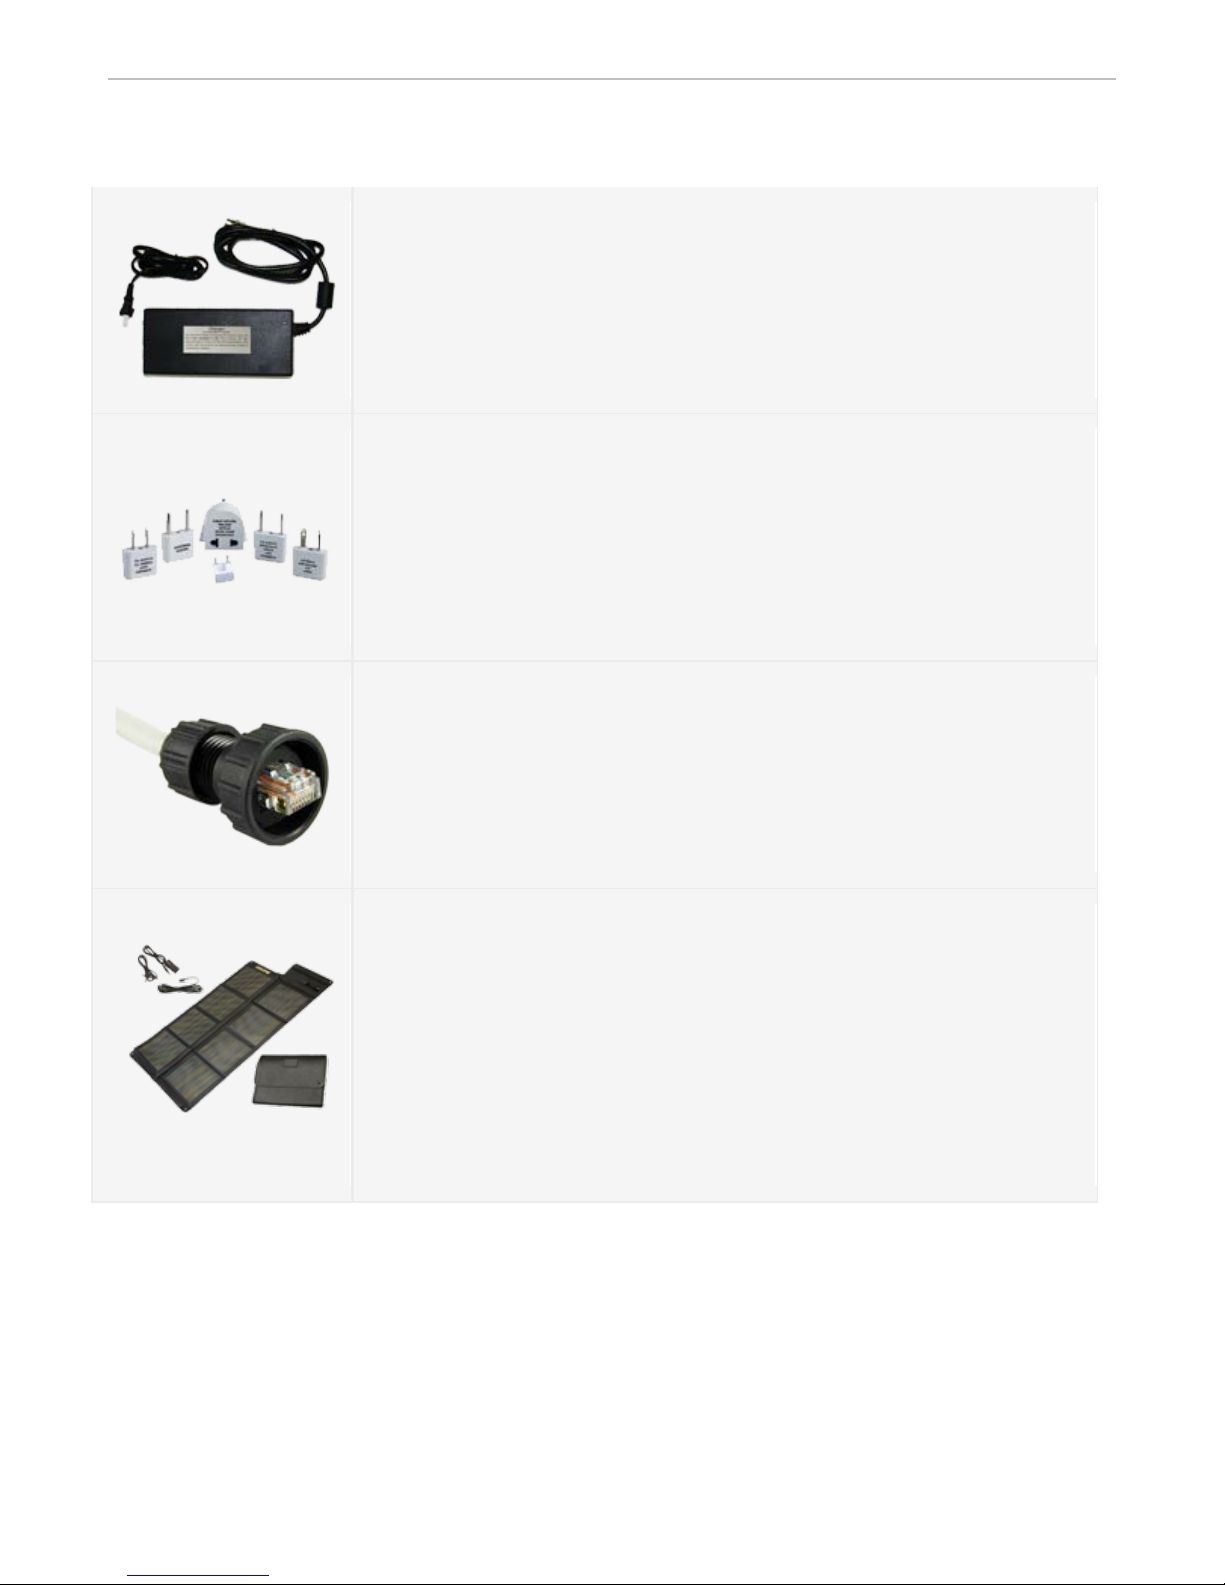
MCD-VOYAGER Replacement AC/DC Charger
and maintenance charging for long term storage. Charge time is just
MPN: MCDVOYCHARGER
Watertight RJ-45 Connectors
MPN: MCDVOYRJ45
60+ Watt Foldable Solar Panel
MCD-VOYAGER Accessories
The power supply for the MCD-VOYAGER works for both fast charging
under 4 hours if the terminal is complete discharged. Keep the power
supply plugged in for long term storage to maintain battery at 100%.
Replacement Universal Power Connectors
International plugs including U.S., U.K., European, Australian, China, N.
Europe.
MPN: MCDVOYCON
Make your own watertight cables with these connectors. While standard
Ethernet cables may connect to the MCD-VOYAGER front panel, these RJ45 Ethernet connectors will make your Cat5e Ethernet cable have a
watertight connection to the MCD-VOYAGER case. Requires standard RJ45 crimper tool to make.
For MCD-VOYAGER & Universal Use
This lightweight 60+ watt solar panel will connect directly to the MCDVOYAGER for both power assist and recharging. Recharge time is 10-12
hours in full sunlight. If the MCD-VOYAGER is turned on, the solar panel
will power assist up to 75% of the power needed, extending the 5 hour
battery life 300% to 400%. This panel also includes a "universal" cable kit
such as a vehicle power port to charge other devices that can power
from a vehicle port.
MPN: MCDVOYSOLAR
16
Page 17
MCD-VOYAGER User Manual Ground Control
from any vehicle power port or battery or any DC power
power locations.
. Includes voltage regulator for
Hydride) battery packs inside of the case. Kit includes instructions for
24 month extension on the standard 12 month warranty.
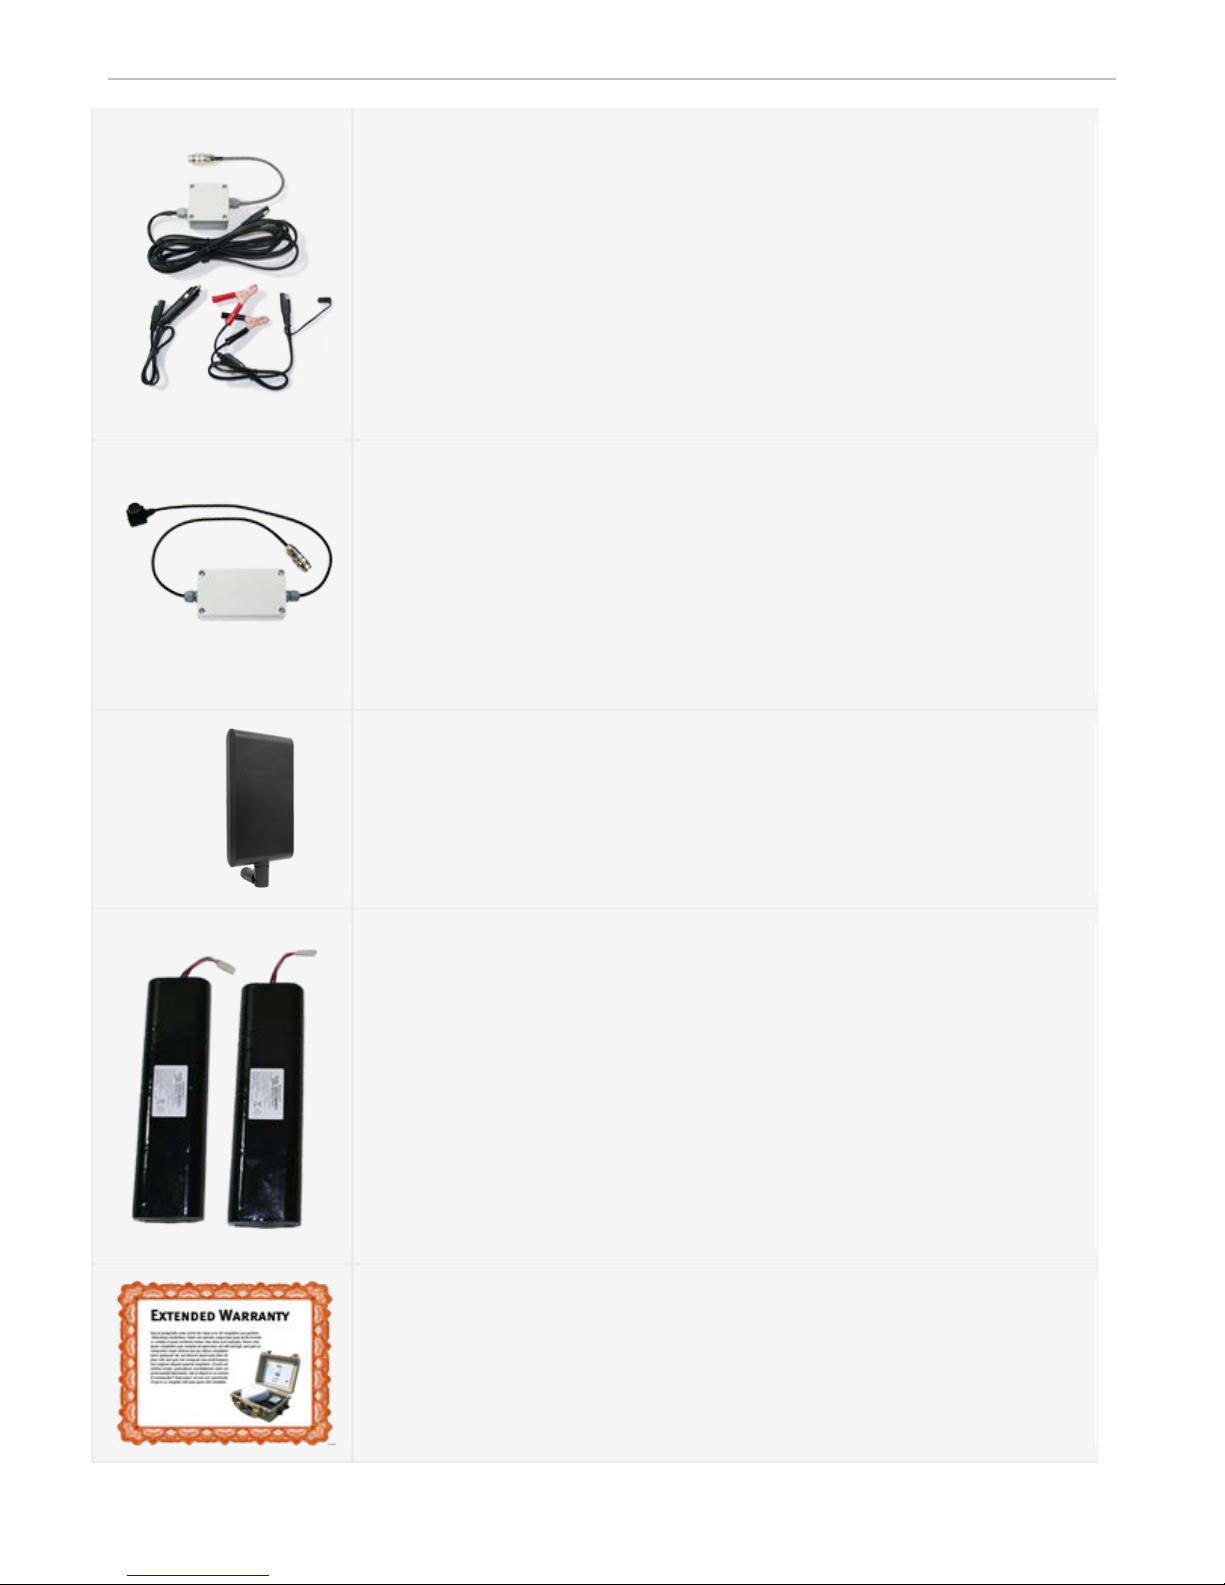
DC Vehicle / Battery Power Cable
3 meters (10' feet) DC power cable - Power or recharge the MCDVOYAGER
source. Includes quick-connecting alligator clips & vehicle power port
connector. Input - 12VDC (vehicle battery) Output 24VDC. This accessory
is essential for charging the MCD-VOYAGER in no-
MPN: MCDVOYDCVEHICLE
Battery Connector Cable
36" (3 feet) connector cable between an external battery (type BB-2590
or BB-5590) and the MCD-VOYAGER
smooth operation.
MPN: MCDVOYBATCAB
Directional 8 dBi Wireless Antenna
This directional antenna extends the wireless range of the MCDVOYAGER in one direction (a focused angle 66 degree wide by 16
degrees vertical from the face of the antenna).
MPN: MCDVOYANT01
Gen 2 - MCD-VOYAGER Internal Batteries
(Includes 2 battery packs)
Each MCD-VOYAGER includes two high-capacity NiMh (Nickel-Metal
replacing packs with existing batteries.
MPN: MCDVOYBAT
MCD-VOYAGER 3 Year Extended Warranty
This is a
Standard & extended warranties include replacement parts & labor.
SKW: MCDVOY3YWAR
17
Page 18
MCD-VOYAGER User Manual Ground Control
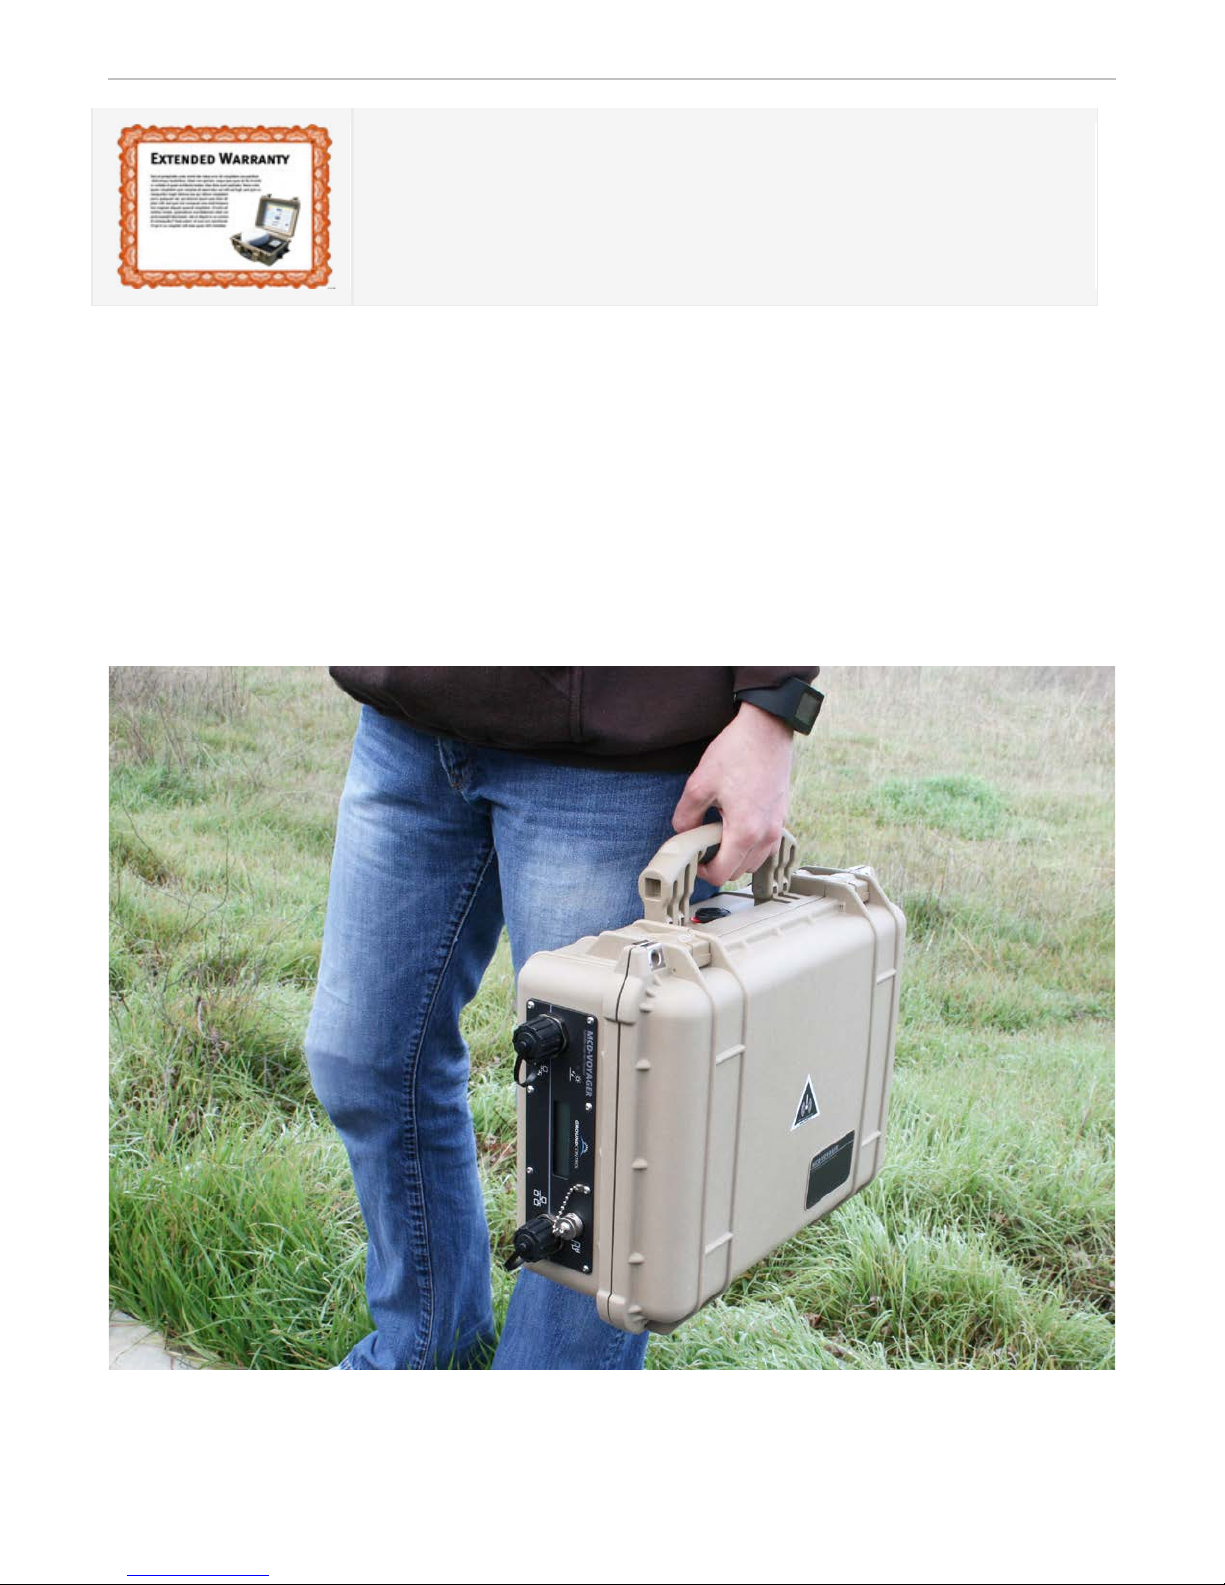
This is a 48 month extension on the standard 12 month warranty.
MCD-VOYAGER 5 Year Extended Warranty
Standard & Extended warranties include replacement parts & labor.
SKW: MCDVOY5YWAR
The MCD-VOYAGER is watertight, and operates with the case lid closed.
18
Page 19
MCD-VOYAGER User Manual Ground Control
MCD-VOYAGER Contents
The MCD-VOYAGER integrates with Thuraya Voyager terminal enclosed in a hardened
External Port - Power
Power & charge port for AC/DC charger or foldable solar option.
Internal battery life
Up to 5 hours normal use
Onboard Battery Type
NiMH (Nickel-Metal Hydride).
Regional Power Compatibility
Includes international plug kit for U.S., U.K., European, Australian, China, N. Europe
Humidity
95% RH at +40°C
Operating Temperatures
-25° C to +70° C (-13° F to 158° F ) operating
Wind
If case is secure, it is not affected by wind
MCD-VOYAGER Technical Specifications
Pelican 1450 case (Flyaway Case) with our proprietary electronics and software. System
components include an AC/DC power-supply / charger with international plug adapters
(US, UK, AU, EU, China, N. Europe), 12V vehicle mini-inverter, compass, laminated
Quickstart Guide (affixed to case lid), users manuals, software, an MCD-VOYAGER
gadget App on a USB flash drive, and a small ruggedized bag to hold all accessories.
Terminal Capability Open TCP-IP connection: Internet, Email, FTP, VPN, video streaming.
Internet Speeds Rated up to 444 Kbps down x 404 Kbps up with standard Thuraya IP service
Streaming Dedicated (unshared) streaming speeds of 384 Kbps
Static Public IP Available from most Thuraya IP providers
Wireless LAN 802.11b/g/n - Up to 100 meters WiFi range. Up to 11 concurrent wireless connections.
Wireless Security WEP, WPA, WPA 2 encryption. SSID broadcast control, MAC address filtering
External Port - LAN RJ45 Ethernet (PoE capable - Power Over Ethernet)
Exterior Case Dimension 432mm x 349mm x 171 mm (17"L x 13.75"W x 6.75 "H)
Weight – MCD-Voyager 11.46 kg (25 lbs 4.3 oz)
Recharge Time Less than 4 hours (from fully discharged) using 110 to 240 VAC (worldwide)
Power Supply - Charger Input 110 to 240 Volts AC. Output 28 Volts DC @ 8 Amps
Rain / Water / Dust: IP66 when closed (withstands powerful water jets from any direction)
19
Page 20
MCD-VOYAGER User Manual Ground Control
Ice
20mm buildup before signal loss
Turning Rate (Azimuth)
40° per second
Turning Acceleration
50°/s2
Case Colors Available
Desert tan (default color), yellow, black, silver, orange OD green
Manufacturer Support
The MCD-VOYAGER is integrated satellite technology manufactured by Ground Control
Warranty
1 year standard warranty. Extended 3 year and 5 year extended warranties available.
Made In The USA
The Thuraya Voyager transceiver and the MCD-VOYAGER case are U.S. manufactured
Compliance & Certification
CE, EMC 301 444, 301 489, IEC 60950, FCC ID: U9R-W2CBW0015
20
Page 21

MCD-VOYAGER User Manual Ground Control
Troubleshooting
SYSTEM OVERHEATING
The MCD-VOYAGER has an internal fan that will activate when internal temperatures increase.
When the temperature reaches 130
automatically. To avoid this, move the MCD-VOYAGER to shade and open up the case lid for
venting.
WIRELESS ACCESS ISSUES
If you are unable to connect to the wireless access point, use an Ethernet cable to directly connect
to the system, and access the web interface screen (192.168.128.100). Click on WLAN Settings to
access the wireless access parameters and configure to your required specifications (including
WEP Security).
UNABLE TO CONNECT TO THE INTERNET
If you are able to connect to the wireless access point, but unable to connect to the Internet, it
could be:
1. The system has not yet acquired GPS. If this is the case, turn the system off, and then back on.
Access the Web Interface screen to see the current status of the Thuraya connection.
2. A Thuraya satellite has not been found, normally because there is a line-of-sight obstacle like a
tree or building. Simply move the case to a new location and try again. Make sure to turn it off,
and back on when a new location is found. Make sure there are no items stored inside or on top
of the case that may be blocking the signal.
º Fahrenheit (54º Celsius), the terminal will shut off
LOCATION AND LINE-OF-SIGHT
When choosing a place to set up your satellite equipment, please keep the following in mind:
First, all satellite systems require constant line-of-sight access to the stationary satellite in the sky,
which means that you must choose your location with care. Small obstructions may sometimes be
ignored, but that is never guarantee of connectivity. Large obstructions – such as trees, buildings,
etc – must be avoided. The case requires a clear view of either of the two Thuraya satellites for
operation.
Second, there are other things that can obstruct your signal through radio-spectrum interference.
High voltage power lines may cause interference with the satellite signal, reducing performance or
preventing access altogether. Radar emitters, such as those found at airports, in police vehicles,
and in certain areas as part of speed enforcement measures, may also prevent the satellite
system from obtaining a signal lock. Further, radar installations can shut off an already
established satellite link by causing harmful interference.
21
Page 22

MCD-VOYAGER User Manual Ground Control
Third, it is wise to place the system high enough so that people who walk around the system will
not interfere with the signal. We recommend placing he case on top of a vehicle, or other high
location.
Remember, use good judgment when choosing a set-up location. Choose an area with no
obstructions to the south (if in the United States), and clear of other sources of radio or radar
interference.
All rights reserved. This publication and its contents are proprietary to Ground
Control Systems, Inc. (aka Ground Control). No part of this public ation may be
reproduced in any form or by any means without the written permission of
Ground Control, 3100 El Camino Real, Atascadero, CA 93422.
Ground Control has made every effort to ensure the correctness and
completeness of the material in this document. Ground Control shall not be liable
for errors contained herein. The informati on i n this document is subject to change
without notice. G round Control makes no warranty of any ki nd with regard to this
material, including, but not limited to, the implied warranties of merchantability
and fitness for a particular purpose.
Ground Control and Ground Control Systems are trademarks of Ground Control
Systems, Inc. All other trademarks are the property of their respective owners.
Copyright © 2016 Ground Control Systems, Inc.
Trademarks
www.groundcontrol.com
22
 Loading...