

Page 1

ROLLOVER
5 in 1 cot to full size single bed
This product is covered by a number of registered designs, trademarks and patents pending
!
!
Two adults required to assemble this cot.
The manufacturer's assembly instructions must be followed
in detail to ensure the safety features to the cot are not compromised.
Page 2
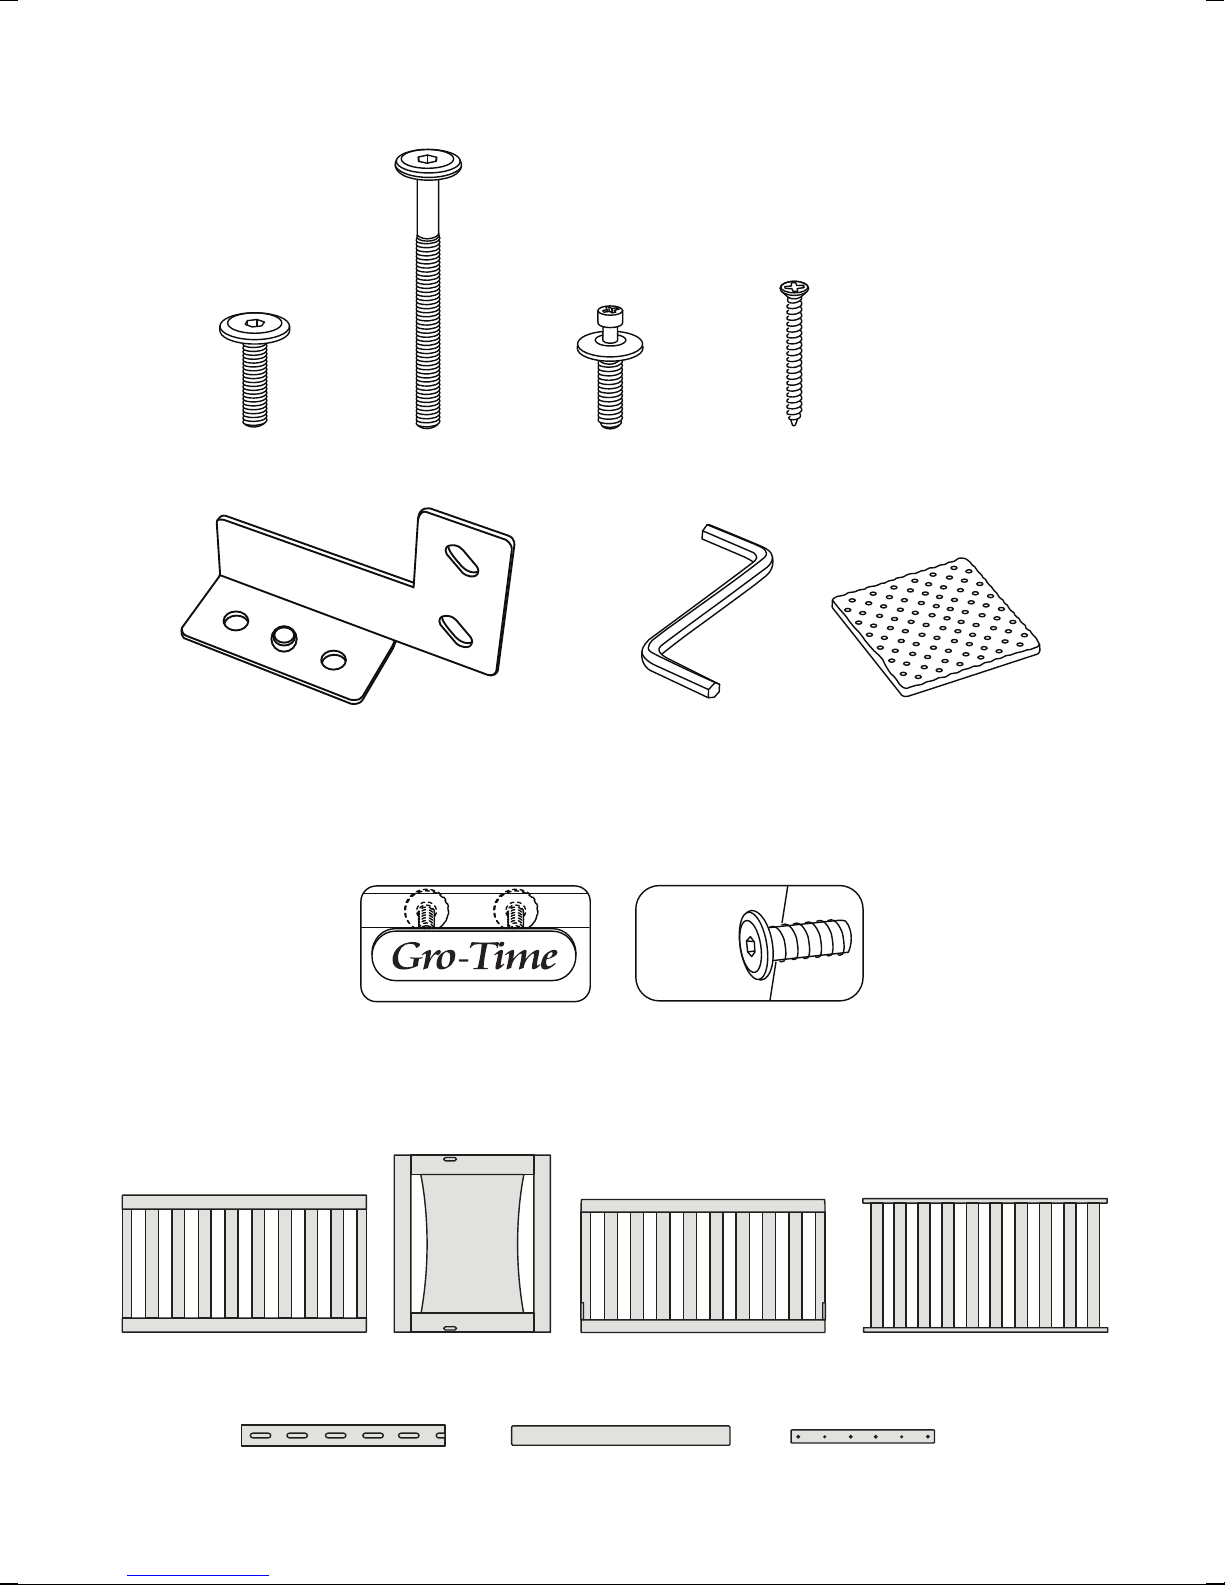
HARDWARE INVENTORY
x12x32
16mm
HA
Bolts
70mm Bolts
HB
x4
CAMDOCK
PRE-INSTALLED HARDWARE
TM
Base Plates
HF
x4
Guide Pins
HC
Allen Key
HG
x4
Wood Screws
HD
x2
x8
Feet Pads
HH
Oval Badges x 4 pcs with
40mm Bolts x 8 pcs
PARTS LIST
1 x Fixed Side
PA
4 x BILATERAIL TM Base Rails
PE
2
2 x End Panels
PB
1 x Drop Side
11 x Single Bed Slats
PF
Locking Bolts
PC
2 x BILATERAIL
PG
TM
Base Bracketss
1 x Cot Base
PD
Page 3
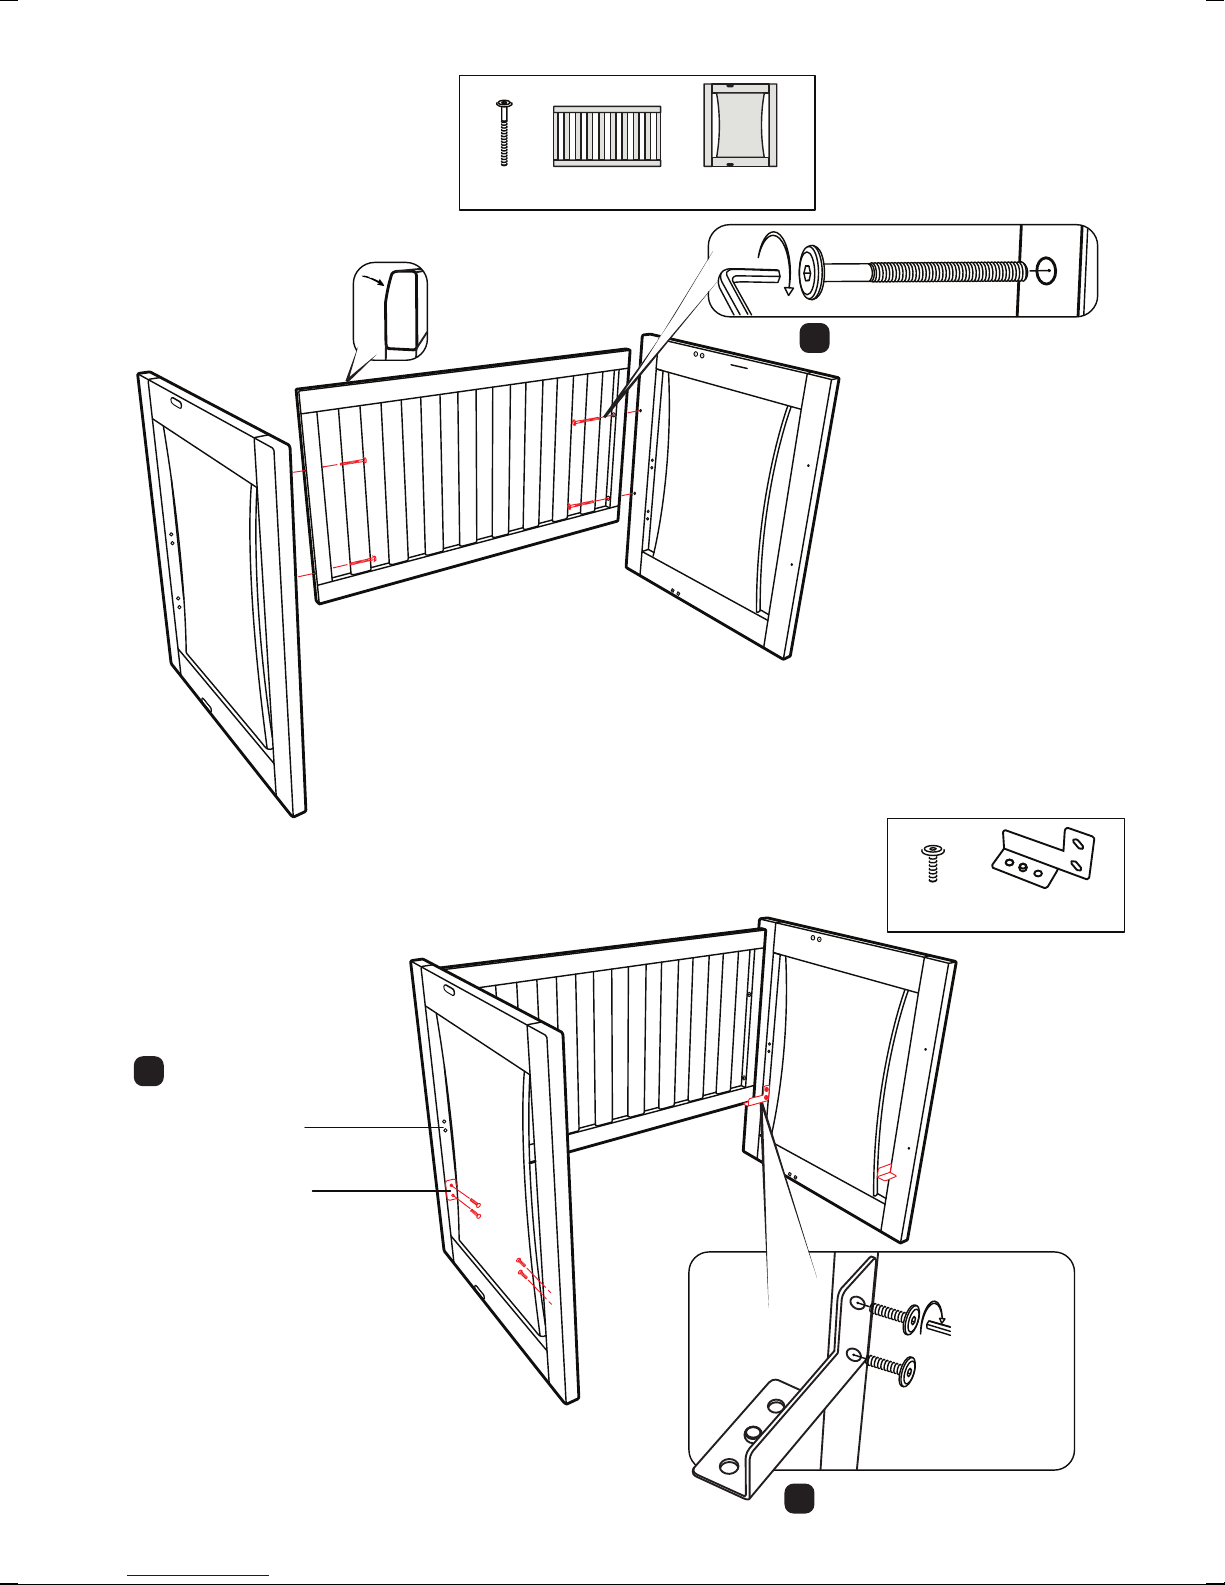
STEP 1
ASSEMBLE FIXED SIDE TO ENDS
x4
70mm Bolts
HB
Fixed Side
PA
x1
End Panels
PB
x2
Do not tighten bolts at this stage
!
STEP 2
FIX FOUR CAMDOCK TM BASE PLATES*
*Patent pending
Chose high or low
!
position for mattress base
HIGH
Bassinet level
LOW
Toddler level
x8
16mm Bolts
HA
CAMDOCK Base Plates
x4
TM
HF
Do not tighten bolts at this stage
!
3
Page 4
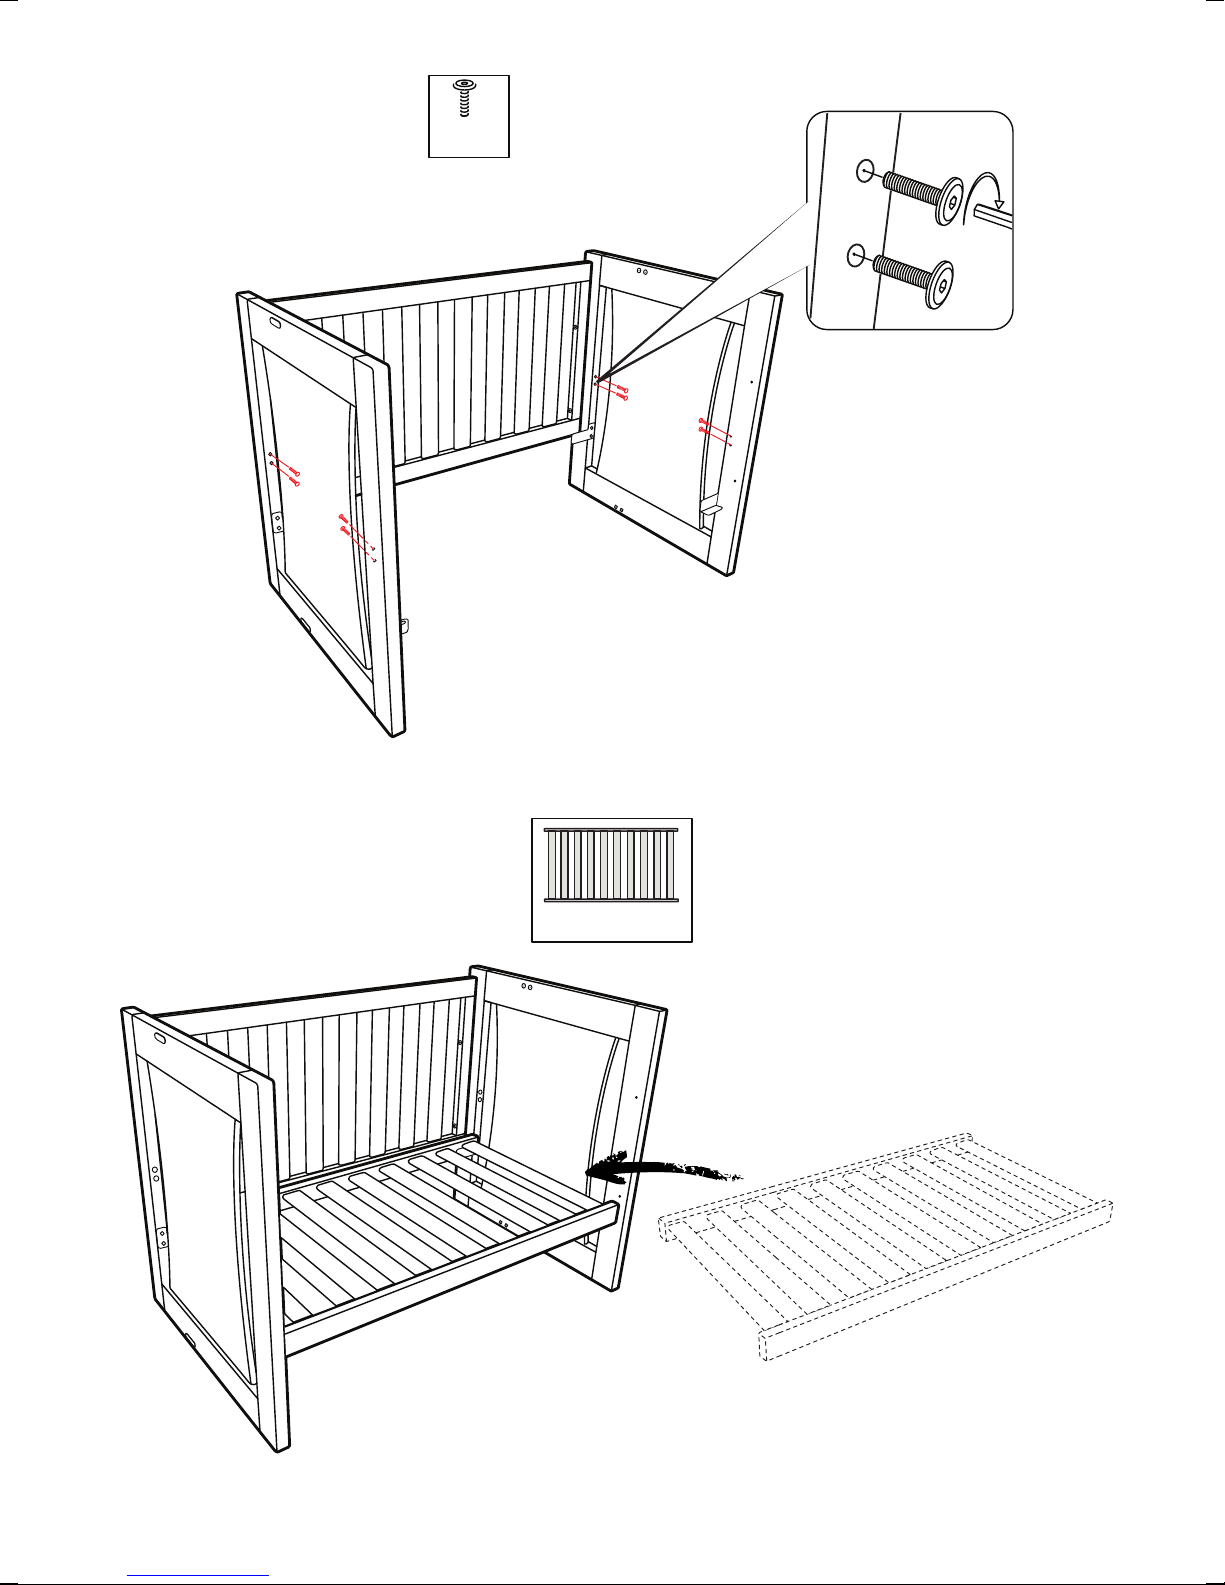
STEP 3
PLUG FINGER ENTRAPMENTS
6mm Bolts
1
HA
x8
STEP 4
PLACE COT BASE ON TOP OF BASE PLATES
1 x Cot Base
PD
4
Page 5
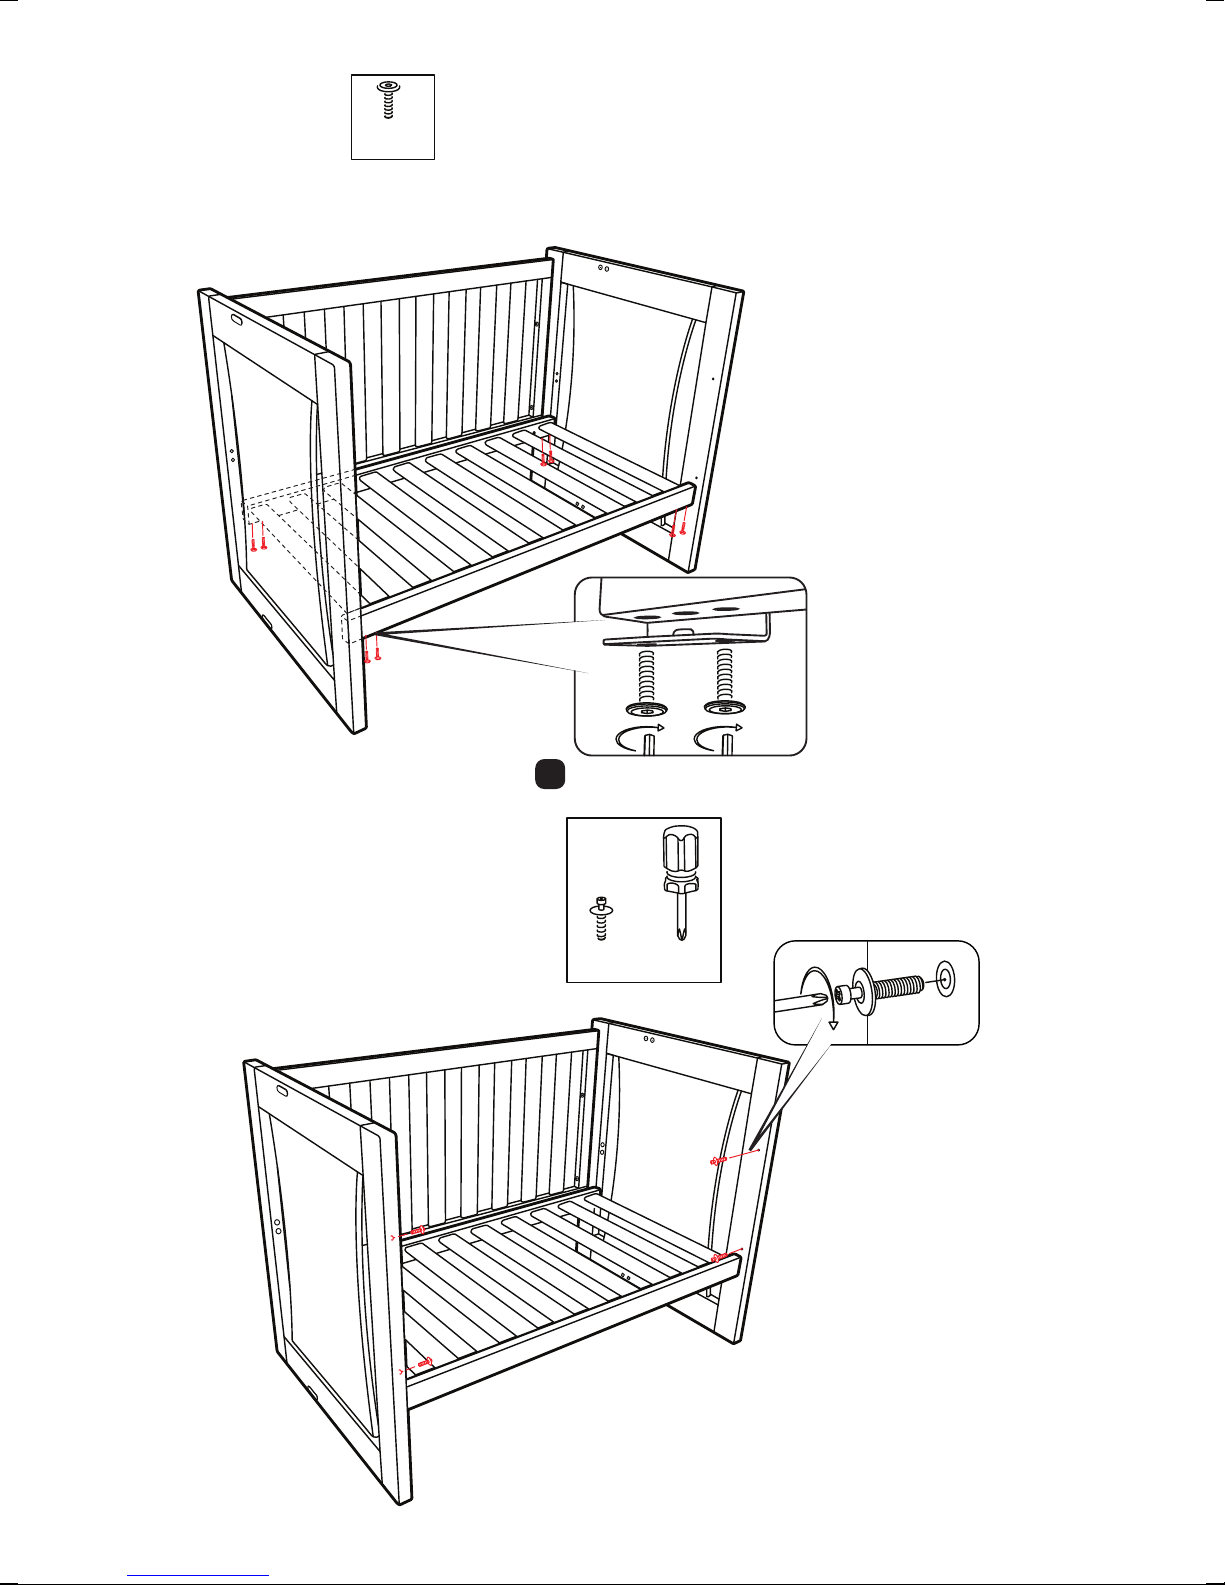
STEP 5
ASSEMBLE COT BASE
6mm Bolts
1
HA
x8
STEP 6
SCREW FOUR GUIDE PINS INTO ENDS FIRMLY
Do not tighten bolts at this stage
!
x4
Guide PinsHCScrew Driver
5
Page 6
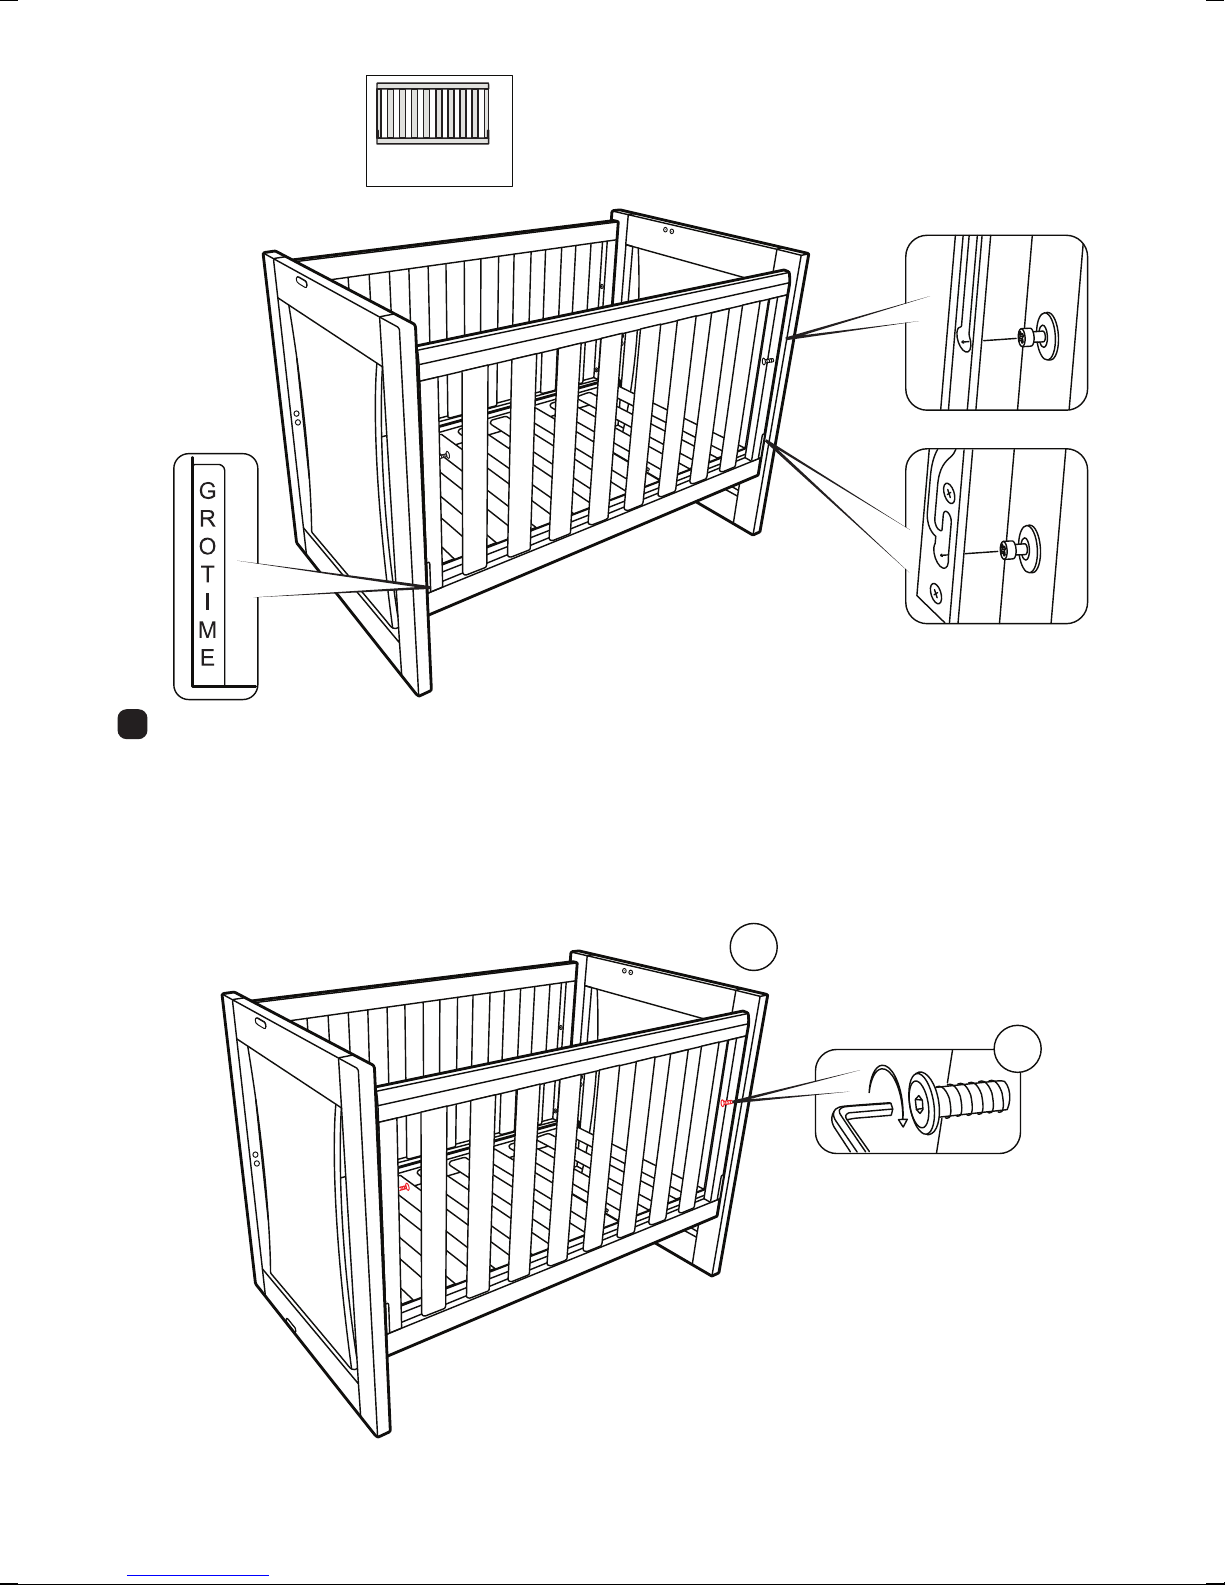
STEP 7
ASSEMBLE DROP SIDE
Drop Side
PC
x1
Align two access holes in the built-in
runner with the guide pins on one end.
Now repeat on other end.
Ensure correct side is facing out.
!
STEP 8
FULLY SCREW IN LOCKING BOLTS
Lift drop side up until it clicks
a.
into the locking position.
b.
6
Page 7
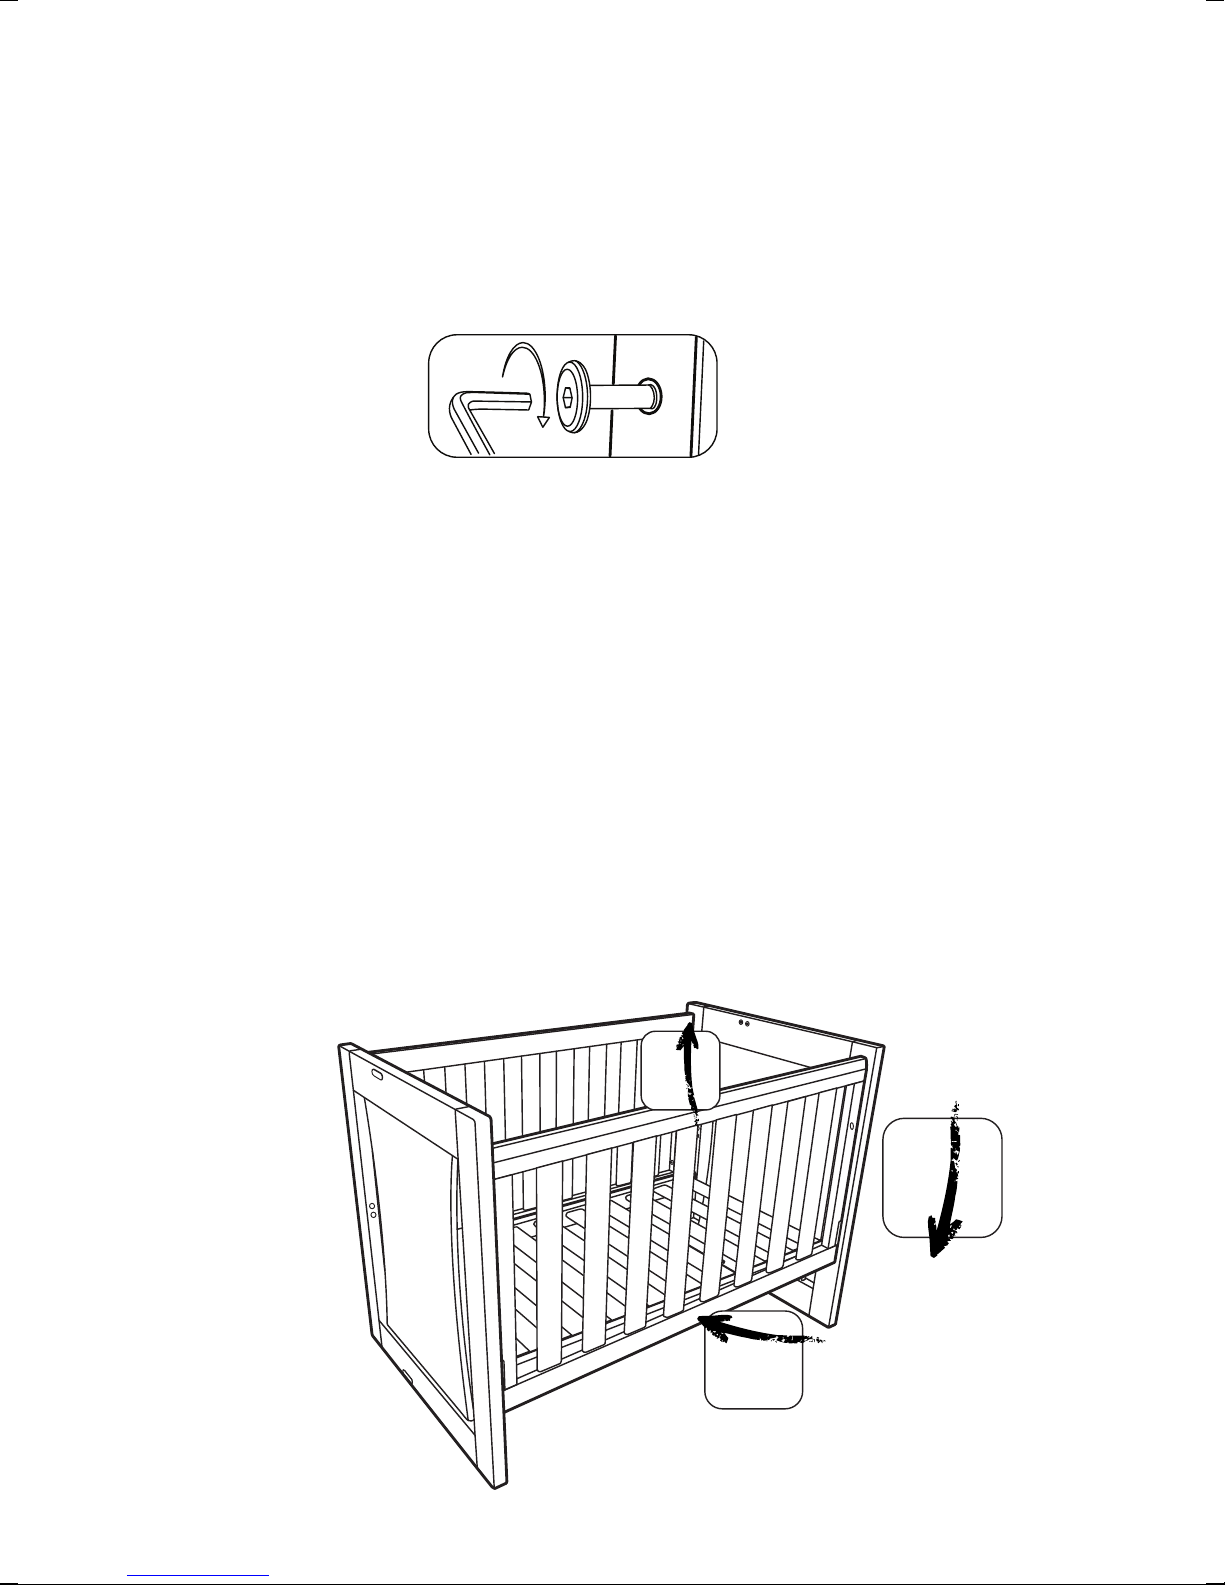
STEP 9
TIGHTEN ALL BOLTS
STEP 10
OPERATION
To lower drop side, lift from centre of top rail, hold side in that position while using your leg to push inward on
centre of bottom rail. Then allow to slide gently down.
1.
3.
2.
Base shown in Lower Position.
7
Page 8
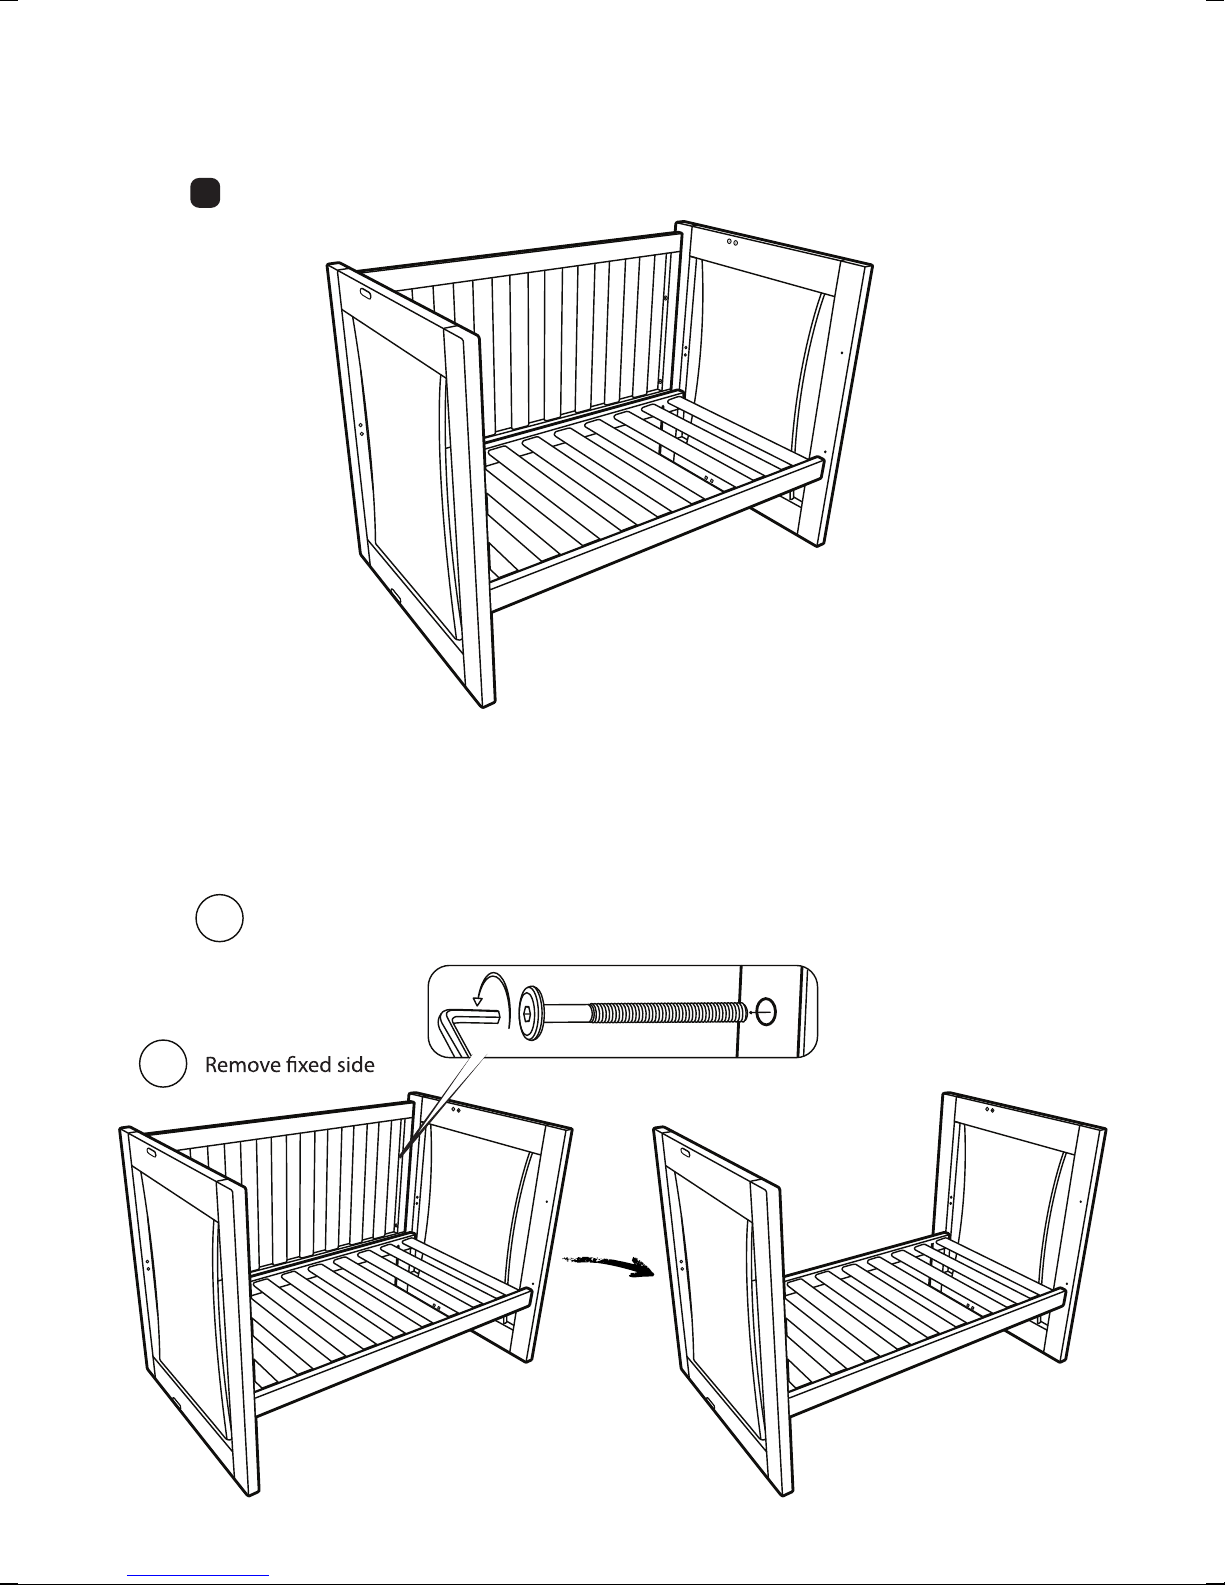
DAY BED CONVERSION
Remove dropside by reversing to step 5.
Remove dropside guide pins (HC) from the ends to prevent injury.
!
Day Bed
COT BED CONVERSION
a.
Remove dropside by reversing to step 5.
b.
Cot Bed
8
Page 9
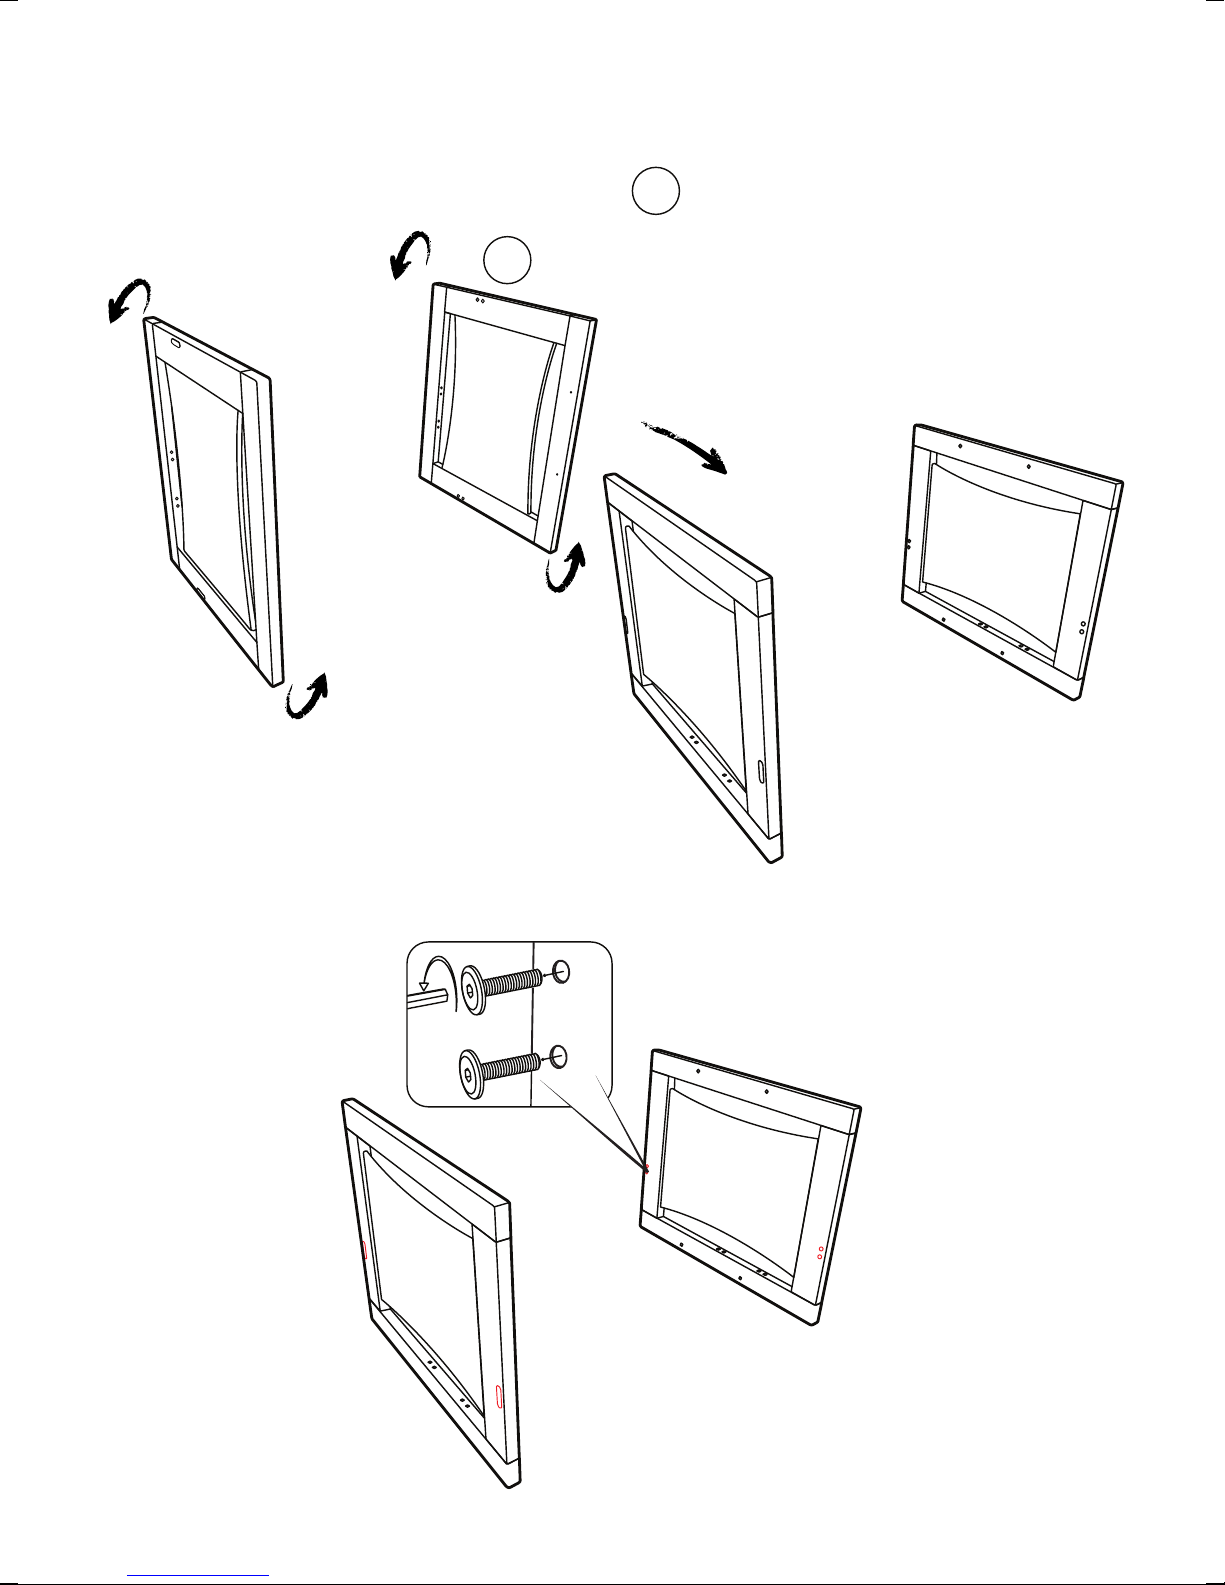
FULL SIZE SINGLE BED CONVERSION
Rollover action Patent Pending
STEP 1
a.
Roll over cot ends on their sides
b.
Disassemble the cot following the
assemble instructions in reverse order.
STEP 2
REMOVE FOUR GROTIME BADGES
9
Page 10
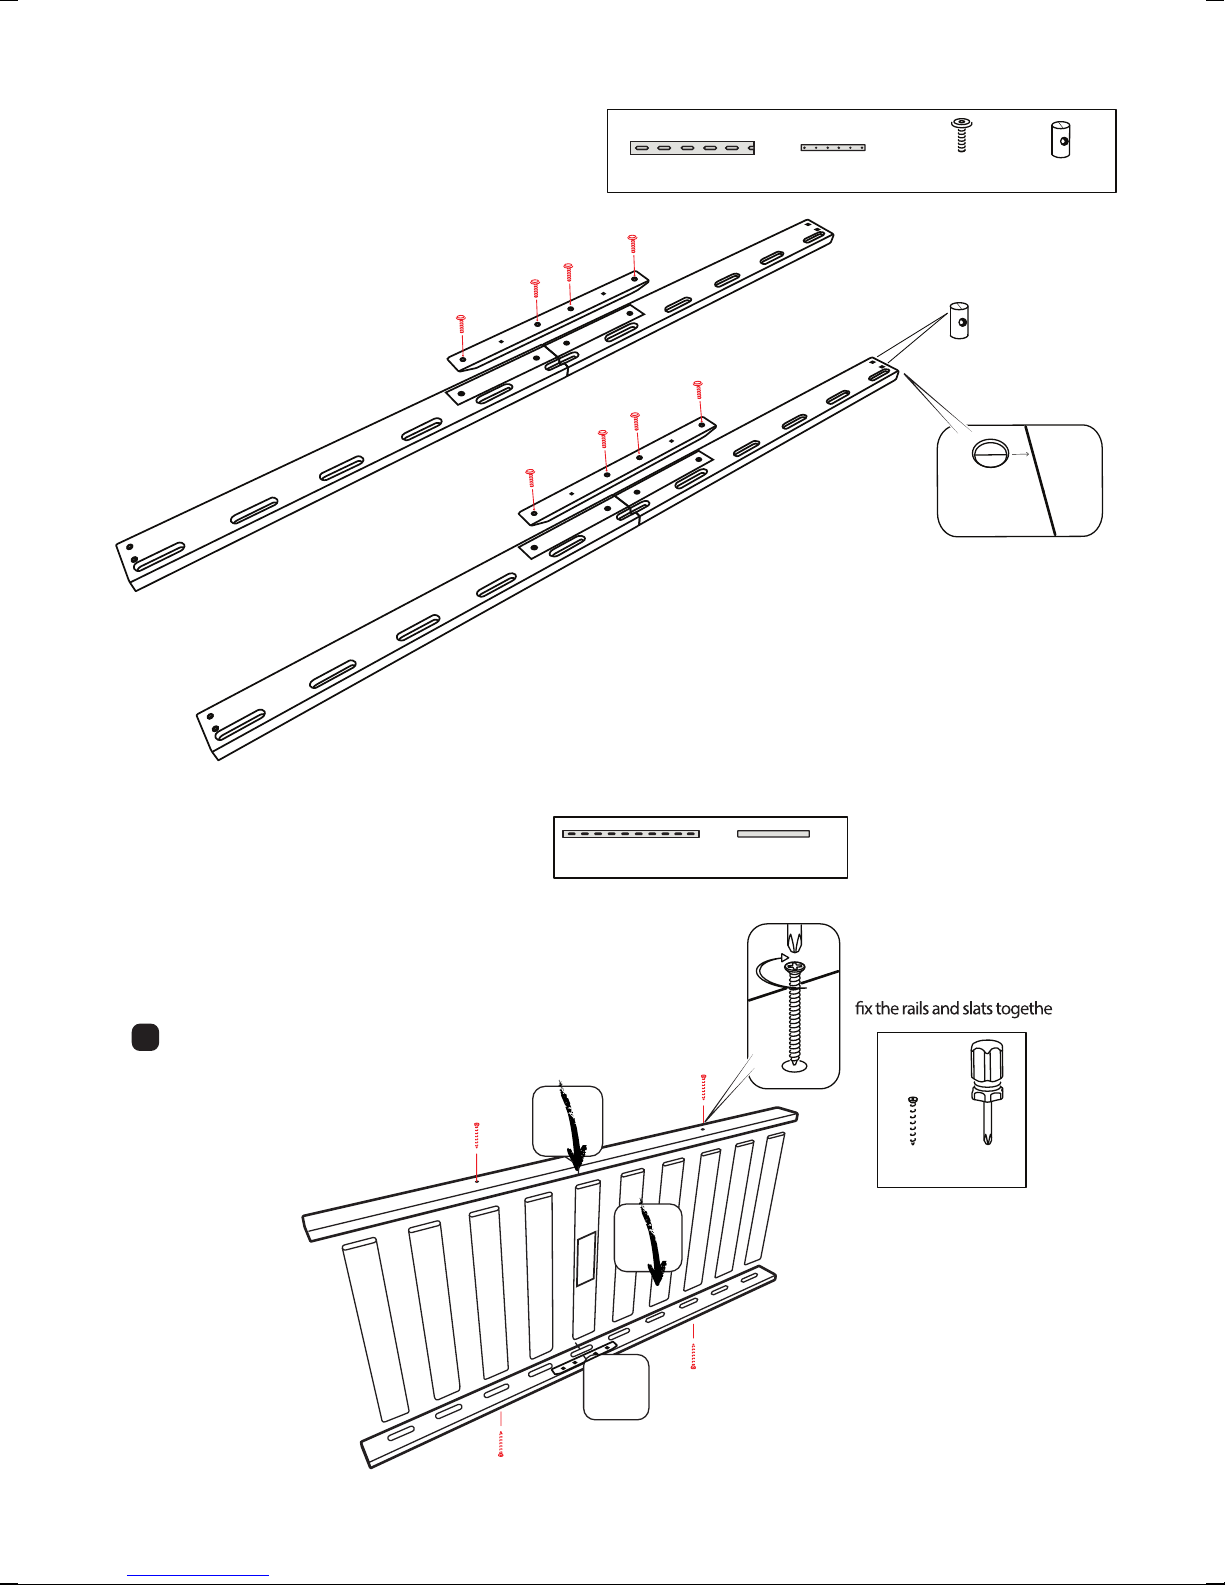
STEP 3
ASSEMBLE BILATERAIL
Patent pending
TM
BED RAILS
BILATERAIL
TM
PE
Base Rails
x4 x2
BILATERAIL
TM
Base Brackets
PG
x8
mm Bolts
16
HE
Place insert sleeves
into base rail.
(2 at each end of rail)
Align insert
sleeve so the slot
is facing out
x8
20mm Insert Nut
HP
STEP 4
ASSEMBLE SINGLE BED BASE
Lay one side rail down then slot all slats into the mortises.
Place the second side rail on top.
Working from one end slot all stats into the mortises.
Ensure the slat with the warning labels is correctly positioned
!
in the middle and the “this way down” lable
is facing down as directed by the
warning lable on the rails.
3.
Assembled base rails
PE
2.
1.
x2 x11
Cot Bed Slats
PF
Use the four wood screws to
r.
x4
Wood ScrewsHDScrew Driver
10
Page 11
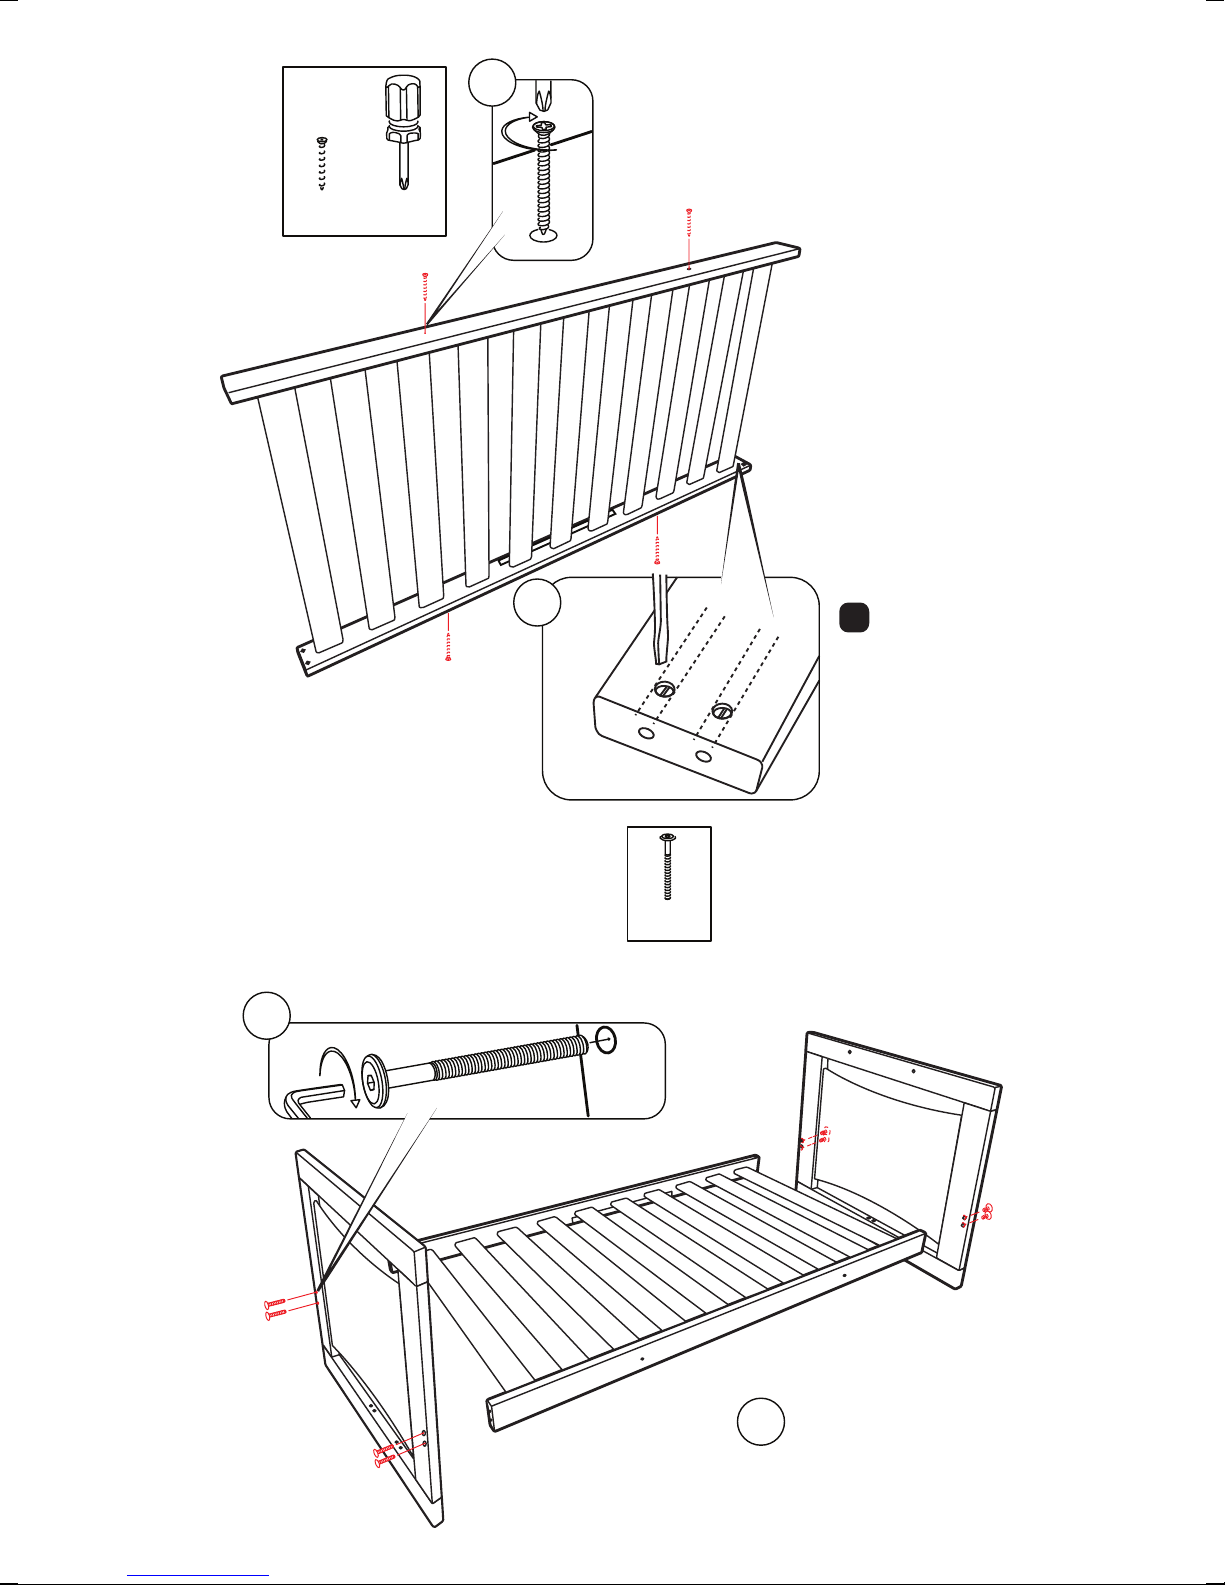
STEP 5
x4
Wood ScrewsHDScrew Driver
a.
Use the four wood screws to
x the rails and slats together.
b.
STEP 6
ASSEMBLE SINGLE BED BASE BETWEEN TWO ENDS
a.
x8
70mm Bolts
HB
!
Adjust insert nut
cl
ockwise/anticlockwise
so that threaded holes
in insert nut align with bolt
holes in end of base rail
b.
TIGHTEN ALL BOLTS
Your single bed is now complete.
11
Page 12

MAINTENANCE
Check your cot regularly. Retighten all bolts. For after sales service contact Grotime Service Australia on
1300 799 912; or New Zealand on 0508 476 932;
RECOMMENDED MATTRESS SIZE
This cot has been manufactured for use with a mattress which measures 760mm in width and 1300mm in length and 130mm
in thickness. The width and length are specified because it is important that the gaps between the mattress and the sides and
ends of the cot will not exceed 40mm. This is to minimise the risk of the child’s limb becoming caught in the gap. The thickness
of the mattress has been specified to ensure that the depth of the cot is greater than 500mm with the mattress base in the lowest
position to minimise the risk of a child climbing or falling out of the cot.
5 YEAR NURSERY FURNITURE WARRANTY
1.
Our goods come with guarantees that cannot be excluded under the Australian Consumer Law. You are entitled to a
replacement or refund for a major failure and for compensation for any other reasonably foreseeable loss or damage. You are
also entitled to have the goods repaired or replaced if the goods fail to be of acceptable quality and the failure does not
amount to a major failure.
2.
In order for your claim to be processed in an efficient timely manner please follow the warranty claims process as out lined
below.
•
Fill in the online customer service form found on the following link
http://grotime.net/customer-service-form
If you are unable for any reason to process your warranty claim using the online customer service form please call our
•
Grocorp aftersales service department on toll free 1300 799 912 or email [email protected]
•
In order for your claim to be processed you will need to provide to Grocorp with an original proof of purchase. For
example original retailer purchase receipt, bill of sale, invoice, lay-by docket, credit card receipt or similar proof of
purchase.
•
Note; providing attached photographs with your claim will greatly enhance the speed in which your claim is processed.
3.
This warranty does not obligate Grocorp to bear transportation costs incurred in the repair or replacement of any defective
parts and excludes any superficial scratches, dents, scrapes or blemishes to paint work or timber surfaces. This Warranty
does not cover faults or defects caused by:
Unsuitable, improper use or use not in accordance with the manufactures specifications;
•
•
Incorrect installation or installation not in accordance with instructions provided;
•
Normal wear and tear;
•
Inadequate or complete lack of maintenance;
•
Chemical, electrochemical or electrical influences; or
Harsh detergents or abrasive cleaners used on product finishes.
•
4.
To the fullest extent permitted by law, Grocorp excludes all liability for damage or injury to any person, damage to any
property, and any indirect consequential or other loss or damage.
WARNING
TO PREVENT FALLS, THE
MATTRESS BASE OF THIS
COT SHOULD BE ADJUSTED
TO THE LOWEST POSITION
BEFORE CHILD CAN SIT UP.
WARNING
ENSURE YOUR CHOSEN LOCATION FOR THE COT IS A REASONABLE DISTANCE FROM
CURTAINS, BLINDS, HEATERS, AND POWER POINTS. ALWAYS KEEP MEDICATION, STRING,
ELASTIC, SMALL TOYS OR SMALL ITEMS SUCH AS MONEY OUT OF REACH FROM ANY
POSITION IN THE COT.
BEFORE ASSEMBLING THE COT, ENSURE YOU HAVE A CLEAR AREA ON CARPET OR A THICK
BLANKET OR RUG. NEVER ASSEMBLE ON A HARD SURFACE.
AUSTRALIA - 10 Martini Parade Lithgow NSW 2790
Phone 1300 799 912 Email [email protected] Web www.grotime.net
CONTACT US
NEW ZEALAND - 9 Greenacres Road North Richmond, Nelson 7050
Phone 0508 476 932 Email [email protected] Web www.grotime.co.nz
12
12
 Loading...