

Grotime C47 0510 Assembly Instructions Manual
Cot Assembly Instructions (Ref C47 0510)
Guide
Pins
or Fixed
Side Holes
High
Position
Base
Low
Position
Base
Fixed Side Holes
Locking Bolts
Insert Nut Holes
Warning Label
Identical Cot Ends
Cot Fixed Side
Cot Base
Page 1
Cot Drop Side
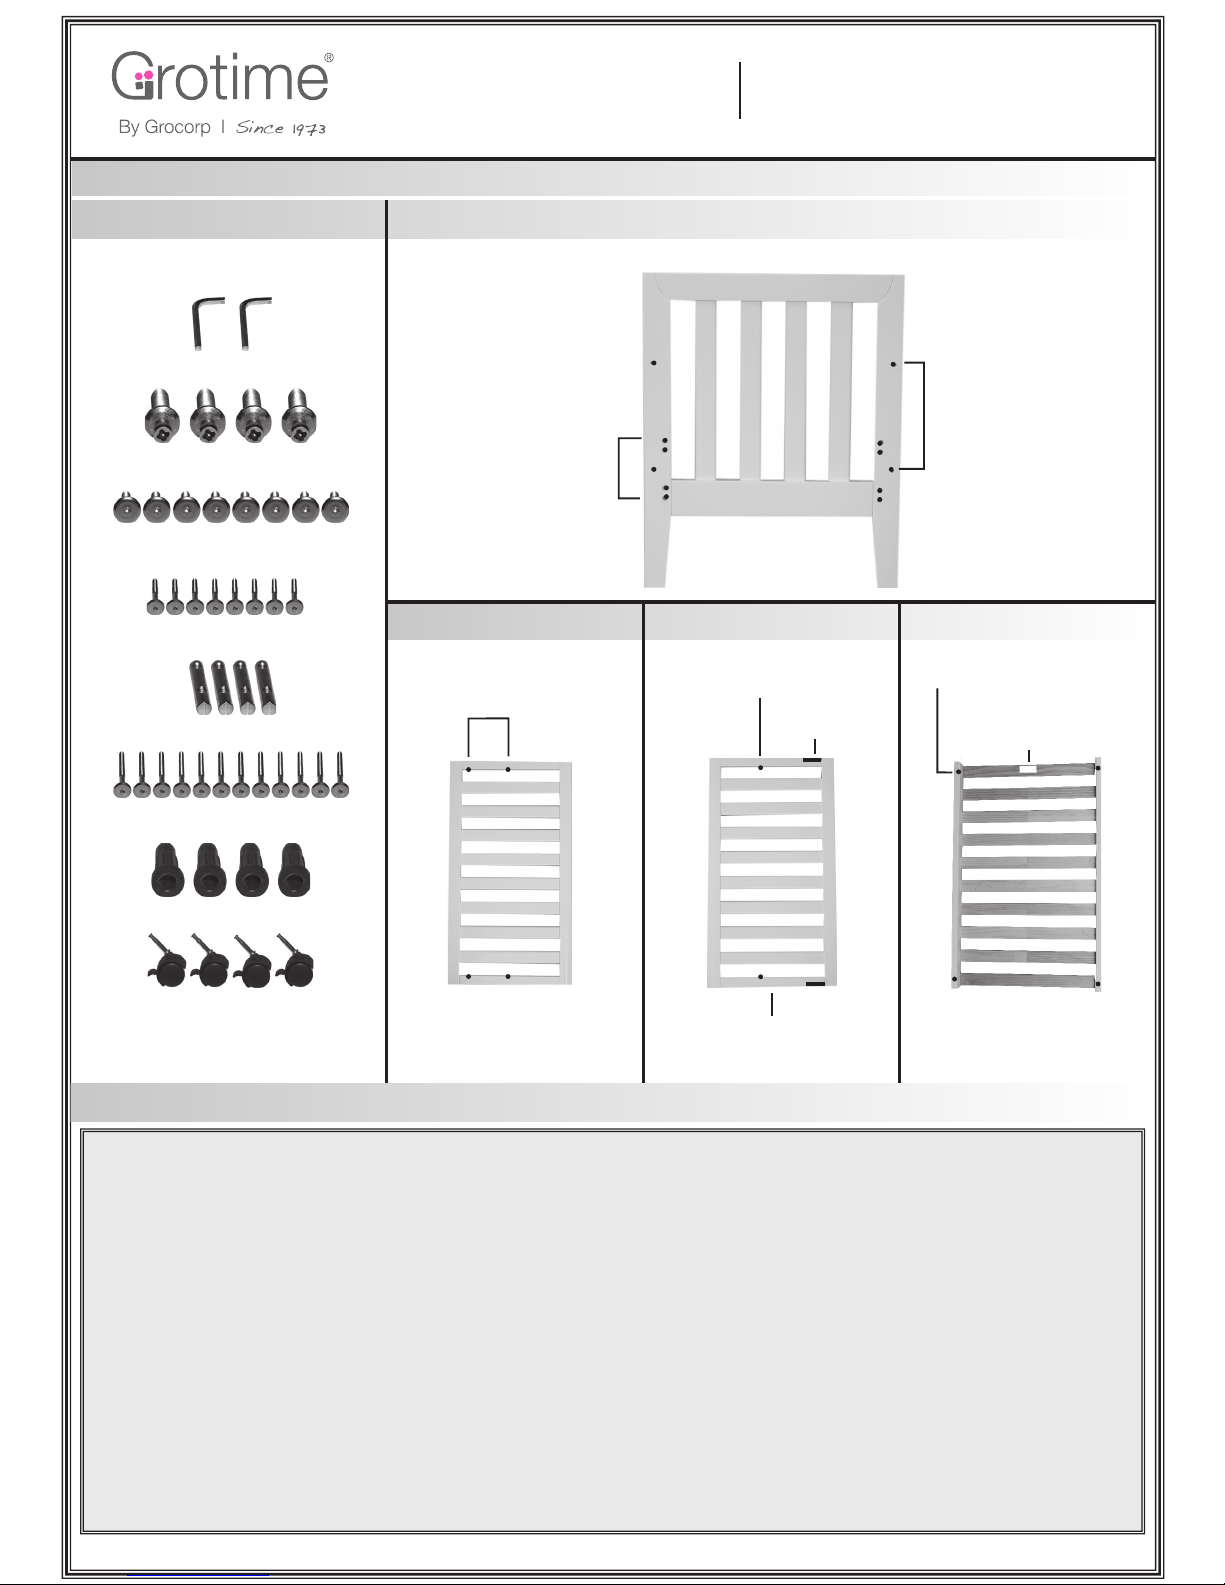
Hardware Inventory
GROTIME NURSERY FURNITURE warrants that this product is free of defects in material and workmanship of a structural
nature. This warranty is limited to making good of replacing to the original purchaser any part or parts that appear, upon
inspection by the manufacturer at his works, to be defective in material or workmanship. This warranty shall apply for a
period of 60 months from the date of purchase and only applies to products with a serial number which must be quoted.
This warranty does not obligate GROTIME to bear transportation costs incurred in the repair or replacement of any defective
parts and excludes any superficial scratches, dents, scrapes or blemishes to paint work or timber surfaces.
In these conditions “non-excludable conditions and/or warranties” means conditions or warranties the exclusion of which
would render any or all of these conditions void or voidable or which would render GROTIME liable to penalty or which be
the terms of any statute or subordinate legislation may not be excluded, modified or amended and “excludable conditions
and/or warranties” has a corresponding meaning.
To the extent (if any) that non-excludable conditions and/or warranties are or will be implied in relation to the supply by
GROTIME of particular goods or services by any statute or subordinate legislation, these conditions shall not be deemed
in any way to exclude, modify or amend or attempt to exclude, modify or amend those conditions and warranties which
conditions and warranties shall apply to the supply of such particular goods and services.
All other excludable conditions and/or warranties which might otherwise be implied by the general or statutory Law are
hereby excluded.
* Some hardware is already installed
B/ Guide Pin - x 4 pcs
D/ 16mm Bolts - x 8 pcs
*E/ 55mm Insert Nut - x 4 pcs
F/ 50mm Bolts - x 12 pcs
*G/ Castor Sockets - x 4 pcs
H/ Castor - x 4 pcs
C/ Cap Nut - x 8 pcs
A/ Allen Key - x 2 pcs
Warranty
Built in Runner
Grotime
Name Plate
AUSTRALIA 10 Martini Parade, Lithgow NSW 2790
Phone: (02) 6350 7000 Fax: (02) 6350 7020
Email: sales@grocorp.net.au www.grotime.net
NEW ZEALAND 9 Greenacres Rd North, Richmond,
Nelson 7050 Ph: (03) 544 2959 Fax: (03) 544 2979
Email: sales@groyears.co.nz www.grotime.co.nz

Operation
To lower drop side, lift from centre of top rail, hold side in that position while using your leg to push inward on centre of bottom rail.
Then allow dropside to slide gently down.
Maintenance
Check your cot regularly. Retighten all bolts. For after sales service contact Grotime Service Australia on (02) 6350 7000
or New Zealand on (03) 544 2959.
Recommended Mattress Size
This cot has been manufactured for use with a mattress which measures 690mm in width and 1300mm in length and 130mm
in thickness. The width and length are specified because it is important that the gaps between the mattress and the sides and
ends of the cot will not exceed 40mm. This is to minimise the risk of the child’s limb becoming caught in the gap. The thickness of
the mattress has been specified to ensure that the depth of the cot is greater than 500mm with the mattress base in the lowest
position to minimise the risk of a child climbing or falling out of the cot.
WARNING
TO PREVENT FALLS, THE MATTRESS BASE OF THIS COT SHOULD BE
ADJUSTED TO THE LOWEST POSITION BEFORE CHILD CAN SIT UP.
Page 2
Ensure four insert nuts in top of base rail have screw driver slot parallel to
base rail. Choose high or low position for mattress base and assemble
between two ends with eight 70mm bolts. To avoid finger entrapments
the remaining base holes should be plugged with eight cap nuts and
40mm bolts (do not tighten bolts ant this stage).
Screw four guide pins into ends firmly. Important, ensure correct side is
facing out. Assemble dropside by aligning the two access holes in the
built in runner with the guide pins on one end. Now repeat on other
end. Lift dropside up until it clicks into the locked position. Fully screw
in locking bolts. Tighten all bolts (do not over tighten).
Read and follow the manufacturers assembly instructions in detail to ensure the safety features of the cot are not compromised.
It is recommended that the product be assembled by two people.
Ensure your chosen location for the cot is a reasonable distance from curtains, blinds, heaters, and power points. Always keep
medication, string, elastic, small toys or small items such as money out of reach from any position in the cot
.
Single Bed Conversion
Assemble fix side between the two ends using four 70mm bolts
(do not tighten bolts at this stage).
Step 1. Assemble Fixed Side to Ends Step 2. Assemble Base
Step 3. Assemble Drop Side
a. Remove dropside by following step 3 in reverse.
b. Assemble base in lower position as per step 2.
c. Remove fixed side by following step 1 in reverse.
d. Tighten all bolts (do not over tighten).
Position Bolt
Holes Here
Base Shown in
Lower Position
Base Assembled in
Lower Position
Plug Finger
Entrapments
Locking Bolts
Grotime Name Plates
Facing Out
 Loading...