

Page 1
EASY SETUP GUIDE
Page 2

QUICK SETUP REFERENCE
Truss Rod – Relief
Measure At Condition Specication Notes
8th Fret Hold down rst and last frets Guitar: 0.010”
Bass: 0.015”
Bridge – Action (String Height)
Measure At Condition Specication Notes
17th fret Clearance between string and fret Guitar: 5/64” (2mm)
Bass: 3/32”
Nut
Measure At Condition Specication Notes
First fret Clearance between string and fret 0.020” – 0.022”
Pickup Height
Measure At Condition Specication Notes
Pickup Depress last fret Guitar: 1/16” – 1/8”
Bass: 3/32” – 1/8”
Bridge – Intonation
Condition Result Notes
Fret and harmonic at 12th string Fretted note sharp Lengthen string
Fretted note at Shorten string
Use the blanks to write in your brand-specic setup parameters, if applicable.
1
Guitar: Check on 6th string
Bass: Check on 4th string
Unfretted
Unfretted
Adjust for equal volume on all strings
Page 3

Thank you for your purchase of the GrooveTech™ Tool Kit! We put a lot of care into selecting the right combination of tools and other
contents to allow easy setup and other work on your instrument. The kit includes:
Screwdriver: 6-in-1 reversible with #1 and #2 Phillips tips, 1/4” and 3mm slotted tips, 1/4” and 5/16” nut drivers (for Gibson and other
makes requiring a conventional socket)
Measurement: 15 Blade Thickness Gauge, 6” Precision Steel rule
Misc.: GrooveTech Diagonal Cutting Pliers, Capo, 3 LED 2AA Flashlight, String Winder (Guitar kit only)
Hex Keys (Guitar Kit): 1.5mm, 2.5mm, 3mm, 4mm (Ball-End), 5mm (Ball-End), 0.050”, 1/16”, 5/64”, 3/32”, 1/8” (Ball-End), 3/16” (Ball-
End); (Bass Kit): 1.5mm, 4mm (Ball-End), 5mm (Ball-End), 0.050”, 1/16”, 5/64”, 7/64”, 3/16” (Ball-End)
The pouch is designed for easy access to all items, and will t into most gig bags. In addition, a large pocket is included to carry a spare
set of strings, your owner’s manual, and of course, this guide. There’s also a pocket to store your picks.
Some tools may contain an oily lm which helps to protect against corrosion during transportation and storage. Now’s a good time to
thoroughly wipe tools down – especially the thickness gauge – using a soft tissue.
Note that fractional hex keys have a black nish and metric keys a gold nish for quick identication.
In addition to setup, the GrooveTech kit should address virtually all the tool needs of your guitar or bass, including knobs, tremelo
systems, pick guard, tuning machines, battery replacement, and so on.
NOTE: the work described in this guide is intended for individuals with basic mechanical skills. If you don’t understand the
described procedures or are uncomfortable using tools, please leave work to a qualied stringed instrument technician.
INTRODUCTION
With so much expressiveness, it may be easy to overlook the technical aspects of your guitar or bass. Each string must vibrate at a
certain frequency, frets allow precise control of pitch, neck curvature provides for smooth playability, the bridge sets string length and
height, and electrical components convert acoustic energy into electrical signals with further processing of those signals.
Many of these geometries are xed at design by the manufacturer, but considerable adjustability remains. Adjustments may appear
daunting at rst, but with a little knowledge and experimentation you’ll be well on your way as a basic technician. You will be surprised
how much improvement in performance is possible from a properly setup instrument, and how easy it is to keep in top playing shape
from changes in temperature, humidity, string gauge, and handling.
Before jumping into the setup process, a few general notes are in order:
While all guitar and bass makes are fundamentally similar, any given brand or model will have its own nuances. Therefore, this guide
•
should be considered a supplement to your owner’s manual. In order to keep it simple, we provide general setup specications. If
your make has signicantly dierent setup parameters, use those instead. We refer to inch-based measurements in this guide, but
many manufacturers specify metric units. No problem – both the ruler and thickness gauge provide fractional and metric scales. In
2
Page 4

case you were wondering, simply multiply any inch measurement by 25.4 to obtain the metric equivalent (for example, 0.015” times
25.4 equals 0.381mm).
Your guitar or bass may have come with special tools – for example, a socket-style truss rod wrench. If so, simply store them in the
•
GrooveTech pouch. However, redundant items (such as hex keys) should be set aside in favor of the higher grade tools we provide.
Always make adjustments at room temperature, and keep the instrument in correct tune throughout the entire setup process.
•
Setup starts with the truss rod, followed by the bridge and pickups, and concludes with intonation. Find a surface with suitable
•
space and good lighting – your kitchen table will do ne. Lay down a soft bath towel, and position a few books underneath the
neck. Allow about an hour for your rst setup; subsequent checks and adjustments will go much faster.
For best results, take measurements with the instrument in its upright playing position to avoid the unwanted inuence of gravity.
•
Setup specications are really just a starting point. For example, some players prefer the tone of a atter neck, and will try to set it as
•
at as possible without buzzing. Alternatively, others want extremely low action on a certain part of the neck, and might use a setup
combination to achieve that goal. Once you become comfortable with the process, feel free to experiment, taking small steps at a
time. After nding a setup that works for you, be sure to measure and record settings - you’ll always be able to return to it!
Tremelo setup and adjustment is outside the scope of this guide – refer to specic instructions from the manufacturer. Regardless,
•
the GrooveTech kit should already include the necessary tools for tremelo systems.
Most of the bass references in this guide relate to four-string versions. The same principles apply directly to ve and six stringers as
•
well – we simply recommend that you refer to your owner’s manual for specic setup parameters.
CHANGING STRINGS
The ideal time for a complete setup is following installation of fresh set of strings. A few notes on mounting strings:
1. Change only one string at a time, keeping other strings at regular tuning. This will help to maintain somewhat normal tension on the
neck.
2. If using the cutters to remove strings, detune the string a little rst to reduce tension and the risk of injury or damage from "snapping" of the string.
3. Cut each new string four to ve inches beyond the tuning post. You may see recommendations elsewhere for as little as two inches,
but the extra winds will help hold tuning.
4. Insert the tips of the string into the post, and wind from the top down. While turning the key, use your other hand to coil the string
on the post – keep it nice and neat.
5. Bring the string to desired tuning pitch, then move to the next one.
Note that most tuning machines are much better at tuning "up," rather than tuning "down." Therefore, when you need to tune down
it’s a good practice to go below the desired frequency and tune back up from there. A gentle tug on the string can also help.
3
Page 5
TRUSS ROD
One adjustment that probably causes the greatest anxiety is the truss rod. Clearly, random truss rod changes can cause problems, but
the right tools and process will empower you to master this otherwise mysterious component.
String tension pulls on the neck, creating a slight upward bow. This is called "relief," and desirable within a certain range. To control
relief, manufacturers place a metal bar (or sometimes more exotic material) called a truss rod inside the neck with a nut on one end.
Tightening the nut (clockwise) will atten the neck, reducing relief. Conversely, loosening the truss rod (counterclockwise) will increase
relief. Since the neck is made of wood, it won’t necessarily respond immediately to changes in truss rod tension. Therefore, it is generally recommended to wait at least several minutes between adjustments to
let the neck "settle," then measure again. Only a small amount of adjustment is typically required; otherwise you may need to consult a professional.
Before making the rst measurement, you can "sight" for curvature by
looking down the neck. With the instrument in an upright position, set the
body on a table or other surface and look down from the headstock. You
can quickly get a feel of your starting point. After making adjustments,
sight the neck again. After a while, you’ll be able to spot problems without
tools.
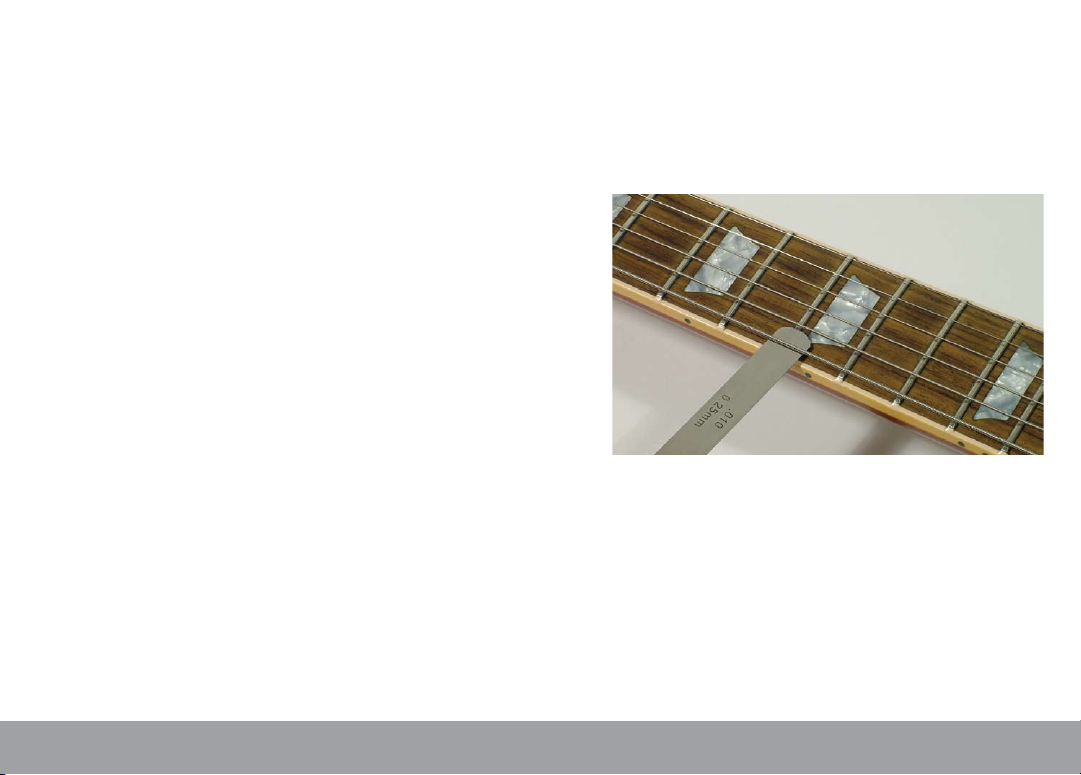
To measure for proper truss rod tightness, an automotive-style thickness
gauge and straightedge are needed. As it turns out, a string under tension
happens to make a very good straightedge. The process therefore involves
holding the string down at the two extreme frets and measuring clearance
between the string and fret at the midway point. Since you only have two
hands, a capo is provided for the rst fret. Fasten the capo on top, rather
than behind, the rst fret.
You can measure relief by fretting at the rst and last fret on the 6th string (4th string on basses), and checking clearance at the eighth
fret. That is, with the rst and last fret depressed, measure the distance between the bottom of the string and the top of the eighth
fret on the E string. Gently insert the thickness gauge while laying it completely at on top of the fret. Clearance for guitars should be
about 0.010,” and 0.015” for basses. You may nd it helpful to check with the next highest and lowest gauges until you get a good feel
for clearance.
If the gap exceeds the appropriate thickness, there’s too much relief and the truss rod should be tightened. If less, loosen the truss rod
for more relief. You might end up overshooting the spec – that’s OK; just go back in the other direction slightly. The important thing is
to make small adjustments at a time.
As previously mentioned, necks can be somewhat slow to respond to truss rod adjustments. It’s therefore useful to recheck the neck
later, perhaps after a gig or two, and make residual adjustments as needed.
4
Page 6
Use common sense and don’t force truss rod adjustments! If you feel abnormal resistance to movement, or if the neck is signicantly
out of spec, it would be prudent to leave further work to a qualied technician.
ACTION
Action refers to string height, which is adjusted by raising or lowering the bridge saddles. If set too low, buzzing occurs; too high and
playability is impacted
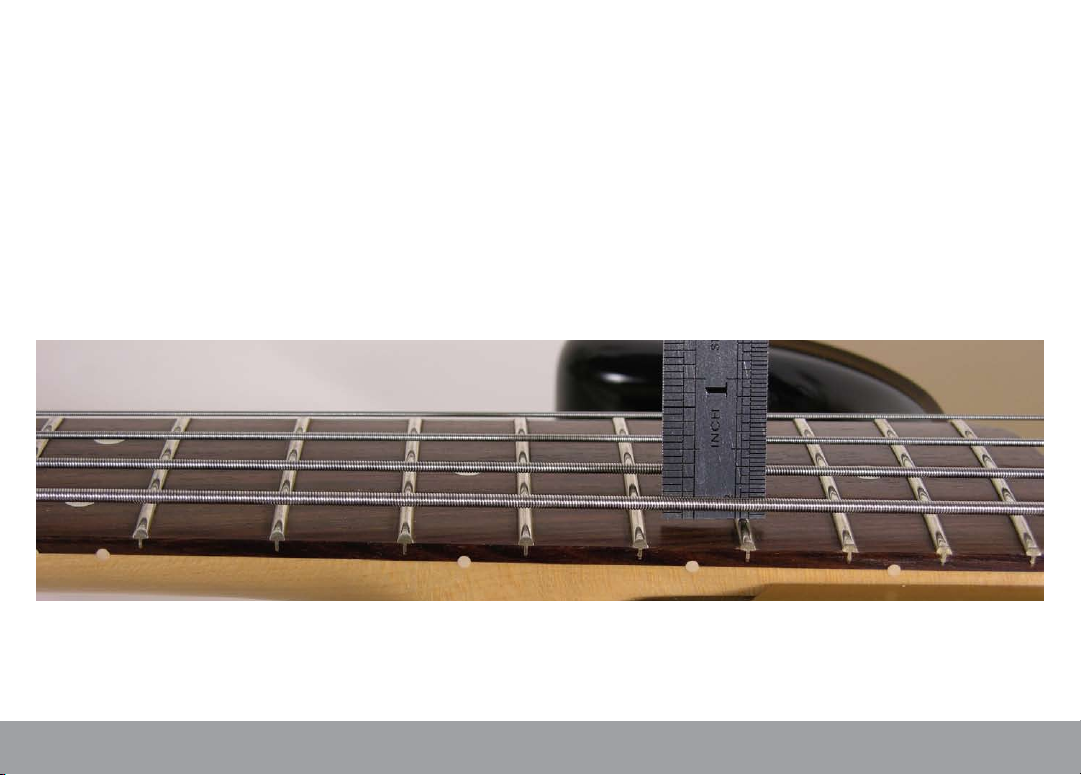
Measure clearance between the bottom of the string and top of the 17th fret, and adjust to about 5/64” for guitars (2mm may be easier
to read on the ruler) and 3/32” for basses. Rest the steel ruler on top of the fret, placed behind the string, and measure. Bridge saddles
require either a slotted screwdriver or hex key for adjustment. Make sure each saddle screw pair is set to approximately the same
height. Since thinner strings move less from vibration, you can usually set action lower on these without buzzing.
In addition to bowing in the direction of the truss rod, each neck also has a xed curve in the direction of the frets. If you were to complete an imaginary circle from the frets, you would be able to associate a radius with it. Most guitars and basses have a radius ranging
from seven to twenty inches.
Setting string height as described above will roughly match neck radius. For more precision, you can purchase a commercially available steel gauge, make one using a protractor, or nd printable gauges on the web.
Action can be set to a wide range of preferences. Those who want lightning fast action might try for the lowest possible setting, perhaps even to a level that tolerates slight buzzing. Others may be more comfortable with a higher setting. The key is to experiment and
nd what best suits your style.
5
Page 7

NUT CHECK
With the truss rod and action set, you’re ready to check the nut. Measure for a clearance of 0.020” to 0.022” at the rst fret, without
fretting the string. This is an excellent "acid" test of your nut, which can cause problems on an otherwise properly set up instrument.
For example, you might set up a bass completely to spec, and be driven crazy by a buzzy E string. The nut clearance check may reveal
insucient clearance as the culprit. Alternatively, too much clearance will prevent action from being set suciently low.
Any nut work should be left to an experienced professional. However, if your string sits too low in the string slot with resultant buzzing,
you can temporarily solve the problem by placing a shim under the string. Small pieces of business card paper stock work ne.
PICKUP HEIGHT
Virtually all pickups can be adjusted, and it’s not unusual for the treble side pickup to sit slightly closer to the string. Pickup adjustments are interactive, requiring listening through an amp over a range of playing conditions, and ne tuning for uniform volume levels
across all strings.
Typical clearance ranges from 1/16” to 1/8” for guitars, and 3/32” to 1/8” for basses. Using the ruler, the measurement is made at the
pickup with the last fret depressed. Bass players with split "Precision" style pickups don’t need to worry about having both pickup
surfaces on the same plane – start with a setting using the ruler, and ne tune for uniform volume output.
INTONATION
The other bridge adjustment sets length of the string by moving the saddle forward or backward. Calibration of intonation assures
optimal tuning increments over the entire fretboard, and is easily adjusted with the aid of an electronic tuner.
The process involves comparing tune between a fretted note and harmonic at the twelfth fret. A properly intonated string will have
the exact same frequency under both conditions.
With the tuner ready, depress the string at the twelfth fret and observe the output frequency. Then, play a harmonic (with your nger
only slightly touching the string) at the twelfth fret and note that frequency. If the fretted note is sharp, increase string length; if at,
decrease length. Most bridges are adjusted using either a #1 or #2 Phillips screwdriver – make relatively small adjustments, retune, and
check intonation again. If you’re shortening the string, you’ll need to tap the top of the screwdriver handle to make sure the saddle
moves forward; otherwise the adjusting screw head may not be seated against the bridge chassis.
BECOME YOUR OWN BASIC TECHNICIAN
After you’ve completed a few setups, you should feel empowered! Not only should there be a sense of satisfaction from doing your
own setup, but you’ll start to become aware when further adjustments are needed. You’ll also probably notice the most signicant
truss rod adjustment will be necessary during Spring and Fall as temperatures change, and quickly take care of it.
We sincerely hope this guide has been helpful, and welcome your feedback. Thanks for reading...
6
Page 8

LIMITED WARRANTY AND DISCLAIMERS
Hand tools are lifetime warranted against defects in workmanship, when used under normal conditions. The
remainder of kit contents and other products carry a one year warranty from CruzTOOLS. In the unlikely event
that any CruzTOOLS item breaks or becomes unusable, simply contact us for a replacement. Your satisfaction is
very important to us!
This warranty does not apply if the product has been damaged by misuse, accident, modication or unauthorized repair. The warranty is not transferable to subsequent owners.
CRUZTOOLS EXPRESSLY DISCLAIMS ALL OTHER WARRANTIES, WHETHER ORAL OR WRITTEN, EXPRESS
OR IMPLIED, INCLUDING IMPLIED WARRANTIES OF MERCHANTABILITY AND FITNESS FOR A PARTICULAR
PURPOSE. IN NO EVENT WILL CRUZTOOLS BE LIABLE FOR DIRECT, INDIRECT, SPECIAL, INCIDENTAL, OR
CONSEQUENTIAL DAMAGES FOR THE BREACH OF ANY EXPRESS OR IMPLIED WARRANTY, INCLUDING DAM
AGE TO PROPERTY AND, TO THE EXTENT PERMITTED BY LAW, DAMAGES FOR PERSONAL INJURY, EVEN IF
CRUZTOOLS HAS BEEN ADVISED OF THE POSSIBILITY OF SUCH DAMAGES OR IF THIS WARRANTY IS FOUND
TO FAIL ITS ESSENTIAL PURPOSE.
Contents of CruzTOOLS kits should be used only for their intended applications. Use of tools and emergency
items require proper care, including eye protection.
Copyright © 2008 – 2010 CruzTOOLS, Inc.
PRODUCTS AND SPECIFICATIONS ARE SUBJECT TO CHANGE WITHOUT NOTICE
Rev. 4.0/10
PO Box 250, Standard, CA 95373 USA • 888-909-8665 • www.cruztools.com
 Loading...