

Page 1
G-AUX1
Auxiliary Interface Adapter,
AUX-IN Car Kit
www.gromaudio.com
gromaudio.com/support.html
USER MANUAL
Copyright © GROM Audio, 2014
Page 2

Installation Instructions
Chapter 1 – Getting Started
1.1 Subject
The GROM-AUX1 adapter – an integration between an MP3, XM, DVD player, iPod/iPhone and
any other audio source, and a factory installed car stereo. Equipped with the specific vehicle
harness and standard 3.5mm phone jack the GROM-AUX1 interface will allow you to connect your
audio device such as MP3 player, Smartphone or iPod/iPhone to the car stereo system easily.
1.2 Introduction
Thank you for purchasing the GROM-AUX1 adapter, which has been designed to provide endless
hours of listening pleasure through most vehicles factory radios. To insure that your AUX1 interface
performs correctly in your car or truck, we recommend that you read this entire manual before
attempting install the GROM interface.
1.3 Precautions
Proper mounting location
Securely install the interface in a location that is free from heat, humidity, moving parts, or direct
sunlight. Beware of hot airflow from your vehicle’s climate control system. We recommend securing
the interface to a suitable location, free of sharp metal edges, using double-sided tape, Velcro, or
wire ties.
1.4 Disclaimer
• This product is not affiliated with any of the OEM manufactures
• Modifying the radio may void any outstanding warranty.
• The purchase of this product carries with it no warranties, either expressed or implied.
• While every care has been taken to provide a quality product, we cannot guarantee that the
GROM AUX adapter to function correctly if installation is not done according to the
instructions in this guide. We also cannot guarantee that the GROM AUX adapter will
function correctly with an MP3 player if the MP3 player is broken or damaged or not
supported
• Keep your eyes on the road while driving!
• We are not liable for the misuse of this product. Misuse includes improper installation,
damage to the board or radio while trying to install it, and the illegal use of the radio.
Page 3
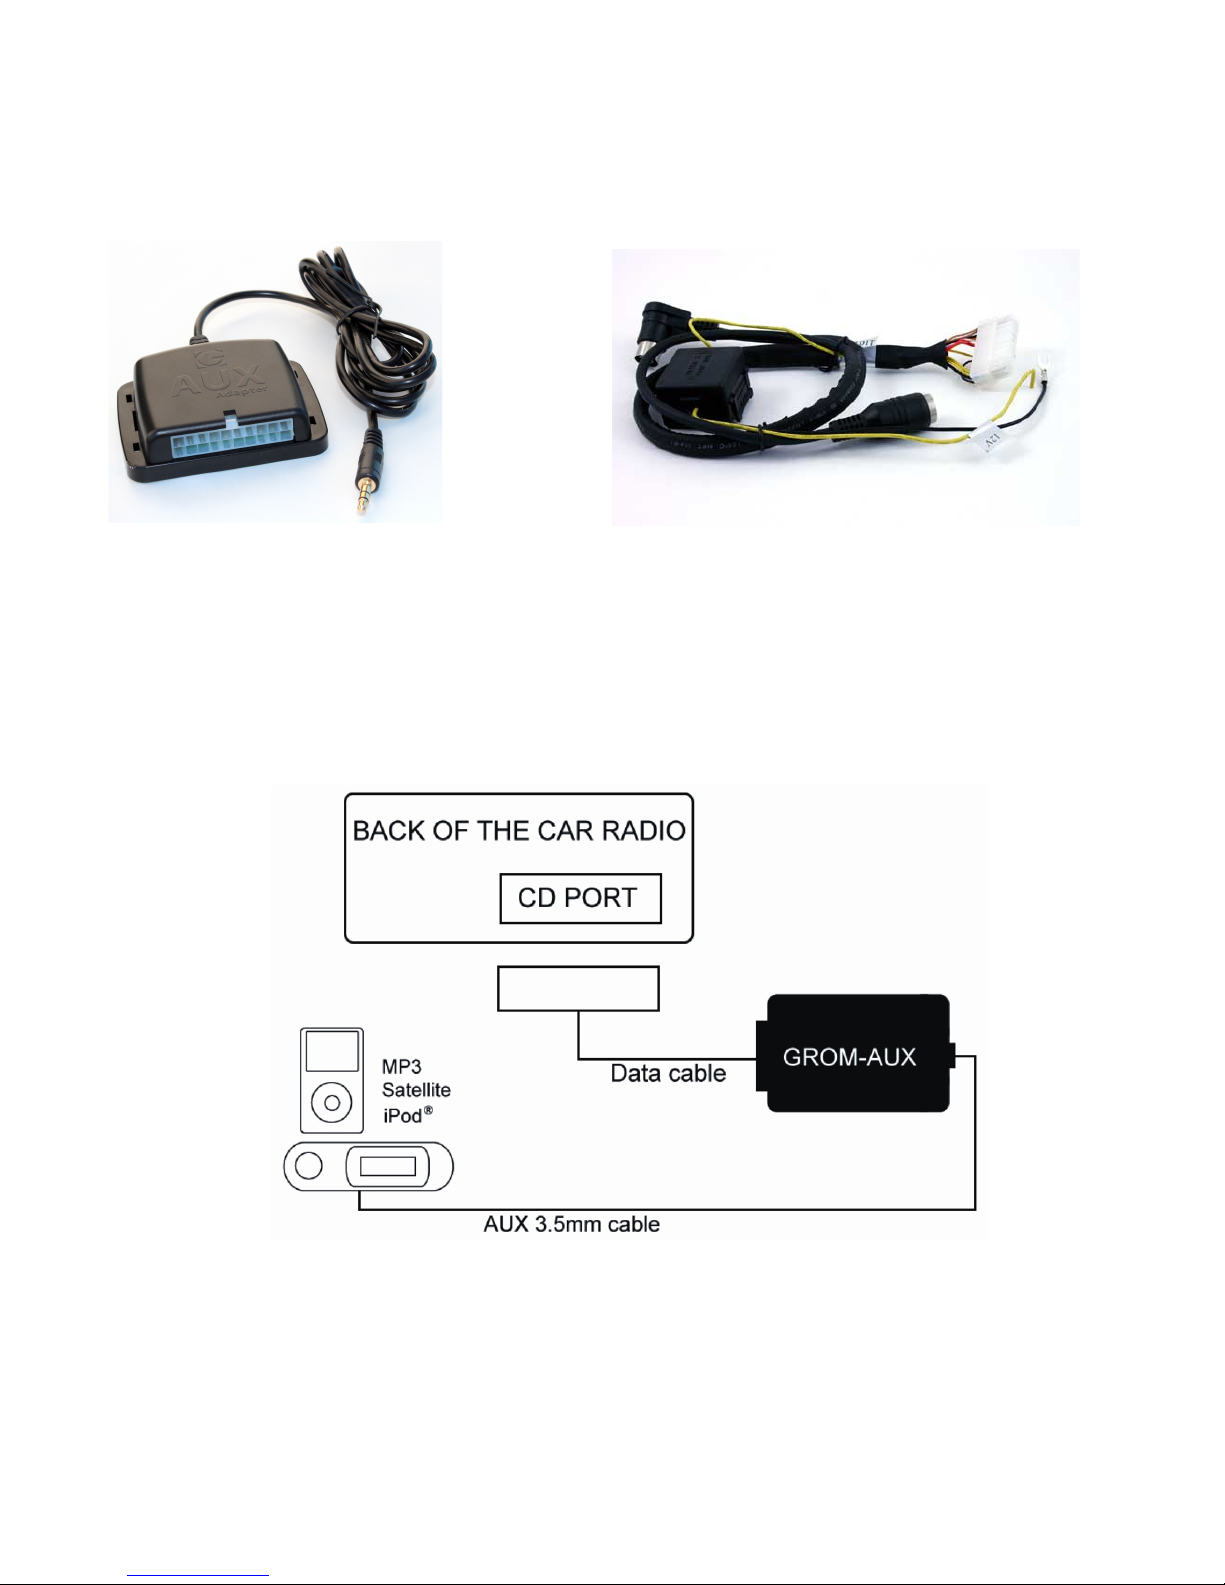
1.5 Completeness and connection of set
a) GROM Audio AUX1 adapter set consists of G-AUX1 interface, with attached 3.5mm audio cable,
and vehicle specific cable (see figure 1).
G-AUX1 interface with 3.5mm audio cable (1) Vehicle specific cable (2)
Figure 1. Package content.
b) Basic wiring diagram of GROM Audio AUX adapter is the following (see Figure 2):
1.6 Important Compatibility Notes
If your vehicle is equipped with an external factory CD changer, you must disconnect it in order to
be able to install the interface. You will lose the use of the external CD changer to gain the use of
Figure 2. Basic wiring diagram
Page 4

your iPod or MP3 player. Any built-in CD changer will remain working.
For a full version of the GROM application guide, please visit
http://gromaudio.com/grom_application_guide.pdf or contact GROM Audio at
http://gromaudio.com/support.html
Chapter 2 – General Installation
2.1 Installation location:
Most installations will require you to remove the factory radio in order to plug in the vehicle specific
harness. For some vehicles, you will also have the option to connect the interface to the factory
pre-run CD changer cable located in the trunk or glove box.
2.2 Tools needed:
In many cases, there are no any special tools required in order to remove the stereo out. For some
stereos, it is better to use car stereo removal tools. Please consult your local car audio shop or
your vehicle’s dealership for instructions or assistance if necessary.
If you are unsure how to install the interface properly, we recommend contacting your local car
stereo shop for the assistance.
2.3 Preparation and adapter installation
1. Turn off car engine and remove key from ignition
2. If your radio uses a Security Code, make sure that you have the code before unplugging
the radio.
3. Un-mount your radio from the dash in order to get access to the back side of the radio.
Some vehicles require the special tools to remove the radio. Please consult your vehicle’s
dealership or a local car audio professional if necessary.
4. Attach the car harness connector to the back of the stereo to the CD changer port. Be sure
to make a firm connection but do not force it. Connect the other end to the interface.
5. WV/AUDI/SEAT/SKODA - there is a black single cable on the vehicle specific harness
(see Figure 3). You will need to attach it to the back bolt of the car stereo or to the stereo
chassis.
Remove the PVC from the end of the black wire (2)
(a) Connect the end of the black wire (2) to the metal part of the car stereo chassis. You can
connect it under the bolt (3) if present
(b) Make sure that the solid contact is maintained between the striped black wire and the
metal part of the car stereo body.
Page 5

(c) The failure to attach the black cable to the chassis of the stereo will mean that the
GROM adapter will not work! All VW / AUDI / Seat / Skoda vehicles require this black
cable to be attached.
Figure 3. Wire grounding for VW/AUDI Installs
6. For AUDI vehicles only: For some AUDI head units an additional part or harness
modification is required in order to gain the access to the CD changer port. The 8-pin CD
changer port on such stereos is occupied by a solid 20-pin connector. Please refer to the
instructions at: http://gromaudio.com/pie-audi-how-to.html or obtain GROM part number
AUDS.
7. For BMW vehicles only: Please refer to the installation insert for the special guidelines for
BMW installation.
8. For Toyota/Honda vehicles only:
In some Toyota/Lexus/Scion and Honda/Acura vehicles the CD changer port is occupied
with a factory harness (such as NAV or audio harness). The GROM package for Toyota or
Honda includes a Y shaped vehicle cable. In order to connect interface properly please
follow to the scheme below.
Figure 4. Connection scheme for Toyota/Lexus/Scion and Honda/Acura
Page 6

If the car has no NAV or XM leave the female end of the Toyota harness open.
9. For kits where vehicle specific harness is connected to the stereo using P-Taps such as
Nissan, Infiniti, BMW behind the stereo, Volvo, Mitsubishi and the others, please refer to the
specific vehicle harness installation manual that came with your kit.
10.Once the interface is connected to the radio, you will need to test the operation of the
interface before re-assembling the dash.
11. Turn your car stereo on and switch it over to the CD Changer mode using the Disk / Mode /
CD / AUX (depending on the stereo type) buttons on your car stereo until it shows Disk 1,
Track 01 on a display.
12.Connect the 3.5mm audio cable to the MP3 player or the iPod. Turn on the MP3 player or
iPod and play some tunes. You should now hear the sound coming from the car stereo.
13. Once the operation of the interface is confirmed, you may continue with the installation. If
you experience difficulties with the installation, please see our troubleshooting section.
14.Find a place where you can place the G-AUX1 adapter. In many cars, there is enough room
in the dash to place GROM.
Note: Make sure you mount the G-AUX1 adapter in the place with enough room so that,
when you re-mount the car stereo, you do not break the adapter.
15.You may use the glove box or other spaces inside the dash to direct Audio cables out.
16. Re-mount your car stereo, making sure its clips or strews are secure.
Adapter mounting in the trunk (for VW and BMW only)
1. Locate the trunk mounting cable in your car (usually located along the left side of the car in
the back).
2. Disconnect the existing CD changer, if present.
3. Attach the matching cables.
Note for BMW trunk installations: Some BMW are factory wired for the cellular phone. Except
for wire location, the factory cellular phone connector looks identical to the factory 3-pin connector
used for the CD changer. The CORRECT 3-pin connector for the CD-Changer has a BROWN wire
(ground) in the #1 pin position. Please make certain you use this connector. The INCORRECT
factory cellular phone connector has a BROWN wire in the center position – DO NOT USE
THIS CONNECTOR.
Congratulations! You have installed the G-AUX1 adapter. You may now use it with your MP3
player, Smartphone, XM, DVD or iPod/iPhone.
Page 7

2.4 When the car ignition is OFF
GROM-AUX adapter does not control the MP3 player or the iPod. When you turn your car ignition
or car stereo off, the MP3 player or the iPod will remain playing. You will need to turn the iPod or
the MP3 player off manually if you do not want it to continue playing.
Chapter 3. Support
For questions or technical support please visit http://gromaudio.com/support.html Your
question will be answered within next 1 (one) business day.
Troubleshooting
Symptom Cause Remedy
No power Bad connection Check the cable connections.
Radio is not
Some Honda, Toyota, Lexus car stereo
After connecting the adapter turn the
recognizing G-AUX1
adapter
Radio is not
recognizing G-AUX1
adapter
Radio is not
recognizing G-AUX1
adapter
Radio is not
recognizing G- AUX1
adapter
You can’t hear the
music from MP3 player
For VAG only:
Radio is not
recognizing GROM
AUX adapter
For BMW only:
have to be restarted before the radio
catches the signal
External CD changer is present Make sure to disconnect the external CD
Bad cables or cables are not connected
properly between the interface box and
car radio.
The GROM unit needs to be reset. Reset the GROM unit by disconnecting it
No CD changer is selected Make sure CD changer, SAT mode or
Single black wire on the vehicle specific
harness (2) is not attached to the stereo
chassis ( stereo body)
iBus wire have come loose
stereo on, and then turn the ignition off
and back on
changer
Check connection and cables, push in
firmly.
from the vehicle specific harness.
AUX is selected ( correct key depends
on your stereo)
Attach the black cable to the car stereo
body
Make sure it is properly grounded
Make sure the IBus wire is securely
Radio is not
recognizing GROM
AUX adapter
Audio is coming only
from 1 speaker
Sometimes when using Posi-Tap clips,
the IBus wire may not receive proper
connection due to its wire size
The 10-pin sound connector is not
aligned correctly
attached by using multimeter or slightly
tight up the Posi-Tap connector so its slot
get s smaller.
Make sure that 10-pin sound connector
on the vehicle cable is aligned correctly
Page 8

Audio is not coming
The audio cable is not inserted properly. Make sure that the audio cable inserted
from the speakers
properly.
Chapter 4. Warranty, license agreement and disclaimers
4.1 THIRTY (30) - DAY MONEY BACK WARRANTY.
You can return any product purchased directly from GROM AUDIO or from www.InDashPC.org, referencing
a Return Merchandize Authorization (RMA) during the Thirty-(30) day period following shipment by
GROM AUDIO. The product may be returned for a full refund of the purchase price actually paid for any
reason. The RMA number must be obtained from GROM Audio Customer Support via web form on
www.gromaduio.com/support.html, and is valid for only fifteen - (15) days from its issuance. RMA must
be noted on the outside of the returned PRODUCTS packaging. The PRODUCT must be returned in its
original packaging, intact, without any evidence of tampering with the PRODUCT or physical damage
caused by the Customer (End-User). We would strongly recommend that the item is being shipped insured.
We are not responsible for the lost or stolen items.
SHIPPING AND HANDLING OF THE END-USER IS NOT REFUNDABLE.
PLEASE ALLOW UP TO TWO (2) WEEKS FOR GROM AUDIO TO CREDIT YOUR ACCOUNT.
4.3 LICENSE AGREEMENT AND DISCLAIMER
GROM AUDIO AUX adapter (hereinafter referred to as ‘PRODUCT’) and its related software
THIS IS A LEGAL AGREEMENT BETWEEN YOU, AS THE END USER, AND GROM Audio (“GROM”).
PLEASE CAREFULLY READ THE TERMS AND CONDITIONS OF THIS AGREEMENT BEFORE USING
THE GROM PRODUCTS. BY USING THE GROM PRODUCTS AND SOFTWARE INSTALLED ON THE
GROM PRODUCTS, YOU ARE AGREEING TO BE BOUND BY THE TERMS OF THIS AGREEMENT.
SINCE GROM DOES NOT INSTALL THIS EQUIPMENT, GROM DISCLAIMS ANY LIABILITY FOR
IMPROPER INSTALLATION OF THE GROM AUDIO OR THE ‘AFTER-MARKET’ EQUIPMENT (INPUTS).
FURTHER, THE ‘END USER’ ACKNOWLEDGES THAT THE PRODUCT AND ITS SOFTWARE ARE NOT
INHERENTLY DANGEROUS AND DO NOT PROVIDE ANY INHERENT RISKS AND THEREFORE
POTENTIAL DAMAGES TO THE END-USER, OTHER THAN ‘Fitness for its Purpose’. Some radio receiver
models may cause you to experience some technical difficulties, if the product does not operate properly
please contact technical department promptly at www.gromaudio.com/support.html
4.3.1 GRANT OF LICENSE
GROM grants to you a non-transferable, non-exclusive license to use the PRODUCT and its software
installed on the GROM product (the “PRODUCTS”) and the related documentation solely for your
own personal use or for internal use by your business, only on such GROM PRODUCTS. You shall
not copy, reverse engineer, translate, port, modify or make derivative works of the Software contained in the
Page 9

PRODUCT. You shall not loan, rent, disclose, publish, sell, assign, lease, sublicense, market or otherwise
transfer the Software in the PRODUCT or use it in any manner not expressly authorized by this agreement.
You shall not derive or attempt to derive the source. code or structure of all or any portion of the Software in
the PRODUCT by reverse engineering, dissembling, recompilation, or any other means. You shall not use
the Software in the PRODUCT to operate a service bureau or for any other use involving the processing of
data for other persons or entities. GROM and its licensee(s) shall retain all copyright, trade secret, patent
and other proprietary ownership rights to the Software in the PRODUCT. You may transfer all of your license
rights in the Software or the PRODUCT, the related documentation and a copy of this License Agreement
And Warranty to another party, provided that the party reads and agrees to accept the terms and conditions
of this License Agreement And Warranty.
4.3.2 OPERATIONAL WARNING AND SAFETY INSTRUCTIONS.
IMPORTANT NOTICE: YOU SHOULD READ AND FAMI LIARIZE YOURSELF THOROUGHLY WITH THE
FOLLOWING INFORMATION PRIOR TO INSTALLING AND USING THE GROM AUDIO AUX adapter.
FAILURE TO ABIDE BY THESE OPERATIONAL WARNINGS AND SAFETY INSTRUCTIONS COULD
RESULT IN SERIOUS BODILY INJURY OR DEATH. IN ADDITION, FAILURE TO FOLLOW THESE
INSTRUCTIONS MAY VOID THE PRODUCT WARRANTY AND COULD
BECOME A BASIS FOR LIABILITY ON THE PART OF THE VEHICLE OPERATOR IN THE EVENT OF AN
ACCIDENT WHICH RESULTS IN INJURY TO PERSONS OR PROPERTY. UNDER NO CIRCUMSTANCES
WILL GROM OR ITS IMMEDIATE AGENTS OR PRINCIPALS, BE LIABLE, FOR DAMAGES INCURRED
TO THE PRODUCTS, THE VEHICLE OR ITS PASSENGERS, OR OTHER THIRD-PARTIES AS A RESULT
OF FAILURE TO FOLLOW GROM INSTALLATION INSTRUCTIONS.
4.3 3 DISCLAIMER AND LIMITATION OF WARRANTIES.
(A) EXCEPT AS OTHERWISE CONTAINED HEREIN, the PRODUCTS and related documentation are
provided to you, “AS IS”. IN NO EVENT SHALL GROM BE LIABLE FOR ANY DAMAGES, CLAIM OR
LOSS INCURRED BY YOU (INCLUDING WITHOUT LIMITATION, COMPENSATORY, INCIDENTAL,
INDIRECT, SPECIAL, CONSEQUENTIAL, OR EXEMPLARY DAMAGES, LOST PROFITS, LOST SALES
OR BUSINESS, EXPENDITURES, INVESTMENTS, OR COMMITMENTS IN CONNECTION WITH ANY
BUSINESS, LOSS OF ANY GOODWILL, OR DAMAGES. THE TERM ‘INCIDENTAL DAMAGES’ REFERS
TO THE EXPENSES OF TRANSPORTING THE PRODUCTS TO THE GROM AUDIO SERVICE CENTER,
LOSS OF THE END-USERS [ORIGINAL PURCHASER’S] TIME, LOSS OF THE USE OF THE PRODUCT,
BUS FARES, CAR RENTALS OR OTHER COSTS RELATED TO THE CARE AND CUSTODY OF THE
PRODUCT. THE TERM ‘CONSEQUENTIAL DAMAGES’ REFERS TO THE COST OF REPAIRING OR
REPLACING OTHER PROPERTY, WHICH IS
DAMAGED WHEN THIS PRODUCT DOES NOT WORK PROPERLY, RESULTING FROM THE USE OR
INABILITY TO USE THE PRODUCTS, INCLUDING ANY DAMAGES INCURRED DUE TO THE
NEGLIGENT OPERATION OF A MOTOR VEHICLE, IN CONJUNCTION WITH THE USE OF SAID
Page 10

PRODUCTS. THE END-USER ACKNOWLEDGES ITS RESPONSIBILITY FOR THE USE OF THE
PRODUCT. THE ADDITION OF GROM PRODUCTS AND ANY AFTER-MARKET EQUIPMENT MAY
ENHANCE THE VALUE OF A VEHICLE OR CAUSE A THIRD-PARTY TO ILLEGALLY ATTEMPT TO
REMOVE THE PRODUCTS AND AFTER-MARKET EQUIPMENT. GROM DISCLAIMS ANY LIABILITY
RELATED TO SUCH THEFT AND POTENTIAL DAMAGE TO PROPERTY. IT IS THE END-USERS
RESPONSIBILITY TO PROTECT ITS OWN PROPERTY. THE END-USER FURTHER ACKNOWLEDGES
THAT THE OPERATION OF A MOTOR VEHICLE IS AN INHERENTLY DANGEROUS ACTIVITY, AND BY
ITS USE OF GROM’S PRODUCTS, ACKNOWLEDGES THAT THE PRODUCTS ARE REMOTELY
RELATED TO SAID MOTOR VEHICLE OPERATION, AND THUS ANY DAMAGES CAUSED TO THE
DRIVER OF THE VEHICLE, THE VEHICLE ITSELF OR
ANY THIRD-PARTY AND ITS PROPERTY IS NOT THE RESPONSIBILITY OF GROM, ITS AGENTS OR
ITS PRINCIPALS AND IS THE SOLE RESPONSIBILITY OF THE DRIVER OF SAID VEHICLE. YOU, THE
END-USER, OR ANY OTHER DRIVER OF THE VEHICLE, IS SOLELY RESPONSIBLE FOR THE SAFE
OPERATION OF THE VEHICLE AND THE SAFETY OF BOTH YOU AND THE PASSENGERS. FOR
SAFETY PURPOSES, THE PRODUCT SHOULD NOT BE USED FOR THE DRIVER’S ENTERTAINMENT,
WHILE THE VEHICLE IS BEING DRIVEN. SUCH USE COULD BE A DISTRACTION TO THE DRIVER,
WHICH COULD CAUSE AN ACCIDENT LEADING TO SERIOUS INJURY OR DEATH. IF YOU, THE END-
USER ALLOW ANOTHER PERSON TO USE THE VEHICLE, IT IS YOUR RESPONSIBILITY TO
THOROUGHLY BRIEF THAT OTHER USER, ON THE SAFETY REQUIREMENTS FOR OPERATING THE
VEHICLE AND THE PRODUCTS INSTALLED THEREIN.
(B) SAID DISCLAIMERS SHALL APPLY TO THE USE OF SAID PRODUCTS, EVEN IF GROM HAS BEEN
INFORMED OF, KNEW OF, OR SHOULD HAVE KNOWN OF THE LIKELIHOOD OF SUCH DAMAGES.
THIS LIMITATION APPLIES TO ALL CAUSES OF ACTION IN THE AGGREGATE, INCLUDING WITHOUT
LIMITATION: BREACH OF CONTRACT, BREACH OF WARRANTY, NEGLIGENCE, STRICT LIABILITY,
MISREPRESENTATION AND OTHER TORTS. IF GROM’S WARRANTY DISCLAIMER OR LIMITATION OF
LIABILITY SET FORTH IN THIS AGREEMENT SHALL, OR FOR ANY REASON WHATSOEVER, BE HELD
UNENFORCEABLE OR INAPPLICABLE, YOU AND ANY OTHER END USER AGREE THAT GROM’S
LIABILITY SHALL NOT EXCEED (70%) OF THE PRICE PAID FOR THE ENCLOSED GROM PRODUCT.
Some states do not allow the exclusion or limitation of incidental or consequential damages, so the above
limitation or exclusion may not apply to you. This Warranty Disclaimer and Limitation of Liability shall not be
applicable to the extent that any federal, state or local law, which cannot be preempted, prohibits any
provision of this Warranty.
Any use of the PRODUCTS where it is illegal to do so, may be used against you as evidence of negligence
in the event of an auto accident or other traffic infraction.
4.3.4 OTHER PROVISIONS:
A. INDEMNIFICATION OF GROM AUDIO, ITS AGENTS AND EMPLOYEES. By Purchasing, Installing and
Using the Products, You, the End- User, agree to indemnify, defend and hold harmless, GROM AUDIO, and
Page 11

it s Affiliates, Directors, Officers, Agents and Employees from any Liabilities, Damage, Loss, Claim and
Expense (including reasonable Attorney’s Fees) arising out of the installation and use of the Products.
B. GOVERNING LAW. THIS AGREEMENT and all Purchases hereunder shall be governed by, and
construed under the laws of the State of California, without regard to conflicts of law rules. You agree that
the Courts of California shall have exclusive jurisdiction over the Parties, for all disputes.
C. FORCE MAJEURE. GROM shall not be liable for any delay or failure in performance caused by or
resulting from acts of
God, fire, flood, storms, earthquakes, tornados, other acts of nature, any accidents, riots, wars, government
intervention, embargoes, strikes, labor difficulties, equipment failures, or any other causes beyond the
control of GROM AUDIO. Quantities are subject to availability.
L. ENTIRE AGREEMENT. These terms and conditions constitute the entire and exclusive agreement
between you, the End-User and GROM AUDIO, concerning the Products, and your purchase hereunder,
and supersede all statements or other agreements, whether oral or written, between you and GROM
AUDIO. No change in this Agreement shall be effective, unless agreed to in writing by both, you, the end-
user and GROM AUDIO.
IF YOU DO NOT AGREE WITH THESE TERMS, PLEASE RETURN THE GROM PRODUCTS IN ORIGINAL
CONDITION, AND INORIGINAL PACKAGE WITHIN FIVE (5) BUSINESS DAYS OF RECEIPT OF THE PRODUCTS,
TO THE PLACE FROM WHICH YOU PURCHASED THEM, FOR A FULL REFUND OF THE PURCHASE PRICE OF
GROM PRODUCTS.
Page 12

Technical Support:
• web form: www.gromaudio.com/support.html
• Chat with us live 9am-5pm PST Monday through Friday at www.gromaudio.com
Install Videos:
• gromaudio.com/installs/index.html
• youtube.com/gromaudio/
Stay Connected:
• facebook.com/gromaudio/
• twitter.com/gromaudio
• plus.google.com/+gromaudio
www.gromaudio.com
 Loading...