

Innovative Solutions for Gardeners Everywhere!
®
AAsssseemmbbllyy MMaannuuaall
©© 22001144 GGRROO PPrroodduuccttss AAllll RRiigghhttss RReesseerrvveedd
GRO Products • P.O. Box 248 Genoa, IL 60135 • 877.442.9267 • www.groproducts.com
VVeerrttiiccaall GGrroowwiinngg SSyysstteemmss
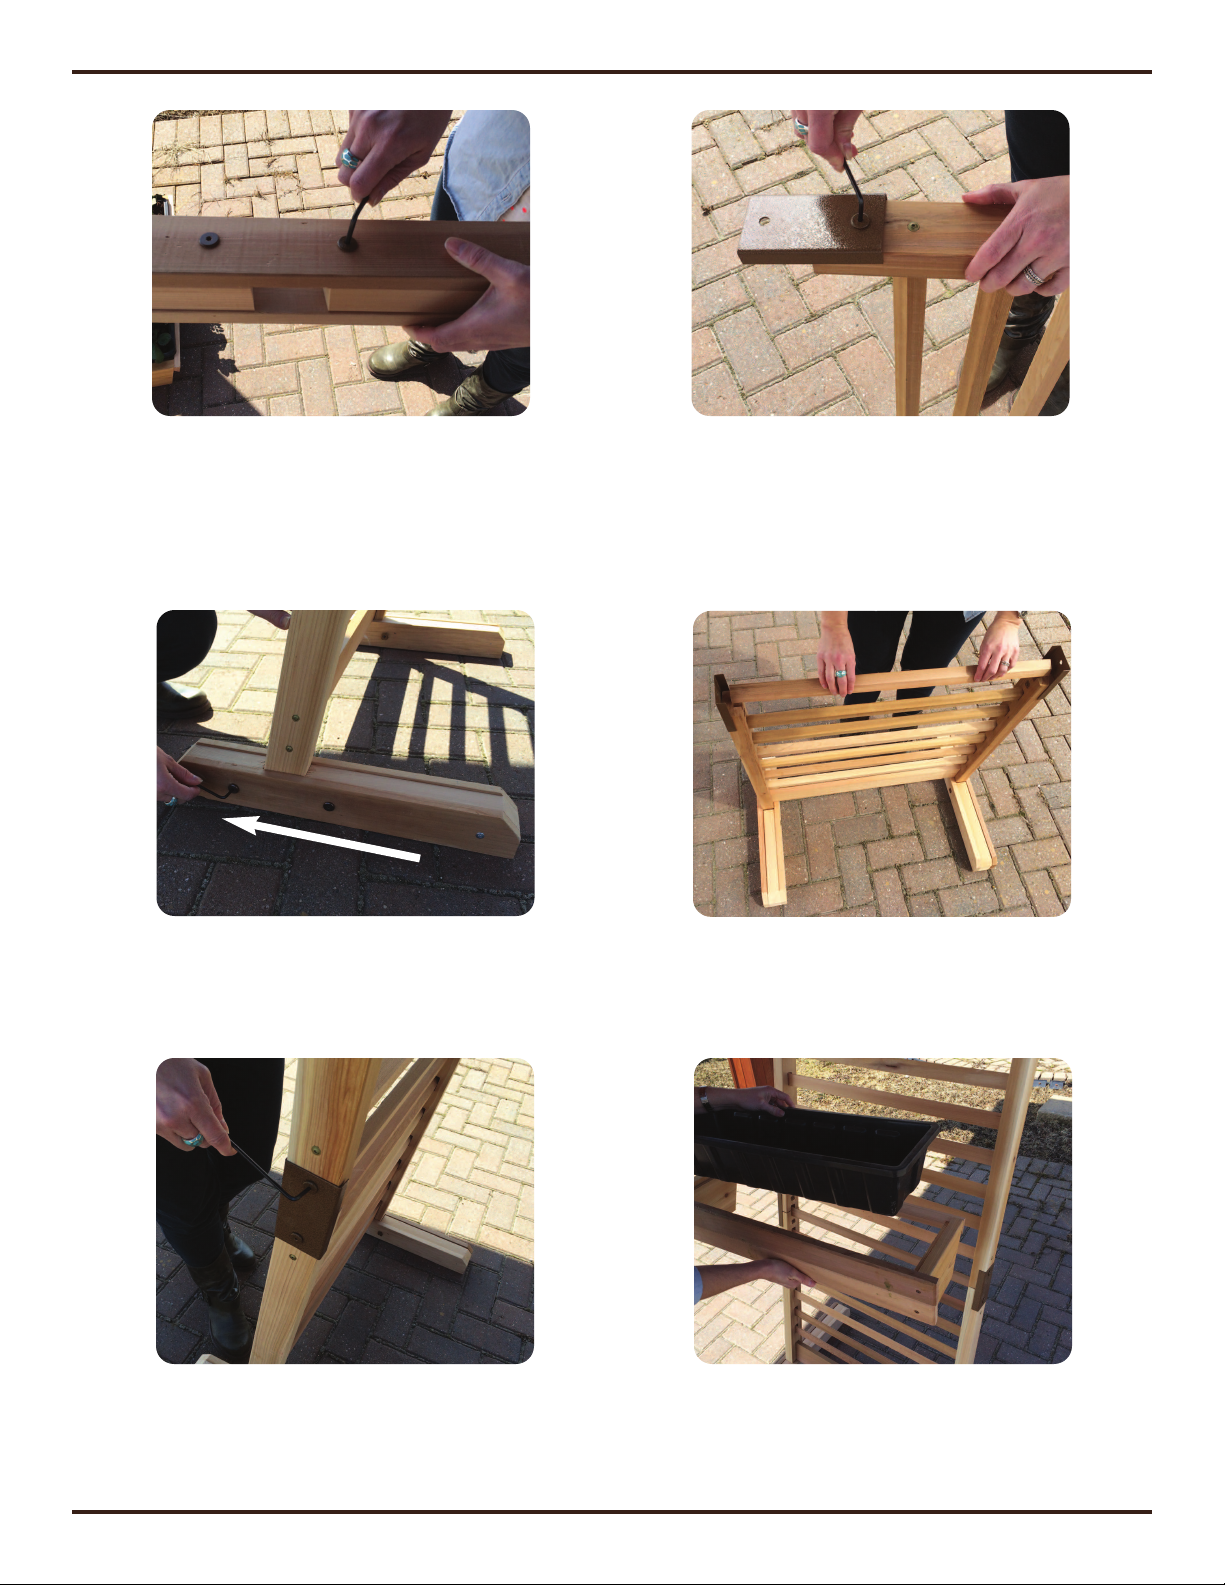
The feet will come with the bolts tight. On both
feet, loosen both bolts as far as they will go while
remaining attached to the receiving T-nut.
Start with the VGS bottom (the section without the
GRO Products logo) and attach the bracket onto the
leg using the provided bolt & allen wrench as
shown above. Do this on both sides of the bottom
section.
NNOOTTEE:: TThhee bbrraacckkeettss ccaann bbee ssnnuugg.. TThhiiss iiss nnoorr--
mmaall.. YYoouu mmaakkee hhaavvee ttoo ssqquueeeezzee tthheemm oonnttoo tthhee lleeggss..
Place the VGS bottom into the feet with the brack-
ets facing up. Make sure that the flat side of the
slats are facing the front of the feet.
Insert the loose slat into the groove at the top of
the VGS bottom, keeping the flat side of the slat to-
wards the front of the VGS like the pre-installed
slats.
Slide the VGS top into the brackets, making sure
the loose slat goes into the groove on the VGS top
and that the flat portion of the slats are all facing
the front of the VGS.
1.
2.
3.
6.
4.
5.
F
R
O
N
T
Put all the plastic liners into the hanging wooden
boxes. Remember to punch out the draingage
holes in each plastic liner if needed.

Hang all of your planter boxes on your Vertical
GRO System.
You’re now ready to plant your favorite herbs,
flowers and vegetables in your Vertical GRO Sys-
tem.
7.
8.
We highly suggest sealing your Vertical Growing
System. This will lengthen the life of your Vertical
Growing System, helping protect it from the sun,
rain & other elements.
If you have the VGS Irrigation System and/or the VGS Casters Pack-
age, please continue on in the Instruction Manual

Your VGS Irrigation Unit will come with the main
hose pre-assembled as shown above.
Place the 90º elbow on the back of the VGS, tightly
againt the foot, leg and bottom brace. Attach the
hose to the bottom brace using one of the provided
brackets as shown above.
Attach the hose to one of the horizontal slats (ap-
proximately half way between the elbow & leg
bracket) using one of the provided brackets as
shown above. Make sure you keep the hose
straight and tight up against the VGS.
Attach the hose to one of the horizontal slats (ap-
proximately half way between the leg bracket &
top of main hose) using one of the provided brack-
ets as shown above. Make sure you keep the
hose straight and tight up against the VGS.
Attach the hose to the top brace, just below the
hose cap using one of the provided brackets as
shown above. Make sure you keep the hose
straight and tight up against the VGS.
Hang all of your boxes where you would like them
on your VGS. Using the provided “Punch Pal,”
punch a hole in the main hose just above box. Do
this for all boxes.
1.
2.
3.
6.
4.
5.
Vertical Growing System - Irrigation System Manual

Insert all of the the drip lines into their respective
punched holes using the end with the pre-installed
fitting.
Cut all of the drip lines to length to fit in the box.
Insert the drip line caps into the cut end of all of
the drip lines.
7.
8.
9.
Place all of the drip lines in their respective plastic
liners.
10.
Connect your hose to the fitting on the bottom of
the Irrigation Unit and you are ready to water your
favorite herbs, flowers & vegetables.
11.

There will be four casters in your kit, two with
brakes & two without brakes. The ones with
brakes (pictured in the bottom of the picture above)
will go on the front of your VGS legs.
Start with your VGS legs upside down. Put one of
the caster inserts in the front hole as shown
above.
Use a hammer to drive caster insert in the hole.
This may take a few strikes. Make sure the teeth
on the underside of the head have dug into the VGS
leg as shown on the right in the picture above.
Place the caster in the caster insert as shown
above. Note that in the picture above, that the
caster with the brake is in the front of your VGS
leg.
Use a hammer to drive the caster into the caster
insert as shown above. This make take a few
strikes.
Once you make sure the caster is fully secure in
the caster insert, continue steps 2 through 5 for
the rest of the casters, again making sure the
casters with the brakes are in the front of your VGS
legs.
1.
2.
3.
6.
4.
5.
Vertical GRO System - Caster Kit Instruction Manual
 Loading...