

Grizzly Pro Video r-THREE Operating Instructions Manual

Grizzly Pro Video
r-THREE
Integrated Remote Camera System
Operating Instructions
These instructions cover the r-THREE family of products which
includes the r-ONE, the r-THREE and the r-THREE-LS. Before
operating any of these systems, please read this manual and
keep it for future reference.
©2004, 2005 by Grizzly Pro Video

r3a-x2.0
1
Thank You & Welcome!
We at Grizzly Pro Video would like to say thanks for
choosing our remote camera system. If you have any
questions, check http://www.grizzlypro.com for contact
information or call us toll free at 1-866-remcam1. We truly
appreciate any and all feedback!
The r-THREE family of products includes the r-ONE, the r-
THREE and the r-THREE-LS. Given the scalability of our
product design, in most cases the r-THREE family of products
can be described together. Where differences exist, a note
will be given.
The r-THREE family of Integrated Remote Camera Systems
has been designed for LANC™ cameras (including HD!).
You will get the most benefit from this system if you are
using such cameras. However, we do support Non-LANC
Panasonic cameras, but only with a limited set of features.
The following Operating Instructions have been written for
LANC cameras; if you are using a Panasonic camera, see
Panasonic Support on page 49 for the noted differences.
ENJOY!
Grizzly Pro Staff
LANC™ is a registered trademark of Sony

r3a-x2.0
2
Table of Contents
Introduction ……………………………………….………... 3
Limitations ………………………………….......................... 5
System Components ...……………..……………….……... 6
Options and Accessories …………………… …… 7
r-ONE Cabling ……………………………............................. 8
r-THREE Cabling ……………………………......................... 11
r-THREE Components ……………………………….……..... 15
1. r-THREE Control Head ……………….………...… 15
2. r-THREE Interface Box ………………….……..….. 25
3. r-THREE Pan/Tilt Head ……………………...….. 28
Basic Operations ………………………..............…………….30
1. r-ONE Example … ……………….………...………...31
2. r-THREE Examples ………………….……..………...32
r-THREE Advanced Operations ………………….……..….. 35
MODES …………………………….……..…..............36
Time Code MODE ……………………….……..…... 37
SYS MODE …………………………………………... 38
Table 1 - SYS MODE Menu ……….……..... 39
Table 2 - Curve Configuration …….…….... 43
Table 3 - Deadband Configuration ……….... 44
CAM MODE ……………………………………..….. 46
Table 4 - LANC Camera Commands ……..... 46
Panasonic Support …………………………………….…….. 49
Helpful Hints ……………………………………………..….. 51
Troubleshooting ……………………………………….…….. 52
INDEX ……………………………………………………..…. 57
FCC Warning …………………………………………..……… 58
Warranty ……………………………………………….…….. 59
NOTES ……………………………………………………….. 60

r3a-x2.0
3
Introduction
With your r-THREE system, you will be able to easily setup and
remotely control up to three cameras.
The key elements of the r-THREE system are:
From a single point (your chair) and a single controller
(in your hands), you have the ability to
o dynamically switch to any camera and operate the
camera remotely (e.g. start/stop record, zoom, focus,
exposure, pan & tilt, etc).
o monitor the view for all camera.
o attach the composite video signal from two or all
three cameras to a live switch or purchase the LS
option.
o monitor the status of your cameras (e.g. record
on/off, time codes, battery charge, etc).
o configure the system to your needs (e.g. adjust pan,
tilt and zoom speed, configure joystick response, etc.)
o send camera menu commands to your LANC camera
as if you were dialing the menus dial from the back
of your camera. (e.g. exposure control)
In addition, only a very thin, flexible CAT5 cable from each
pan/tilt head to one centralized interface box is needed for
each remote camera. This cable powers the pan/tilt head
and enables the remote control features for the associated
pan/tilt head and camera as well as sending a video feed
back to the operator. Except for the cameras, the power for
the entire system comes from this one centralized point in
the
r
-THREE system.

r3a-x2.0
4
We recommend that you first read r-THREE Cabling, r-THREE
Components and then r-THREE Basic Operations as you practice
using the system.
Once you have become familiar running the r-THREE system with
only the Basic Operations, then read over the features described in
the Advanced Operations. Keep in mind that the system, as
shipped, is fully configured to control up to three cameras
remotely, so none of the features described in the Advanced
Operations are required to successfully operate your r-THREE
system.

r3a-x2.0
5
Limitations
♦ Cameras cannot exceed 6 pounds, as heavier cameras
will respond poorly and are not within the
specification of the Pan/Tilt Head.
♦ The r3a-ptzcable (CAT5) cables can extend up to 600’
from each Pan/Tilt Head to the r-THREE Interface
Box.
♦ A 12V power supply is required to run the system. If
battery power is used, we strongly recommend using
a 12V lead acid battery as the Low Battery indicator
will be in-accurate if other types of batteries are used.
♦ Not all cameras support the LANC protocol. Not all
LANC cameras support all LANC protocols. All
LANC cameras support zoom, focus, power on/off,
record on/off and time codes. Other features like
auto focus control, and some CAM MODE functions
(see Table 4) are dependent upon what portions of the
LANC protocol the manufacturer of your camera has
chosen to implement.
♦ Panasonic cameras do not support the rich set of
LANC commands that can be found on many others
camera. Therefore, you will find that the CAM
MODE features are not supported for Panasonic
cameras. In a nutshell, if you have a Panasonic
camera, you will only be able to control Pan, Tilt,
Zoom, Record On and Record Off remotely. See
Panasonic Support on page 40.

r3a-x2.0
6
System Components
r-ONE System:
1- r-THREE Control
Head
2- r-THREE Pan/Tilt
Head
3- r-ONE Power
Supply
4-r3a-ptzcam-rca
5-r3a-ptzcable-50
2
3
5
1
4
r-THREE(-LS)
System:
1- r-THREE Control
Head
2- r-THREE Pan/Tilt
Head
3- r-THREE Power
Supply
4- r3a-ptzcam-rca
5- r3a-ptzcable-100
6- r-THREE
Interface Box
7- r3a-intcable
1
2
3
4
5
6
7
r3a-x2.0
7
Options and Accessories
Pan Tilt Head
For additional remote cameras, the following is needed:
Up to three r-THREE Pan Tilt Heads are supported.
Optional Powered Monitor Cable
(for r-THREE and r-THREE-LS only)
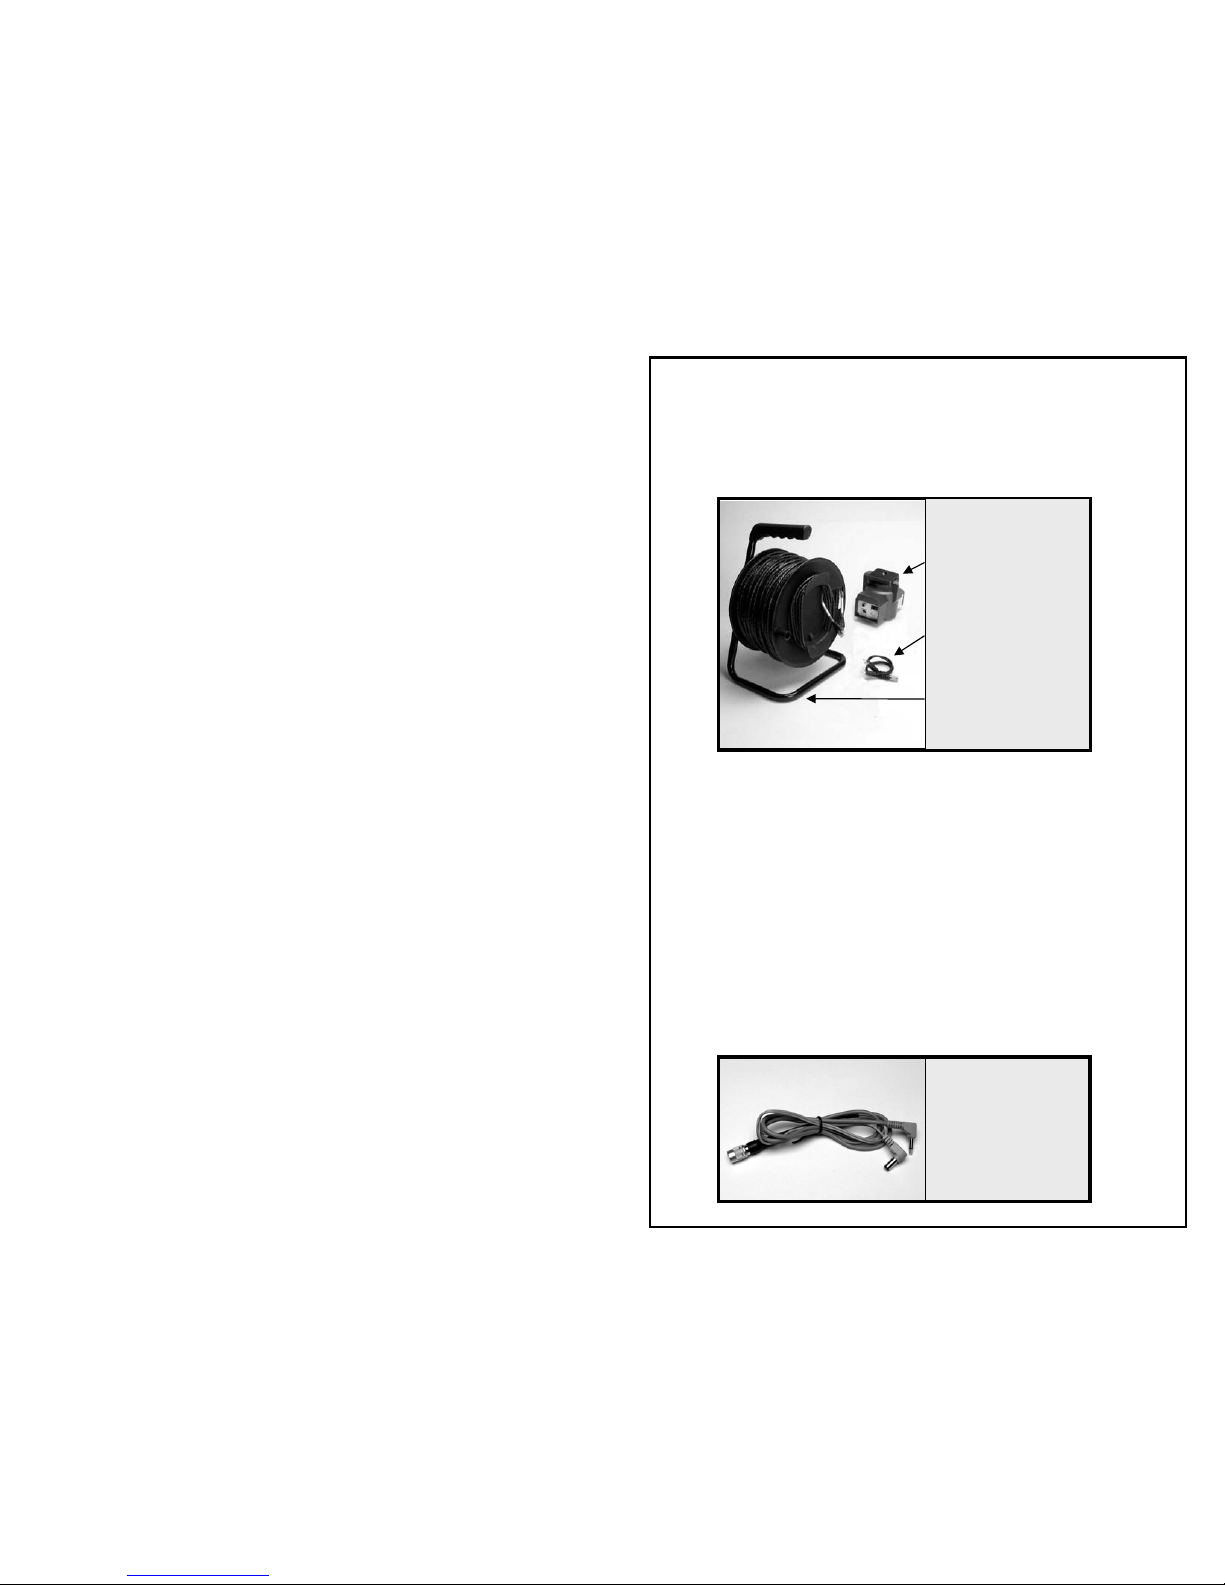
If using a monitor with a power specification of 12V at no
more than 0.75A, we highly recommend our powered
monitor cable. The r-THREE Interface Box can provide the
needed power for up to two monitors, if such a cable is used.
We recommend the Marshall 5.6 Pro Monitor, though other
monitors that draw 12V @ no more than 0.75A and take a
composite input should work.
Powered
Monitor
Cable
r3a-moncable
[rca or phone]
r-THREE PanTilt
Head
r3a-ptzcam-rca
r3a-ptzcable-
[50’, 100’ or 300’]
(300’ shown on Jack Reel)
r3a-x2.0
8
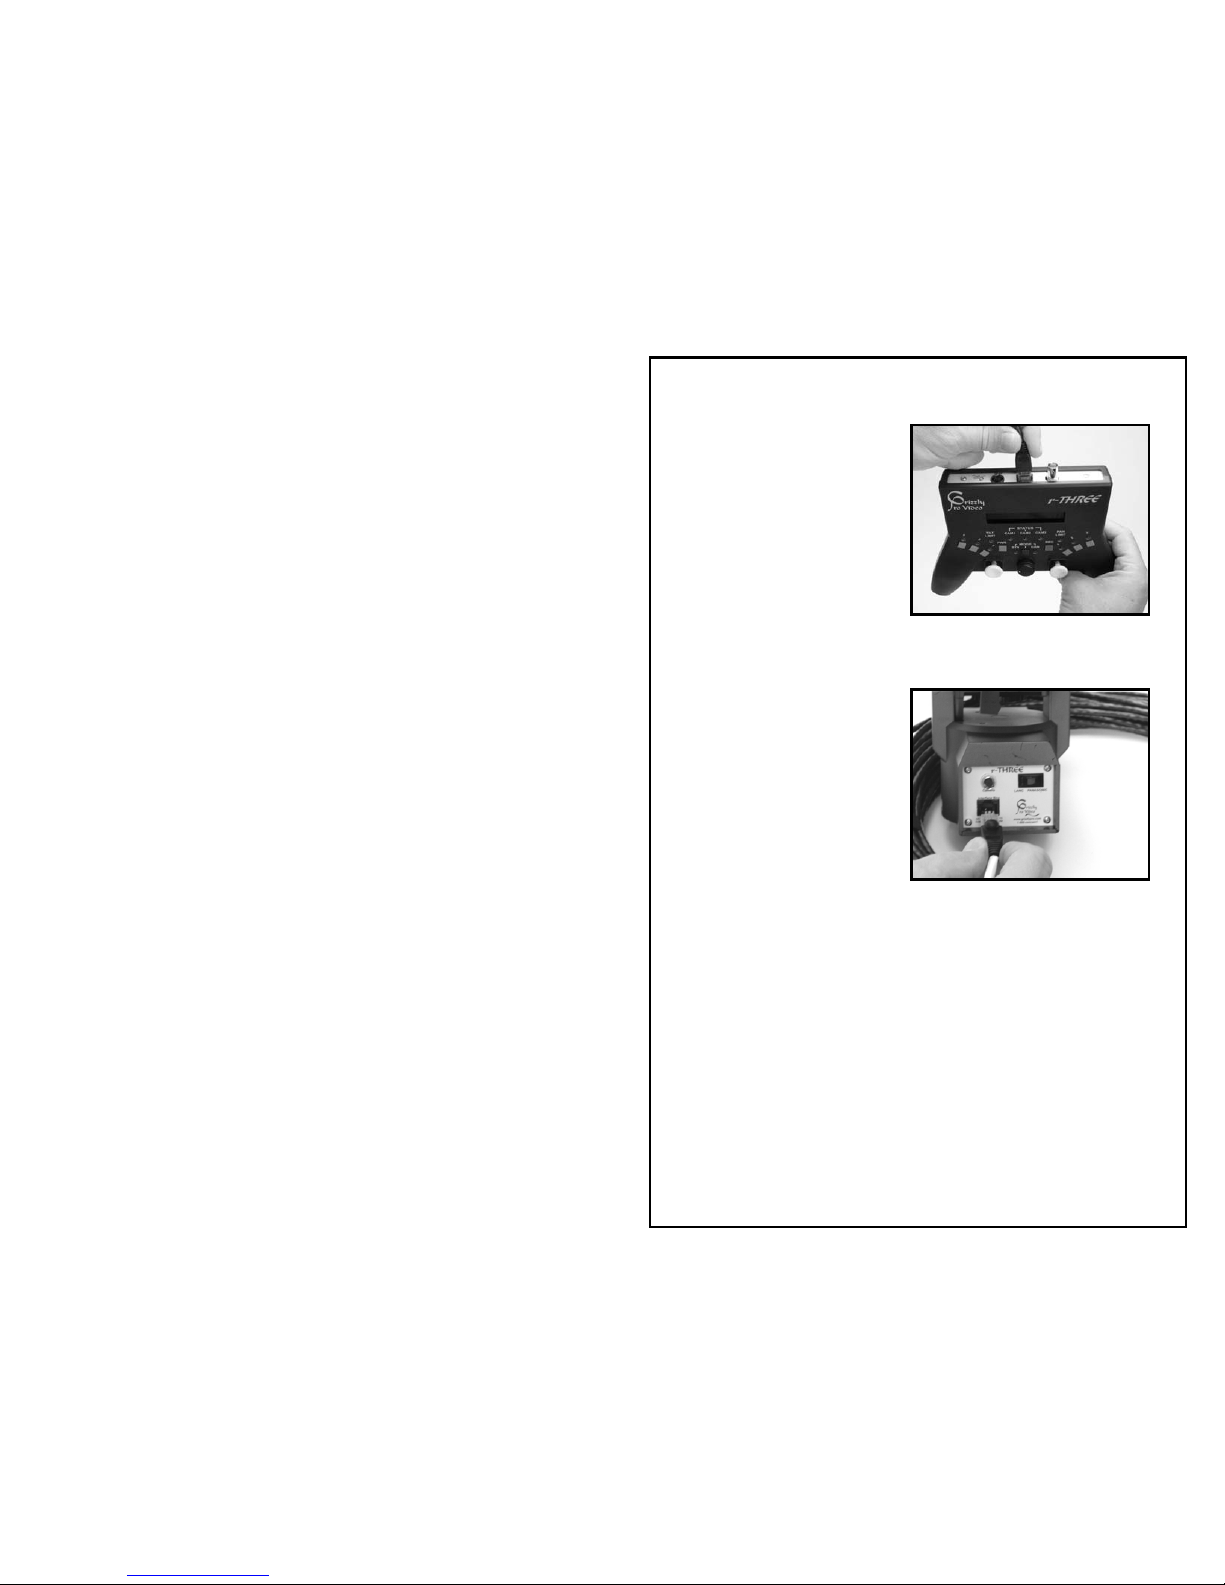
r-ONE Cabling
1. Connect the r3a-ptzcable to
the r-THREE Control Head.
This connector is labeled
Interface.
2. Connecting the r-THREE
Pan Tilt Head:
a. Attach the r-THREE
Pan Tilt Head to a
light stand, tripod or
any stable surface.
b. Attach your camera to
the r-THREE Pan Tilt
Head.
c. Connect the other end of the r3a-ptzcable to an r-THREE
Pan Tilt Head. This connector is labeled Interface Box.
d. Connect the camera to its power source.
e. Set the LANC PANASONIC switch on r-THREE Pan Tilt to
• LANC for cameras that support the LANC protocol (e.g.
Sony, Canon).
• PANASONIC for Panasonic cameras
r3a-x2.0
9
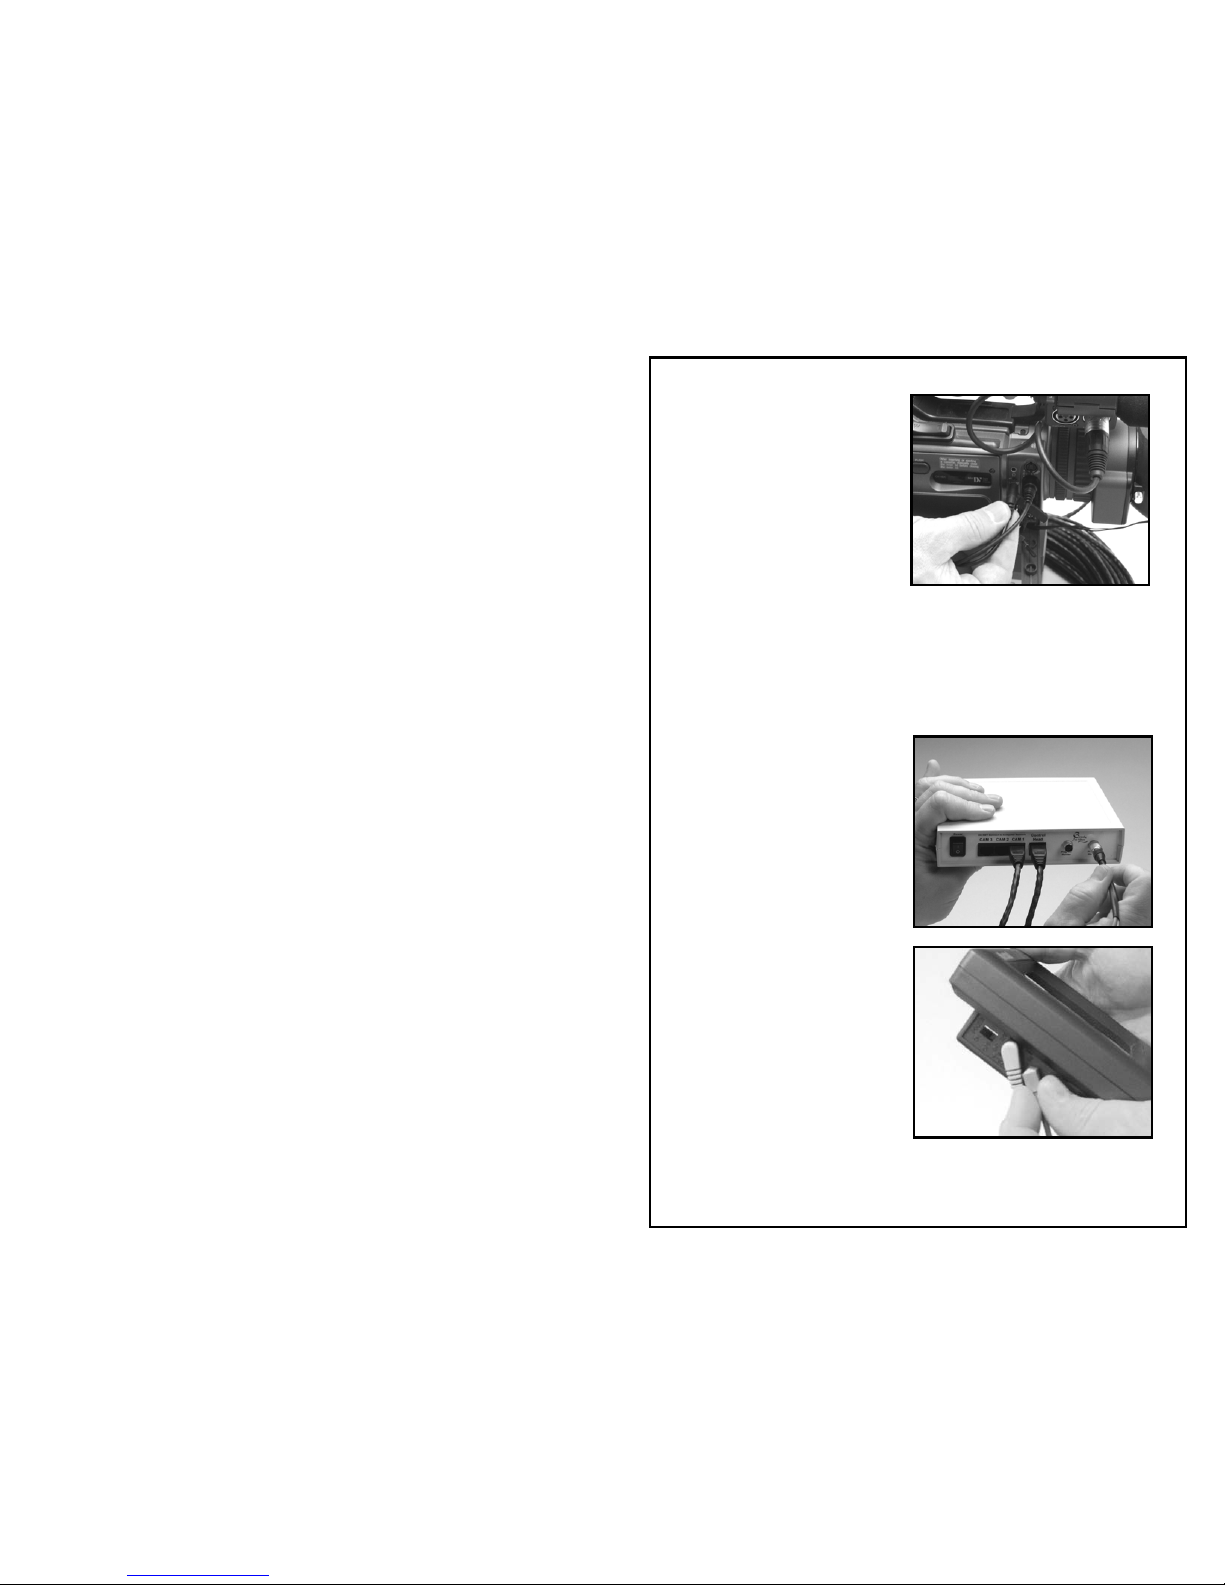
3. Connect the r3a-ptzcam-rca
cable to the back of the r-
THREE Pan Tilt Head. This
connector is labeled Camera.
4. Connect the other two ends
of the r3a-ptzcam-rca to your
camera.
a. The small phone plug
should connect to the
LANC connector on your
camera (or to the remote
connector for Panasonic
cameras).
b. The remaining plug
should connect to the Video plug on your camera. On most
cameras this connector is yellow.
5. Connecting the monitor:
a. Connect the monitor
cable that came with
your monitor to the
Preview on the r-THREE
Control Head.
b. Connect the other end of
this cable to your
monitor.
c. Connect the power cable
that came with your monitor to the monitor and power up
your monitor.

r3a-x2.0
10
6. Connect the power supply:
a. Connect the two
pieces of the power
supply together.
b. Connect the end of
the power supply to
the 24vdc on the back
of the r-THREE
Control Head.
c. Then, plug the power supply into the wall and you are
ready to start shooting
7. The r-THREE Control Head
will look like:
See the Basic Operations
section once you are ready to
start shooting.

r3a-x2.0
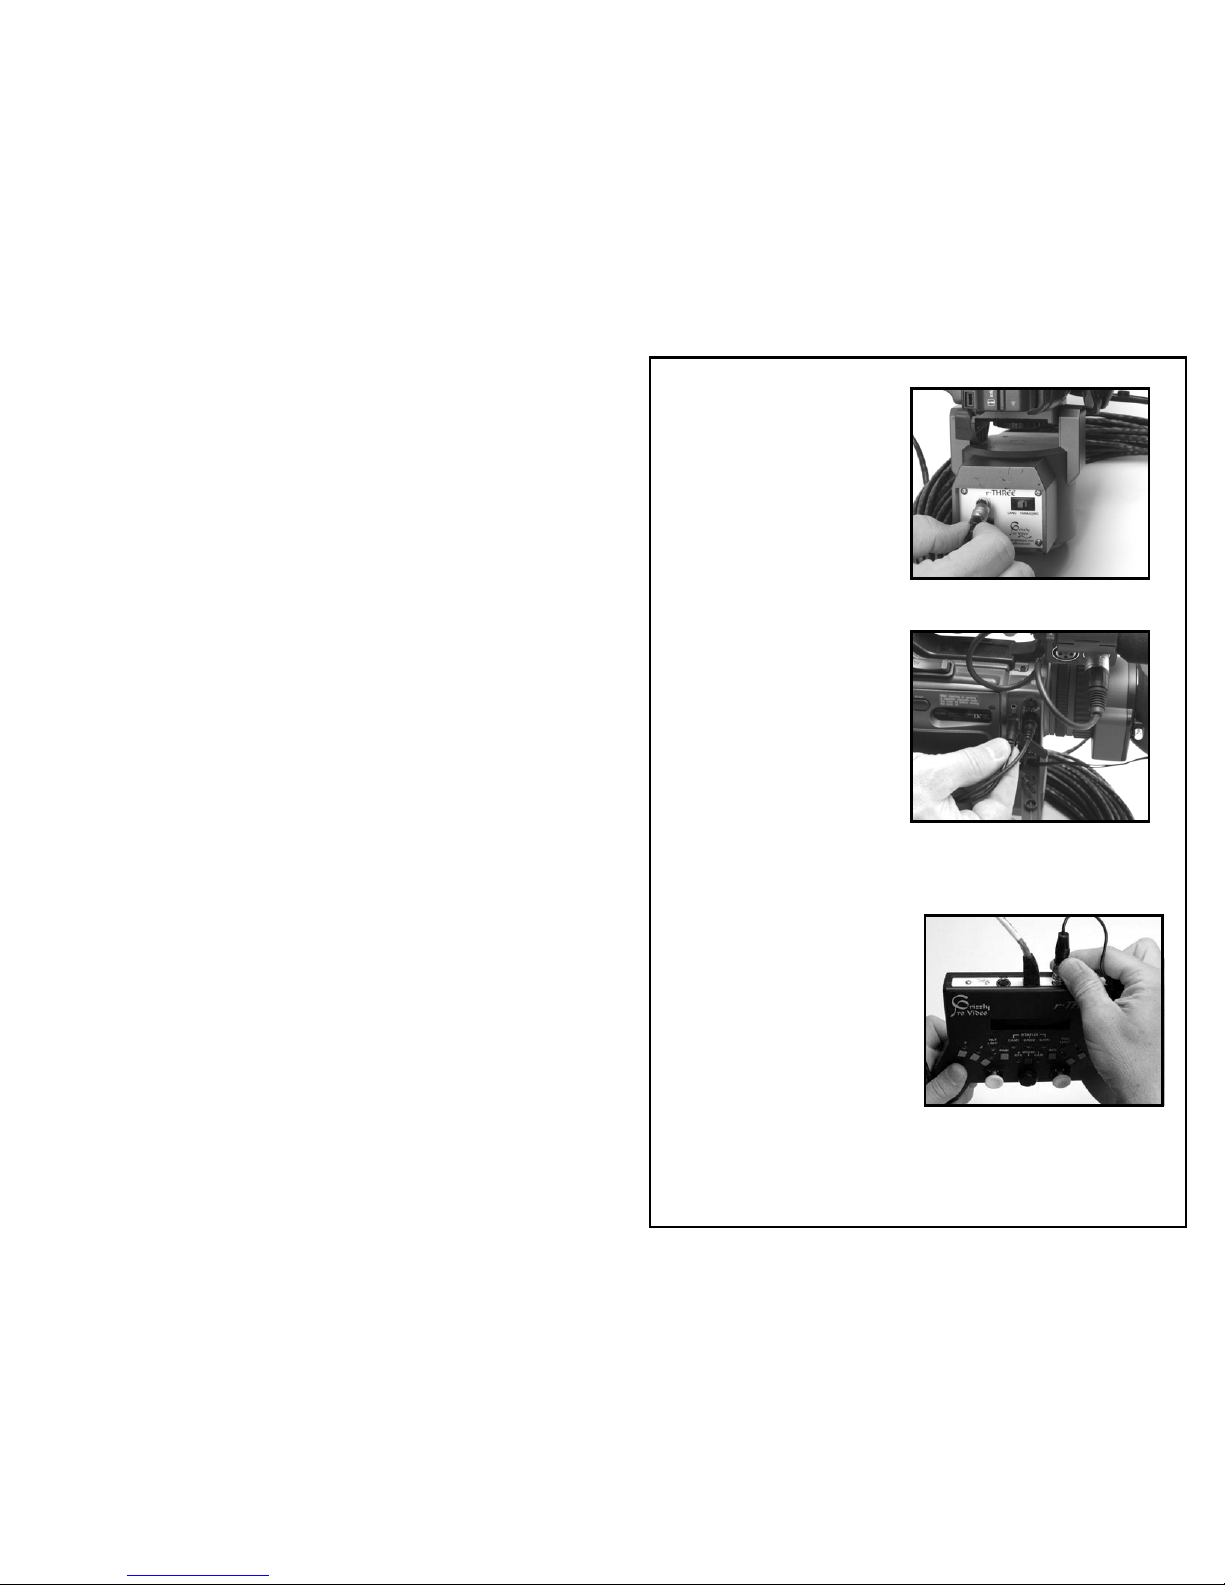
11
r-THREE Cabling
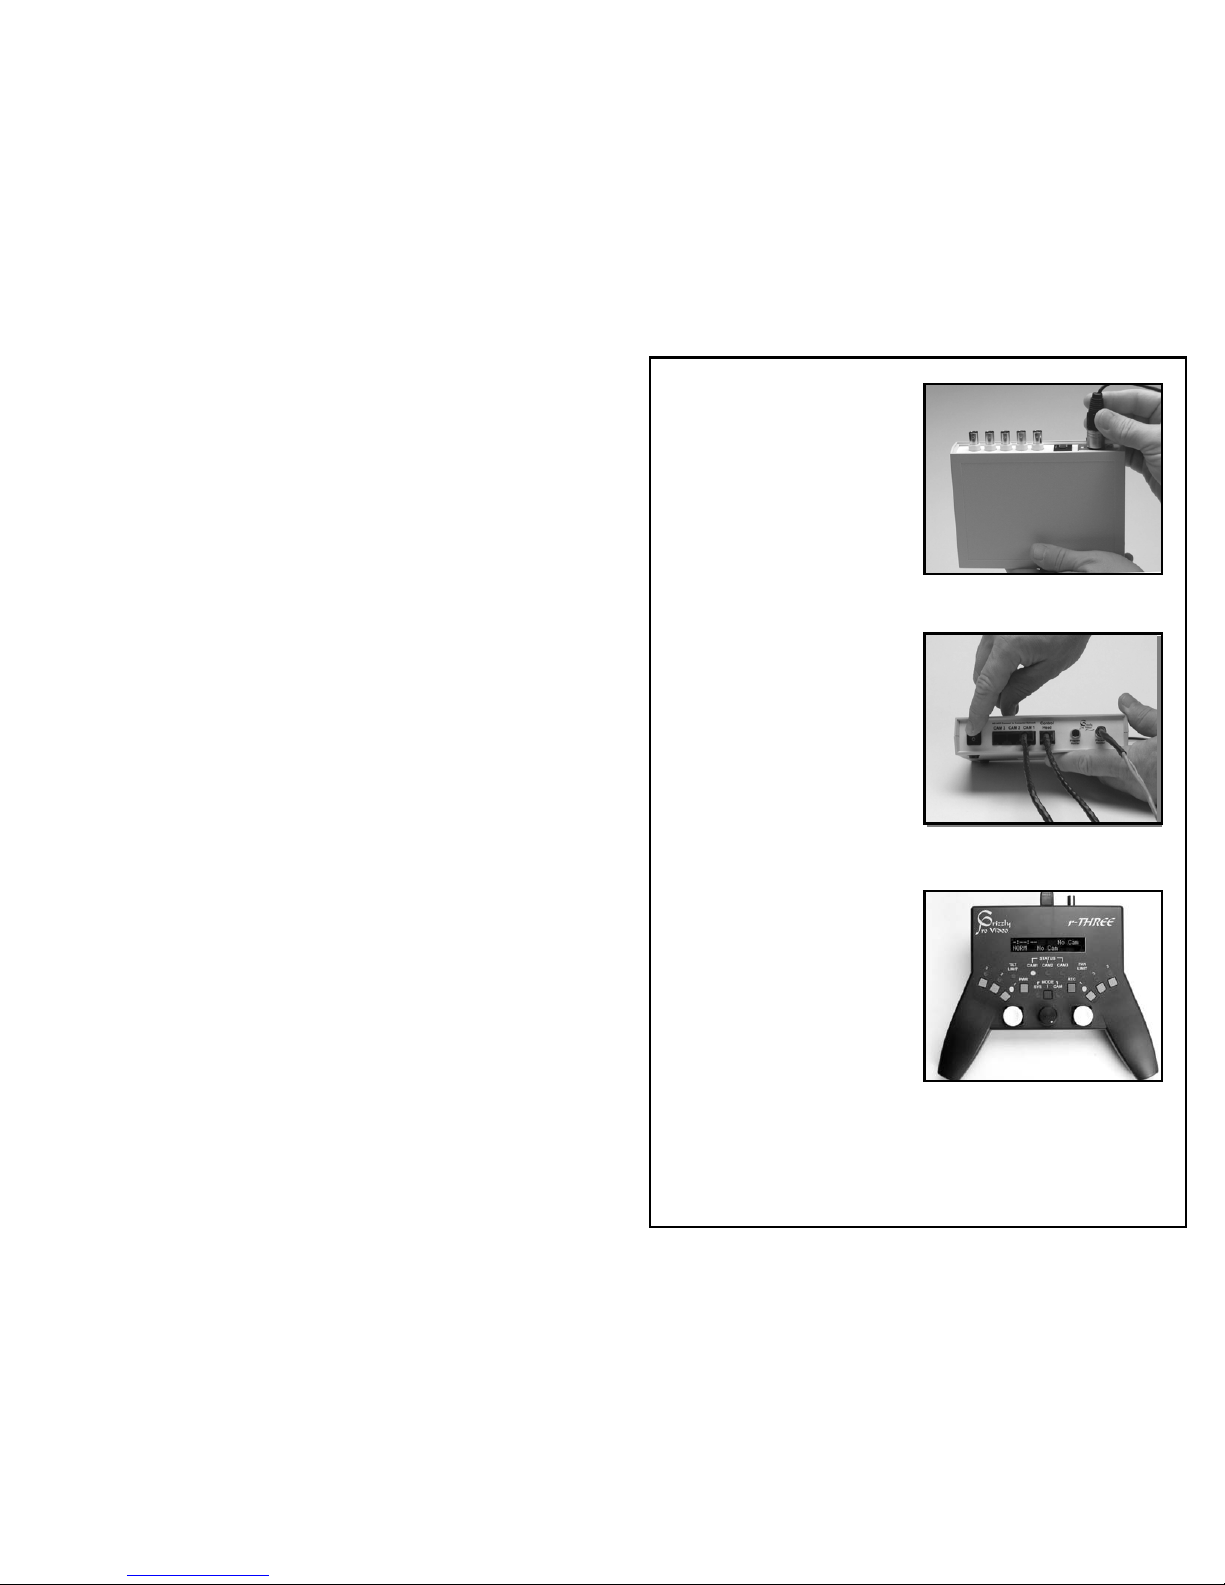
1. Connect the r3a-intcable to
the r-THREE Control Head.
This connector is labeled
Interface.
2. Connect the other end of
the r3a-intcable to the r-
THREE Interface Box. This
connector is labeled Control
Head.
3. Connect the r3a-ptzcable
to one of the three CAM
connections on the front of
the r-THREE Interface Box.
r3a-x2.0
12
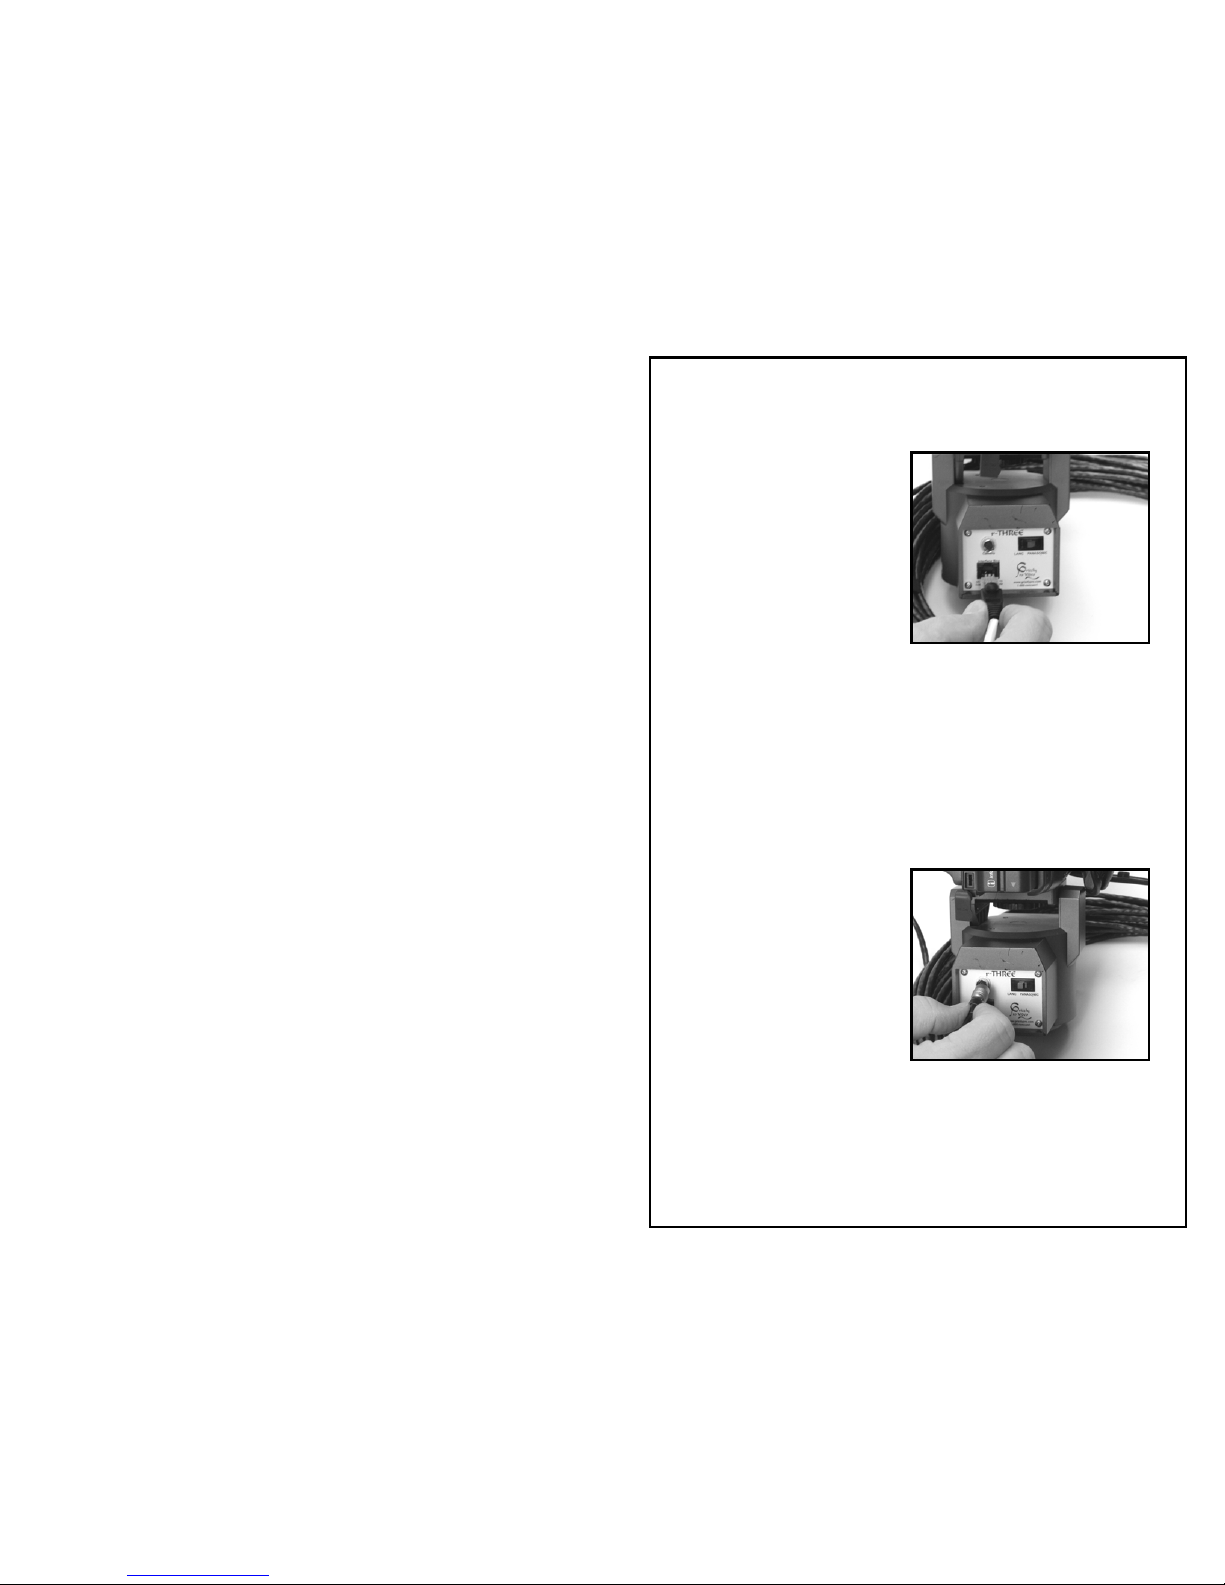
4. Connecting the r-THREE
Pan Tilt Head:
a. Attach the r-THREE
Pan Tilt Head to a
light stand, tripod or
any stable surface.
b. Attach your camera to
the r-THREE Pan Tilt
Head.
c. Connect the other end of the r3a-ptzcable to an r-THREE
Pan Tilt Head. This connector is labeled Interface Box.
d. Connect the camera to its power source.
e. Set the LANC PANASONIC switch on r-THREE Pan Tilt to
• LANC for cameras that support the LANC protocol (e.g.
Sony, Canon).
• PANASONIC for Panasonic cameras.
5. Connect the r3a-ptzcam-rca
cable to the back of the r-
THREE Pan Tilt Head. This
connector is labeled Camera.
r3a-x2.0
13
6. Connect the other two ends
of the r3a-ptzcam-rca to your
camera.
c. The small phone plug
should connect to the
LANC connector on
your camera (or to the
remote connector for
Panasonic cameras).
d. The remaining plug
should connect to the Video plug on your camera. On most
cameras this connector is yellow.
7. Repeat steps 4-6 for any additional r-THREE Pan Tilt Heads that
are to be controlled by the r-THREE system.
8. Connect the r3a-moncable
to the Preview Monitor on front
of the r-THREE Interface Box
or attach your monitor to the
Preview BNC on the back of
the interface box.
9. Connect the other end of the
r3a-moncable to the monitor in
two locations - DC 12V and
Video In.
For a second monitor, repeat
steps 8 & 9 but plug the r3amoncable into
Program
Monitor
on the r-THREE
Interface Box.
r3a-x2.0
14
10. Connect the two pieces of
the power supply together.
Then connect the end of the
power supply to the XLR
12VDC @ 3.5A on the back of
the r-THREE Interface Box
Then, plug the power supply
into the wall (or power source).
11. Power on the r-THREE
Interface Box using the 1/0
Power
switch. Powering the
system on will also power on
the Preview Monitor (and
Program Monitor if it is also
connected), the r-THREE
Control Head and the r-THREE
Pan Tilt Head(s).
12. If only one pan/tilt head is
attached, the r-THREE Control
Head will look like:
See the Basic Operations section
once you are ready to start
shooting.

r3a-x2.0
15
r-THREE Components
1. r-THREE Control Head
Display
The Display is the area on the r-THREE Control Head
that always starts up showing the following four
indicators
• time codes for each camera
• pan speed
• focus (manual or auto)
• battery charge indicator
Display
P
review
P
rogram
P
an/Tilt
Zoom/Focus
M
enu Knob
Picture 1a – r-THREE Control Head
Top View
r3a-x2.0
16
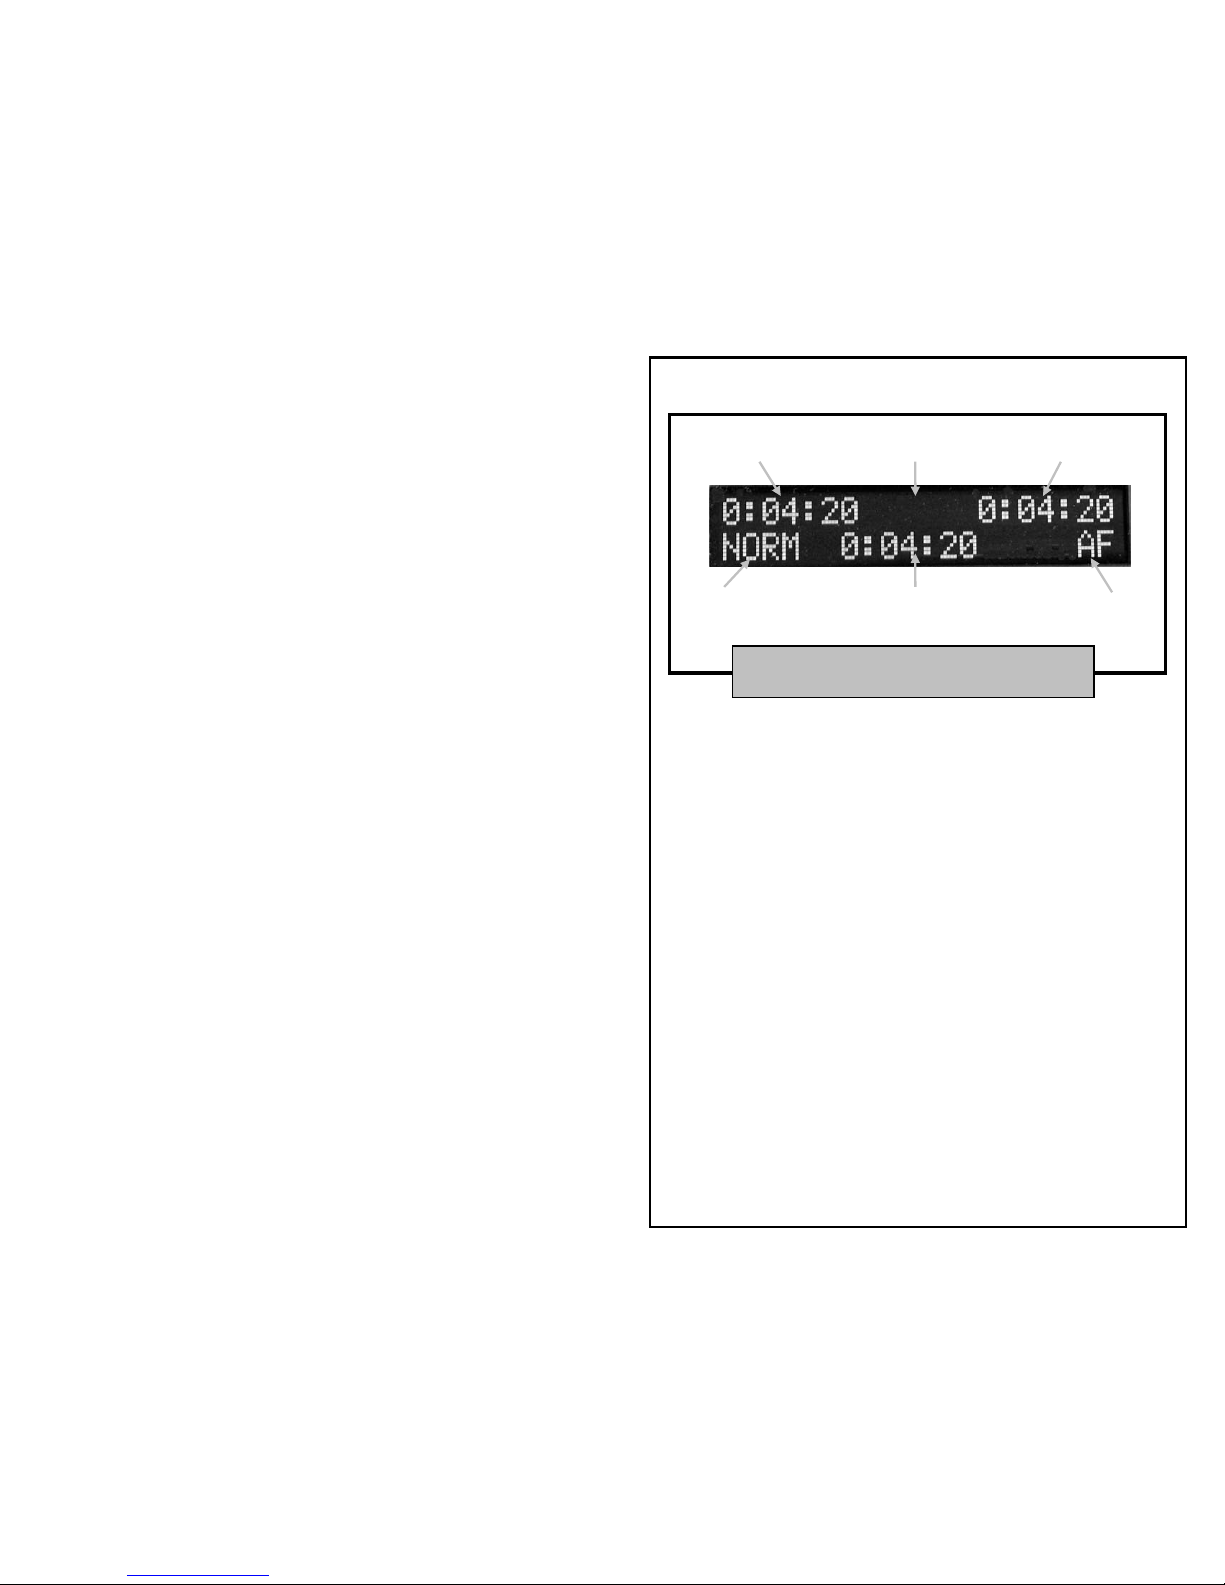
Time Code Indicators :
The three values x:xx:xx displayed on the top left,
bottom center and top right which are the time codes
for camera 1, camera 2 and camera 3, respectively.
Battery Indicator :
VLOW on the top center of the Display – your
power for the r-THREE system is below 11.5V. This
is an early warning and should be monitored for
the potential of VCRT.
VCRT (critical) on the top center of the Display –
your power for the r-THREE system is below 10.8V
and you should shutdown the system
immediately or risk damaging your battery.
The VLOW and VCRT indicators are set to monitor
lead-acid batteries. Other battery types are not
recommended and may not provide any early
warning.
Picture 1b – r-THREE Control Head
Display when in Time Code MODE
Time Code Indicato
r
for Camera 1
Time Code Indicator
for Camera 3
Time Code Indicator
for Camera 2
P
an Speed
Indicator
Focus
Indicator
Battery
Indicator

r3a-x2.0
17
Pan Speed Indicator :
The display will indicate Fast, Norm or Slow in the
lower left hand corner. Pressing the Pan/Tilt joystick
(left) will cycle the speeds from Norm to Fast to Slow.
Focus Indicator :
The value displayed on the lower right for Focus can
be one of two values.
o AF indicates that the camera is in auto focus.
o Blank indicates that the camera is in manual
focus.
If the camera is in manual focus and you are actively
using the Zoom/Focus Joystick to focus your image,
the focus indicator will show F-N or F-F to indicate
that the camera is focusing near or focusing far.
Note: Some LANC cameras were not designed to
communicate the focus indicator information. Thus,
the AF indicator may not appear on the Display even
when you are set to auto focus.
Preview Buttons
Preview buttons are, by default, the set of three
buttons on the right which are labeled 1, 2, 3. This
selects the camera which can now be controlled
remotely via the r-THREE Control Head. You may
switch to any camera at any time. In addition, this
defines the camera which is currently feeding the
composite video signal to the Preview output of the r-
THREE Interface Box.
Program Buttons

r3a-x2.0
18
Program buttons are, by default, the set of three
buttons on the left which are labeled 1, 2, 3. This
defines the camera which is currently feeding the
composite video signal to the Program output of the
r-THREE Interface Box.
With the r-THREE-LS only, when a switch is made
from one Program camera to another:
• A synchronized cut will occur when the Program
button for the camera that is being switched to is
pressed and then released quickly (< 0.5s).
• A synchronized dissolve will occur when the
Program button for the camera that is being
switched to is pressed and held for at least half a
second. The length of this dissolve is configurable
in the Video Configuration section of the Sys
Menu.
Note: the r-THREE system only allows for selecting
Preview or Program cameras that are currently
connected to the system. If you select a Preview or
Program button for a camera and the light does not
come on, check to ensure that the r3a-ptzcable cable
from the r-THREE Pan/Tilt Head to the r-THREE
Control Head is making a connection.
STATUS Lights (CAM1, CAM2, CAM3)
No light – r-THREE Interface Box is powered off or
the r-THREE Pan/Tilt head connected to this
camera is not connected to the r-THREE Interface
Box via the r3a-ptzcable.
Solid red - r-THREE Pan/Tilt head is connected to
the r-THREE Interface Box, but the camera is not
powered on.

r3a-x2.0
19
Blinking green – camera is powered on but not
recording.
Solid green – camera is powered on and recording.
Blinking red – record protect tab is set, or power is
low, or less than 5 minutes of tape remains, or
there is no tape in the camera.
TILT or PAN LIMIT Lights
No light – you can continue to pan or tilt as you
have not yet reached the limit of the Pan/Tilt
head.
Flashing amber – you have reached the pan or tilt
limit of the Pan/Tilt head and thus you can go no
further in that direction.
PWR Button
Power on/off the current Preview Camera by
pressing PWR. This assumes that the selector switch
on the physical camera has been previously set to
CAMERA.
If you press and hold the PWR button for greater than
2 seconds, all cameras will power on simultaneously.
But, when powering off, each camera must be
powered off separately - as described in the above
paragraph.
MODE Button
The MODE Button indicates if you are in SYS MODE,
CAM MODE or neither (aka Time Code Mode). By
pressing the MODE button you will cycle through
these modes.
Press the MODE button :
1. once and you will be in SYS MODE and the
SYS MODE Light will be on.
 Loading...