

Page 1
MODEL T28172/T28369/T28370
ROLLER TABLES
INSTRUCTIONS
FOR MODELS MFD. SINCE 10/17
For questions or help with this product contact Tech Support at (570) 546-9663 or techsupport@grizzly.com
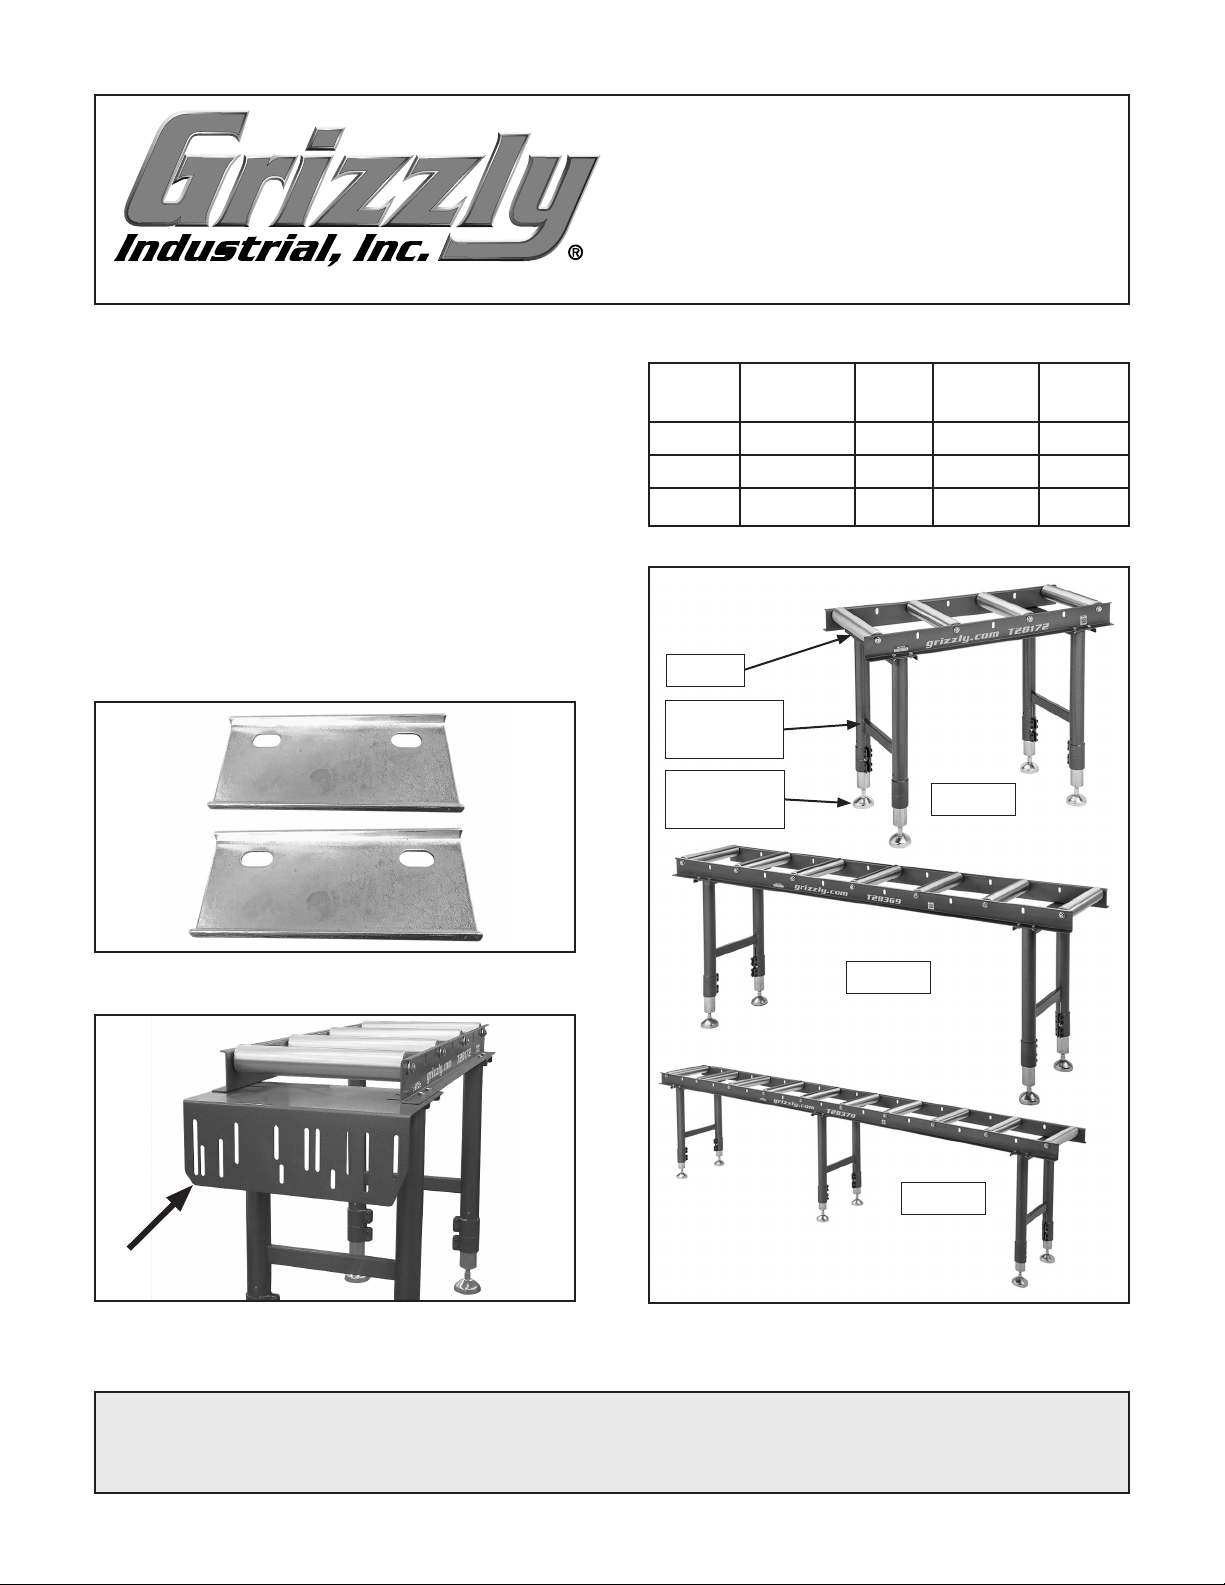
Introduction
These roller tables provide infeed/outfeed support
for processing long workpieces on machines with
a working height of 24"– 40". They can be used
alone or connected together with optional connector plates (T28371) to establish custom-length
roller supports for nearly any type of workflow.
Depending on the type of operation, the roller
tables can be set up next to machine as a standalone unit, or they can be secured directly to
the machine with an optional mounting plate
(T28378).
Specifications
Model
T28172 141⁄2 x 39
T28369 141⁄2 x 78
T28370 141⁄2 x 118
Rollers
Adjustable
Adjustable
W" x L"
Legs
Feet
Work
Ht ."
24–40
24–40
24–40
Max. Wt.
Limit
110 0 lb s.
1540 lbs. 128 lbs.
1540 lbs. 154 lbs.
T28172
Table
Weight
66 lbs.
Figure 1. Optional T28371 Connector Plates.
Figure 2. Optional T28378 Mounting Plate
installed on T28172.
COPYRIGHT © JANUARY, 2018 BY GRIZZLY INDUSTRIAL, INC.
NO PORTION OF THIS MANUAL MAY BE REPRODUCED IN ANY SHAPE
OR FORM WITHOUT THE WRITTEN APPROVAL OF GRIZZLY INDUSTRIAL, INC.
#KBAB19284 PRINTED IN CHINA
T28369
T28370
Figure 3. Models T28172, T28369, and T28370
and features.
V1.0 1.18
Page 2

Inventory
Description (Figure 4) Qty
A. Roller Table Assembly
— Model T28172 39" .................................. 1
— Model T28369 78" ................................. 1
— Model T28370 118" ................................ 1
B. Adjustable Leg Assemblies
— Model T28172, T28369 .......................... 2
— Model T28370 ........................................ 3
C. Hex Nuts M8-1.25 (T28172, T28369) ......... 8
Hex Nuts M8-1.25 (T28370) ..................... 12
D. Flat Washers 8mm (T28172, T28369) ........ 8
Flat Washers 8mm (T28370) .................... 12
E. Hex Bolts M8-1.25 x 16 (T28172, T28369) . 8
Hex Bolts M8-1.25 x 16 (T28370) ............. 12
F. Hex Wrench 6mm ....................................... 1
To assemble roller table:
1. With help from an assistant, place roller table
assembly upside-down on cardboard or blanket with wider lip of side rails facing up.
2. Secure each leg assembly to roller table
assembly with (4) M8-1.25 x 16 hex bolts, (4)
M8-1.25 hex nuts, and (4) 8mm flat washers
per leg (see Figure 5).
Note: If using T28378 Mounting Plate, install
on machine-mounting side of table before
securing leg assembly during Step 2.
A
B
C D E F
Figure 4. Model T28172, T28369, T28370
inventory.
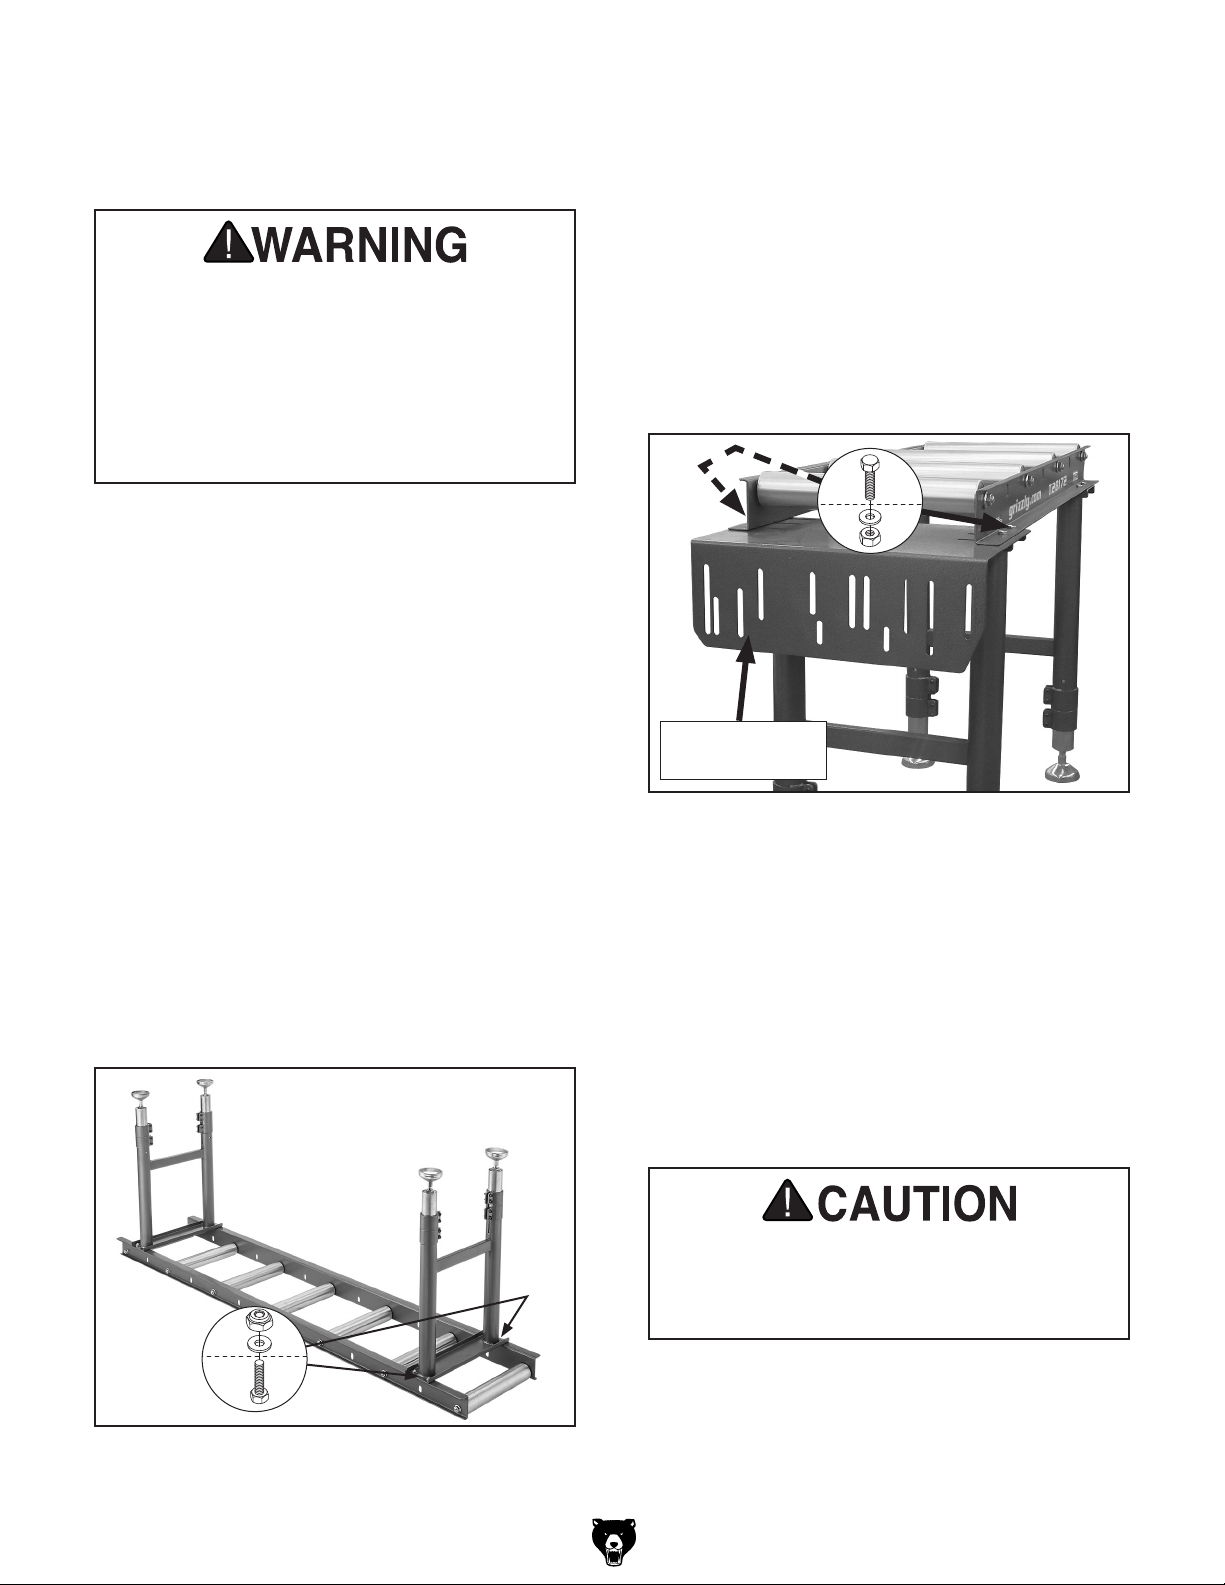
Assembly
It is easiest to assemble the roller table upsidedown, then have another person to help you turn
it upright when complete. If you are securing the
table to the machine, you will need to have the
optional T28378 Mounting Plate available at the
time of assembly.
x 8
Figure 5. Roller table assembly (T28369 shown).
The dynamic forces involved with processing large/heavy workpieces may cause
unsecured roller tables to shift during cutting operations, which could result in kickback injuries, depending on the type of
machine being used. To reduce this risk,
properly secure roller tables to both infeed
and outfeed side of your machine.
Items Needed Qty
Open-End Wrenches or Sockets 14mm ............ 2
Cardboard or Blanket ........................................ 1
Additional Person .............................................. 1
T28378 Mounting Plate (Optional) ..................... 1
-2-
T28172/369/370 Roller Tables (Mfd. 10/17)
Page 3

Installation & Height Adjustment
Roller table height adjusts from 24" to 40" with
adjustable legs and feet. The roller table must be
set to the same height as the machine work table.
The roller table should also be secured directly to the machine (using the optional T28378
Mounting Plate) to prevent it from shifting over
time. Depending on your setup and the type of
machine being used, a shifted roller table could
result in loss of cutting accuracy or kickback
injuries.
4. At each leg, loosen (4) cap screws securing
inner leg in sleeve, adjust leg in/out so height
of foot-to-ground matches measured height
of machine table, then secure cap screws
(see Figure 7).
Inner
Leg
x 2
Items Needed Qty
Additional Person .............................................. 1
Tape Measure .................................................... 1
Hex Wrench 6mm .............................................. 1
Open-End Wrench 24mm .................................. 1
Open-End Wrench 16mm .................................. 1
To install roller table and adjust height:
1. Measure table height of machine that will be
used with roller table assembly.
2. With help from an assistant, place roller table
assembly upside-down on clean, level surface (see Figure 6).
x 8
Sleeve
Figure 7. Adjusting leg height and level (T28369
shown).
5. With help from an assistant, turn roller table
assembly rightside-up and position it next to
machine work table.
6. Adjust feet up/down as necessary to set
entire length of roller table even with machine
work table, then tighten hex nuts on feet to
secure in position (see Figure 8).
Figure 6. Turn roller table over to adjust leg
height (T28369 shown).
3. Loosen hex nuts securing feet and adjust
feet to middle of threaded shaft. This will
allow you to make fine adjustments up or
down later when finalizing roller table height
(see Figure 7).
T28172/369/370 Roller Tables (Mfd. 10/17)
x 4
Figure 8. Tighten (4) hex nuts on feet after
adjusting height (T28369 shown).
7. If required for your setup, secure roller table
assembly to machine (refer to Securing
Roller Table to Machinery instructions later
in this document).
-3-
Page 4

Connecting Multiple Roller Tables
To create a longer work support surface, any combination of the T28172, T28369, and T28370 roller
tables can be connected end-to-end by using the
T28371 Connector Plates.
Items Needed Qty
Additional Person .............................................. 1
Wrench or Socket 18mm ................................... 1
Hex Wrench 6mm .............................................. 1
T28371 Connector Plates .................................. 2
To connect two roller table units end-to-end:
1. With help from an assistant, place two roller
table assemblies end to end, as shown in
Figure 9.
3. Working on one side at a time, remove the
(2) flange nuts securing adjoining end roller
shafts (see Figure 10).
Remove Flange Nuts
2. Adjsut table heights even with each other.
Refer to Installation & Height Adjustment
if necessary.
Figure 9. Placing roller tables end to end to
connect T28371 Connector Plate.
Figure 10. Removing flange nuts on end roller
shafts.
3. Install T28371 Connector Plate over threaded end of roller shafts with lips facing out
(see Figure 11). Re-attach flange nuts and
tighten.
T28371
Connector
Plate
End Roller
Shaft
Flange Nuts
-4-
Figure 11. Attaching T28371 Connector Plate to
end roller shafts.
4. Repeat Steps 2–3 on opposite side of tables
to attach second T28371 connector plate
(see Figure 11).
5. Check and adjust roller table to assure they
are even with each other across length of the
tables.
T28172/369/370 Roller Tables (Mfd. 10/17)
Page 5
Securing Roller Table to Machinery
Use the optional T28378 Mounting Plate to connect roller tables to a machine.
The dynamic forces involved with processing large/heavy workpieces may cause
unsecured roller tables to shift during cutting operations, which could result in kickback injuries, depending on the type of
machine being used. To reduce this risk,
properly secure roller tables to both infeed
and outfeed side of machine.
Items Needed Qty
Additional Person .............................................. 1
Wrench Open-End 14mm .................................. 1
Socket 14mm ..................................................... 1
T28378 Mounting Plate ..................................... 1
Pencil or Permanent Marker .............................. 1
Drill with 3⁄8" Bit .................................................. 1
4. Insert T28378 Mounting Plate between leg
assembly and roller table assembly, and reinstall hex bolts, flange nuts, and flat washers
removed in Step 2. Finger-tighten for now.
5. With help from an assistant, turn roller table
assembly rightside-up.
6. Adjust location of T28378 Mounting Plate
if necessary, then secure (4) hex bolts,
(4) flange nuts, and (4) flat washers
re-installed in Step 4 (see Figure 13).
x 4
To secure roller table to machinery:
1. With help from an assistant, place roller table
assembly upside-down on clean, level surface (see Figure 12).
2. Adjust leg height if necessary (see Installation
& Height Adjustment, Steps 1–6).
3. Remove (4) hex bolts, (4) flange nuts, and
(4) flat washers securing one leg assembly to
roller table assembly (see Figure 12).
T28378
Mounting Plate
Figure 13. Installing T28378 mounting plate.
7. Align roller table fitted with T28378 against
suitable machine.
8. Secure roller table with T28378 Mounting
Plate to machine using appropriate length
5
⁄16" or 8mm hex bolts, hex nuts, and washers
as needed.
Note: If machine does not have existing
mounting holes, you will need to drill them
yourself.
To avoid machine damage and possible
electrocution/shock hazard, inspect workbench or machine to avoid drilling into wiring or important internal components.
x 4
Figure 12. Removing leg assembly to attach
T28378 Mounting Plate.
T28172/369/370 Roller Tables (Mfd. 10/17)
-5-
Page 6

16
1
2
4
11
T28172
grizzly.com
REF PART # DESCRIPTION REF PART # DESCRIPTION
T28172 Parts
11
15
12
6
10
22
3
7
9
8
13
14
5
6
10
16
DO NOT exceed maximum
weight capacity of 1100 lbs.
20
21
18
NOTICE
19
T28172
1 PT28172001 SIDE PLATE 12 PT28172012 HEX NUT M8-1.25
2 PT28172002 ROLLER 14 1/4" x 2 3/8" 13 PT28172013 FOOT 80D M16-1.5
3 PT28172003 BALL BEARING 6003ZZ 14 PT28172014 EXT RETAINING RING 12MM
4 PT28172004 CENTER SHAFT 15 PT28172015 FLAT WASHER 8MM
5 PT28172005 EXT RETAINING RING 17MM 16 PT28172016 FLANGE NUT M12-1.75
6 PT28172006 SUPPORT FRAME 18 PT28172018 NOTICE LABEL
7 PT28172007 EXTENSION LEG 19 PT28172019 QR LABEL
8 PT28172008 ADJUSTABLE SCREW M16-1.5 x 50 20 PT28172020 MODEL NUMBER LABEL
9 PT28172009 HEX NUT M16-1.5 21 PT28172021 GRIZZLY.COM LABEL
10 PT28172010 CAP SCREW M8-1.25 X 25 22 PT28172022 TOUCH-UP PAINT GRIZZLY GREEN
11 PT28172011 CAP SCREW M8-1.25 X 16
-6-
BUY PARTS ONLINE AT GRIZZLY.CO M!
Scan QR code to visit our Parts Store.
T28172/369/370 Roller Tables (Mfd. 10/17)
Page 7

T28369 Parts
11
REF PART # DESCRIPTION REF PART # DESCRIPTION
12
10
15
22
4
2
6
7
9
8
13
14
5
3
1
18
NOTICE
DO NOT exceed maximum
weight capacity of 1540 lbs.
16
19
T28369
20
grizzly.com
1 PT28369001 SIDE PLATE 78" 12 PT28369012 HEX NUT M8-1.25
2 PT28369002 ROLLER 14-1/4" X 2-3/8" 13 PT28369013 STEEL FOOT 80D M16-1.5
3 PT28369003 BALL BEARING 6003ZZ 14 PT28369014 EXT RETAINING RING 12MM
4 PT28369004 CENTER SHAFT 15 PT28369015 FLAT WASHER 8MM
5 PT28369005 EXT RETAINING RING 17MM 16 PT28369016 HEX NUT M12-1.75
6 PT28369006 SUPPORT FRAME 18 PT28369017 NOTICE LABEL
7 PT28369007 EXTENSION LEG 19 PT28369018 QR CODE LABEL
8 PT28369008 ADJUSTABLE SCREW M16-1.5 X 50 20 PT28369019 MODEL NUMBER LABEL
9 PT28369009 HEX NUT M16-1.5 21 PT28369020 GRIZZLY.COM LABEL
10 PT28369010 CAP SCREW M8-1.25 X 25 22 PT28369021 TOUCH-UP PAINT, GRIZZLY GREEN
11 PT28369011 CAP SCREW M8-1.25 X 16
T28369
21
T28172/369/370 Roller Tables (Mfd. 10/17)
BUY PARTS ONLINE AT GRIZZLY.CO M!
Scan QR code to visit our Parts Store.
-7-
Page 8

T28370 Parts
11
REF PART # DESCRIPTION REF PART # DESCRIPTION
22
10
2
8
3
4
1
6
15
12
7
9
5
16
18
NOTICE
DO NOT exceed maximum
weight capacity of 1540 lbs.
20
T28370
19
T28370
13
14
1 PT28370001 SIDE PLATE 118" 12 PT28370012 HEX NUT M8-1.25
2 PT28370002 ROLLER 14-1/4" X 2-3/8" 13 PT28370013 FOOT 80D M16-1.5
3 PT28370003 BALL BEARING 6003ZZ 14 PT28370014 EXT RETAINING RING 12MM
4 PT28370004 CENTER SHAFT 15 PT28370015 FLAT WASHER 8MM
5 PT28370005 EXT RETAINING RING 17MM 16 PT28370016 FLANGE HEX NUT M12-1.75
6 PT28370006 SUPPORT FRAME 18 PT28370018 NOTICE LABEL
7 PT28370007 EXTENSION LEG 19 PT28370019 QR CODE LABEL
8 PT28370008 ADJUSTABLE SCREW M16-1.5 X 50 20 PT28370020 MODEL NUMBER LABEL
9 PT28370009 HEX NUT M16-1.5 21 PT28370021 GRIZZLY.COM LABEL
10 PT28370010 CAP SCREW M8-1.25 X 25 22 PT28370022 TOUCH-UP PAINT, GRIZZLY GREEN
11 PT28370011 HEX BOLT M8-1.25 X 16
grizzly.com
21
-8-
BUY PARTS ONLINE AT GRIZZLY.CO M!
Scan QR code to visit our Parts Store.
T28172/369/370 Roller Tables (Mfd. 10/17)
 Loading...