

Page 1

MODEL T25862
OPEN STAND FOR
MODEL G1183/G1276
INSTRUCTIONS
For questions or help with this product contact Tech Support at (570) 546-9663 or techsupport@grizzly.com
Introduction
The Model T25862 Open Stand is designed to be
used with the Model G1183 and G1276 HeavyDuty Combination Sanders.
Inventory
Description Qty
A. Stand Legs ................................................. 4
B. Short Cross Braces .................................... 2
C. Long Cross Braces ..................................... 2
D. St a nd Top ................................................... 1
E. Rubber Feet ............................................... 4
F. Hardware Bag (Not Shown) ........................ 1
—Hex Bolts
—Hex Nuts
—Flat Washers
—Flange Screws
—Phillips Head Screws
—Hex Nuts
—Flat Washers
3
⁄8"-16 x 4" .............................. 4
3
⁄8"-16....................................... 4
3
⁄8" ..................................... 8
1
⁄4"-20 x 1⁄2 " ................... 40
1
1
⁄4"-20 .................................... 44
1
⁄4"-20 .............................. 44
⁄4"-20 x 1" ............ 4
Tools Needed for Assembly
Description Qty
A. Phillips Head Screwdriver #2 ..................... 1
B. Wrench or Socket 10, 14, 17mm ..........1 Ea.
Assembly
We recommend assembling the stand upside
down. After the stand is assembled, two strong
people are required to lift the G1183/G1276 onto
the stand and hold it in place until firmly secured
to the stand.
1. Place stand top upside down on a flat surface.
1
2. Secure legs to top with (24)
1
screws, (24)
⁄4" flat washers, and (24) 1⁄4"-20
hex nuts. Only hand-tighten stand fasteners
for this step.
⁄4"-20 x 1⁄2" flange
A
Leg
E
Top
B
D
C
COPYRIGHT © APRIL, 2014 BY GRIZZLY INDUSTRIAL, INC.
NO PORTION OF THIS MANUAL MAY BE REPRODUCED IN ANY SHAPE
OR FORM WITHOUT THE WRITTEN APPROVAL OF GRIZZLY INDUSTRIAL, INC.
#BL16519 PRINTED IN TAIWAN
x 24
Page 2
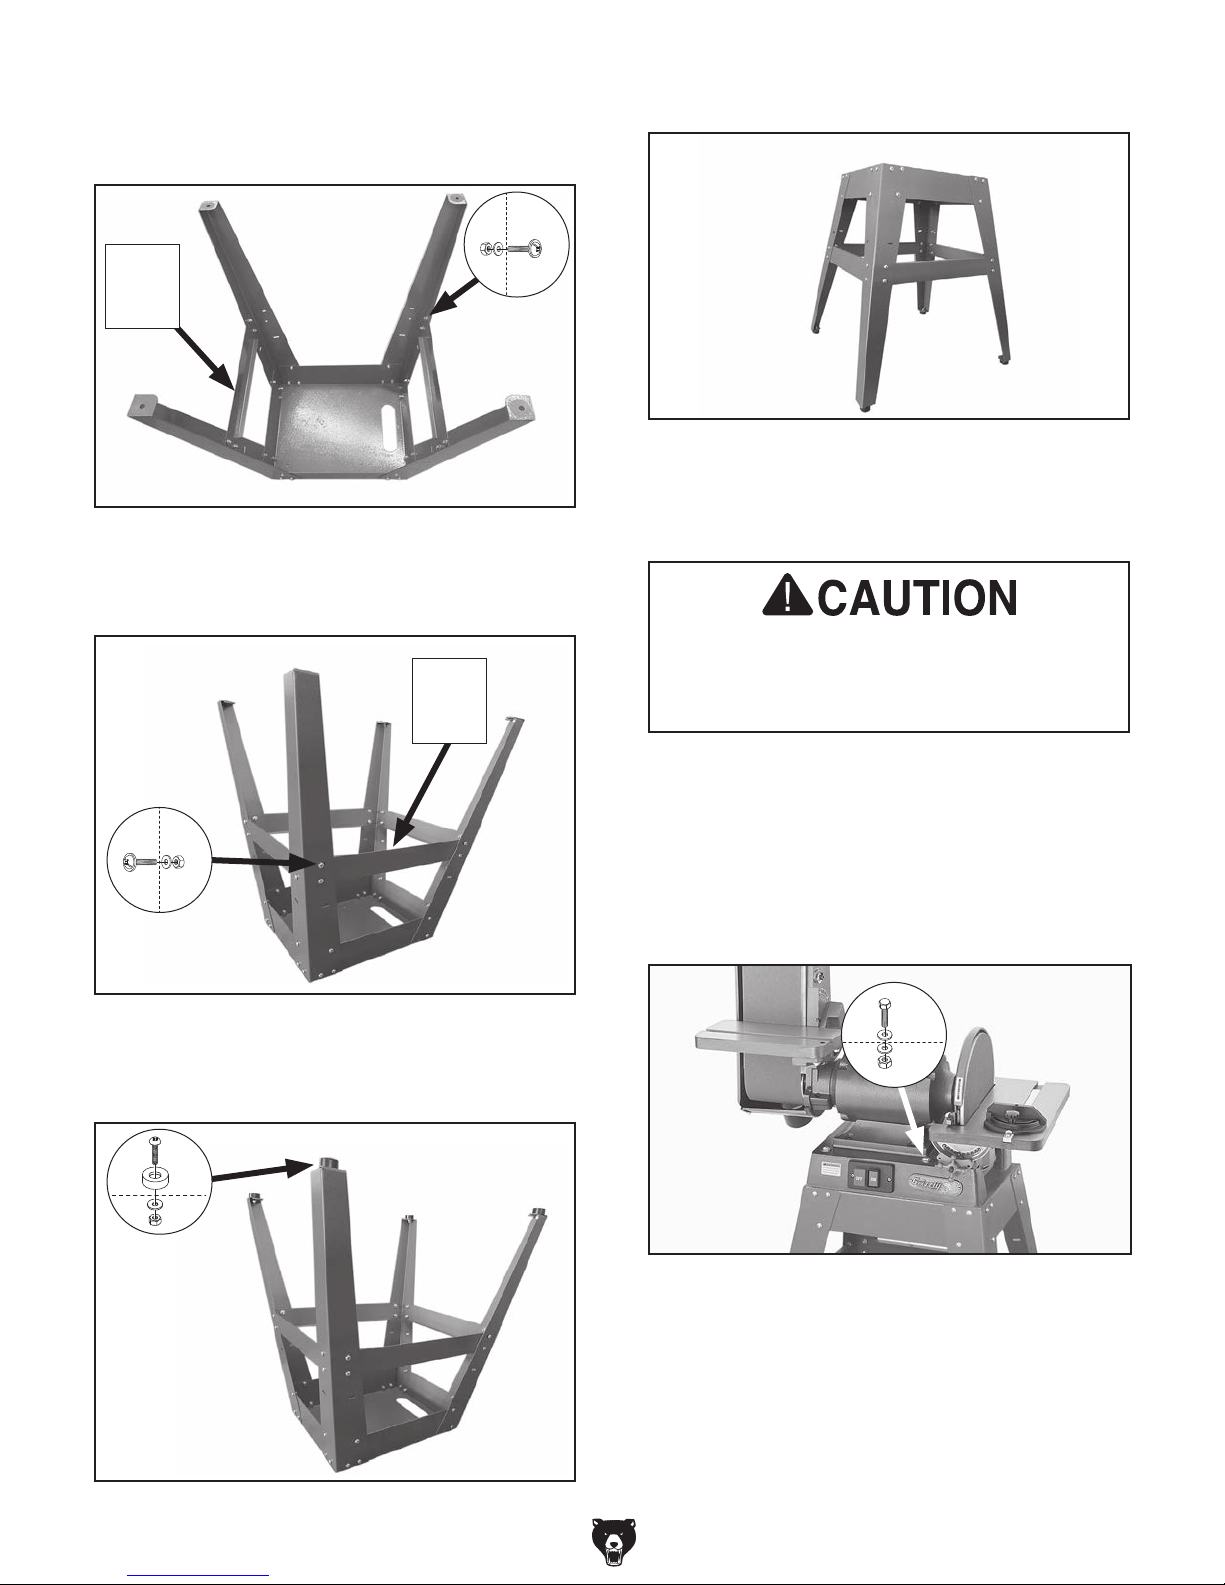
3. Secure short cross braces to legs with (8) 1⁄4"-
1
20 x
and (8)
⁄2" flange screws, (8) 1⁄4" flat washers,
1
⁄4"-20 hex nuts.
x 8
Short
Cross
Brace
1
4. Secure long cross braces to legs with (8)
1
20 x
and (8)
⁄2" flange screws, (8) 1⁄4" flat washers,
1
⁄4"-20 hex nuts.
⁄4"-
Long
Cross
Brace
6. Turn stand assembly upright.
7. Position stand so it is evenly centered on its
feet, and with appropriate tools, tighten all
fasteners.
At approximately 150 lbs., Model G1183/
G1276 is heavy and awkward to lift onto
stand. Get assistance from two additional
people while lifting and securing to stand.
x 8
5. Attach rubber feet to stand legs with (4) 1⁄4"-
1
20 x 1" Phillips head screws, (4)
1
ers, and (4)
⁄4"-20 hex nuts.
⁄4" flat wash-
x 4
8. Lift sander onto stand, position sanding disc
over opening in stand top, then align mounting holes.
3
9. Secure sander to stand with (4)
3
hex bolts, (8)
⁄8" flat washers, and (4) 3⁄8"-16
⁄8"-16 x 4"
hex nuts in the configuration shown below.
x 4
10. Congratulations, stand assembly is complete!
-2-
Model T25862 (Mfd. 4/14+)
Page 3

T25862 Parts Breakdown
Please Note: We do our best to stock replacement parts whenever possible, but we cannot guarantee that all parts shown here
are available for purchase. Call (800) 523-4777 or visit our online parts store at www.grizzly.com to check for availability.
6
8
8
1
9
7
11
12
2
4
11
12
9
11
12
5
3
10
REF PART # DESCRIPTION REF PART # DESCRIPTION
1 PT25862001 STAND LEG 7 PT25862007 HEX NUT 3/8-16
2 PT25862002 SHORT CROSS BRACE 8 PT25862008 FLAT WASHER 3/8
3 PT25862003 LONG CROSS BRACE 9 PT25862009 FLANGE SCREW 1/4-20 X 1/2
4 PT25862004 STAND TOP 10 PT25862010 PHLP HD SCR 1/4-20 X 1
5 PT25862005 RUBBER FOOT 11 PT25862011 HEX NUT 1/4-20
6 PT25862006 HEX BOLT 3/8-16 X 4 12 PT25862012 FLAT WASHER 1/4
Model T25862 (Mfd. 4/14+)
-3-
Page 4

 Loading...