

Page 1

Always wear safety
glasses when tapping!
Introduction
The Model H7819 High Speed Steel Tap and Drill
Set comes supplied with six of the most commonly
used coarse thread sizes with the corresponding
tap drill. Each size set has taps with taper, plug,
and bottoming grinds, allowing you to choose the
right tap for any job. Tap handle not included.
MODEL H7819
24-PC H.S.S. DRILL &
TAP SET
INSTRUCTION SHEET
Inventory
A. 27⁄64" Tap Drill .............................................. 1
B. 1⁄2"-13 Plug Tap .......................................... 1
C. 1⁄2"-13 Bottoming Tap ................................. 1
D. 1⁄2"-13 Taper Tap ........................................ 1
E. 5⁄16" Tap Drill ............................................... 1
F. 3⁄8"-16 Plug Tap .......................................... 1
G. 3⁄8"-16 Bottoming Tap ................................. 1
H. 3⁄8"-16 Taper Tap ........................................ 1
I. F Tap Drill ................................................... 1
J. 5⁄16"-18 Plug Tap ......................................... 1
K. 5⁄16"-18 Bottoming Tap ................................ 1
L. 5⁄16"-18 Taper Tap ....................................... 1
M. #7 Tap Drill ................................................. 1
N. 1⁄4"-20 Plug Tap .......................................... 1
O. 1⁄4"-20 Bottoming Tap ................................. 1
P. 1⁄4"-20 Taper Tap ........................................ 1
Q. #25 Tap Drill ............................................... 1
R. #10-24 Plug Tap ......................................... 1
S. #10-24 Bottoming Tap ................................ 1
T. #10-24 Taper Tap ...................................... 1
U. #29 Tap Drill ............................................... 1
V. #8-32 Plug Tap ........................................... 1
W. #8-32 Bottoming Tap .................................. 1
X. #8-32 Taper Tap ........................................ 1
Figure 1. Model H7819.
Identification
Tapered Taps: Tapered taps have 7-10 threads
at the bottom that are tapered. The lengthened
taper on these taps makes it easier to keep the
tap straight as the cutting begins.
Plug Taps: Plug taps have 3-4 threads at the bot
tom that are tapered. Plug taps follow the tapered
tap. Plug taps are designed for tapping open or
"through holes." They can also be used for start
ing threads on easily cut materials like aluminium,
brass and cast iron.
Bottoming Taps: Bottoming taps have 1-2 threads
at the bottom that are tapered. Bottoming taps are
generally used for cutting threads as close as
possible to the bottom of a hole or "blind holes."
The bottoming tap is usually used after threads
have been started with the taper tap or the plug
tap (see Figure 2
Tap Drill: The tap drill is a standard jobber type
drill used for drilling the pilot hole.
).
-
-
COPYRIGHT © AUGUST, 2006 BY GRIZZLY INDUSTRIAL, INC.
WARNING: NO PORTION OF THIS MANUAL MAY BE REPRODUCED IN ANY SHAPE
OR FORM WITHOUT THE WRITTEN APPROVAL OF GRIZZLY INDUSTRIAL, INC.
#PC8462 PRINTED IN CHINA
Page 2
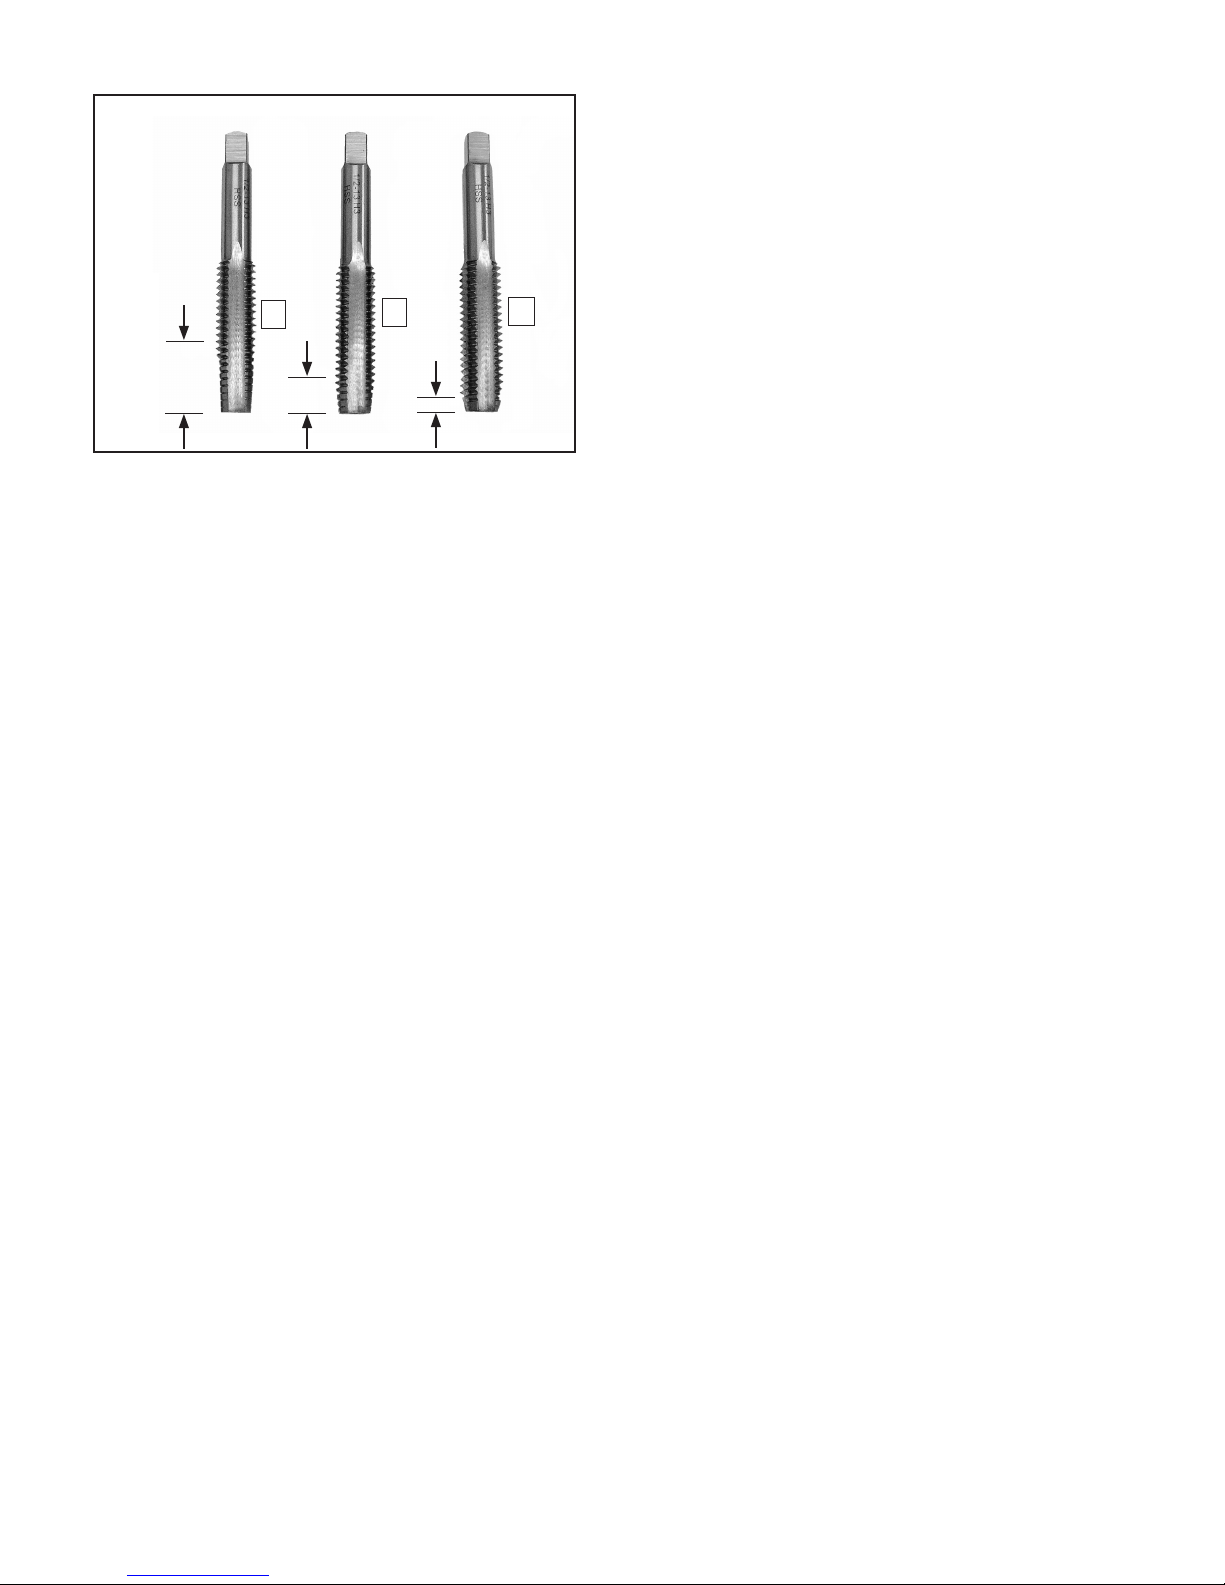
Length of Taper
7. After cutting 2-3 threads, reverse the direction of th
Failure to break the chips will c
tap to bind and will likely break the tap.
8. Continue this process until your hole is com-
plete.
e tap a half turn to break the chips.
ause the
A
Figure 2. Tap styles: A) tapered tap, B) plug tap,
C) bottoming tap.
B
C
Operation
To tap a through hole:
1. Secure your workpiece with a clamp or vise.
2. Drill the tap hole with the appropriate sized
tap drill.
3. Install a taper tap or plug tap in a tap handle.
4. Lubricate the tap with the appropriate cutting
and tapping fluid for the material used in your
project. (see Page 586 in the current 2006
Grizzly catalog for a number of choices).
To tap a blind hole:
1. Following all the steps for a through hole, run
a plug tap as far as it will
of the hole frequently to clear the chips.
2. Switch to the bottoming tap and repeat Step
1.
Note:
Trying to turn the tap further after
reaching the bottom of the hole will cause the
tap to break
starting to bind, back out the tap and e
ine the workpiece for chip loading, too small
tap hole, or obstructions. Always use a light
touch when tapping, DO NOT FORCE IT!
. If at anytime you feel the tap
go. Back the tap out
xam-
5. Insert the tap into the hole, while keeping
your hand(s) centered over the top of the
tap to apply even downward pressure. It is
important that the tap be started parallel
with the hole.
Note: A tap started at an angle
and deeper into
often results in a broken tap. Broken taps are
VERY DIFFICULT to remove.
6. Turn the tap clockwise while applying light
even downward pressure. Once a few threa
are cut, move your hands further out on the
handles.
one side of the hole, which
cuts deeper
ds
 Loading...