

Page 1
FOLDING SIDES GARDEN
WAGON
MODEL H0771
INSTRUCTION SHEET
COPYRIGHT © MARCH, 2004 BY GRIZZLY INDUSTRIAL, INC.
WARNING: NO PORTION OF THIS MANUAL MAY BE REPRODUCED IN ANY SHAPE
OR FORM WITHOUT THE WRITTEN APPROVAL OF GRIZZLY INDUSTRIAL, INC.
PRINTED IN CHINA
#6143
Page 2
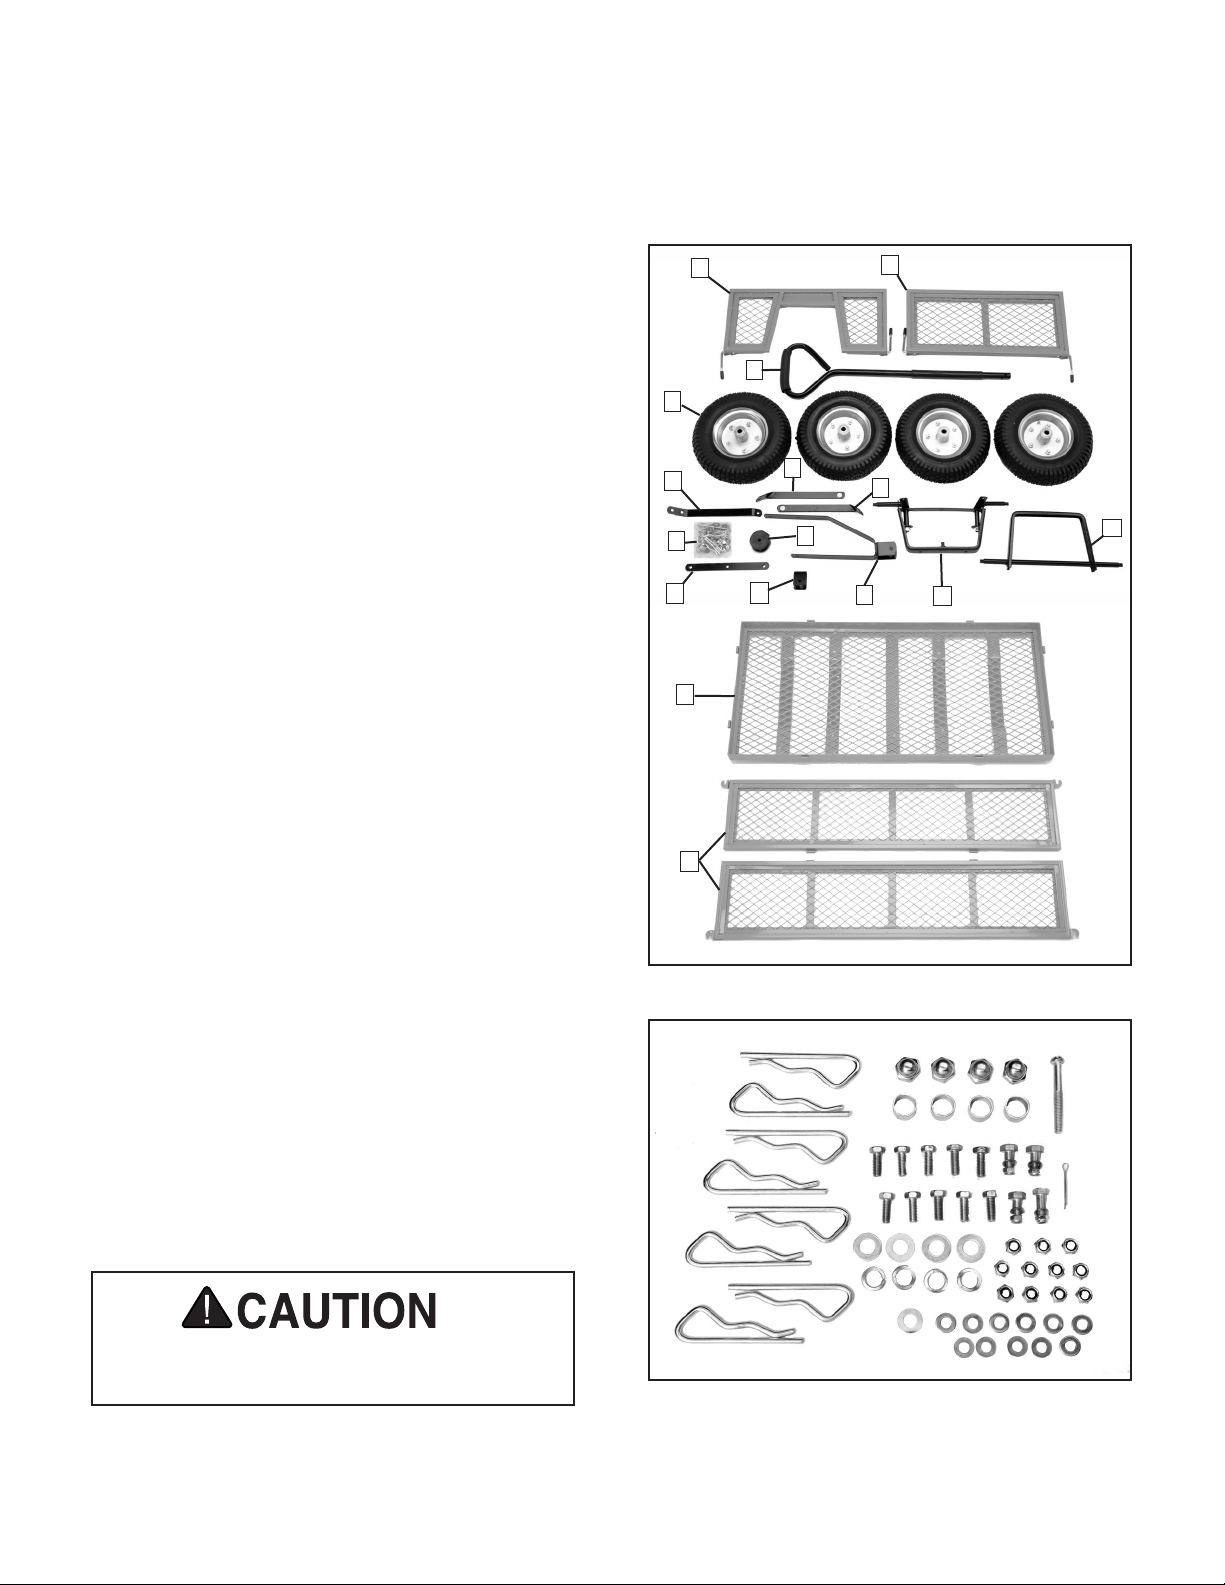
PARTS INVENTORY
After removing the wagon from the box, you
should find the following components:
Figure 1 - Main Contents.
A. Front Panel ................................................. 1
B. Back Panel ................................................. 1
C. Pull Handle ................................................. 1
D. Wheels ....................................................... 4
E. Left Rear Axle Brace .................................. 1
F. Right Rear Axle Brace ................................
G. Center Front Axle Brace ............................. 1
H. Bolt Bag ...................................................... 1
I. Steering Connector .................................... 1
J. Plastic Coupling .......................................... 1
K. Yoke ........................................................... 1
L. Front Axle Support ..................................... 1
M. Rear Axle Support ...................................... 1
N. Bed ............................................................. 1
O. Side Panels ................................................ 2
P. Tractor Connector ......................................
Figure 2 - Bolt Bag.
— Panel Assembly
— Flat Washer 8mm ................................
— Lock Nut M8-1.25 ................................
Pins ............................. 8
11
11
— Wheel Bushing ......................................
— Acorn Nut M12-1.75 ..............................
— Lock Washer 12mm ..............................
— Flat Washer 12mm ................................
— Carriage Bolt M8-1.25 x 20 .................
10
— Slotted Screw M8-1.25 x 80 .................
— Shoulder Bolt M8-1.25 x 15 ...................
— Shoulder Bolt M8-1.25 x 17 ...................
— Flat Washer 6mm ..................................
— Lock Nut M6-1.0 ....................................
— Flat Washer M10 ...................................
— Cotter Pin ...............................................
A
C
D
1
G
H
I
N
E
J
P
B
F
M
K
L
1
O
4
4
4
4
Figure 1. Main contents.
1
3
1
4
4
1
1
Adult supervision is always required while
this wagon is being used by children.
Figure 2. Bolt bag contents.
Page 3

ASSEMBLY INSTRUCTIONS
REMOVAL & INVENTORY
1. Remove your new wagon from the carton.
2. Make sure all parts are present and in good
condition.
FRONT SUPPORT ASSEMBLY
1. Insert the yoke into the front axle support
by sliding the top hole of the yoke onto the
pivot post on the front axle support. Place
the 10mm flat washer on the pivot post and
slide the cotter pin in the pre drilled hole and
spread. Bolt the center front axle brace and
yoke to the bottom of the front axle support
with the M8-1.25 x 17 shoulder bolt, 6mm flat
washer and lock nut.
See Figure 1
Figure 2. Rear and front axle assemblies
Front axle
support
Center front
axle brace
Yoke
Steering
Connector
Figure 1. Front axle assembly detail.
2. Bolt the steering connector to the steering
arms of the front axle support and the yoke
using M8-1.25 x 15 shoulder bolts, 6mm flat
washers and lock nuts.
3. Mount the front axle assembly to the end
of the bed with the corresponding bolt pat
tern using M8-1.25 x 20 carriage bolts, 8mm
washers and lock nuts.
REAR SUPPORT ASSEMBLY & WHEELS
1. Loosely assemble the rear axle support to the
bed using M8-1.25 x 20 carriage bolts, 8mm
washers and lock nuts.
2. Slide the left and right rear axle braces onto
the rear axles and bolt the opposite ends of
the braces to the bed using M8-1.25 x 20 car
riage bolts, 8mm washers and lock nuts.
Figure 2
3. Tighten the rear axle support.
See
4. Slide a wheel spacer bushing, part 22, on
each axle.
5. Slide a wheel onto each axle with the valve
stems to the outside and fasten using the
M12-1.75 acorn nuts, 12mm flat washers
and lock washers.
FOLDING SIDES
1. Using the panel assembly pins, fasten the
hinges of the side panels to the bed, with the
side panel hinges on the outside.
2. Fasten the hinges of the front panel to the
end with the front axle assembly using the
panel assembly pins.
3. Fasten the hinges of the back panel to the
end with the rear axle support using the
panel assembly pins.
PULL HANDLE
1. Slide the plastic coupling on to the pull
-
-
handle, making sure the holes are correctly
aligned.
2. Place the pull handle and plastic coupling
into the yoke and insert the M8-1.25 x 80
slotted screw. Fasten using an 8mm washer
and lock nut.
Note—The Folding Sides Garden Wagon comes
equipped with a tractor connector. Slide
the tractor connector over the handle of the
wagon and connect to the tractor hitch.
If you need additional help with this procedure,
call our service department at: (570) 546-9663.
Page 4

25
4
1
2
2
3
10
11
26
13
21
20
14
9
7
8
6
23
24
5
22
19
20
21
28
27
16
30
12
31
18
15
32
33
H0771 Parts Breakdown and List
REF PART# DESCRIPTION
1
2 PH0771002 SIDE PANEL
3 PH0771003 FRONT PANEL
4 PH0771004 BACK PANEL
5 PH0771005 WHEEL 13" X 5.00-6
6 PH0771006 REAR AXLE SUPPORT
7 PH0771007 LEFT REAR AXLE BRACE
8 PH0771008 RIGHT REAR AXLE BRACE
9 PH0771009 FRONT AXLE SUPPORT
10 PH0771010 CNTR FRONT AXLE BRACE
11 PH0771011 YOKE
12 PH0771012 STEERING CONNECTOR
13 PH0771013 PLASTIC COUPLING
14 PH0771014 PULL HANDLE
14-1 PH0771014-1 PAD (LOWER)
14-2 PH0771014-2 PAD (UPPER)
PH0771001 BED PANEL
REF PART# DESCRIPTION
15 PW04M FLAT WASHER 10MM
16 PH0771016 PANEL ASSEMBLY PINS
18 PW06M FLAT WASHER 12MM
19 PH0771019 MALE LOCK HANDLE M8-1.25
20 PW01M FLAT WASHER 8MM
21 PLN04M LOCK NUT M8-1.25
22 PH0771022 WHEEL SPACER BUSHING
23 PN26M ACORN NUT M12-1.75
24 PLW05M LOCK WASHER 12MM
25 PCB01M CARRIAGE BOLT M8-1.25 x 20
26 PH0771026 SLOT SCREW M8-1.25 x 80
27 PH0771027 SHLDR BOLT M8-1.25 x 15
28 PH0771028 SHLDR BOLT M8-1.25 x 17
30 PW03M FLAT WASHER 6MM
31 PLN03M LOCK NUT M6-1.0
32 PH0771032 COTTER PIN
33 PH0771033 TRACTOR CONNECTOR
 Loading...