

Page 1

COPYRIGHT ©2000 BY GRIZZLY INDUSTRIAL, INC.
1821 VALENCIA ST., BELLINGHAM, WA 98227
WARNING: NO PORTION OF THIS MANUAL MAY BE REPRODUCED IN ANY SHAPE
OR FORM WITHOUT THE WRITTEN APPROVAL OF GRIZZLY INDUSTRIAL, INC.
AUGUST, 2000 PRINTED IN CHINA
18V 5-IN-1 CORDLESS TOOL KIT
MODEL G9921
INSTRUCTION SHEET
WWW.GRIZZLY.COM
Page 2

G9921 18V Cordless Set-2-
Page 3
G9921 18V Cordless Set-3-
SAFETY
For Your Own Safety Read Instruction Manual
Before Operating This Equipment
Indicates an imminently hazardous situation which, if
not avoided, WILL result in death or serious injury.
Indicates a potentially hazardous situation which, if
not avoided, COULD
result in death or serious injury.
Indicates a potentially hazardous situation which, if
not avoided, MAY
result in minor or moderate injury.
It may also be used to alert against unsafe practices.
This symbol is used to alert the user to useful information
about proper operation of the equipment.
The purpose of safety symbols is to attract your attention to possible hazardous
conditions. This manual uses a series of symbols and signal words which are
intended to convey the level of importance of the safety messages. The progression of symbols is described below. Remember that safety messages by themselves do not eliminate danger and are not a substitute for proper accident prevention measures.
NOTICE
Safety Instructions For Power Tools
5. KEEP CHILDREN AND VISITORS
AWAY. All children and visitors
should be kept a safe distance from
work area.
6. MAKE WORK SHOP CHILD
PROOF with padlocks, master
switches, or by removing starter
keys.
7. DON’T FORCE TOOL. It will do the
job better and safer at the rate for
which it was designed.
8. USE RIGHT TOOL. Don’t force tool
or attachment to do a job for which it
was not designed.
1. KEEP ALL SAFETY DEVICES IN
PLACE and in working order.
2. REMOVE ADJUSTING KEYS AND
WRENCHES. Form habit of check-
ing to see that keys and adjusting
wrenches are removed from tool
before turning on.
3. KEEP WORK AREA CLEAN.
Cluttered areas and benches invite
accidents.
4. DON’T USE IN DANGEROUS
ENVIRONMENT. Don’t use power
tools in damp or wet locations, or
where any flammable or noxious
fumes may exist. Keep work area
well lighted.
Page 4
G9921 18V Cordless Set -4-
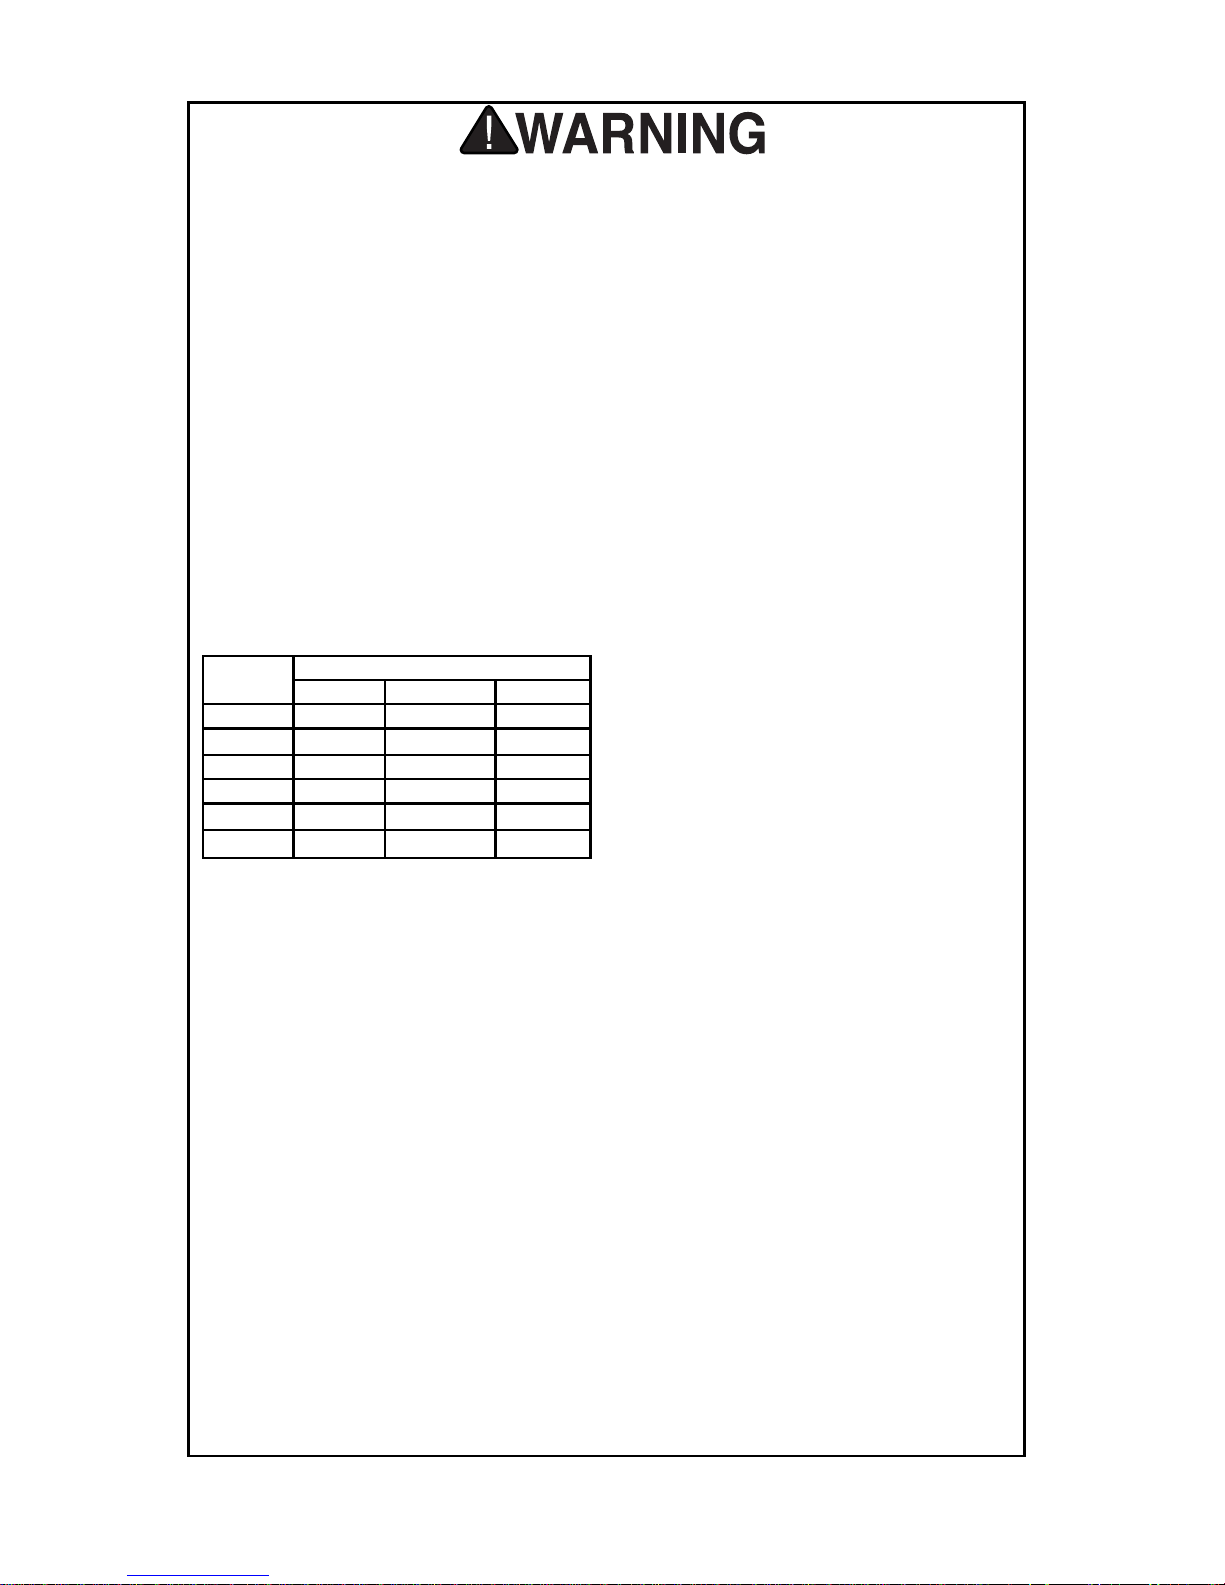
9. USE PROPER EXTENSION CORD
for the charger. Make sure your
extension cord is in good condition.
Conductor size should be in accordance with the chart below. The
amperage rating should be listed on
the motor or tool nameplate. An
undersized cord will cause a drop in
line voltage resulting in loss of power
and overheating. Your extension
cord must also contain a ground wire
and plug pin. Always repair or
replace extension cords if they
become damaged.
Minimum Gauge for Extension Cords
10. WEAR PROPER APPAREL. Do not
wear loose clothing, gloves, neckties, rings, bracelets, or other jewelry which may get caught in moving
parts. Non-slip footwear is recommended. Wear protective hair covering to contain long hair.
11. ALWAYS USE SAFETY GLASSES.
Also use face or dust mask if cutting
operation is dusty. Everyday eyeglasses only have impact resistant
lenses, they are NOT safety glasses.
12. SECURE WORK. Use clamps or a
vise to hold work when practical. It’s
safer than using your hand and frees
both hands to operate tool.
13. DON’T OVERREACH. Keep proper
footing and balance at all times.
Safety Instructions For Power Tools
AMP LENGTH
RATING 25ft 50ft 100ft
0-6 18 16 16
7-10 18 16 14
11-12 16 16 14
13-16 14 12 12
17-20 12 12 10
21-30 10 10 No
14. MAINTAIN TOOLS WITH CARE.
Keep tools sharp and clean for
best and safest performance.
Follow instructions for lubricating
and changing accessories.
15. DISCONNECT TOOLS before ser-
vicing and changing accessories,
such as blades, bits, cutters, and
the like.
16. REDUCE THE RISK OF UNINTENTIONAL STARTING. Make
sure switch is in off position before
plugging in.
17. USE RECOMMENDED ACCESSORIES. Consult the owner’s
manual for recommended accessories. The use of improper accessories may cause risk of injury.
18. CHECK DAMAGED PARTS.
Before further use of the tool, a
guard or other part that is damaged should be carefully checked
to determine that it will operate
properly and perform its intended
function. Check for alignment of
moving parts, binding of moving
parts, breakage of parts, mounting, and any other conditions that
may affect its operation. A guard or
other part that is damaged should
be properly repaired or replaced.
19. NEVER LEAVE TOOL RUNNING
UNATTENDED. TURN POWER
OFF. Don’t leave tool until it comes
to a complete stop.
20. NEVER OPERATE THIS TOOL
WHEN TIRED, OR WHEN
UNDER THE INFLUENCE OF
DRUGS OR ALCOHOL. Full men-
tal alertness is required at all times
when operating this tool.
Page 5
G9921 18V Cordless Set-5-
CHARGING SAFETY
1. READ ALL INSTRUCTIONS and
warnings on the battery and charger before charging the battery.
2. CHARGE ONLY USING THE SUPPLIED CHARGER AND BATTERY. Do not use with other batter-
ies, chargers or drills.
3. DO NOT EXPOSE BATTERY OR
CHARGER TO WET OR RAINY
CONDITIONS. Moisture greatly
increases the risk of a shock hazard.
4. DO NOT TOUCH BATTERY
POLES with any conductive materi-
als. Touching any two poles at the
same time causes an electrical
short condition and can cause
sparks, electrical shock or fire.
5. DO NOT STORE BATTERY WITH
CONDUCTIVE MATERIALS.
Storing the battery in a box of
screws or nails can cause shorting
across the battery poles.
6. DO NOT THROW BATTERY IN
FIRE. Combustion of some of the
batteries’ component materials can
cause toxic fumes and possible
explosion.
7. IF CHARGER LIGHT FAILS TO
COME ON check the incoming
power supply. If power source is
okay, then the fuse inside the
charger needs replacement.
Charger should be serviced by a
qualified electrical technician only.
8. CHARGER HAS A POLARIZED
PLUG (one prong is wider than the
other). Do not attempt to modify the
plug. Modifying the plug will result
in a safety hazard and will void the
warranty.
9. CHARGER IS DESIGNED TO
OPERATE AT 110-120 VOLTS.
Never try to plug into any circuit that
is not 110-120 volts. Never modify
or change the plug that is attached
to the charger unit to attempt to
plug into 220 volt. This can cause
serious electrical damage to the
unit, possible fire or explosion.
BATTERY MUST BE RECYCLED
OR DISPOSED OF PROPERLY.
Consult your local Yellow Pages directory under the category “Recycling” to
locate a battery recycler in your area.
Page 6
G9921 18V Cordless Set -6-
BEFORE YOU START
The battery in your new cordless power
tool will not be fully charged when you
receive it. To maximize the storage capacity of the battery it should be completely
discharged, then fully recharged 3-5 times.
For optimal life span, completely discharge
the battery before recharging. Follow the
instructions below to charge your battery.
Battery charging with the 1 hour
“Smart” charger (1 piece charger):
1. Plug the charger into an appropriate
110/120V outlet.
2. Insert the battery into the charger.
The battery fits into the oval recess in
only one way. Do not force the battery. Insert until it locks into place.
3. The green light over the word “OFF”
on the control panel should come on.
If it doesn’t, make certain the wall outlet you are plugged into is working. If
the outlet power is okay, the fuse
inside the charger may have blown.
Fuses should be replaced by a qualified electrical technician.
4. To begin charging, press the “SET”
button. A steady red light over the
word “ON” should come on indicating
the battery is being charged.
5. When the battery is fully charged, the
red light will go off and the unit will
stop charging. Remove the battery
from the charger upon completion of
the charge cycle.
Never leave a battery unattended while charging. While charging will make the battery and
charging unit warm, if it
becomes hot to the touch, disconnect the charger immediately. There is a possibility of fire
hazard. Have the battery and
charging unit checked by a qualified electrical service technician.
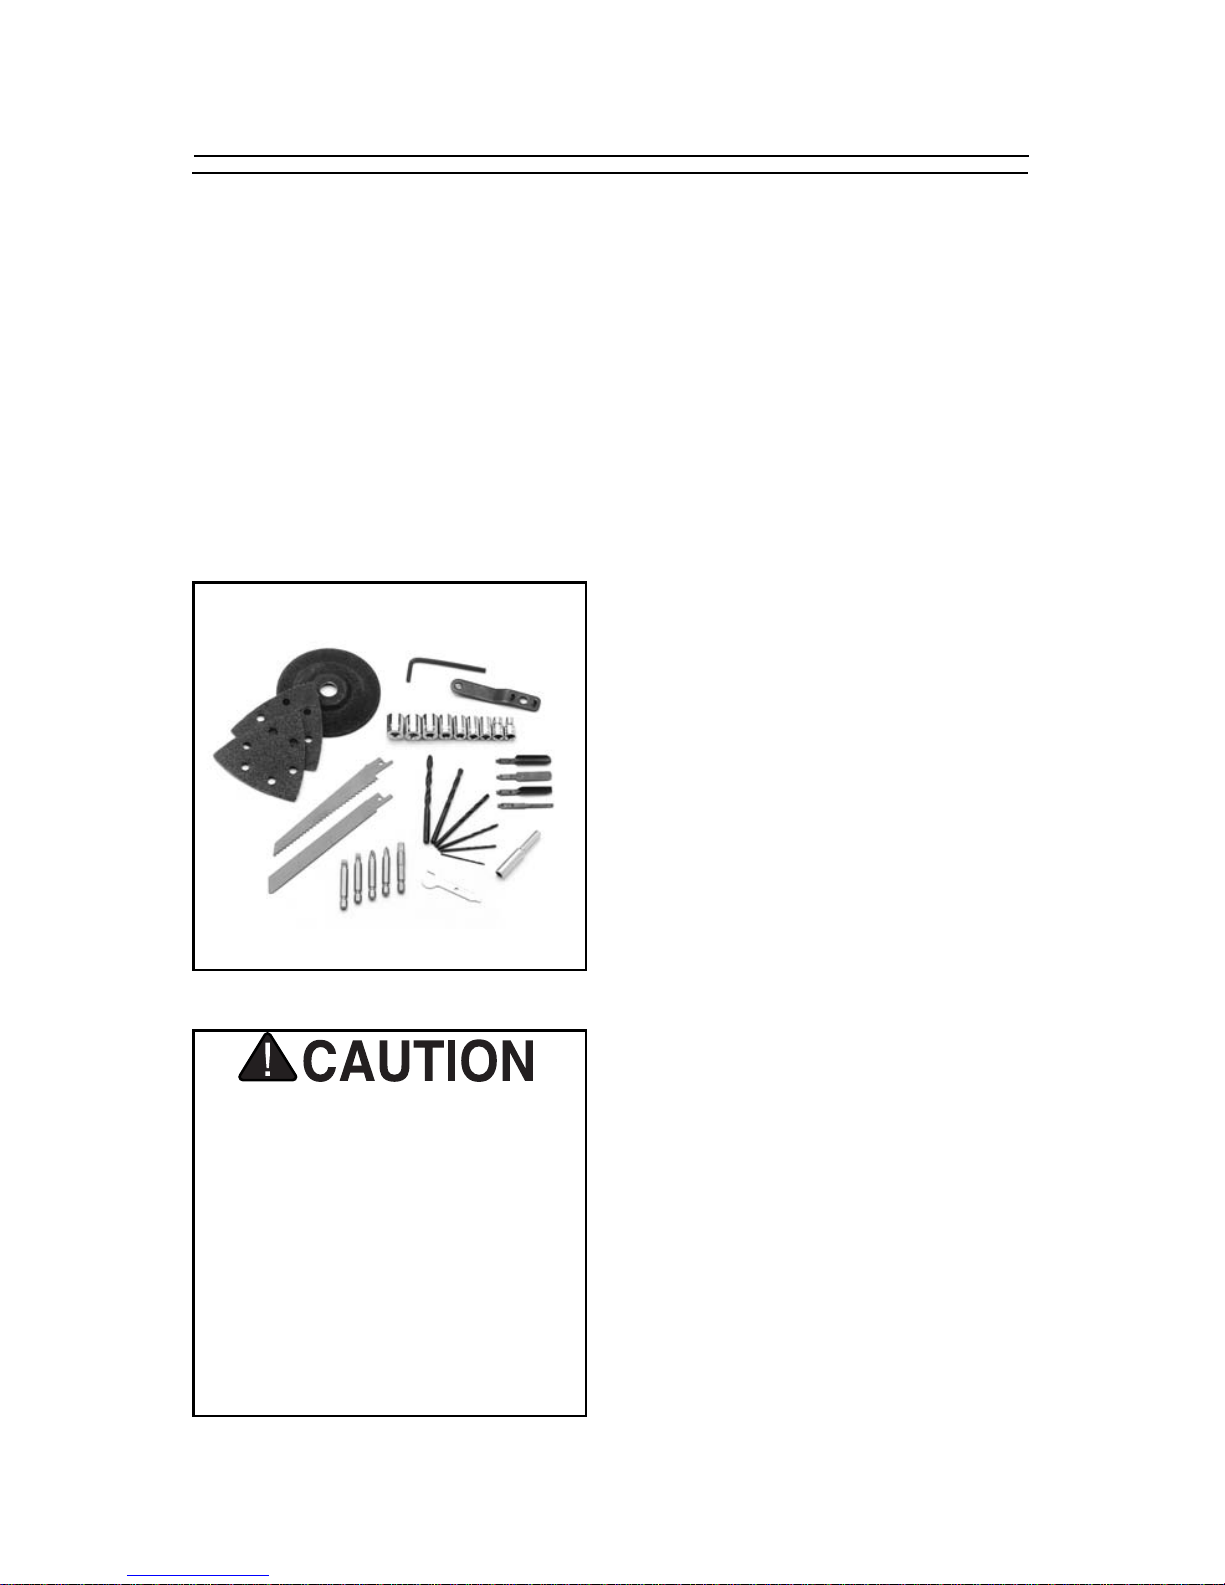
Fig 1. Tool and accessory kit contents.
First review the contents of your cordless
tool kit and familiarize yourself with the key
components:
Heavy-Duty Case
Cordless Drill
Reciprocating Saw Head
Power Carver Head
Angle Grinder Head
Detail Sander Head
Battery Pack
1 Hour Charger
Tool and Accessory Kit
Page 7

G9921 18V Cordless Set-7-
CHANGING ATTACHMENTS
CHANGING THE BATTERY
Fig 2. Changing the heads.
The accessory heads can be easily and
quickly changed. On the left hand side of
the motor housing there is a slider switch
which locks the head in place. The head
has three tabs which engage with slots in
the motor body. One of the tabs is larger
than the other two which ensure proper orientation of the head.
To change heads, move the slider switch
to the unlocked position and pull the head
straight out of the slots. Select the new
head and orient the tabs and insert into the
motor body. Push it in all the way until it
seats, then move the slider switch to the
locked position.
Test to make sure the new head is
engaged properly by quickly cycling the
motor. When testing the power carver be
aware that it is spring loaded and will only
oscillate when it is pushed against the
workpiece.
Insert the battery into the handle of the
motor body so the long end is forward. The
battery will only install in one orientation.
Make sure the securing clasps on either
side of the drill base engage with the clips
on the battery compartment.
Page 8
G9921 18V Cordless Set -8-
DRILL OPERATION
Inserting and Removing Bits
and Drivers
1. Set the direction switch, located just
above the trigger, so that it is in the
center locked position.
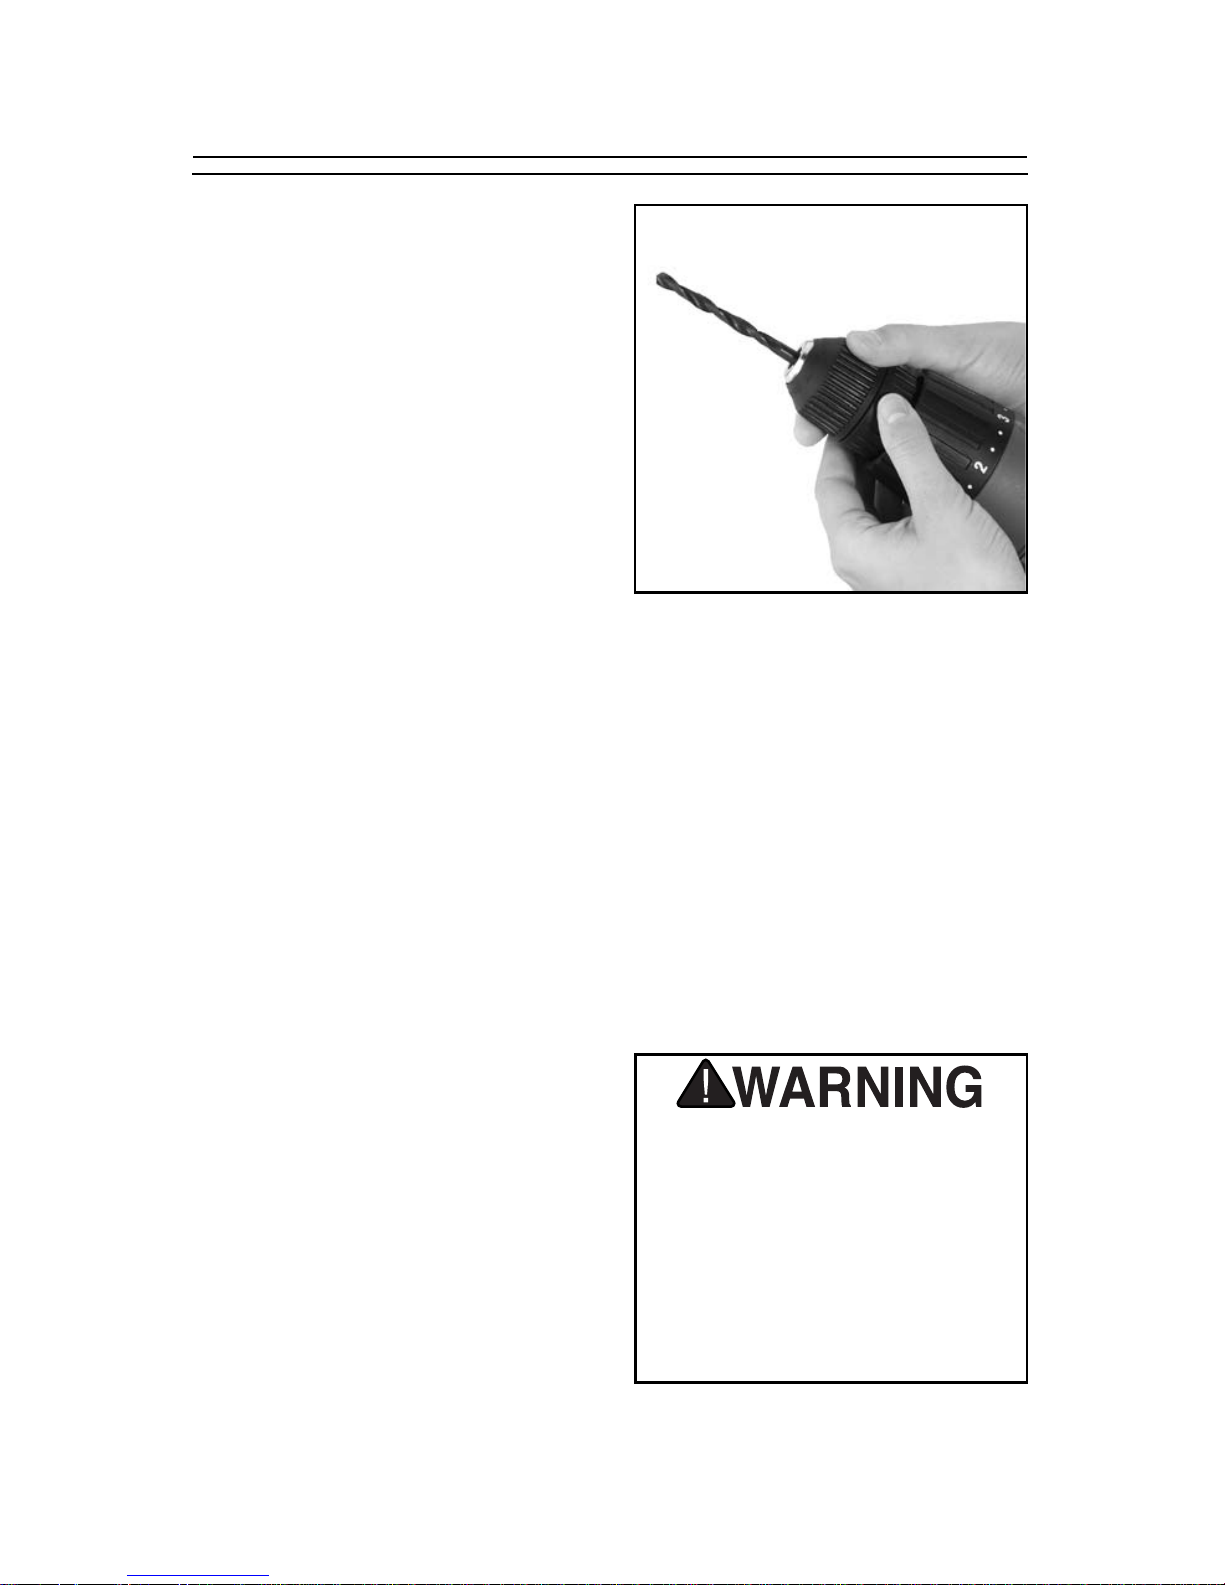
2. Hold the chuck by the collar while
turning the sleeve (the forward sec-
tion). See Figure 3. This will cause
the three chuck jaws located inside
the recess to open or close depending upon the direction.
3. When the jaws are at the approximate
diameter of the bit or driver, insert the
shank end of the bit or driver into the
jaw opening.
4. Turn the sleeve clockwise until it tight-
ens around the bit or driver. Never
“power tighten” which is holding the
sleeve while running the drill. This
can cause a loose grip on the bit or
driver and potential damage to chuck
jaws. Check for tightness periodically
while using the tool.
5. To release the bit or driver, hold the
chuck collar, and turn the sleeve
counterclockwise.
Operating this equipment has the
potential to propel debris into the air
which can cause eye injury. Always
wear safety glasses or goggles when
operating equipment. Be certain the
safety glasses you wear meet the
appropriate standards of the
American National Standards
Institute (ANSI).
Fig 3. Inserting bits into the chuck.
Page 9
G9921 18V Cordless Set-9-
DRILL OPERATION,
CONT’D
Operating the drill
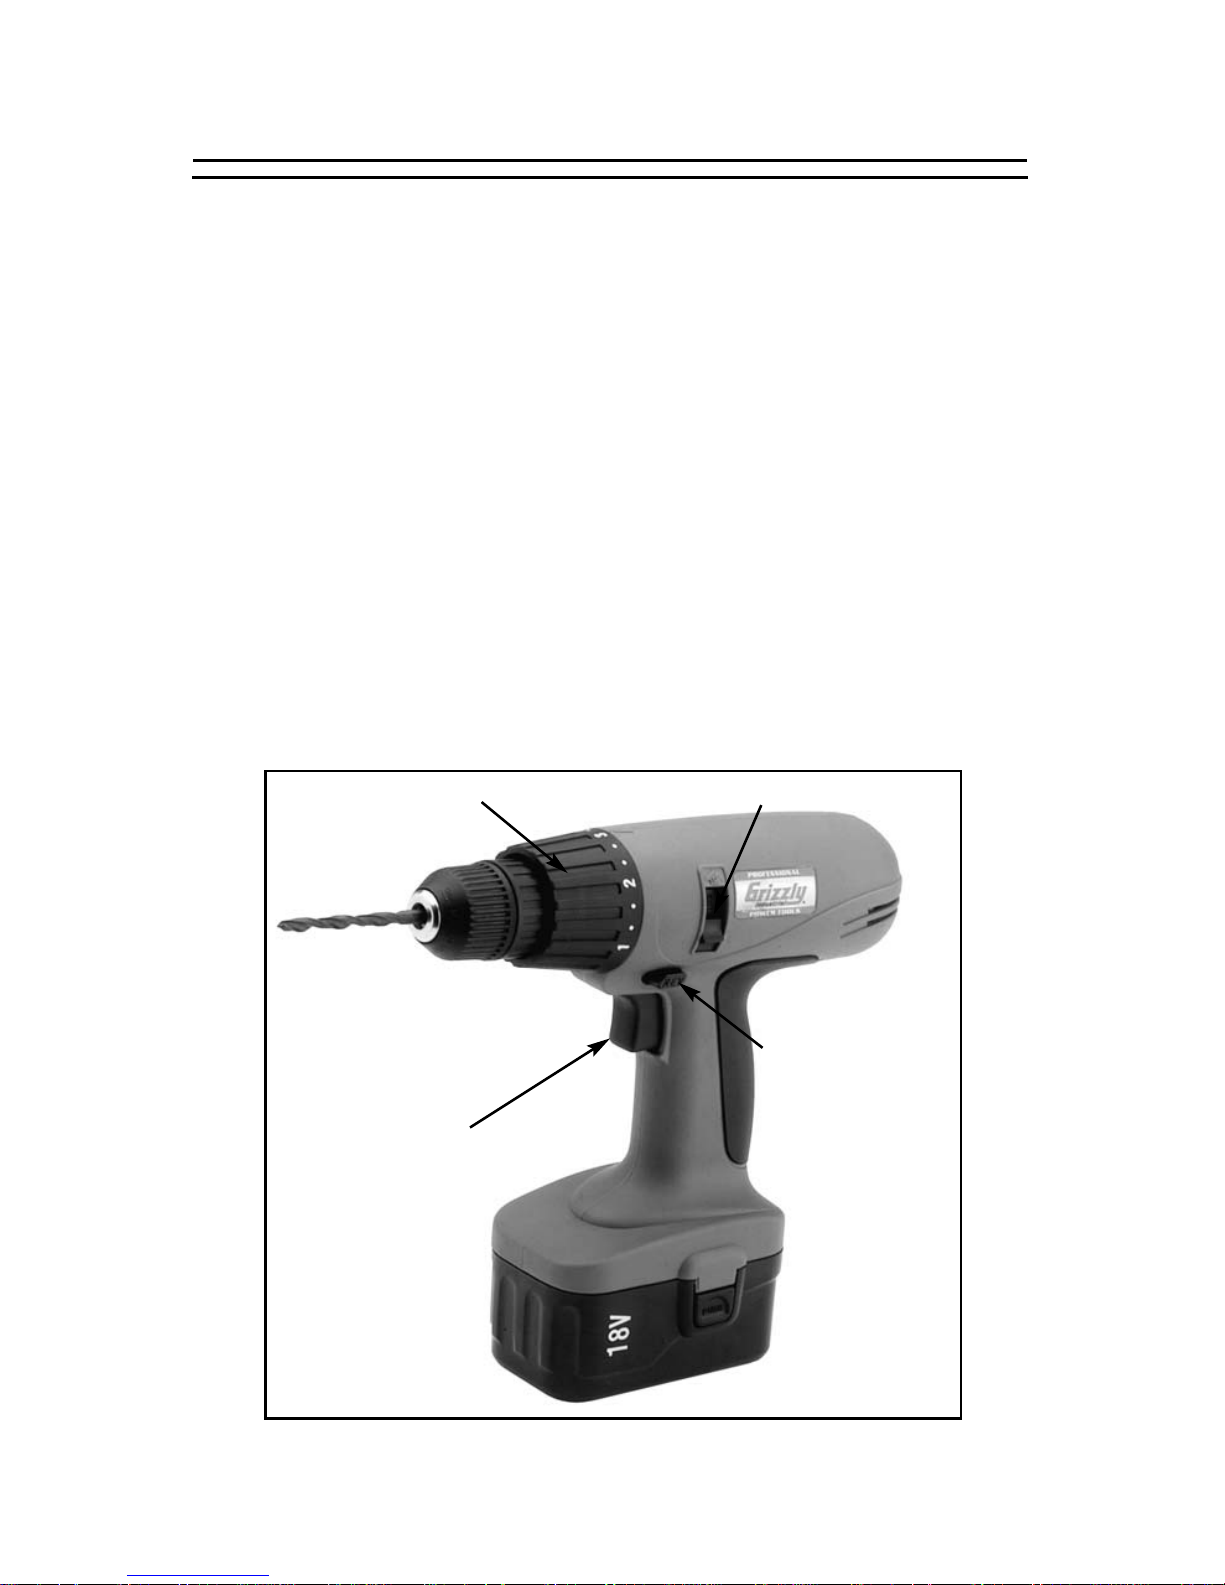
1. Set the Direction Switch for the
desired rotation of the bit or driver.
The direction switch is the sliding
switch located just above the trigger.
When looking down on the drill, pushing the switch all the way to the right
will give a counterclockwise rotation
(normally for loosening fasteners and
bits), all the way to the left will be
clockwise (normally for tightening fasteners and drilling holes). When the
switch is in the center position it locks
the switch to avoid accidentally starting the drill.
2. Set the Torque Setting Ring located
just behind the chuck. This ring has
Fig 4. Location of controls.
numbers from 1 to 5 on it, and a pointer indicator embossed on the drill
case. Set on 1 for very light applications such as driving screws into drywall. Use the higher settings up to 5
for denser woods and materials. Use
the drill bit symbol when boring holes.
Using the proper torque setting will
ensure that the fastener is not driven
too deeply, damaging the surface
material, or in the worst case,
stripped out of the hole due to overtorquing.
3. Pull the trigger to activate the drill.
This drill is variable speed from 0 750 RPM, therefore, the more you
pull on the trigger, the faster the
motor and chuck will rotate.
Direction Switch
Speed Trigger
Torque Setting
Locking Switch
Page 10
G9921 18V Cordless Set -10-
Set the direction switch, located just above
the trigger, so that it is in the center locked
position. Install the reciprocating saw head
onto the motor body. Install the reciprocating saw blade into the saw. The teeth of
the blade can be positioned so they are
pointed up or down, depending upon the
type of cutting operation to be performed.
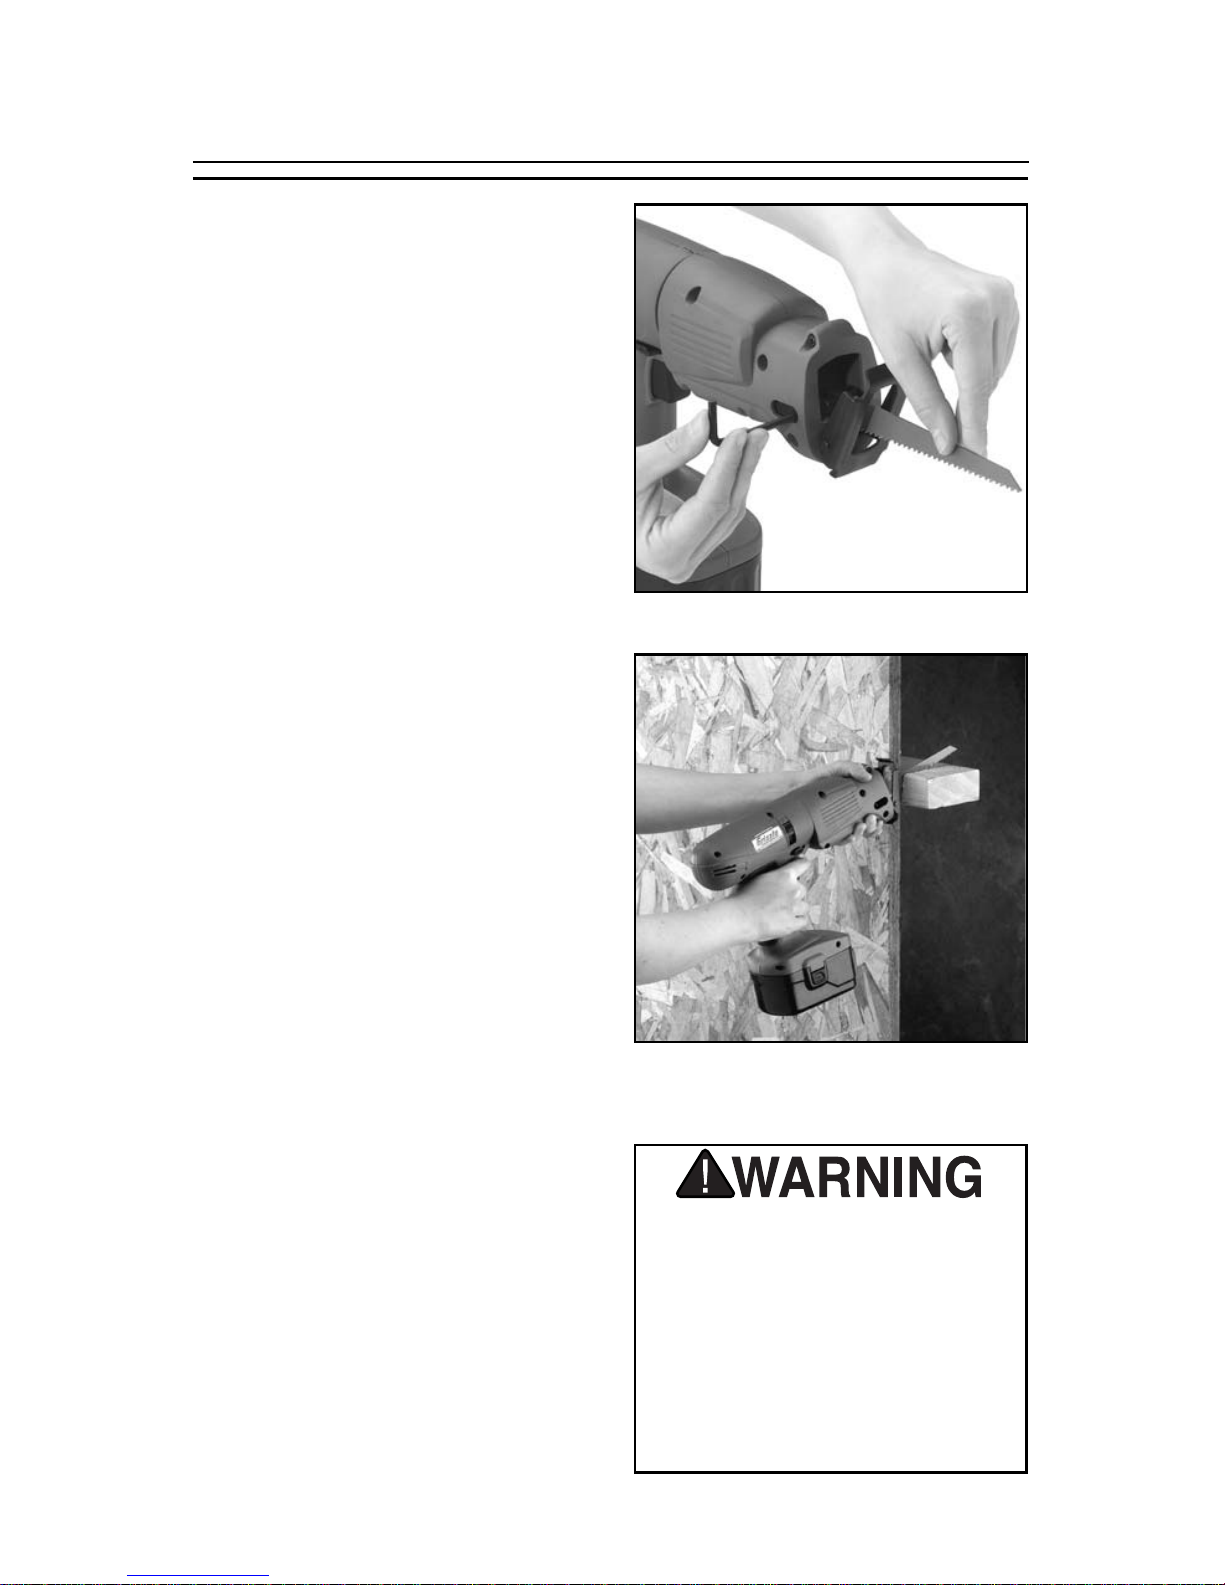
Loosen the Allen®screw which is
accessed through the slot on the right
hand side of the head. See Figure 5.
Insert the blade between the retaining
plate and the flat, being sure to engage the
hole in the blade on the pin. Hold the blade
in position with your other hand while tightening the Allen® screw to retain the blade.
Refer to the Grizzly catalog or website for
other types of blades suitable for a wide
variety of materials.
The reciprocating saw is the perfect tool for
doing tough cutout work. If cutting through
sheathing, a small pilot hole can be used
to provide a place for the blade to start. In
softer materials such as drywall, the pointed tip of the blade can be carefully
punched into the drywall to give a starting
point for the cut. A typical cutting operation
is shown in Figure 6.
If cutting to a pattern, always cut to the outside of the pattern line. Push the saw
evenly at a rate suitable for the material
being cut. If the motor should begin to
slow, ease up on the cutting pressure.
RECIPROCATING SAW OPERATION
Operating this equipment has the
potential to propel debris into the air
which can cause eye injury. Always
wear safety glasses or goggles when
operating equipment. Be certain the
safety glasses you wear meet the
appropriate standards of the
American National Standards
Institute (ANSI).
Fig 5. Blade installation.
Fig 6. Reciprocating saw in use.
Page 11
G9921 18V Cordless Set-11-
Set the direction switch, located just above
the trigger, so that it is in the center locked
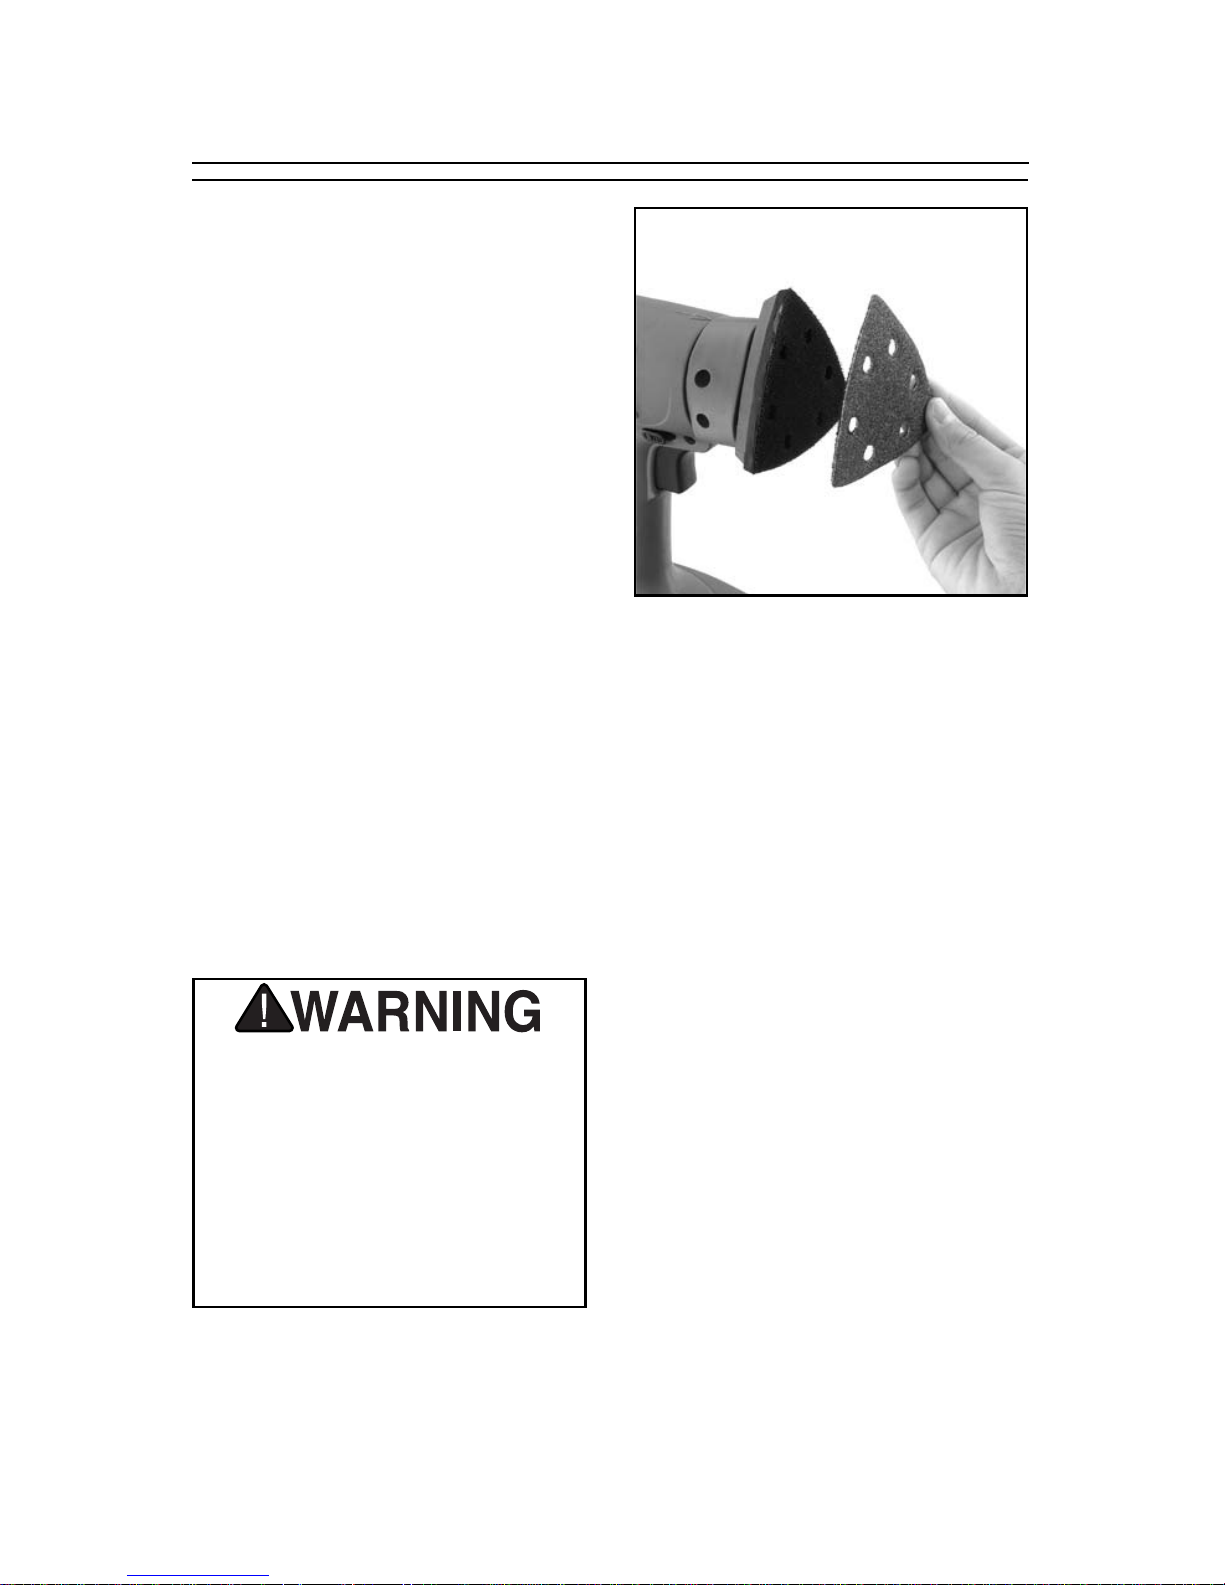
position. Install the detail sanding head
onto the motor body. Install the desired
sandpaper grit onto the triangular sanding
pad. Consult the Grizzly catalog or website
for ordering information for sandpaper. The
sandpaper attaches by means of a hook
and loop material. Be certain the replacement sandpaper purchased is of this type.
The oscillating motion of the triangular
sanding pad provides fast cutting action for
detail and intricate sanding. The detail
sander is excellent for hard-to-reach
places like the corners of a picture frame.
Both wood and metal materials can be
sanded with this device as long as the
appropriate types of sandpaper are
installed. Always be sure to check the
sandpaper for loading and sharpness of
grit. Change the sandpaper when the
paper loses its surface, or when the edges
become torn or loose.
DETAIL SANDER OPERATION
Operating this equipment has the
potential to propel debris into the air
which can cause eye injury. Always
wear safety glasses or goggles when
operating equipment. Be certain the
safety glasses you wear meet the
appropriate standards of the
American National Standards
Institute (ANSI).
Fig 7. Attaching Sandpaper.
Page 12

G9921 18V Cordless Set -12-
Set the direction switch, located just above
the trigger, so that it is in the center locked
position. Install the power carving head
onto the motor body. Install one of the four
supplied chisels depending upon the type
of carving work you want to perform.
Consult the Grizzly catalog or website for
ordering replacement chisels. The chisel
slides into the collet in only one direction.
See Figure 8. Seat the chisel firmly in the
bottom of the collet, then tighten the collar
of the collet.
The oscillating motion of the chisel is only
activated when the chisel is against the
workpiece. Test the chisel action on a
scrap piece before beginning. Experiment
with the amount of pressure necessary to
take the desired cuts, and the orientation
of the carving chisel and motor body during
the chiseling process.
For best results make certain the chisels
are sharpened periodically. Sharpening
gouge style chisels does require some
special sharpening expertise. Refer to one
of the several reference books on chisel
sharpening, or locate a local sharpening
service.
POWER CARVER OPERATION
Operating this equipment has the
potential to propel debris into the air
which can cause eye injury. Always
wear safety glasses or goggles when
operating equipment. Be certain the
safety glasses you wear meet the
appropriate standards of the
American National Standards
Institute (ANSI).
Fig 8. Attaching chisel.
Fig 9. Using the power carver.
Page 13
G9921 18V Cordless Set-13-
Set the direction switch, located just above
the trigger, so that it is in the center locked
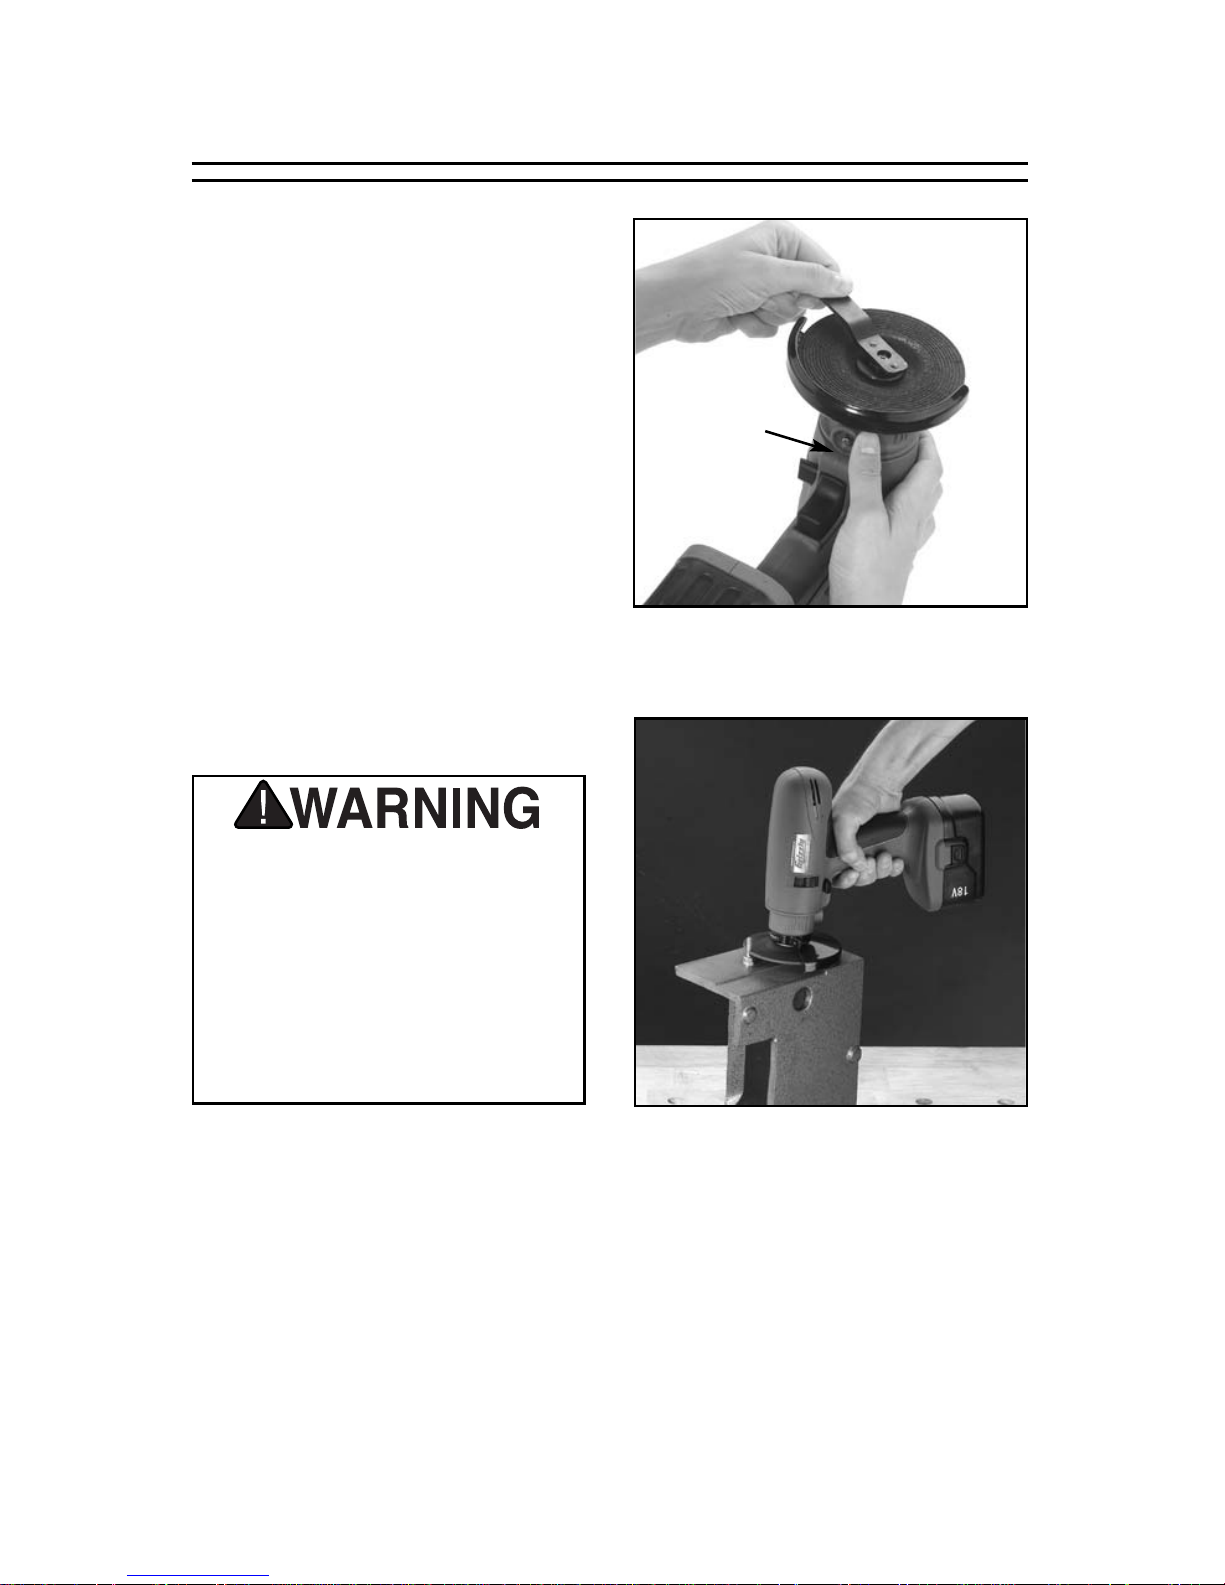
position. Install the angle grinder on the
motor body. Install the grinding wheel on
the grinder. Use the supplied wrench to
tighten the mounting ring. There is a rotation lock on the side of the grinder head
which will limit movement while you tighten
the bolt. See Figure 10. Consult the
Grizzly catalog or website for ordering
information for replacement grinding discs.
The angle grinder can be used in a couple
of different ways. The edge of the disc can
be used as a cutoff tool as shown in
Figure 11. Or the face of the disc can be
used to grind a surface, such as removing
a layer of rust from a metal surface.
ANGLE GRINDER OPERATION
Operating this equipment has the
potential to propel debris into the air
which can cause eye injury. Always
wear safety glasses or goggles when
operating equipment. Be certain the
safety glasses you wear meet the
appropriate standards of the
American National Standards
Institute (ANSI).
Fig 10. Attaching wheel.
Fig 11. Using the wheel as a cutoff tool.
Rotation Lock
Page 14

G9921 18V Cordless Set -14-
Maintenance
Your cordless power tool will give you hundreds of hours of operation time before
ever needing service. The electrical components of this cordless drill are not user
serviceable. Repair should always be
undertaken by a qualified electrical repair
technician.
Keep the motor body and accessory heads
free from dirt and grease. Always store
them in a dry place, preferably in the case
that is supplied.
The battery will require periodic recharging, and eventually replacement after it
has exceeded its recharge life (approximately 800-1000 recharge cycles). You
will notice extended charging times or
shortened operation time as the battery
experiences more cycles. Battery must
be recycled or disposed of properly.
Refer to the Grizzly catalog for replacement batteries.
OPERATING TIPS AND MAINTENANCE
Disassembly and improper reassembly of this device can result in electrical shock danger. Always have this
device serviced by an qualified electrical repair technician. Serious injury
will result.
Operating Guides and Tips
Avoid overloading the accessory
heads. Do not apply excessive pres-
sure to the tool while using. If the
speed drops abnormally, decrease
pressure immediately. When drilling,
if the bit stops abruptly or becomes
blocked, release the trigger at once.
Reverse the direction to free the drill
bit.
Ensure the safety of the workplace.
Clear the work area of all parts and
debris that may cause injury by flying
objects. Securely fix the object to be
worked on in a vise or otherwise
clamp to avoid injury. Do not attempt
to hold workpiece by hand.
Inspect the cordless tool before use.
Run the tool before using to ensure
all parts are running smoothly and
there are no abnormal sounds or
sparks. If any defect is found, have
unit serviced.
Know your work site. Take care to make
sure the material being worked on is
not supporting another structure, or
that there are no obstructions.
Before drilling or sawing. check
behind walls for wires, other electrical hazards, or plumbing.
Use accessories properly. Use the low-
est possible torque setting when driving fasteners. This will increase the
life span of the driving bit and prevent damage to the fastener.
Page 15

G9921 18V Cordless Set-15-
Grizzly Industrial, Inc. warrants every product it sells for a period of 1 year to the original
purchaser from the date of purchase. This warranty does not apply to defects due directly
or indirectly to misuse, abuse, negligence, accidents, repairs or alterations or lack of maintenance. This is Grizzly’s sole written warranty and any and all warranties that may be
implied by law, including any merchantability or fitness, for any particular purpose, are hereby limited to the duration of this written warranty. We do not warrant or represent that the
merchandise complies with the provisions of any law or acts unless the manufacturer so
warrants. In no event shall Grizzly’s liability under this warranty exceed the purchase price
paid for the product and any legal actions brought against Grizzly shall be tried in the State
of Washington, County of Whatcom.
We shall in no event be liable for death, injuries to persons or property or for incidental, contingent, special, or consequential damages arising from the use of our products.
To take advantage of this warranty, contact us by mail or phone and give us all the details.
We will then issue you a “Return Number’’, which must be clearly posted on the outside as
well as the inside of the carton. We will not accept any item back without this number. Proof
of purchase must accompany the merchandise.
The manufacturers reserve the right to change specifications at any time because they constantly strive to achieve better quality equipment. We make every effort to ensure that our
products meet high quality and durability standards and we hope you never need to use this
warranty.
Please feel free to write or call us if you have any questions about the machine or the manual.
Grizzly Industrial, Inc.
2406 Reach Road
Williamsport, PA 17701
Phone: (570) 326-3806
Fax: (800) 438-5901
E-Mail:
Web Site: http://www.grizzly.com
Thank you again for your business and continued support. We hope to serve you again
soon.
WARRANTY AND RETURNS
Page 16

Name__________________________________________________________
Street__________________________________________________________
City____________________State________Zip_________
Phone Number____________E-Mail___________________FAX____________
MODEL # G9921 18V Cordless Set Order #_______________________
The following information is given on a voluntary basis. It will be used for marketing purposes to help
us develop better products and services. Of course, all information is strictly confidential.
WARRANTY CARD
9. How many of the machines checked above are
Grizzly? ____________
10. Which portable/hand held power tools do you own?
Check all that apply.
___Belt Sander ___Orbital Sander
___Biscuit Joiner ___Palm Sander
___Circular Saw ___Portable Planer
___Detail Sander ___Saber Saw
___Drill/Driver ___Reciprocating Saw
___Miter Saw ___Router
___Other_________________________________
11. What machines/supplies would you like Grizzly
Industrial to carry?
___12" Table Saw ___Radial Arm Saw
___12" Jointer ___Panel Saw
___Brass Hardware ___Lumber
___Paint & Finishing Supplies
___Contractor’s Supplies
___Combination Planer/Jointer
___Other_________________________________
12. What new accessories would you like Grizzly
Industrial to carry?
___Builders Hardware ___Hand Tools
___Fasteners
___Wood Components
___Other_________________________________
13. What other companies do you purchase your tools
and supplies from?
_________________________________________
_________________________________________
_________________________________________
14. Do you think your purchase represents good value?
___Yes ___No
15. Would you recommend Grizzly to a friend?
___Yes ___No
16. Would you allow us to use your name as a reference for Grizzly customers in your area? Note: We
never use names more than three times.
___Yes ___No
17.Comments:________________________________
_________________________________________
_________________________________________
_________________________________________
1. How did you learn about us?
___Advertisement ___Friend
___Catalog ___Card Deck
___World Wide Web
___Other__________________________
2. What is your annual household income?
___$20,000-$29,999 ___$60,000-$69,999
___$30,000-$39,999 ___$70,000-$79,999
___$40,000-$49,999 ___$80,000-$89,999
___$50,000-$59,999 ___$90,000 +
3. What is your age group?
___20-29 ___50-59
___30-39 ___60-69
___40-49 ___70 +
4. How long have you been a woodworker?
___0 - 2 Years ___8 - 20 Years
___2 - 8 Years ___20+ Years
5. How would you rank your woodworking skills?
___Simple ___Advanced
___Intermediate ___Master Craftsman
6. What stationary woodworking tools do you own?
Check all that apply.
___Air Compressor ___Panel Saw
___Band Saw ___Planer
___Drill Press ___Power Feeder
___Drum Sander ___Radial Arm Saw
___Dust Collector ___Shaper
___Spindle Sander ___Jointer
___Table Saw ___Lathe
___Mortiser ___Wide Belt Sander
___Horiz.Boring Machine
___Vacuum Veneer Press
___Other______________________________
7. How many of your woodworking machines are
Grizzly? _____________
8. Which benchtop tools do you own? Check all
that apply.
___1"x42" Belt Sander ___6" - 8" Grinder
___5" - 8" Drill Press ___Mini Lathe
___8" Table Saw ___8" - 10" Bandsaw
___Scroll Saw ___Disc/Belt Sander
___Spindle/Belt Sander ___Mini Jointer
___10"-12"Thickness Planer
___Other______________________________
Page 17

FOLD ALONG DOTTED LINE
GRIZZLY INDUSTRIAL, INC.
P.O. BOX 2069
BELLINGHAM, WA 98227-2069
TAPE ALONG EDGES--PLEASE DO NOT STAPLE
Name________________________________
Street________________________________
City______________State______Zip_______
Send a Grizzly Catalog to a friend:
 Loading...