

Page 1

1 HP DUST COLLECTOR
MODEL G8027
INSTRUCTION MANUAL
COPYRIGHT © MAY, 2005 BY GRIZZLY INDUSTRIAL, INC.
WARNING: NO PORTION OF THIS MANUAL MAY BE REPRODUCED IN ANY SHAPE
OR FORM WITHOUT THE WRITTEN APPROVAL OF GRIZZLY INDUSTRIAL, INC.
#BL7091 PRINTED IN CHINA
Page 2

WARNING
Some dust created by power sanding, sawing, grinding, drilling, and other construction activities contains
chemicals known to the State of California to cause
cancer, birth defects or other reproductive harm. Some
examples of these chemicals are:
• Lead from lead-based paints.
• Crystalline silica from bricks, cement, and
other masonry products.
• Arsenic and chromium from chemically treated
lumber.
Your risk from these exposures varies, depending on
how often you do this type of work. To reduce your
exposure to these chemicals: work in a well ventilated
area, and work with approved safety equipment, such
as those dust masks that are specially designed to fil
ter out microscopic particles.
-
Page 3

Table of Contents
INTRODUCTION ............................................................................................................................... 2
Foreword .................................................................................................................................... 2
Contact Info ................................................................................................................................
Machine Data Sheet ................................................................................................................... 3
Identification ............................................................................................................................... 4
SECTION 1: SAFETY .......................................................................................................................
Safety Instructions for
Additional Safety for Dust C
SECTION 2: CIRCUIT REQUIREMENTS ........................................................................................
110V Operation ..........................................................................................................................
SECTION 3: SET UP ........................................................................................................................
Unpacking .................................................................................................................................. 9
Items Needed For Set Up .......................................................................................................... 9
Inventory ................................................................................................................................... 10
Site Considerations ..................................................................................................................
Hardware Recognition Chart ....................................................................................................
Base and Supports ...................................................................................................................
Collector Support Bolts ............................................................................................................ 13
Collection and Filtration Bags ..................................................................................................
Collection System .................................................................................................................... 15
SECTION 4: OPERATION ..............................................................................................................
Operation Safety ......................................................................................................................
Test Run ...................................................................................................................................
General ..................................................................................................................................... 17
SECTION 5: ACCESSORIES ......................................................................................................... 18
SECTION 6: MAINTENANCE ........................................................................................................
Schedule .................................................................................................................................. 20
Lubrication ................................................................................................................................ 20
Bag Cleaning ............................................................................................................................
Troubleshooting ........................................................................................................................ 22
Electrical Components and Wiring ...........................................................................................
G8027 Parts Breakdown ..........................................................................................................
G8027 Parts List ......................................................................................................................
WARRANTY AND RETURNS ........................................................................................................
Machinery ............................................................................................... 5
ollectors ......................................................................................... 7
10
11
12
14
17
17
17
20
21
23
24
25
26
2
5
8
8
9
Page 4

INTRODUCTION
Foreword
We are proud to offer the Model G8027 1 HP
Dust Collector. This machine is part of a growing
Grizzly family of fine woodworking machinery.
When used according to the guidelines set forth in
this manual, you can expect years of trouble-free,
enjoyable operation and proof of Grizzly’s commitment to customer satisfaction.
We are pleased to provide this manual with
the Model
through assembly, review safety considerations,
and cover general operating procedures. It repre
sents our effort to produce the best documenta
tion possible.
The specifications, drawings, and photographs
illustrated in this manual represent the Model
G8027 as supplied when the manual was prepared. However, owing to Grizzly’s policy of con
tinuous improvement, changes may be made at
any time with no obligation on the part of Grizzly.
For your convenience, we always keep current
Grizzly manuals available on our website at
grizzly.com. Any updates to your machine will be
reflected in these manuals as soon as they are
complete. Visit our site often to check for the lat
est updates to this manual!
G8027. It was written to guide you
www.
Contact Info
If you have any comments regarding this manual,
please write to us at the address below:
C
/O Technical Documentation Manager
We stand behind our machines. If you have any
service questions or parts requests, please call or
-
-
-
-
write us at the location listed below.
Grizzly Industrial, Inc.
P.O. Box 2069
Bellingham, WA 98227-2069
Grizzly Industrial, Inc.
1203 Lycoming Mall Circle
Muncy, PA 17756
Phone: (570) 546-9663
Fax: (800) 438-5901
E-Mail: techsupport@grizzly.com
Web Site: http://www.grizzly.com
-2- G8027 1 HP Dust Collector
Page 5

MACHINE DATA
SHEET
Customer Service #: (570) 546-9663 • To Order Call: (800) 523-4777 • Fax #: (800) 438-5901
MODEL G8027 1 HP DUST COLLECTOR
Design Type ................................................................................ Single Stage Floor Model
Overall Dimensions:
Base .............................................................................................................15'' x 25
Height (With Bags Inflated) ......................................................................................
Shipping Weight ................................................................................................. 67 lbs.
Box Size ...........................................................................
Specifications:
Intake Hole Size .........................................................................................................
Bag Size (2) .................................................................................................
Bag Capacity (Replacement Bag G1027) .................................................2 Cubic Feet
Bag Material ....................................................................................... Fabric/30 Micron
Impeller Size ..............................................................................................................
Suction Capacity ............................................................................................ 500 CFM
Static Pressure (Inches of Water) .........................................................................
Construction:
Base ................................................................................ Pre-formed Steel on Casters
Radial Impeller .................................................................................
Motor:
Type ............................................................................TEFC Capacitor-Start Induction
Horsepower ........................................................................................................... 1 HP
Phase ⁄ Voltage .............................................................................. Single Phase 110V
Prewired ................................................................................................................
Amps .........................................................................................................................
Cycle ⁄ RPM ................................................................................... 60 Hertz/3450 RPM
Switch .................................................................Toggle ON ⁄ OFF w/ Safety Lock Tab
Bearings ................................................................. Sealed & Lubricated Ball Bearings
261⁄4" L x 163⁄4"" W x 173⁄4" H
141⁄2" x 23"
3
⁄32" Steel, Riveted
1
63"
2.76"
110V
8A
⁄2"
4"
9"
Specifications, while deemed accurate, are not guaranteed.
G8027 1 HP Dust Collector -3-
Page 6
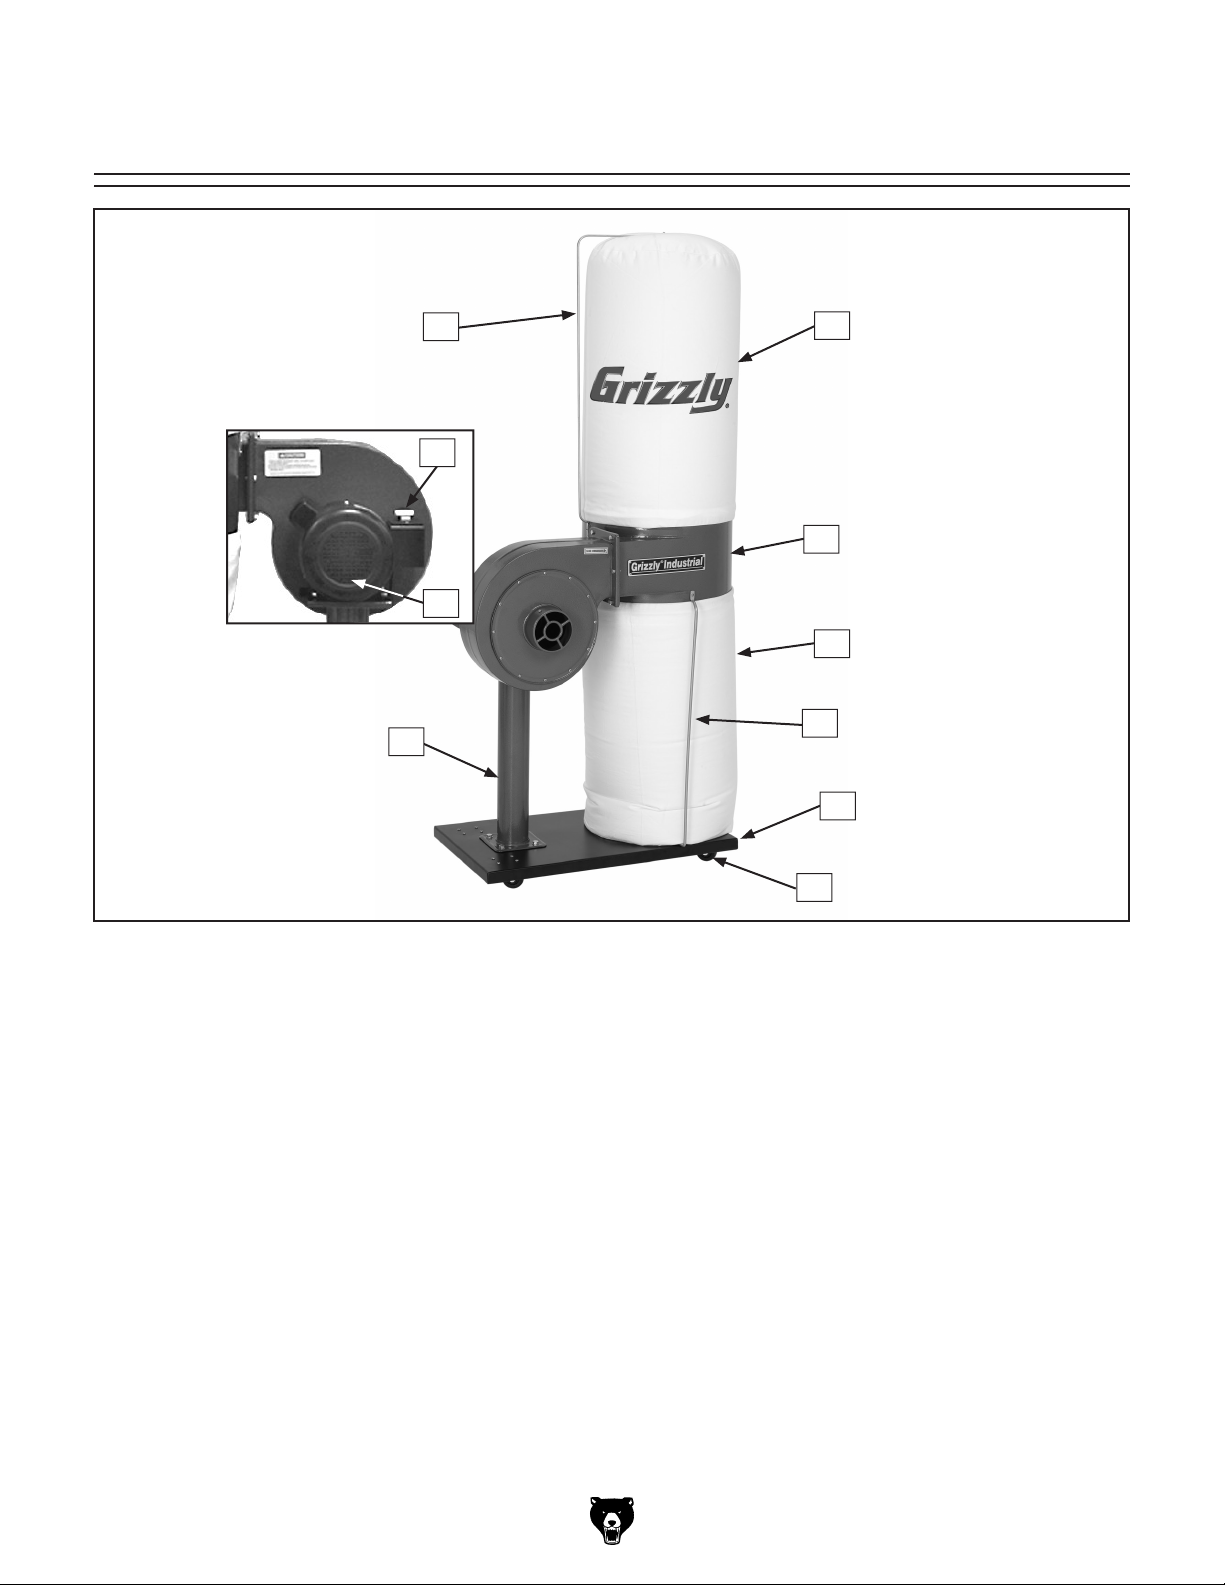
Identification
1
9
10
8
2
3
4
5
6
7
Figure 1.
1. Upper Bag Support Rod
2. Filtration Bag
3. Collector
4. Collection Bag
5. Collection Bag Support Rod
-4- G8027 1 HP Dust Collector
Model G8027 Identification.
6. Base Plate
7. Swivel Casters
8. Impeller Housing Support
9. ON/OFF Switch
10. Motor
Page 7

SECTION 1: SAFETY
For Your Own Safety, Read Instruction
Manual Before Operating this Machine
The purpose of safety symbols is to attract your attention to possible hazardous conditions. This
manual uses a series of symbols and signal words which are intended to convey the level of
importance of the safety messages. The progression of symbols is described below. Remember
that safety messages by themselves do not eliminate danger and are not a substitute for proper
accident prevention measures.
Indicates an imminently hazardous situation which, if not avoided,
WILL result in death or serious injury.
Indicates a potentially hazardous situation which, if not avoided,
COULD result in death or serious injury.
Indicates a potentially hazardous situation which, if not avoided,
MAY result in minor or moderate injury. It may also be used to
alert against unsafe practices.
This symbol is used to alert the user to useful information about
NOTICE
proper operation of the machine.
Safety Instructions for Machinery
1. READ THROUGH THE ENTIRE MANUAL
BEFORE STARTING MACHINERY.
Machinery presents serious injury hazards
to untrained users.
2. ALWAYS USE ANSI APPROVED
SAFETY GLASSES WHEN OPERATING
MACHINERY. Everyday eyeglasses only
have impact resistant lenses, they are
NOT safety glasses.
4. ALWAYS USE HEARING PROTECTION
WHEN
Machinery noise can cause permanent
hearing damage.
5. WEAR PROPER APPAREL. DO NOT
wear loose clothing, gloves, neckties, rings,
or jewelry which may get caught in moving
parts. Wear protective hair covering to con
tain long hair and wear non-slip footwear.
OPERATING MACHINERY.
-
3. ALWAYS WEAR AN ANSI APPROVED
RESPIRATOR WHEN OPERATING
MACHINERY THAT PRODUCES DUST.
Wood dust is
cancer and severe respiratory illnesses.
G8027 1 HP Dust Collector -5-
a carcinogen and can cause
6. NEVER OPERATE MACHINERY WHEN
TIRED, OR UNDER THE INFLUENCE OF
DRUGS OR ALCOHOL. Be mentally alert
at all times when running machinery.
Page 8

Safety Instructions for Machinery
7. ONLY ALLOW TRAINED AND PROPERLY SUPERVISED PERSONNEL TO
OPERATE MACHINERY. Make sure
operation instructions are safe and clearly
understood.
8. KEEP CHILDREN AND VISITORS AWAY.
Keep all children and visitors a safe distance from the work area.
9. MAKE WORKSHOP CHILD PROOF. Use
padlocks, master switches, and remove
start switch keys.
10. NEVER LEAVE WHEN MACHINE IS
RUNNING. Turn power OFF and allow all
moving parts to come to a complete stop
before leaving machine unattended.
11. DO NOT USE IN DANGEROUS
ENVIRONMENTS. DO NOT use machin-
ery in damp, wet locations, or where any
flammable or noxious fumes may exist.
12. KEEP WORK AREA CLEAN AND WELL
LIT. Clutter and dark shadows may cause
accidents.
13. USE A GROUNDED EXTENSION CORD
RATED FOR THE MACHINE AMPERAGE.
Undersized cords overheat and lose power.
Replace extension cords if they become
damaged. DO NOT use extension cords
for 220V machinery.
16. MAKE SURE GUARDS ARE IN PLACE
AND WORK CORRECTLY BEFORE
USING MACHINERY.
17. REMOVE ADJUSTING KEYS AND
WRENCHES. Make a habit of checking for
keys and adjusting wrenches before turn
ing machinery
18. CHECK FOR DAMAGED PARTS
BEFORE USING MACHINERY. Check
for binding and alignment of parts, broken
parts, part mounting, loose bolts, and any
other conditions that may affect machine
operation. Repair or replace damaged
parts.
19. USE RECOMMENDED ACCESSORIES.
Refer to the instruction manual for recom
mended accessories. The use of improper
accessories may cause risk of injury.
20. DO NOT FORCE MACHINERY. Work at
the speed for which the machine or acces
sory was designed.
21. SECURE WORKPIECE. Use clamps or
a vise to hold the workpiece when practical. A secured workpiece protects your
hands and frees both hands to operate the
machine.
22. DO NOT OVERREACH. Keep proper foot
ing and balance at all times.
ON.
-
-
-
-
14.
ALWAYS DISCONNECT FROM POWER
SOURCE BEFORE SERVICING
MACHINERY. Make sure switch is in
position before reconnecting.
15. MAINTAIN MACHINERY WITH CARE.
Keep blades sharp and clean for best and
safest performance. Follow instructions for
lubricating and changing accessories.
-6- G8027 1 HP Dust Collector
OFF
23. MANY MACHINES WILL EJECT THE
WORKPIECE TOWARD THE OPERATOR.
Know and avoid conditions that cause the
workpiece to "kickback."
24. ALWAYS LOCK MOBILE BASES
(IF USED) BEFORE OPERATING
MACHINERY.
Page 9
Additional Safety for Dust Collectors
1. MACHINE USE. DO NOT use this dust
collector to pick up liquids and metal scrap
including, but not limited to, nails and fil
ings. Also, DO NOT pick up material which
cannot safely pass through the impeller,
such as solid wood scraps.
2. KEEPING FINGERS SAFE. DO NOT place
your hands or tools near the open inlet du
ing operation for any reason including, but
not limited to, unclogging material and test
ing suction. The impeller could cause seri
ous damage to body parts if touched while
spinning.
3. SAFE SERVICING. Disconnect power and
allow impeller to come to a complete stop
before servicing or working on the dust col
lector ducting system.
4. SUSPENDED DUST PARTICLES AND
IGNITION SOURCES. DO NOT operate the
dust collector in areas where explosion risks
would be high if dust were dispersed into
the area. Areas of high risk include, but are
not limited to, areas near pilot lights and/or
open flames.
5. EMPTYING BAGS. When emptying dust
from the collection bags, wear a respirator
and safety glasses. Empty dust into an
approved container and dispose of
properly.
r-
6. AVOIDING FIRES. DO NOT allow steel
to strike against impeller, which may pro
-
-
-
-
duce a spark. Sparks can smolder in wood
dust for a long time before fire or flame is
detected. If metal contacts metal during
operation, immediately turn off the dust col
lector, unplug the power cord from the out
let, or flip the disconnect switch and wait for
all moving parts to stop. Remove collection
bags and empty the dust into an approved
air tight metal container in case of spark.
Remedy the metal to metal contact problem
before resuming operation.
7. OPERATIONAL QUESTIONS. If at any
time you are experiencing difficulties per
forming the intended operation, stop using
the machine! Then contact our Service
Department or ask a qualified expert how
the operation should be performed.
8. DUST HAZARD. Be aware that certain
woods may cause an allergic reaction
in people and animals, especially when
exposed to fine dust. Make sure you know
what type of wood dust you will be exposed
to in case there is a possibility of an
allergic reaction. Always wear an approved
respirator!
-
-
-
-
No list of safety guidelines can be complete. Every shop environment is different.
Always consider safety first, as it applies
to your individual working conditions. Use
this and other machinery with caution and
respect. Failure to follow guidelines could
result in serious personal injury, damage to
equipment or poor work results.
G8027 1 HP Dust Collector -7-
DO NOT use the dust collector for any
other purpose besides collecting dust from
connected woodworking machines. A dust
collector should NEVER be used as an air
cleaner. For safest use, wear a respirator
and use an air cleaner in addition to the
dust collector.
Page 10
SECTION 2: CIRCUIT REQUIREMENTS
110V Operation
Electrocution or fire could
result if this machine is
not grounded correctly or
Serious personal injury could occur if you
connect the machine to the power source
before you have completed the set up pro
cess. DO NOT connect the machine to the
power source until instructed to do so.
-
Amperage Draw
The 1 HP motor on the Model G8027 will draw
the following amps:
if your electrical configu
ration does not comply
with local and state codes.
Ensure compliance by
checking with a qualified
electrician!
-
Motor Draw ..............................................
8 Amps
Circuit Requirements
Only connect your machine to a circuit that meets
the requirements below. Always check to see if
the wires and circuit breaker in your circuit are
capable of handling the amperage draw from
your machine, as well as any other machines that
could be operating on the same circuit. If you are
unsure, consult a qualified electrician.
Minimum Circuit Requirement ................. 15 Amp
Plug/Receptacle Type
Included Plug Type ........................... NEMA 5-15
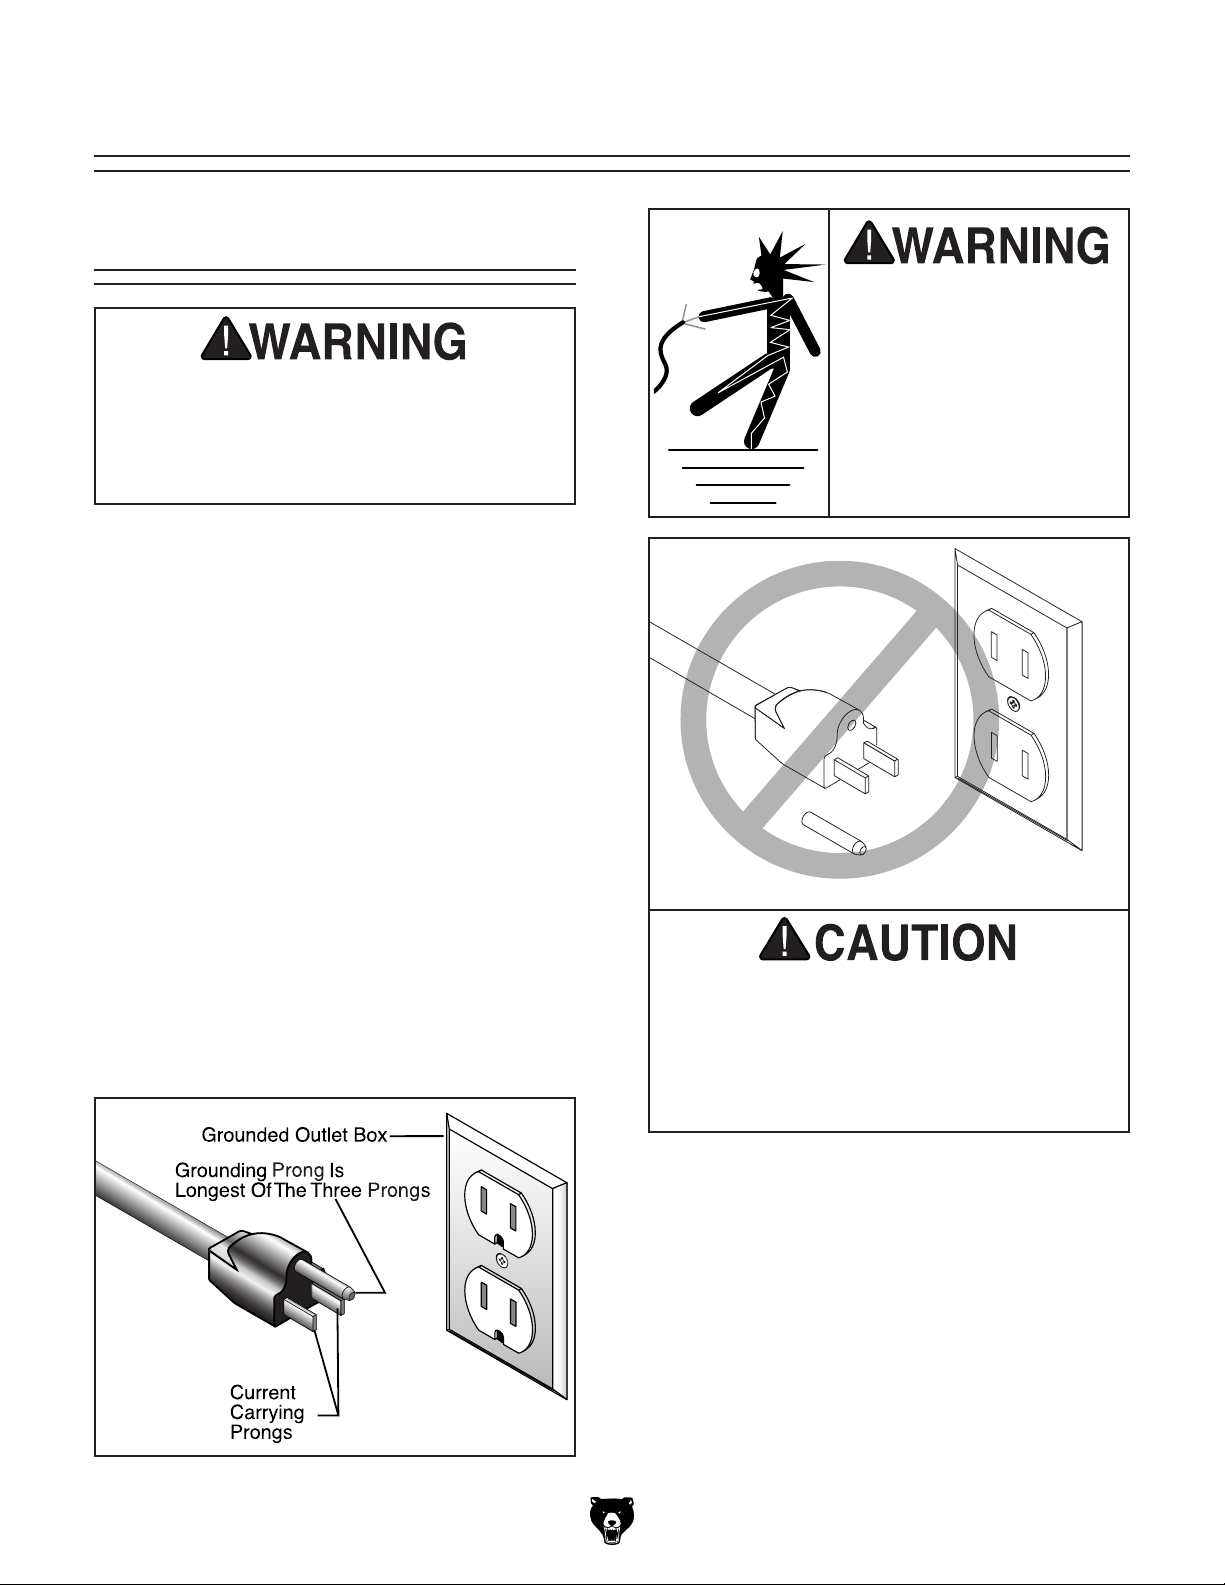
This machine must have a ground prong in
the plug to help ensure that it is grounded.
DO NOT remove ground prong from plug
to fit into a two-pronged outlet! If the plug
will not fit the outlet, have the proper outlet
installed by a qualified electrician.
Extension Cords
• Make sure the cord is rated Standard Service
(grade S) or better.
• The extension cord must contain a ground
wire and plug pin.
• Use at least a 16 gauge cord.
cord if the cord is between 51-100 feet.
Figure 2. Typical type
-8- G8027 1 HP Dust Collector
5-15 plug and receptacle.
Use a 14 gauge
Page 11

SECTION 3: SET UP
Items Needed For
This machine presents
serious injury hazards
to untrained users. Read
through this entire man
ual to become familiar
with the controls and
operations BEFORE
starting the machine!
Wear safety glasses during the entire set up pro
cess!
The Model G8027 weighs
approximately 67 lbs.
(shipping weight). DO
NOT over-exert yourself
while unpacking or mov
ing your machine—get
assistance.
-
-
Set Up
Items Needed for Setup Qty
Wrench or Socket 8mm .....................................
Wrench or Socket 10mm ...................................
Wrench or Socket 13mm ...................................
Phillips Screwdriver #2 .....................................
-
1
1
2
1
Unpacking
Your machine left our warehouse in two carefully packed boxes. If you discover the machine
is damaged after you have signed for delivery,
please immediately call Customer Service at
(570) 546-9663
Save the containers and all packing materials
for possible inspection by the carrier or its agent.
Otherwise, filing a freight claim can be difficult.
When you are completely satisfied with the con
dition of the shipment, you should inventory the
equipment.
G8027 1 HP Dust Collector -9-
for advice.
-
Page 12

Inventory
A
C
B
J
I
D
G
E
F
H
Site Considerations
Working Clearances
Consider existing and anticipated needs, size of
material to be processed through each machine,
and space for auxiliary stands, work tables or
other machinery when establishing a location
for the machine. See Figure 4 for the footprint
dimensions of the Model G8027.
28"
Figure 3. Main box items.
After all the parts have been removed from the
two boxes, you should have the following items:
Box Components
A. Motor/Impeller Housing .............................. 1
B. Collector ...................................................... 1
C. Base Plate .................................................. 1
D. Bags ............................................................ 2
E. Rubber Gasket ........................................... 1
F. Swivel Casters ............................................ 4
G. Collection Bag Support Rods .................... 2
H. Upper Bag Support Rod ............................. 1
I. Bag Clamps ................................................ 2
J. Impeller Housing Support ........................... 1
K. Hardware and Tools (Not Shown)
— Hex Bolts M6-1 x 15 ..............................
— Hex Bolts M8-1.25 x 15 .........................
— Hex Nuts M8-1.25 ..................................
— Hex Nut M5-.8 .....................................
— Flat Washers 8mm .............................. 12
— Flat Washers 5mm ..............................
— Phillips Head Screws M5-.8 x 15 .......... 6
— Phillips Head Screws M5-.8 x 10 ........
— Phillips Head Screws M4-.7 x 8 ............
— Hex Wrench 5mm .................................
— Hex Wrench 4mm .................................
(Figure 3) Qty
6
8
4
18
22
16
2
1
1
16"
Figure 4. Dust collector footprint.
Unsupervised children and
visitors inside your shop
could receive serious per
sonal injury. Ensure child
and visitor safety by keep
ing all entrances to the
shop locked at all times.
DO NOT allow unsuper
vised children or visitors
in the shop at any time.
-
-
-
In the event that any non proprietary parts are
missing (e.g. a nut or a washer), we would be
glad to replace them, or, for the sake of expedi
ency, replacements can be obtained at your local
hardware store.
-10- G8027 1 HP Dust Collector
-
Page 13

Hardware Recognition Chart
Page 14

Base and Supports
Components and Hardware Needed: Qty
Motor/Impeller Housing ......................................1
Collector .............................................................1
Base ...................................................................1
Rubber Gasket ...................................................
Swivel Casters ....................................................
Collection Bag Support Rods ............................
Upper Bag Support
Impeller Housing Support ...................................
Hex Bolts M6-1 x 15 .........................................
Hex Bolts M8-1.25 x 15 ......................................
Hex Nuts M5-.8 ................................................
Hex Nuts M8-1.25 ..............................................
Flat Washers 5mm ...........................................
Flat Washers 8mm ...........................................
Phillips Head Screws M5-.8 x 15 ......................
Phillips Head Screws M5-.8 x 10 .................... 16
Phillips Head Screws M4-.7 x 8 ........................
To assemble the dust collector base:
1. Make sure the dust collector motor is
unplugged!
Rod .....................................1
1
4
2
1
6
8
18
4
22
12
6
2
3. Place the base right side up and install the
collector support (
1.25 x 15 hex bolts and four flat washers.
Figure 6. Installing collector support.
4. Place the motor/impeller housing onto the
collector support plate and fasten with four
M8-1.25 x 15 hex bolts, four hex nuts, and
eight flat washers as shown in
Figure 6) using four M8-
Figure 7.
2. Install the swivel casters onto the base with
sixteen M5-.8 x 10 Phillips head screws,
nuts, and flat washers (see
Figure 5. Installing casters.
Figure 5).
Figure 7.
Installing motor/impeller housing on
collector support.
-12- G8027 1 HP Dust Collector
Page 15

5. Install the rubber gasket onto the motor/
impeller housing opening
6. Install the collector onto the motor/impeller
housing with six M6-1 x 15 hex bolts, as
shown in
Collector
Motor/Impeller Housing
Figure 8.
.
8. Install the upper bag support onto the collec-
tor, as shown in Figure
x 8 Phillips head screws.
Figure 10.
Installing upper bag support.
10, using two M4-.7
Figure 8.
7. Secure the two collection bag support rods
Installing collector onto motor/impeller
housing.
to the base plate
head scre
collector using two M5-.8 x 15 Phillip head
screws, two flat washers, and two hex nuts
as shown in
ws and four flat washers, and to the
with four M5-.8 x 15 Phillip
Figure 9.
Collector Support
Bolts
1. Adjust the two hex bolts located on the col-
lector support plate (
heads press against the motor/impeller hous
ing.
2. Tighten the hex nuts against the support
Figure 11) so the bolt
-
Figure 9.
G8027 1 HP Dust Collector -13-
Securing collection bag support rods.
Figure 11. Adjusting collector support plate
bolts.
Page 16

Collection and
Filtration Bags
3. Bag clamp springs should be located between
the belt and latch
clamp will not work. Adjust the springs if
needed.
(Figure 13); if not, the bag
Components and Hardware Needed: Qty
Collection Bag ....................................................
Filtration Bag ......................................................1
Bag Clamps ........................................................
To install the collection bag:
1. Place the collection bag over the bottom
edge of the collector and secure the bag
clamp as shown in
Clamp
Wide Foam Strip
Figure 12.
Cleated Tips of Belt
1
2
Springs
Latch
Belt
Figure 13. Correct bag clamp spring position.
To install the filtration bag:
1. Hook the top of the filtration bag onto the
upper bag support rod, slip the filtration bag
over the top of the collector, and secure the
bag clamp. The dust collector should look
similar to
Figure 14 when fully assembled.
Figure 12. Securing collection bag onto collec-
tor.
2. If belts are not already installed on the col-
lection and filtration bags, thread the cleated
end of each belt through the left hole and out
the right hole of each bag
tips face out.
. Make sure cleated
Figure 14. Filtration and collection bags
installed.
-14- G8027 1 HP Dust Collector
Page 17

Collection System
General
The Model G8027 is designed to be a singlemachine dust collector. Locate the dust collec
tor where it will not interfere with the workpiece
being processed, and no more than 10' of ducting
is used, otherwise the CFM will be reduced. To
solve dust collection questions, Grizzly offers a
guide book entitled Dust Collection Basics that
will help you design your system.
Whatever system you choose, always make sure
there are no open flames or pilot lights in the
same room as the dust collector. There is a risk
of explosion if dust is dispersed into the air.
Material Selection
You have many choices regarding dust collection
ducting, but flexible hose is the most common.
However, be aware that there is a fire or explo
sion hazard if plastic duct material is used for
dust collection without being grounded against
static electrical charge build-up.
and plastics. However, the cost of specifically
designed flexible duct can vary greatly. Grizzly
offers polyethylene hose, which is well suited for
the removal of particulate matter, especially saw
dust, since it is durable and completely flexible.
Polyethylene is also very economical and avail
-
able in a wide variety of diameters and lengths for
most applications.
-
-
Duct Grounding
Plastic flex-hose is an insulator, and dust particles
moving against the walls of the hose creates a
static electrical build up. This charge will build
until it discharges to a ground. If a grounding
medium is not available to prevent static electrical
build up, the electrical charge will arc to the nearest grounded source. This electrical discharge
may cause an explosion and subsequent fire
inside the system.
To protect against static electrical build up inside
a non-conducting duct, a bare copper wire should
-
be placed inside the duct along its length and
grounded to the dust collector. You must also
confirm that the dust collector is continuously
grounded through the electrical circuit to the elec
tric service panel.
-
Plastic Flexible Duct
Flexible rubber hose, polyethylene, plastic flexhose and other flexible ribbed hose is generally
used for short runs, small shops, and at rigid
duct-to-tool connections. There are many differ
ent types of flex hose on the market today. These
are manufactured from materials such as poly
ethylene, PVC, cloth hose dipped in rubber and
even metal, including steel and aluminum.
There are also many kinds of pure plastic flex
ible hose, such as non-perforated drainage type
hose and dryer vent hose. Drainage type hose,
while being economical, does not quite have the
flexibility required for dust collection. The inside
of the duct is also deeply corrugated and can
increase the static pressure loss by as much as
50% over smooth wall duct. Dryer vent hose,
while being completely flexible, is non-resistant
to abrasion and has a tendency to collapse in a
negative pressure system.
If using flex-hose, you should choose one of the
many types that are designed specifically for
the movement of solid particles, i.e. dust, grains
Always guard against
-
-
Be sure that you extend the bare copper wire
-
down all branches of the system. Do not forget
to connect the wires to each other with wire nuts
when two branches meet at a “Y” or “T” connec
tion.
static electrical build up
by grounding all dust
collection lines.
-
G8027 1 HP Dust Collector -15-
Page 18

Ensure that the entire system is grounded. If
using plastic blast gates to direct air flow, the
grounding wire must be jumped (
Figure 15)
around the blast gate without interruption to the
grounding system.
Plastic Blast Gate
We also recommend wrapping the outside of all
plastic ducts with bare copper wire to ground the
outside of the system against static electrical
build up. Wire connections at Y’s and T’s should
be made with wire nuts.
Attach the bare ground wire to each stationary
woodworking machine and attach the dust col
lector frame with a ground screw as shown in
Figure 16. Ensure that each machine is continuously grounded to the grounding terminal in your
electric service panel.
-
Copper Ground Wire
Metal Duct
Figure 15. Ground jumper wire when using
plastic blast gates or elbows and metal duct.
Ground Screw
Flex-Hose
External Ground Wire
Internal Ground Wire
Figure 16. Flex-hose grounded to machine.
-16- G8027 1 HP Dust Collector
Page 19

!
SECTION 4: OPERATION
Operation Safety
Disconnect power to the
machine when perform
ing any maintenance,
assembly or adjust
ments. Failure to do this
may result in serious
personal injury.
Keep loose clothing
rolled up and out of the
way of machinery and
keep hair pulled back.
Test Run
Once assembly is complete and adjustments are
done to your satisfaction, you are ready to test
run the machine.
-
-
Turn on the power supply at the main panel.
Turn the dust collector ON. Make sure that your
finger is poised on the toggle switch just in case
there is a problem. The dust collector should run
smoothly, with little or no vibration or rubbing
noises. Strange or unnatural noises should be
investigated and corrected before operating the
machine further.
If you cannot easily locate the source of an
unusual noise or vibration, contact our service
department for help.
General
Wear safety glasses during the entire operations
process. Failure to com
ply may result in serious
personal injury.
Always wear a respirator when operating
your dust collector. This
machine circulates saw
dust dust which may
cause allergic reactions
or respiratory problems.
-
Operating your Model G8027 is simple and
-
straightforward. Move the dust collector to the
machine location, connect the duct, connect the
ducting ground, and you are ready to begin.
DO NOT use the dust collector for any
other purpose besides collecting dust from
connected woodworking machines. A dust
collector should NEVER be used as an air
cleaner. For safest use, wear a respirator
and use an air cleaner in addition to the
dust collector.
G8027 1 HP Dust Collector -17-
Page 20

SECTION 5: ACCESSORIES
H2499—Small Half-Mask Respirator
H3631—Medium Half-Mask Respirator
H3632—Large Half-Mask Respirator
H3635—Disposable Cartridge Filter Pair P100
Wood dust is now considered a known carcino
gen and has been linked to nasal cancer and
severe respiratory illnesses. If you work around
dust everyday, a half-mask respirator can be a
lifesaver. Also compatible with safety glasses!
G7984—Face Shield
H1298—Dust Sealed Safety Glasses
H1300—UV Blocking, Clear Safety Glasses
H2347—Uvex® Spitfire Safety Glasses
-
H0736—Shop Fox
Safety Glasses are essential to every shop. If
you already have a pair, buy extras for visitors
or employees. You can't be too careful when it
comes to shop safety!
H1300
H2347
®
Safety Glasses
G7984
H1298
H0736
Figure 17. Half-mask respirator and disposable
cartridge filters
G1034—Upper Bag
G5051—Lower Bag
G5557—2.5 Micron Dust Bag-Medium Bag
G5559—14.5” x 23” , 3.0 Micron Bag
To ensure consistent results, buy Grizzly
replacement dust collector bags. Keep several
spares on hand.
.
Figure 19. Our most popular safety glasses.
G1842—3" Plastic Blast Gate
G1843—4" Plastic Blast Gate
G1844—5" Plastic Blast Gate
H1845—6" Plastic Blast Gate
Figure 20. Model G1842 Plastic Blast Gate.
Figure 18.
-18- G8027 1 HP Dust Collector
Model G1034 Upper Bag.
Page 21

H2443—Universal Adapter
Seven-step adapter provides a multitude of dust
collection reducing options. Simply cut away
unneeded steps with a hacksaw. Outside diam
eter step sizes include 1”, 2”, 2-1/2”, 3”, 4”, 5” and
6”. Wall thickness is 1/8”.
Figure 21.
Model H2443 universal adapter.
G2525—Dust Collection Basics
This incisive book skillfully guides the wood
worker through all the steps necessary in
-
the design and construction of an efficient cen
tral dust collection system and tells you what
you need to know for easy installation. The
text offers practical hints and techniques and
takes the mystery, misery and hype away from
a subject that should be as clear as the air you
breathe. Fifty pages of concise, carefully illustrated text. A MUST!
-
-
G3181—Dust Collection Kit #1
Designed for a one machine hook-up, kit #1
comes complete with installation instructions
and an accessories list for expanding your
dust collection system in the future. Acessories
included:
• (1) G1536 4" x 10' Hose
• (1) G1838 Universal Dust Hood
• (2) G2974 Wire Hose Clamps
Figure 23. Model G2525 Dust Collection Basics.
G4679—Grounding Kit
Eliminate potential hazards by dissipating static
charges. Kit includes 50' of 14-gauge bare cop
per wire, electrical connectors, grounding screws,
terminal ends and instructions.
-
Figure 22. Model G3181 Dust Collection Kit.
Figure 24. Model G4679 Grounding Kit.
G8027 1 HP Dust Collector -19-
Page 22

SECTION 6: MAINTENANCE
!
Schedule
Disconnect power to the
machine when perform
ing any maintenance,
assembly or adjust
ments. Failure to do this
may result in serious
personal injury.
-
-
Regular periodic maintenance on your Model
G8027 Dust Collector will ensure its optimum
performance. Make a habit of inspecting your
machine each time you use it. Check for the
following conditions and repair or replace when
necessary:
1. Loose mounting bolts.
Keep loose clothing
rolled up and out of the
way of machinery and
keep hair pulled back.
Wear safety glasses during the entire operations
process. Failure to com
ply may result in serious
personal injury.
2. Worn switch.
3. Worn or damaged cords and plugs.
4. Any other condition that could hamper the
safe operation of this machine.
5. DO NOT let collection bags get completely
full.
-
Lubrication
Since all bearings are shielded and permanently
lubricated, simply leave them alone until they
need to be replaced. DO NOT lubricate them.
-20- G8027 1 HP Dust Collector
Page 23

Bag Cleaning
Always wear a respirator or dust mask and safety
glasses when emptying the storage bag (
25). Small dust particles can escape the bags
during emptying, causing them to become air
borne and easily inhaled. This microscopic air
borne dust is extremely unhealthy to breathe and
can cause serious health problems.
Grizzly offers replacement collection bags
(G5051 and G5559) for your Model G8027 Dust
Collector.
Figure
To empty the collection bag:
1. Make sure you are wearing a respirator and
the dust collector is unplugged.
2. Un-clamp the collection bag and empty it.
-
-
3. Reinstall the collection bag.
While the Model G8027 excels at collecting the
majority of wood dust produced by your machines,
it is not an air filter; therefore, we strongly rec
ommend the supplemental aid of a shop air filter
such as the Grizzly G5955 or G9956. Air filters
are designed to collect the smaller dust particles
that a dust collector cannot trap.
-
Figure 25. Safely disposing of wood dust.
G8027 1 HP Dust Collector -21-
Page 24

Troubleshooting
SYMPTOM POSSIBLE CAUSE CORRECTIVE ACTION
Motor will not start, or it
growls on start up
Motor runs slower than
normal.
Loud, repetitious noise, or
excessive vibration coming
from dust collector
Dust collector does not
adequately collect dust or
chips; poor performance.
.
.
1. Power supply fuse or circuit breaker
has tripped.
2. Toggle switch is broken inside
Start capacitor is at fault.
3.
4. Motor fan cover is dented, stopping
the fan from being able to spin.
5. Motor is at fault.
1. Poor electrical connection
2. Low power source voltage.
3. Motor is at fault.
1. Dust collector is not on a flat
surface and wobbles.
2. Impeller fan is damaged and
unbalanced
3. The motor mounting is loose.
4. Impeller is loose on the motor
shaft
5. Motor fan cover is dented, causing
the motor fan to hit the cover while
spinning.
1. Dust collection bag is full.
2. There is a restriction at the inlet
grate.
3. The dust collector is too far away
from the point of suction, or there
are too many sharp bends in the
ducting.
4. The lumber is wet and not flowing
through the dust lines smoothly.
5. There is a leak in the ducting, or a
series of small leaks, or too many
open ports
6. There is a restriction in the ducting,
or the ducting and ports are
incorrectly sized
7. The machine dust collection design
is inadequate.
8. The dust collector is too small for
the dust collection system.
.
.
.
.
.
.
1. Disconnect power, and inspect circuit for electrical
shorts and repair
or has tripped many times.
2. Disconnect power, and use an ohmmeter to check
switch terminals for continuity, and replace switch if
required.
3. Replace start capacitor.
4. Replace motor fan cover (and fan, if damaged).
5. Replace motor.
1. Inspect the power supply for loose, corroded, or
overheated electrical connections and repair
2. Have the power source voltage checked; reduce
the length of extension cord.
3. Replace the motor.
1. Stabilize the dust collector.
2. Unplug dust collector, and inspect the impeller for
dents, bends, loose fins
damage is found.
3. Make sure all fasteners on the dust collector are
tight.
4. Replace the motor and impeller as a set if the
motor shaft and the impeller hub are damaged
5. Replace motor fan cover.
1. Empty bags
2. Remove dust line from dust collector inlet and
clean debris from the inlet grate (and wireconnector, if installed).
3. Relocate the dust collector closer to the point of
suction, and rework ducting without sharp bends.
Refer to the Dust Collection Basics handbook
(ISBN 0-9635821-2-7) to help configure your dust
system.
4. Process lumber with less than 20% moisture
content.
5. Rework the ducting as to eliminate all leaks, and
refer to the Dust Collection Basics handbook (ISBN
0-9635821-2-7) for more solutions.
6. Rework the ducting as to eliminate all restrictions,
and refer to the Dust Collection Basics handbook
(ISBN 0-9635821-2-7) for more solutions.
7. Use proper dust collection accessories.
8. Install a larger dust collector to power your dust
collection system.
. Replace circuit breaker if it is old
.
.
. Replace impeller if any
.
-22- G8027 1 HP Dust Collector
Page 25

Electrical Components and Wiring
GREEN(GROUND)
TO 110 VOLT
POWER CORD
Disconnect power before
performing any electrical
service. Electricity presents
serious shock hazards that
will result in severe personal
injury and even death!
MOTOR WIRES
BLACK WIRE
WHITE WIRE
MOTOR
ON/OFF SWITCH
GREEN(GROUND)
Motor
Motor Wires
ON/OFF
Switch
110V
Power
Cord
Ground (Green)
Black Wire
White Wire
G8027 1 HP Dust Collector -23-
Page 26

33
25
41
23
41
24
2
3
2
30
27
28
29
1
3
5
4
40
13
20
40
39
26
38
18-4
18
35
17
16
34
13
40
21
19
14
7
6
9
8
10
13
12
11
36
31
22
3
32
29
5
18-1
42
43
47
45
46
44
48
U
N
P
L
U
G
P
O
W
E
R
A
N
D
W
A
I
T
F
O
R
D
U
S
T
C
O
L
L
E
C
T
O
R
T
O
S
T
O
P
B
E
F
O
R
E
P
L
A
C
I
N
G
H
A
N
D
S
N
E
A
R
I
N
L
E
T
C
A
U
T
IO
N
D
U
S
T
H
A
Z
A
R
D!
A
lw
a
y
s
w
e
a
r
a
r
e
s
p
ir
a
to
r
w
h
e
n
u
s
in
g
t
h
is
m
a
c
h
i
n
e
.
G8027 Parts Breakdown
-24- G8027 1 HP Dust Collector
Page 27

REF PART # DESCRIPTION REF PART # DESCRIPTION
1 P8027001 SWIVEL CASTER 23 P8027023 COLLECTOR
2 PS20M PHLP HD SCR M5-.8 X 15 24 P8027024 COLLECTION BAG
3 PW02M FLAT WASHER 5MM 25 P8027025 FILTRATION BAG
4 P8027004 BASE PLATE 26 PWRCRD110L POWER CORD
5 PS09M PHLP HD SCR M5-.8 X 10 27 PAW04M HEX WRENCH 4MM
6 P8027006 INLET COVER 28 PAW05M HEX WRENCH 5MM
7 PB08M HEX BOLT M6-1 X 20 29 PN06M HEX NUT M5-.8
8 PSS14M SET SCREW M8-1.25 X 12 30 P8027030 COLLECTOR BAG SUPPORT ROD
9 P8027009 SPECIAL WASHER 31 PN01M HEX NUT M6-1
10 P8027010 IMPELLER 32 PS07M PHLP HD SCR M4-.7 X 8
11 P8027011 IMPELLER HOUSING 33 P8027033 UPPER BAG SUPPORT ROD
12 PLW04M LOCK WASHER 8MM 34 PHTEK5M TAP SCREW M4 X 12
13 PB87M HEX BOLT M8-1.25 X 15 35 P8027035 SWITCH PLATE
14 PB18M HEX BOLT M6-1 X 15 36 PB10M HEX BOLT M6-1 X 25
16 PSW06 SWITCH SAFETY KEY 38 PS85M PHLP HD SCR M4-.7 X 60
17 PSW06 SWITCH 110/220V 39 PN03M HEX NUT M8-1.25
18 P8027018 MOTOR 40 PW01M FLAT WASHER 8MM
18-1 P8027018-1 CAPACITOR COVER
41 P8027041 BAG CLAMP
18-2* P8027018-2 MOTOR FAN COVER
42 P8027042 RUBBER GASKET
18-3* P8027018-3 MOTOR FAN
43 P8027043
MACHINE ID LABEL
18-4 P8027018-4 COMPLETE SWITCH BOX
44 P8027044
NO HAND IN INLET LABEL
19 P8027019 RUBBER GASKET 45 P8027045
GRIZZLY INDUSTRIAL, INC. LABEL
20 P8027020 IMPELLER HOUSING SUPPORT 46
PLABEL-39
RESPIRATOR LABEL
21 P8027021 FLAT PIN 5 x 30 47
PLABEL-12
READ MANUAL LABEL
22 P8027022 RUBBER GASKET 48
PLABEL-14
ELECTRICITY LABEL
G8027 Parts List
* Item not shown in Parts Breakdown
Page 28

WARRANTY AND RETURNS
Grizzly Industrial, Inc. warrants every product it sells for a period of 1 year to the original purchaser from
the date of purchase. This warranty does not apply to defects due directly or indirectly to misuse, abuse,
negligence, accidents, repairs or alterations or lack of maintenance. This is Grizzly’s sole written warranty
and any and all warranties that may be implied by law, including any merchantability or fitness, for any par
ticular purpose, are hereby limited to the duration of this written warranty. We do not warrant or represent
that the merchandise complies with the provisions of any law or acts unless the manufacturer so warrants.
In no event shall Grizzly’s liability under this warranty exceed the purchase price paid for the product and
any legal actions brought against Grizzly shall be tried in the State of Washington, County of Whatcom.
We shall in no event be liable for death, injuries to persons or property or for incidental, contingent, special,
or consequential damages arising from the use of our products.
To take advantage of this warranty, contact us by mail or phone and give us all the details. We will then
issue you a “Return Number,’’ which must be clearly posted on the outside as well as the inside of the
carton. We will not accept any item back without this number. Proof of purchase must accompany the
merchandise.
The manufacturers reserve the right to change specifications at any time because they constantly strive to
achieve better quality equipment. We make every effort to ensure that our products meet high quality and
durability standards and we hope you never need to use this warranty.
-
Please feel free to write or call us if you have any questions about the machine or the manual.
Thank you again for your business and continued support. We hope to serve you again soon.
-26- G8027 1 HP Canister Dust Collector
Page 29

WARRANTY CARD
Name _____________________________________________________________________________
Street _____________________________________________________________________________
City _______________________ State _________________________ Zip _____________________
Phone # ____________________
Model # ____________________ Order # _______________________ Serial # __________________
The following information is given on a voluntary basis. It will be used for marketing purposes to help us develop
better products and services. Of course, all information is strictly confidential.
1. How did you learn about us?
____ Advertisement ____ Friend ____ Catalog
____ Card Deck ____ Website ____ Other:
2. Which of the following magazines do you subscribe to?
____ Cabinet Maker
____ Family Handyman
____ Hand Loader
____ Handy
____ Home Shop Machinist
____ Journal of Light Cont.
____ Live Steam
____ Model Airplane News
____ Modeltec
____ Old House Journal
3. What is your annual household income?
____ $20,000-$29,000 ____ $30,000-$39,000 ____ $40,000-$49,000
____ $50,000-$59,000 ____ $60,000-$69,000 ____ $70,000+
Email ________________________ Invoice # _________________
____ Popular Mechanics
____ Popular Science
____ Popular Woodworking
____ Practical Homeowner
____ Precision Shooter
____ Projects in Metal
____ RC Modeler
____ Rifle
____ Shop Notes
____ Shotgun News
____ Today’s Homeowner
____ Wood
____ Wooden Boat
____ Woodshop News
____ Woodsmith
____ Woodwork
____ Woodworker West
____ Woodworker’s Journal
____ Other:
4. What is your age group?
____ 20-29 ____ 30-39 ____ 40-49
CUT ALONG DOTTED LINE
____ 50-59 ____ 60-69 ____ 70+
5. How long have you been a woodworker/metalworker?
____ 0-2 Years ____ 2-8 Years ____ 8-20 Years ____20+ Years
6. How many of your machines or tools are Grizzly?
____ 0-2 ____ 3-5 ____ 6-9 ____10+
7. Do you think your machine represents a good value? _____ Yes _____No
8. Would you recommend Grizzly Industrial to a friend? _____Yes _____No
9. Would you allow us to use your name as a reference for Grizzly customers in your area?
Note: We never use names more than 3 times.
10. Comments: _____________________________________________________________________
_________________________________________________________________________________
_________________________________________________________________________________
_____ Yes _____No
_________________________________________________________________________________
Page 30

FOLD ALONG DOTTED LINE
FOLD ALONG DOTTED LINE
Place
Stamp
Here
GRIZZLY INDUSTRIAL, INC.
P.O. BOX 2069
BELLINGHAM, WA 98227-2069
Send a Grizzly Catalog to a friend:
Name_______________________________
Street_______________________________
City______________State______Zip______
TAPE ALONG EDGES--PLEASE DO NOT STAPLE
Page 31

Page 32

Buy Direct and Save with Grizzly® – Trusted, Proven and a Great Value!
Visit Our Website Today And Discover Why
Grizzly® Is The Industry Leader!
• SECURE ORDERING
• ORDERS SHIPPED WITHIN 24 HOURS
• E-MAIL RESPONSE WITHIN ONE HOUR
-OR-
Call Today For A
Full Color Catalog
FREE
 Loading...