

Page 1
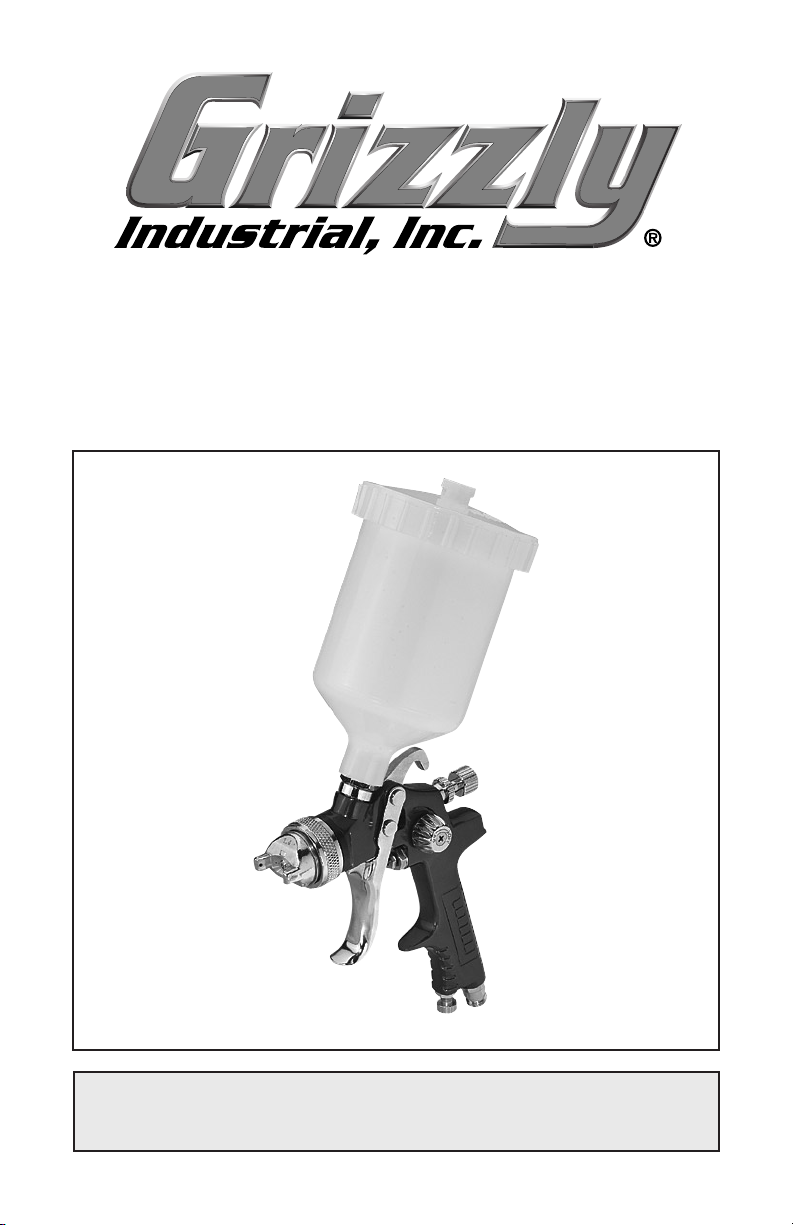
SPRAY GUN
MODEL G5352
INSTRUCTION MANUAL
WARNING: NO PORTION OF THIS MANUAL MAY BE REPRODUCED IN ANY SHAPE
OR FORM WITHOUT THE WRITTEN APPROVAL OF GRIZZLY INDUSTRIAL, INC.
COPYRIGHT © MAY, 2006 BY GRIZZLY INDUSTRIAL, INC.
#PC8211 PRINTED IN TAIWAN
Page 2
SECTION 1: SAFETY
For Your Own Safety Read Instruction Manual
Before Operating This Equipment
The purpose of safety symbols is to attract your attention to possible hazardous conditions. This manual uses a series of symbols and signal words which
are intended to convey the level of importance of the safety messages. The
progression of symbols is described below. Remember that safety messages by
themselves do not eliminate danger and are not a substitute for proper accident
prevention measures.
Indicates an imminently hazardous situation which, if
not avoided, WILL result in death or serious injury.
Indicates a potentially hazardous situation which, if
not avoided, COULD result in death or serious injury.
Indicates a potentially hazardous situation which, if
not avoided, MAY result in minor or moderate injury.
It may also be used to alert against unsafe practices.
NOTICE
This symbol is used to alert the user to useful information about proper operation of the equipment.
Safety Instructions For Pneumatic Tools
1. KEEP ALL SAFETY DEVICES IN
PLACE and in working order.
2. REMOVE ADJUSTING KEYS AND
WRENCHES. Form habit of check-
ing to see that keys and adjusting
wrenches are removed from tool
before operation.
3. KEEP WORK AREA CLEAN
Cluttered areas and benches invite
accidents.
4. DO NOT USE IN DANGEROUS
ENVIRONMENT. Do not use pneu-
matic tools in damp or wet locations, or where any flammable or
noxious fumes may exist. Keep
work area well lighted.
5. KEEP CHILDREN AND VISITORS
AWAY. All children and visitors
should be kept at a safe distance
from work area.
6. MAKE WORKSHOP CHILD
PROOF by locking your shop and
shutting off air valves.
7. DO NOT FORCE TOOL. It will do
.
the job better and safer at the rate
for which it was designed.
8. USE THE RIGHT TOOL. Do not
force tool or attachment to do a job
for which it was not designed.
9. DO NOT USE UNDER THE
INFLUENCE OF DRUGS OR
ALCOHOL.
Model G5352 Spray Gun-2-
Page 3
Safety Instructions For Pneumatic Tools
10. USE PROPER AIR HOSE for the
tool. Make sure your air hose is in
good condition and is long enough to
reach your work without stretching.
11. WEAR PROPER APPAREL. Do not
wear loose clothing, gloves, neck
ties, rings, bracelets, or other jewelry which may get caught in moving
parts. Non-slip footwear is recommended. Wear a protective hair covering to contain long hair.
12. ALWAYS USE SAFETY GLASSES.
Also use a face or dust mask if cutting operation is dusty. Everyday
eyeglasses only have impact resistant lenses—they are NOT safety
glasses.
13. WEAR APPROVED HEARING
PROTECTION. Air escaping from
pneumatic tools can exceed safe
exposure limits and may cause
hearing damage with prolonged
exposure.
14. SECURE WORK. Use clamps or a
vise to hold work when practical. It is
safer than using your hand and frees
both hands to operate tool.
15. MAINTAIN TOOLS WITH CARE.
Keep tools lubricated and clean
for best and safest performance.
Follow instructions for lubricating
and changing accessories.
16. REDUCE THE RISK OF
UNINTENTIONAL STARTING. Do
not carry tool with hand on trig
ger and always disconnect from air
when not in use.
17. DISCONNECT TOOLS before servicing and changing accessories.
18. DO NOT OVERREACH. Keep
proper footing/balance at all times.
19. USE THE RECOMMENDED
-
-
ACCESSORIES. Consult owner’s
manual for recommended acces
sories. The use of improper accessories may cause risk of injury.
20. CHECK FOR DAMAGED PARTS
BEFORE USING.
ing and alignment of parts, broken
parts, part mounting, loose bolts,
and any other conditions that may
affect machine operation. Repair or
replace damaged parts.
21. NEVER LEAVE UNATTENDED
TOOL CONNECTED TO AIR.
Disconnect the air hose and do not
leave tool until it is relieved of any
built up pressure.
22. NEVER ALLOW UNTRAINED
USERS TO USE THIS TOOL
WHILE UNSUPERVISED.
23. IF YOU ARE UNSURE OF THE
INTENDED OPERATION, STOP
USING TOOL. Seek formal training
or research books or magazines
that specialize in pneumatic tools.
24. BE AWARE OF HOSE LOCATION
WHEN USING PNEUMATIC
TOOLS. Hoses can easily become
a tripping hazard when laid across
the floor or spread out in a disorganized fashion.
Check for bind-
-
Model G5352 Spray Gun -3-
Page 4
Additional Safety Instructions for Spray Guns
1. READ THIS MANUAL. This manual
contains proper operating instructions for this spray gun.
2. RE AD MATER IAL LA BE LS
and MATERIAL SAFETY DATA
SHEETS (MSDS). Read and know
all the instructions on the packaging label and the MSDS before
opening the package. This information could save your life.
3. RESPIRATORY PROTECTION.
Always wear a NIOSH approved
respirator when spraying or working around finishing materials.
4. FIRE EXTINGUISHERS. Always
have a fully charged multi-class
or class B fire extinguisher in the
immediate area.
5. FLAMMABLE MATERIAL. NEVER
spray near open flame or where
any spark could occur.
6. FRESH AIR. Always provide adequate exhaust to keep area free of
built-up vapors. NEVER spray in an
enclosed space.
7. DI SC ON NECT COMPRESS ED
AIR. Always disconnect the spray
gun from compressed air before
cleaning, changing attachments or
when performing maintenance of
any kind on this tool.
8. PROTECTIVE CLOTHING. Protect
exposed skin from overspray by
wearing a protective suit or other
approved garment.
9. INAPPROPRIATE USE. DO NOT
point or shoot spray gun directly
at yourself or another person or
animals. Do not attempt to use the
spray gun for any other use than it
was intended.
10. STORAGE. Thoroughly clean and
dry spray gun before storage. Store
in an approved cabinet.
11. SOLVENTS. Always store solvents
and shop towels soaked in solvent
in approved containers.
12. EYE PROTECTION. Wear eye protection whenever spraying or cleaning. Solvents and chemicals can
cause serious eye injury, which
could lead to blindness.
13. OPERATI NG PRESSURE. DO
NOT exceed the recommended
inlet air pressure. Excessive pressure could cause the spray gun to
burst or cause other internal equipment damage.
14. LOCAL LAWS. Consult local
authorities regarding exhaust and
waste disposal requirements.
Model G5352 Spray Gun-4-
Page 5

SECTION 2: INTRODUCTION
Foreword Contact Information
We are proud to offer the Grizzly Model
G5352 Spray Gun. This model is part
of a growing Grizzly family of fine tools.
When used according to the guidelines set
forth in this manual, you can expect years
of trouble-free, enjoyable operation, and
proof of Grizzly’s commitment to customer
satisfaction.
It is our pleasure to provide this manual
with the Model G5352. It was written
to encourage safety considerations and
guide you through general operating procedures and maintenance.
The specifications, details, and photographs in this manual represent the Model
G5352 as supplied when the manual was
prepared. However, owing to Grizzly’s policy of continuous improvement, changes
may be made at any time with no obligation on the part of Grizzly.
If you have any comments regarding this
manual, please write to us at the following
address:
Grizzly Industrial, Inc.
C/O Technical Documentation
P.O. Box 2069
Bellingham, WA 98227-2069
Most importantly, we stand behind our
tools. If you have any service questions or
parts requests, please call or write us at
the location listed below.
Grizzly Industrial, Inc.
1203 Lycoming Mall Circle
Muncy, PA 17756
Phone: (570) 546-9663
Fax: (800) 438-5901
E-Mail: [email protected]
Web Site: http://www.grizzly.com
Read the manual before operation.
Become familiar with this tool, its
safety instructions, and its operation
before beginning any work. Serious
personal injury may result if safety or
operational information is not under
stood or followed.
Model G5352 Spray Gun -5-
-
Page 6
TOOL DATA SHEET
Customer Service #: (570) 546-9663 • To Order Call: (800) 523-4777 • Fax #: (800) 438-5901
GRAVITY FEED SPRAY GUN MODEL
G5352
MODEL G5352
CUP SIZE
TYPE OF FEED
FLUID TIP
AIR CONSUMPTION
INLET AIR
PRESSURE
FLUID PRESSURE
CUP MATERIAL
MAX. PATTERN
WIDTH
BODY MATERIAL
MATERIAL USAGE
WATERBORNE
MATERIAL
COMPATIBLE
600 ml
Gravity
1.4 mm
5 CFM
1.5-3.5 BAR
21-50 PSI
Greater Than
10 PSI
Aluminum
250mm
Painted Metal
Medium
Solids, i.e..
Enamels &
Lacquers
NO
Model G5352 Spray Gun-6-
Page 7

SECTION 3: SET UP
Inventory
Your spray gun left our warehouse in a
carefully packed box. If you discover the
spray gun is damaged after you have
signed for delivery, please immediately
call Customer Service at (570) 546-9663
for advice.
Save the containers and all packing materials for possible inspection by the carrier or
its agent. Otherwise, filing a freight claim
can be difficult.
After you have unpacked the carton you
should find the following:
Model G5352 Inventory (Figure 1)
A. Large Spray Gun ............................... 1
B. Cup .................................................... 1
C. Service Wrench .................................. 1
D. Cleaning Brush .................................. 1
E. Baffle Wrench .................................... 1
F. Spare Filter ........................................ 1
Assembly
Prior to assembling and using the spray
gun, it is essential that all parts be thoroughly cleaned and dried. Please refer to
Cleaning in the MAINTENANCE section
on Page 13 for more detailed instructions.
Make sure all connections are tight enough
to prevent air leaks but not so tight as to
damage the tool.
To assemble the spray gun :
1. Insert the filter into the gun body (see
Figure 2).
B
E
D
Figure 1. Model G5352 inventory.
Model G5352 Spray Gun -7-
A
F
C
Figure 2. Installing filter.
Continued on next page
Page 8
2. Screw the cup onto the top of the
body.
3. Attach the air hose directly to the air fit-
ting on the spray gun or with a 1⁄4" NPT
quick connect fitting (not included).
4. Attach the spray gun to a filtered, regu-
lated air source. See the Tool Data
Sheet on Page 8 for your spray gun air
requirements.
Note: For the best results, use a hose
that will be dedicated for spray use
only. Do not use a hose that has been
used with an in-line oiler or other possible contaminant.
If you need additional help with this assembly, call our Technical Support at: (570)
546-9663.
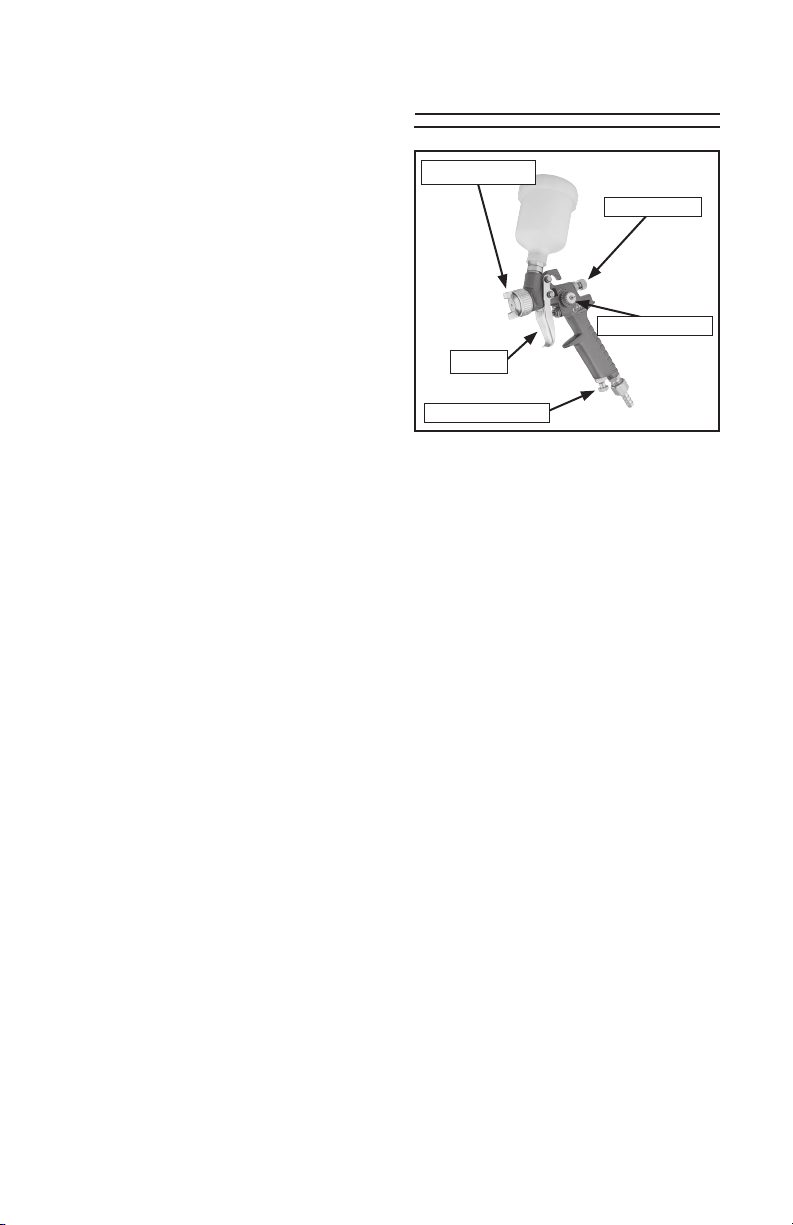
Controls
Atomizing Cap
Fluid Control
Pattern Control
Trigger
Air Flow Control
Figure 3. Controls.
1. Fluid Control: Controls the volume of
material that travels through the fluid
tip.
2. Pattern Control: Adjusts the spray
pattern from a round pattern to a wide
fan.
3. Air Flow Control: Controls the fluid
pressure inside the spray gun.
4. Atomizing Cap: Controls the spray
pattern from vertical to horizontal.
5. Trigger: Two stage trigger. Stage
one only releases compressed air for
blowing off the work piece. Stage two
sprays material. Lightly squeeze the
trigger for stage one. Squeeze the
trigger all the way to spray.
Model G5352 Spray Gun-8-
Page 9

SECTION 4: OPERATIONS
EXPLOSION HAZARD! DO NOT
smoke or have any source of flame
or spark near spraying. Vapors will
explode if ignited.
RESPIRATORY HAZARD! Always use
a NIOSH approved respirator when
using spray equipment. Failure to
protect your lungs can lead to respiratory illness and nervous system
damage.
Spraying
The Model G5352 gravity feed spray gun
set is designed to spray a wide variety
of materials such as lacquers, stains,
primers, multi-component paints, clear
coats, acrylics, epoxies etc. It is ideal for
auto body and woodworking projects. The
spray guns are not designed to be used
with waterborne materials.
To use your spray gun :
1. Read and follow the material manufac-
turer's instructions for spraying, mixing,
safety, disposal, and any other instruction on the label or Material Safety Data
Sheet (MSDS).
2. Ensure the cup is securely tightened
and all other fittings are secure to avoid
air leaks or material spills.
3. Set the inlet air pressure (the air com-
ing to the spray gun) to the lowest
pressure recommended in Tool Data
Sheet on Page 6 or to the material
manufacturer's recommendations.
4. Adjust the atomizing cap to vertical or
horizontal. See Atomizing Cap and
Fan Adjustments on Page 11 for further explanation.
5. Fill the cup with material.
TOXIC FUMES ! Always use an
approved spray booth or well ventilated area when spraying. NEVER
spray in a confined space where
toxic fumes and flammable vapors
can accumulate to deadly levels.
Model G5352 Spray Gun -9-
6. Trial and error are necessary to achieve
the results you want along with a fair
amount of practice. Test your material
flow and spray pattern on a piece of
cardboard or some scrap of material
similar to your project.
Page 10
7. Adjust the fluid control knob to start
with a low volume of material and keep
the atomization as low as possible.
You will need to use a combination of
fluid control, inlet air pressure, air flow
control and stroke speed to achieve the
results you want. Spray so the material
wets out nicely without running or sagging.
8. Use the pattern control knob to adjust
the spray fan to your desired pattern.
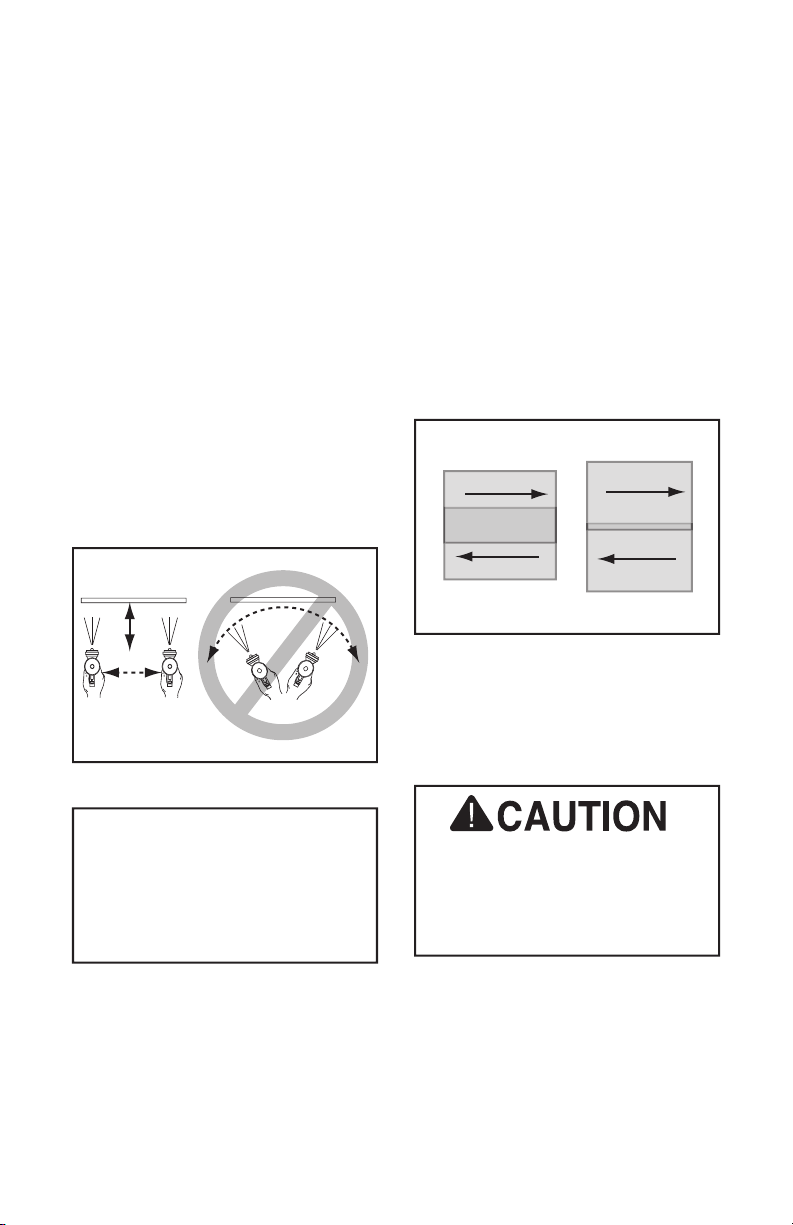
9. Keep the gun tip perpendicular, parallel
and 8-10" from the work at all times
when spraying as shown in Figure
4. Do not allow your wrist to bend.
This will cause the gun to arc across
the surface and distribute the material
unevenly, possibly creating sags and
dry spots.
10. Begin spraying 2-3 inches before the
work and continue to the end of the
work. Continue the motion for a few
inches past the work until you are
ready for the return stroke.
11. Maintain an even speed when spraying.
12. Overlap each stroke by 50%. This will
ensure even coverage as shown in
Figure 5. Overlapping less than 50%,
as shown in the figure to the right,
may lead to missed spots or streaky
results.
Figure 4. Spray technique.
NOTICE
Tipping the spray gun may cause
material to spill out of the cup. Always
hold the spray gun perpendicular to
the ground to avoid potential spills
and feed problems.
Yes
Figure 5. Overlap technique.
13. The spray stroke should have even con-
sistency and parallel edges. If it doesn't,
please refer to Troubleshooting on
Page 15.
CONTAMINATION HAZARD! Dispose
of paint waste in a responsible manner! Follow manufacturer's recommendations and local laws regarding
disposal.
Model G5352 Spray Gun-10-
No
Page 11
Atomizing Cap and
Fan Adjustments
Pattern Control
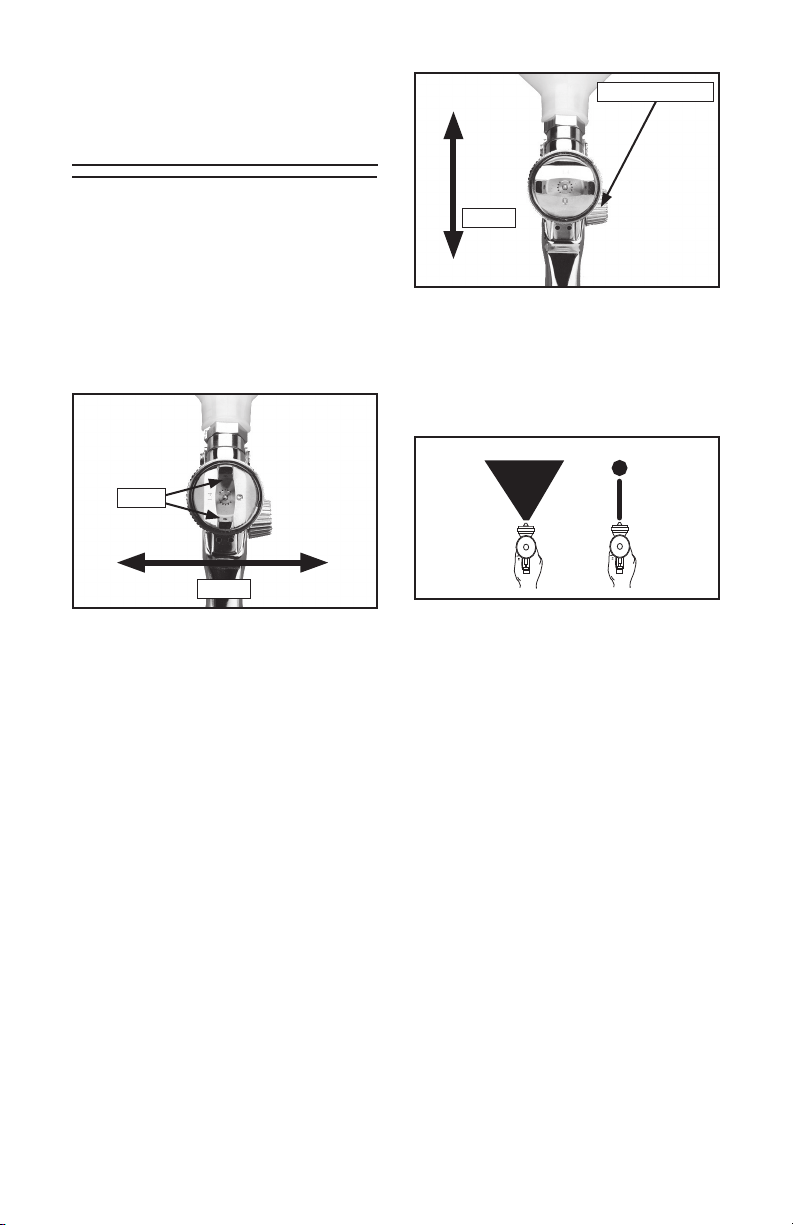
The atomizing cap needs to be adjusted
for horizontal or vertical spraying patterns.
Spraying in the wrong direction may lead
to material build up on the atomizing cap
horn. Many performance problems are
caused by clogged atomizing holes on the
atomizing cap horns (see Cleaning on
Page 13).
Holes
Stroke
Figure 6. Set up for horizontal stroke
direction with vertical fan pattern.
Stroke
Figure 7. Set up for vertical spray stroke
with horizontal fan pattern.
Rotating the pattern adjustment control in
Figure
7 will give you a range between the
two patterns in Figure 8.
Figure 8. Fan adjustment.
Model G5352 Spray Gun -11-
Page 12
SECTION 5: ACCESSORIES
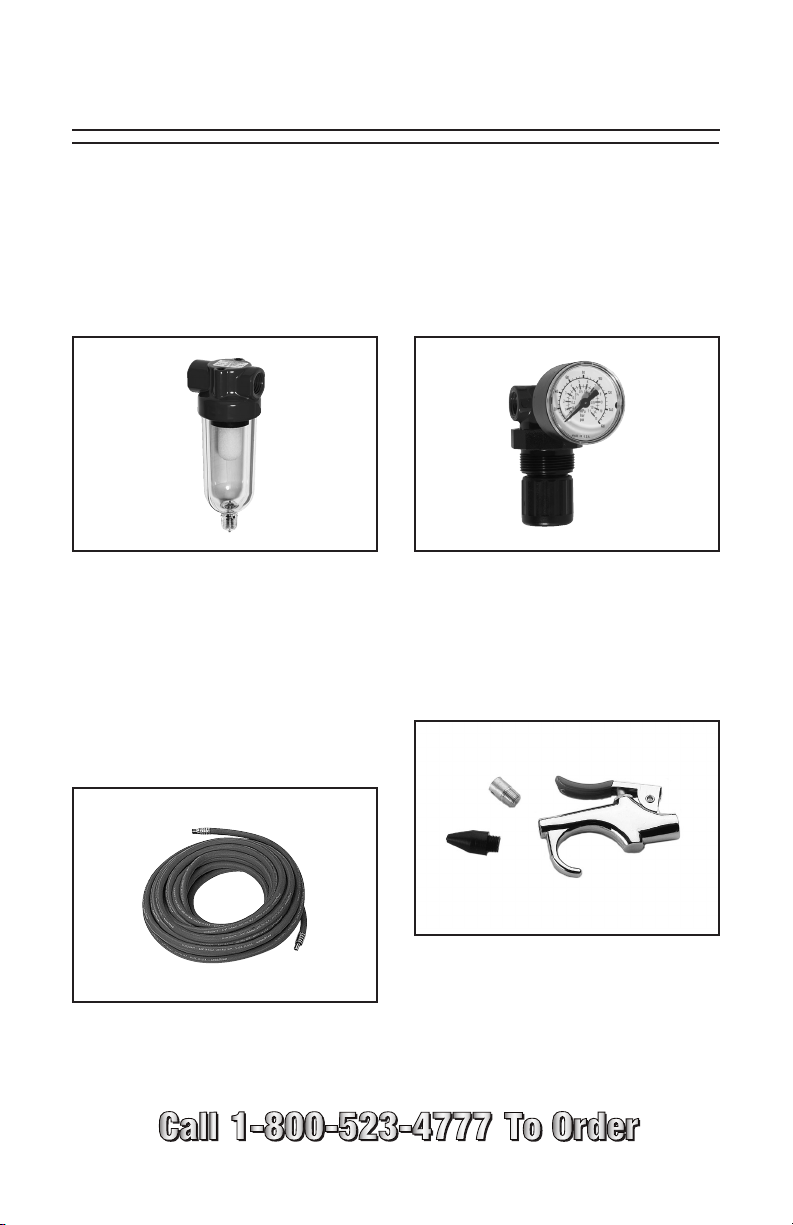
G62 61— Campbell Hausfeld™ Water
Filter
Remove damaging water vapor before it
reaches your pneumatic tools. This highly
effective, five micron filter features a seethrough bowl and easy in-line connections.
150 PSI maximum air pressure. 1⁄4" NPT.
Figure 9. G6261 Campbell Hausfeld™
water filter.
G8114—3⁄8 " x 25 Ft. Air Hose
G8115—3⁄8 " x 50 Ft. Air Hose
G8116—3⁄8 " x 100 Ft. Air Hose
Multi-purpose red rubber air hose is flexible and abrasion resistant. Rated for 200
PSI, this air hose has a bursting strength
of 800 PSI and 1⁄4" NPT ends.
H7274— Campbell Hausfeld™ Pressure
Regulator
Mini Series. Provides regulated output
pressure of 0 to 125 PSI for proper tool
operation. Locking pressure knob prevents
accidental adjustments. 15 SCFM flow
capacity @ 90 PSI. 1⁄4" NPT.
Figure 11. H7274 Campbell Hausfeld™
pressure regulator.
H3174—Air Blow Gun with 2 Tips
This air blow gun includes a safety tip and
rubber tip for all normal air cleaning jobs.
1
⁄4" NPT .
Figure 10. Red rubber air hose.
Figure 12. H3174 Air Blow Gun with 2
Tips.
Model G5352 Spray Gun-12-
Page 13
SECTION 6: MAINTENANCE
Cleaning
Proper cleaning is the best way to ensure
trouble free performance from your spray
gun. If your gun is not thoroughly cleaned,
damage and poor spraying will result.
Problems caused by improper cleaning will
not be covered by the warranty. Clean the
spray gun immediately after each use.
To clean your spray gun:
1. Spray a small amount of solvent
through the spray gun.
Note: Check with local laws regarding
this practice. If you are spraying on a
regular basis, spraying solvents into
the air may be illegal. A cabinet style
spray gun cleaner may be required.
2. Disconnect the gun from the com-
pressed air!
3. Unscrew the cup.
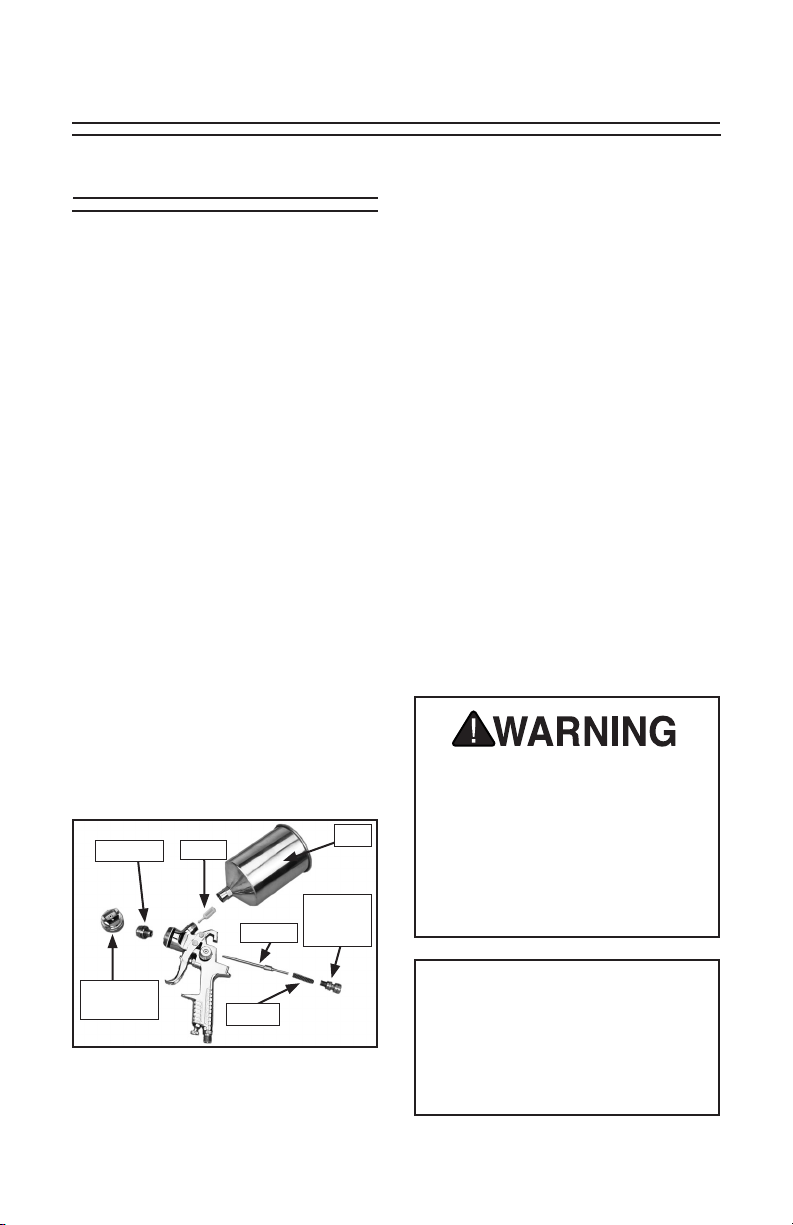
5. Unscrew the atomizing cap with your
fingers and the fluid tip with the service wrench. The fully disassembled
gun should look like Figure 13.
6. Rinse these parts thoroughly in solvent, then dry with compressed air or
let air dry.
Note: If the small holes in the atomiz-
ing cap become blocked, soak in clean
solvent. If the blockage still exists,
clear the blockage with a small needle,
taking great care to not enlarge or
damage the hole. Damage to the hole
will create a disrupted spray pattern.
7. Use the cleaning brush with solvent to
clean the inner orifice and other hard
to reach areas on the outside of the
spray gun body.
8. Wipe the rest of the gun body with a
shop towel and dry.
4. Unscrew the fluid control knob and
remove the spring and needle.
Fluid Tip
Atomizing
Cap
Figure 13. Disassembly for cleaning.
Model G5352 Spray Gun -13-
Filter
Needle
Spring
Cup
Fluid
Control
Knob
EXPLOSION HAZARD! Chlorinated
Solvents like 1,1,1-Tricloroethane
and Methylene Chloride (methyl
chloride) can chemically react with
aluminum and may explode. Many
parts in spray guns are made of aluminum. Read solvent label carefully
before using solvent.
NOTICE
DO NOT soak the spray gun body in
solvent. Prolonged exposure to solvent will rapidly deteriorate the spray
gun washers and seals. Ignoring this
notice will void your warranty.
Page 14
Lubrication
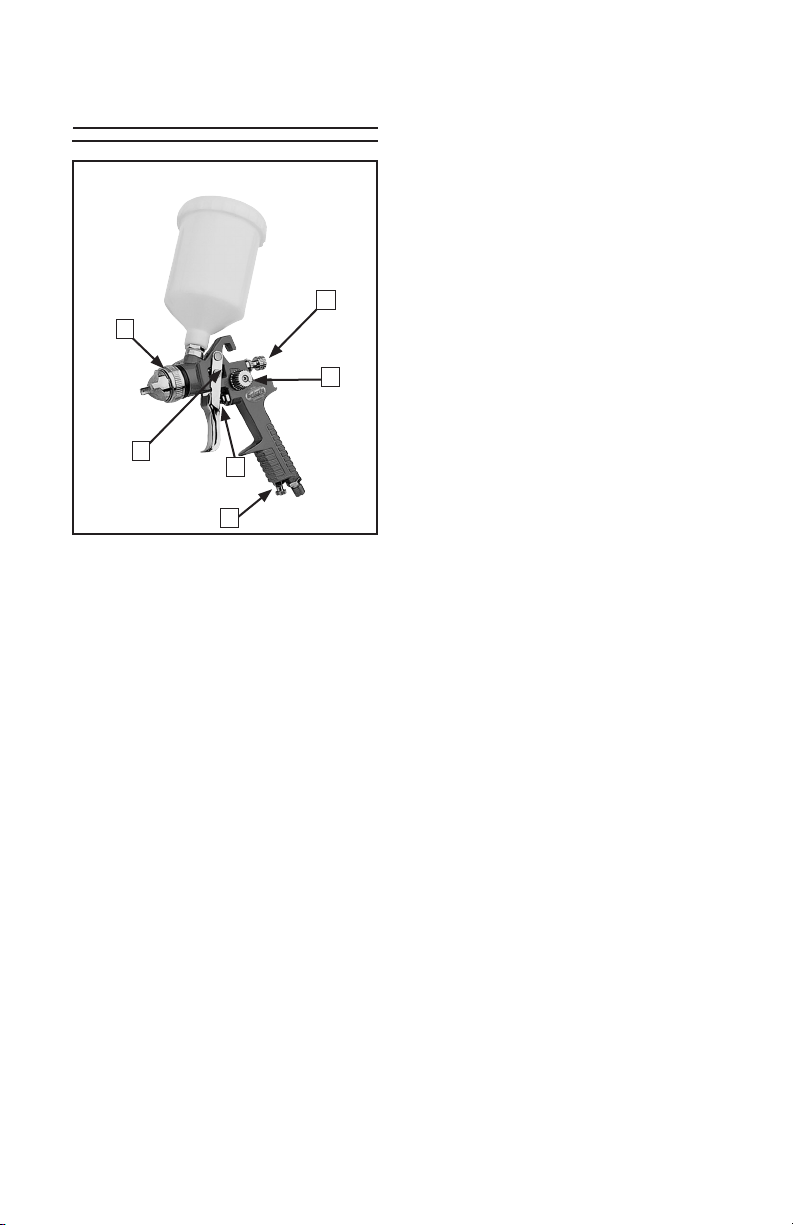
Lubricate the following areas with a nonsilicon spray gun lubricant after cleaning.
A. Atomizing Cap Threads
B. Air Valve Packing
C. Trigger Pin
D. Air Flow Control Valve
E. Pattern Control
F. Fluid Control Knob
A
B
Figure 14. Lubrication points.
C
D
F
E
Allow the lubricant to coat threads, and run
into gun body to lubricate all moving parts
and seals.
Model G5352 Spray Gun-14-
Page 15
Troubleshooting
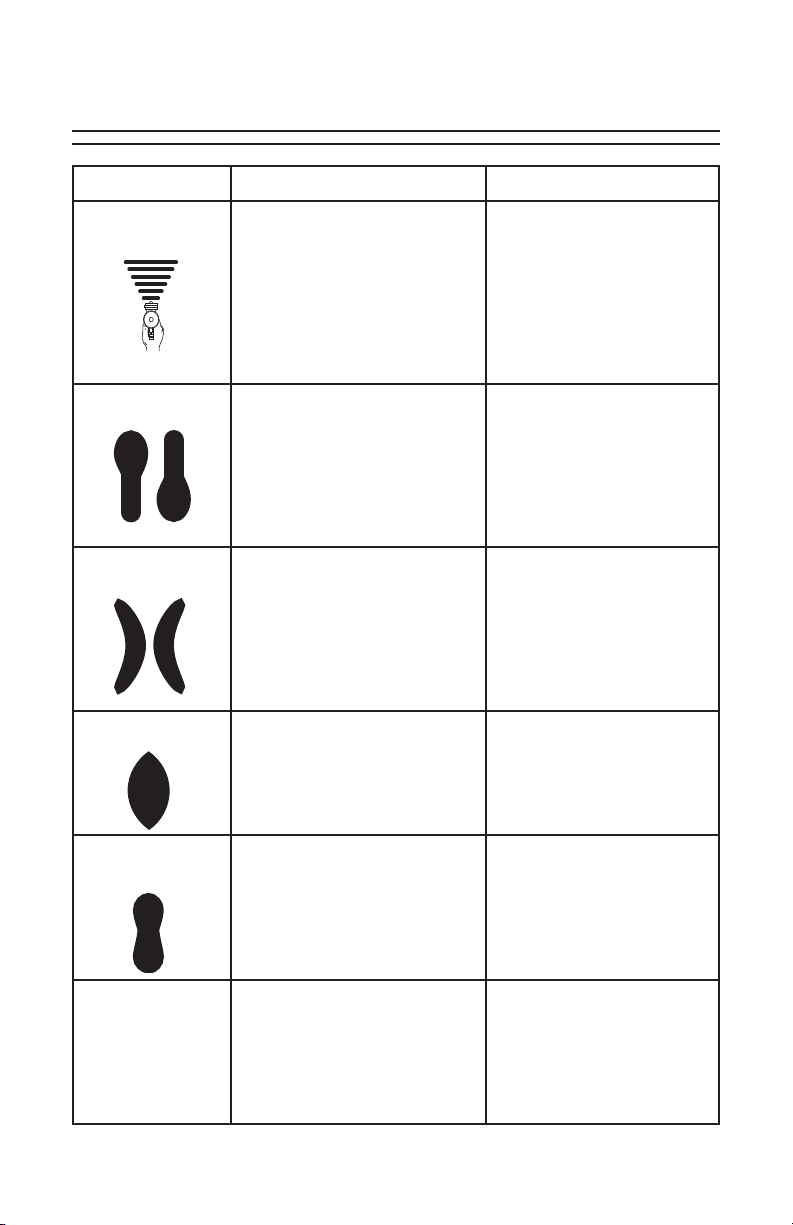
Symptom Possible Cause Solution
Fluttering or spitting
spray.
1. Dry or worn fluid tip seat permits air to seep into fluid passage.
1. Tighten fluid tip or replace
seat with new one.
Uneven top or bot
tom pattern.
Right or left arc
pattern.
Heavy deposit of
material in center
Narrow center pat
tern.
2. Material level too low.
3. Fluid tip or filter obstructed.
4. Dry needle packing.
-
1. Atomizing cap holes are
obstructed.
2. Build-up on top or bottom of
3. Build-up on atomizing cap is
1. Left or right side horn holes
2. Build-up on left or right side of
3. Build-up of material inside
1. The material flow exceeds the
.
2. Inlet air pressure is too low.
3. Material is too thick.
-
1. Volume control turned in too
2. Inlet air pressure too high.
.
fluid tip
on needle seat
are plugged.
fluid tip
atomizing cap.
atomizing cap capacity.
far.
.
.
2. Add material.
3. Clean.
4. Lubricate needle.
1. Clear holes.
2. Clean.
3. Clean.
1. Clear holes.
2. Clean.
3. Clean.
1. Lower fluid flow.
2. Increase inlet air pressure.
3. Thin material.
1. Increase volume.
2. Reduce inlet air pressure.
3. Fluid pressure is too low.
4. Material is too thin.
No spray output
Model G5352 Spray Gun -15-
. 1. No pressure at gun.
2. Fluid passages dirty.
3. Fluid control closed.
4. Out of paint.
5. Material too thick.
3. Increase fluid pressure.
4. Adjust material.
1. Check air supply.
2. Clean gun, remove any
obstructions.
3. Open.
4. Refill.
5. Thin to manufacturer's rec
ommendations.
-
Page 16

Symptom Possible Cause Solution
Excessive overspray.
Unable to control
spray fan.
Runs and sags. 1. Damaged seal. 1. Replace damaged seals.
Material leaks from
cup.
Material leaks from
gun.
Thick dimpled fin
ish: orange peel
appearance.
Dry Spray.
Gun leaks from
fluid tip.
Contaminated
paint: fish eye
appearance.
1. Fluid pressure too high.
2. Gun is too far from surface.
3. Spraying too fast.
1. Pattern adjustment screw is
not seating properly
2. Atomizing cap is loose.
1. Cap not secure.
2. Cup not tight on gun body.
3. Leaking from cap vent hole.
1. Fluid tip loose.
2. Dry or damaged seals.
3. Excessive pressure.
-
1. Holding gun too close to surface.
2. Inlet air pressure too low.
3. Material not properly mixed.
4. Surface is dirty or oily.
1. Inlet air pressure too high.
2. Gun too far from surface.
3. Gun stroke too fast.
1. Debris will not let the needle
seat with the fluid tip.
1. Water or oil in the air line. 1. Install an in-line air filter.
.
1. Reduce fluid pressure.
2. Keep gun at recommended
distance.
3. Slow down and maintain
consistent, even parallel
stroke.
1. Clean or replace.
2. Tighten atomizing cap.
1. Tighten
2. Tighten.
3. Hold gun upright, do not tilt.
1. Tighten.
2. Replace
3. Reduce pressure.
1. Spray at recommended dis-
2. Check inlet air pressure.
3. Follow manufacturer's
4. More surface prep is
1. Lower inlet air pressure.
2. Keep gun at recommended
3. Slow down and maintain
1. Clean or replace both.
2. Replace air line.
.
seals.
tance.
instructions.
required.
distance.
consistent even parallel
stroke.
Model G5352 Spray Gun-16-
Page 17
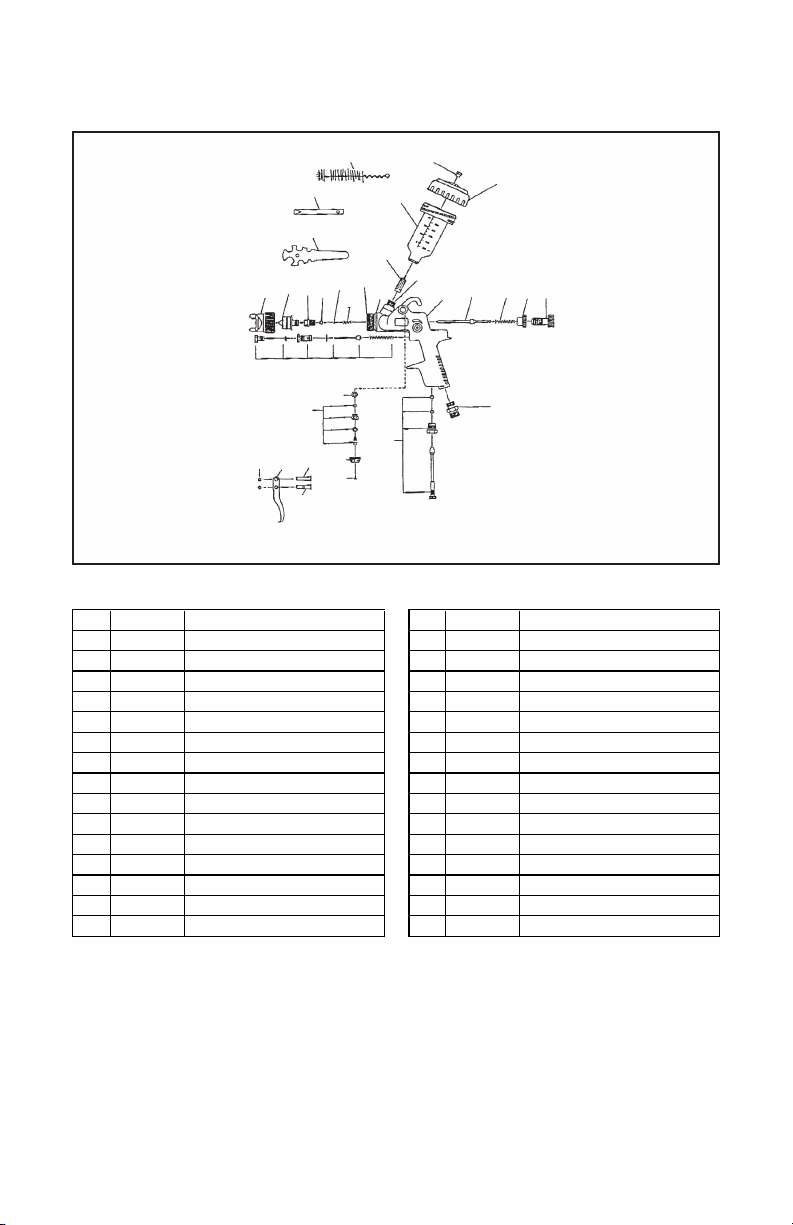
Parts Breakdown G5352
REF PART # DESCRIPTION REF PART # DESCRIPTION
1 P5352001 AIR NOZZLE WITH BRASS CAP 17 P5352017 LOCK FLUID CONTROL KNOB
2 P5352002 FLUID NOZZLE 18 P5352018 FLUID CONTROL KNOB
3 P5352003 PACKING SCREW 19 P5352019 COUNTERSUNK SCREW
4 P5352004 TEFLON SEAL 20 P5352020 NON-DRIP CONTROL DEVICE
5 P5352005 WASHER 21 P5352021 TRIGGER
6 P5352006 COMPRESSION SPRING 22 P5352022 SCREW
7 P5352007 BRASS RING 23 P5352023 PIN
8 P5352008 GASKET 24 P5352024 AIR CONNECTION PIECE
9 P5352009 CONNECTOR FOR 0.6 CUP 25 P5352025 MATERIAL SLEEVE
10 P5352010 GUN BODY 26 P5352026 PLASTIC CUP
11 P5352011 AIR VALVE ASSEMBLY 27 P5352027 COVER
12 P5352012 SPRAY REGULATING NUT 28 P5352028 SERVICE WRENCH
13 P5352013 CONTROL KNOB 29 P5352029 BAFFLE WRENCH
14 P5352014 PAINT NEEDLE COMPLETE 30 P5352030 CLEANING BRUSH
15 P5352015 SPRING FOR PAINT NEEDLE 31 P5352031 AIR ADJUSTING VALVE ASSY
16 P5352016 GASKET 32 P5352032 E-RING
Model G5352 Spray Gun -17-
Page 18

WARRANTY AND RETURNS
Grizzly Industrial, Inc. warrants every product it sells for a period of 1 year to the original
purchaser from the date of purchase. This warranty does not apply to defects due directly
or indirectly to misuse, abuse, negligence, accidents, repairs or alterations or lack of
maintenance. This is Grizzly’s sole written warranty and any and all warranties that may
be implied by law, including any merchantability or fitness, for any particular purpose, are
hereby limited to the duration of this written warranty. We do not warrant or represent that
the merchandise complies with the provisions of any law or acts unless the manufacturer so
warrants. In no event shall Grizzly’s liability under this warranty exceed the purchase price
paid for the product and any legal actions brought against Grizzly shall be tried in the State
of Washington, County of Whatcom.
We shall in no event be liable for death, injuries to persons or property or for incidental,
contingent, special, or consequential damages arising from the use of our products.
To take advantage of this warranty, contact us by mail or phone and give us all the details.
We will then issue you a “Return Authorization Number,” which must be clearly posted on
the outside as well as the inside of the carton. We will not accept any item back without this
number. Proof of purchase must accompany the merchandise.
The manufacturers reserve the right to change specifications at any time because they
constantly strive to achieve better quality equipment. We make every effort to ensure that
our products meet high quality and durability standards and we hope you never need to
use this warranty.
Please feel free to write or call us if you have any questions about the machine or the
manual.
Grizzly Industrial, Inc.
1203 Lycoming Mall Circle
Muncy, PA 17756
Phone: (570) 546-9663
Fax: (800) 438-5901
E-Mail:
Web Site: http://www.grizzly.com
Thank you again for your business and continued support. We hope to serve you again
soon!
Model G5352 Spray Gun-18-
Page 19

WARRANTY CARD
Name _________________________________________________________________
Street _________________________________________________________________
City _______________________ State _________________________ Zip _________
Phone # ____________________
Model # ____________________ Order # _______________________ Serial # ______
The following information is given on a voluntary basis. It will be used for marketing purposes to
help us develop better products and services.
Email ________________________ Invoice # _____
All information is strictly confidential.
1. How did you learn about us?
____
____Card Deck ____Website Other:________________________
2. Which of the following magazines do you subscribe to?
____ Cabinet Maker
____ Family Handyman
____ Hand Loader
____ Handy
____ Home Shop Machinist
____ Journal of Light Cont.
____ Live Steam
____ Model Airplane News
____ Modeltec
____ Old House Journal
3. What is your annual household income?
4. What is your age group?
5. How long have you been a woodworker/metalworker?
6. How many of your machines or tools are Grizzly?
7. Do you think your machine represents a good value? ____Yes ____No
Advertisement ____Friend ____Catalog
____ Popular Mechanics
____ Popular Science
____ Popular Woodworking
____ Practical Homeowner
____ Precision Shooter
____ Projects in Metal
____ RC Modeler
____ Rifle
____ Shop Notes
____ Shotgun News
____$20,000-$29,000 ____$30,000-$39,000 ____$40,000-$49,000
____$50,000-$59,000 ____$60,000-$69,000 ____$70,000+
____20-29 ____30-39 ____40-49
____50-59 ____60-69 ____70+
____0-2 Years ____2-8 Years ____8-20 Years ____20+ Years
____0-2 ____3-5 ____6-9 ____10+
____ Today’s Homeowner
____ Wood
____ Wooden Boat
____ Woodshop News
____ Woodsmith
____ Woodwork
____ Woodworker West
____ Woodworker’s Journal
____ Other:
8. Would you recommend Grizzly Industrial to a friend? ____Yes ____No
9. Would you allow us to use your name as a reference for our customers in your area?
Note: We never use names more than 3 times.
10. Comments: _________________________________________________________
______________________________________________________________________
______________________________________________________________________
______________________________________________________________________
____Yes ____No
Page 20
Send a Grizzly Catalog to a friend:
Name________________________________
Street________________________________
City______________State______Zip_______
FOLD ALONG DOTTED LINE
GRIZZLY INDUSTRIAL, INC.
P.O. BOX 2069
BELLINGHAM, WA 98227-2069
TAPE ALONG EDGES--PLEASE DO NOT STAPLE
Place
Stamp
Here
 Loading...