

Page 1
www.gritomatic.com
MANUAL
GUIDE
Page 2
www.gritomatic.com
1 TECHNICAL SPECIFICATIONS AND FEATURES.
Dimensions and weight:
- Knife sharpener dimensions (ready to work) 60.6 19 26.5 cmх х
- Knife sharpener weight 2.5 kg (6 lbs)
Features of the Hapstone knife sharpener:
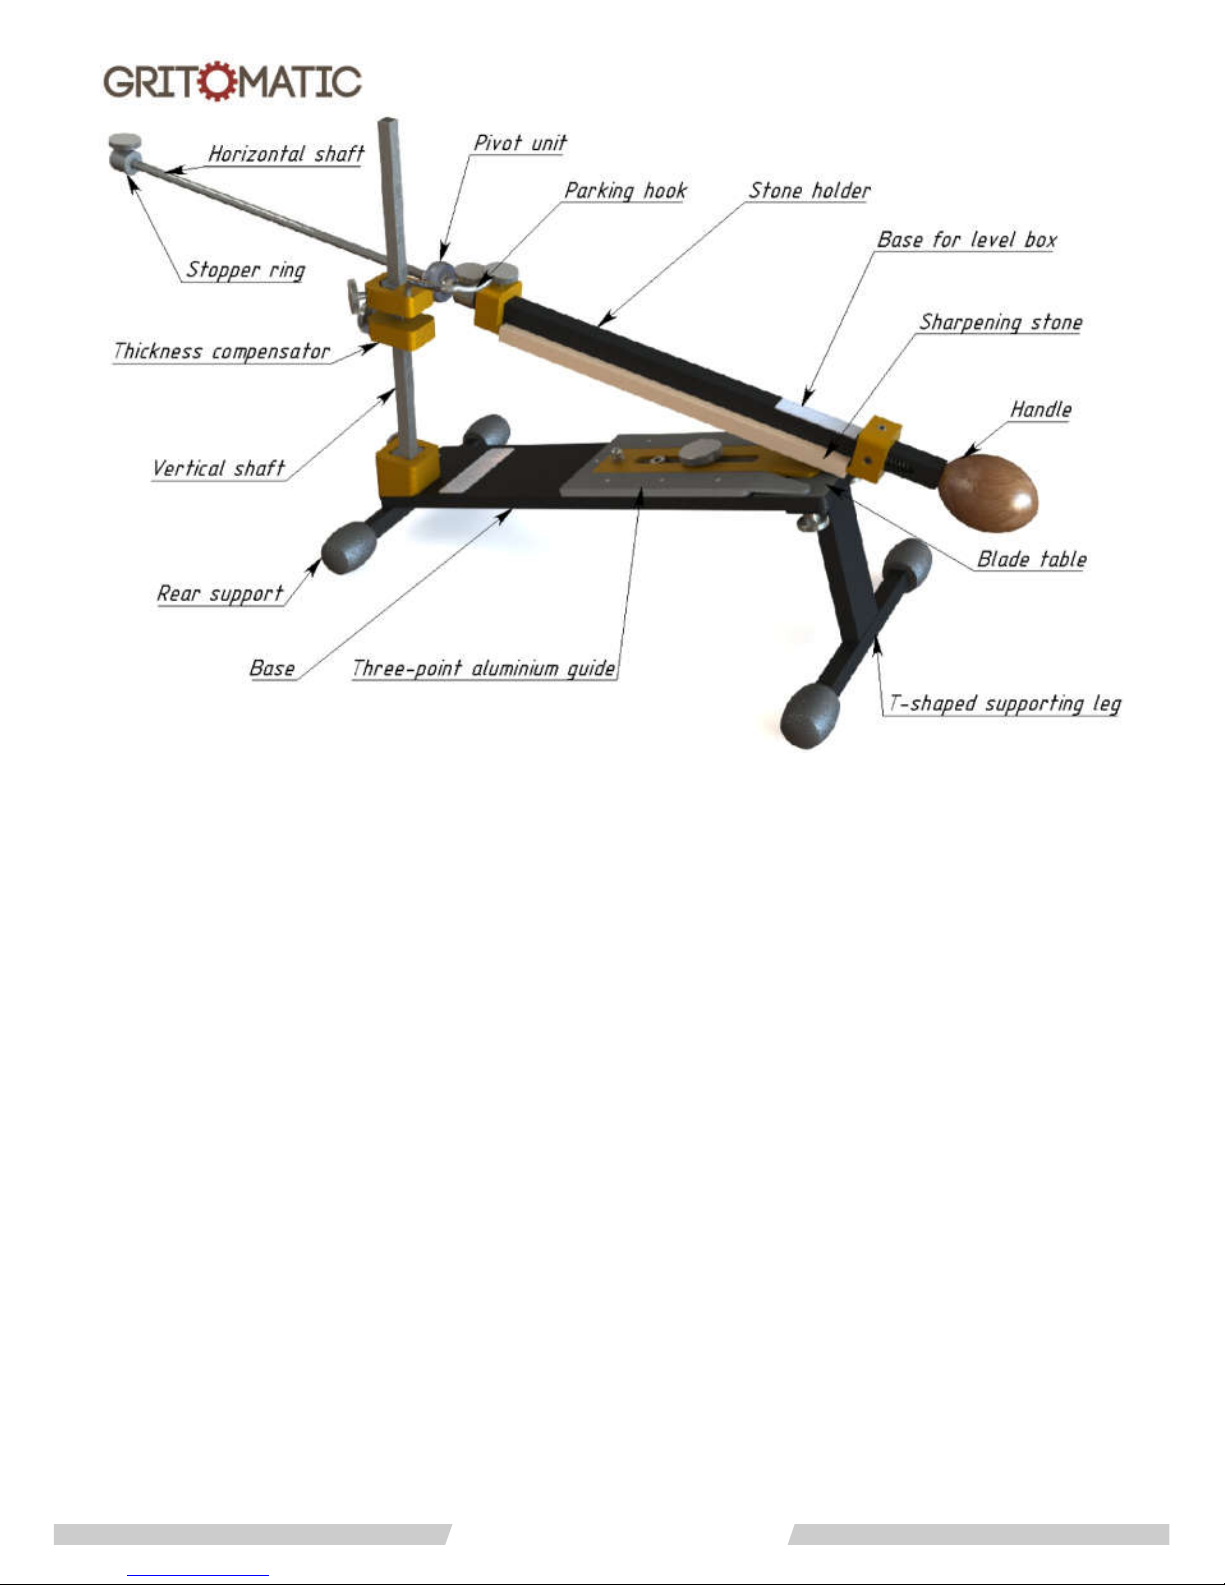
- High-precision universal stone holder and pivot rod of new “square” design
- Pivot unit and pivot rod holder with “zero wobble” inserts.
- Anodized coating for extra durability
- All parts including thumbs made of metal
- Suitable for sharpening stones up to 210 mm
- Full compatibility with Edge Pro and KME stones
- Thickness compensator allowing for sharpening stones of different thicknesses
- Rubber covered blade table to protect your knives from scratches
- Strong neodymium magnet to facilitate knife fastening
- Rubber coated supporting legs that can be used on any surface
- No-tool assembly for fast deployment and mobility
- Any sharpening angle in a range from 11 to 43 degree
- Three Point Guide for a high-precision knife positioning
- Light-alloy horizontal shaft for better pressure control during the sharpening process
- Parking hook for horizontal shaft
Page 3
www.gritomatic.com
- Metal pivot unit with PTFE insert provides smooth shaft movement and requires no
lubrication or cleaning
- Spring for quick changes to the sharpening stone
- Stopper rings to limit the movement of the horizontal shaft
- Wooden handle to make time-consuming work a little easier
2. STANDARD CONFIGURATION
- Hapstone V7 knife sharpener (disassembled) 1 pc.
- Black marker 1 pc.
- Sharpening stone set 1 pc.
- Manual 1 pc.
- Carton box 1 pc.
3. SETUP INSTRUCTIONS
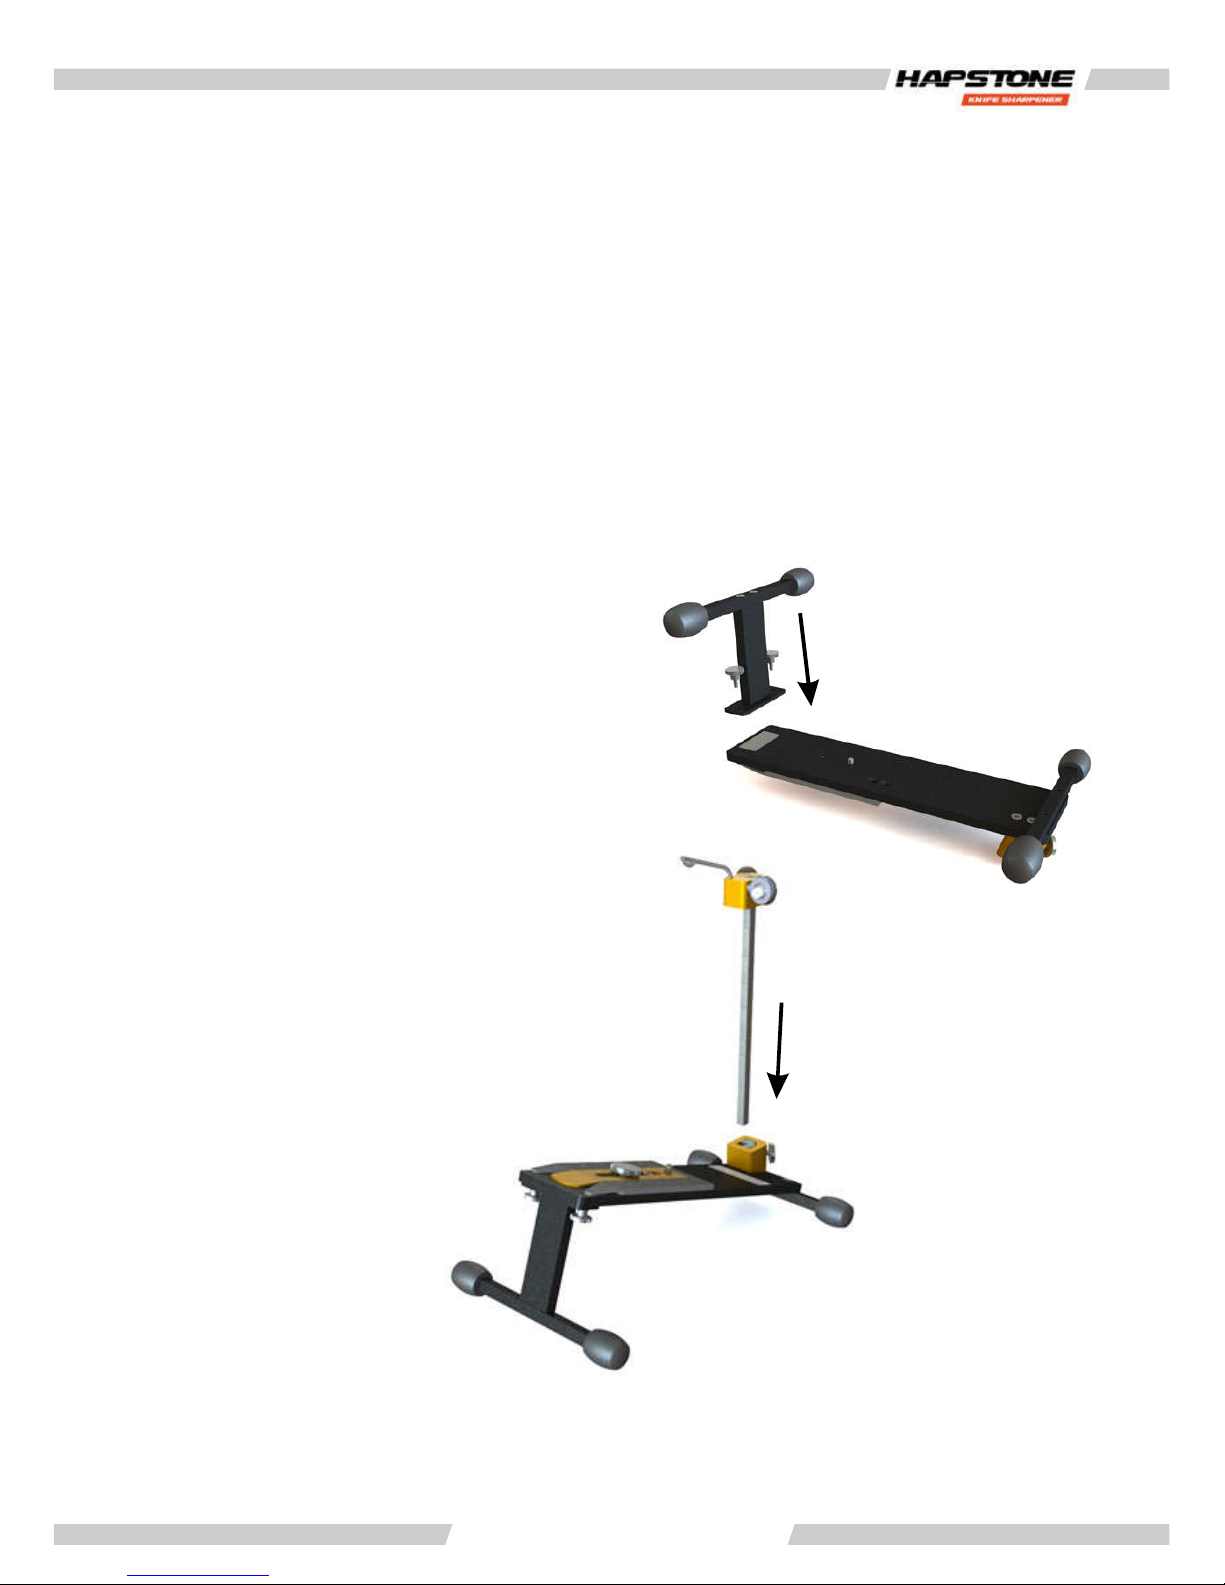
Attach the T-shaped supporting leg to the
base of the knife sharpener and secure
with 2 thumb screws. The thumb screws
of the T-shaped supporting legs should
be tightened only when the sharpener is
positioned on the surface.
Install the pivot rod on the back side of the
base, as shown in the gure. Secure all
thumb screws.
Page 4
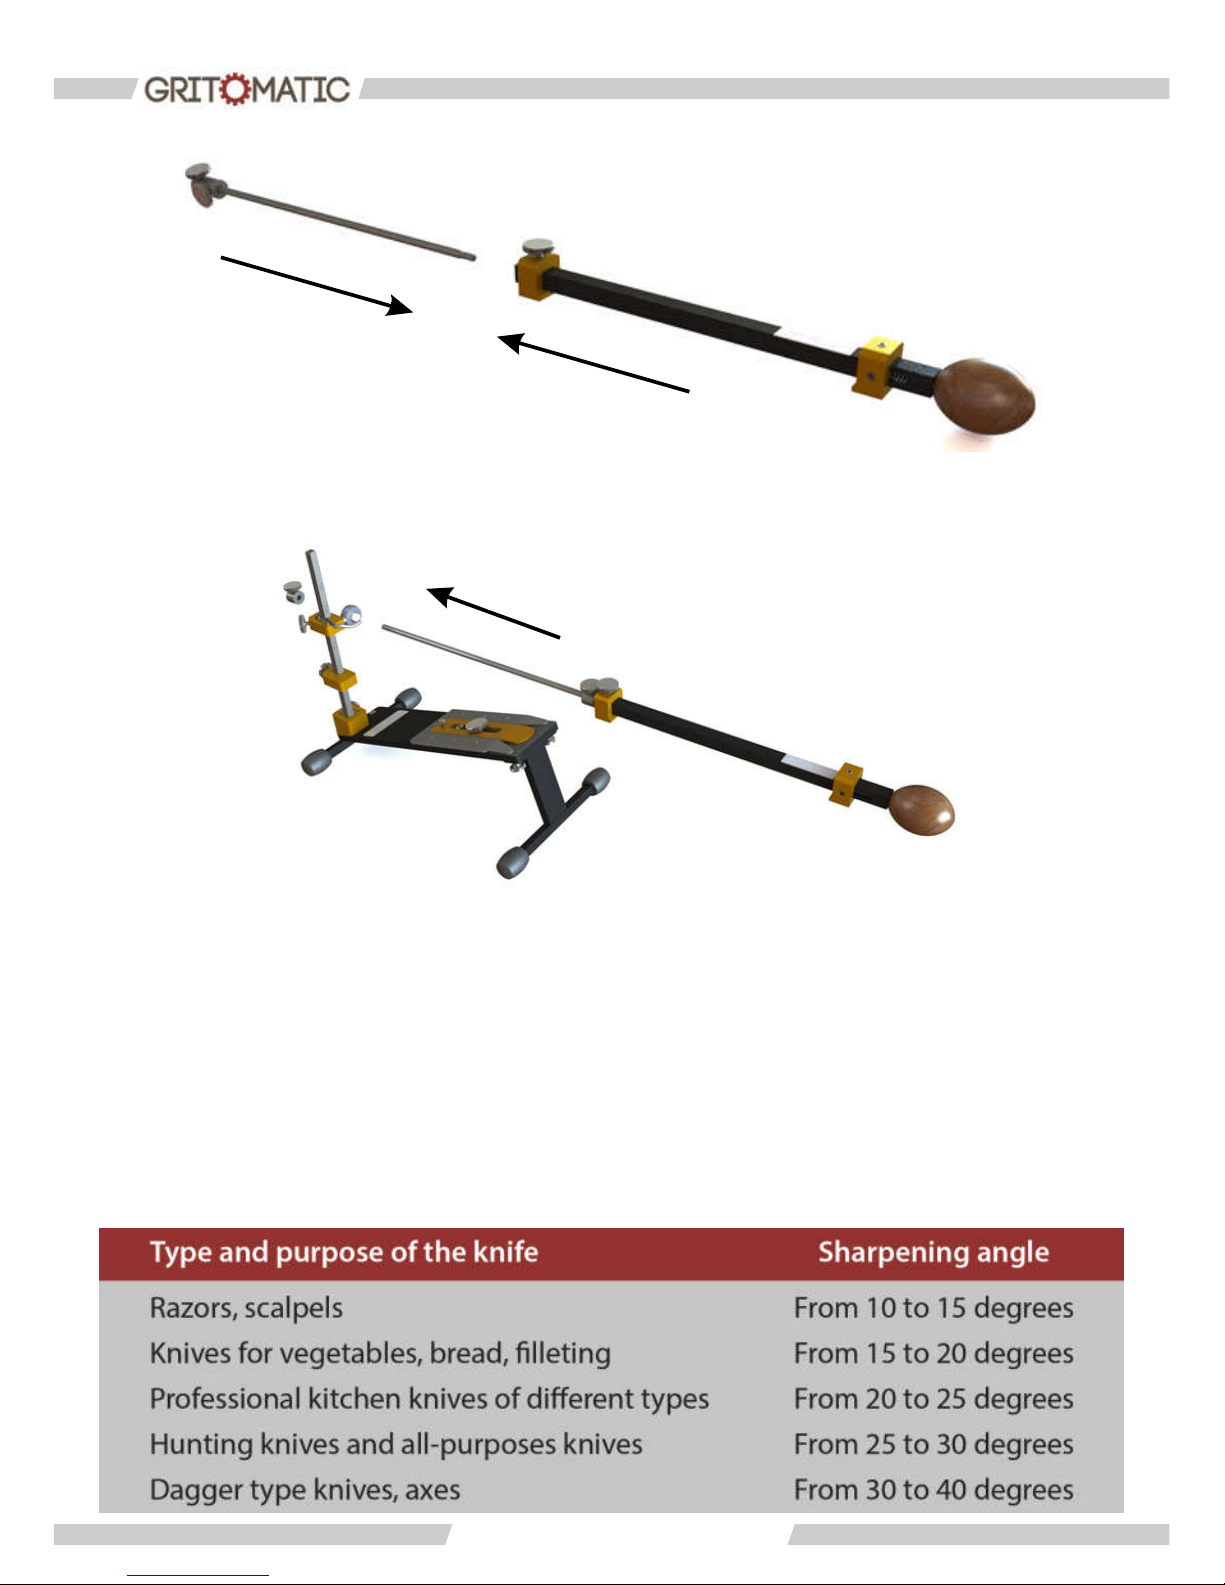
Connect the two parts of the horizontal shaft together.
www.gritomatic.com
Insert the horizontal shaft into the pivot unit. The pivot unit should be installed between
two stopper rings. Remove a stopper ring if necessary. Stopper ring is a safety feature
that limits the movement of the shaft.
4. PRE-OPERATION INSTRUCTIONS
4.1.Setting the sharpening angle
Before sharpening a knife, it is the necessary to choose the sharpening angle. The
sharpening angle chosen depends on the type of knife steel or purpose for which the
knife is to be used. The smaller the sharpening angle, the thinner the cutting edge on the
knife and, consequently, the sharper the blade that is obtained. But it should be
remembered that sharp blades are easier to damage when used, especially if hard
surfaces are cut. Thus, you have to nd an optimum angle that makes the knife sharp
enough for your needs, but not too easily damaged. Recommendations for the choice of
sharpening angle (in accordance with the type of the knife) are given in the chart below:
Page 5
www.gritomatic.com
Note: When you read about knife sharpening, you may come across the term “full
sharpening angle.” This means the sum of the two angles used to sharpen both sides of a
blade (e.g. 15 one side + 15 the other side = 30 full sharpening angle). As a result, when
using the Hapstone, you need to divide the value of the full angle by 2 to get the value of
the angle you need to set on the Hapstone.
You'll see angle marks for knife sharpening (at 15, 18, 20, 25, 30, 35 and 40 degrees) on
the pivot rod of the Hapstone knife sharpener. On the lower part of the pivot rod, there is
a mark with the smallest angle value, on the upper part, the largest.
Note. The actual sharpening angle also depends on the thickness of the knife spine. The
thicker the knife spine is, the less the actual angle is. For example, if the knife thickness is
3 mm, the knife sharpening half angle is reduced by about 2 degrees. Keep this in mind
when sharpening.
4 2 . .Using the thickness compensator
Because the sharpening stones vary in size and thickness, the sharpening angle varies as
well. The thicker the sharpening stone is, the smaller the sharpening angle you get. The
thickness compensator helps to keep sharpening angle the same.
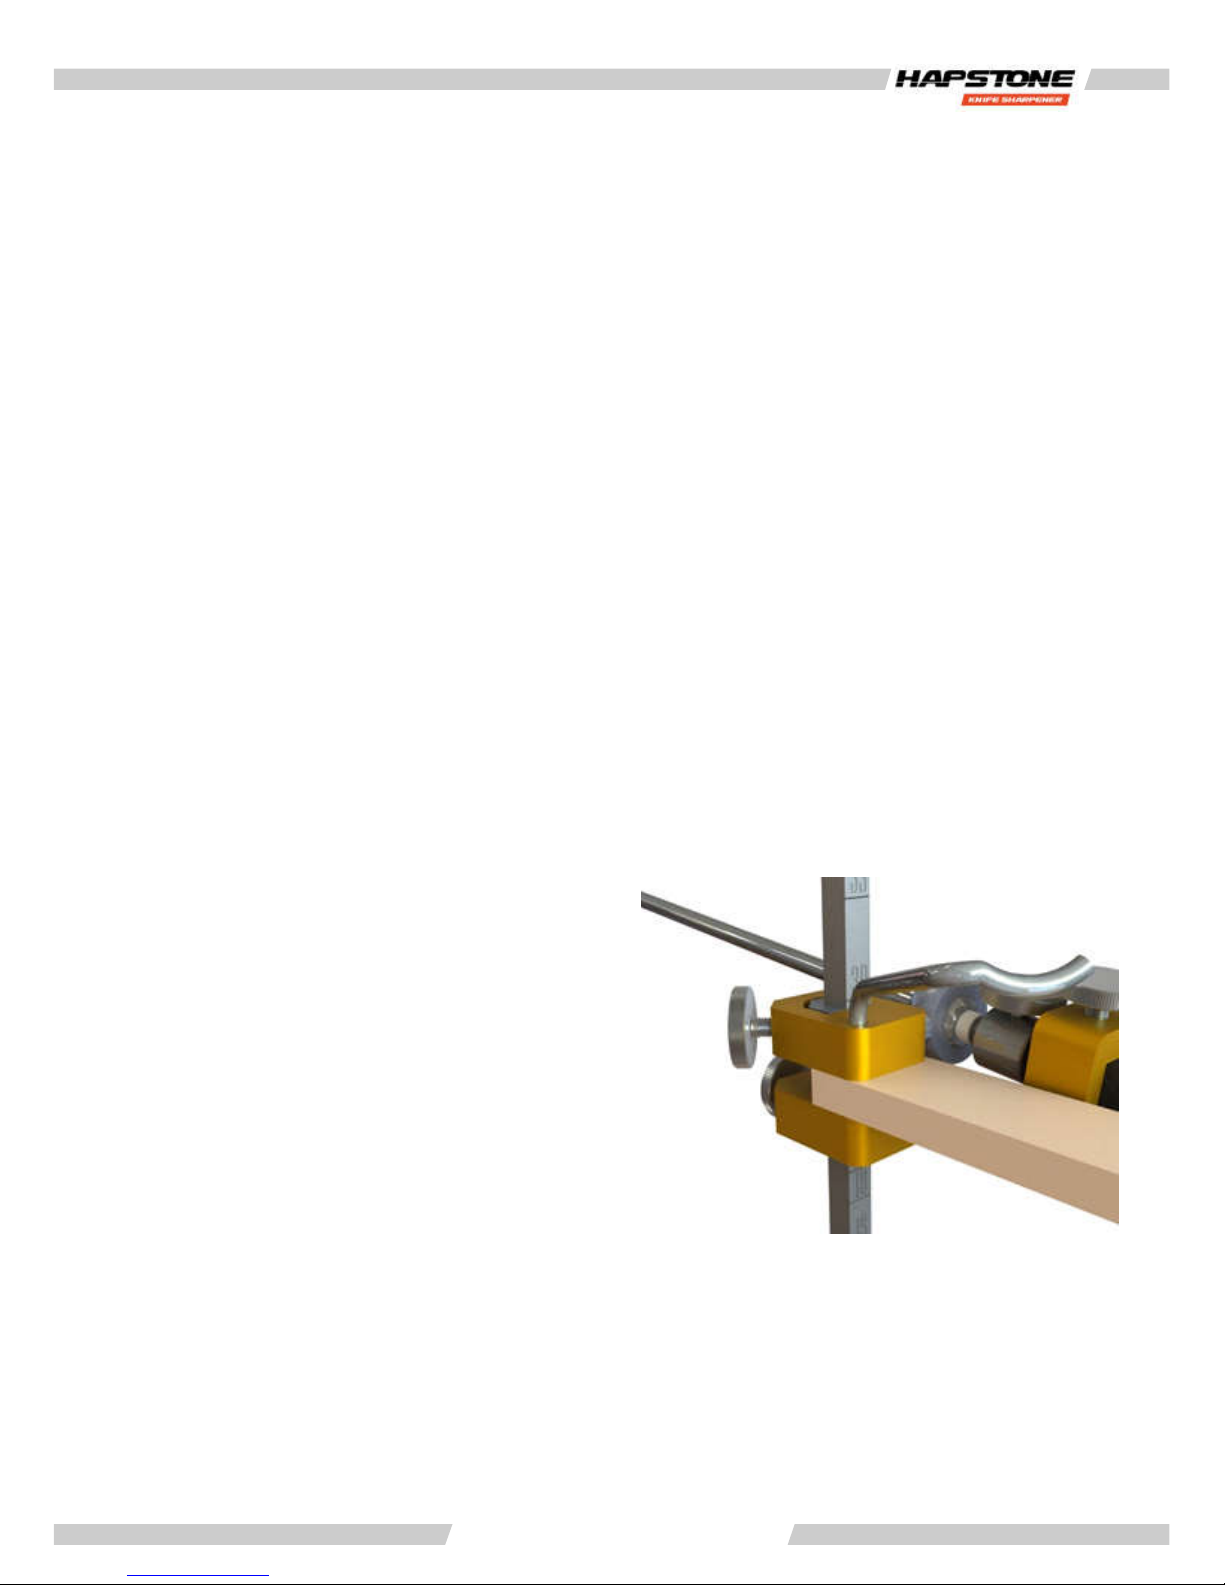
After choosing a sharpening angle, lift the
thickness compensator on the pivot rod up
to the necessary angle indicator mark. The
upper side of the thickness compensator
should be on the level of the chosen angle
indicator mark. Next, fasten the compensator
on the pivot rod with the thumb screw. When
setting the angle of sharpening, the
thickness of the sharpening stone should be
taken into consideration. To do this, before
setting the sharpening stone, put it with its
horizontal surface down onto the surface of
the thickness compensator. Lower the pivot
to securely fasten the sharpening stone
between the thickness compensator and
pivot.
Page 6
Note: When changing sharpening stones of different thicknesses, control the angle of
sharpening of the knife. It should remain unchanged. Every time a sharpening stone is
changed the procedure for measuring the sharpening stone (between the thickness
compensator and the pivot) described in section 4.2. should be repeated. If the
sharpening stones are of the same size/thickness, there is no need to measure again.
After you clamp the pivot with the thumb screw, the sharpening stone can be removed.
The distance you get between the thickness compensator and the pivot is to
compensate for the variance in sharpening angle created by the sharpening stone. Now,
the sharpening angle is set with the utmost precision.
4 3 . .Attaching the sharpening stone
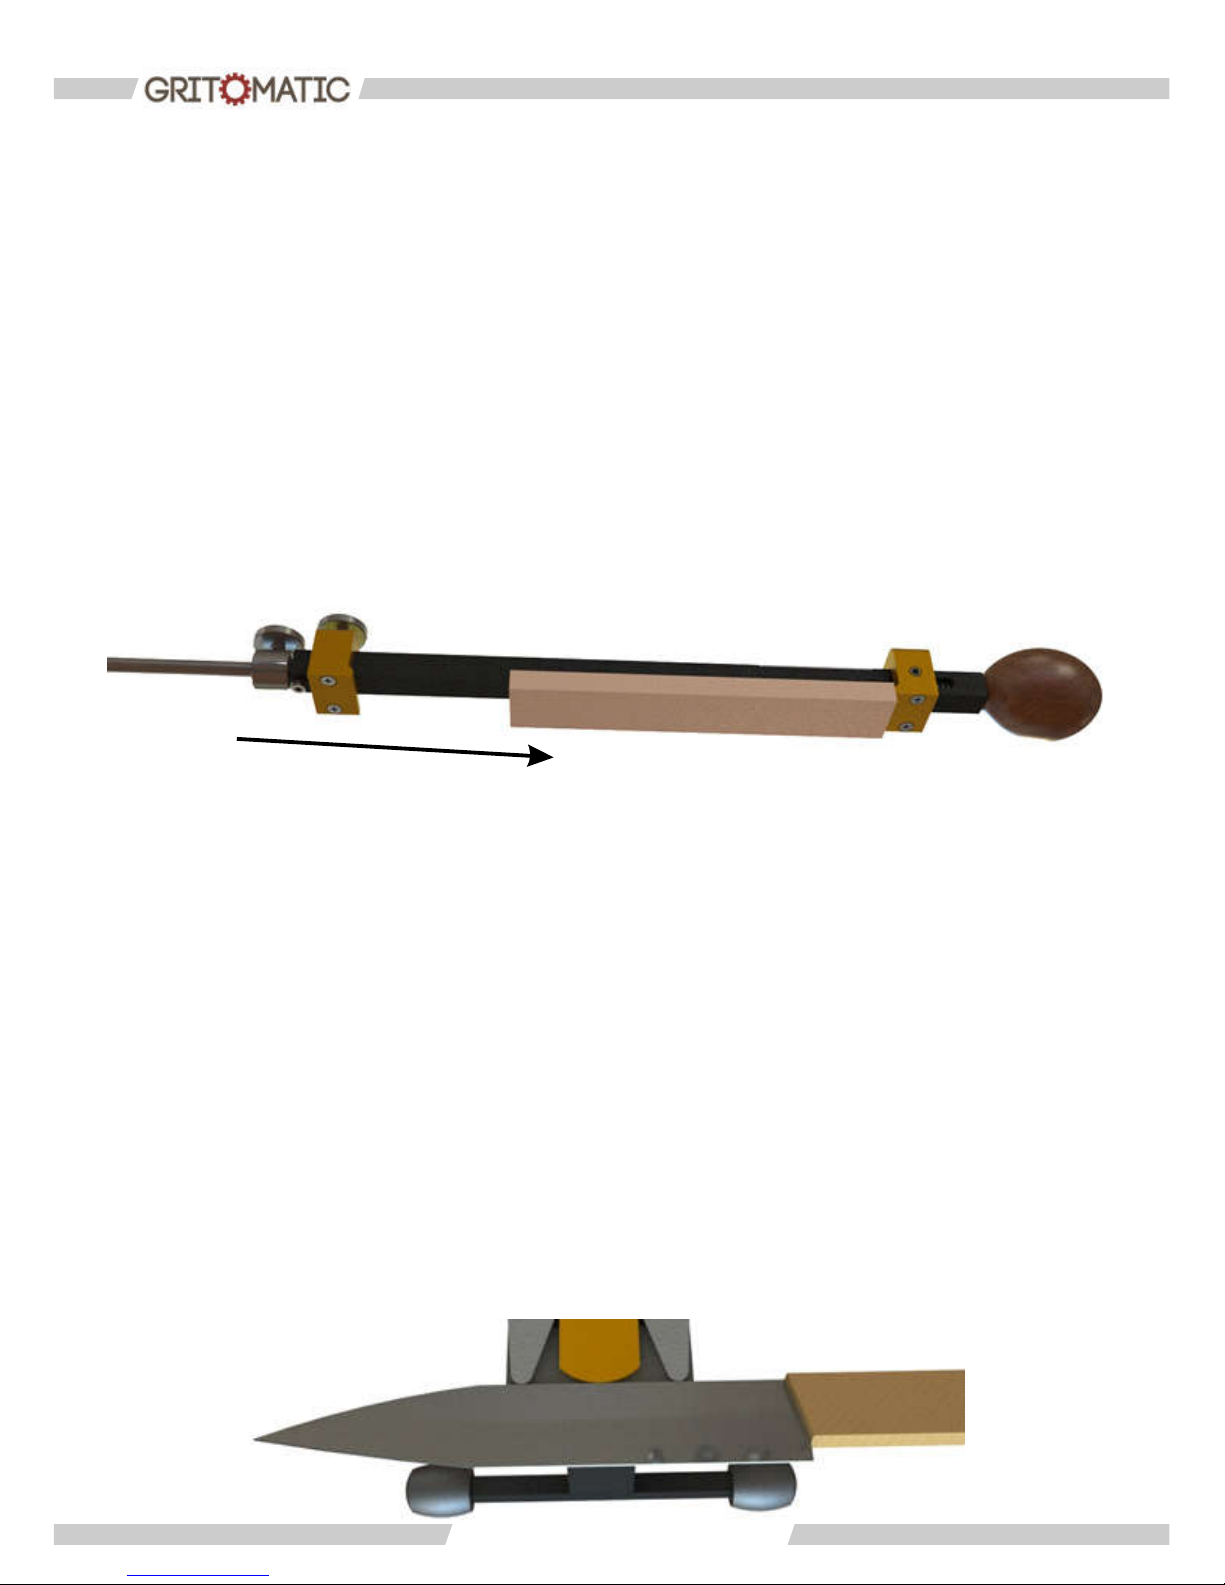
The sharpening stone should be fastened on the horizontal shaft in the stone holder.
Because sharpening stones can be of different lengths, the clamp with the xing screw is
movable. It moves along the entire length of the horizontal shaft and this allows a
sharpening stone of any length to be attached.
With two ngers press the nearest side of the stone holder through the spring and get it
as close as you can to the wooden handle. Put the sharpening stone into the stone
holder and fasten it with the thumb screw.
www.gritomatic.com
4 4 . .Fastening the knife
Position the knife on the rubber mat at the base of the knife sharpener. The edge of a
knife with a blade should be directed outwards (towards you). You will immediately feel
the magnet located in front part of the base. The cutting edge of the knife must slightly
overlap the edge of the base (approximately 1-3 mm). Attach the three point guide
tightly to the knife and secure it with the large thumb screw. The three-point guide
allows the knife to be precisely positioned on the working plate – both before and after
being ipped over – ensuring a smooth and symmetrical cutting edge. You need not
worry about the safety of your blade, because the guide is made of aluminum. For
additional protection, you can cover the blade with protective tape.
Page 7
www.gritomatic.com
5. KNIFE SHARPENING RECOMMENDATIONS
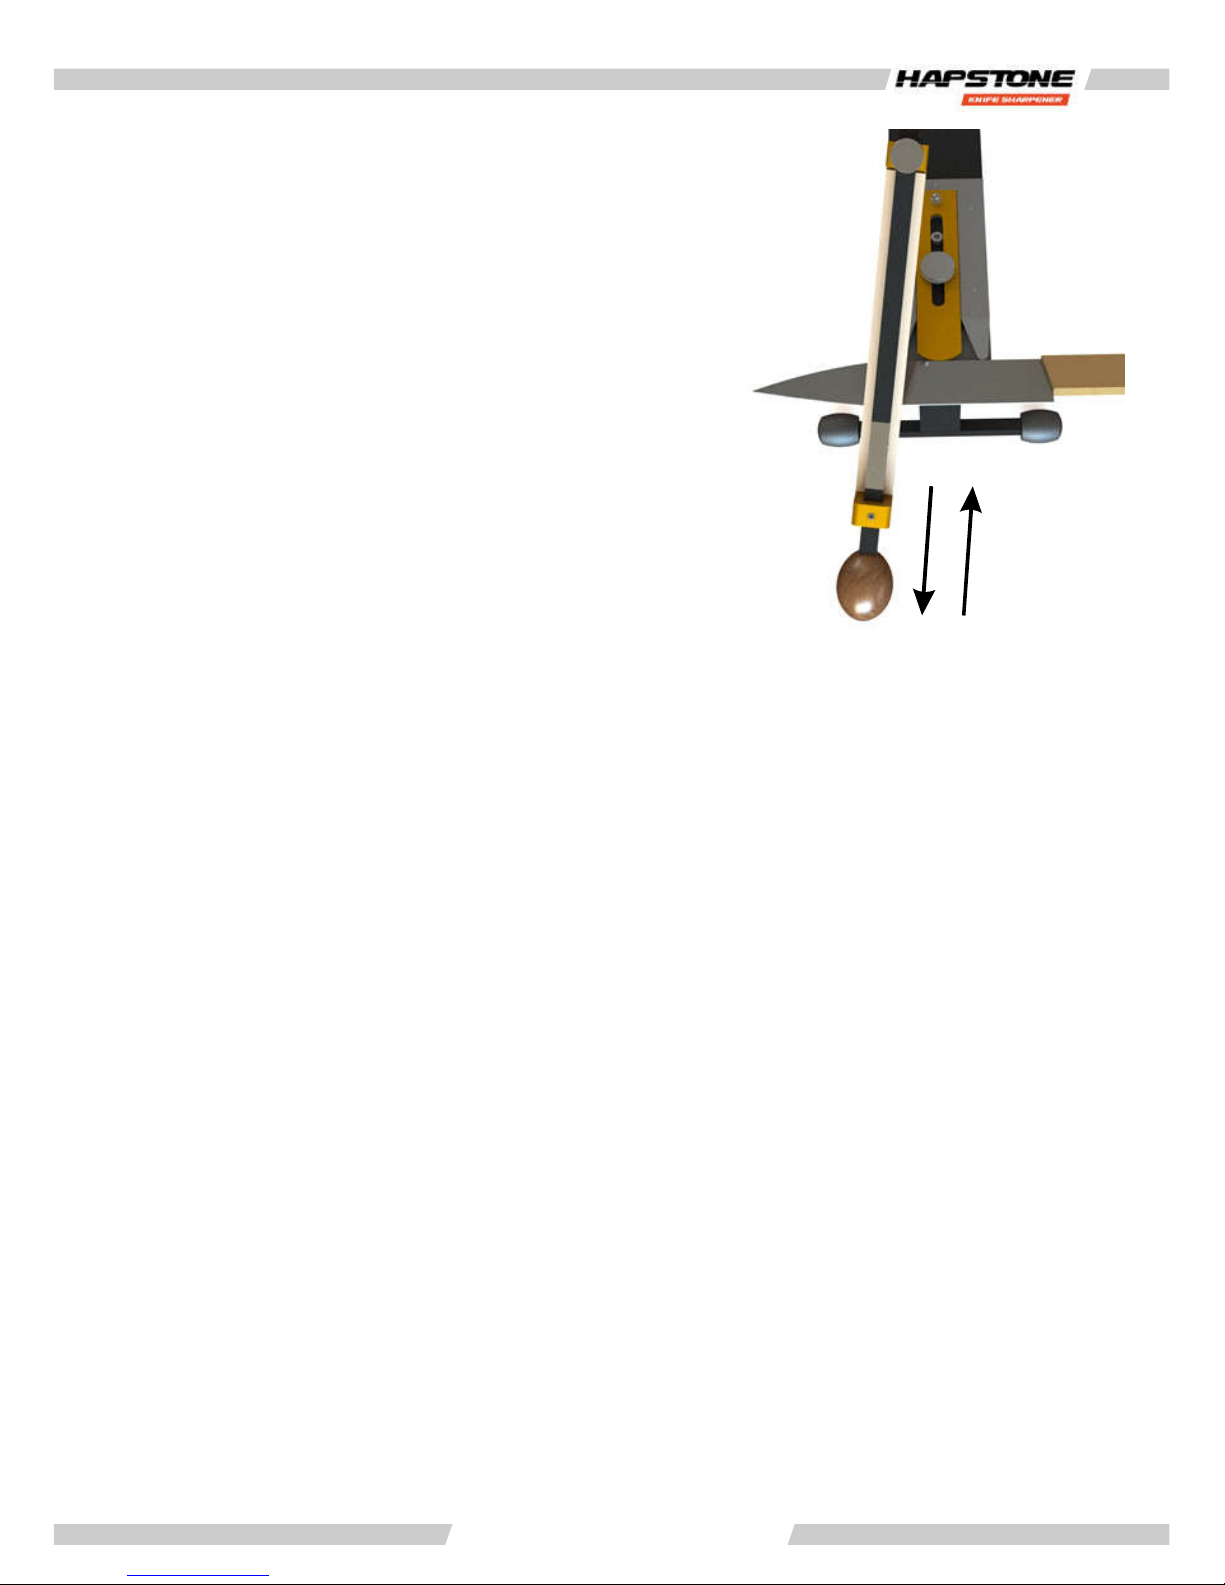
You should use the coarsest sharpening stone to begin
sharpening the knife. You should move the sharpening
stone away from you along the blade, and then return it
to the initial position without touching the blade. This is
especially important when working with ne
sharpening stones.
The whole blade should be worked until you see burrs
(fractured stripes of metal along the whole length of
the cutting edge). These can be felt by slowly drawing
your nail along the lower part of the edge. After you've
sharpened the rst side, ip the knife and repeat the
procedure for the second side.
Change the sharpening stones from the coarsest to
ner and sharpen both sides of the knife again. Finer
sharpening stones have less granularity and will
eliminate the burrs.
While changing sharpening stones, remove metal
lings from the blade and the knife sharpener to
prevent cross contamination of sharpening stones.
6. OPERATION CONDITIONS AND PRECAUTIONS
Hapstone knife sharpener is made of steel and covered with high-quality coating. It
can be used in any conditions. It can be conveniently placed on any surface and its
rubber-tipped legs prevent it from sliding while sharpening.
While sharpening a knife, observe all safety measures. Be careful that your hand does
not to slide down the sharp part of a knife.
During the sharpening process, magnetized metal shavings usually accumulates on
the blade of the knife. Use the wipe periodically to clean the blade and remove the
accumulated shavings.
Thank you for choosing HAPSTONE. We wish you sharp knives!
 Loading...