

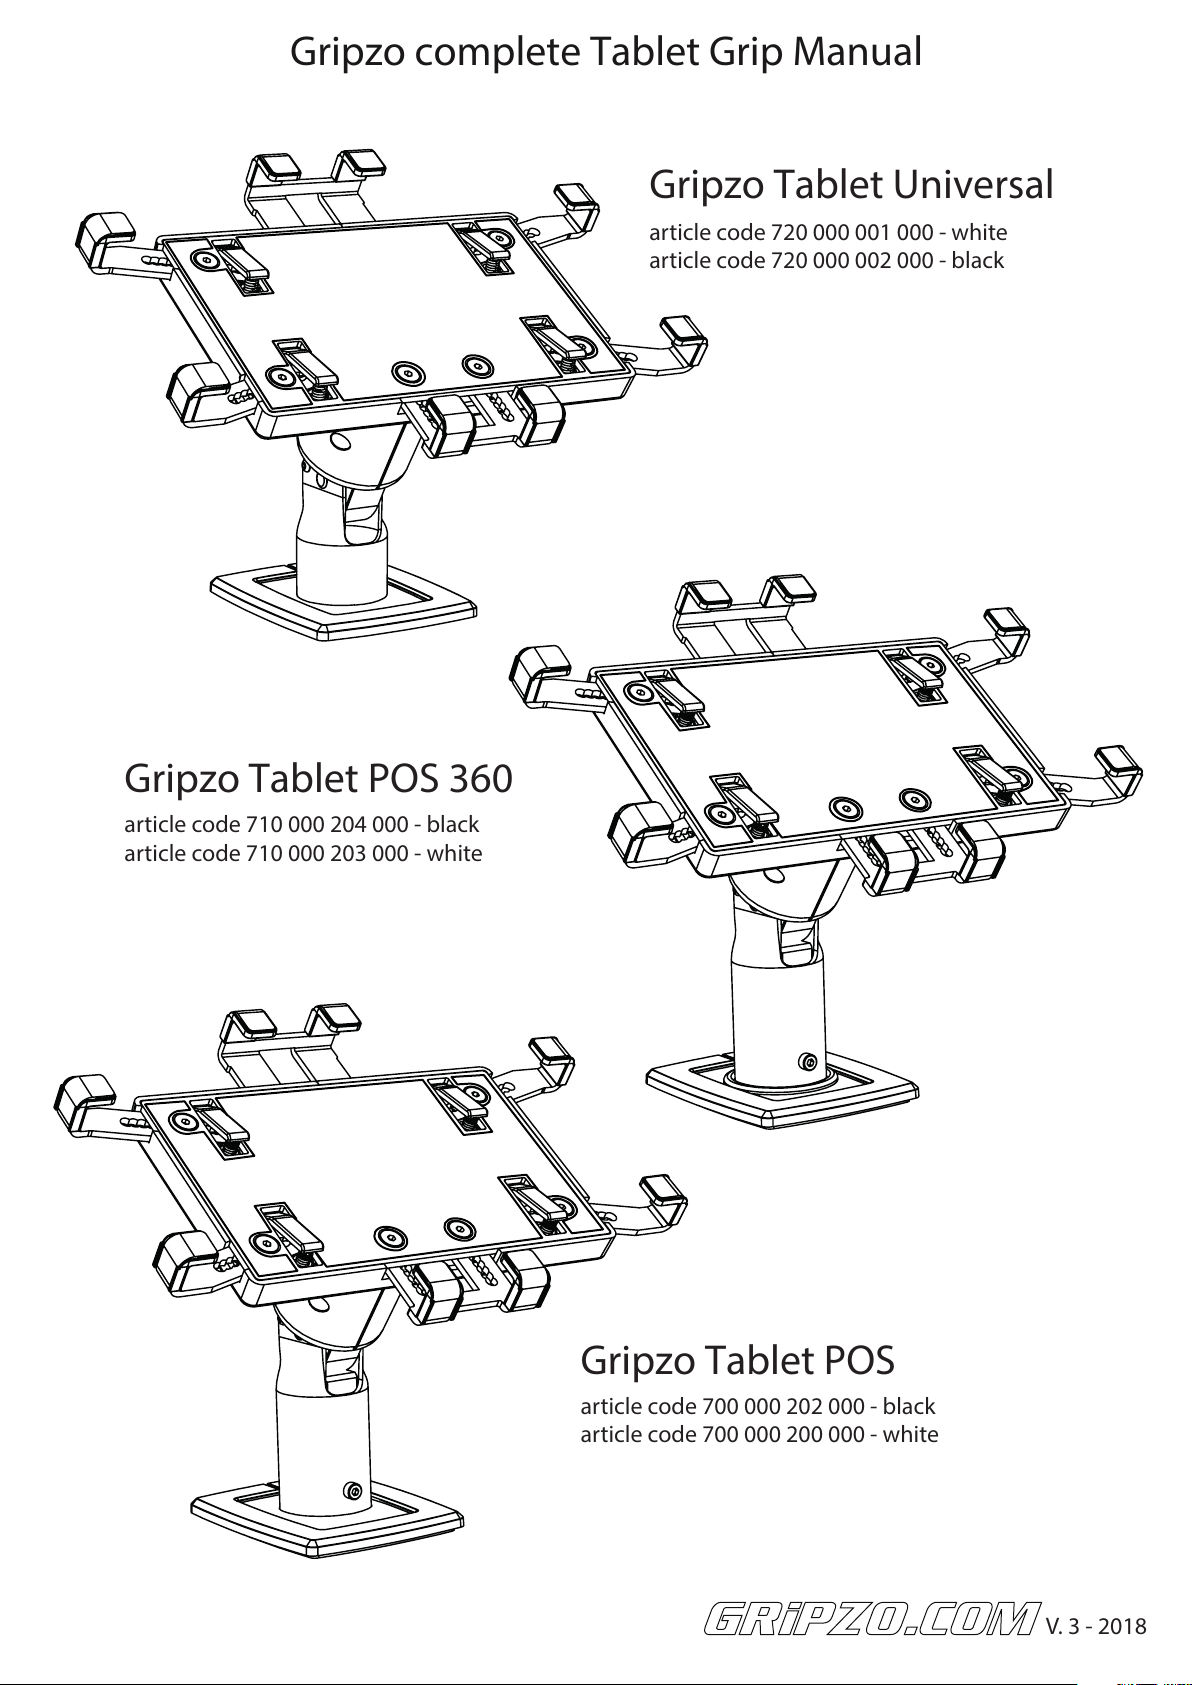
Gripzo complete Tablet Grip Manual
Gripzo Tablet Universal
article code 720 000 001 000 - white
article code 720 000 002 000 - black
Gripzo Tablet POS 360
article code 710 000 204 000 - black
article code 710 000 203 000 - white
Gripzo Tablet POS
article code 700 000 202 000 - black
article code 700 000 200 000 - white
V. 3 - 2018
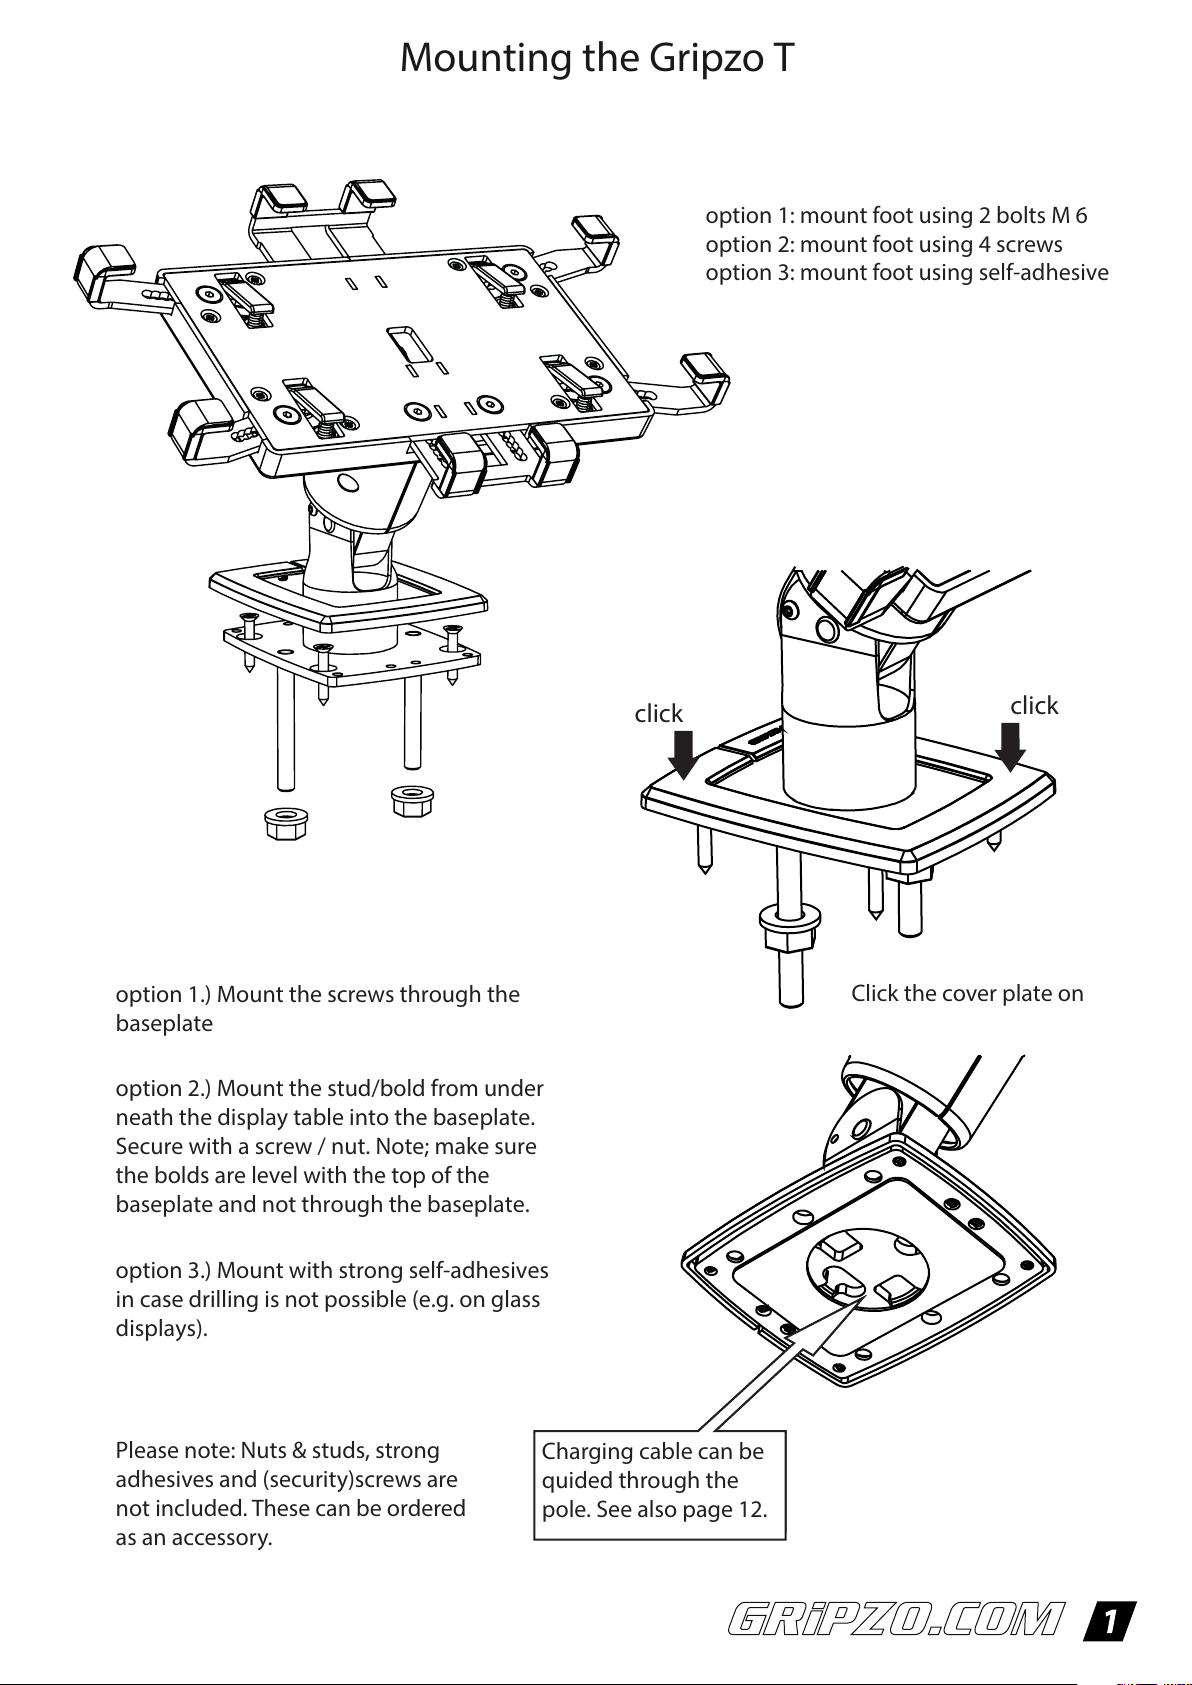
Mounting the Gripzo T
option 1: mount foot using 2 bolts M 6
option 2: mount foot using 4 screws
option 3: mount foot using self-adhesive
option 1.) Mount the screws through the
baseplate
option 2.) Mount the stud/bold from under
neath the display table into the baseplate.
Secure with a screw / nut. Note; make sure
the bolds are level with the top of the
baseplate and not through the baseplate.
option 3.) Mount with strong self-adhesives
in case drilling is not possible (e.g. on glass
displays).
click
click
Click the cover plate on
Please note: Nuts & studs, strong
adhesives and (security)screws are
not included. These can be ordered
as an accessory.
Charging cable can be
quided through the
pole. See also page 12.
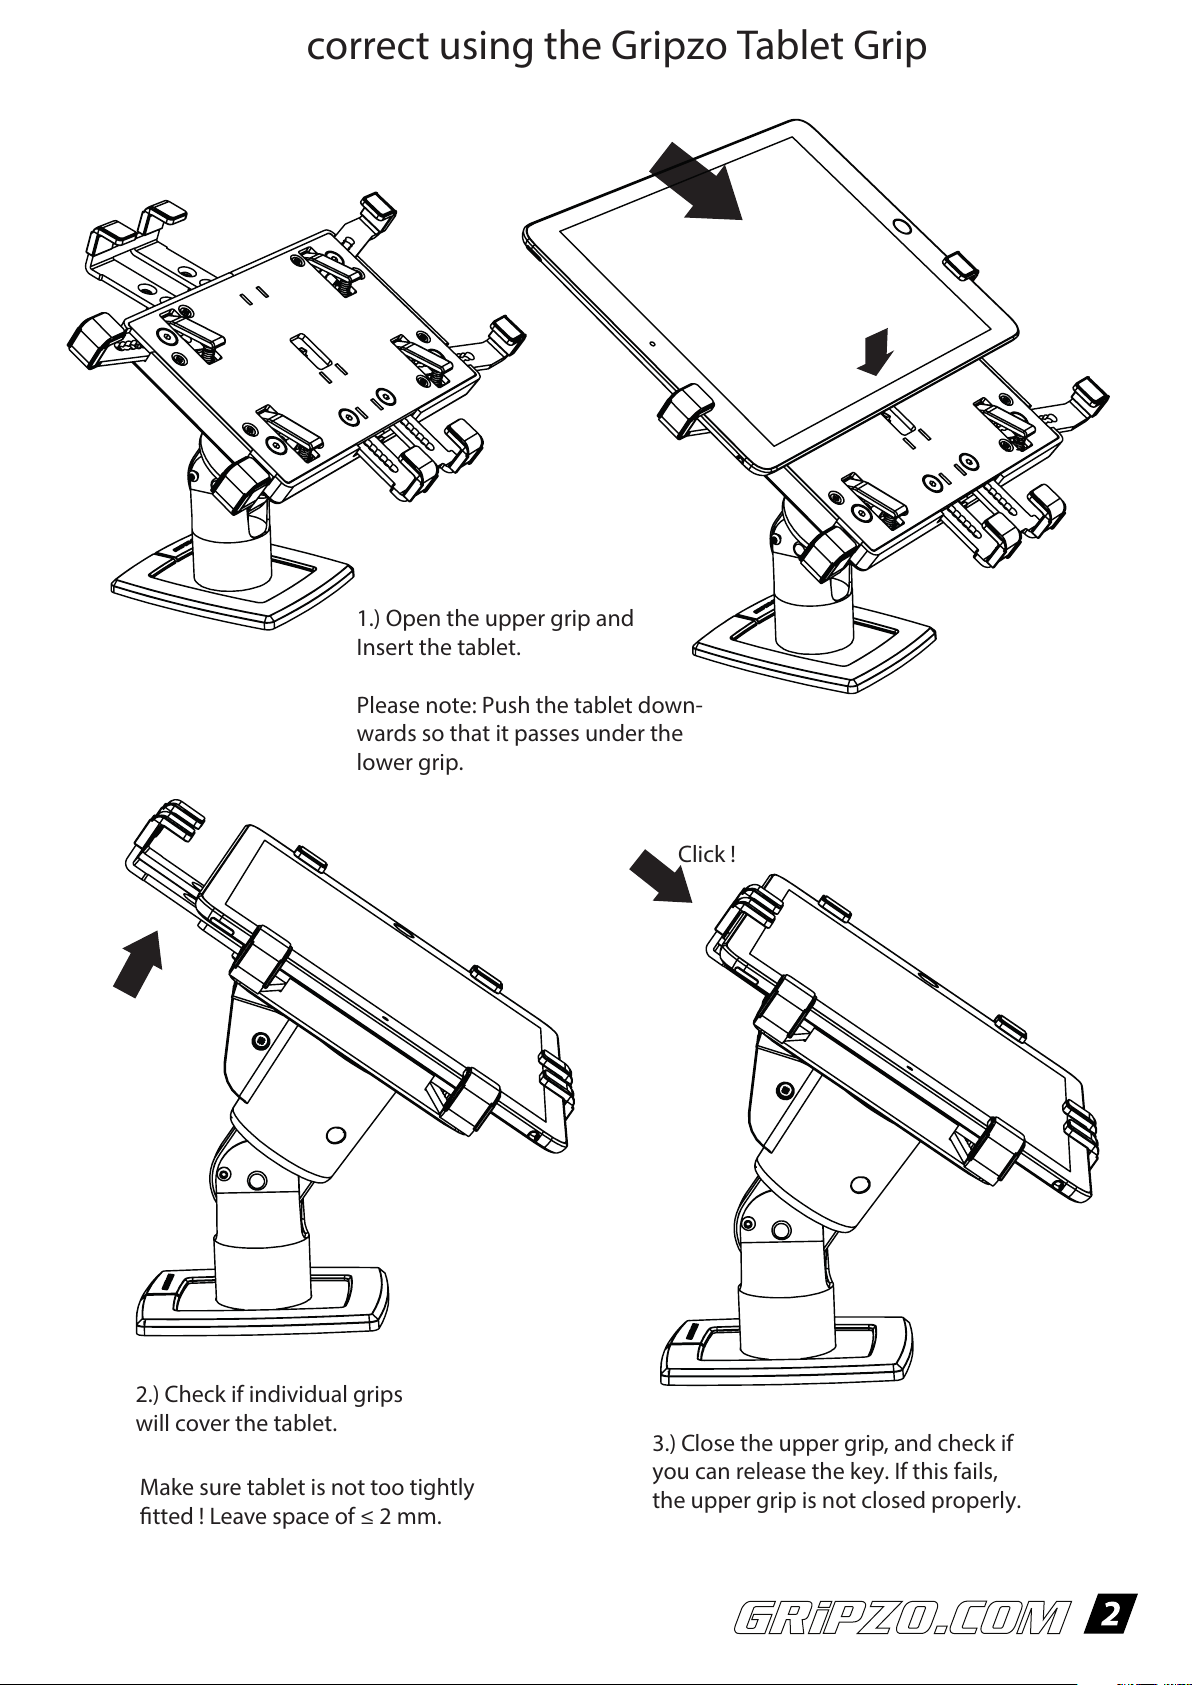
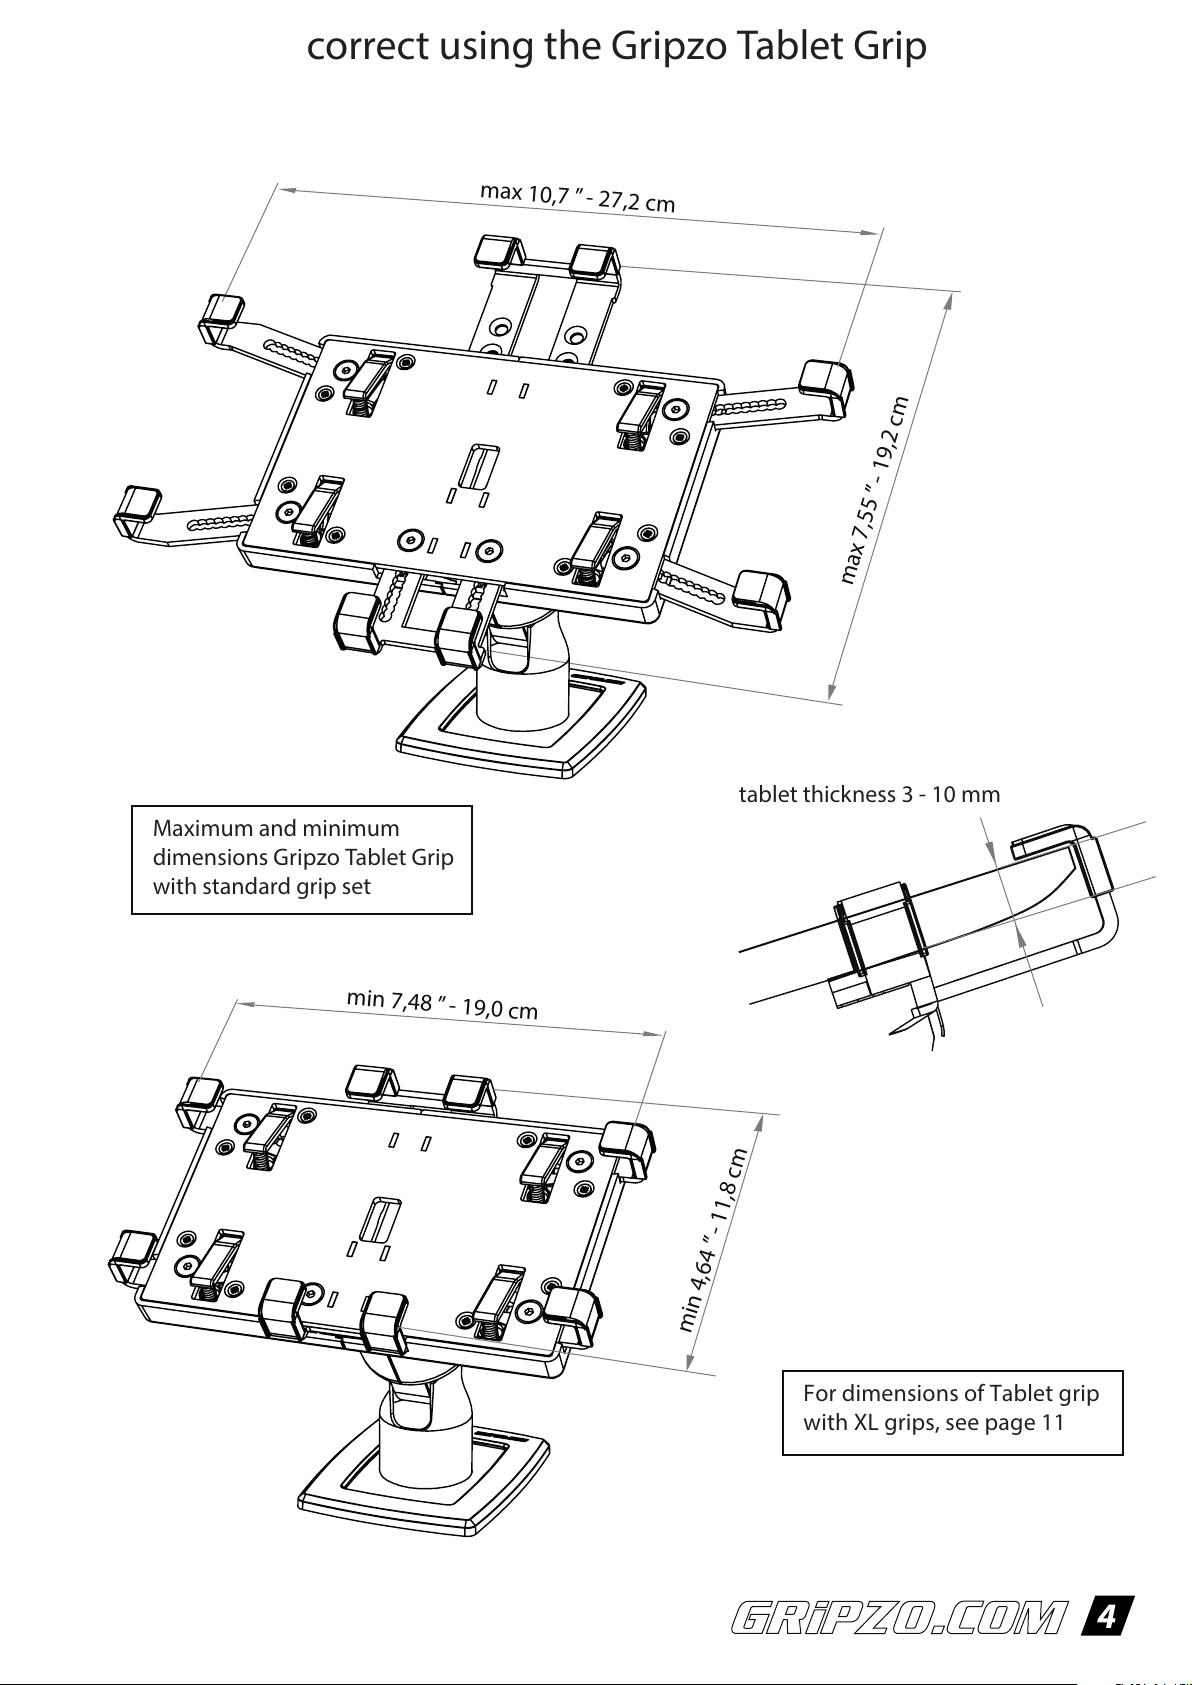
correct using the Gripzo Tablet Grip
1.) Open the upper grip and
Insert the tablet.
Please note: Push the tablet down-
wards so that it passes under the
lower grip.
Click !
2.) Check if individual grips
will cover the tablet.
Make sure tablet is not too tightly
fitted ! Leave space of ≤ 2 mm.
3.) Close the upper grip, and check if
you can release the key. If this fails,
the upper grip is not closed properly.
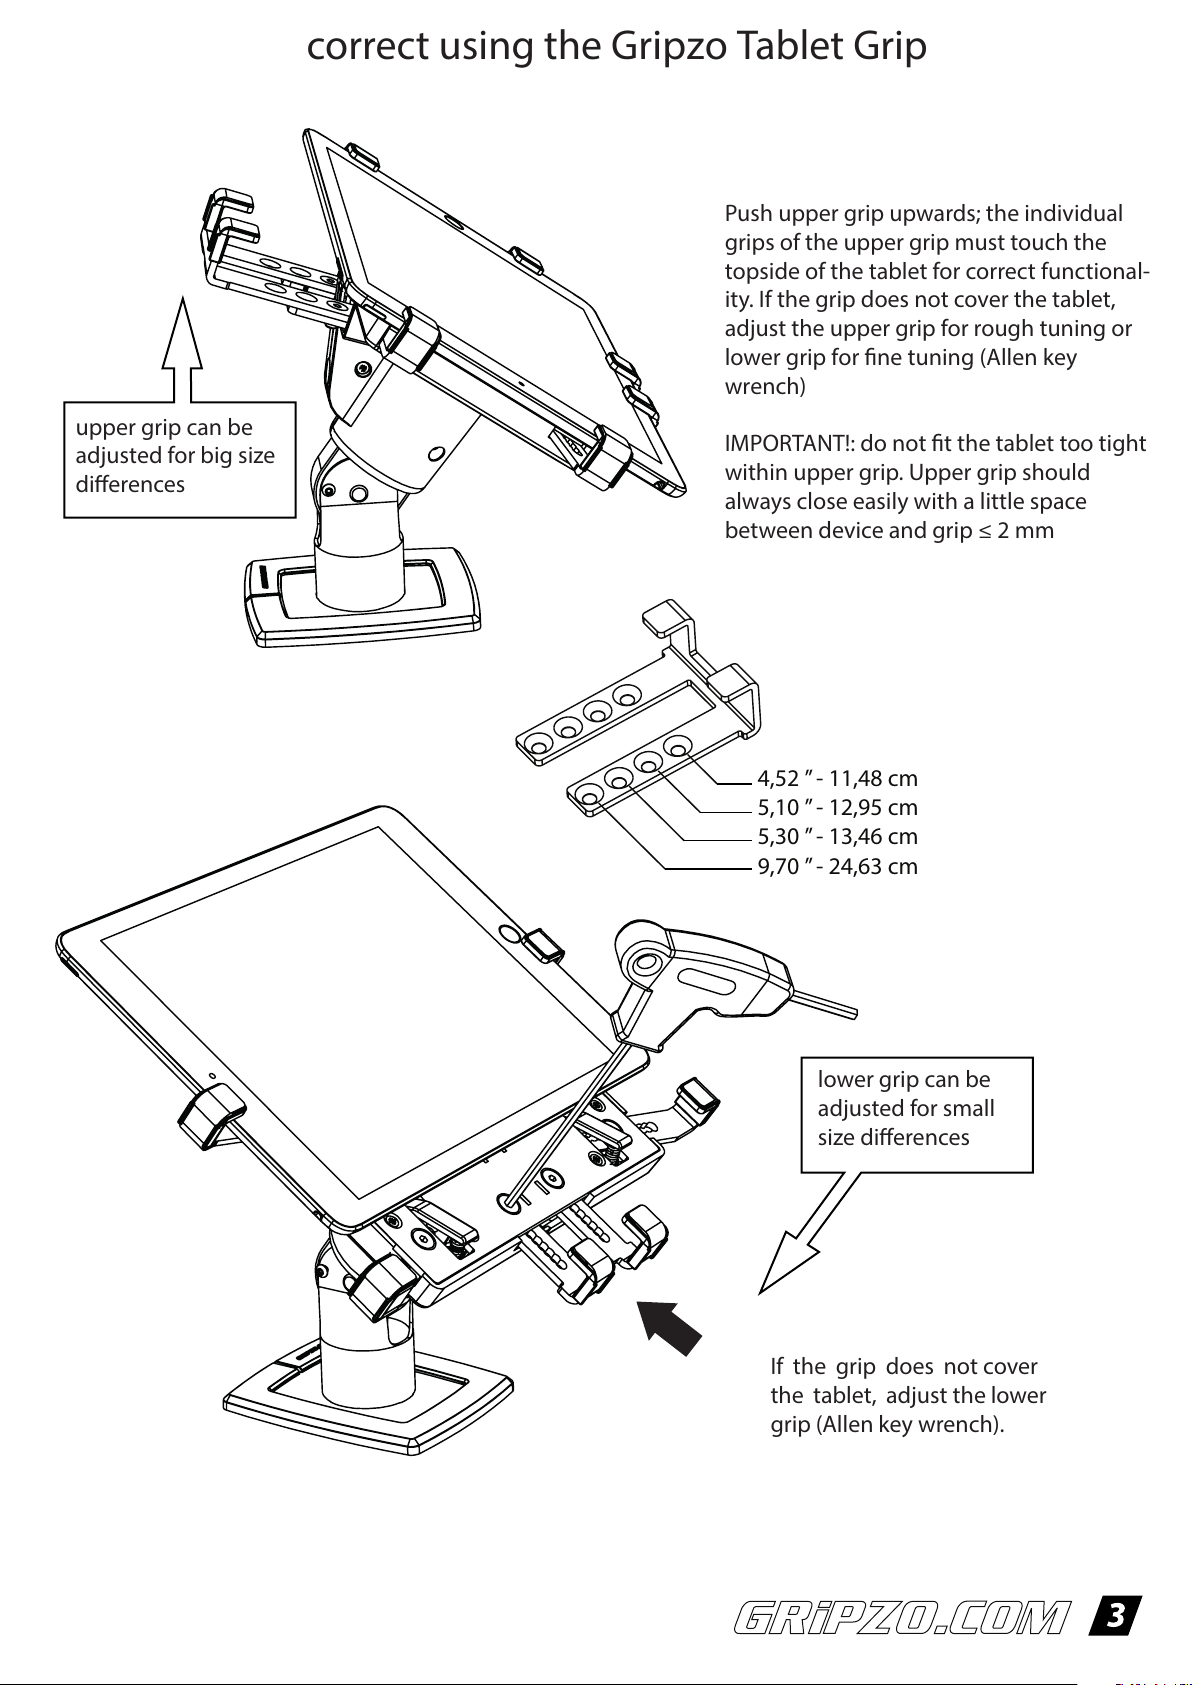
correct using the Gripzo Tablet Grip
Push upper grip upwards; the individual
grips of the upper grip must touch the
topside of the tablet for correct functional-
ity. If the grip does not cover the tablet,
adjust the upper grip for rough tuning or
lower grip for fine tuning (Allen key
wrench)
upper grip can be
adjusted for big size
differences
IMPORTANT!: do not fit the tablet too tight
within upper grip. Upper grip should
always close easily with a little space
between device and grip ≤ 2 mm
4,52 ” - 11,48 cm
5,10 ” - 12,95 cm
5,30 ” - 13,46 cm
9,70 ” - 24,63 cm
lower grip can be
adjusted for small
size differences
If the grip does not cover
the tablet, adjust the lower
grip (Allen key wrench).
correct using the Gripzo Tablet Grip
max 10,7 ”
- 27,2 cm
” - 19,2 cm
max 7,55
Maximum and minimum
dimensions Gripzo Tablet Grip
with standard grip set
min 7,48 ”
- 19,0 cm
tablet thickness 3 - 10 mm
- 11,8 cm
”
min 4,64
For dimensions of Tablet grip
with XL grips, see page 11

correct using the Gripzo Tablet Grip
1.) Adjust the side grips with
Allen key wrench #3.
Remove Allen screw completely
to adjust grip.
2.) Adjust left and right the
same so device is in the
center.
TIP! If buttons are in
the way of grips you
can adjust side grips
more left or right so
button is free.
3.) Check if all Allen bolds
are used and tightened.
DO NOT screw too tight.
4.) Insert the tablet

correct using the Gripzo Tablet Grip
Upper grip springs open; if not
push tablet slightly down
where the arrow is pointed.
1.) Turn the key to the left (counter
clockwise) to unlock.
2.) Remove the tablet.
3.) Insert the tablet and
close the upper grip.
4.) Close the upper grip. Click!
Leave a little space whilst adjusting
between device and grip
5.) Remove the key.

changing the display angle
1.) Loose the screw on the pole with an
Allen key #2 mm.
90°
72°
54°
36°
18°
18°
0°
Gripzo T POS 360 and
Gripzo T POS have a
permanent angle
adjustment option.
Gripzo T Universal:
6 display angle positions
2.) Remove the screw to
adjust the display angle
3.) Fasten the screw
Gripzo T POS 360 and
Gripzo T POS have a tension
adjuster to adjust tension of
the swivel function.
use Allen key (3 mm)

Wall mount
Gripzo T Universal
Gripzo T POS
Gripzo T POS 360 is not
recommended for wall mount
Use 2 mm hex screw for angle
adjustment (in steps of 18 °)
Wall mount adjustment
angle position is parallel to wall
Wall mount adjustment
angle 18 ° or 36 °
The Gripzo T POS has continously
angle adjustment possibility

changing the lock
1.) Remove the cap with an
Allen key (2 mm)
1
2
2.) Remove the screw in
the back completely and
remove it from the grip.
3.) Turn the key to the left. Keep it
counter-clock wise (1) and pull out
the lock using the key to do so (2)
3
4
4.) Place the new lock, keep the key count-
er-clockwise (3) and push it into the opening (4)

changing the lock
5.) Put the locking screw into the lock, make
sure this is not too tight otherwise the lock
will not rotate smoothly.
Please note: proper function of the lock is
very
important for a correct functioning of the
grip.
6.) Replace the cap with an 2mm
Allen key / wrench

changing the lock Tablet - Smartphone
It is possible to exchange the lock from Tablet to
Smartphone holder and vice versa. In that case
notice that the cams is positioned correctly.
1. push the pin
downwards
Cams position for Gripzo T
Universal and Gripzo T POS 360
1. push the pin
downwards
2. rotate cams to
11:00 o’clock.
Cams position for Gripzo
Smartphone Grip
2. rotate cams to
7:00 o’clock.

changing standard grips for an XL gripset
1.) unscrew the bolts com-
pletely and remove the grips.
2.) option 1: change lateral undergrip
by its XL version (to optimize central-
ised position of the tablet; or better
position of grips with respect to
buttons of the tablets)
max 12,93 ” - 32,9 cm
max 8,70 ”
- 22,1 cm
3.) option 2: change all grips by
the XL version of these grips.
Please note: No need to
change the upper grip. This
has the same dimensions
with regular and XL grips.
Maximum dimensions Gripzo
Tablet Grip with XL grip set

implement chargingcable
1.) Lead charging
cable through cable
entry hole in the
display table
2.) Lead charging
cable through the
pole.
3.) Lead charging cable
out of the top of the
pillar and pull forward.
Thereafter, mount the
grip to the display table.
4.) Insert the charging
cable in the tablet

Swivel and Rotation functionality
The Universal Tablet grip and the
POS Tablet grip can rotate over 90°;
portrait to landscape position.
Gripzo T Universal
Gripzo T POS
The POS Tablet grip and the POS
360 Tablet grip can swivel over
150°.
Gripzo T POS
Gripzo T POS 360
The POS 360 tablet grip can
rotate on the foot 360°.
Please note: Cannot turn
portrait - landscape
Gripzo T POS 360

Free standing Foot plates
Free standing foot plate
Positioning the Tablet grip on a
table without drilling or other
processing in this table can be
accomplished by using the free
standing foot plate.
Gripzo T Universal
Gripzo T POS 360
Gripzo T POS
Mount Gripzo T Universal and Gripzo T
POS with
(4 x) countersunk.
Mount Gripzo T POS 360 with
mm hex bolts or screws (4 x)
countersunk.
(This foot plate is thicker.)
ø10 mm hex bolts or screws
ø10
use 2 mm hex
screw for angle
adjustment
Tablet kiosk pole
Mounting the tablet kiosk pole
(tablet floor stand) to the addition-
al floor plate to allow the floor
stand free standing.
Mount with ø10 mm bolts or
screws (4 x)
 Loading...