

Grin Technologies Cycle Satiator Universal Charger
www.ebikes.ca/satiator
info@ebikes.ca
+1(604) 569-0902
IMPORTANT SAFETY INSTRUCTIONS
INSTRUCTIONS IMPORTANTES CONCERNANT LA SECURITE
1. SAVE THESE INSTRUCTIONS: This manual contains important safety and operating
instructions for battery charger Model GC360-6008.
CONSERVER CES INSTRUCTIONS: Ce manuel contient des instructions importantes
concernant la sécurité et le fonctionnement du chargeur.
2. Before using battery charger, read all instructions and cautionary markings on battery
charger, battery, and product using battery.
3. CAUTION: Risk of electric shock- connect only to properly grounded outlets. Do not
expose to rain when charging. Charge only rechargeable lithium, NiMH, or sealed leadacid batteries with correct voltage and current settings. Other battery types or incorrect
settings may damage battery, with risk of fire and personal injury. Never charge a frozen
battery.
AVERTISSEMENT: Risque de decharge electrique. Connecter uniquement a des prises
à la terre. Ne pas exposer à la pluie lors de la charge. Recharger uniquement des
batteries rechargeables au lithium, au nimh ou au plomb-acide scellees, avec des
parametres de tension et courant adequats. Tout autre type de batterie ou tout
parametre incorrect peut endommager la batterie et causer des risques d'incendie et
blessures. Ne jamais charger une batterie gelée.
4. WARNING: The device is not to be used by persons (including children) with reduced
physical, sensory or mental capabilities, or lack of experience and knowledge, unless
they have been given supervision or instruction. Children must not play with the charger.
5. DANGER: Do not open charger- there are no user serviceable parts inside. Only operate
charger in a dry location with the battery pack located a safe distance from combustible
materials. Do not leave batteries charging unattended. Only charge lithium batteries that
have an onboard Battery Management System (BMS).
- 1 -
FCC NOTICE:
FCC rules, which governs the emission limits for a Class B digital device. These limits offer
reasonable but not guaranteed protection against electrical interference between your charger
and TV’s, radios, and other radio-frequency communication devices. If electrical interference is
still detected, which can be confirmed by turning the charger off and on, possible corrective
actions include:
• Reorienting or relocating the receiving antenna of your device
• Increasing the separate distance between the charger and receiver
• Connecting the charger into a different AC outlet circuit as the receiver
• Consulting a dealer or radio/TV technician for help
This charger has been tested and found to comply with Part 15 of the

www.ebikes.ca/satiator
info@ebikes.ca
+1(604) 569-0902
Table of Contents
1. Basic Overview ___________________________________________________________ 3
1.1. Getting Started _____________________________________________________________ 4
1.2. Setting up your First Profile __________________________________________________ 4
1.3. Charging Process ___________________________________________________________ 5
1.4. Terminating Charge _________________________________________________________ 6
1.5. Screen Saver _______________________________________________________________ 7
2. Satiator Setup Menu _______________________________________________________ 7
2.1. Editing the Profile List _______________________________________________________ 8
2.2. Advanced Settings___________________________________________________________ 9
2.3. Connect to PC _____________________________________________________________ 11
3. Charge Process with Multiple Profiles _______________________________________ 11
3.1. No Default Profile __________________________________________________________ 11
3.2. With Default Profile ________________________________________________________ 12
3.3. Default Profile Usage _______________________________________________________ 12
4. Charge Profile Details ____________________________________________________ 13
4.1. Lithium___________________________________________________________________ 13
4.2. Lead Acid (SLA) ___________________________________________________________ 14
4.3. Nickel (NiCad or NiMH) ____________________________________________________ 15
5. Additional Features and Details ____________________________________________ 17
5.1. Force Start ________________________________________________________________ 17
5.2. Fault Conditions ___________________________________________________________ 17
5.3. Cell Balancing _____________________________________________________________ 18
5.4. Thermal Rollback __________________________________________________________ 19
5.5. Exposure to Rain___________________________________________________________ 19
5.6. Orientation and Vent _______________________________________________________ 19
5.7. Thermistor________________________________________________________________ 19
5.8. Upgrading Firmware _______________________________________________________ 19
6. Complete Navigation Map _________________________________________________ 20
7. Specifications ___________________________________________________________ 21
- 2 -
www.ebikes.ca/satiator
info@ebikes.ca
+1(604) 569-0902
Congratulations on acquiring a Cycle Satiator universal charger, for use with all kinds of 24-48V
nominal battery packs. We hope that this one device serves you and your batteries for years to
come.
1. Basic Overview
The Satiator was designed with a compact and narrow form factor so that it could be used either
as a portable stand-alone charger, or mounted to the frame of your bike/vehicle as an onboard
charger. It has an AC input power port on the side, (100-240V AC), a DC output cable to
connect the charger to the battery, a graphical display screen for showing the current charging
status, and a pair of buttons to navigate the charger menu.
Figure 1: Satiator Model and Features
While most battery chargers are limited to charging one specific battery type and voltage, the
Satiator is programmable so that you can choose between a number of battery charge
behaviours. You could use it to charge a 24V lead acid pack one day, and a 48V lithium ebike
battery the next.
This adjustability is useful. It means a separate charger is no longer needed for each of your
batteries, and when you upgrade to a new pack, the Satiator can be configured to match it even
if the voltage and chemistry are different. It also allows you to select between rapid charge rates
for top-up convenience and conservative overnight charging to maximize battery life.
- 3 -
www.ebikes.ca/satiator
Splash Screen
+1(604) 569-0902
1.1. Getting Started
The Satiator does not have an ON/OFF switch, so it
will turn on whenever there is power present on the
AC input port. The 3-pin IEC connector is the familiar
standard for personal computers, and if the included
Figure 3: Connect
AC Power to Turn
On
cable does not match your country's outlet standard
then there should be no problem finding one locally.
Just be sure to use a grounded 3-pin outlet.
Figure 2:
after power applied,
shows Model and
Firmware Version
1.2. Setting up your First Profile
If the Satiator was purchased by itself without a battery, then it will usually arrive out of the box
without a profile activated. Before you can use it to charge a battery, you will need to select an
output appropriate for your pack. The display will say NO PROFILES ACTIVE after briefly showing a
splash screen.
info@ebikes.ca
Figure 4: Setting up the first profile on a new Satiator device
Pressing the up or down button will let you scroll through a number of preset profiles. When you
see the profile for your battery, press and hold the lower button to select it. A screen will ask you
to confirm the selection.
Figure 5: First profile confirmation
The preset profiles are shown in the table below and cover the majority of lithium and lead acid
batteries encountered in ebike applications
Title:
Subtitle:
Bulk Amps:
Full Volts:
36V Lithium 36V Lithium 36V Lithium 36V LiFePO4 36V LiFePO4
Fast Charge Stnd Charge 80% Charge Fast Charge Stnd Charge
8.0 A 4.0 A 4.0 A 8.0 A 4.0 A
42.0 V 42.0 V 40.5 V 43.2 V 43.2 V
- 4 -
www.ebikes.ca/satiator
info@ebikes.ca
+1(604) 569-0902
Title:
Subtitle:
Bulk Amps:
Full Volts:
48V Lithium 48V Lithium 48V Lithium 48V LiFePO4 48V LiFePO4
Fast Charge Stnd Charge 80% Charge Fast Charge Stnd Charge
7.0 A 4.0 A 4.0 A 7.0 A 4.0 A
54.5 V 54.5 V 52.6 V 57.6 V 57.6 V
Title:
Subtitle:
Bulk Amps:
Full Volts:
Float Volts
24V SLA 36V SLA 48V SLA
Fast Charge Stnd Charge Stnd Charge
8.0 A 4.0 A 4.0 A
28.8 43.2 57.6
27.0 40.5 54.0
If none of the presets are appropriate for your battery, then you have the option to add a custom
profile as well with the Create New Profile screen at the end of the list. Custom profile creation is
detailed in Section 2.1.3.
1.3. Charging Process
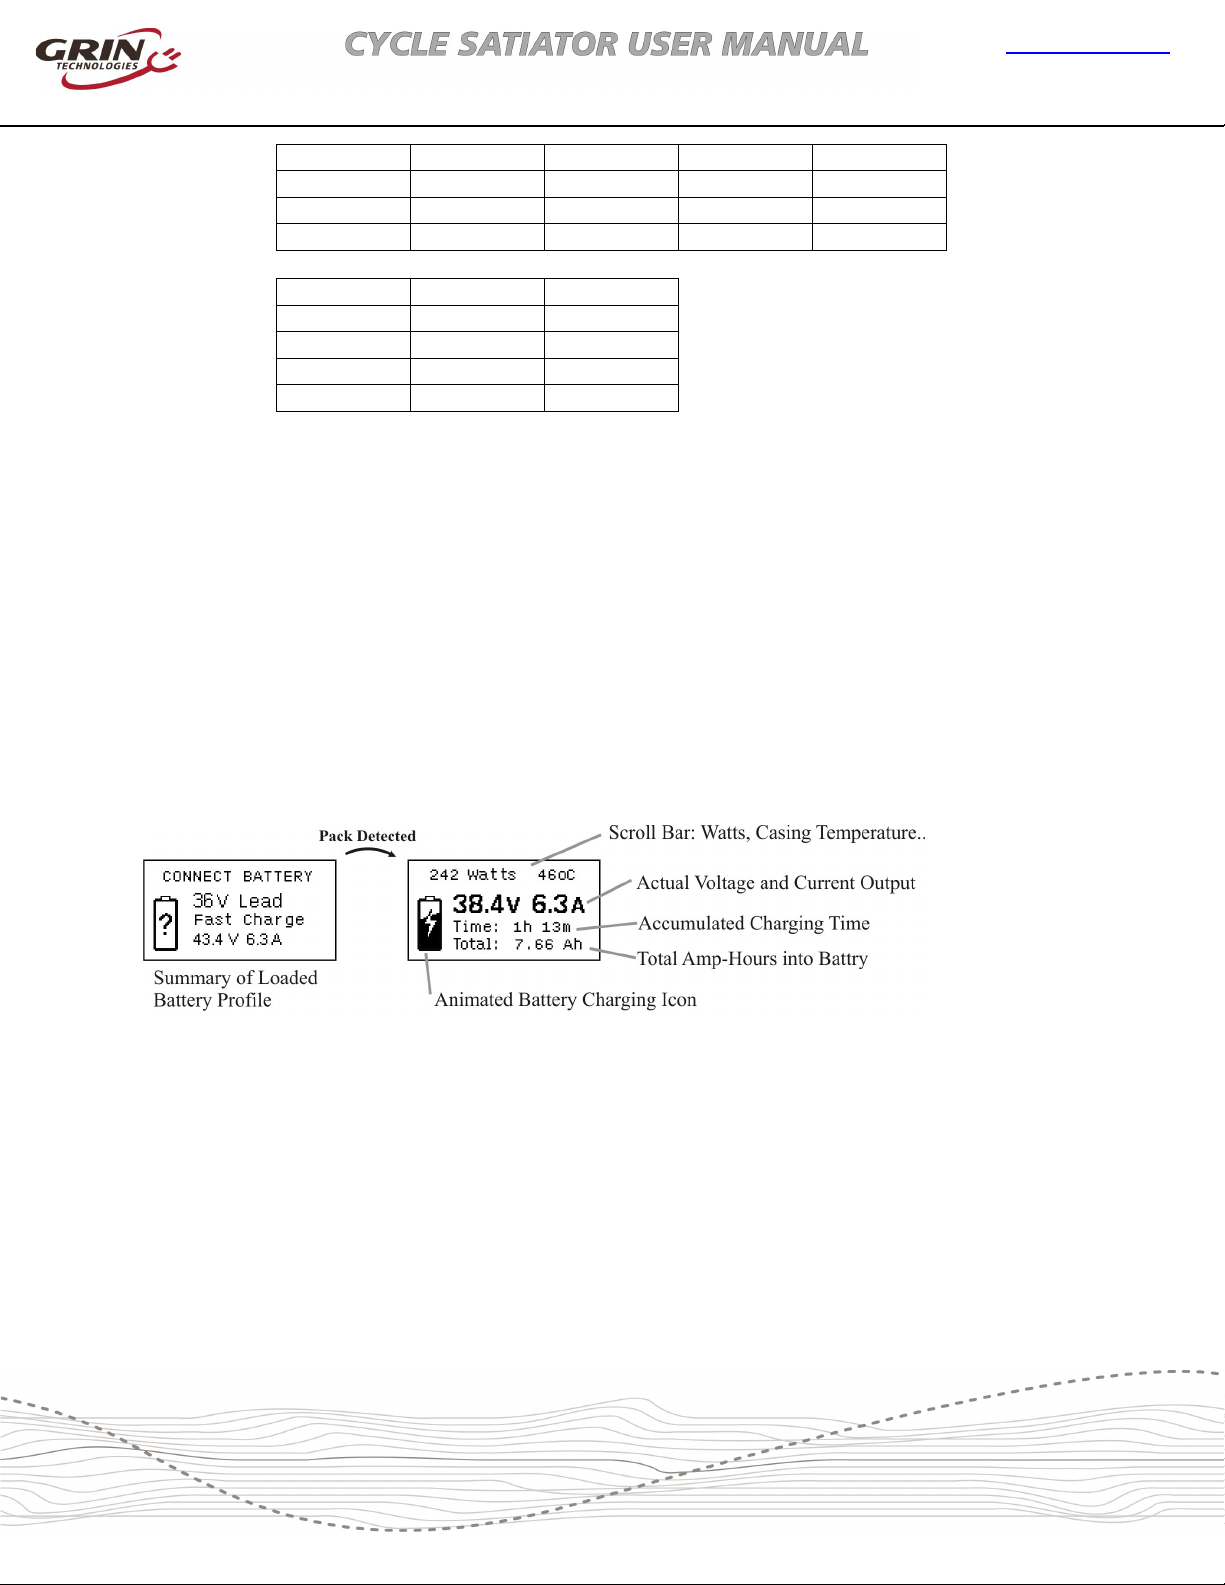
With just one profile active, the Satiator will start charging the battery whenever it is connected
to a pack that isn't fully charged. If there is no battery attached, the display screen will say
CONNECT BATTERY along with a summary of the charge profile. Once it detects a pack has been
plugged in, then the charger will automatically start the charge process, and the display will
show the charging status in real time.
Figure 6: Display screen before battery connected and after start of charge cycle
The ability to see the actual amp-hours put into the pack can be of great value in understanding
the health of a battery system and allowing the user to rest confident that it has received a full
charge.
A title bar across the top provides additional information, including the output watts, the casing
temperature, and the target full charge voltage. The target voltage is useful to confirm that the
correct profile is selected even after the charge process has begun. In the case of NiCad / NiMH
batteries, the title bar will also show the battery temperature and the remaining top-up time
during top up mode (see section 4.3)
- 5 -
www.ebikes.ca/satiator
+1(604) 569-0902
1.4. Terminating Charge
The charge process can be stopped by allowing the charge to finish, unplugging the battery, or
by aborting charge.
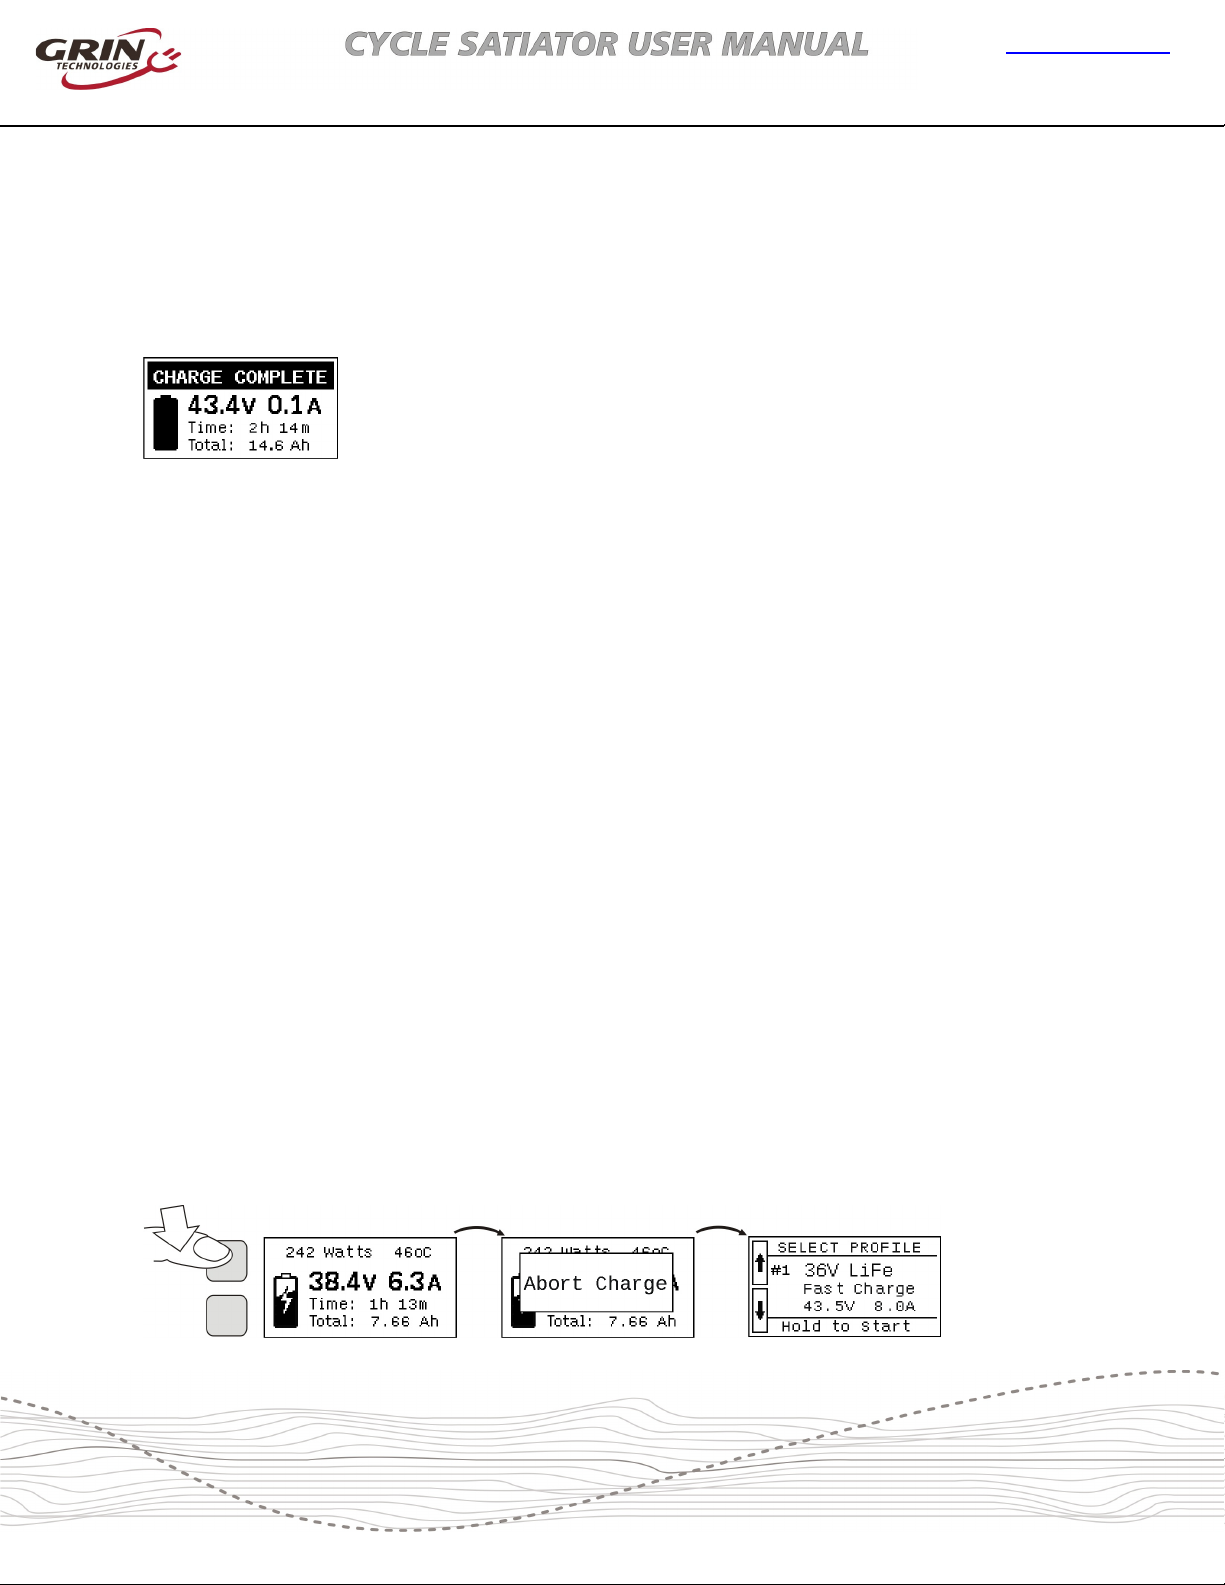
1.4.1. Charge Complete
If the battery is left charging until reaching a full charge, the display bar
will invert and say CHARGE COMPLETE allowing you to see from a distance
that the cycle has finished. You will also see a summary of the elapsed
charge time and amp-hours delivered to the battery.
Figure 7: On charge complete,
voltage, time, and amp-hours still visible
With batteries that have a constant voltage end of charge mode, it is possible for small currents
to continue flowing into the battery when the output says complete. CHARGE COMPLETE does not
mean that the output is disabled, just that the full voltage has been reached and the charge
current has decayed below the Complete Amps threshold specified for the profile.
info@ebikes.ca
1.4.2. Pack Disconnect
You can also stop the charge by simply disconnecting the battery from the charger. Once the
battery is removed, the screen will return to saying CONNECT BATTERY. Be aware that you cannot
see the elapsed amp-hours and charge time when the battery is disconnected. If the battery is
plugged back in within 5 seconds, then it will resume charging from the previous amp-hours and
time, but if the delay is longer then it will start a new charge cycle and the previous charge
statistics will be lost.
1.4.3. Abort Charge
Finally, it is possible to stop the charge process while charging is underway without unplugging
the battery by pressing and holding the top button until Abort Charge pops up. The Satiator will
return to the active profile list allowing you to scroll through and select a different charge profile.
- 6 -
Figure 8: Aborting Charge, hold top button to disable output and return to profile list
www.ebikes.ca/satiator
+1(604) 569-0902
This feature is useful in the case of onboard installations where the battery terminals are
permanently wired to the charger, and physically disconnecting the pack is difficult.
1.5. Screen Saver
After several minutes with no button activity, the Satiator will go into a screen saver mode,
where the key charge statistics and status are instead shown in a small text box that moves
around the display. The screen saver will preserve the life and brightness of the OLED display
pixels and ensures that they have a uniform intensity.
info@ebikes.ca
Figure 9: Screen saver views, with no battery connected (left), during charge (middle),
after charge complete (right). The screen saver text will move around the display.
Pressing either button will exit the screen saver and return to the most recent display window.
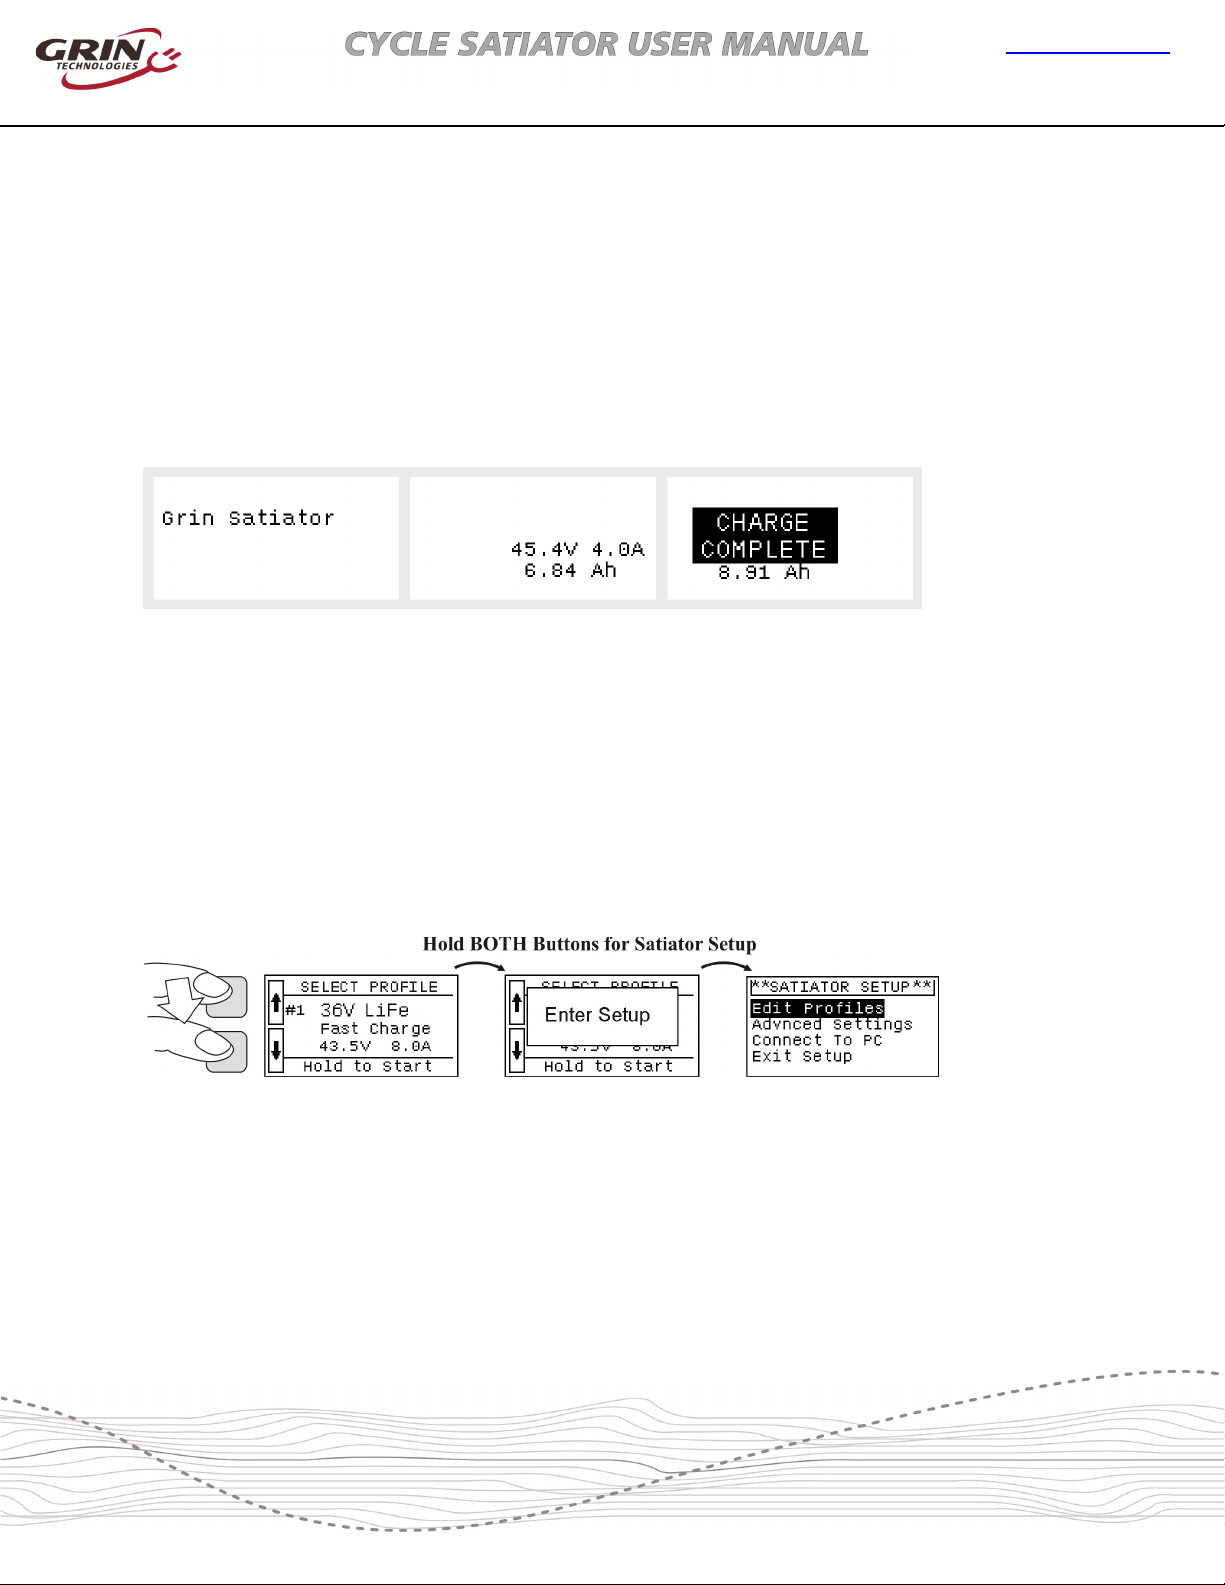
2. Satiator Setup Menu
The Satiator setup menu allows you to edit the profile list, set advanced parameters, and
connect the Satiator to a computer. The setup menu is accessed by pressing and holding down
both buttons until you see the Enter Setup message.
Figure 10: Access the setup menu by pressing and holding both buttons
The navigation of the setup menu with just two buttons will be very intuitive from the following
principles:
- 7 -
• Briefly press the up or down buttons to cycle through a list or toggle through a value
being edited.
• Press and Hold the lower button to select an option.
• Press and Hold the upper button to escape and go to the previous screen.
 Loading...