

Page 1

800 Series Coffee Grinders
Operator Manual
Models 810, 835, 875, 890
GMCW
4003 Collins Lane, Louisville, KY 40245 USA
Phone: 502.425.4776 Toll Free: 800.695.4500
Fax: 502.425.4664
Web: gmcw.com Email: info@gmcw.com
Model 810
Model 875
Specifications...........................2
Safety Information..................3
Installation...............................3
Operation ................................4
Cleaning & Maintenance........5
Troubleshooting Guide...........6
Parts Diagram and List ...........7
Wiring Diagram.....................10
Thank you for purchasing this quality coffee grinder. For your safety and the safety of others, read all
warnings and the operator’s manual before installing or using the product. Properly instruct all operators.
Keep training records. For future reference, record serial number here:
Table of Contents
Model 835
©1995 GMCW
Printed in USA
0615 Form # GR-380-18
Part # 83427
Model 890
GMCW provides the industry’s BEST
warranty. Visit gmcw.com for warranty
terms and conditions.
Page 2

2 Grindmaster
®
800 Series Coffee Grinders
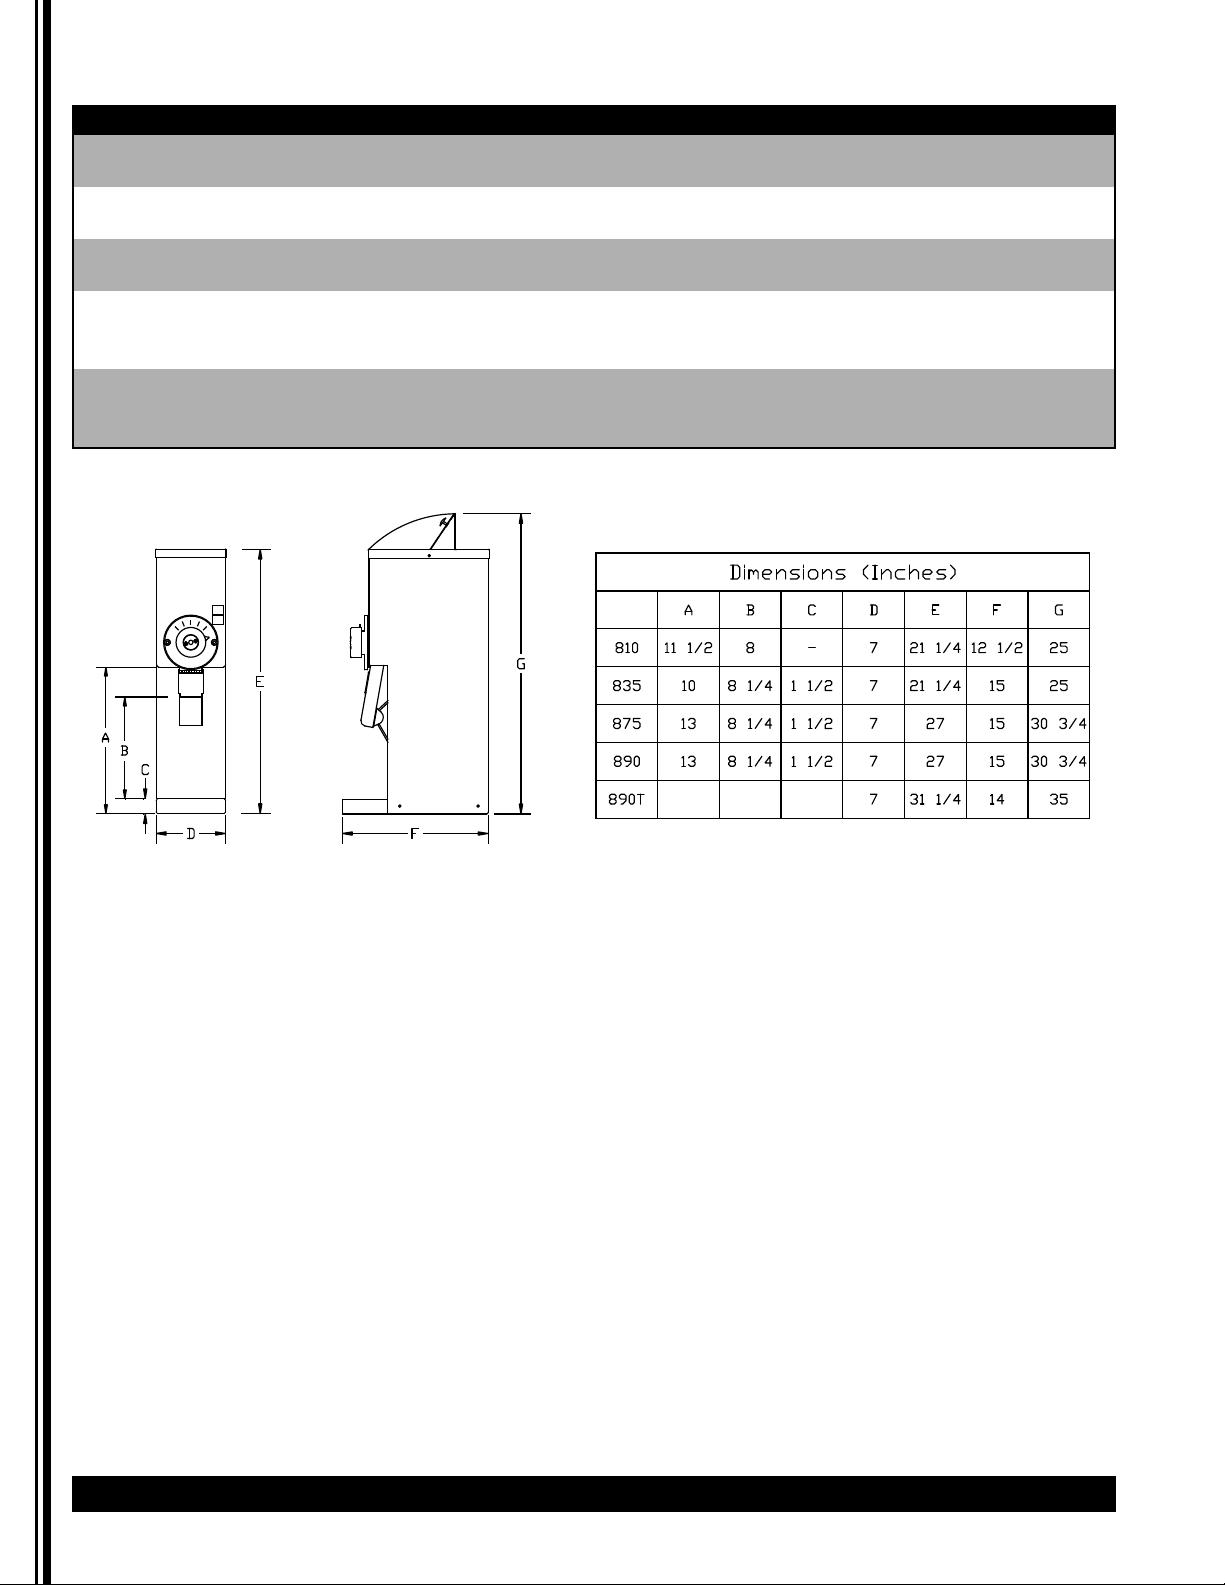
Specifications
Model Description Electrical
810S
Medium duty grinder - 1.5 lbs hopper.
C-UL US, ETL Sanitation Certification
120V / 920 W / 8A / 1 Ph
835S
Medium duty grinder - 1.5 lbs hopper.
C-UL US, ETL Sanitation Certification
120V / 920 W / 8A / 1 Ph
875S
Medium duty grinder - 3 lbs hopper.
C-UL US, ETL Sanitation Certification
120V / 920 W / 8A / 1 Ph
890BS
Medium duty grinder with European slicing burrs
- 3 lbs. hopper.
C-UL US, ETL Sanitation Certification
120V / 920 W / 8A / 1 Ph
890T
Medium duty grinder with European slicing burrs
- 5 lbs. hopper.
C-UL US, ETL Sanitation Certification
120V / 920 W / 8A / 1 Ph
Page 3

800 Series Coffee Grinders Grindmaster
®
3
Safety Information
Important Safety Information
This is the safety alert symbol. It is used to alert you to potential personal injury hazards. Obey all safety messages
that follow this symbol to avoid possible injury or death.
WARNING
•Product must be attached to a three wire 120V 15 AMP receptacle (export units - 230V 16 AMP).
•Do not deform plug or cord.
•Follow national and local electrical codes.
•Do not use near combustibles.
•Use only on a circuit load that is properly protected and capable of the rated load.
•Always unplug unit from power supply before servicing or cleaning.
FAILURE TO COMPLY RISKS PERSONAL INJURY, SHOCK HAZARD, FIRE, OR DAMAGE TO EQUIPMENT.
CAUTION
Personal injury hazard. Keep fingers, hands, and foreign objects out of hopper or chute opening.
Model 890T must be bolted to the counter to prevent possible bodily injury from overturning.
NOTICE
Never connect to an overloaded circuit or to an extension cord, otherwise serious damage to the motor may
result.
CAUTION: Risk of bodily injury due to tipping.
Use care when installing Model 890T.
NOTICE: It is essential that full voltage and amperage
always be available as it takes full power to grind
coffee.
Please read this manual before operating the grinder.
1. Carefully remove grinder from carton.
2. Place grinder in position on shelf, counter
or other flat surface.
3. (Model 890T only). Using (4) provided 5/16”18 x 1 1/2” bolts, washers, and nuts, attach
grinder securely to counter.
4. Plug grinder into the specified power
source. (Check rating plate on back of unit
for voltage and amperage requirements.)
Do not use an extension cord.
5. Fill hopper with whole bean coffee.
6. Grind a small amount of whole bean coffee
following operating instructions as
described in this manual
7. If there is any problem, consult the
Troubleshooting Guide in this manual, (also
on back of grinder.)
If you need help, call GMCW Technical Service
Department for help, (502) 425-4776 or (800) 695-4500
(USA & Canada only) 8 AM - 6 PM EST.
Prior authorization must be obtained from GMCW for
all warranty claims.
Installation
For your safety and the safety of others, read all warnings and the operator’s manual before installing or using
the product.
DANGER: This term warns the user of imminent hazard that will result in serious injury or death.
WARNING: This term refers to a potential hazard or unsafe practice, which could result in serious injury or
death.
CAUTION: This term refers to a potential hazard or unsafe practice, which could result in minor or moderate
injury.
NOTICE: This term refers to information that needs special attention or must be fully understood.
Page 4

Your new coffee grinder is easy to operate and
maintain. Before you place it in service, please have all
personnel familiarize themselves with these
instructions. Keep this manual in a convenient place for
ready reference.
How to Operate
1. Turn the selector knob to the desired grind
setting.
2. Fill the hopper with the desired type and
amount of whole bean coffee. Close the
lid.
3. Place the bag underneath the spout.
4. Press the start button. *810 model - Press
the grinder switch to the ON position.
5. The grinder will automatically stop when
the bag is removed.**
* 810 model - Once coffee is ground, press
the grinder switch to the off position or
grinder will continuously run.
** On models 835 and 875 the stop button
may be pressed after the grinder has
completed grinding.
6. Remove bag from coffee spout once coffee
is ground.
Grinds
Before shipment, this grinder has been tested with
coffee and has been accurately adjusted to deliver
ground coffee to normal auto drip specifications.
The Grinding Burrs are made of an extremely hard and
wear resistant material. From time to time, grind
adjustments (see following instructions) may be
necessary. If the grind runs coarser than expected after
normal adjustment and the grind time has increased,
the burrs may have excess wear and should be
replaced. New burrs should always be installed as a
pair, never one or the other, as they are accurately
ground and lapped in pairs. Old burrs cannot be
resharpened.
Grind Adjustment
Tools required: Phillips screwdriver
Large blade screwdriver
Pliers
1. Remove all coffee from the hopper.
2. Set selector knob to the finest setting
(Espresso or Turkish) depending on the
model.
3. Loosen both knob retainer screws in
selector knob one turn only.
4. While pressing the bag switch, located
behind the spout, press the start button so
that the grinder will run during
adjustment.
*810 model - Press the on or start button
so that the grinder will run during
adjustment.
5. With the grinder still running, turn the
adjusting screw in the center of the selector
knob slowly to the right until a slight
chirping noise is heard. Immediately turn
the adjusting screw to the left until
chirping noise stops. This is the finest grind
obtainable.
6. Tighten both of the knob retainer screws.
Once the finest grind has been set, the
other grind settings will automatically set
correctly.
7. Press the stop or off button.
NOTICE: Always be sure the grinding burrs are not
touching while the machine is running on the
ESPRESSO/TURKISH setting. Otherwise serious damage
to the motor may result.
Protection
This grinder is equipped with both a circuit breaker and
a shear disc or shear pin to protect motor and burrs.
Circuit Breaker
This grinder is equipped with a circuit breaker to
protect the motor from overloading. When the circuit
breaker trips, the reset button will pop out
approximately 1/4” which stops the power to the
grinder. The reset button is located on the front panel
of the Model 810, 835 and 875. To reset the circuit
breaker, wait two minutes then push in the reset
button. You will hear a click as it resets. If the grinder
does not operate after resetting the circuit breaker,
there may be an obstruction in the grinding
mechanism that is stalling the motor. Turn the grind
selector knob all the way to the left. Try restarting the
grinder. If the circuit breaker “trips” again, the
obstruction was not able to pass. In this case, the
Grinder Head should be cleaned out as described in the
Shear Disc Replacement section of this manual.
4 Grindmaster
®
800 Series Coffee Grinders
Operation
Page 5

Cleaning Instructions
NOTICE: The person cleaning the parts should do so
with clean hands.
The outside of the machine can be cleaned with warm
soapy water and a damp cloth.
Grinding parts should be cleaned with a stiff brush or
dry cloth. DO NOT USE WATER. See Shear Disc
Replacement for instructions on assembling and
disassembling grinder parts. Before reassembling, wipe
motor shaft with dry cloth.
All other parts that are in contact with food must be
washed with warm soapy water, rinsed, and air-dried.
Lubrication
None required.
Shear Disc Replacement
If the motor should run and no coffee is dispensed, the
Shear Disc may have sheared. Should this occur,
perform the following operations in the sequence
given (refer to following drawing).
Tools Required: Slotted Screwdriver
Pliers
WARNING: Unplug grinder to prevent electrical
shock.
1. Remove all of the coffee beans from the
hopper.
2. Remove the Grinder Cap by taking out the
2 Cap Screws.
3. (Model 890) Turn Feedworm Assembly such
that the slot in the assembly is vertical then
push inward to release the Shear Pin.
4. Pull out the Rotary Burr and Feedworm
Assembly. Clean out the Grinder Head,
removing all coffee particles from inside of
the Grinder Head and the Grinder Cap so
that it can be reset properly.
5. Check that no obstruction has been caught
on the surface of the teeth of either burr.
Remove the Shear Cover and broken pieces
of the Shear Disc or Shear Pin. You are now
ready to reassemble the grinder
mechanism.
6. Slide the Rotory Burr and Feedworm
Assembly onto the Drive Shaft.
(Model 810, 835, 875) Insert the shear drive
so that the Motor Shaft tongue engages
into the shear drive notch.
7. (Model 810, 835, 875) Insert a new Shear
Disc by aligning the slot in the Shear Drive
with the slot in the hub of the Feedworm.
(Model 890) Align slot in Feedworm
Assembly with the hole in the motor shaft.
Install new Shear Pin.
8. Reassemble the Shear Cover and Grinder
Cap. Make certain the Grinder Cap is
screwed on tight and is sealed properly
against the head and not tilted or
misaligned. Otherwise, a proper grind
cannot be obtained.
9. Your grinder is now ready to grind.
800 Series Coffee Grinders Grindmaster
®
5
Cleaning & Maintenance
Page 6

If you still need help, call GMCW Technical Service Department, (502) 425-4776 or (800) 695-4500 (USA & Canada
only) (Monday through Friday 8 AM - 6 PM EST). Please have the model and serial number ready so that accurate
information can be given.
Prior authorization must be obtained from GMCW for all warranty claims.
GMCW provides the industry’s BEST warranty. Visit our website at GMCW.com for warranty terms and
conditions.
6 Grindmaster
®
800 Series Coffee Grinders
Troubleshooting Guide
Before you call for help, please read the following:
WARNING: Unplug power cord from outlet before cleaning or servicing your grinder.
Problem Possible Cause Solution
Grinder will not start when Bag not under spout. Place bag underneath spout.
START button is pushed Plug not in outlet properly. Install plug in outlet.
No power to outlet. Check outlet with lamp or radio to verify
outlet has power.
Grinder runs or hums but no Circuit breaker has tripped. Reset circuit breaker by pushing in reset
coffee is dispensed button until you hear a click.
Shear disc is broken. Replace shear disc. See Shear Disc
Replacement or instructions on back of
grinder.
Obstruction in opening to grinding Unplug unit. Empty beans out of hopper
chamber. and clear obstructions. See Shear Disc
Replacement for disassembly and
assembly instructions.
Excessive amount of coffee Defective chaff mixer spring. If bent, broken, or missing, replace spring.
chaff flying about If stuck open with coffee, clean out coffee
to free spring.
Outlet not properly grounded. Check power cord end and outlet for
proper ground.
Static electricity. Tighten all nuts, bolts, and screws and
verify outlet is grounded.
Circuit breaker continuously Insufficient amperage due to use of Plug unit directly into outlet. Do not use.
trips extension cord. extension cord.
Insufficient amperage due to Designate single line for grinder. Do not
overloaded line. use multi-outlet box.
Grind setting needs adjustment. Adjust grind to coarser setting (see Grind
Adjustment).
Page 7

800 Series Coffee Grinders Grindmaster
®
7
Parts Diagram and List
Page 8

8 Grindmaster
®
800 Series Coffee Grinders
Parts Diagram and List (continued)
800 Series
Item # DESCRIPTION
120V GROCERY GRINDER PART NUMBERS
230V GROCERY GRINDER PART NUMBERS
810-BS
835-BS
875-BS &
875-RS
890-BS
890-B-T
810E-BG
835-B-
230VG
835-R-
230VG
835-R-
230VS
875-B-
230V
875-R-
230V
890E-BG
1 * Casing, grocery 83332 * 83362* 82356* 83332 * 83332 * 83362 *
2 * Base 83302 * 83321 * 82355* 83302 * 83321 * 83321 *
3 * Front panel 83316 * 83301 * 83363 * 82362* 83316 * 83301 * 83363 *
4 * Lower front 83305 * 80072 80073 82360 83305 * 80072 80073
5 * Top, bifold lid - 83308BK or 88308RK 6 * Lid, bifold hinge - 88704BK or 88704RK -
7 *
Top, 800 series
sanitation
83451BK or 83451RK - 83451 *
8 * Lid, 800 series sanitation 83450BK or 83450RK - 83450 *
9 Knob, lid 86223 86246 86223 86246
10 Screw, #8 x 1/4 ph tr hd
11 Screw, #8 x 3/8" sl ovl 86914 86914
12 Plate, knob retainer 82024 82024
13 Knob, grind select 82022 82022
14 Pointer, knob 88027 88027
15 Screw, #6-32 x 1/4" 86866 86866
16 Plate, detent 83361 82025 83361 82025
17 Screw, #8-32 x 1/4" 86224 86224
18 Screw, grind adjust 82023 86434 82023 86434
19 Pin, grind adjust 71298 71298
20 Screw, 5/16-18 x 1" 86887 86887
21 Plunger, detent 83318 83318
22 Spring, detent 83443 83443
23 Grinder cap 82021 86439 82021 86439
24 Cover, shear 86355 86355
25
Disc, shear (890 - Shear
pin)
86123 86620 86123 86620
26 Drive, shear 86154 - 86154 27 Feedworm 85188 86468 85188 86468
28 Burr set 85281W 86430 85281W 86430
29 Screw, #10-32 x 5/16" 350-00014 350-00014
30 Feedworm spring - 86432 - 86432
31 Tension spring 86118 86438 86118 86438
32 Thrust collar 86304 - 86304 33 Grinder head 84171S 84172 86435 84171S 84172 86435
34 Nut, 1/4-20 cage 86864 86864
35
Motor, 1/2hp 120VAC
60Hz [230VAC 60Hz]
86419 86581 [86421] 86581
36 Gasket, hopper 88211 88211
37 Finger guard 83324 83324
38 Hopper 83356 88280 82365 83356 88280
39
Circuit breaker, 10amp
for 120VAC [5amp for
230VAC]
86618 [83107]
40
Screw, #10 x 1/2", sems,
tr ph
86868 86868
41 Screw, spout flap - 60288 - 60288
42
Eyelet, 0.162 ID, rolled
edge
- 82039 - 82039
Page 9

800 Series Coffee Grinders Grindmaster
®
9
Parts Diagram and List (continued)
800 Series
Item # DESCRIPTION
120V GROCERY GRINDER PART NUMBERS
230V GROCERY GRINDER PART NUMBERS
810-BS
835-BS
875-BS &
875-RS
890-BS
890-B-T
810E-BG
835-B-
230VG
835-R-
230VG
835-R-
230VS
875-B-
230V
875-R-
230V
890E-BG
43 Spout flap - 82036 - 82036
44 Screw, chaff spring 07023-01 86806 07023-04 86806
45 Chaff spring 84154 82026 84154 82026
46 Screw, #8-32 x 3/8" 82124 82124
47 Spout 88033 80088 82019 88033 80088 82019
48 Motor shelf 83334 83334G 83334 83334G 83334 83334 83334 83334G
49 Bolt, 1/4-20 x 5/8" 86872 86872
50 Nut, 1/4-20 Nylon - 60007 87049 - 87049 60007
51 Bushing, spacer - 83253 - 83253
52 Bag, actuator - 80084 - 80084
53 Bushing, flanged - 83252 - 83252
54 Bracket, switch - 83250 - 83250
55 Switch, micro - 80083 - 80083
56
Screw, #4-40 x 5/8" sl bd
hd
- 86928 - 86928
57 Nut, 4-40 hex - 86929 - 86929
58
Capacitor, 120VAC 60Hz
[230VAC 50Hz]
86144 [86179]
59 Screw, #8-32 x 3/8" 86874 86874
60 Screw, #8-32 x 1/4" - -
61
Relay, 120VAC
[Relay, 230VAC]
- 85303 - [85275] [83106]
62 Tidy tray drawer - 83323 - 83323
63 Tidy tray cover - 83322 - 83322
64
Power cord, standard
120VAC [1.5MM CE]
86222 [61453]
65
Strain relief, standard
cord
86071 86071
66 Switch, start 70449 70445 88056 88056 70449 70445 88056
67 Switch, stop - 83327 88057 - 83327 88057
70 Screw, #6-32 x 1/4", SS - 86993
71
Relay, Motor Start,
230VAC
- 86424
72 Finger guard - - 83297
73
Screw, #8-32 x 1/2",
Ground
86867 86867
74 Nut, #8-32, KEPS 86810 86810 86810
77 Harness, wiring 83341 82029 84143 82029
78 Harness, bag switch - 80086 - 80086
Page 10

10 Grindmaster
®
800 Series Coffee Grinders
Wiring Diagram
800 Series 120V Wiring Diagrams
BLK/WHT
NCNC
Page 11

800 Series Coffee Grinders Grindmaster
®
11
Wiring Diagram (continued)
800 Series 230V, 50Hz Wiring Diagrams
Page 12

©1995 GMCW
Printed in USA
0615 Form # GR-380-18
Part # 83427
GMCW
4003 Collins Lane, Louisville, KY 40245 USA
Phone: 502.425.4776 Toll Free: 800.695.4500
Fax: 502.425.4664
Web: gmcw.com Email: info@gmcw.com
Page 13

MOULINS À CAFÉ SÉRIE 800
Manuel d'instruction
Modèles 810, 835, 875, 890
GMCW
4003 Collins Lane, Louisville, KY 40245 USA
Téléphone : 502.425.4776 Appel gratuit : 800.695.4500
Fax: 502.425.4664
Web: gmcw.com Email: info@gmcw.com
Modèle 810
Modèle 875
Spécifications .....................................14
Instructions de sécurité......................15
Installation .........................................15
Mode d’emploi...................................16
Nettoyage et entretien......................17
Guide de dépannage .........................18
Pièces de rechange utilisateur .........19
Schémas de câblage électrique .........22
Merci d'avoir choisi ce moulin à café de qualité. Pour votre sécurité et la sécurité des autres, lisez tous les
avertissements et le manuel d'instruction avant d’installer et d’utiliser le produit. Former correctement
tous les opérateurs. Conserver les documents de formation. Pour référence ultérieure, enregistrer le
numéro de série ici :
Table des matières
Modèle 835
©1995 GMCW
Imprimé aux USA
0615 Formulaire # GR-380-18
Elément # 83427
Modèle 890
Consulter GMCW.com pour les
informations sur la garantie actuelle.
Page 14
14 Grindmaster
®
Moulins à café série 800
Spécifications
Modèle Description Électrique
810S
Moulin à café pour usage modéré - Trémie de 1.5 lbs.
Certification sanitaire C-UL, US, ETL
120V / 920 W / 8A / 1 Ph
835S
Moulin à café pour usage modéré - Trémie de 1.5 lbs.
Certification sanitaire C-UL, US, ETL
120V / 920 W / 8A / 1 Ph
875S
Moulin à café pour usage modéré - Trémie de 3 lbs.
Certification sanitaire C-UL, US, ETL
120V / 920 W / 8A / 1 Ph
890BS
Moulin à café à meule européenne pour usage modéré
- Trémie de 3 lbs.
Certification sanitaire C-UL, US, ETL
120V / 920 W / 8A / 1 Ph
890T
Moulin à café à meule européenne pour usage modéré
- Trémie de 5 lbs.
Certification sanitaire C-UL, US, ETL
120V / 920 W / 8A / 1 Ph
Page 15

ATTENTION : Risque de blessures corporelles si
l'appareil bascule. Faire attention lors de l'installation
du Modèle 890T.
AVIS : Il est essentiel que la tension et l’ampérage
exigés soient disponibles, car une puissance électrique
totale est nécessaire pour moudre le café.
Merci de lire ce manuel avant de faire fonctionner le
moulin.
1. Sortez le moulin de son emballage avec
précaution.
2. Placez le moulin sur une étagère, un
comptoir ou sur toute autre surface plane.
3. (Modèle 890T uniquement). En utilisant les
(4) boulons, rondelles et écrous 5/16 " -18 x
1 1/2" prévues, fixez solidement le moulin
au comptoir.
4. Branchez le moulin à la source
d'alimentation requise. (Consultez la
plaque signalétique à l'arrière de l'unité
pour les exigences de tension et
d'ampérage.) Ne pas utiliser de rallonge.
5. Remplissez la trémie avec du café en grains.
6. Moulez une petite quantité de café en
grains en suivant les instructions
d’utilisation décrites dans ce manuel.
7. En cas de problème quelconque, référezvous au Guide de dépannage contenu dans
ce manuel (aussi à l'arrière du moulin).
Si vous avez besoin d’aide complémentaire, appelez le
Service Technique de GMCW, (502) 425-4776 ou (800)
695-4500 ( États-Unis et Canada uniquement) ( du lundi
au vendredi 8 heures-18 heures HNE ).
Une autorisation préalable doit être obtenue du
Service Technique de GMCW pour toutes réclamations
concernant la garantie.
Moulins à café série 800 Grindmaster
®
15
Instructions de sécurité
Information de sécurité importante
Ceci est un symbole d’alerte de sécurité. Il est utilisé pour vous alerter de dangers potentiels de blessures
personnelles. Respectez tous les messages de sécurité qui suivent ce symbole pour éviter des blessures ou la
mort.
AVERTISSEMENT
•Châssis relié électriquement à la terre.
•Ne pas déformer la prise ou le cordon.
•Suivre les codes électriques nationaux et locaux.
•Ne pas utiliser près de combustibles.
•Utiliser uniquement sur un circuit de charge qui est bien protégé et qui supporte la charge nominale.
•Débrancher le moulin à café avant le nettoyage et l’entretien.
LE NON-RESPECT DE CES AVERTISSEMENTS PEUT ENTRAÎNER DES BLESSURES, CHOC ÉLECTRIQUE, INCENDIE, OU
DES DÉGÂTS MATÉRIELS.
ATTENTION
Risque de blessures. Gardez les doigts, les mains et les objets étrangers hors de la trémie ou de l'ouverture de la
goulotte.
Le modèle 890T doit être boulonné au comptoir pour éviter des blessures corporelles lors d'un basculement
éventuel.
AVIS
Ne branchez jamais le moulin en surcharge électrique ou à une rallonge électrique, sinon le moteur risque d'être
gravement endommagé. NE PAS UTILISER DE RALLONGE ÉLECTRIQUE.
Installation
Pour votre sécurité et la sécurité des autres, lisez tous les avertissements et le manuel d'instruction avant d’installer
et d’utiliser le produit.
DANGER : Ce terme prévient l’utilisateur d’un danger de mort ou de blessure grave.
AVERTISSEMENT : Ce terme fait référence à un danger potentiel ou une pratique dangereuse, qui pourrait
entraîner des blessures graves.
ATTENTION : Ce terme fait référence à un danger potentiel ou une pratique dangereuse, qui pourrait entraîner
des blessures mineures ou modérées ou des dégâts matériels.
AVIS : Ce terme fait référence à une information qui nécessite une attention spéciale ou doit être pleinement
comprise.
Page 16

Votre nouveau moulin à café est facile à utiliser et à
entretenir. Avant de le mettre en service, veuillez vous
assurer que tout le personnel connaisse ces
instructions ; veuillez ensuite à ce que ce manuel soit
conservé dans un endroit pratique, où il sera facile de
le consulter pour référence rapide.
Fonctionnement
1. Tournez le bouton sélecteur pour le mettre
au type de mouture désiré.
2. Remplissez la trémie avec la quantité et la
sorte de café en grains désirées. Fermez le
couvercle.
3. Placez le sac sous le bec.
4. Appuyez sur le bouton de mise en marche.
*Modèle 810 - Basculer le commutateur du
moulin sur la position ON.
5. Le moulin s’arrête automatiquement
quand le sac est enlevé.**
* Modèle 810 - Une fois que le café est
broyé, basculez l'interrupteur du moulin en
position d'arrêt sinon le moulin va
fonctionner en continu.
** Sur les modèles 835 et 875 le bouton
d'arrêt peut être enfoncé dès que le moulin
a terminé de broyer.
6. Retirez le sac du bec lorsque le café est
moulu.
Mouture
Avant son expédition, votre moulin est réglé pour une
mouture précise correspondant à chaque méthode de
préparation de café indiquée.
Les fraises de mouture sont fabriquées à partir d’un
alliage extrêmement dur et résistant à l’usure. De
temps en temps, des ajustements sur le moulin peuvent
être nécessaire (voir les instructions ci-dessous). Si la
mouture est plus grossière que prévu après un réglage
normal, et le temps de mouture a augmenté, il est
possible que les fraises aient subi une usure excessive
et doivent être remplacées. Les nouvelles fraises
doivent toujours être montées par paire ; il ne faut
jamais en remplacer une seulement, car elles sont
meulées et rodées en paires. Les anciennes fraises ne
peuvent pas être réaffûtées.
Réglage de la mouture
Outils nécessaires : Tournevis Phillips
Tournevis à lame longue
Pinces
1. Videz le réservoir de son café.
2. Réglez le sélecteur sur le réglage le plus fin
(Espresso ou Turkish) en fonction du
modèle.
3. Desserrez d’un tour seulement les deux vis
de blocage du bouton sélecteur.
4. Tout en appuyant sur l’interrupteur du sac,
situé derrière le bec, appuyez aussi sur le
bouton de mise en marche < START >, pour
que le moulin tourne pendant le réglage.
Modèle 810 : Appuyez sur le bouton de
mise en marche < On > ou < START >, pour
que le moulin tourne pendant le réglage.
5. Pendant que le moulin tourne, tournez
lentement la vis de réglage au centre du
bouton sélecteur vers la droite, jusqu’à ce
qu’un léger clic se fasse entendre. Tournez
alors immédiatement la vis de réglage vers
la gauche, d’un cran de mouture. Ceci
produit la mouture la plus fine possible.
6. Serrez les deux vis de blocage du bouton.
Une fois que la mouture la plus fine a été
réglée, les autres consignes de mouture
seront établies automatiquement et
correctement.
7. Appuyez sur le bouton d’arrêt < STOP > ou
< Off >.
AVIS : Il faut toujours s’assurer que les fraises de
mouture ne se touchent pas quand le moulin est en
réglage ESPRESSO/TURKISH, afin d’éviter de sérieuses
avaries au moteur.
Protection
Ce moulin est équipé à la fois d'un disjoncteur et d'un
disque de cisaillement ou goupille de cisaillement pour
protéger le moteur et les fraises.
Disjoncteur
Ce moulin est équipé d’un disjoncteur, qui protège le
moteur contre la surcharge. Si le disjoncteur se
déclenche, le bouton de remise en marche ressort
automatiquement de 5 mm, ce qui coupe l’alimentation électrique au moulin. Le bouton de remise en
marche se trouve sur le panneau avant (Modéles 810,
835, 875).
16 Grindmaster
®
Moulins à café série 800
Mode d’emploi
Page 17

Pour ré-enclencher le disjoncteur, attendez deux
minutes, puis appuyez sur le bouton de réinitialisation.
Vous entendrez un clic, indiquant le réenclenchement.
Si le moulin ne marche pas après le réenclenchement
du disjoncteur, il est possible qu’il existe une
obstruction dans le mécanisme de mouture, qui fait
caler le moteur. Tournez le bouton sélecteur à fond
vers la gauche. Essayez de remettre le moulin en
marche. Si le disjoncteur se déclenche à nouveau, c’est
que l’obstruction n’a pas pu passer. Dans ce cas, la tête
de mouture devra être nettoyée, comme indiqué dans
la section Changement du disque de broyage de ce
manuel.
Nettoyage et entretien
Nettoyage
REMARQUE : La personne qui lave ces pièces doit avoir
les mains propres.
L'extérieur de la machine peut être nettoyé avec de
l'eau chaude savonneuse et un chiffon humide.
Les pièces de broyage doivent être nettoyées avec une
brosse dure ou un chiffon sec. NE PAS UTILISER D'EAU.
Consultez la section Changement du disque de
broyage de ce manuel, en ce qui concerne les
instructions de montage et de démontage des
composants du moulin. Avant de remonter, essuyez
l'arbre moteur avec un chiffon sec.
Toutes les pièces étant en contact avec la nourriture
doivent être lavées à l’eau savonneuse chaude, rincées,
et séchées à l’air.
Lubrification
Aucune lubrification n’est nécessaire.
Changement du disque de broyage
Si le moteur tourne sans production de café, ceci peut
signifier que le déclencheur du disque de broyage a
pu étre en fonctionnement. Dans ce cas, suivez les
étapes ci-dessous, en respectant l’ordre donné. Voir le
dessin suivant.
Outils nécessaires : un tournevis à lame plate et des
pinces
AVERTISSEMENT : Débranchez la machine
pour éviter un choc électrique.
1. Videz le réservoir de café de tout son
contenu.
2. Enlevez le Couvercle de broyage, en
dévissant les deux vis à chapeau.
3. (Modèle 890) Tournez l'ensemble serpentin
de telle sorte que la fente dans
l'assemblage soit verticale puis poussez vers
l'intérieur pour libérer la goupille de
cisaillement.
4. Tirez sur la fraise rotative et sur le serpentin
pour les sortir. Nettoyez la Tête de
mouture, enlevant tous les grains de café
de son intérieur, ainsi que du Couvercle de
broyage, afin de pouvoir le remettre
correctement en place.
5. Vérifiez qu’aucune obstruction ne se trouve
sur la surface des dents de chaque fraise.
Enlevez le couvercle, et tout élément cassé
du disque de cisaillement ou goupille de
cisaillement. Vous êtes maintenant prêt à
remonter le mécanisme de mouture.
6. Faites glisser la fraise rotative et le
serpentin sur l’arbre de commande.
(Modéles 810, 835, 875) Introduisez la
commande de broyage de façon à ce que
la languette de l’arbre du moteur soit
engagée dans l’encoche de la commande
de broyage.
7. (Modéles 810, 835, 875) Introduisez le
nouveau disque de cisaillement en alignant
la fente de la commande de broyage avec
celle du moyeu du serpentin.
(Modèle 890) Alignez la fente du serpentin
avec le trou dans l'arbre du moteur.
Installez la nouvelle goupille de
cisaillement.
8. Replacez le Cisaillement couvercle et le
Couvercle de broyage. Vérifiez que le
Couvercle de broyage est vissé fermement
et est en position correcte contre la tête (il
ne doit pas être mal positionné). Son
mauvais positionnement empêcherait
d’obtenir une mouture correcte.
9. Votre moulin est maintenant prêt au
fonctionnement.
Moulins à café série 800 Grindmaster
®
17
Mode d’emploi (suite)
Page 18
Avant d'appeler pour une aide complémentaire, merci de lire ce qui suit :
AVERTISSEMENT : Débrancher la prise électrique avant d’effectuer n’importe quelle opération de
nettoyage.
Si vous avez besoin d’aide complémentaire, appelez le Service Technique de GMCW, (502) 425-4776 ou (800) 6954500 ( États-Unis et Canada uniquement) ( du lundi au vendredi 8 heures-18 heures HNE ). Veuillez avoir les
numéros de modèle et de série à portée de la main pour pouvoir obtenir des renseignements exacts.
Une autorisation préalable doit être obtenue du Service Technique de GMCW pour toutes réclamations concernant
la garantie.
Consulter GMCW.com pour les informations sur la garantie actuelle.
18 Grindmaster
®
Moulins à café série 800
Guide de dépannage
PROBLÈME CAUSE POSSIBLE SOLUTION
Le moulin ne se met pas en
marche quand on appuie sur le
bouton de mise en marche
< START >.
Il n’y a pas de sac sous le bec. Placez le sac sous le bec.
La prise n'est pas bien branchée. Bien enfoncer la prise.
Pas d'alimentation vers la prise
murale.
Testez la prise murale avec une lampe ou
un poste radio pour s’assurer de son
alimentation.
Le disjoncteur s’est déclenché. Réenclenchez le disjoncteur en appuyant
sur le bouton de remise en marche
jusqu’à ce qu’un déclic se fasse entendre.
Le moulin tourne ou émet un
son, sans production de café
Le disque de broyage est cassé. Changez le disque de broyage. Consultez
la section Changement du disque de
broyage ou les intructions à l'arrière
du moulin.
Obstruction dans l’ouverture du
compartiment de broyage.
Débranchez l’appareil. Videz le réservoir
de son café et enlevez l’obstruction.
Consultez la section Changement du
disque de broyage, pour les instructions
de démontage et de remontage.
Excès de pelures flottantes Ressort du mélangeur défectueux. Si le ressort est déformé, cassé ou absent,
remplacez-le.
En cas de blocage en position ouverte par
du café, enlevez le café pour libérer le
ressort.
Mauvaise mise à la terre de la sortie. Vérifiez la mise à terre du cordon
électrique et de la sortie.
Électricité statique. Serrez tous les écrous, boulons et vis, et
vérifiez la mise à la terre de la prise
murale.
Le disjoncteur se déclenche
constamment.
Courant insuffisant dû à l’utilisation
d’une rallonge électrique.
Branchez l’appareil directement sur la
prise, sans utiliser de rallonge électrique.
Courant insuffisant dû à un secteur
surchargé.
Réservez un secteur électrique pour le
moulin. Ne pas employer de boîte à prises
multiples.
Réglage nécessaire des points de
consigne de la mouture.
Réglez la mouture à un point de consigne
plus gros. Consultez la section Réglage
de la mouture.
Page 19

Séries 800 vue éclatée
LES NUMÉROS DE PIÈCE AVEC UN ASTÉRISQUE (*)
SONT DES ÉLÉMENTS PEINTS, ET LA COULEUR DEVRA
ÊTRE PRÉCISÉE AU MOMENT DE LA COMMANDE.
REMARQUE: VEUILLEZ VOUS RÉFÉRER À LA LISTE DES
NUMÉROS DE PIÈCE DE LA PAGE SUIVANTE POUR
PLACER VOTRE COMMANDE.
Moulins à café série 800 Grindmaster
®
19
Pièces de rechange utilisateur
810 HAUT – PARTIE AVANT
INFÉRIEURE, KIT NO. 83299K*
SÉRIE 800 – HAUT ET COUVERCLE ELT,
KIT NO. 83426K*
Modèle 890
Page 20
20 Grindmaster
®
Moulins à café série 800
Pièces de rechange utilisateur (suite)
Séries 800
DESCRIPTION
120V NUMÉROS DE PIÈCE DES MOULINS
COMMERCIAUX
230V NUMÉROS DE PIÈCE DES MOULINS
COMMERCIAUX
810-BS
835-BS
875-BS &
875-RS
890-BS
890-B-T
810E-BG
835-B-
230VG
835-R-
230VG
835-R-
230VS
875-B-
230V
875-R-
230V
890E-BG
1 * Carter d'alimentation 83332 * 83362* 82356* 83332 * 83332 * 83362 *
2 * Base 83302 * 83321 * 82355* 83302 * 83321 * 83321 *
3 * Panneau avant 83316 * 83301 * 83363 * 82362* 83316 * 83301 * 83363 *
4 * Partie avant inférieure 83305 * 80072 80073 82360 83305 * 80072 80073
5 * Haut, couvercle pliant - 83308BK or 88308RK -
6 * Couvercle, charnière pliante - 88704BK or 88704RK -
7 * Haut, série 800 ETL 83451BK or 83451RK - 83451 *
8 * Couvercle, série 800 ETL 83450BK or 83450RK - 83450 *
9 Bouton, couvercle 86223 86246 86223 86246
10 Vis No. 8 x 1/4” ph tr hd
11
Vis No. 8 x 3/8”, fendue
oval
86914 86914
12 Plaque, retenue du bouton 82024 82024
13 Bouton, sélecteur mouture 82022 82022
14 Pointeur, bouton 88027 88027
15 Vis No. 6-32 x 1/4” 86866 86866
16 Plaque, arrêt 83361 82025 83361 82025
17 Vis No. 8-32 x 1/4” 86224 86224
18 Vis, réglage mouture 82023 86434 82023 86434
19 Goupille, réglage mouture 71298 71298
20 Vis 5/16-18 x 1” Lg 86887 86887
21 Piston, arrêt 83318 83318
22 Ressort, arrêt 83443 83443
23 Couvercle de broyage 82021 86439 82021 86439
24 Couvercle, cisaillement 86355 86355
25
Disque, cisaillement (890 Goupille, cisaillement
86123 86620 86123 86620
26 Commande, cisaillement 86154 - 86154 27 Serpentin 85188 86468 85188 86468
28 Jeu de fraises 85281W 86430 85281W 86430
29 Vis No. 10-32 x 5/16” 350-00014 350-00014
30 Ressort de serpentin - 86432 - 86432
31 Ressort de tension 86118 86438 86118 86438
32 Bague de butée 86304 - 86304 33 Tête de broyage 84171S 84172 86435 84171S 84172 86435
34 Écrou 1/4-20 Cage 86864 86864
35
Moteur, 1/2hp 120VAC
60Hz [230VAC 50Hz]
86419 86581 [86421] 86581
36 Joint trémie 88211 88211
37 Protège doigts 83324 83324
38 Trémie 83356 88280 82365 83356 88280
39
Disjoncteur, 10amp pour
120VAC [5amp pour
230VAC]
86618 [83107]
Page 21

Moulins à café série 800 Grindmaster
®
21
Pièces de rechange utilisateur (suite)
Séries 800
DESCRIPTION
120V NUMÉROS DE PIÈCE DES MOULINS
COMMERCIAUX
230V NUMÉROS DE PIÈCE DES MOULINS
COMMERCIAUX
810-BS
835-BS
875-BS &
875-RS
890-BS
890-B-T
810E-BG
835-B-
230VG
835-R-
230VG
835-R-
230VS
875-B-
230V
875-R-
230V
890E-BG
40
Vis à rondelle intégrée No
10 x 1/2" tr ph
86868 86868
41 Vis, couvre bec - 60288 - 60288
42
Oeillet , 0.162 diamètre
intérieur, bord roulé
- 82039 - 82039
43 Couvre bec - 82036 - 82036
44
Vis, ressort pelure des
grains de café
07023-01 86806 07023-04 86806
45
Ressort pelure des grains
de café
84154 82026 84154 82026
46 Vis No. 8-32 x 3/8” 82124 82124
47 Bec 88033 80088 82019 88033 80088 82019
48 Support moteur 83334 83334G 83334 83334G 83334 83334 83334 83334G
49 Boulon, 1/4-20 x 5/8" 86872 86872
50 Écrou, 1/4-20 Nylon - 60007 87049 - 87049 60007
51 Douille , entretoise - 83253 - 83253
52 Commande sac - 80084 - 80084
53 Douille à bride - 83252 - 83252
54 Support d’interrupteur - 83250 - 83250
55 Micro-interrupteur - 80083 - 80083
56
Vis 4-40 x 5/8”, tête
rainurée
- 86928 - 86928
57 Écrou, 4-40 hex - 86929 - 86929
58
Condensateur, 120VAC
60Hz [230VAC 50Hz]
86144 [86179]
59 Vis, 8-32 x 3/8” 86874 86874
60 Vis 8-32 x 1/4” - -
61
Relais, 120VAC
[Relais, 230VAC]
- 85303 - [85275] [83106]
62 Tiroir plateau de rangement - 83323 - 83323
63
Couvercle plateau de
rangement
- 83322 - 83322
64
Cordon d'alimentation
standard 120VAC [1.5MM
CE]
86222 [61453]
65
Décharge de traction pour
cordon standard
86071 86071
66
Interrupteur, mise en
marche (START)
70449 70445 88056 88056 70449 70445 88056
67 Interrupteur, arrêt (STOP) - 83327 88057 - 83327 88057
70 Vis 6-32 x 1/4”, SS - 86993
71
Relais 230 V.c.a. (fourni
avec moteur)
- 86424
72 Protège doigts - - 83297
73 Vis 8-32 x 1/2" fixation 86867 86867
74 Écrou, #8-32, KEPS 86810 86810 86810
77 Faisceau de câblage 83341 82029 84143 82029
78
Faisceau du détecteur de
sac
- 80086 - 80086
Page 22

22 Grindmaster
®
Moulins à café série 800
Schémas de câblage électrique
Schémas de montage électrique pour les Séries 800 120 volt
SÉRIE 810
CONDENSATEUR
NOIR
NOIR
BLANC
NOIRNOIR
MOTEUR
BLANC
NOIR
DISJONCTEUR
NOIR
INTERRUPTEUR ON/OF
NOIR
BLANC
CONDENSATEUR
NOIR
NOIR
BLANC
NOIRNOIR
MOTEUR
BLANC
DISJONCTEUR
BLANC
BLANC
NOIR/ BLANC
NC NC
NOIR
NOIR
ROUGE
INTERRUPTEUR DE
MISE EN MARCHE
NO
(Normalement
Ouvert)
NOIR
ROUGE
INTERRUPTEUR
D’ARRÊT
NF
(Normalement
Fermé)
NF
DÉTECTEUR DE
SAC
ORANGE
ORANGE
R
E
L
A
I
S
NOIR
SÉRIES 835 À 890
Page 23

Moulins à café série 800 Grindmaster
®
23
Schémas de câblage électrique (suite)
Schémas de montage électrique pour les Séries 800 230volt, 50 Hz
TERRE
TERRE
Page 24

GMCW
4003 Collins Lane, Louisville, KY 40245 USA
Téléphone : 502.425.4776 Appel gratuit : 800.695.4500
Fax: 502.425.4664
Web: gmcw.com Email: info@gmcw.com
©1995 GMCW
Imprimé aux USA
0615 Formulaire # GR-380-18
Elément # 83427
 Loading...