

Page 1

CONTENTS
0 - INTRODUCTION
0.1 - Preliminary remarks .............................................................................. 2
0.2 - Symbols ................................................................................................ 3
0.3 - General safety notices .......................................................................... 3
0.4 - Guards .................................................................................................. 4
0.5 - Position of stickers ............................................................................... 5
0.6 - Safety precautions to be taken when working on the machine .............. 5
0.7 - Practical tips on making a cup of coffee ................................................ 5
1 - TECHNICAL DATA
1.1 - Background information ........................................................................ 6
1.2 - Taking delivery and unpacking ............................................................. 6
1.3 - Positioning and installation .................................................................... 7
1.4 - Specifications ....................................................................................... 8
1.5 - Guarantee ............................................................................................. 8
2 - GENERAL DESCRIPTION
2.1 General description ................................................................................. 9
2.2 Operating principles .............................................................................. 10
3 USING THE MACHINE
3.1 - Switches and switch functions ............................................................ 10
3.2 - Machine functions and operating instructions ..................................... 11
3.3 - Accessories and optional extras ......................................................... 12
4 CHECKS AND SERVICING
4.1 - Operating faults .................................................................................. 13
4.2 - General servicing ........................................................................... 13-14
pag.
5 - MAINTENANCE
5.1 - Cleaning ............................................................................................. 15
6 - SPARE PARTS
1
Page 2

SECTION 0 - INTRODUCTION
These Operating Instructions are a guide to using and maintaining the
MINIGRIMAC machine manufactured by Grimac srl.
Before USING OR WORKING ON THE MACHINE in any way, read the
whole of this manual carefully.
The manual contains all the information, advice and warnings about using
the coffee machine that are required to ensure long term reliability and
optimum operating efficiency.
The MINIGRIMAC single unit coffee machine has been designed in such a
way that it incorporates all the features of a traditional coffee machine for
bars:
component parts designed for professional use, reliability and operating
autonomy, a copper lined water heater but above all it provides coffee of
superlative quality. The MINIGRIMAC series machines have been
designed for people who really know about coffee.
Carefully follow all the advice contained in the manual in order to ensure
optimum machine efficiency and in order to ensure that it has a long
working life. Remember that the Operating Instructions are an integral part
of the product and must be kept carfully throughout the whole working life
of the machine.
If the machine is passed onto another user or owner the Operating
Instructions must go with it.
2
Page 3
0.2 - SYMBOLS
The symbols below are used to draw the reader’s attention to important
points regarding personal safety, machine safety and to certain operating
conditions.
SECTION 0 - INTRODUCTION
General operating
notice
General warning
Damage may be
caused to things
or to the coffee
machine
WARNING!
Source of danger
to persons or the
machine
WARNING!
Danger of electric
shock to persons
or electrical
damage to the
coffee machine.
0.3 - GENERAL SAFETY NOTICES
• Any use of the MINIGRIMAC machine that is not specified in this manual or
any use of products other than those approved at the time of purchase
exonerates GRIMAC srl from any liability for any harm or injury to persons
or damage to things or the machine.
THE ELECTRICAL SYSTEM MUST BE EARTHED.
• Never place hands or metal or other objects inside the machine when it is
connected to the electric power supply.
• Always contact one of our service centres for any repair or maintenance task
that is not described in this manual.
• Before working on the machine in any way, ALWAYS take out the plug from
the mains power supply socket.
• Check the power cable regularly. A worn cable is a potential source of
electrocution (see Section 4, Paragraph 4.2).
• Before using the machine to make coffee, make sure that you are perfectly
familiar with the location and function of all the controls and the machine
specifications contained in the OPERATING INSTRUCTIONS.
3
Page 4
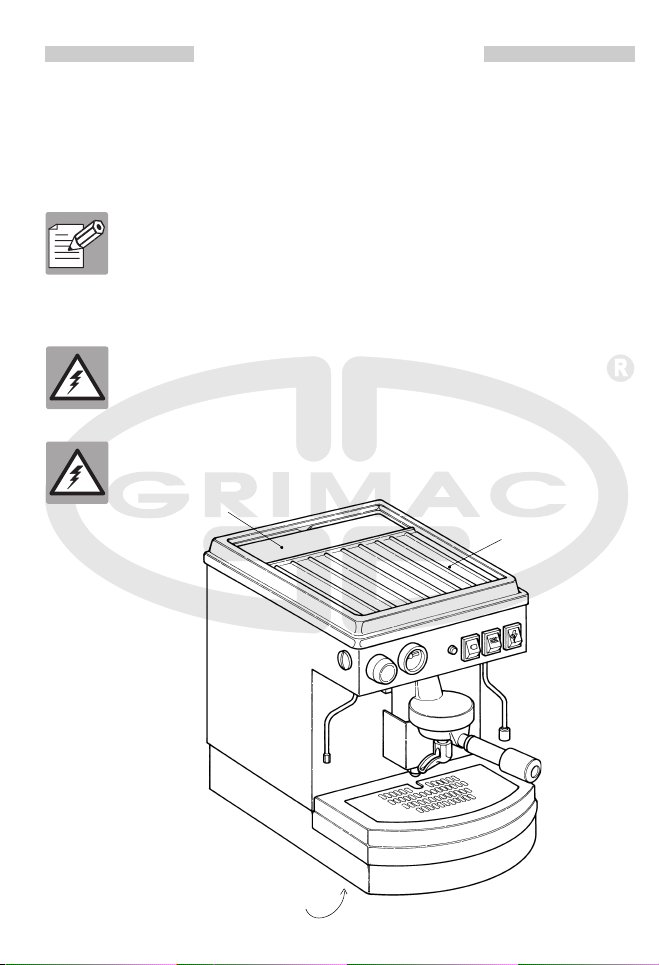
0.4 - GUARDS
The MINIGRIMAC component parts are housed inside a series of covers
or guards that isolate them from any contact with the outside and the
person using the machine.
A - Removable top guard: protects the tank containing the water supply
(MINIGRIMAC - Tank). It is not fixed by screws and is removed in
order to supply the machine with water.
In the MINIGRIMAC - Mains Supply model there is no tank under the
guard but a pressure adjuster that has been calibrated by GRIMAC
s.r.l. during testing.
B - Fixed top guard: must be removed ONLY by competent and
authorised service staff. It contains the machine’s vital working parts.
This guard can be used as a flat service on which to place cups and
saucers.
C - Bottom guard: must never be removed (ONLY by competent and
authorised service staff).
SECTION 0 - INTRODUCTION
A
B
C
4
Page 5

SECTION 0 - INTRODUCTION
0.5 - POSITION OF STICKERS
Stickers and plates displaying ‘Notices’ and ‘Warnings’ are located on the
machine. Replace them if they become illegible.
0.6 - SAFETY PRECAUTIONS TO BE TAKEN WHEN WORKING ON
THE MACHINE
• Switch off the machine and disconnect it from the electric power supply
before carrying out routine maintenance, special maintenance and general
cleaning operations.
• In or der to ensure that the machine has a long working life, any component
parts should be replaced with original GRIMAC parts by competent Grimac
approved staff.
• After carrying out any kind of maintenance, ensure that all parts of the
machine are in proper working order.
• Repairs to the electrical system must be carried out by properly qualified
service staff and only after the electric power supply has been disconnected
and the plug has been removed from the mains power supply socket
• Never use running water on the machine whilst it is switched on or being
cleaned.
• Never wash the machine with solvents, paint thinners, alcohol, etc. We
recommend the use of warm water and neutral detergent in order not to
damage the internal and external parts of the machine.
0.7 - PRACTICAL TIPS ON MAKING A CUP OF COFFEE
The MINIGRIMAC series coffee machine guarantees you a perfect cup of
coffee because it uses the same professional standard component parts as
those found in coffee machines in bars. Nevertheless, the user must ensure
that the steps prescribed in Section 3 Paragraph 3.2 are strictly adhered to
and in particular the user must ensure that the filter is filled with the correct
amounts of coffee.
The dose inserted in the filter holder (1 or 2 cups) is sufficient for just
one or two cups.
5
Page 6

SECTION 1 - TECHNICAL DATA
1.1 - BACKGROUND INFORMATION
This machine has been manufactured from component parts and materials
that conform to the new standards now in force. Each part of the
MINIGRIMAC machine has therefore been carefully designed with
particular attention being paid to the electrical system components and the
elements that come into direct contact with the coffee being dispensed.
1.2 - TAKING DELIVERY AND UNPACKING
The MINIGRIMAC coffee machine is housed in a box that protects it from
jolts and breakage.
Open the box and remove the moveable cardboard protection in order to be
able to take hold of the bottom of the machine with both hands. Lift out slowly
and carefully.
Rest the machine on a flat surface or table for the preliminary operations.
First, check that the machine is complete and undamaged.
Also check that underneath the coffee dispenser unit there is the box
containing the accessories that come supplied with the machine.
The box contains:
•a filter holder and a filter for one after dinner cup of coffee (fig. 1 ref. 13)
•a filter holder and a filter for two after dinner cups of coffee (fig. 1 ref. 14)
• a measuring spoon (fig. 1 ref. 16)
• an instrument for pressing down the coffee (fig. 1 ref. 15)
The MINIGRIMAC is tested, packed and dispatched ready assembled by
GRIMAC s.r.l. .
Any breakage or other matter is the direct responsibility of the shipper.
Check the machine carefully when taking delivery.
In the event of damage, advise GRIMAC s.r.l. of the damage ascertained.
Before connecting the coffee machine to the mains electric power supply,
check that the mains voltage is compatible with the technical
specifications.
The electrical system must be earthed.
6
Page 7

SECTION 1 - TECHNICAL DATA
1.3 - POSITIONING AND INSTALLATION
After checking that the machine is complete, locate it in the position in
which it will be used. Ensure that the position is stable and safe and allows
enough space for carrying out the different operations (fitting the filter
holder, obtaining hot water and steam)
The machine is delivered ready assembled and does not require any
mechanical adjustment.
The plug just needs to be inserted into the socket provided.
MINIGRIMAC - T
For the tank version, leave
enough space to allow the tank
to be topped up.
When the MINIGRIMAC (T/M) has gone through the above steps, the plug
merely needs to be inserted into the appropriate socket.
E' bene inoltre collocare la macchina su un piano sufficientemente alto per
evitare che sia alla portata dei bambini.
Non collocarla in luoghi di passaggio o corridoi stretti per evitare che venga
urtata.
Installation and final adjustments should nevertheless be carried out by
competent and properly qualified service staff.
MINIGRIMAC - M
Remember that the supply pipe
to the mains supply version is
1.5 m long.
When the pipe has been
connected to the mains supply,
first dispense the normal supply
of coffee and then clean the pipe
by running the water through the
coffee dispenser nozzle (fig. 2).
7
Page 8

SECTION 1 - TECHNICAL DATA
1.4 - TECHNICAL SPECIFICATIONS
Supply voltage and absorbed power
- 230 V, 900 W (Europe)
- 110 V, 900 W (North America)
Dimensions and space required
H = height = 420 mm
D = depth = 420 mm
W = width = 270 mm
- Weight: 24 kg
- Tank capacity: 5 litres (MINIGRIMAC - T)
1.5 - GUARANTEE
The machine is guaranteed for 12 months from the date of purchase and
the guarantee extends to all electrical and mechanical components.
Guarantee rights are voided if the machine is used in an improper manner
or if unauthorised persons tamper with it. Parts that are acknowledged to
be faulty will be replaced free of charge.
Transport costs shall be borne by the purchaser.
Grimac srl reserves the right to make modifications to any of its models at
any moment. It also declines all liability for harm or injury to persons or
damage to things arising from failure to observe the regulations contained
in this manual.
8
Page 9

SECTION 2 - GENERAL DESCRIPTION
2 - GENERAL DESCRIPTION
The MINIGRIMAC machine comprises the following external component
parts:
1) removable cover
2) coffee dispenser switch
3) hot water dispenser switch
4) main switch
5) steam dispenser tap
6) warning light
7) gauge
8) drip tray and grid
9) steam nozzle
10) hot water nozzle
11) flat surface for cups and saucers
12) power cable
13) filter holder plus 1 cup filter
14) filter holder plus2 cup filter
15) coffee press
16) measuring spoon
17) European plug
18) American plug
1
11
9
12
17
18
15
16
675
14
32
4
10
8
1
13
9
Page 10

SECTION 2 - GENERAL DESCRIPTION
2.2 OPERATING PRINCIPLES
Coffee dispenser: the machine has been designed to dispense coffee from
the nozzle of a filter holder filled with ground coffee.
The operating principles are the same as that for traditional espresso
coffee machines. It has an internal water heater and can in fact also
dispense hot water and steam from separate nozzles in order to make tea,
cappuccini, etc...
SECTION 3 - USING THE MACHINE
3.1 - SWITCHES AND SWITCH FUNCTIONS
• 0/1 Main switch. Set at 1 to switch on and set at 0 to switch off completely.
• Coffee dispenser switch: when the warning light is off, press the dispenser
switch to obtain a supply of coffee and press again to interrupt the supply.
10
• Warning light: if the light is off, the machine is ready to dispense coffee;
if the light is on, the temperature is not ideal. Wait for a few seconds until
the light goes out.
• Hot water dispenser switch: use this switch to obtain a supply of almost
boiling water from the nozzle on the right.
• Steam dispenser tap: turn clockwise to obtain steam from the nozzle on
the left. Turn anticlockwise to close (as indicated by direction of arrow).
Page 11

SECTION 3 - USING THE MACHINE
3.2 - MACHINE OPERATING PRINCIPLES AND OPERATING
INSTRUCTIONS
DISPENSING COFFEE
Switch on the main switch and wait approximately 8-10 minutes for the
warning light to go off (fig. 3).
Choose the filter holder supplied for one or two cups (fig. 1, ref. 13 or 14)
and use the measuring spoon (fig. 4) to fill the coffee filter. One spoonful
corresponds to the necessary dose for one coffee. Next, press down the
coffee (fig. 5) and refit the filter holder.
Place the cup(s) in position and press the switch to dispense the coffee
(fig. 6).
When the required amount of coffee has been dispensed, press the
switch again.
Remove the filter holder and throw away the coffee grounds.
Turn off the machine if it is used only occasionally.
DISPENSING HOT WATER
To obtain a supply of hot water, just keep the relative switch (fig. 7)
pressed until the required amount has been obtained.
No more than the amount required for a cup of tea (about 200 c.c.) should
be dispensed at any one time and you should wait for the warning light to
go out.
Warning! Exercise great caution in order to avoid scalding!
DISPENSING STEAM
To obtain a supply of steam, turn the knob anticlockwise (fig. 8). The jet of
steam that is dispensed is sufficient to boil a considerable quantity of
liquids.
Warning! Exercise great caution in order to avoid scalding!
Before using the machine to dispense coffee in the normal manner,
it is advisable to clean the internal elements (heat exchanger, pipes
and pod holders) by ‘throwing away’ the first coffee that is made. The
machine will then be ready to serve excellent espresso coffee.
11
Page 12

SECTION 3 - USING THE MACHINE
3.3 - ACCESSORIES AND OPTIONAL EXTRAS
The GRIMAC series of accessories includes the indispensable MIGNON
coffee grinder and measurer for instant grinding and spot on measuring of
the quantity. It is compact and is the perfect companion for your coffee
machine.
For the MINIGRIMAC - M the water filter GRIMAC 5LT should be fitted.
This is part of our range of accessories and should be fitted between the
mains pipe and the fitting on the machine.
GRIMAC RICAMBI also supplies special adapters for the filter support if
you should wish to use pods containing pre-meausured quantitities of
coffee (pod system).
12
Page 13

SECTION 4 - CHECKS AND SERVICING
4.1 - OPERATING FAULTS
The machine may not work because:
- the plug has not been inserted into the mains socket;
- the mains switch has not been pressed;
- the filters are blocked;
- there is no water in the tank (MINIGRIMAC -T);
- there is an obstruction to the mains water supply (MINIGRIMAC -M).
If the above operations have been carried out and the filters are clean
(see 5.1) the machine must be faulty and should therefore be checked by
one of our service centres.
WARNING! Before removing the guards, ALWAYS remove the plug
from the mains socket. Never place hand or objects in the machine
when it is still connected to the power supply.
4.2 - GENERAL SERVICING
POWER CABLE
Check the power cable regularly
and replace if it is worn or
damaged.
Remove the plug from the mains
socket. Remove the wires from
the terminal (located inside the
machine).
Loosen the 3 screws that fix the
terminal to the machine.
Remove the worn cable,
reconnect the wires in the
manner indicated in the drawing.
Reconnect the wires to the
terminal.
Refit the terminal and tighten the
3 terminal screws.
L
N
This operation should be
carried out by an authorised
person.
13
Page 14

SECTION 4 - CHECKS AND SERVICING
WATER TANK
Check the water level occasionally and top up as necessary. To top up, lift
the cover and unscrew the plug as indicated in fig. 10.
A device has nevertheless been fitted that stops the machine if the water
level drops below a preset limit.
Add water to reset this safety device.
PRESSURE GAUGE
A pressure gauge has been supplied to check pressure inside the heat
exchanger, see fig. 1, ref. 7.
Ensure that machine operating pressure is between 1 and 1.3 bar; if it is
lower, wait for a few seconds for the required water temperature to be
reached.
If the temperature is not reached, ask an authorised service centre for
assistance.
14
Page 15

5.1 - CLEANING
FILTER: If the machine is used only occasionally, after making the last
cup of coffee, wash the filter. If the filter appears to be worn out, replace it
with an original GRIMAC spare part.
WARNING! the water is dispensed at an extremely high temperature.
Danger of scalding!
This ensures that the filter remains cleaner for longer.
More thorough cleaning should nevertheless be carried out at regular
intervals. Use a screwdriver to prise open (fig. 6). If the filter is worn,
replace it.
TRAY AND GRID: remove the tray and grid from their seat at regular
intervals to remove traces of spilt liquid.
Use only boiling water to disinfect (fig. 1, ref. 8).
WATER TANK FILTER (MINIGRIMAC - T): the water tank is fitted with a
filter that is connected to the mains supply pipe and softens the water. On
no account tamper with the filter.
- Clean every 2 months by placing it in a salt and water solution.
- After 3 washes, (6 to 8 months’ use) replace the filter with a new one.
OUTER CASING: to keep the outer casing clean, use a sponge or cloth
soaked in a specific cleaning liquid (a neutral detergent).
SECTION 5 - MAINTENANCE
Do not use solvents, abrasive powders, or steel wool.
SECTION 6 - SPARE PARTS
Replace component parts only with ORIGINAL GRIMAC SPARE PARTS.
These can be obtained from our service centres.
GRIMAC accepts no liability for MINIGRIMAC operating faults that develop
because non original spare parts have been used.
Any repairs must be carried out by one of our service centres.
15
Page 16

2
3
16
7
8
Page 17

4
5
6
9
10
17
 Loading...