

Page 1
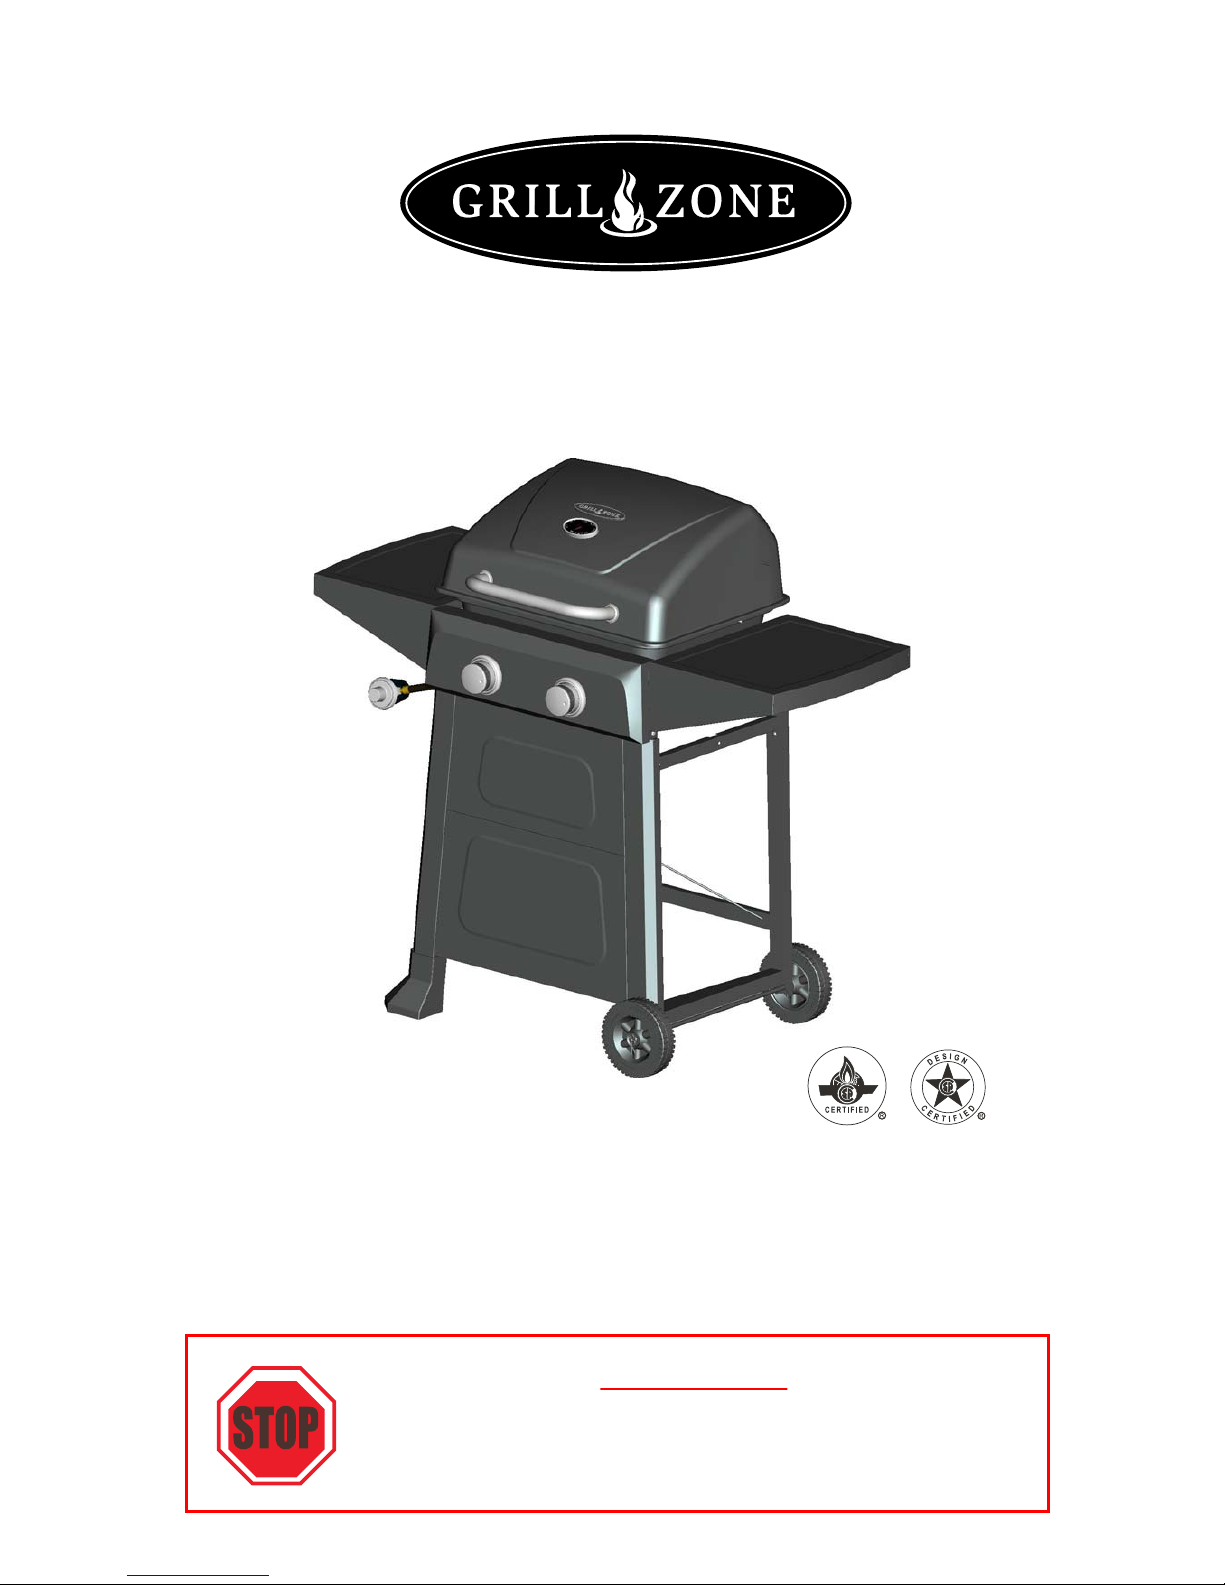
Consumer: Retain this manual for future reference.
Installer: Leave this manual with consumer.
PLEASE CONTACT 1-866-814-0585 FOR ASSISTANCE
DO NOT RETURN TO PLACE OF PURCHASE
OFFICE HOURS 9AM TO 5PM EST
TM
MODEL NO.: SRGG21201 / TV NO.: 143761
30,000 BTU Gas Grill
USER MANUAL
FOR OUTDOOR USE ONLY
Page 2
2
SAFETY INSTRUCTIONS
DANGER
If you smell gas:
1. Shut off gas to the appliance.
2. Extinguish any open flame.
3. Open lid.
4. If odor continues, keep away from the appliance and immediately call your gas
supplier or your fire department.
WARNING
1. Do not store or use gasoline or other flammable liquids OR vapors in the vicinity
of this or any other appliance.
2. An LP cylinder not connected for use shall not be stored in the vicinity of this or
any other appliance.
Page 3
3
SECTION ONE
Safety Instructions………………………… 4
Placement of the Grill……………………...8
SECTION TWO
Exploded View…………………………...…
Part List and Hardware List…………..…...
Assembly Instructions…….………..……....
Gas cylinder Installation Instruction….…..
SECTION THREE
Gas Hook-Up……………………………….
Leak Testing………………………………...
Installer Final Check ………………………
Read this User Manual carefully and
completely before using your grill
to reduce the risk of fire, burn
hazard or other injury.
SECTION FOUR
Operating Instructions………………..…
Lighting Instructions……………………..
SECTION FIVE
Care & Maintenance ………………….…
How to Replace Main Burner………...…
Trouble Shooting…………………………
SECTION SIX
Limited Warranty………………..………..
TABLE OF CONTENTS
9
10
11
17
22
23
25
26
27
28
18
21
22
Page 4
4
WARNING
Do not try lighting this appliance without first
reading the “LIGHTING INSTRUCTIONS” section
of this manual.
DO NOT LEAVE THE GRILL UNATTENDED
WHILE COOKING.
SAFETY INSTRUCTIONS
RECOGNIZED SAFETY SYMBOLS, WORDS AND LABELS
LP gas cylinder must be fitted with Overfill Protection Device (OPD).
DO NOT USE ALUMINUM FOIL TO LINE THE
GRILL RACKS OR GRILL BOTTOM. This can
severely upset combustion airflow or trap excessive
heat in the control area.
INSECT WARNING!!! Spiders and insects can nest
in the burners of this and any other grill, and cause
the gas to flow improperly. This is a very dangerous
condition, which can cause a fire to occur behind
and beneath the valve panel, thereby damaging the
grill and making it unsafe to operate. Inspect the
grill twice a year.
GAS INSTALLATION CODES
The installation must conform with local codes or, in
the absence of local codes, with the national fuel gas
code, ANSIZ223.1/NFPA 54, natural gas and propane
installation code, CSA B149.1, or propane storage
and handling code, B149.2,or the Standard for
Recreational Vehicles, ANSI A 119.2/NFPA 1192, and
CSA Z240 RV Series, Recreational Vehicle Code,as
applicable.
WARNING:
a) DO NOT store a spare LP/gas cylinder under or near this appliance.
b) NEVER fill the cylinder beyond 80% full.
c) If the information in “a” and “b” is not followed exactly, a fire causing death or serious
injury may occur.
Page 5
5
Keep a spray bottle of soap water near the gas supply
valve and check the connections before each use. See
leak testing section
Do not attempt to light the grill if odor of gas is present.
Call for customer service 1-866-814-0585
SAFETY INSTRUCTIONS
RECOGNIZED SAFETY SYMBOLS, WORDS AND LABELS
WARNING: Always keep your face and body away from the burner when lighting.
WARNING: IMPORTANT!
BEFORE LIGHTING…
Inspect the gas supply hose prior to turning the gas “ON”. If it is evident there is excessive abrasion or wear, or the hose is
cut, it must be replaced prior to the grill being put into operation. The replacement pressure regulator and hose assembly
shall be that specified by the manufacturer. Do not use the grill if the odor of gas is present. Only the pressure regulator and
hose assembly supplied with the unit should be used. Never substitute regulators for those supplied with the grill.
If a replacement is necessary, contact the customer service number below for proper repla
cement.
Attach the regulator onto the cylinder. Check the hose and regulator connections using a soap and water solution
before operating the grill.
Page 6
6
TESTED IN ACCORDANCE WITH ANS
Z21.58-2007 / CSA 1.6- 2007, ANS Z1.58- 2008 /
CSA1.6a-2008 STANDARD FOR OUTDOOR
COOKING GAS APPLIANCES. THIS GRILL IS
FOR OUTDOOR USE ONLY.
Check your local building codes for the proper
method of installation. In the absence of local
codes, you must conform with either the National
Fuel Gas Code, ANSI Z223.1/NFPA 54, or
CAN/CSA-B149.1, Natural Gas and propane
Installation Code. Electrical Code, ANSI/NFPA 70.
When properly cared for, your grill will give safe,
reliable service for many years. However, extreme
care must be used since the grill produces intense
heat and that can increase accident potential. When
using this appliance basic safety practices must be
followed, including the following:
Do not repair or replace any part of the grill unl
ess
specifically recommended in this manual. All other
service should be referred to a qualified technician.
This outdoor cooking gas appliance is not intended to
be installed in or boats.
DO NOT STORE ITEMS OF INTEREST TO
CHILDREN AROUND OR BELOW THE GRILL OR IN
THE CART. NEVER ALLOW CHILDREN TO CRAWL
INSIDE OF THE CART.
Never let clothing, pot holders or other flammable
materials come in contact with or too close to any
grate, burner or hot surface. Fabric may ignite and
result in personal injury.
For personal safety, wear proper apparel. Loose fitting
garments or sleeves should never be worn while
this appliance. Some synthetic fabrics are highly
flammable and should not be worn while cooking.
Only certain t
ypes of glass, heatproof glass
ceramic, earthen
ware, or other glazed utensils are
suitable for grill use. These types of materials
may break with sudden temperature changes.
Do not heat unopened food containers as a build-up
of pressure may cause the container to burst.
Never lean over an open grill.
The outdoor cooking gas appliance shall not be used
under overhead combustible construction.
CALIFORNIA PROPOSITION 65-WARNING
The burning of gas fuel generates some
byproducts, which are known by the State of
California to cause cancer or reproductive harm. To
minimize exposure to these substances, always
operate this unit according to the use and care
manual, ensuring you provide good ventilation
when cooking with gas.
SAFETY INSTRUCTIONS
SAFETY PRACTICES TO AVOID
PERSONAL INJURY
using
Page 7

7
When using the grill, do not touch the grill rack,
burner grate or immediate surroundings as these
areas become extremely hot and could cause
burns. Use only dry potholders. Moist or damp
potholders on hot surfaces may cause burns from
steam. Do not use a towel or bulky cloth in place of
potholders. Do not let potholders touch hot portions
of the grill rack.
Grease is flammable. Let hot grease cool before
attempting to handle it. Avoid letting excess grease
deposits collect in the grease slide panel bottom at
the bottom of the grill’s firebox. Clean this area
often.
For proper lighting and performance of the burners
keep the burner ports clean. It is necessary to clean
them periodically for optimum performance. The
burners will only operate in one position and must
be mounted
correctly for safe operation.
Clean the grill with caution. Avoid steam burns; do
not use a wet sponge or cloth to clean the grill while
it is hot. Some cleaners produce noxious fumes or
can ignite if applied to a hot surface.
Be sure all grill controls are turned off and the grill is
cool before using any type of aerosol cleaner on or
around the grill. The chemical that produces the
spraying action could, in the presence of heat, ignite
or cause metal parts to corrode.
Do not use the grill for cooking excessively fatty
meats or products, which promote flare-ups. Do not
operate the grill under construction.
Use only in well ventilated areas. Do not use in
buildings, garages, sheds, breezeways or other such
enclosed areas. THIS UNIT IS FOR OUTDOOR USE
ONLY.
Keeps the
area surrounding the grill free from
combustible materials, trash, or combustible fluids and
vapors such as gasoline or charcoal lighter fluid. Do not
obstruct the flow of combustion and ventilation air. If the
unit is stored indoors ensure that it is cool. If propane is
used, the cylinder must be unhooked and the propane
cylinder stored outside in a well-ventilated area, out of
the reach of children.
DO NOT USE BRIQUETTES OF ANY KIND IN THE
GRILL.
The grill is designed for optimum performance without
the use of briquettes. Do not place briquettes on the
fame tamers as this will block off the area for the grill
burners to vent. Adding briquettes can damage ignition
components and knobs, and void the warranty.
Keep the back of the cart free and clear from debris.
Keep any electrical supply cord, or the rotisserie motor
cord away from the heated areas of the grill.
Never use the grill in extremely windy conditions. If
located in a consistently windy area (oceanfront,
mountaintop, etc.) a windbreak will be required (see
below) . Always adhere to the specified clearance.
NEVER USE A DENTED OR RUSTY PROPANE
CYLINDER.
SAFETY INSTRUCTIONS
Page 8
8
MINIMUM CLEARANCE:
2’ Clearance from both sides of combustible
material, and 3’ Clearance from the back.
LOCATION
When determining a suitable location take into
account concerns such as exposure to wind,
proximity to traffic paths and keeping any gas supply
lines as short as possible. Locate the grill only in a
well-ventilated area. Never locate the grill in a
building, garage, breezeway, shed or other such
enclosed areas. During heavy use, the grill will
produce a lot of smoke. Lock the wheels after the grill
is placed in a suitable position.
PLACEMENT OF THE GRILL
DO NOT RETURN TO RETAILER
ATTENTION
1-866-814-0585
REMOVE ALL PARTS FROM THE CARTON; IDENTIFY PARTS AND HARDWARE TO
BE SURE ALL PARTS ARE INCLUDED. ASSEMBLY REQUIRED.
IDENTIFY MISSING OR DAMAGED PARTS, PLEASE CALL CUSTOMER SERVICE
! !
Page 9
9
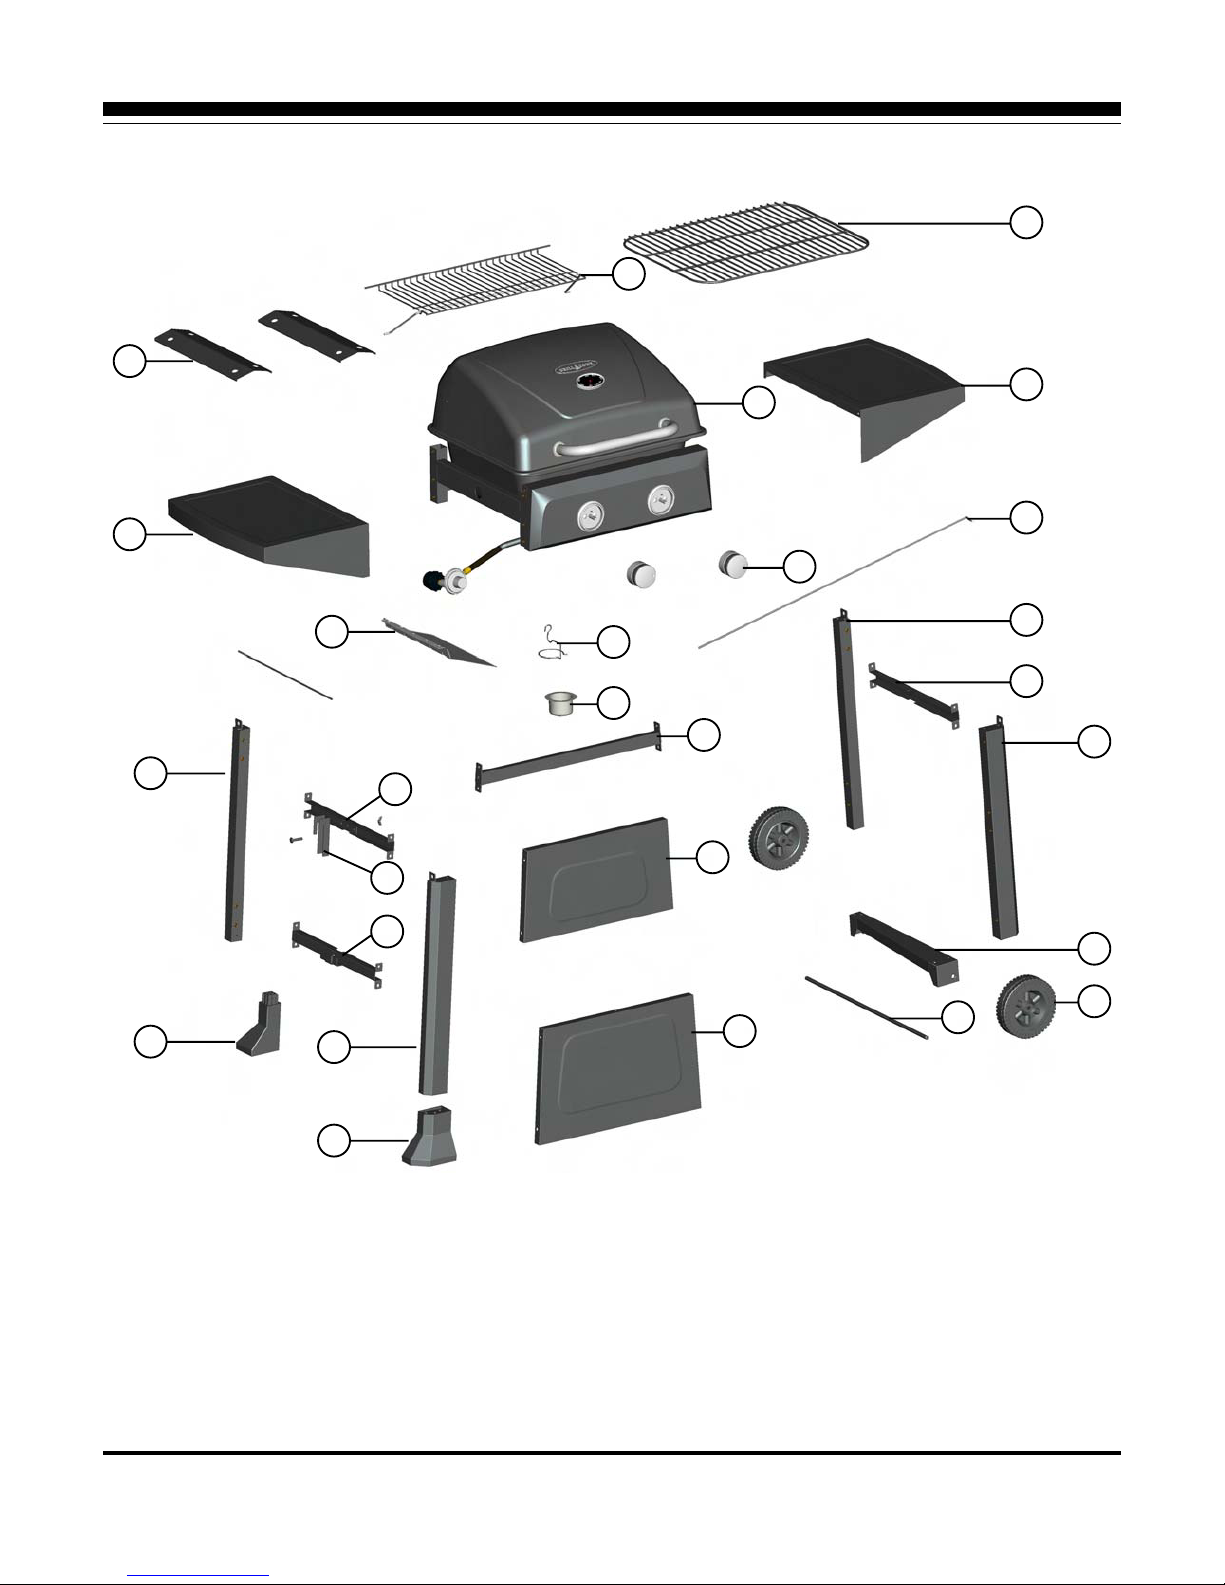
EXPLODED VIEW
1
2
3
4
5
6
7
8
9
10
11
12
13
18
19
20
21
26
27
25
22
23
24
14
15
16
17
Page 10
10
PART LI ST
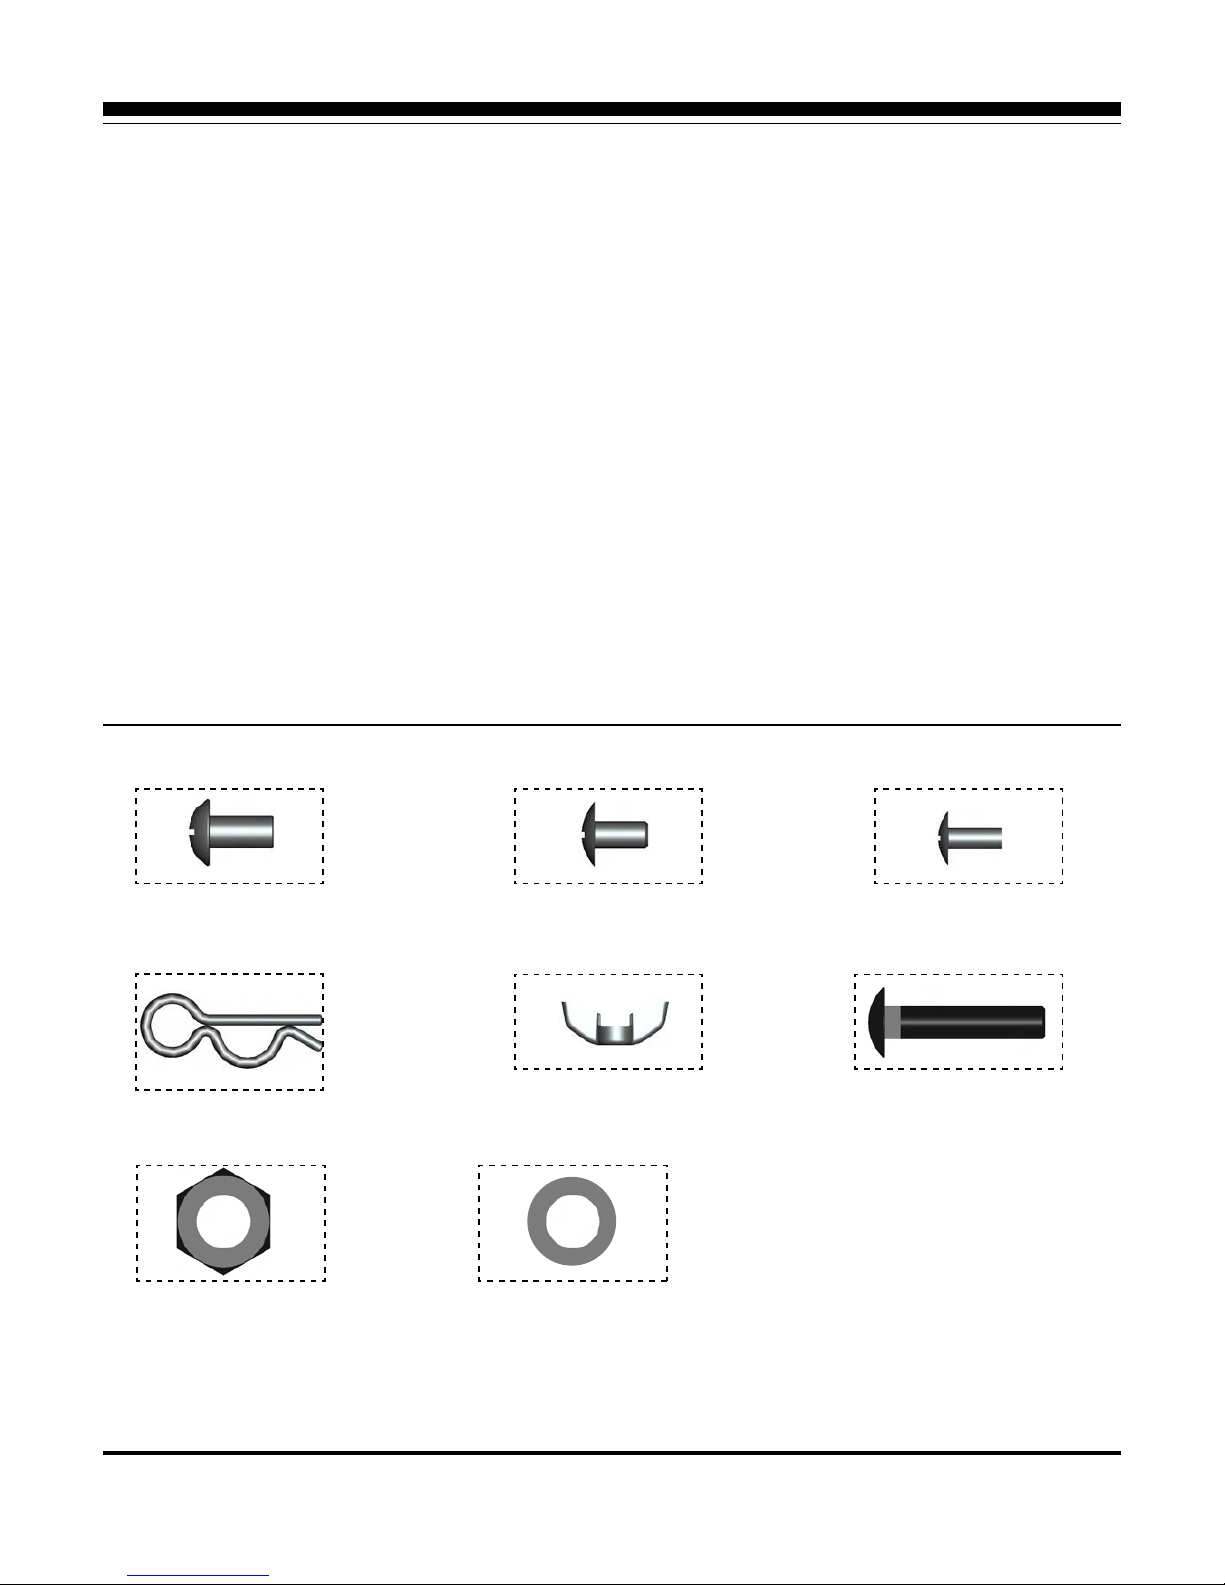
HARDWARE LIST
M6 x 12 bolts 4pcs M5 x 10 bolts 36pcs M4 x 10 bolts 7pcs
M6 wing nut 1pc M6 x 30 bolt 1pc
R-pins 4pcs
M10 nuts 2pcs
D10 washers 2pcs
1. Cooking grate, 1pc
2. Right side shelf, 1pc
3. Connection bar, 2pcs
4. Rear right pole, 1pc
5. Cart right support bar, 1pc
6. Front right pole, 1pc
7. Wheel supporter, 1pc
8. Wheel, 2pcs
9. Axle, 1pc
10. Warming rack, 1pc
11. Grill body, 1pc
12. Control knob, 2pcs
13. Grease cup Hanger, 1pc
14. Grease cup, 1pc
15. Rear support bar, 1pc
16. Cart front panel-upper, 1pc
17. Cart front panel-lower, 1pc
18. Flame tamer, 2pcs
19. Left side shelf, 1pc
20. Heat isolation panel, 1pc
21. Rear left pole, 1pc
22. Cart left support bar-upper, 1pc
23. Cylinder fixing plate, 1pc
24. Cart left support bar-lower, 1pc
25. Rear leg stand, 1pc
26. Front left pole, 1pc
27. Front leg stand, 1pc
Page 11
11
ASSEMBLY INSTRUCTIONS
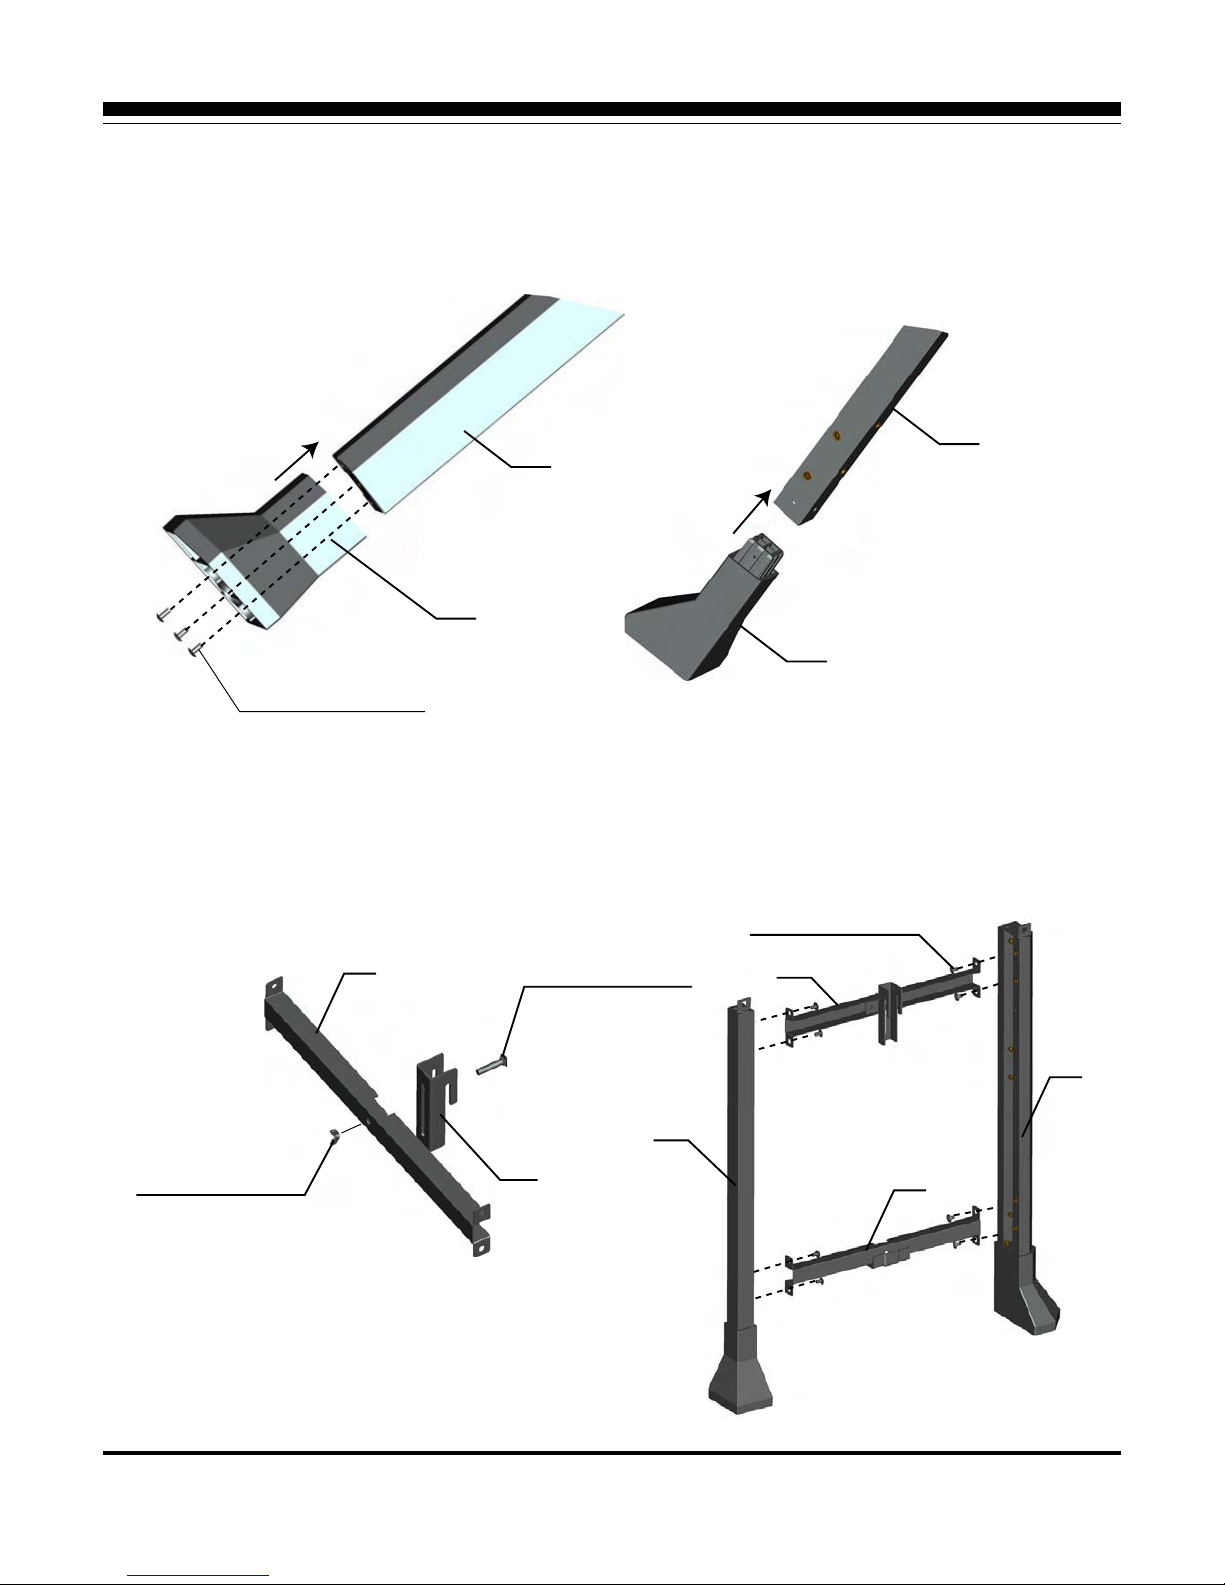
STEP 1
STEP 2
26
21
25
27
M4x10 bolts 3pcs
M5x10 bolts 8pcs
M6x30 bolts 1pc
M6 wign nut 1pc
22
26
21
22
24
23
Attach front leg stand (27) to front left pole (26) with 3pcs M4 x 10 bolts.
Attach rear leg stand (25) to rear left pole (21).
Attach cylinder fixing plate (23) and the slot on cart left support bar-upper (22) with 1pc M6 x 30 bolts
and 1pc M6 wing nut.
Attach cart left support bar-upper (22) to rear left pole (21) and front left pole (26) with 4pcs M5 x 10
bolts as illustrated, two on each side.
REPEAT the same procedure to install cart left support bar-lower (24).
Page 12
12
ASSEMBLY INSTRUCTIONS
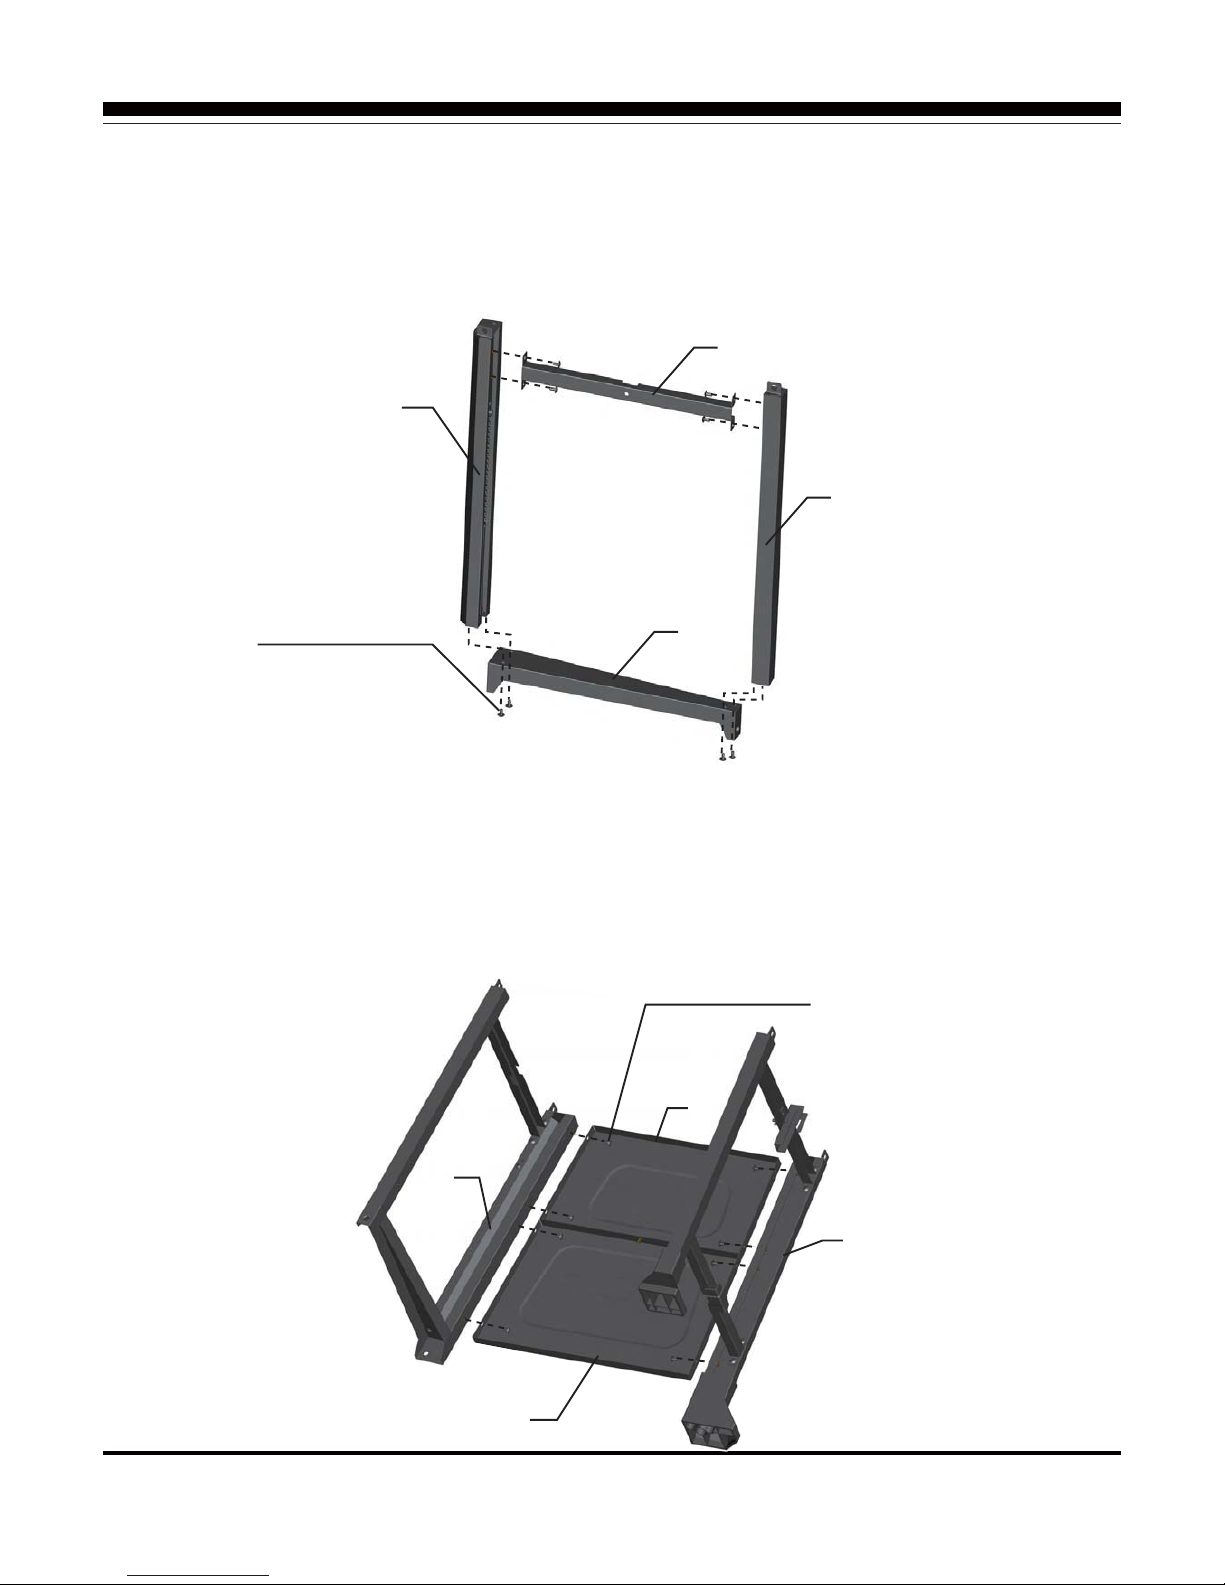
STEP 3
STEP 4
5
6
4
7
M5x10 bolts 8pcs
M5x10 bolts 9pcs
16
26
6
17
Attach cart right support bar (5) to rear right pole (4) and front right pole (6) with 4pcs M5 x 10 bolts
as illustrated, two on each side.
Attach wheel supporter (7) to rear right pole (4) and front right pole (6) with 4pcs M5 x 10 bolts (BB)
as illustrated, two on each side.
Install cart front panel-upper (16) to front right pole assembly and front left pole assembly with 4pcs
M5 x 10 bolts.
Install cart front panel-lower (17) to front right pole assembly and front left pole assembly with 4pcs
M5 x 10 bolts.
NOTE: KEEP all bolts half loosen during the assembly of this step until the all parts are installed into
the correct position.
Page 13
13
ASSEMBLY INSTRUCTIONS
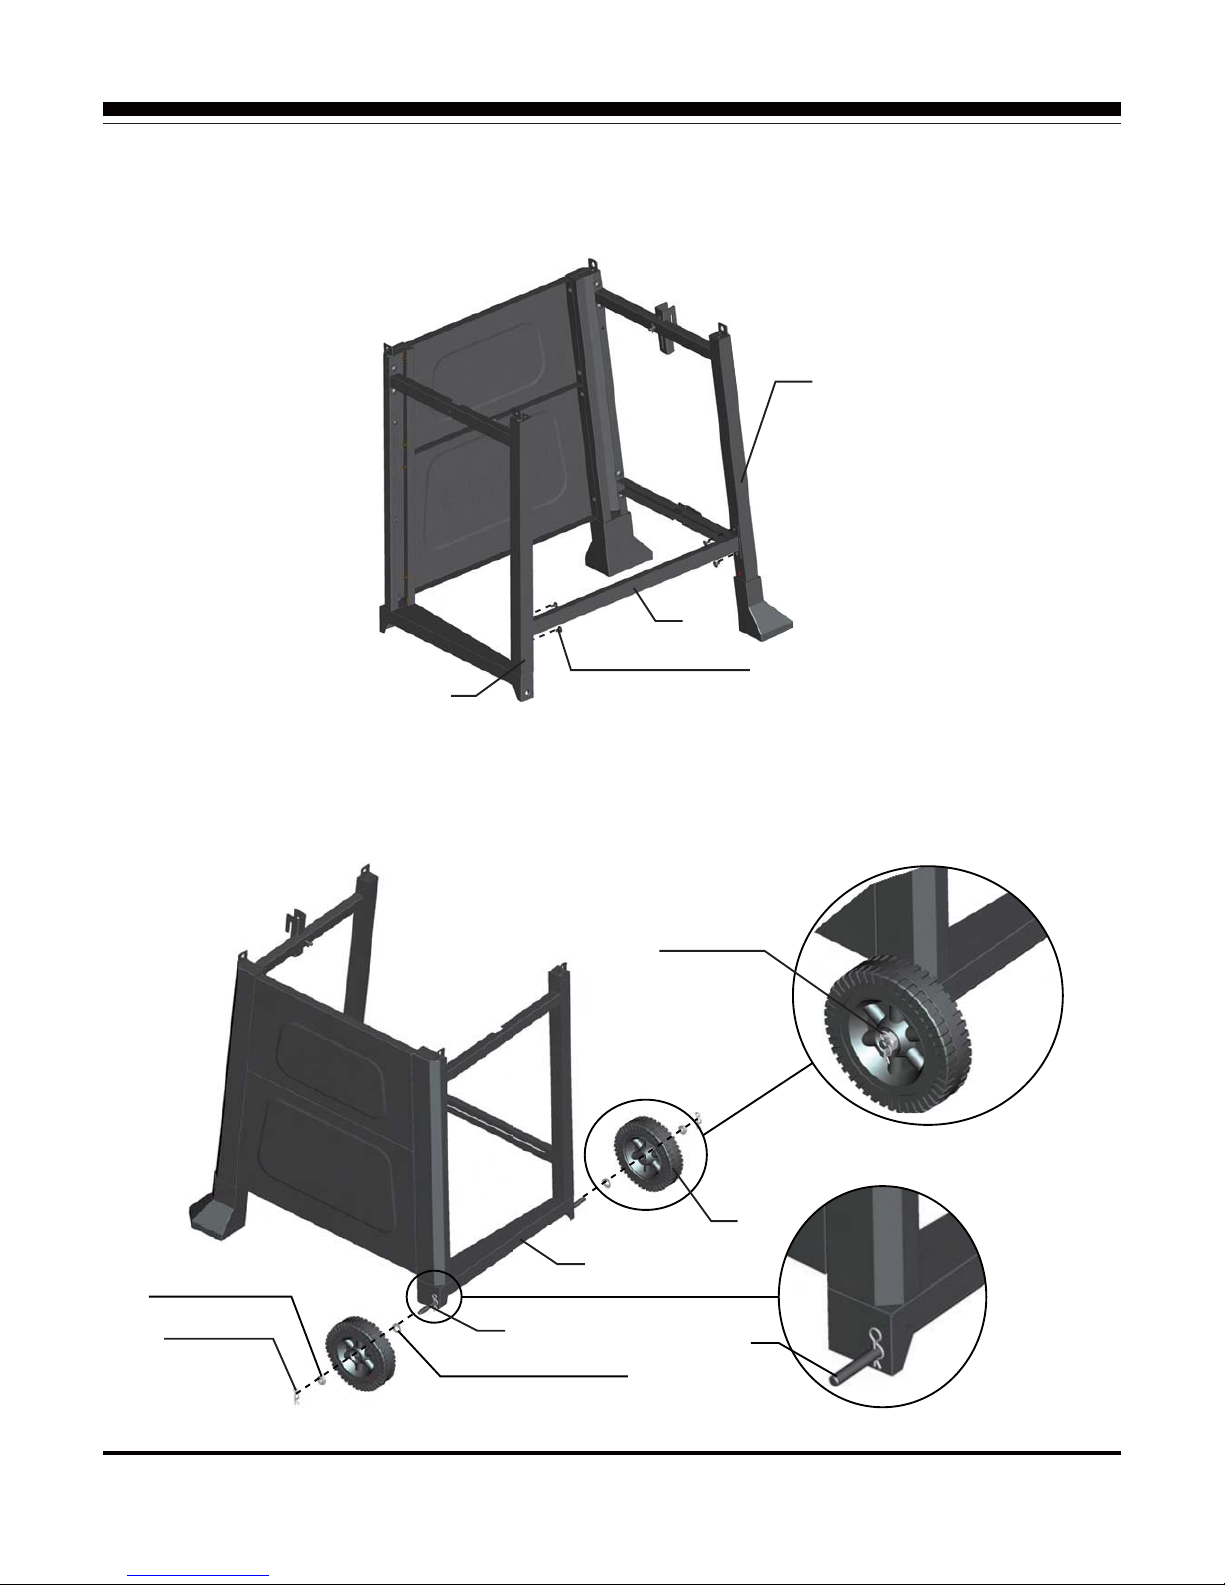
STEP 5
STEP 6
21
15
4
M5x10 bolts 4pcs
9
7
D10 washers 2pcs
M10 nuts 2pcs
R-pin 2pcs
R-pin 2pcs
9
Attach rear support bar (15) to rear right pole (4) and rear left pole (21) with (4) M5 x 10 bolts.
Insert the axle (9) into wheel supporter (7), secure with 2pcs R-pins.
Attach 2pcs D10 washer, 2pcs wheels (8), 2pcs M10 nuts and 2pcs R-pins to axle (9), secure in turn
as illustrated.
8
Page 14
14
ASSEMBLY INSTRUCTIONS
STEP 7
STEP 8
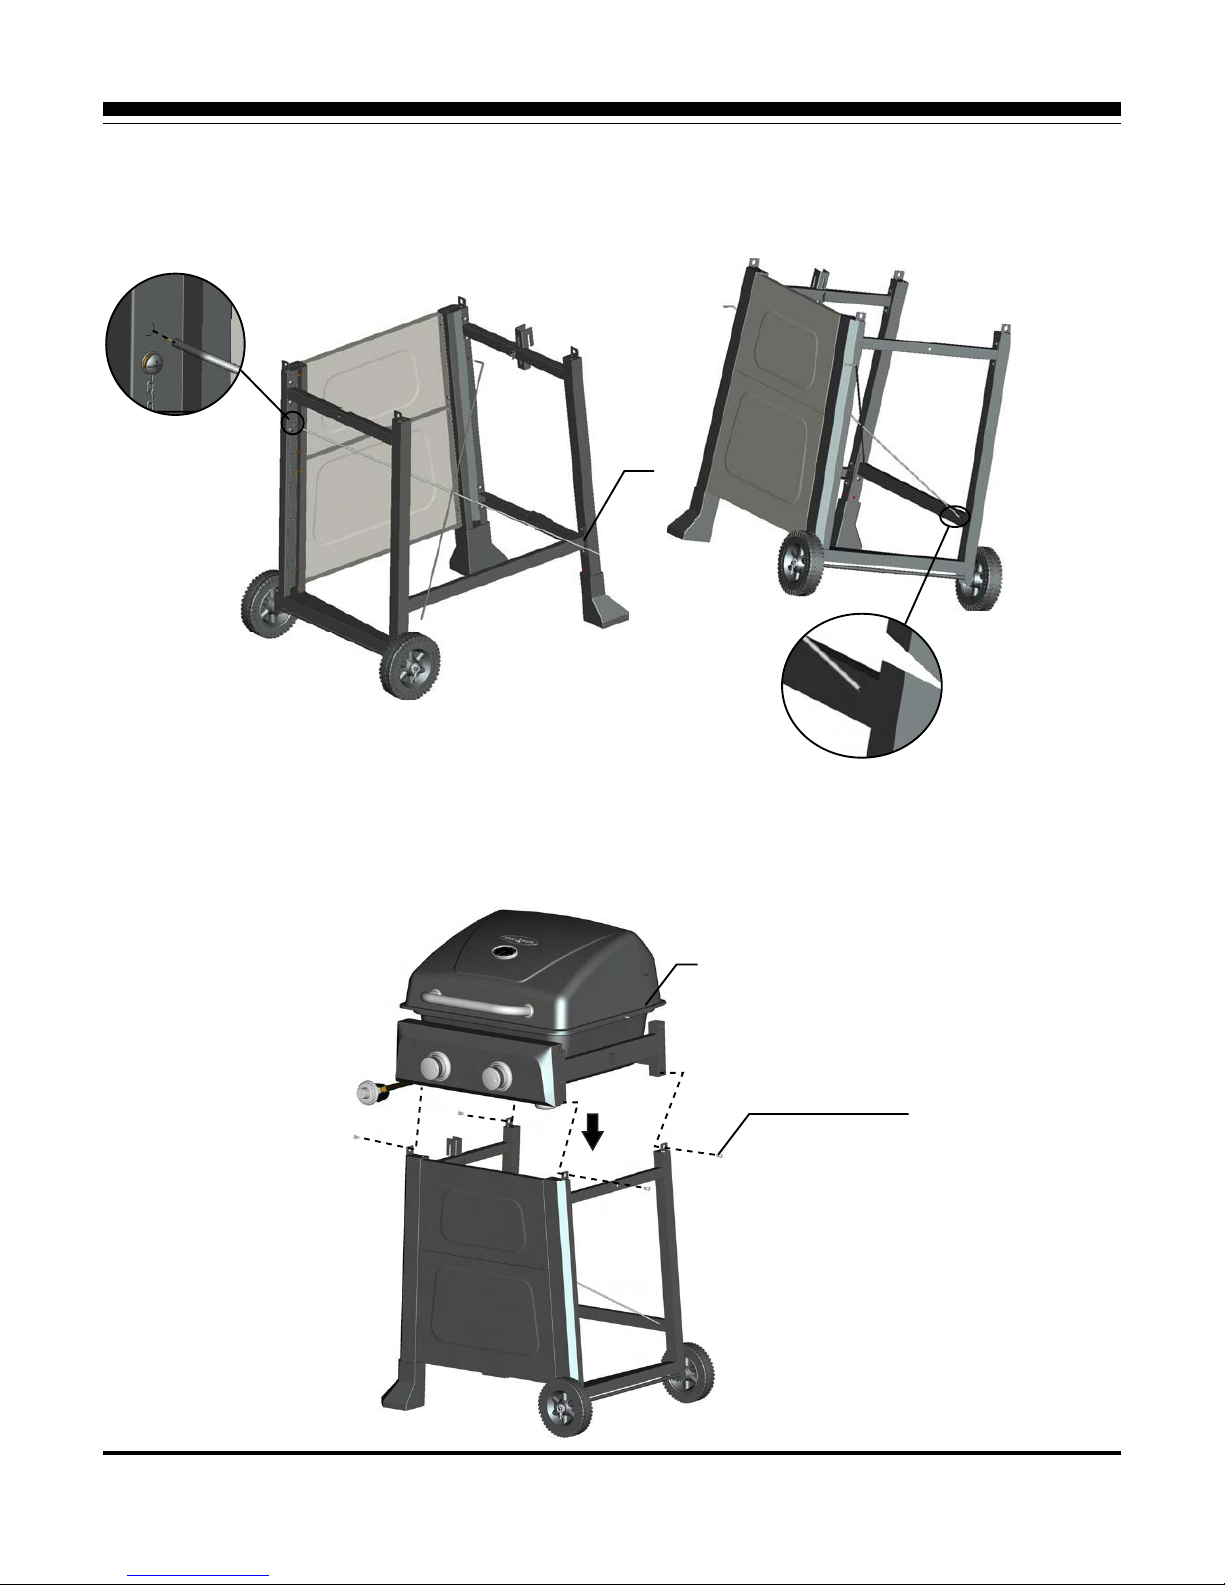
3
Install two connection bars (3) as illustrated.
Carefully place the grill body (11) onto the cart assembly, fix them with 4pcs M6 x 12 bolts, two on
each side.
NOTE: It should be done with 2pcs persons for safety & accuracy.
11
M6x12 bolts 4pcs
Page 15
15
ASSEMBLY INSTRUCTIONS
11
20
M4x10 bolts 2pcs
M5x10 bolts 4pcs
M5x10 bolts 4pcs
M4x10 bolt 1pc
19
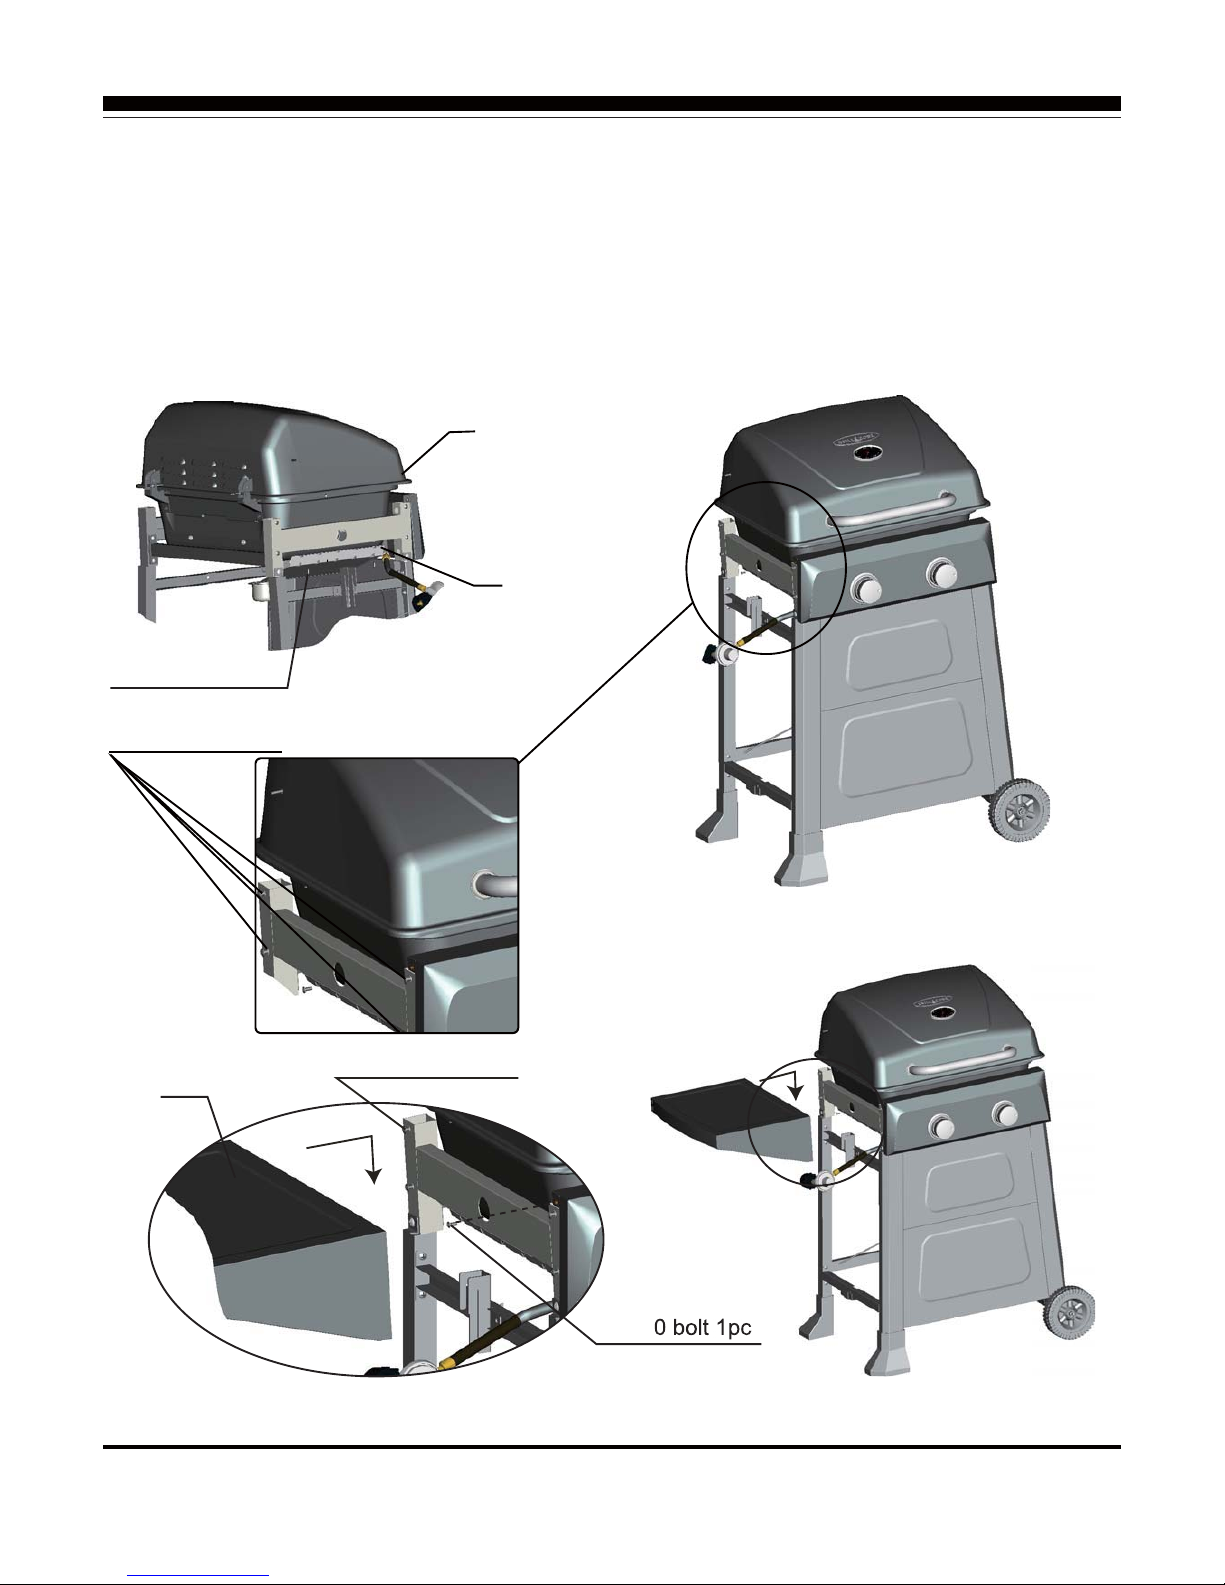
Install one heat isolation panels (20) to grill body (11) with 2pcs M4 x 10 bolts.
Install 4pcs M5 x 10 bolts onto the grill body (11) as illustrated and keep them half loosen.
Then install left side shelf (19) onto grill body (11) with these 4pcs M5 x 10 bolts. Fix left side shelf
(19) and grill body (11) with 1pc M4 x 10 bolt at the position as illustrated. Then tighten 4pcs half
loosen M5 x 10 bolts.
REPEAT the same procedure to install right side shelf (2).
Step 9
Page 16
16
ASSEMBLY INSTRUCTIONS
13
14
11
1
18
11
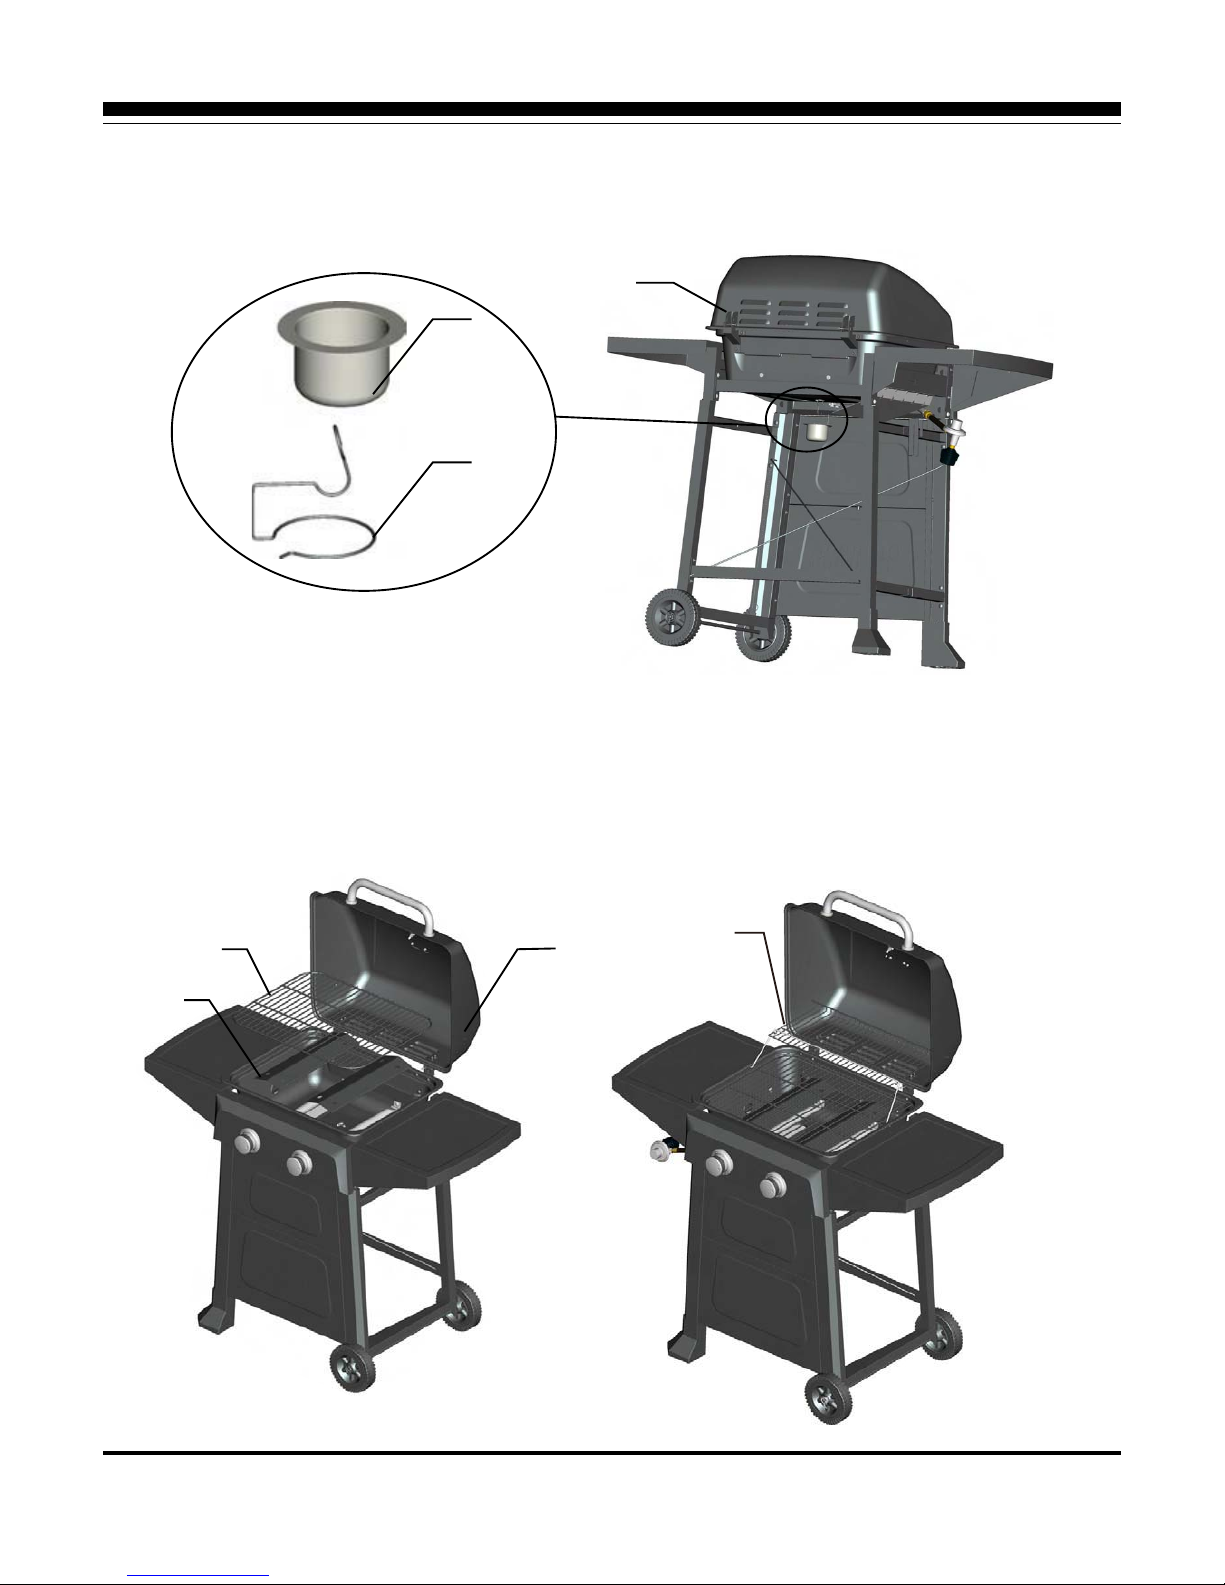
Install grease cup (14) onto grease cup hanger (13), and place it at the bottom of grill body (11).
STEP 10
Open the lid, place 2pcs flame tamers (18), cooking grate (1) and warming rack (10) into the grill body
(11) respectively.
STEP 11
10
Page 17
17
GAS CYLINDER INSTALLATION INSTRUCTIONS
STEP 1
STEP 2
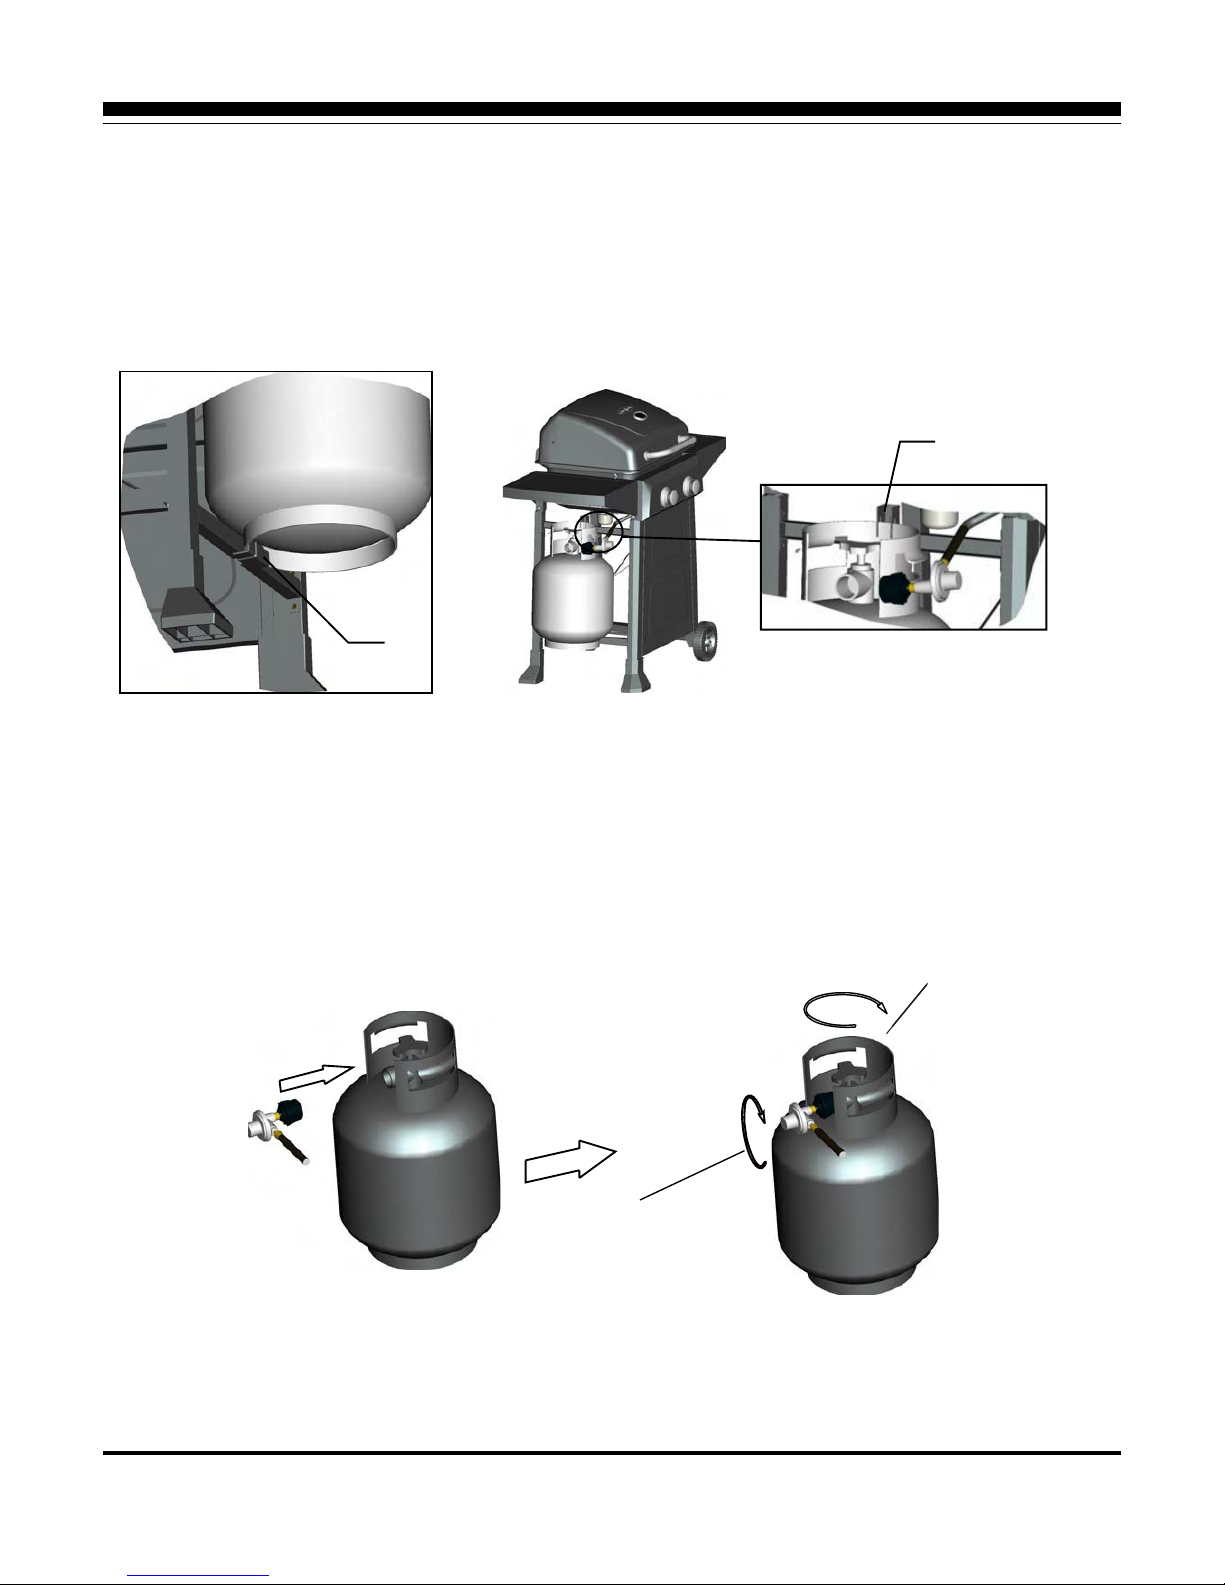
1) Check to ensure that the valve of gas cylinder is securely turned off prior to making the connection. If not, turn
the valve clockwise to turn it off.
2) Connect the hose and regulator assembly to the gas cylinder. Turn the requlator clockwise to make sure it’s
securely tightened.
Shut off gas supply by rotating valve of gas cylinder clockwise.
Gas cylinder
Fix regulator
by rotating it
clockwise
23
24
1. Place gas cylinder (not included) into the slot of cart left support bar-lower (24) as illustrated. Fig.1
2. Make sure the valve of gas cylinder is securely turned off prior to the left position of the grill. Then slide cylinder fixing
plate (#23) over cylinder handle to secure the gas cylinder tightly. Fig.2
Fig.1
Fig.2
Page 18

18
Only the pressure regulator and hose assembly supplied
with the grill should be used. Any replacement pressure
regulator and hose assembly must be those specified by
the grill manufacturer.
This is a liquid propane configured grill.
Do not attempt to use a natural gas supply.
Total gas consumption (per hour) of this grill with all
burners on “MAX”:
Main burner 30,000 Btu/hr.
Total 30,000 Btu/hr.
The installation of this appliance in Canada must be in
accordance with the Standard CAN/CSA-B149.2
(installation code for gas burning appliances and
equipment) and local codes.
LP GAS CYLINDER REQUIREMENTS
(20LB. CYLINDER)
A dented or rusty LP Gas Cylinder may be hazardous and
should be checked by your LP supplier. Never use a
cylinder with a damaged valve.
The LP gas cylinder must
be constructed and marked in accordance with the
specifications for LP gas cylinders of the U.S. Department
of Transportation (D.O.T) or the Standard for Cylinders,
Spheres and Tubes for Transportation of Dangerous
Goods; and Commission, CAN/CSA-B339, as applicable.
The 20lb. cylinder must be provided with a shut off valve
terminating in an LP gas supply cylinder valve outlet
specified, as applicable, for connection type QCC1 is the
standard for compressed gas cylinder valve outlet and
inlet connection ANSI/CSA-V-1.
The cylinder supply system must be arranged for vapor
withdrawal. The cylinder must include a collar to protect
the cylinder valve.
Other cylinder may be acceptable for use with the
appliance provided they
are compatible with the appliance
retention means.
Main Manifold operating pressure: 11” water column
(W.C.)/2.74KPA
LP Gas Cylinder must be fitted with Overfill Prevention
Device (OPD).
LP Gas Cylinder must be provided with a cylinder
connection device compatible with the connection for
outdoor cooking appliances.
LP GAS HOOK-UP
Ensure that the black plastic grommets on the LP cylinder
valve are in place and that the hose does not come into
contact with the grease tray or the grill head.
CONNECTION
Your grill is equipped with gas supply orifices for use only
with liquid propane gas. It is also equipped with a high
capacity hose/regulator assembly for connection to a
standard 20lb. LP cylinder (18-1/4” high, 12-1/4”
diameter).
TO CONNECT THE L.P.
GAS SUPPLY CYLINDER
1. Make sure cylinder valve is in its full off position (turn
clockwise to stop).
2. Check cylinder valve to ensure it has proper external
male threads (type 1 connection per ANSIZ21.81).
3. Make sure all burner valves are in the off position.
4. Inspect valve connections, port and regulator
assembly. Look for any damage or debris. Remove
any debris. Inspect hose for damage. Never attempt
to use damaged or obstructed equipment. See your
local LP gas dealer for repair.
5. When connecting regulator assembly to the valve,
hand tighten the nut clockwise to a complete stop. Do
not use a wrench to tighten. Use of a wrench may
damage the quick coupling nut and result in a
hazardous condition.
GAS HOOK-UP
Page 19
19
GAS HOOK-UP
6 Open the cylinder valve fully (counterclockwise).
Use a soapy water solution to check all connections
for leaks before attempting to light the grill. See
below. If a leak is found, turn the cylinder valve off
and do not use the grill until a local LP gas dealer
can make repairs.
To disconnect LP gas cylinder:
1. Turn the burner valves off.
2. Turn the cylinder valve off fully (turn clockwise to
stop). Detach the regulator assembly from the
cylinder valve by turning the quick coupling nut
counterclockwise.
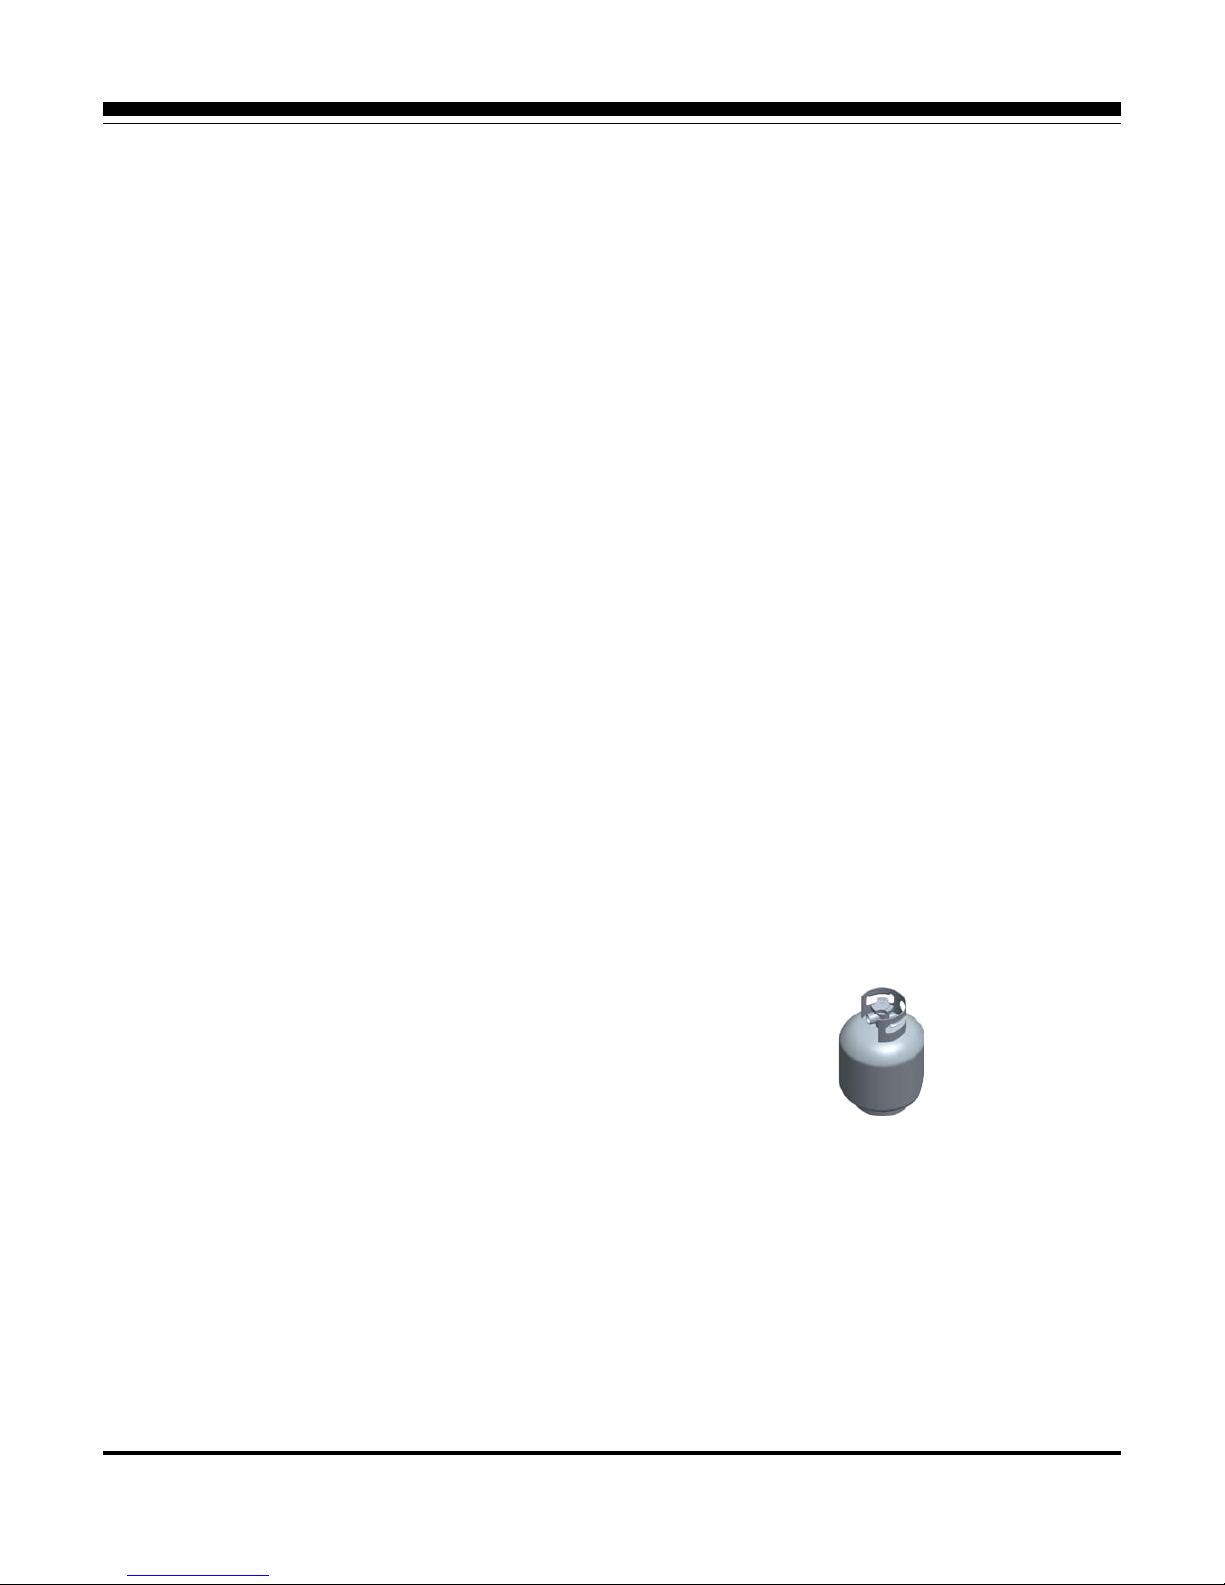
A cylinder of approximately 12 inches in diameter by
18-1/2 inches high is the maximum size LP gas cylinder
to use.
You must use an OPD gas cylinder which offers an
Overfill Prevention Device.
This safety feature prevents the cylinder from being
overfilled which can cause malfunction of the LP gas
cylinder, regulator and/or grill. In Canada, the LP gas
cylinder must meet the National Standard of Canada,
Can CSA –B339, Cylinders, spheres and Tubes for
Transportation of Dangerous Goods and Commission.
1. The LP gas cylinder must have a shutoff valve,
terminating in an LP gas supply cylinder valve outlet
that is compatible with a Type 1 cylinder connection
device. The LP gas cylinder must also have a safety
relief device that has a direct connection with the
vapor space of the cylinder.
2. The cylinder supply system must be arranged for
vapor withdraws.
3. The LP gas cylinder used must have a collar to protect
the cylinder valve.
PROPER PLACEMENT AND
CLEARANCE OF GRILL
Never use your gas grill in a garage, porch, shed,
breezeway or any other enclosed area. Your gas grill is
to be used
outdoors only,
at least 3 feet from the back
and 2 feet from side of any combustible surface. Your
gas grill should not be used under overhead combustible
construction. Do not obstruct the flow of ventilation air
around the gas grill housing. This outdoor gas grill is not
intended to be installed in or on recreational vehicles
and/or boats.
Never connect an unregulated LP gas cylinder to your
gas grill. The gas regulator assembly supplied with
your gas grill is adjusted to have an outlet pressure of
11” water column (W.C.)2.74KPA for connection to an
LP gas cylinder.
Replacement regulators and hose assemblies must be
those specified in this manual.
Have your LP gas cylinder filled by a reputable
propane gas dealer and visually inspected and
re-qualified at each filling.
a ) Do not store a spare LP gas cylinder under or near
this appliance.
b) Never fill the cylinder beyond 80 percent full.
c) If the information in a) and b) is not followed
exactly a fire causing death or serious injury may
occur.
Always keep LP gas cylinders in an upright position.
Do not store (or) or use gasoline or other flammable
vapors and liquids in the vicinity of this gas grill.
Do not subject the LP gas cylinder to excessive heat.
Never store an LP gas cylinder indoors. If you store
your gas grill in the gar
age or other indoor location,
always disconnect the LP gas cylinder first and store it
safely outside.
Place dust cap on cylinder valve outlet whenever the
cylinder is not in use. Only install the type of dust cap
on the cylinder valve outlet that is provided with the
cylinder valve. Other types of caps or plugs may result
in leakage of propane.
LP gas cylinders must be stored outdoors out of reach
of children.
Disconnected LP gas cylinder must not be stored in a
building, garage or any other enclosed area.
Page 20
20
GAS HOOK-UP
WARNING
A strong gas smell or the hissing sound of gas
indicates a serious problem with your gas grill or the
LP gas cylinder. Failure to immediately follow the
steps listed below could result in a fire or explosion
that could cause serious bodily injury, death, or
property damage.
Shut off gas supply to the gas grill.
Turn the control knobs to OFF position.
Put out any flame with a proper fire extinguisher.
Open Grill Lid.
Get away from the LP gas cylinder.
Do not try to fix the problem yourself.
If odor continues or you have a fire you can not
extinguish, call your fire department. Do not call
from near the LP gas cylinder because your
telephone is a form of electrical device and
could create a spark resulting
in fire and/or
explosion.
When your gas grill is not in use, the gas must
be turned off at the supply cylinders. Storage
of an outdoor cooking gas appliance indoors
is permissible only if the cylinder is
disconnected and removed from the outdoor
cooking gas appliance.
The pressure regulator and hose assembly
must be inspected before each use of the grill.
If there is excessive abrasion or wear or if the
hose is cut, it must be replaced prior to the
grill being used again.
Keep the gas regulator hose away from hot
grill surfaces and dripping grease. Avoid
unnecessary twisting of hose. Visually inspect
the hose prior to each use for cuts, cracks,
excessive wear or other damage. If the hose
appears damaged do not use the gas grill.
Call 1-866-814-0585 for
an authorized
replacement hose.
Never light your gas grill with the lid closed or
before checking to ensure the burner tubes
are fully seated over the gas valve orifices.
Page 21
21
GENERAL
Although all gas connections on the grill are leak
tested at the factory prior to shipment, a complete gas
tightness check must be performed at the installation
site due to possible mishandling in shipment, or
excessive pressure unknowingly being applied to the
unit. Periodically check the whole system for leaks
following the procedures listed below. If the smell of
gas is detected at any time, you should immediately
check the entire system for leaks.
BEFORE TESTING
Make sure that all packing material is removed from
the grill including the burner tie-down straps.
DO NOT SMOKE WHILE LEAK TESTING.
NEVER LEAK TEST WITH AN OPEN FLAME.
Make a soap solution of one part liquid detergent and
one part water. You will need a spray bottle, brush, or
rag to apply the solution to the fittings. For the initial
leak test, make sure the L.P. cylinder is full.
TO
TEST
Make sure all control valves are in the “OFF” position.
Turn the gas supply on. Check all connections from
the L.P. cylinder up to and including the connection to
the manifold pipe assembly (the pipe that goes to the
burners). Use the soap solution and spray or brush it
onto all of these connections. Soap bubbles will
appear where a leak is present. If a leak is present,
immediately turn off the gas supply, tighten any
leaking fittings, turn gas on, and recheck. Should the
gas continue to leak from any or all of the fittings, turn
off the gas supply, and contact our customer service
at 1-866-814-0585
Only those parts recommended by the manufacturer
should be used on the grill. Substitution will void the
warranty.
Do not use the grill until all
connections
have been checked and do not leak.
GAS FLOW CHECK
Each grill burner is tested and adjusted at the factory prior
to shipment; however, variations in the local gas supply
may make it necessary to adjust the burners, the flames
of the burners should be visually checked.
Flames should be blue and stable with no yellow tips,
excessive noise or lifting. If any of these conditions exist,
check to see if the air shutter or burner ports are blocked
by dirt, debris, spider webs, etc. If you have any questions
regarding flame stability, please call customer service at
1-866-814-0585.
ALWAYS CHECK FOR LEAKS AFTER EVERY LP
TANK CHANGE
Check all gas supply fittings for leaks before each
use. It is handy to keep a spray
bottle of soapy water
near the shut-off valve of
the gas supply line. Spray
all the fittings. Bubbles indicate leaks.
Disconnected L.P. cylinders must have threaded valve
plugs tightly installed, and must not be stored in a
building, garage or any other enclosed area.
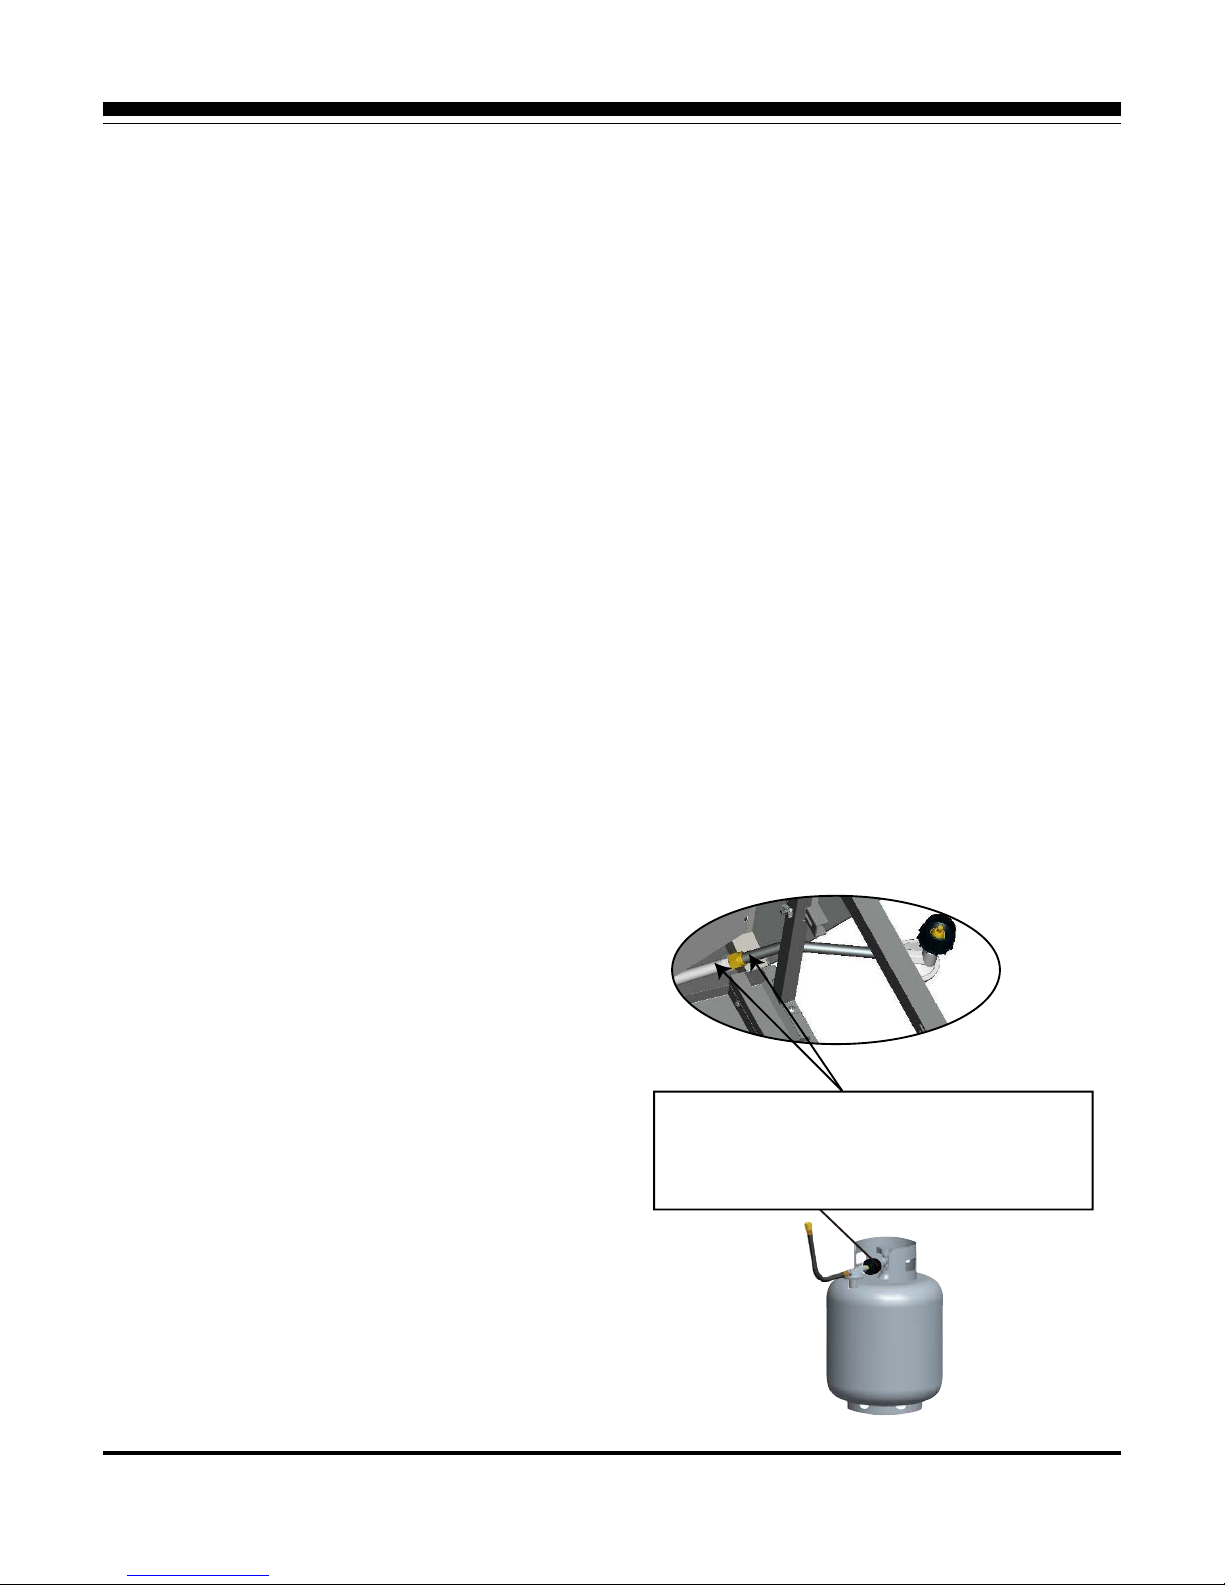
LEAK TESTING
Test leak burner connections where shown.
Ɣ0HWDOJDVKRVH
Ɣ+RVHFRQQHFWLRQWREXUQHULQOHWILWWLQJ
Ɣ0DLQJDVKRVHFRQQHFWLRQ
Page 22
22
Specified clearance maintained 2 feet from
sides of combustibles, and 3 feet from the back.
All internal packaging removed.
Knobs turn freely.
Burners are tight and sitting properly on orifices.
Pressure regulator connected and set for 11”
W.C. LP gas. Gas connections to grill using
hose & regulator assembly provided (pre-set for
11.0” water column).
INSTALLER FINAL CHECK OPERATING INSTRUCTIONS
Unit tested and free of leaks.
User informed of gas supply shut off valve location.
USING THE GRILL
Grilling requires high heat for searing and proper
browning. Most foods are cooked at the “MAX” heat
setting for the entire cooking time. However, when
grilling large pieces of meat or poultry, it may be
necessary to turn the heat to a lower setting after the
initial browning. This cooks the food through without
burning the outside. Foods cooked for a long time or
foods basted with a sugary marinade may need a lower
heat setting near the end of the cooking time.
TO BIGIN
1. Make sure the grill has been leak tested and is
properly located.
2. Remove any remaining packing material.
3. Light the grill burners using the instructions.
4. Turn the control knob(s) to “MAX” and preheat the
grill for 15 minutes. The grill lid is to be closed
during the appliance preheat period.
5. Place the food on the grill and cook to the desired
doneness. Adjust heat setting, if necessary. The
control knob may be set to any position between
“MAX” and “MIN”.
NOTE: The grill is designed to grill efficiently without the
use of lava rocks or briquettes of any kind. Heat is
radiated by the stainless steel flame tamers positioned
above each burner.
NOTE: The hot grill sears the food, sealing in the juices.
The longer the preheat lasts, the faster the meat browns
and the darker the grill marks.
DO NOT LEAVE THE GRILL UNATTENDED WHILE
COOKING.
Page 23
23
LIGHTING INSTRUCTIONS
WARNING: IMPORTANT!
BEFORE LIGHTING…
Inspect the gas supply hose prior to turning the gas
“ON”. If it is evident there is excessive abrasion or
wear, or the hose is cut, it must be replaced prior to
the grill being put into operation. The replacement
pressure regulator and hose assembly shall be that
specified by the manufacturer. Do not use the grill if
the odor of gas is present. Only the pressure regulator
and hose assembly supplied with the unit should be
used. Never substitute regulators for those supplied
with the grill. If a replacement is necessary, contact
the factory for proper replacement.
Screw the regulator (type QCC1) onto the cylinder.
Leak check the hose and regulator connections with a
soap and water solution before operating the grill, see
leak testing section.
TO LIGHT THE GRILL BURNER
Always keep your face and body as far from the grill
as possible when lighting.
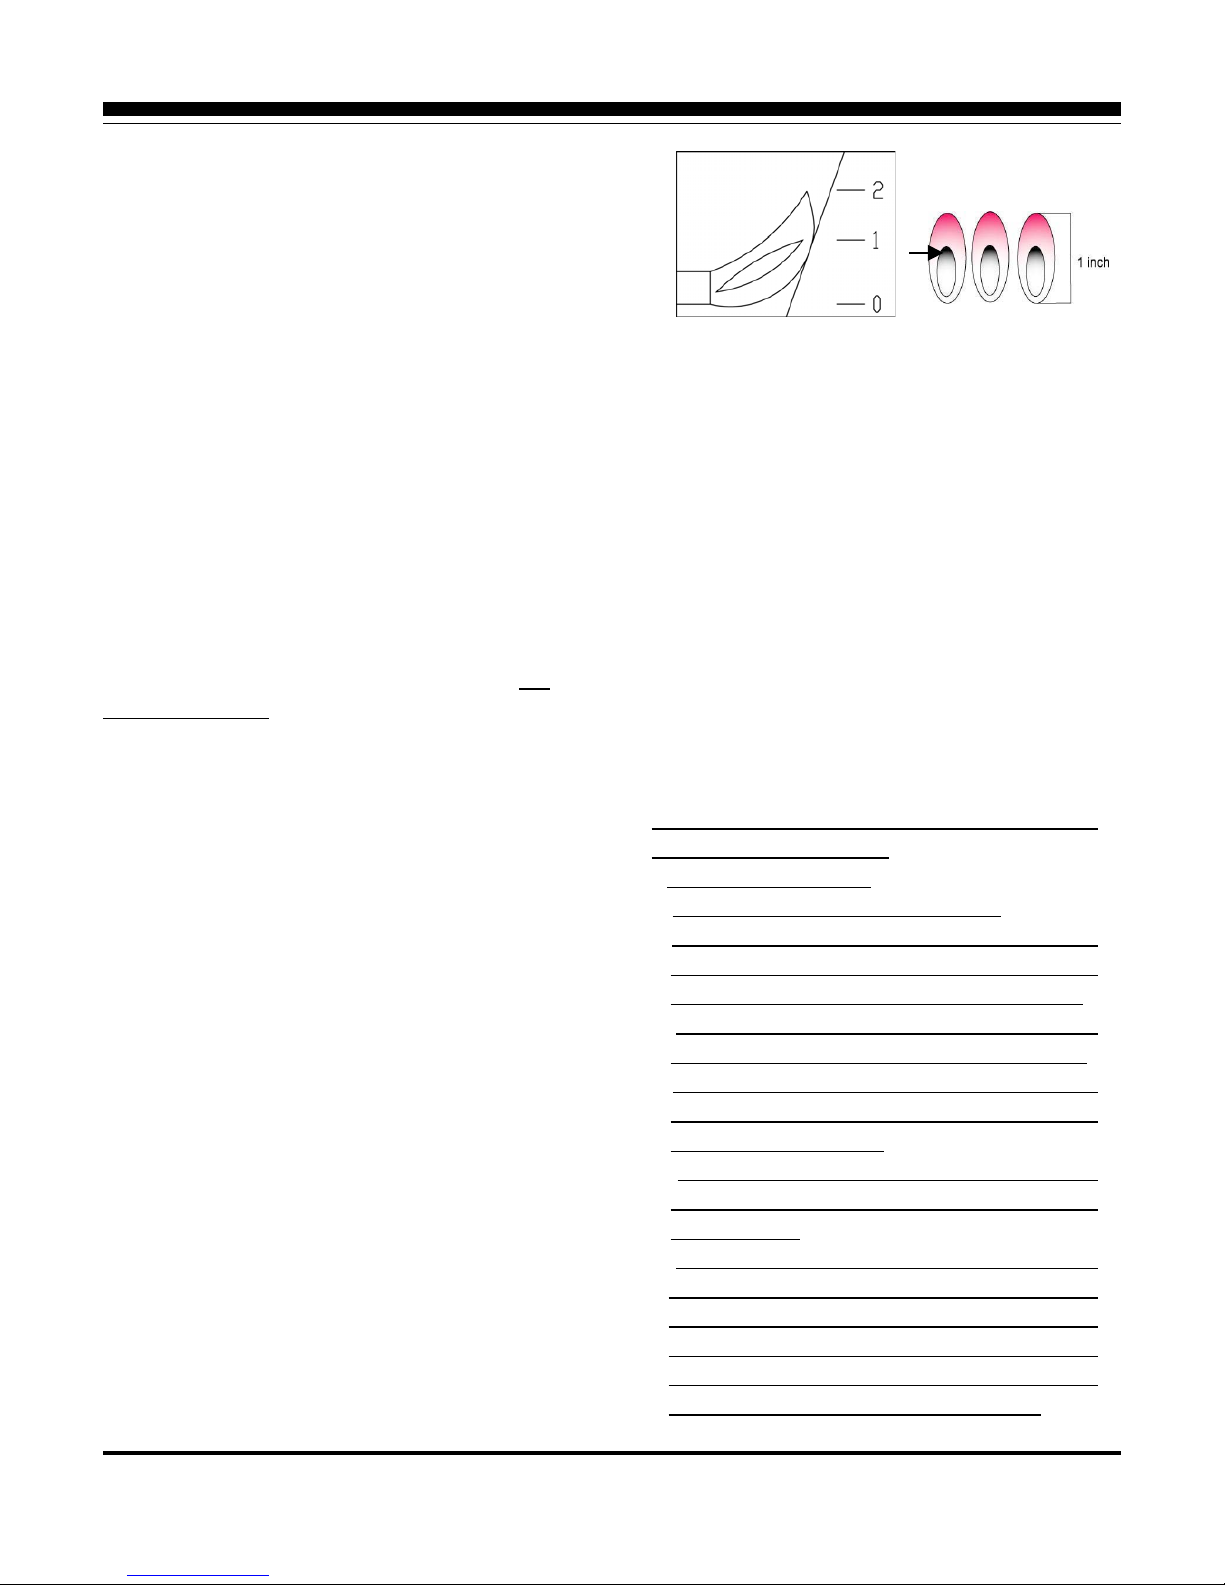
FLAME CHARACTERISTICS
Check for proper burner flame characteristics. Each
Burner flames should be blue and stable with no
yellow tips,
excessive noise, or lifting. If any of these
conditions exist, call our customer service line. If the
flame is yellow, it indicates insufficient air. If the flame
is noisy and tends to lift away from the burner, it
indicates too much air.
Visually check the burner flames prior to each use,
the flames should look like this picture, if flames do
not, refer to the CARE & MAINTENANCE of this
manual. If these conditions exist, call our customer
service line. If the flame is yellow, it indicates
insufficient air. If the flame is noisy and tends to lift
away from the burner, it indicates too much air.
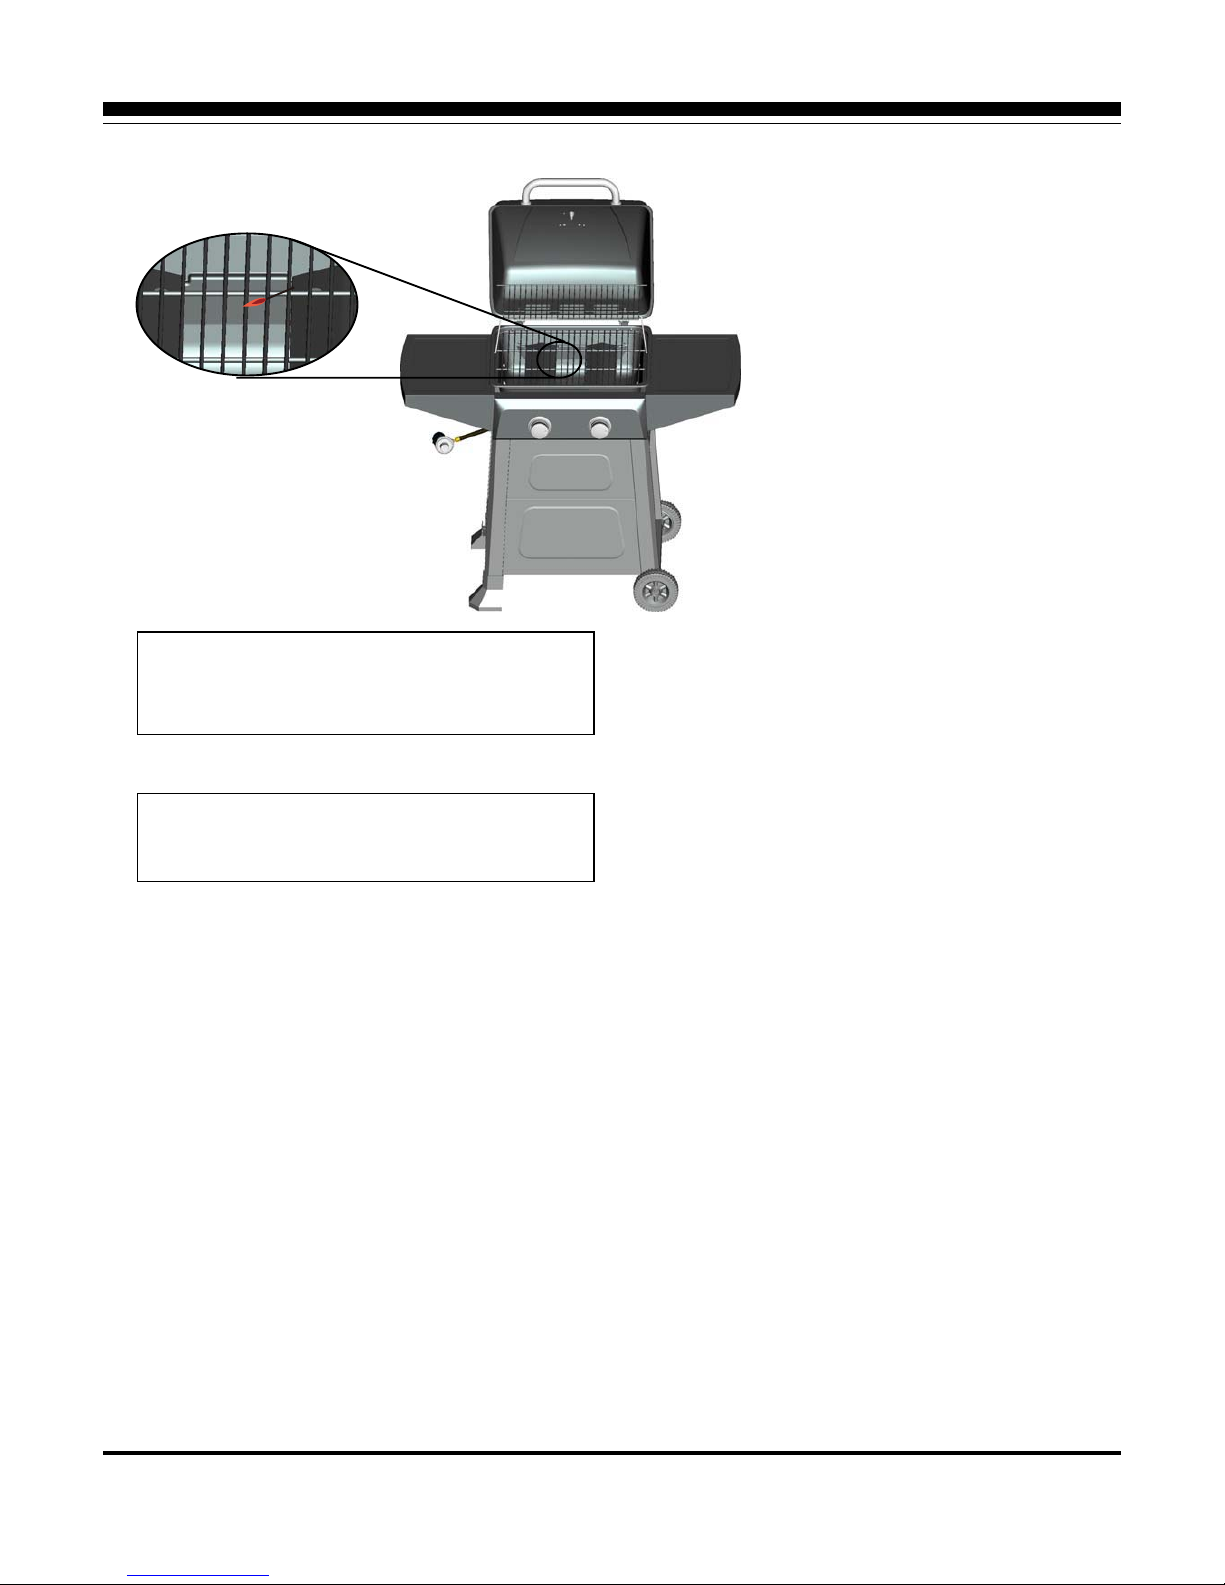
TO MATCH LIGHT THE GRILL
If the burner will not light after several attempts then
the burner can be match lit.
1. Open lid before lighting.
2. Turn the burner control knobs to "OFF".
3. Place a paper match in the end of the match lighter.
Strike the match and place through the cooking
grate to the LEFT burner of 1/2" (1 to 2 cm) away.
4. Turn on the LEFT burner control knob to "MAX"
position. The burner should light within 5 seconds.
5. If the burner does not light, turn the control knob to
"OFF" and wait 5 minutes for gas to dissipate and
repeat lighting procedure.
6. Once lit, light adjacent burners in sequence by
pressing in and rotating the control knob to the
"MAX" position.
7. If the burner does not light within the first few
attempts of match lighting, there is a problem with
the gas supply. Turn off the gas at the burner and
cylinder. DO NOT attempt to operate the grill until
the problem is found and corrected. See "Trouble
Shooting" section of this manual on page 27.
1. Read instructions before lighting.
2. Open lid during lighting.
3. Ensure knobs are in “OFF” position.
4. Turn on the cylinder valve .
5. Push and turn control knob counter-clockwise
to “MAX” position until click is heard and burner
is lit. Then release knob. Adjust the flame by turning
control knob between “MAX” and “MIN” positions.
6. If ignition does not occur in 5 seconds, turn the burner
control off, wait 5 minutes, and repeat the lighting
procedure.
7. To turn off, turn control knob clockwise until it locks in
“off” position.
Page 24
24
Do not attempt to light the grill if odor of gas is
present. Call for customer service 1-866-814-0585.
LIGHTING INSTRUCTIONS
Keep a spray bottle of soapy water near the gas
supply valve and check the connections before
each use.
Page 25

25
CARE & MAINTENANCE
STAINLESS STEEL
Under extreme conditions, stainless steel can rust and
the rust may not be removable. These conditions may
become more prevalent in coastal areas. Always use
extra precautions while cleaning the stainless steel by
using a soft non-abrasive cloth and a stainless steel
cleaner/polish to minimize the risk of scratching the
surface.
BURNERS
Extreme care should be taken when moving a burner as
it must be correctly centered on the orifice before any
attempt is made to relight the grill. Frequency of
cleaning will depend on how often you use the grill.
GRILL BURNER CLEANING
Ensure the gas supply is off and the knobs are in the
“OFF” position. Make sure the grill is cool. Clean the
exterior of the burner with a wire brush. Clear stubborn
scale with a metal scraper. Clear any clogged ports with
a straightened paper clip. Never use a wooden
toothpick as it may break off and clog the port. Please
note if insects or other obstructions are blocking the flow
of gas through the burner, see the TROUBLE
SHOOTING section of this manual
GREASE TRAY CLEANING
The grease tray should be emptied and wiped down
periodically and washed in a mild detergent and warm
water solution. Check the grease tray frequently, don’t
allow excess grease to accumulate and overflow out of
the grease tray.
SIDE BURNER CLEANING:
Clean the exterior of the burner with a brush. Clear any
clogged burner ports with a straightened steel wire.
Never enlar
ge the burner ports. Never use a wooden
toothpick as it may break off and clog the port.
Check your grill for the following items every six
months
Make sure the area around the grill free and clear of
combustible materials.
1. Make sure the combustion and ventilation
openings are not obstructed.
2. Make sure the ventilation openings of the cart are
not obstructed.
3. Visually check the burner flames.
4. Clean your grill as described above.
5. Check the grill for insect nests as described in the
troubleshooting section on page 27.
Page 26
26
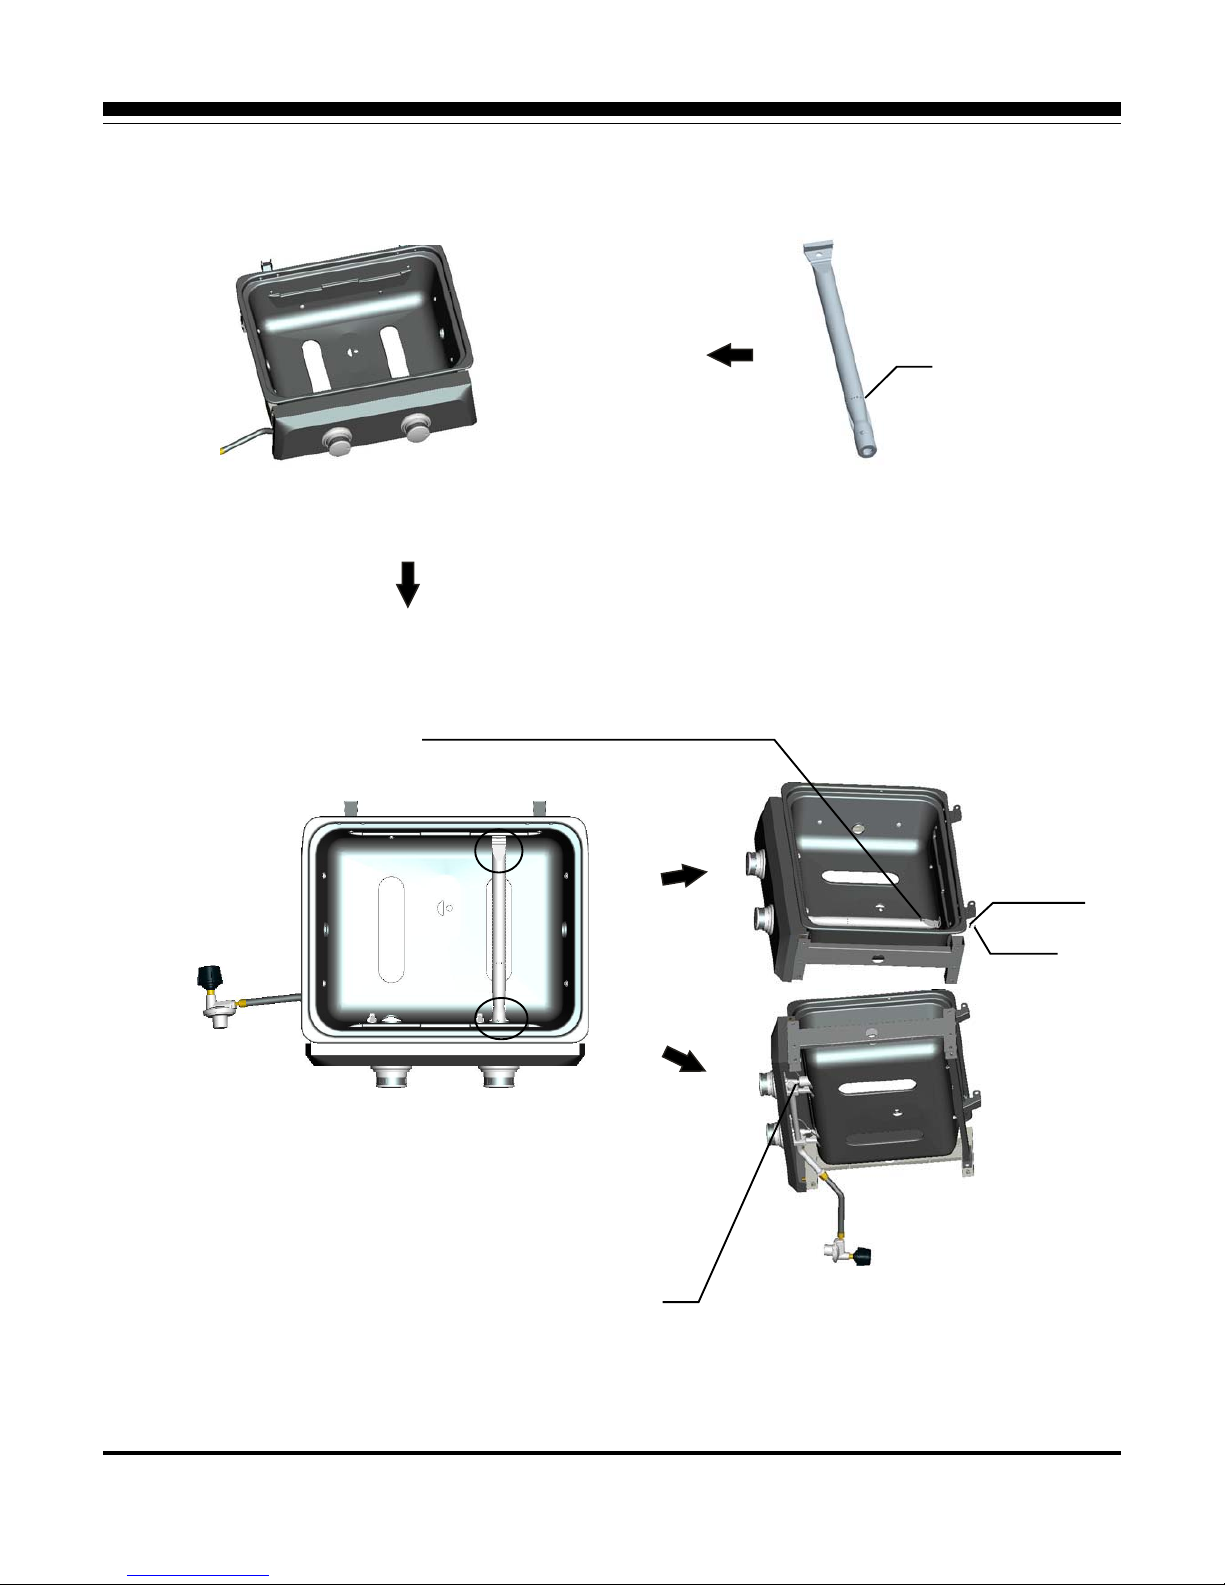
HOW TO REPLACE MAIN BURNER
Ignition hole
(upwards)
1. Line up burner and nozzle.
2. Assembly ignition hole of the burner downwards.
in burner image Ma
3. Line up burner and burner supporter and secure both parts by
using M5x10 bolts and D5 washers and M5 nuts.
Washer D5
Nut M5
Page 27
27
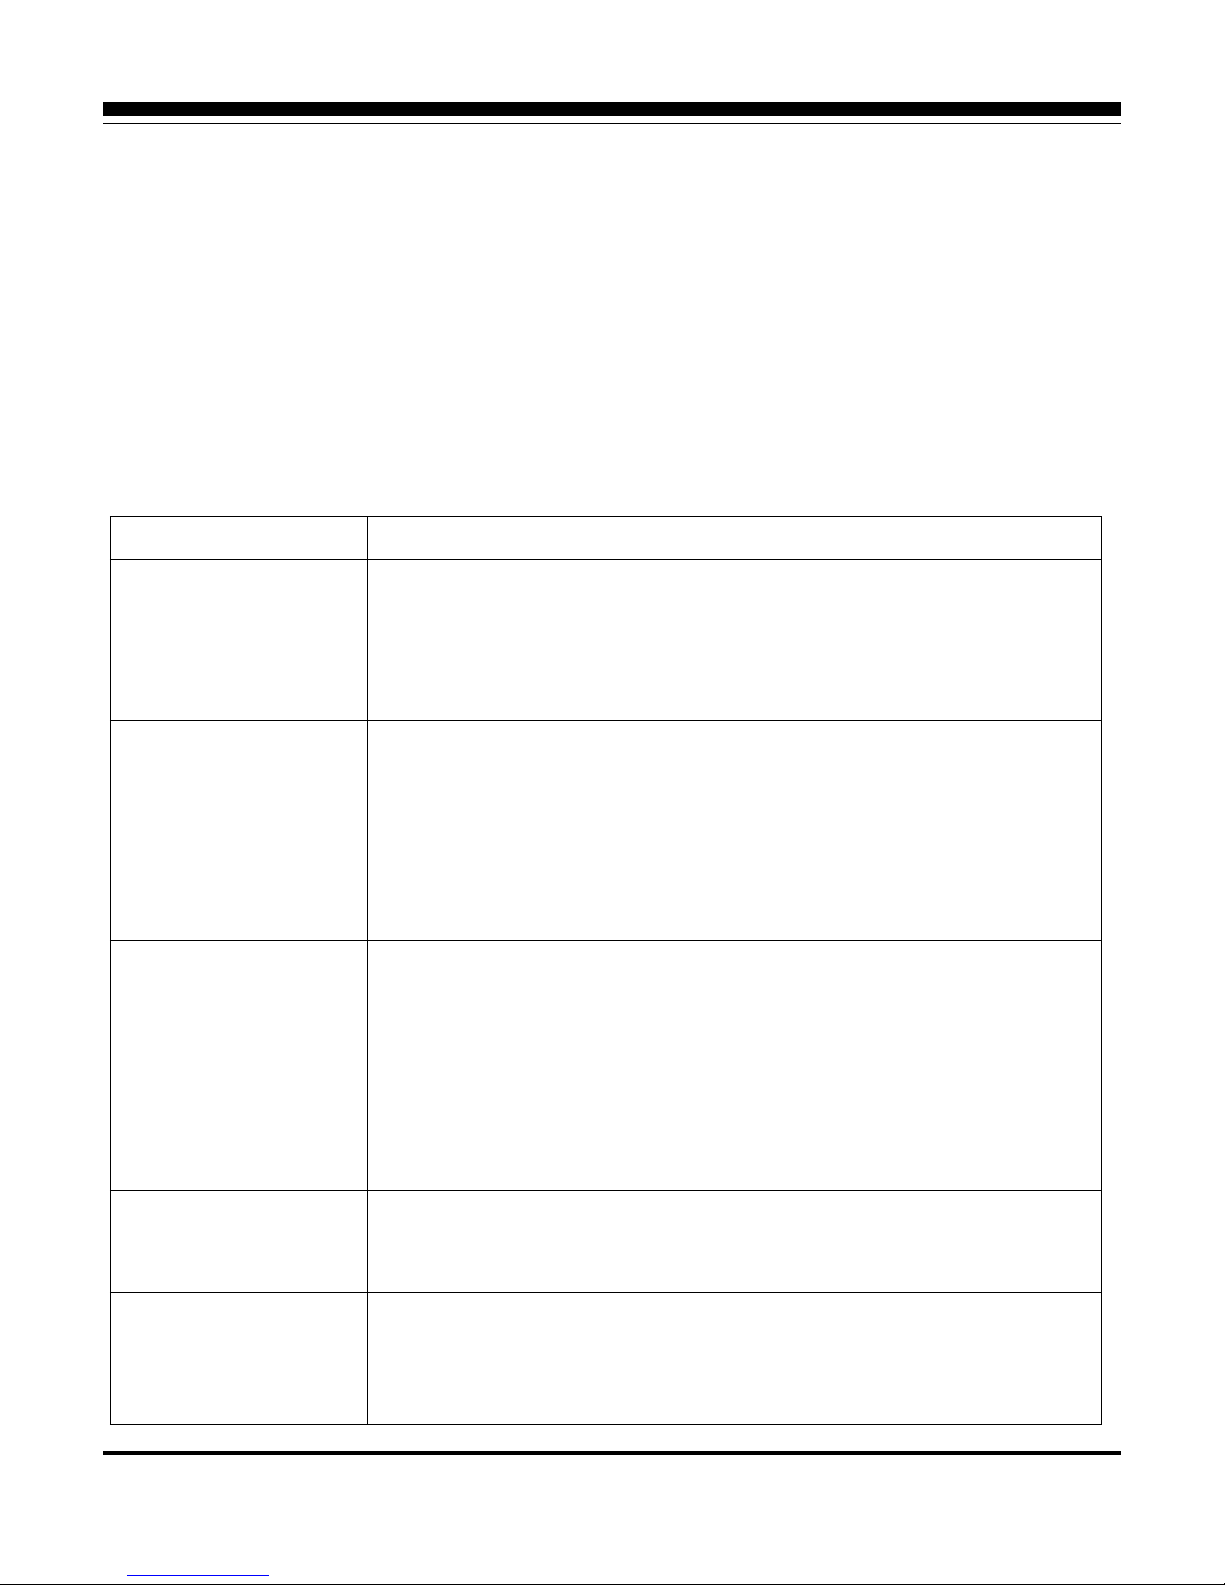
TROUBLE SHOOTING
PROBLEM SOLUTION
When I light the grill, it does
not flame immediately.
-- Make sure you have turned on the gas.
-- Make sure it has a spark while you are trying to ignite the burner.
-- Push in control knob and turn to ignite/preheat and hold for approximately 5 seconds
and then ignite the grill.
-- Make sure your burner is clean.
Regulator makes noise. -- Vent hose on the regulator may be plugged or regulator may be faulty.
-- Make sure the vent hole on the regulator is not obstructed. Clear the hole, close the
LP cylinder and gas control valves. Wait 10 minutes and re-start.
-- When turning the LP cylinder valve on, do not cover vent hole on the regulator.
-- Check your flames for proper performance. Replace regulator if the flames are not
correct.
-- Purge The lines.
Grill only heats to 200-300
degrees.
-- Ensure the temperature gauge is functioning properly. Hold a flame to the probe or
compare the grill gauge to an oven thermometer placed in the grill.
-- Ensure correct start procedure. Prior to lighting grill, the gas control knobs should be
off. The propane bottle should be turned off. If not, wait 15 minutes. Turn cylinder all
the way on. Turn left burner to ignite, wait 5 seconds ignite. Repeat for additional
burners.
-- Check all gas connections for leaks with bubble test. If leaks are found, replace the
part or tighten the fitting.
Grill takes a long time to
preheat.
-- Normal preheat 500-600 degrees, takes about 10-15 min. Cold weather and wind
may effect your preheat time. Volcanic rock and Briquettes should not be used in
this BBQ.
Burner flames are not light
blue.
-- Too much or not enough air mixes for the flame.
-- Elevation is the principal cause, however cold weather can affect the mixture.
-- Grill is in a windy location.
SPIDER AND INSECT WARNING!!!
Spiders and insects can nest in the burners of the grill
and cause the gas to flow from the front of the burner.
This is a very dangerous condition, which can cause a
fire to occur behind the valve panel, thereby damaging
the grill and making it unsafe to operate.
WHEN TO LOOK FOR SPIDERS
You should inspect the burners at least twice a year or
immediately after any of the following conditions occur:
1. The smell of gas in conjunction with the burner
flames appearing yellow.
2. The grill does not reach temperature.
3. The grill heats unevenly.
4. The burners make popping noises.
BEFORE CALLING FOR SERVICE
If the grill does not function properly, use the following
checklist before contacting your dealer for service. You
may save the cost of a
service call.
Page 28

ONE-YEAR LIMITED WARRANTY
True Value Company warrants your gas grill to be free from manufacturer’s defects in workmanship or material under
normal operating conditions for one (1) year from the original date of purchase.
This warranty applies only to products sold at retail.
True Value Company will, at its option, repair or replace free of charge any defective part, where the Purchaser has notified
their Retailer within the warranty period. In the event of product replacement, the current equivalent model will be provided.
The obligation of True Value Company under this warranty is expressly limited to such repairs or replacement. This
warranty does not cover the freight costs to and from the authorized repair facility.
Warranty Program:
Proof of purchase is required to access
this warranty program, which is in effect from the date of purchase. If you are not
able to provide proof of purchase before or after the warranty has expired, you will be subject to parts, shipping and
handling fees.
Full 30-Day Warranty:
Any missing parts can be replaced at no charge within 30 days from the date of purchase, with a valid proof of purchase.
Limited Warranty:
One (1) year warranty on all parts in regards to damage affecting the operation of the gas grill.
Warranty Provisions:
This warranty is non-transferable and does not cover failures due to misuse or improper installation or maintenance.
This warranty is for replacement of defective parts only. We are not responsible for incidental or consequential
damages or labour costs.
This warranty does not cover chips and scratches of porcelain, non-stick or painted surfaces, nor does it cover
corrosion or discoloration due to misuse, lack of maintenance, hostile environment, accidents, alterations, abuse or
neglect.
This warranty does not cover damage caused by heat, abrasive and chemical cleansers, resulting in chipped porcelain
enamel parts or any damage to other components used in the installation or operation of the gas grill.
Some provinces do not allow limitations on how long an implied warranty lasts, so the above limitation may not apply to you.
Some provinces do not allow the exclusion or limitation of incidental or consequential damages, so the above limitation or
exclusion may not apply to you. This warranty gives
you specific legal rights. You may also have other rights, which vary
from province to province.
If you require service, please first see the “Troubleshooting” section of the Owner’s Manual.
Additional assistance can be found by calling our toll-free customer service line at
1-866-814-0585, Monday to Friday from 9:00 AM to 5:00 PM (EST).
28
 Loading...