

Grillstream GSG66SS Pre-assembly Preparation
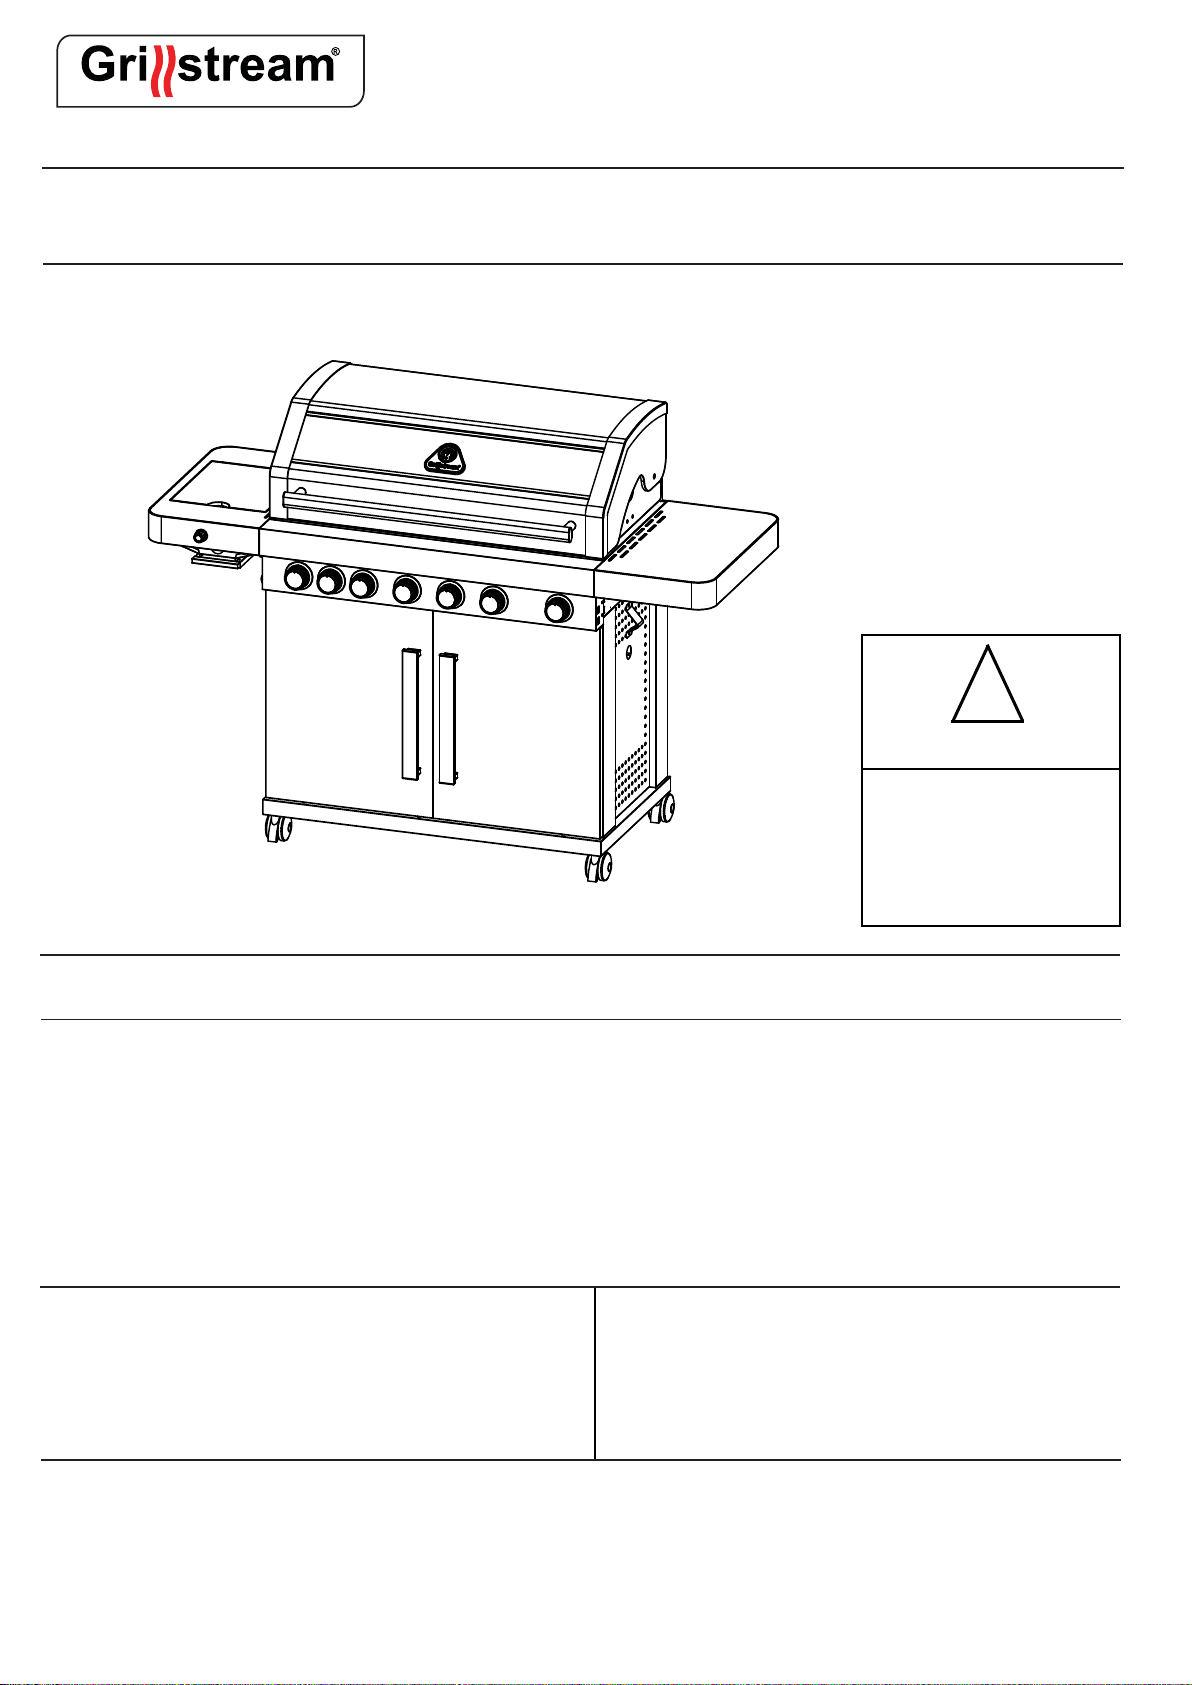
GSG66SS
6 Burner Roaster
Thank you for purchasing this barbecue. Please read the instructions carefully before use to ensure
safe and satisfactory operation of this product. Please keep these instructions for future reference.
!
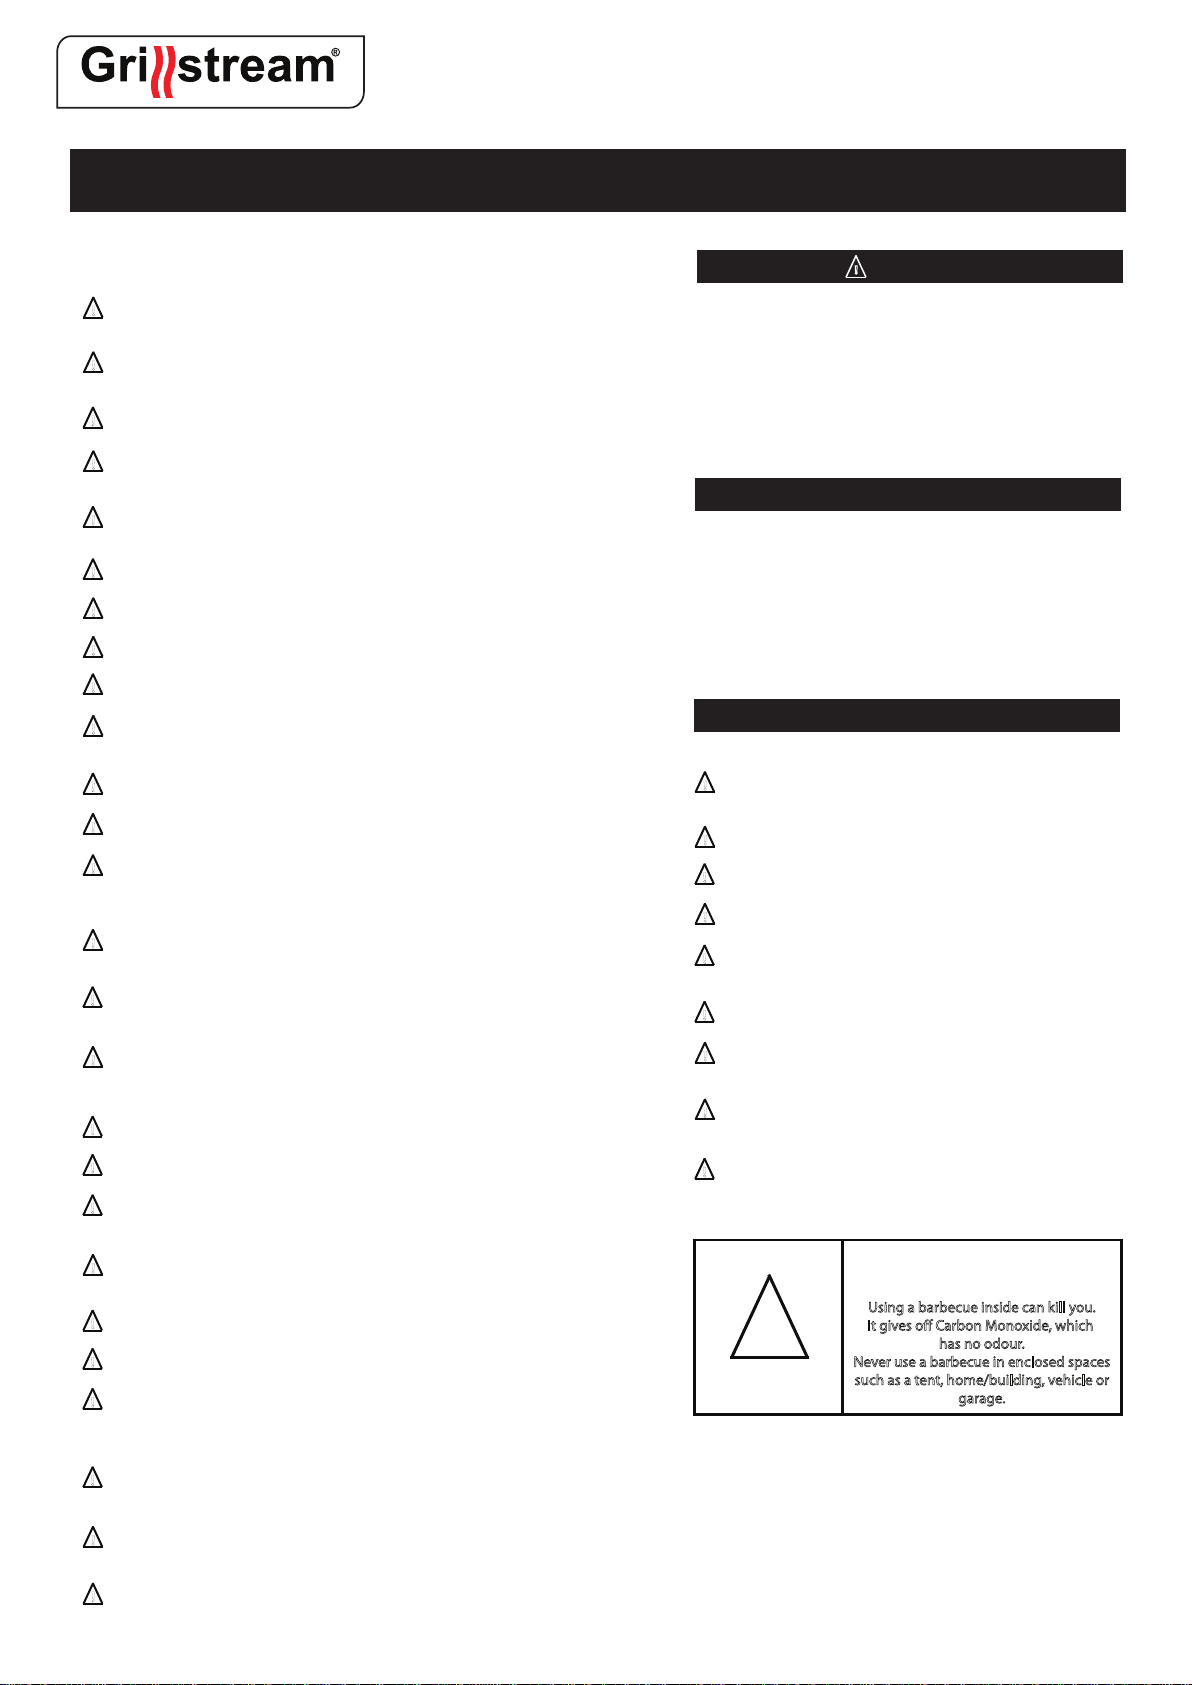
WARNING
Carbon Monoxide Hazard
Using a barbecue inside can kill you.
It gives off Carbon Monoxide, which
Never use a barbecue in enclosed
spaces such as a tent, home/building,
Pre-assembly preparation
WARNING! FOR OUTDOOR USE ONLY
Please read these instructions carefully and ensure that your barbecue is properly installed, assembled,
maintained and serviced in accordance with these instructions.
Failure to follow these instructions may result in serious injury and/or damage to property.
If you have any questions concerning the assembly or operation of this barbecue, please contact your local
stockist.
Before using your BBQ please test for any gas leaks following the guidance given in this instruction manual
has no odour.
vehicle or garage.
Necessary Tools
(Not supplied)
4x AA Batt
This product takes approximately 60 MINUTES to assemble with 2 PEOPLE. The fittings pack contains SMALL ITEMS which
should be KEPT AWAY FROM YOUNG CHILDREN
Please check the pack contents before attempting to assemble this product. A full checklist of components is given on this
leaflet. If any components are missing, please contact the retailer from whom you bought this product.
Read this leaflet in full before commencing assembly.
eries required (Not supplied)
1
YOU MUST CHECK FOR GAS LEAKS
BEFORE USING YOUR BARBECUE.
SEE PAGE 2 AND/OR PAGE 33

GSG66SS
IMPORTANT - PLEASE READ
TESTING FOR LEAKS - DO THIS BEFORE USING YOUR BBQ
NOTE - DO NOT test for gas leaks with an open flame. If you smell gas, turn off at the source.
Before first use, at the beginning of each new season, or whenever a gas cylinder is changed, you must check for gas leaks
Do so by:
- Turn all gas valves on the bbq to the off position
- Turn on the gas cylinder
- Make a soap solution of one part liquid detergent and one part water
- Brush the soap solution over all gas connections
- The presence of bubbles indicates a leak. Tighten or repair as
necessary
- Under no circumstances should a naked flame be used to check
for leaks
- If a gas odour is present and no leaks can be found, do not use
the bbq. Turn the gas off at the source, disconnect the hose and
immediately contact your bbq dealer or place of purchase for
assistance
Page 2
ARNINGS
W
GSG66SS
WARNINGS:
mproper assembly of the grill may be dangerous. Please follow the
I
!
assembly instructions carefully.
Do not use this grill unless all parts are in place. The grill must be properly
!
assembled according to the assembly instructions.
This barbecue is only to be used outdoors.
!
Your gas barbecue should never be used by children. Accessible parts of
!
the grill may be very hot. Keep young children away while grill is in use.
Exercise caution when using your barbeuce. It will be hot during cooking or
!
cleaning, and should never be left unattended while in operation.
Do not use charcoal, briquettes or lava rock in your gas barbecue.
!
While igniting the barbecue or cooking, never lean over open grill.
!
Do not move this barbecue during use.
!
The entire cookbox gets hot when in use. Do not touch.
!
Under no circumstances should you attempt to disconnect the gas
!
regulator or any gas tting while your barbeuce is in operation.
Use heat-resistant barbecue mitts or oven gloves when operating grill.
!
Follow regulator connection instructions for your type of gas barbecue.
!
Should the burners go out while the grill is in operation, turn all gas
!
valves o. Open the lid and wait ve minutes before attempting to relight
grill, using the igniting instructions.
Flammable materials should not be present within approximately 60cm
!
of the grill. This includes the top, bottom. back or sides of the grill.
Do not store an extra (spare) or disconnected gas supply cylinder under
!
or near this grill.
After a period of storage and/or non-use, the barbecue should be checked
!
for gas leaks and burner obstructions before use. See instructions in this
Owner’s Guide for correct procedures.
Do not operate your barbecue if there are any leaking gas connections.
!
Do not use a ame to check for gas leaks.
!
Do not put a grill cover or anything ammable on or in the storage area
!
under the grill while the grill is in operation or is hot.
!
ANGER
D
F
ailure to follow the DANGERS, WARNINGS and
CAUTIONS contained in this instruction manual
may result in serious bodily injury or death, or may
result in a re or an explosion causing damage
to the property.
TANT
PLEASE ENSURE
IMPOR
THAT PRIOR TO USING YOUR BBQ,
all leak test procedures are carried out as per the
instructions. It is important to do this to ensure all
joints are tight and there are no leaks. Do this even
if assembled by a third party.
CHANGING
Only use r
!
equivalent type.
Batteries are to be inserted with the correct polarity.
!
The supply terminals are not to be short-circuited.
!
Remove exhausted batteries from item.
!
Remove batteries if equiptment is not used for extended
!
periods of time.
Do not attempt to recharge non-rechargeable batteries.
!
Batteries contain substances that may be harmful to the
!
environment and human health.
Keep out of reach of children and seek immediate medical
!
help if swallowed.
Never throw batteries in a re or attempt to open outer
!
casing.
ecommended batteries or those of the same or
THE BATTERIES
Visually inspect gas hoses prior to use for cuts, cracks, excessive wear or
!
other damage.
Keep the fuel supply hose away from heated surfaces.
!
The gas barbecue should be thoroughly cleaned on a regular basis.
!
A dented or rusty gas supply cylinder may be hazardous and should be
!
checked by your gas supplier. Do not use a gas cylinder with a damaged
valve.
Although your gas supply cylinder may appear empty, gas may still be
!
present, and the cylinder should be transported and stored accordingly.
Should a grease/fat re occur, turn o all burners and leave the lid closed
!
until the re is out.
Should uncontrolled are-up occur, move food away from the ames until
!
aring subsides.
Page 3
!
ARNING
W
arbon Monoxide Hazard
C
U
sing a barbecue inside can kill you.
I
t gives o Carbon Monoxide, which
Nev
er use a barbecue in enclosed spaces
such as a t
has no odour
ent, home/building, vehicle or
gar
.
age.

Contents
GSG66SS
Leak test
Warning information
Contents
Location of your BBQ
Connecting the gas cylinder
The hose and regulator assembly
Gas cylinder safety
What is Propane/Butane?
Are all gas bottle gases the same?
How is it different from natural gas
Securing the hose and regulator assembly
Testing for leaks
Setting up your BBQ
Lighting your BBQ
First time use of BBQ
First use after long periods
Maintenance of your BBQ
Removing burners
Troubleshooting
Exploded diagram
Parts list
Fittings list
Assembly instructions
Leak test
Page 2
Page 3
Page 4
Page 5
Page 5
Page 5
Page 5
Page 5
Page 5
Page 5
Page 6
Page 6
Page 6
Page 7
Page 7
Page 7
Page 7-8
Page 8
Page 9
Page 10
Page 11
Page 12
Page 13-32
Page 33
Page 4
GSG66SS
LOCATION OF YOUR BBQ
IMPORTANT - BBQS MUST BE INSTALLED IN ACCORDANCE WITH
THE MANUFACTURER’S INSTALLATION INSTRUCTIONS, LOCAL
GAS FITTING REGULATIONS AND MUNICIPAL BUILDING CODES.
Think carefully when deciding on a location where you are to use your
bbq. The bbq must not be installed under or on any combustible
material and must be a level surface.
Minimum clearance from any combustible materials on ALL sides is
430mm (18”). Minimum clearance from any combustible material from
the TOP of the bbq is 1000mm (39”). (Fig. 1)
- Not to be used in garages, porches, breezeways, sheds, or other
enclosed areas
- Not to be used on recreational vehicles
- Do not obstruct flow of combustion and ventilation air around the bbq
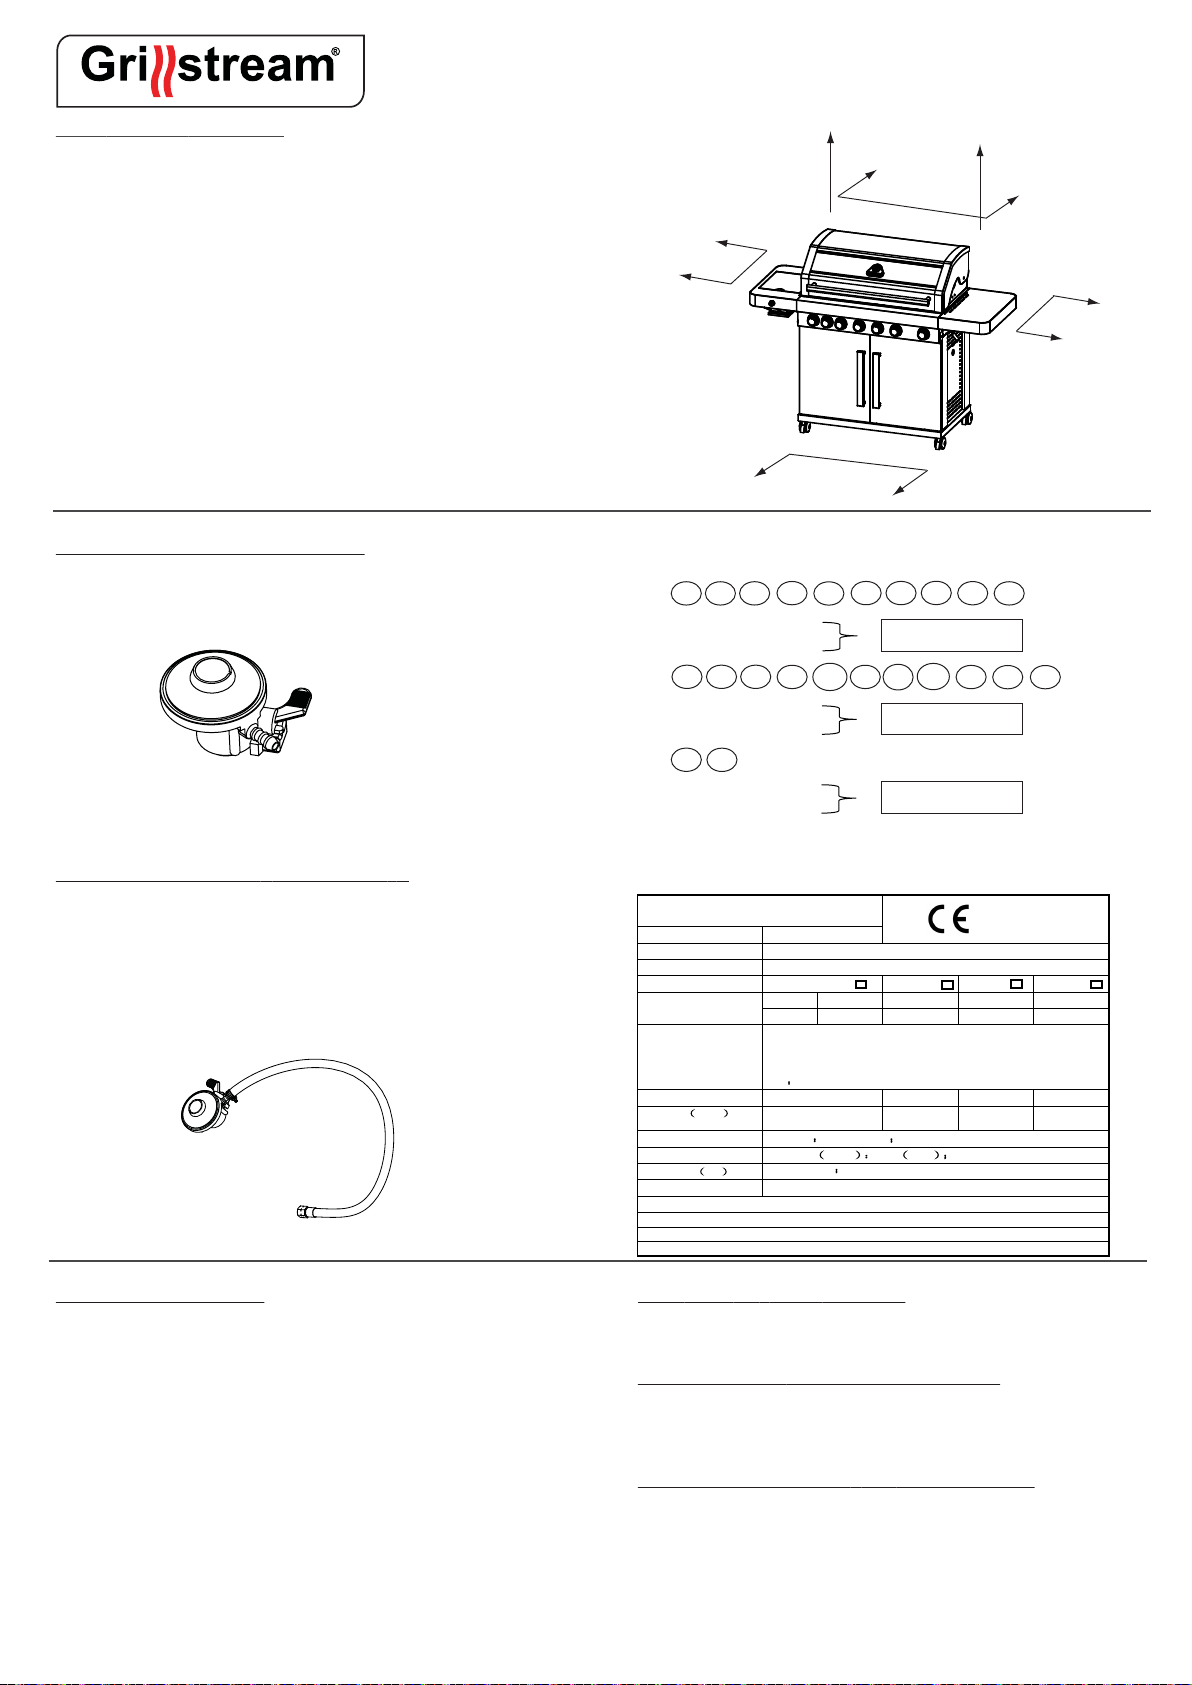
CONNECTING THE GAS CYLINDER
There are two different types of gas that can be used on your gas bbq
depending on where you live, that being either butane or propane gas.
Both are supplied in gas cylinders. The connection between the gas
cylinder and the bbq is made with a regulator. (Fig. 2)
(Fig. 2)
It is important that you use the correct regulator for the particular type
of gas you purchase. See your local gas dealer for information on
purchasing the correct regulator. Never operate this bbq without a gas
regulator. This bbq is supplied with a propane regulator.
THE HOSE AND REGULATOR ASSEMBLY (Fig. 3)
- Must be suitable for liquefied petroleum gas (LPG)
- Must withstand the above pressures
- Must not exceed 1000mm (39”) in length
- The bbq is supplied with a 1/4” BSP LHT adaptor and screw on hose
that is suitable for direct connection of a suitable regulator
- Before connection inspect the hose, its fittings and ruber seals. If
there is any sign of cracking, splitting or wear, have the hose replaced
- While in use, keep the hose unobstructed and free of kinks and
twisting
NOTE: Hose and Regulator
picture for reference only.
(Fig. 3)
1000mm
Minimum
430mm
Minimum
430mm
Minimum
430mm
Minimum
4
30mm
Minimum
(Fig. 1)
The following gas supply pressures are a guide only:
DK FI
For
Butane - 30 millibars
Propane - 30 millibars
GB IE
For
Butane - 28 millibars
Propane - 37 millibars
AT
DE
For
Butane - 50 millibars
Propane - 50 millibars
NL SE
NO
FR GR IT ES LU PT
BE
HR
SI
IS
EE
1 3 B/P (30)
1 3 + (28 - 30/37)
1 3 B/P (50)
LV
CH CZ
FOR AUSTRALIA
Propane - 2.75 kPa
Universal LPG - 2.75 kPa
GRILLSTREAM BARBECUES,
LEISUREGROW PRODUCTS LTD.
Product name
Model Number
Product Identification Number
Gas Category
Gas and Supply Pressure
Country of Destination
Main Burner Injector Size
Side Burner (infrared)
Injector Size
Total Nominal Heat Inputs (Hs)
Side Burner Heat Inputs (Hs)
Electric energy(
Serial Number
Use Outdoors Only .
Read the instructions before using the appliance.
Warning : Accessible parts may be very hot. Keep young children away.
Made in China
V/DC)
Outdoor gas Grill
K106SBEC1
0359CP1429
I
3+(28-30/37)
Butane(G30)
Propane(G31) Butane Butane Butane
28-30 mbar
I
3+(28-30/37)
I
3B/P(30)
I
3B/P(50)
I
3B/P(37)
Ø 0.9 mm
Ø 0.92 mm
Main burner:21kW/1526(g/h ) ;
Side Burner (infrared):3.5kW(254g/h);
4X1.5V-LED lamp;1X1.5V-Infrared Side Burner Ignition
37 mbar 29 mbar 37 mbar 50 mbar
: BE,CH,CY,CZ,ES,FR,GB,GR,IE,IT,LT,LU,LV,PT,SK,SI.
: BE,CY,CZ,DK,EE,FI,FR,HU,IT,LT,NL,NO,SE,SI,SK,RO,HR,TR,BG,IS,LU,MT.
: AT,CH,CZ.,DE,SK
:PL
I
3B/P(30)
Ø 0.9 mm Ø 0.86 mm Ø 0.81 mm
Ø 0.92 mm Ø 0.86 mm Ø 0.81 mm
0359-17
I
3B/P(37)
I
3B/P(50)
GAS CYLINDER SAFETY
- Always change over a gas cylinder away from any possible source
of ignition in a well ventilated area
- Do not smoke whilst handling gas cylinders
- Never store gas cylinder indoors
- Store away from direct heat in a well ventilated area
- The gas cylinder is position on a flat surface
- Always keep the gas cylinder in an upright position
- Close cylinder valve when bbq is not in use and, if available, use a
sealing plug to prevent possible leaks
- Do not tamper with any fitting attached to any gas cylinder. Have it
taken to the manufacturer or an authorized testing station
- When the cylinder runs out of gas, have it refilled or swapped at an
authorized testing station. They will fill the cylinder to no more than
80% of its capacity. This allows the gas to expand with temperatures
WHAT IS PROPANE / BUTANE?
It is a fuel gas compressed until it turns to liquid, then stored in a bottle
or cylinder under pressure for easy transport.
ARE ALL GAS BOTTLE GASES THE SAME?
No. The LPG that cars use is know as auto LPG. It is different to
propane/butane, which is used in household gas appliances. This manual
only deals with propane/butane.
HOW IS IT DIFFERENT FROM NATURAL GAS?
Propane and butane are similar to natural gas. They are colorless,
non-poisonous and do not pollute when burnt. There is one important
difference, propane and butane are heavier than air, if they escape they
don’t float away. The gas collects and forms gas pools at ground level or
at the bottom of your appliance.
Page 5
GSG66SS
SECURING THE HOSE AND REGULATOR ASSEMBLY
Screw on hose connection (Fig. 4)
- The bbq’s manifold connection is 1/4” Male Thread BSP
- The connection between the hose and regulator and the bbq should
always be tightened with a spanner. ‘Finger tight’ only is NOT sufficient.
N.B. IMMEDIATLY PERFORM GAS LEAK CHECK AS SHOWN ON PAGE 2 AND 31
TO ENSURE SAFE CONNECTION.
(Fig. 4)
N.B. LEFT HAND THREAD CONNECTION OF HOSE TO ADAPTOR
TESTING FOR LEAKS - DO THIS BEFORE USING YOUR BBQ
NOTE - DO NOT test for gas leaks with an open flame.
If you smell gas, turn off at the source
Before first use and periodically during the season, or whenever a gas
cylinder is changed, you must check for gas leaks.
Do so by:
- Turn on the gas cylinder
- Turn all gas valves on the bbq to the off position
- Brush a soap solution of one part liquid detergent and one part water
to all gas connections
- The presence of bubbles indicates a leak. Tighten or repair as necessary
- Under no circumstances should a naked flame be used to check for leaks
- If a gas odour is present and no leaks can be found, do not use the
bbq. Turn the gas off at the source, disconnect the hose and
immediately contact your bbq dealer or place of purchase for
assistance
SETTING UP YOUR BBQ
OIL CHANNEL, GRILL, FLAME TAMER AND
FAT CUP PLACEMENT
Order of how things go into the barbecue:
1. Oil Channel inserted into front of frame with end of channel going
through hole in side of barbecue frame. (Fig.5)
2. The flame tamers should be placed underneath the grills but above
the oil channel.
3. Grillstream Grills always go to the left hand sides. (Fig.6)
4. Griddles are always on the right.
5. Attach fat cup to side of barbeuce underneath the side shelf. (Fig.7)
NOTE:
a. Ensure that your grills incline from front to back to the fat
collecting channel at the front of the barbecue.
b. There may be a slight movement in the grill bars while cooking, this
is normal and will not affect the way the Grillstream system works.
Grillstream Grills fit directly on top of each other - do not offset them.
2 X GRILLSTREAM GRILLS
1/3 SOLID GRIDDLE PLATE
(Fig.5)
(Fig.7)
OIL CHANNEL
(Fig.6)
FAT COLLECTION
Using the fat collection cup
Page 6
GSG66SS
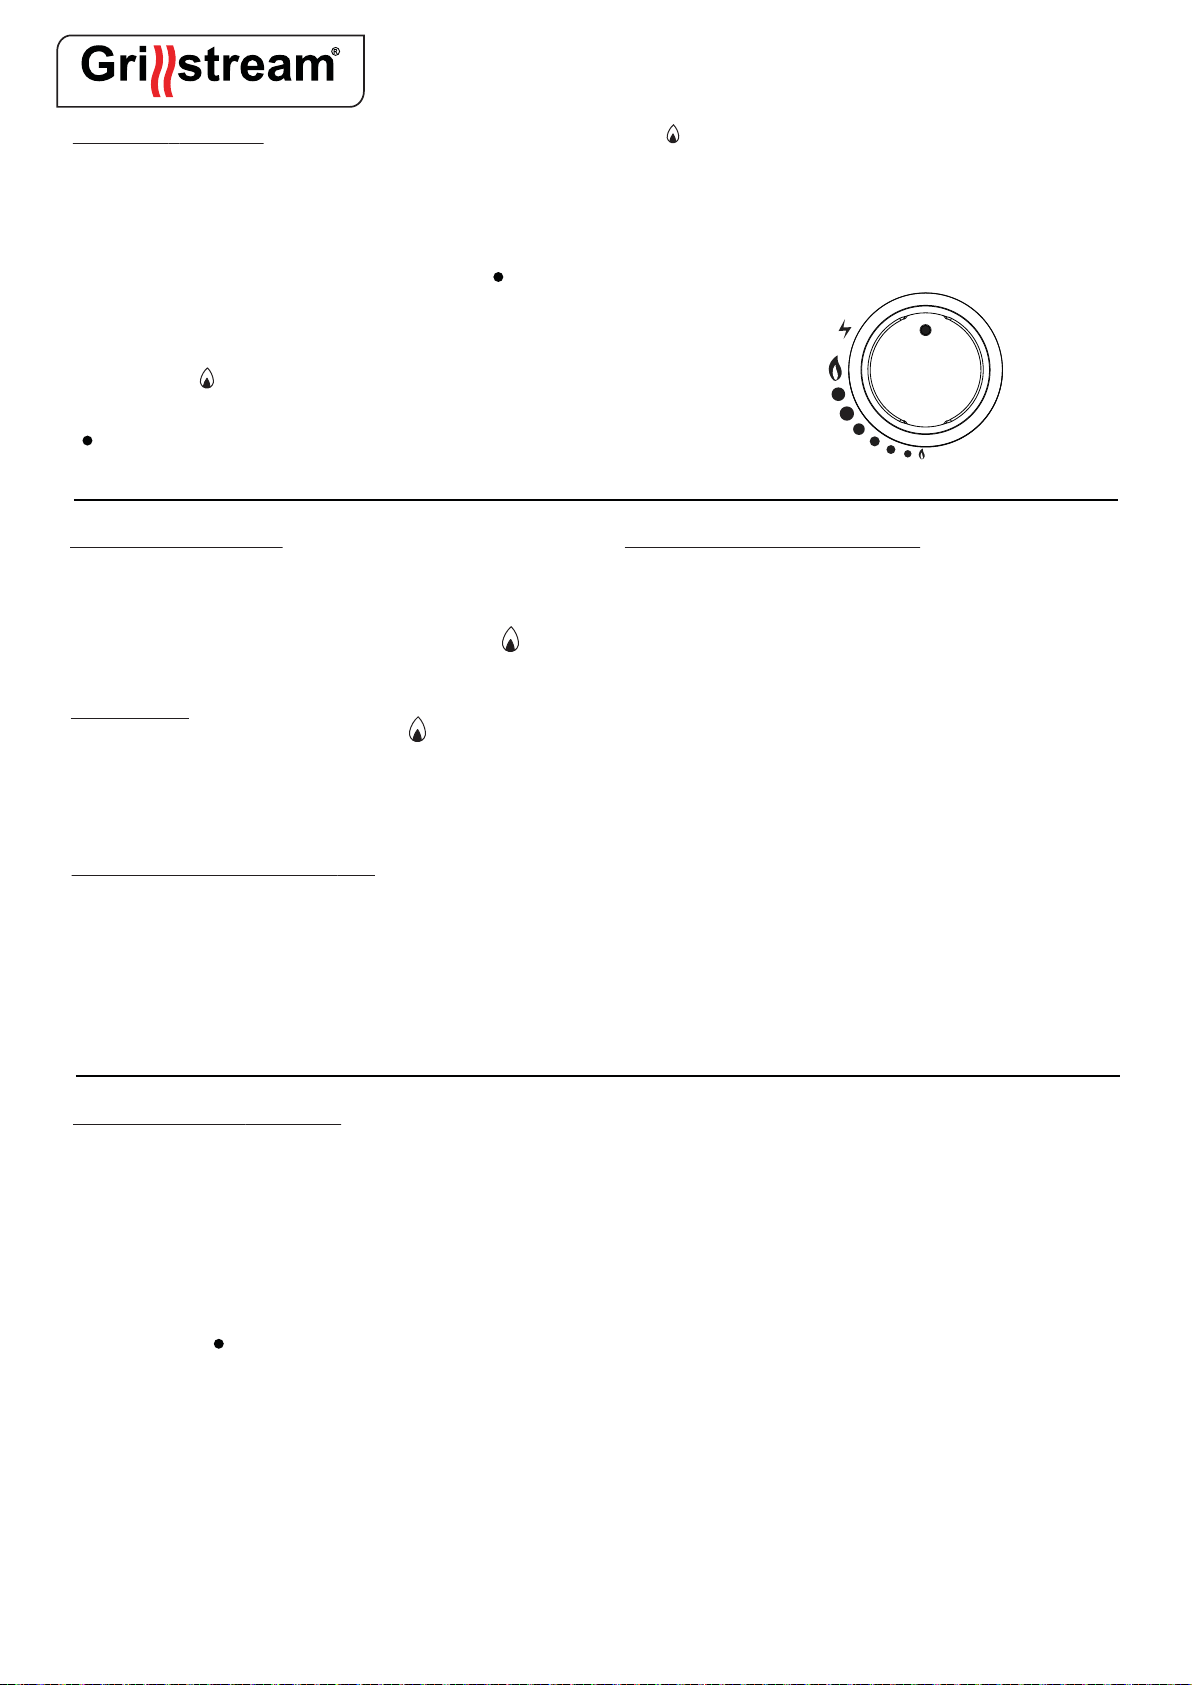
LIGHTING YOUR BBQ
JET FLAME IGNITION SYSTEM
Upon turning any burner control knob you will hear an audible
“click”. This is known as a Jet Flame Ignition System.
Jet Flame Ignition to ALL burners
- Before starting - ALL burner control knobs must be in the off
position (Fig.8)
- Flat lids and roasting hoods must be OPEN before lighting
- Turn on the gas cylinder
- Push in and turn Any Knob in an anti-clockwise
direction to the hi position or until a click is heard. This will trigger
a spark to light the burner
- If burner does not light immediately, turn the gas control knob to the
off position and wait five minutes for any accumulated gas to clear
out of the bbq before repeating procedure
FIRST TIME USE OF BBQ
- Before using the bbq for the first time, it should be first wiped with a
mild soap and water solution to remove any dust
-Make sure your BBQ is on a solid level surface
- Dry cooking surface and apply a light coating of cooking oil
- Light the barbecue and leave burning for 30 minutes on the low
position, with hood up. This is to burn off any residual or foreign
matter on the grills.
PREHEATING
Light the burners as previously directed, turn to low and allow the bbq
to preheat for 2-5 minutes. Adjust control to medium cooking temperature,
the hood must be closed while doing this.
-The low position is obtained by turning the knob fully anti-clockwise
- Adjusting the control knob to your heat requirements allows you to
control the flame
- If ignition cannot be achieved see the troubleshooting section:
If bbq fails to operate properly
IMPORTANT - It is important that all control valves, and the gas cylinder
are turned off after use.
HI
OFF
LOW
(Fig.8)
FIRST USE AFTER LONG PERIODS
At the start of each bbq season or before using after
a long period of time:
- Read this operation manual again thoroughly
- Set burner controls to off and connect gas supply
- Check all gas valve orifices, burner tubes and connections for
obstructions
- Check that all burners are in their correct positions
- Check to see if the gas cylinder is full
- Check for gas leaks using a soapy water solution
- Ensure all grills and hotplates are clean before use
EXCEEDING 250 Degrees CAN DAMAGE THE BBQ AND VOID
YOUR WARRANTY
PREPARE THE COOKING SURFACE
It is preferable to apply a light coat of cooking oil using a long handled
brush to the cooking surface prior to lighting each time. The oil will keep
the food from sticking to the cooking surface. Also see CAST IRON COOKING
SURFACES in the maintenance section below for ongoing maintenance
instructions.
Note: The heat distribution plates disperses the heat from the burners.
This results in a uniform heat zone beneath the cooking grill.
MAINTENANCE OF YOUR BBQ
PROTECTION
Keep your bbq beneath a weather cover and out of the rain. Proper
care and maintenance will keep your bbq in top operating condition
and prolong its life.
CLEANING THE COOKING SURFACES
Allow your bbq to continue burning for 5 minutes after cooking has
ceased, which will burn off excess fats and juices etc. that may block
the flame ports of the burners. To keep your bbq ready for the next time,
turn the burners to off then take a long handled brush and brush the
cooking surface to remove excess oils and food scraps. Be careful as
surfaces are hot. Protect your hands by using an oven mitt to hold the
brush.
Allow to cool before washing in a warm soapy solution. Ensure that
any dried fat/food deposits are cleaned off both the top and bottom
grills after EVERY cooking session to allow fat to stream away
efficiently on your next cooking session. To clean the Grills effectivly
use the Grillstream cleaning brush which has been specially designed
to quickly and effectivly cleay your Grillstream Grills. Rinse off with
clean water and dry before returning to bbq.
CAST IRON COOKING SURFACES (on specific models)
Cast Iron requires curing/seasoning after each use if possible or on a
regular basis. After cleaning as above, lightly coat the grills and griddle
top and bottom with cooking oil, either with a brush or aerosol spray.
Replace all the cooking surfaces back into the barbecue, light the burners
and turn them to low for at least 15 minutes. Your cooking surfaces are
now seasoned.
Note: Curing/seasoning cast iron will help to slow corrosion.
CLEANING THE FLAME TAMERS
Periodically wash in a warm soapy solution. Use a wire brush to remove
stubborn burnt on cooking residue if necessary. Dry thoroughly before
re-installing to the bbq body.
CLEANING THE DRIP TRAY/FAT COLLECTION CUP
- IMPORTANT - the drip tray, Fat Channel and fat collector should be
cleaned on a regular basis. If this is ignored, a build up of fats and greases
may cause a fire in the bbq
- Please check the level of waste fat in the fat collection cup regularly
while cooking to ensure it does not overflow and dispose of the waste
fat responsibly.
- When using a rotisserie please line the drip tray with a fat soak.
- More frequent cleaning may be necessary as usage demands
Page 7
MAINTENANCE OF YOUR BBQ (Contined)
CLEANING THE BBQ BODY
The body of the bbq should be cleaned regularly dependant on the use
and type of food cooked. Use warm soapy solution.
FAT FIRES ARE NOT COVERED BY WARRANTY
CLEANING THE BURNERS
Occasionally after long cooking sessions, excess fats, juices and
marinades can clog the burners. If so, remove the burners (see
removing burners section) for cleaning.
- Clean by washing in hot water and detergant
- Ensure that all burner ports are free from obstruction
- Rinse in water
- Light immediately to prevent rust and corrosion
- Brush lightly with cooking oil if bbq is not used for an extended period
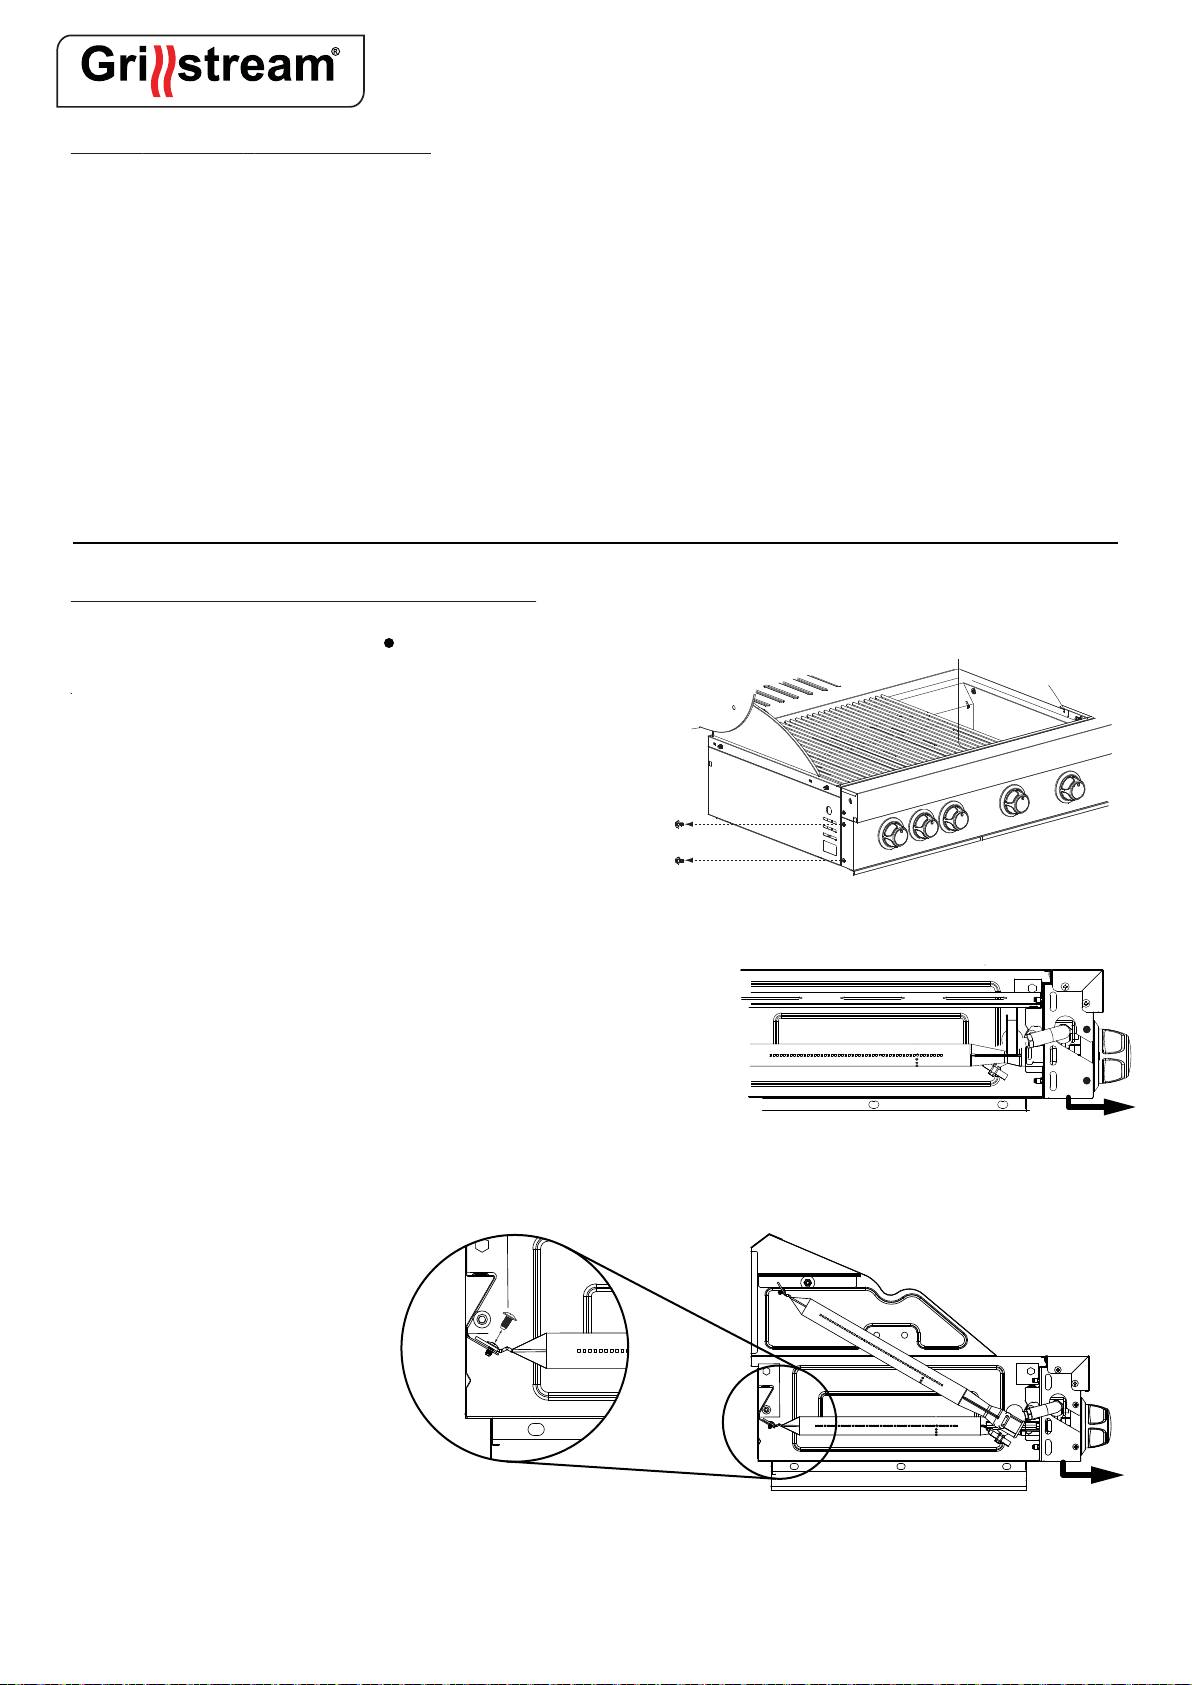
REMOVING BURNERS - Necessary care to be undertaken
- Make sure the bbq has been switched off and has completely cooled down
- Ensure all gas control knobs are set to the off position and the gas cylinder has been turned off
- Lift the grill or hotplate off the bbq
- Unscrew control panel bolts on both sides as shown in (Fig.9)
- Unscrew retaining screw holding the burner in place as show in
the enlarged image in (Fig.11)
(Fig.9)
GSG66SS
- Hold the control panel underneath and pull towards you gently but
firmly as shown in (Fig.10)
- While still holding the control panel in position, pull the burner
towards you then remove by twisting and lifting as shown in (Fig.11)
- Clean burners as described
- Reverse the previous procedure to re-install the burners, flame
diffuser and grill or hotplate
(Fig.10)
(Fig.11)
Page 8

TROUBLESHOOTING
IF BBQ FAILS TO OPERATE PROPERLY
- Stop, turn off gas at its source and turn all burner controls to
OFF
- Do not smoke
- Check gas supply connections
- Repeat lighting procedure after waiting for five minutes for
accumulated gases to disperse
If bbq still fails to operate properly TURN OFF GAS AT SOURCE,
TURN BURNER CONTROLS TO OFF, wait for bbq to cool and check
the following:
a) Misalignment of burner tubes over orifices
CORRECTION: Reposition burner tube to properly sit over orifice
b) Obstruction in gas line
CORRECTION: Remove hose from bbq. Open gas supply for one
second to clear any obstruction from hose. Close off gas supply at
source and re-connect hose to bbq
c) Blocked orifice
CORRECTION: Remove burners as described previously. Inspect gas
valve orifice, clear any obstruction with a fine wire. Re-install
burners over orifices and test again
IF THERE IS A LEAK
- Turn the gas cylinder off
- Ventilate the area to disperse any accumulated gas
- Check all connections
- If the leak persists, keep cylinder upright and take to an open area
- Keep skin away from any gas or liquid escaping from the cylinder
- Keep the cylinder at least 20 meters away from any sparks or ignition
sources including electrical equipment, camera flash, engines or
motors
- Disperse gas by providing maximum ventilation and spraying with a
fine water spray
LED CONTROL KNOBS NOT WORKING
- Check and replace batteries if required (4x AA Batteries)
- Check that wires are connected together correctly
GSG66SS
IF THERE IS A FIRE
- If there is a fire at the appliance, turn the gas off at the cylinder.
- Smother the flames with a wet cloth
If there is a fire at the cylinder or you cannot get to the valve to
turn it off
- call the fire brigade
- direct a garden hose to the middle of the cylinder to keep it cool,
however do not extingish the flame. If the gas is burning it wont
build up and explode
- Evacuate the area
A note on fire prevention:
Most fires in outdoor bbqs are caused by a build up of greases and fat,
or gas connections which have not been secured properly. Remember
to follow the manufacturer’s instructions on proper cleaning and
connection procedures.
INSECTS
Spiders and insects can occasionally spin webs or make nests in the
burner tubes.
These can obstruct gas flow which could result in a fire. This is known
as “Flashback” and can cause serious damage to the bbq and create
an unsafe operating environment.
Frequent inspection and cleaning of the burner tubes is recommended.
Care and Safety Advice
- TAKE CARE Grills are heavy
- Clean grills after each use for continued optimum performance.
- Roasting dishes can be placed on top of the grills.
- When using a rotisserie with the barbecue, always ensure that you
remove all grills, griddles and warming rack brfore use. Ensure the the
drip tray is lined with fat absobant material such as fatsoak before using
the rotisserie.
- For safety and optimum performance ensure that your barbecue is on
a level, solid surface.
- Empty the fat from the drip tray responsibly after each use.
Page 9
GSG66SS
1
40
20
23
21
18
26
22
24
3
5
10
2
4
6
39
11
19
9
8
7
15
34a
38
34b
16a
16b
17
33a
28
12
27
25
33b
13
14
32
37
30
31
29
35
36
Page 10
arts List
P
GSG66SS
Part No.
1
2
3
4
5
6
7
8
9
10
11
12
13
14
15
16a
16b
17
18
19
20
21
22
23
24
25
26
27
28
29
30
31
32
33a
33b
34a
34b
35
36
37
38
39
40
P
art Name
Temperature Gauge
Hood
Hood Handle
Warming Rack
295mm Grillstream Grill
185mm Grillstream Grill
Gastro Plate
Pizza Stone
Circular Griddle
Flame Tamer
Tube Burner
Oil Channel
Fat Tray
Fat Tray Cup
Grillstream Fat Cup
LED Soft Grip Control Knob
LED Side Burner Control Knob
Control Bezel
Left Side Shelf
Right Side Shelf
Infra Red Side Burner Asembly
Infra Red Side Burner Grid
Infra Red Side Burner Lid
Infra Red Side Burner Fat Tray
LoGo
Side Shelf Connector Bar
Side Burner Ignition Button
Front Cross Bar
Back Panel
Base Shelf
Side Panel
Leg B
Leg A
Cart Attachment Bracket (Front)
Cart Attachment Bracket (Back)
Left Door
Right Door
Door Handle
Castor
Bottle Opener
Battery Pack
Smoker Box
Gastro bracket
Quantity
1
1
1
1
2
2
1
1
1
8
6
1
1
1
1
6
1
7
1
1
1
1
1
1
1
4
1
1
1
1
2
2
2
2
2
1
1
2
4
1
1
1
1
Supplier Code
SP-011-TEMP
SP-010-GG65SS-HOOD
SP-010-GG65SS-HDL
SP-013-GG65SS-WR
SP-050-295GL
SP-050-185GL
SP-050-GASTROPL
SP-050-GM-PIZZA
SP-100-GM-CIRGD17
SP-050-GFT17
SP-050-GBURN
SP-070-OC
SP-070-GG65SS-FT
SP-070-GFTCUP
SP-070-FC024
SP-030-SGKNB
SP-030-SBKB
SP-030-BEZ
SP-100-LSS
SP-100-RSS
SP-100-GG65SS-IRDSB
SP-100-GG65SS-IRDGD
SP-100-GG65SS-IRSL
SP-100-GG65SS-IRDTR
SP-100-GG65SS-THOOK
SP-100-GM-SSCB
SP-040-GM-IGNB
SP-100-GG65SS-FXB
SP-100-GG65SS-BP
SP-100-GG65SS-BS
SP-100-GG65SS-SP
SP-100-GM-LEGA17
SP-100-GM-LEGB17
SP-100-GG65SS-BF17
SP-100-GG65SS-BB17
SP-100-GG65SS-LD
SP-100-GG65SS-RD
SP-100-GG65SS-DHDL
SP-081-GG65SS-CAST17
SP-100-BTLOP
SP-100-BATTPK
SP-100-GG65SS-SBOX
SP-100-GG65-RACK
NOTE: LEFT AND RIGHT SIDE OF BBQ ARE DESIGNATED WHILST VIEWING BBQ
FROM THE FRONT
Page 11
 Loading...