

Grillstream GSC35MG User Manual

Necessary Tools
Grilstream 3 Burner Roaster
NO.GSC35MG
WARNING! FOR YOUR SAFETY, FOR OUTDOOR USE ONLY
Please read these instructions carefully and ensure that your barbecue is properly installed, assembled,
maintained and serviced in accordance with these instructions.
Failure to follow these instructions may result in serious injury and/or damage to property.
Please check the pack contents before attempting to assemble this product. A full checklist of
components is given in this leaet. If any components are missing, please contact the retailer from whom
you bought this product.
This product takes approximately 90 MINUTES to assemble with 2 PEOPLE
The ttings pack contains SMALL ITEMS which should be KEPT AWAY FROM YOUNG CHILDREN.
Read this leaet in full before commencing assembly.

GSC35MG
Page 2
Warning Information Page 3
Location of your BBQ Page 3
Connecting to the gas cylinder Page 3
The hose and regulator assembly Page 3
Testing for leaks Page 4
Gas cylinder safety Page 4
What is Propane Page 4
Are all gas bottle gases the same Page 4
How is it dierent from natural gas Page 4
Lighting your BBQ Page 5
Using your BBQ Page 5
Maintenance of your BBQ Page 6
Troubleshooting Page 7
Exploded Diagram Page 8
Parts list for HB47KISLAND Page 9
Fittings list Page 10
Assembly instructions Page 30
Leak Test Page 31
Contents
GSC35MG
Page 3
WARNING INFORMATION
- Read this Operating Manual before use
- Ensure there is adequate clearance away from ammable
materials
- This bbq is only to be used outdoors
- Do not allow children to operate the bbq
- Accessible parts may be very hot, keep children away
- Any modication of this bbq may be dangerous
- Do not move this bbq during use
- When you have nished cooking, turn o the gas cylinder before
you turn o the BBQ controls to ensure any gas in the pipeline is
used up.
- Parts sealed by the manufacturer or their agent must not be
manipulated by the user
- BBQ specications can be found on the data label attached on
the side panel of the bbq frame
- Do not store or use petrol or other ammable vapours and liquids
near the bbq
- Do not store empty or full spare gas cylinders under or near
the bbq
- Keep the gas hose and any electrical cord away from hot surfaces
- Avoid unnecessary twisting of the gas hose
- Visually inspect hose prior to each use for cuts, cracks, excessive
wear or other damage
- The hose must be replaced if damaged and when National
Conditions require it
- Never light the bbq with the hood or lid closed
- Never lean over the cooking surface whilst lighting the bbq
- Use bbq tools with heat proof handles or good quality insulated
oven mitts when operating bbq
- Never alter or modify the regulator or gas supply assembly
THE HOSE AND REGULATOR ASSEMBLY
- Must be suitable for liqueed petroleum gas (LPG)
- Must withstand the above pressures
- Must not exceed 1000mm (39”) in length
- The bbq is supplied with a 1/4” BSP LHT adaptor and screw on hose
that is suitable for direct connection of a suitable regulator
- Before connecting inspect the hose, its ttings and rubber seals. If
there is any sign of cracking, splitting or wear, have the hose
replaced
- While in use, keep the hose unobstructed and free of kinks and
twisting
CONNECTING THE GAS CYLINDER
There are two dierent types of gas that can be used on your gas bbq
depending on where you live, that being either butane or propane gas.
Both are supplied in gas cylinders. The connection between the gas
cylinder and the bbq is made with a regulator. (Fig. 2)
It is important that you use the correct regulator for the particular type
of gas you purchase. See your local gas dealer for information on
purchasing the correct regulator. Never operate this bbq without a gas
regulator.
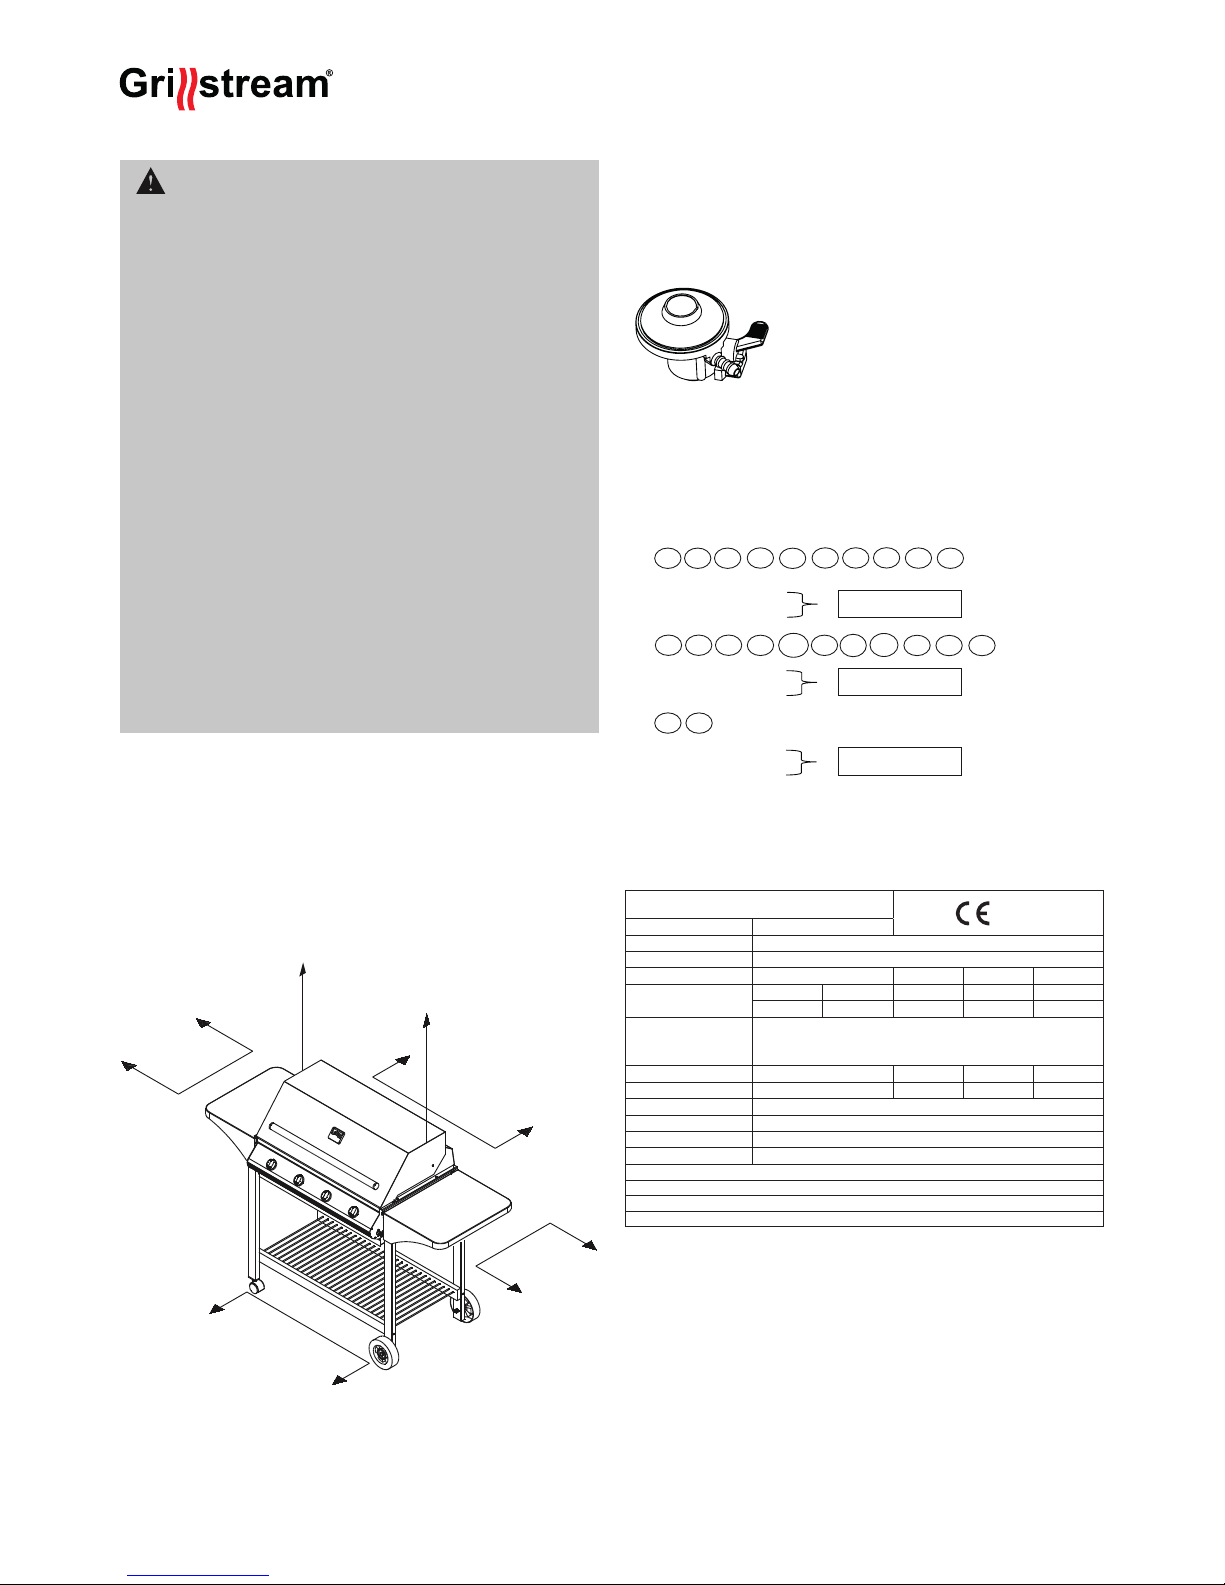
430mm
Minimum
430mm
Minimum
430mm
Minimum
430mm
Minimum
1000mm Minimum
(Fig. 1)
(Fig. 2)
The following gas supply pressures are a guide only:
For DK FI NO NL SE HR SI IS
Butane - 30 millibars
Propane - 30 millibars
For GB IE BE FR GR IT ES LU PT CH CZ
Butane - 28 millibars
Propane - 37 millibars
For DE AT
Butane - 50 millibars
Propane - 50 millibars
FOR AUSTRALIA
Propane - 2.75 kPa
Universal LPG - 2.75 kPa
1 3 B/P (30)
1 3 + (28 - 30/37)
1 3 B/P (50)
EE
LV
LOCATION OF YOUR BBQ
IMPORTANT - BBQS MUST BE INSTALLED IN ACCORDANCE WITH
THE MANUFACTURER’S INSTALLATION INSTRUCTIONS, LOCAL
GAS FITTING REGULATIONS AND MUNICIPAL BUILDING CODES.
Think carefully when deciding on a location where you are to use your
bbq. The bbq must not be installed under or on any combustible
material and must be a level surface.
Minimum clearance from any combustible materials on ALL sides is
430mm (18”). Minimum clearance from any combustible material from
the TOP of the bbq is 1000mm (39”). (Fig. 1)
- Not to be used in garages, porches, breezeways, sheds, or other
enclosed areas
- Not to be used on recreational vehicles
- Do not obstruct ow of combustion and vetilation air around the bbq
GRILLSTREAM BARBECUES,
LEISUREGROW PRODUCTS LTD.
Product name
Outdoor gas Grill
Model Number
K113BCC3
Product Identication Number
0359CP1429
Gas Category
I
3+(28-30/37)
o I
3B/P(30)
o I
3B/P(37)
o I
3B/P(50)
o
Gas and Supply Pressure
Butane(G30) Propane(G31) Butane Butane Butane
28-30 mbar 37 mbar 29 mbar 37 mbar 50 mbar
Country of Destination
I
3+(28-30/37)
: BE,CH,CY,CZ,ES,FR,GB,GR,IE,IT,LT,LU,LV,PT,SK,SI.
I
3B/P(30)
: BE,CY,CZ,DK,EE,FI,FR,HU,LT,IT,NO,NL,SE,SI,SK,RO,HR,TR,BG,IS,LU,MT.
I
3B/P(50)
: AT,CH,CZ,DE,SK,
I
3B/P(37)
: PL
Main Burner Injector Size
Ø 0.92 mm Ø 0.9 2mm 0.86mm Ø 0.81 mm
Side Burner Injector Size
Ø 0.88 mm Ø 0.88 mm 0.79mm Ø 0.75 mm
Total Nominal Heat Inputs (Hs)
Main 10.5kW(763g/h ) :
Side Burner Heat Inputs (Hs)
Side burner: 3kW(218 g/h);
electric energy(V/DC)
4X1.5V-LED lamp:
Serial Number
Use Outdoors Only .
Read the instructions before using the appliance.
Warning : Accessible parts may be very hot. Keep young children away.
Made in China
0359 – 17
GSC35MG
Page 4
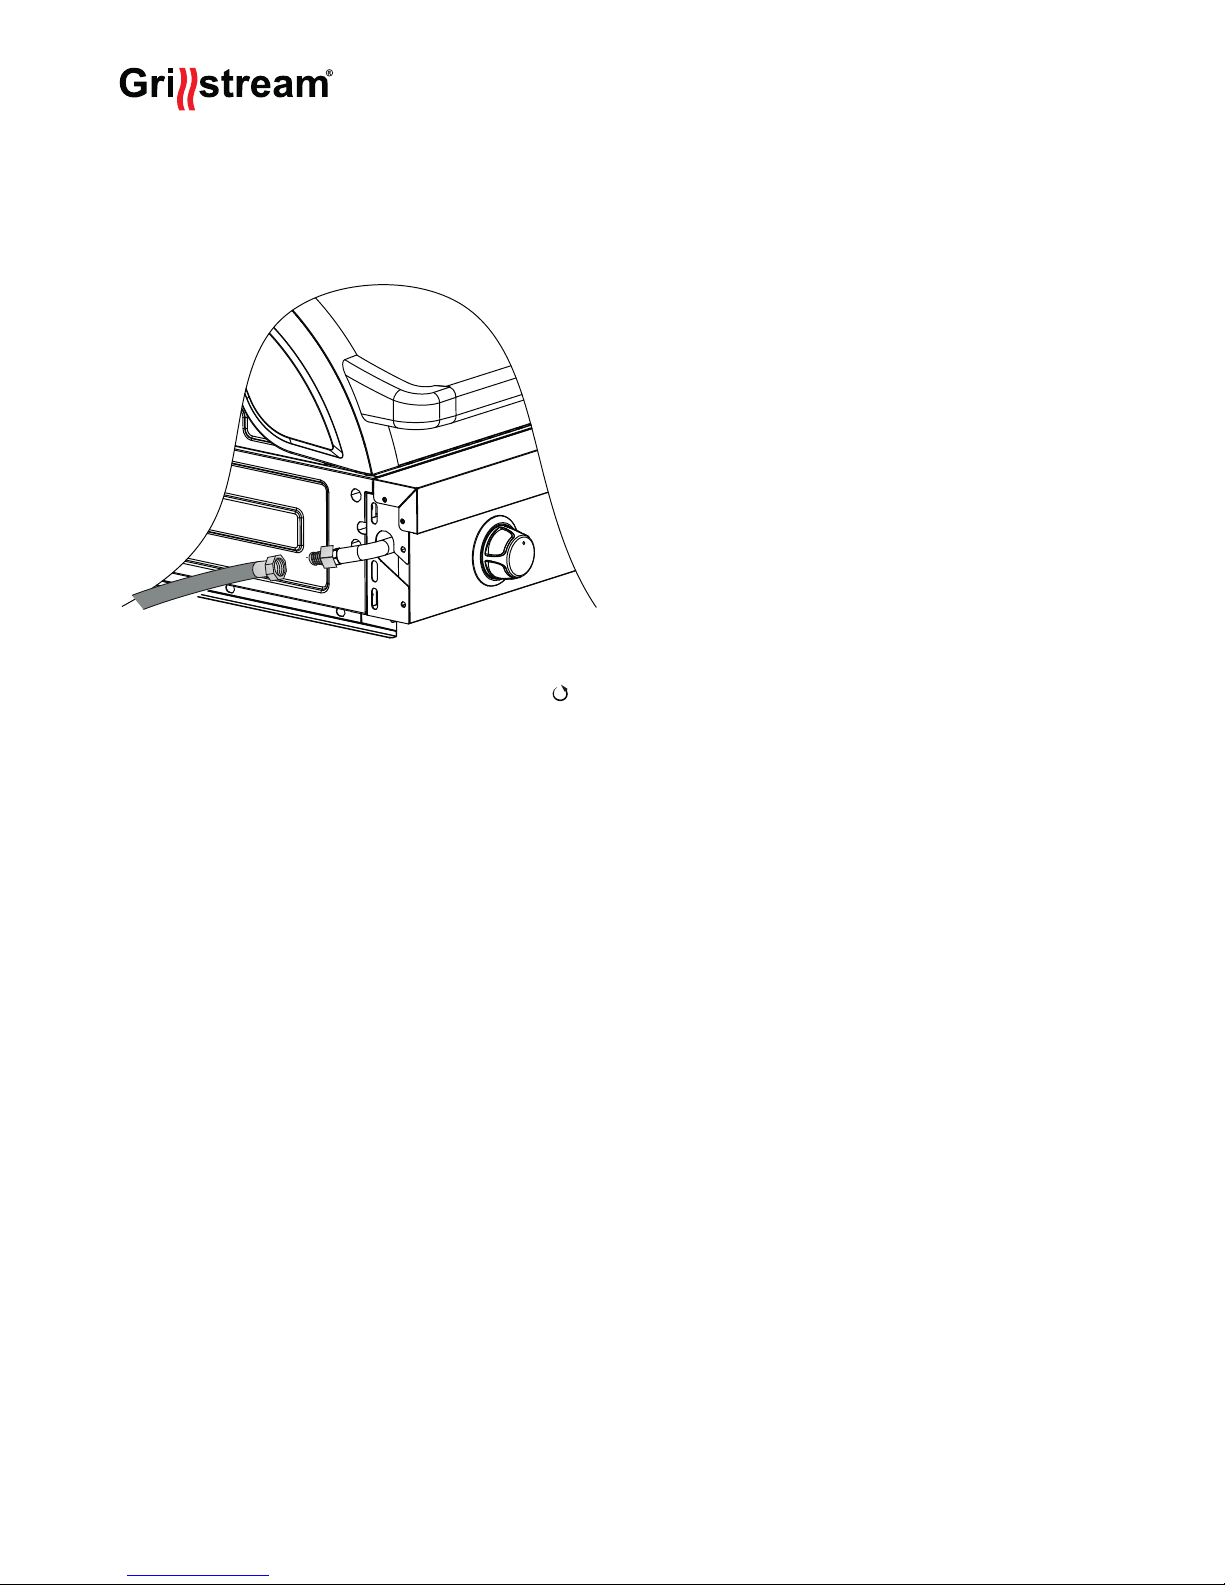
SECURING THE HOSE AND REGULATOR ASSEMBLY
Type A) Screw on hose connection (Fig. 4)
- The bbq’s manifold connection is 1/4” Male Thread BSP
- The connection between the hose and regulator and the bbq should
be tightened with a spanner. Take care not to over tighten the joints
N.B. LEFT HAND THREAD CONNECTION OF HOSE TO ADAPTOR
(Fig. 4)
TESTING FOR LEAKS - DO THIS BEFORE USING
YOUR BBQ
NOTE - DO NOT test for gas leaks with an open ame. If
you smell gas, turn o at the source.
- Before rst use and periodically during the season, or whenever
a gas cylinder is changed, you must check for gas leaks.
Do so by:
- Turn on the gas cylinder
- Turn all gas valves on the bbq to the • off position
- Brush a soap solution of one part liquid detergent and one part
water to all gas connections
- The presence of bubbles indicates a leak. Tighten or repair
as necessary
- Under no circumstances should a naked ame be used to check
for leaks
- If a gas odour is present and no leaks can be found, do not use the
bbq. Turn the gas o at the source, disconnect the hose and
immediately contact your bbq dealer or place of purchase for
assistance
GAS CYLINDER SAFETY
- Always change over a gas cylinder away from any possible source
of ignition in a well ventilated area
- Do not smoke whilst handling gas cylinders
- Never store gas cylinder indoors
- Store away from direct heat in a well ventilated area
- The gas cylinder is position on a at surface
- Always keep the gas cylinder in an upright position
- Close cylinder valve when bbq is not in use and, if available, use a
sealing plug to prevent possible leaks
- Do not subject gas cylinder to excessive heat
- Do not tamper with any tting attached to any gas cylinder. Have it
taken to the manufacturer or an authorized testing station
- When the cylinder runs out of gas, have it relled or swapped at an
authorized testing station. They will ll the cylinder to no more than
80% of its capacity. This allows the gas to expand with temperatures
- Have the cylinder inspected EVERY 10 YEARS at an authorized
testing station. The
WHAT IS PROPANE
It is a fuel gas compressed until it turns to liquid, then stored in a bottle
or cylinder under pressure for easy transport.
ARE ALL GAS BOTTLE GASES THE SAME?
No. The LPG that cars use is known as auto LPG. It is dierent to
propane/butane, which is used in household gas appliances. This
guide only deals with propane/butane.
HOW IS IT DIFFERENT FROM NATURAL GAS?
Propane and butane are similar to natural gas. They are colorless,
non-poisonous and do not pollute when burnt. There is one important
dierence, propane and butane are heavier than air, if they escape they
don’t oat away. The gas collects and forms gas pools at ground level
or at the bottom of your appliance.

GSC35MG
Page 5
LIGHTING YOUR BBQ (cont.)
- The lo position is obtained by turning the knob fully anti-clockwise
- Adjusting the control knob to your heat requirements allows you to
control the ame
- If ignition cannot be achieved see section: If bbq fails to operate
properly
IMPORTANT - It is important that all control valves, and the gas
cylinder are turned o after use.
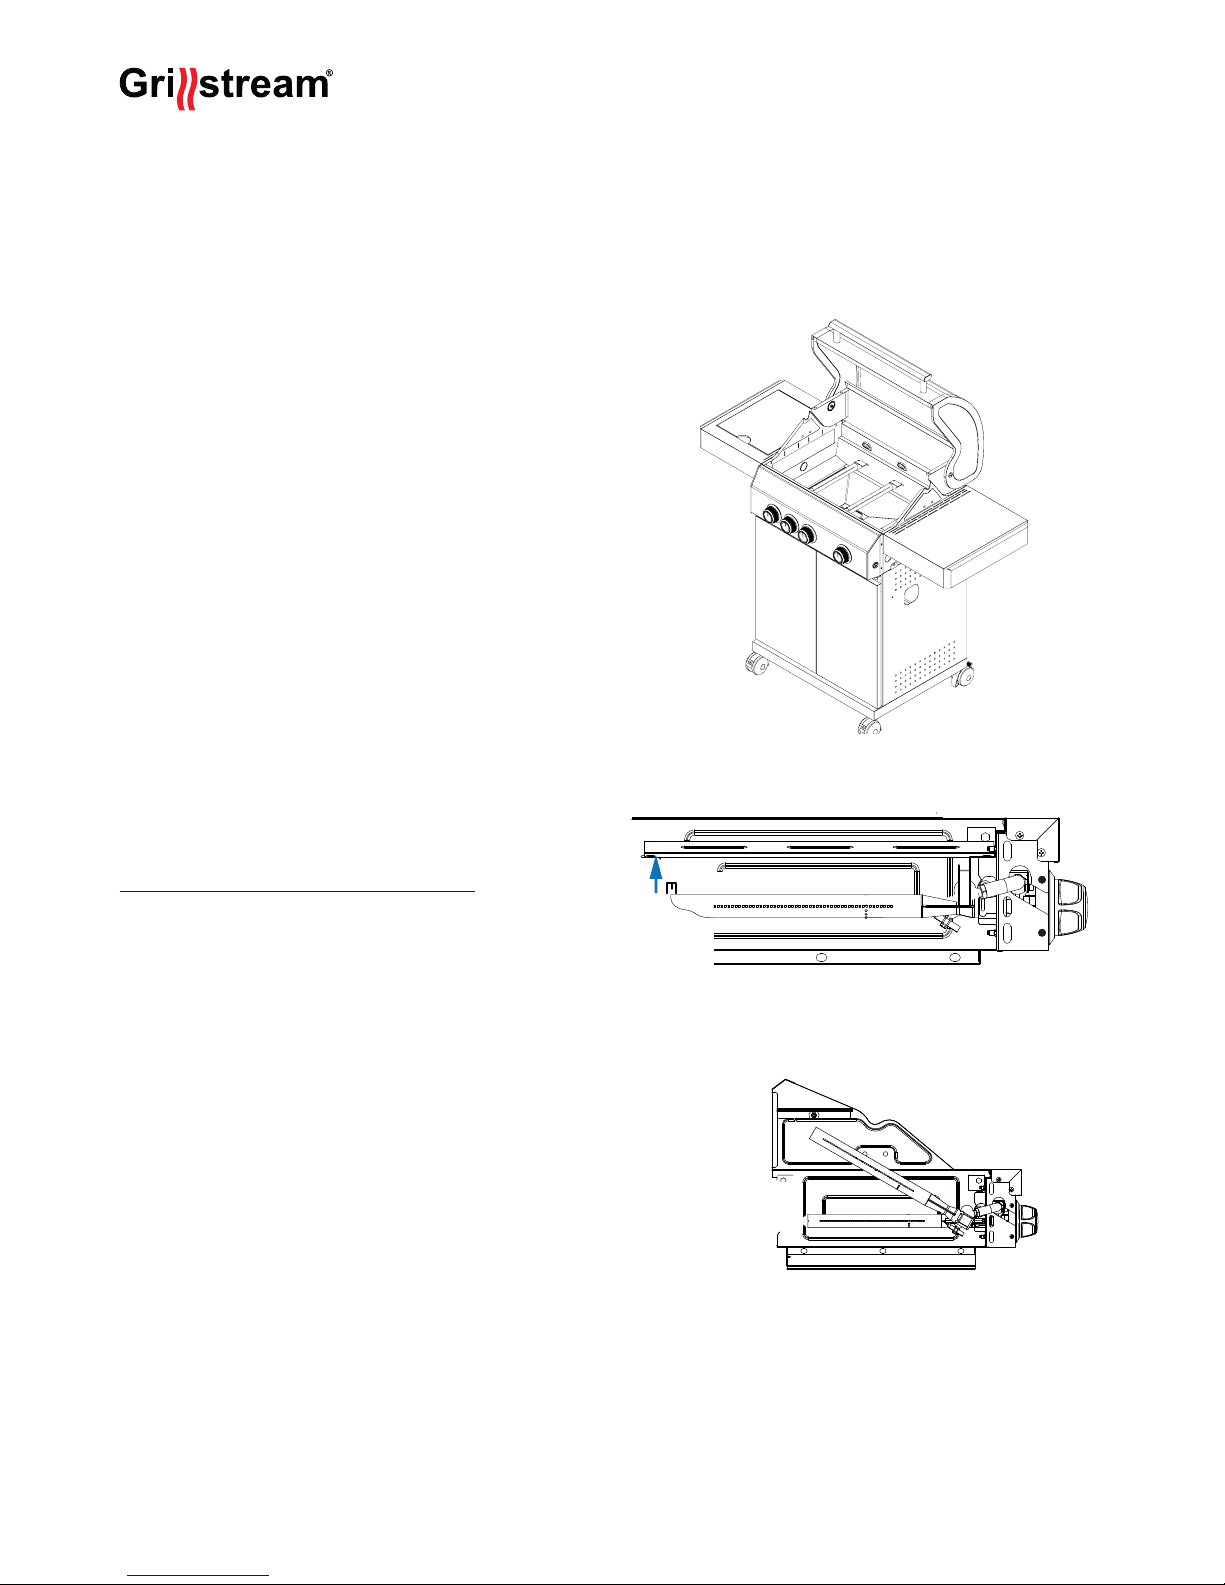
USING YOUR BBQ
GRILL AND FLAME TAMER PLACEMENT
- The ame tamer should be placed underneath the grill
Order of how things go into the barbecue:
1. Channel inserted into front of frame with end of channel going
through hole. (Fig 8)
2. Grillstream Grills always go to the left hand sides.
3. Griddles are always on the right.
NOTE:
a. Ensure that your grills incline from front to back to the fat
collecting channel at the front of the barbecue.
b. There may be a slight movement in the grill bars while cooking,
this is normal and will not aect the way the Grillstream system
works.
(Fig. 6)
OFF
LOW
HI
(Fig.8)
2 X GRILLSTREAM
1/3 SOLID PLATE
RIGHT HAND SIDE
(Fig.10)
Grillstream Grills t directly on top of each other - do not oset them.
LIGHTING YOUR BBQ
JET FLAME IGNITION SYSTEM
Upon turning any burner control knob you will hear an audible
“click”. This is known as a Jet Flame Ignition System.
Jet Flame Ignition to ALL burners
- Before starting - ALL burner control knobs must be in the • off
position
- Flat lids and roasting hoods must be OPEN before lighting
- Turn on the gas cylinder
- Push in and turn Any Knob in an anti-clockwise
direction to the hi position or until a click is heard. This will trigger
a spark to light the burner.
- If burner does not light immediately, turn the gas control knob to the
• off position and wait ve minutes for any accumulated gas to clear
out of the bbq before repeating procedure.
FIRST TIME USE OF BBQ
- Before using the bbq for the rst time, it should be rst wiped with
a mild soap and water solution to remove any dust
- Make sure your BBQ is on a solid level surface
- Dry cooking surface and apply a light coating of cooking oil
- Light the barbecue and leave burning for 30 minutes on the lo
position, with hood up. This is to burn o any residual oils or foreign
matter on the grills and hotplates.
FAT COLLECTION
Using the fat collection cup
Type A :
(Fig.11)
PREHEATING
Light the burners as previously directed, turn to
hi and allow the bbq
to preheat for 2-5 minutes. Adjust control to desired optimum cooking
temperature, the hood must be closed while doing this.
EXCEEDING 250 Degrees CAN DAMAGE THE BBQ AND VOID
YOUR WARRANTY
PREPARE THE COOKING SURFACE
It is preferable to apply a light coat of cooking oil using a long handled
brush to the cooking surface prior to lighting each time. The oil will
keep the food from sticking to the cooking surface.
Note: The heat distribution plates disperses the heat from the burners.
This results in a uniform heat zone beneath the cooking grill.
COOKING WITH THE ROASTING HOOD DOWN
When using the bbq with the hood closed, use the two outside burners
only and position the grill over the centre burners, remove griddle.This
allows for good air circulation within the bbq. Check cooking progress
periodically. Exceeding 250 C can damage the bbq and void your
warranty.
GSC35MG
Page 6
REMOVING BURNERS - Necessary care to be undertaken
- Make sure the bbq has been switched o and has completely cooled
down
- Ensure all gas control knobs are set to the o position and the gas
cylinder has been turned o
- Lift the grill or hotplate o the bbq
- Clean burners as described
- Reverse the previous procedure to re-install the burners, ame
diuser and grill or hotplate
- Remove clip at rear of burner to release the burner
- Remove by twisting and lifting as shown in (Fig. 17)
(Fig. 16)
(Fig. 16)
(Fig. 17)
MAINTENANCE OF YOUR BBQ
PROTECTION
Keep your bbq beneath a weather cover and out of the rain. Proper
care and maintenance will keep your bbq in top operating condition
and prolong its life.
CLEANING THE COOKING SURFACES
Allow your bbq to continue burning for 5 minutes after cooking has
ceased, which will burn o excess fats and juices etc. that may block
the ame ports of the burners. To keep your bbq ready for the next
time, turn the burners to • off then take a long handled brush and
brush the cooking surface to remove excess oils and food scraps. Be
careful as surfaces are hot. Protect your hands by using an oven mitt
to hold the brush.
Allow to cool before washing in a warm soapy solution. Ensure that
any dried fat/food deposits are cleaned o both the top and bottom
grills after EVERY cooking session to allow fat to stream away
eciently on your next cooking session. To clean the Grills eectivly
use the Grillstream cleaning brush which has been specially designed
to quickly and eectivly cleay your Grillstream Grills. Rinse o with
clean water and dry before returning to bbq.
CLEANING THE FLAME TAMERS
Periodically wash in a warm soapy solution. Use a wire brush to
remove stubborn burnt on cooking residue if necessary. Dry thoroughly
before re-installing to the bbq body.
CLEANING THE BBQ BODY
The body of the bbq should be cleaned regularly dependant on the use
and type of food cooked. Use warm soapy solution.
CLEANING THE DRIP TRAY/FAT COLLECTION CUP
- IMPORTANT - the drip tray, Fat Channel and fat collector should be
cleaned on a regular basis. If this is ignored, a build up of fats and
greases may cause a re in the bbq
- Please check the level of waste fat in the fat collection cup regularly
while cooking to ensure it does not overow and dispose of the
waste fat responsibly.
- More frequent cleaning may be necessary as usage demands
- FAT FIRES ARE NOT COVERED BY WARRANTY
CLEANING THE BURNERS
Occasionally after long cooking sessions, excess fats, juices and
marinades can clog the burners. If so, remove the burners (see
removing burners section) for cleaning.
- Clean by washing in hot water and detergant
- Ensure that all burner ports are free from obstruction
- Rinse in water
- Light immediately to prevent rust and corrosion
- Brush lightly with cooking oil if bbq is not used for an
extended period
FIRST USE AFTER LONG PERIODS
At the start of each bbq season or before using after a long period
of time:
- Read this operation manual again thoroughly
- Check all gas valve orices, burner tubes and connections
for obstructions
- Check that all burners are in their correct positions
- Check to see if the gas cylinder is full
- Check for gas leaks using a soapy water solution
- Set burner controls to • off and connect gas supply
- Ensure all grills and hotplates are clean before use

GSC35MG
Page 7
TROUBLESHOOTING
IF BBQ FAILS TO OPERATE PROPERLY
- Stop, turn o gas at its source and turn all burner controls to • off
- Do not smoke
- Check gas supply connections
- Repeat lighting procedure after waiting for ve minutes for
accumulated gases to disperse
If bbq still fails to operate properly TURN OFF GAS AT SOURCE,
TURN BURNER CONTROLS TO OFF, wait for bbq to cool and check
the following:
a) Misalignment of burner tubes over orices
CORRECTION: Reposition burner tube to properly sit over orice
b) Obstruction in gas line
CORRECTION: Remove hose from bbq. Open gas supply for one
second to clear any obstruction from hose. Close o gas supply at
source and re-connect hose to bbq
c) Blocked orice
CORRECTION: Remove burners as described above. Inspect gas
valve orice, clear any obstruction with a ne wire. Re-install
burners over orices and test again
IF THERE IS A LEAK
- Turn the gas cylinder o
- Ventilate the area to disperse any accumulated gas
- Check all connections
- If the leak persists, keep cylinder upright and take to an open area
- Keep skin away from any gas or liquid escaping from the cylinder
- Keep the cylinder at least 20 metres away from any sparks or ignition
sources including electrical equipment, camera ash, engines or
motors
- Disperse gas by providing maximum ventilation and spraying with a
ne water spray
IF THERE IS A FIRE
If there is a re at the appliance
- If there is a re at the appliance, turn the gas o at the cylinder.
- Smother the ames with a wet cloth
If there is a re at the cylinder or you cannot get to the valve to
turn it o
- call the re brigade
- direct a garden hose to the middle of the cylinder to keep it cool,
however do not extinguish the ame. If the gas is burning it wont
build up and explode
- Evacuate the area
A note on re prevention:
Most res in outdoor bbqs are caused by a build up of greases and fat,
or gas connections which have not been secured properly. Remember
to follow the manufacturer’s instructions on proper cleaning and
connection procedures.
INSECTS
Spiders and insects can occasionally spin webs or make nests in the
burner tubes.
These can obstruct gas ow which could result in a re. This is known
as “Flashback” and can cause serious damage to the bbq and create
an unsafe operating environment.
Frequent inspection and cleaning of the burner tubes is recommended.
Care and Safety Advice
- TAKE CARE Grills are heavy
- Clean grills after each use for continued optimum performance.
- Roasting dishes can be placed on top of the grills.
- Ensure that the drip tray is lined with fat absorbent material such as
fatsoak before using the rotisserie.
- For safety and optimum performance ensure that your barbecue is on
a level, solid surface.
- Empty the fat responsibly after each use.
GSC35MG
Page 8
38
37
35
34
33
32
31
30
28
29
36
43
42

GSC35MG
Page 9
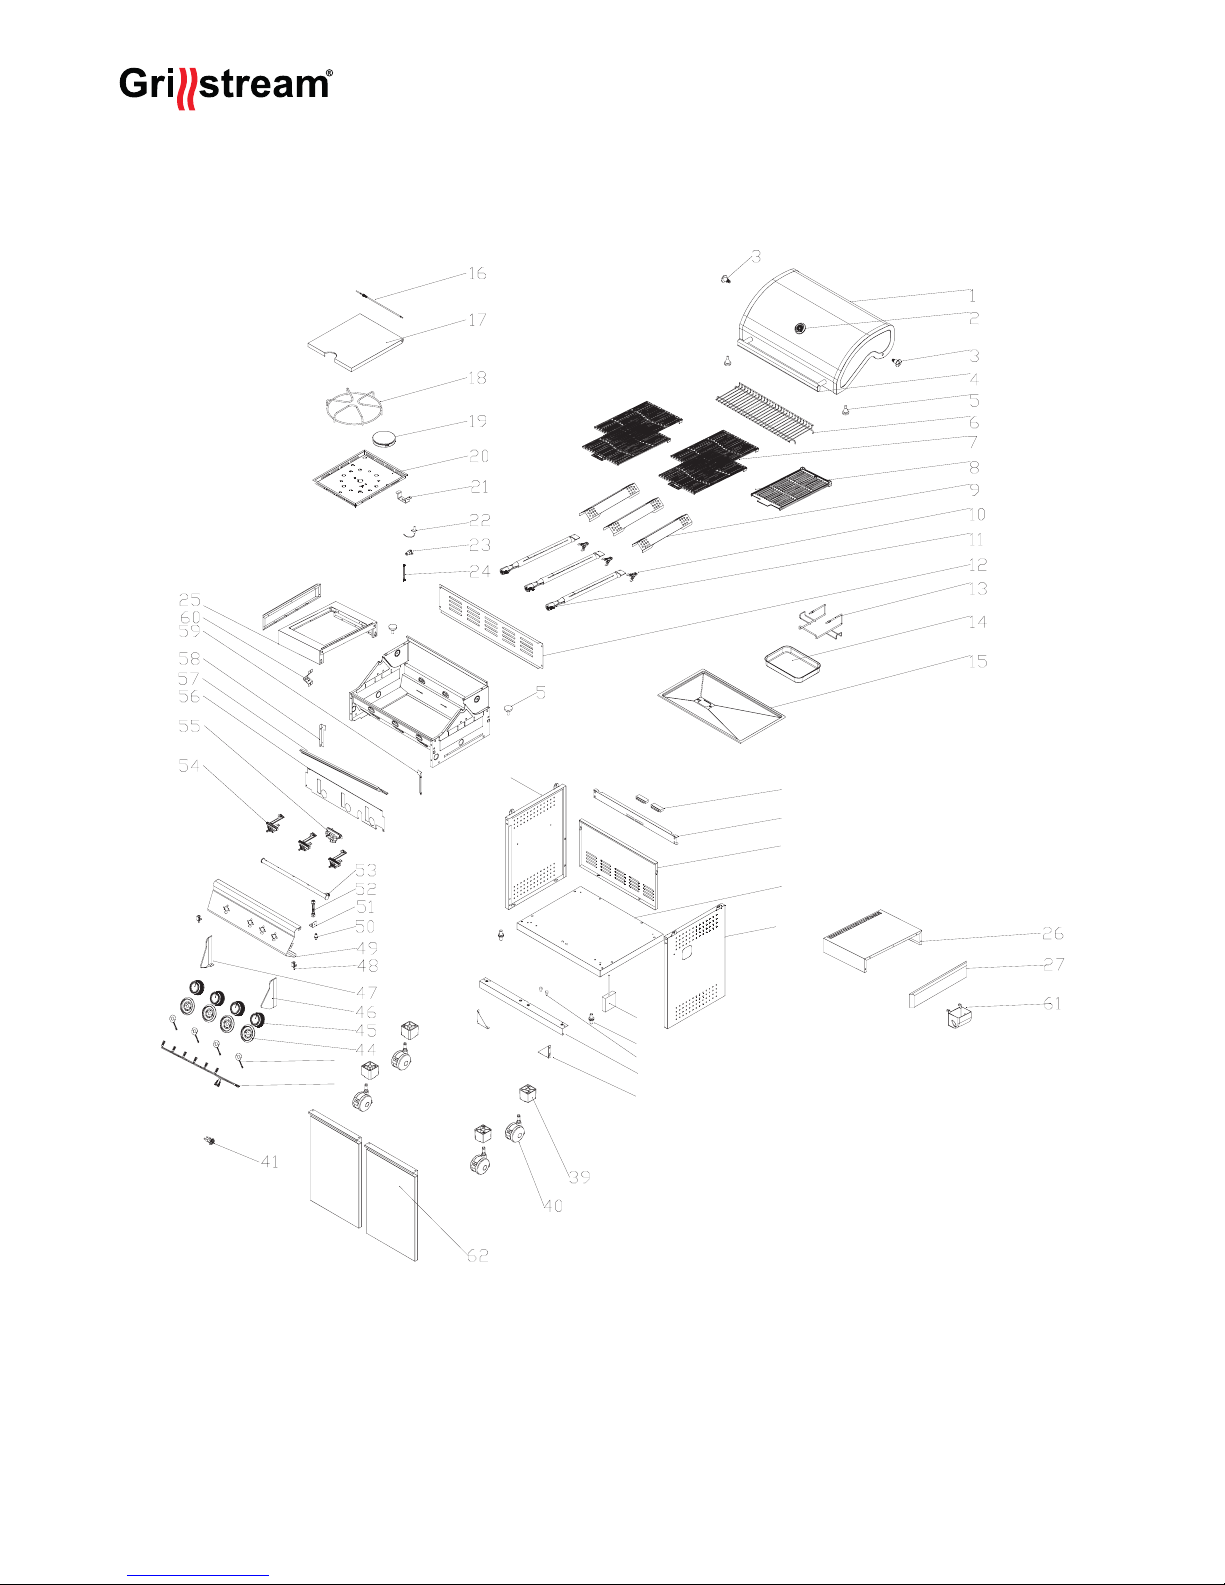
No. Description QTY No Code QTY
1 Hood 1 2 Temperature gauge 1
3 Hood screw 2 4 Hood handle 1
5 Hood buer 4 6 Warming rack 1
7 Grillstream grill 190mm 4 8 Grillstream griddle 220mm 1
9 Flame tamer 3 10 Burner clip 3
11 Main burner 3 12 Fireplace back seal plate 1
13 Grease cup bracket 1 14 Grease cup 1
15 Grease tray 1 16 Side burner lid axis 1
17 Side burner lid 1 18 Side Burner Trivet 1
19 Side burner assembly 1 20 Side burner base 1
21 Side burner connection strap 1 22 Side burner ignition wire 1
23 Side burner injector 1 24 Side Burner Hose Assembly 1
25 Side burner side shelf 1 26 Side shelf 1
27 Side shelf decoration strip 2 28 Left side panel 1
29 Door magnet 1 30 Front Support Bar 1
31 Back panel 1 32 Bottom panel 1
33 Right side panel 1 34 Battery box 1
35 Door spindle 2 36 Door stopper 2
37 Bottom panel decoration strip 1 38 Trolley Corner Brace 2
39 Caster Fixing Plug 4 40 Castor 4
41 LED switch 1 42 LED connection wire 1
43 LED light panel
4 44 Knob bezel 4
45 Control knob 4 46 Control panel right decoration 1
47 Control panel left decoration 1 48 Door hinge 2
49 Control panel board 1 50 Gas connection adaptor 1
51 Gas connection xation 1 52 Gas corrugated pipe 3
53 Gas tube 1 54 Main burner gas valve 3
55 Side burner gas valve 1 56 Inner control panel 1
57 Fat channel 1 58 Control panel left reinforce bar 1
59 Control panel right reinforce bar 1 60 Bottle opener 1
61 Fat cup 1 62 Door 2
GSC35MG
Page 10
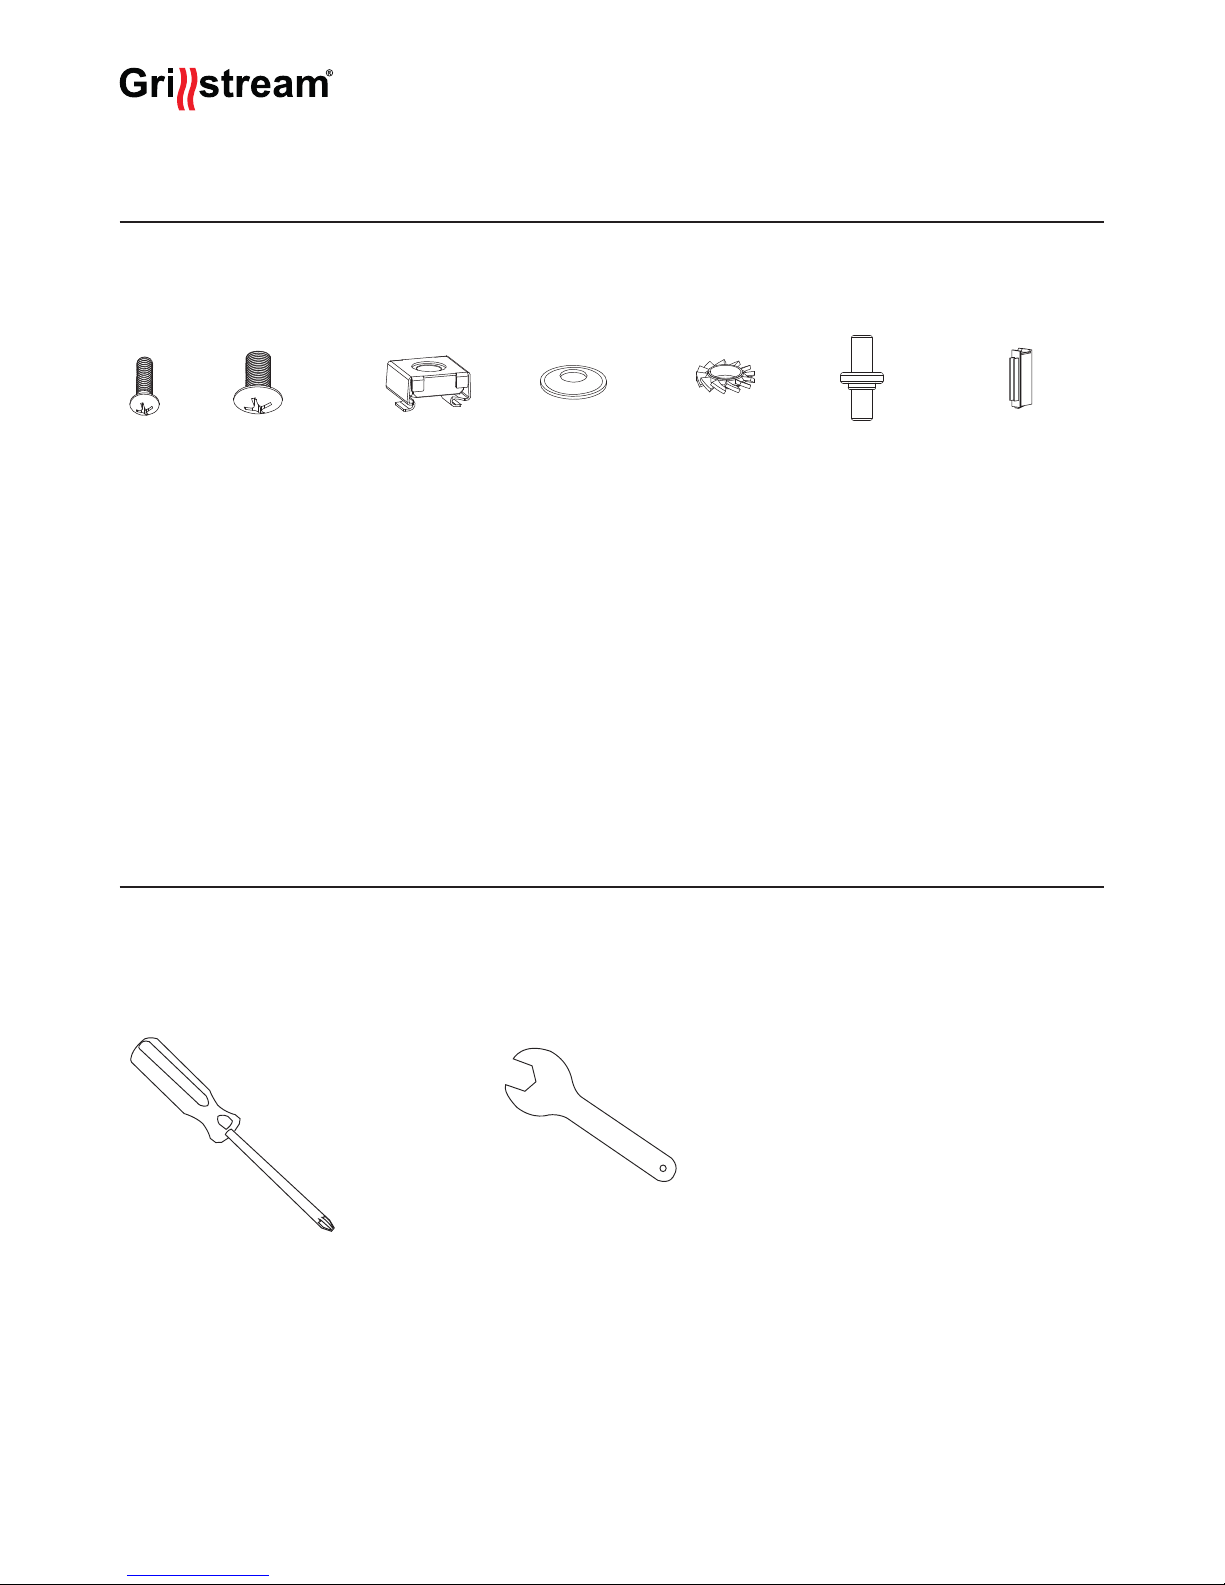
Fittings
NOTE: ALL HARDWARE IS DRAWN IN FULL SCALE TO HELP IDENTIFY EACH PART
Make sure your grill is assembled properly. Detailed assembly
instructions are packed with each grill giving specic assembly
procedures for each model. Follow these instructions carefully to
ensure the correct and safe assembly of the grill.
x 4 x 12
x 44
x 12
x 2
x 44
x 4 x 12
x 12
x 2
x 44
x 4
x 12
x 2
x 44
x 12
x 2
x 44
x 2
x 44
x 2
x 2
Tools required (not supplied)
M4x12 Screw M6x12 Screw M4 Captive Nut Fibre Washer Star Washer Door Hinge Magnet
Caution: Although we take every eort to ensure that the assembly
process is as easy as possible, it is inherent with fabricated steel parts
that corners and edged can cause cuts if improperly handled during
assembly procedures. Be careful while handling any parts during
assembly. It is strongly recommended that you protect hands with a
pair Caution:of work gloves.
Cross Head Screwdriver (Philips)
x 4 x 12
x 2
x 44
Spanner
x 2
x 44
Prepare frame for assembly
Lift hood, remove & unpackage all items except burners & burner assembly.
Proceed to step 1
 Loading...