

Page 1
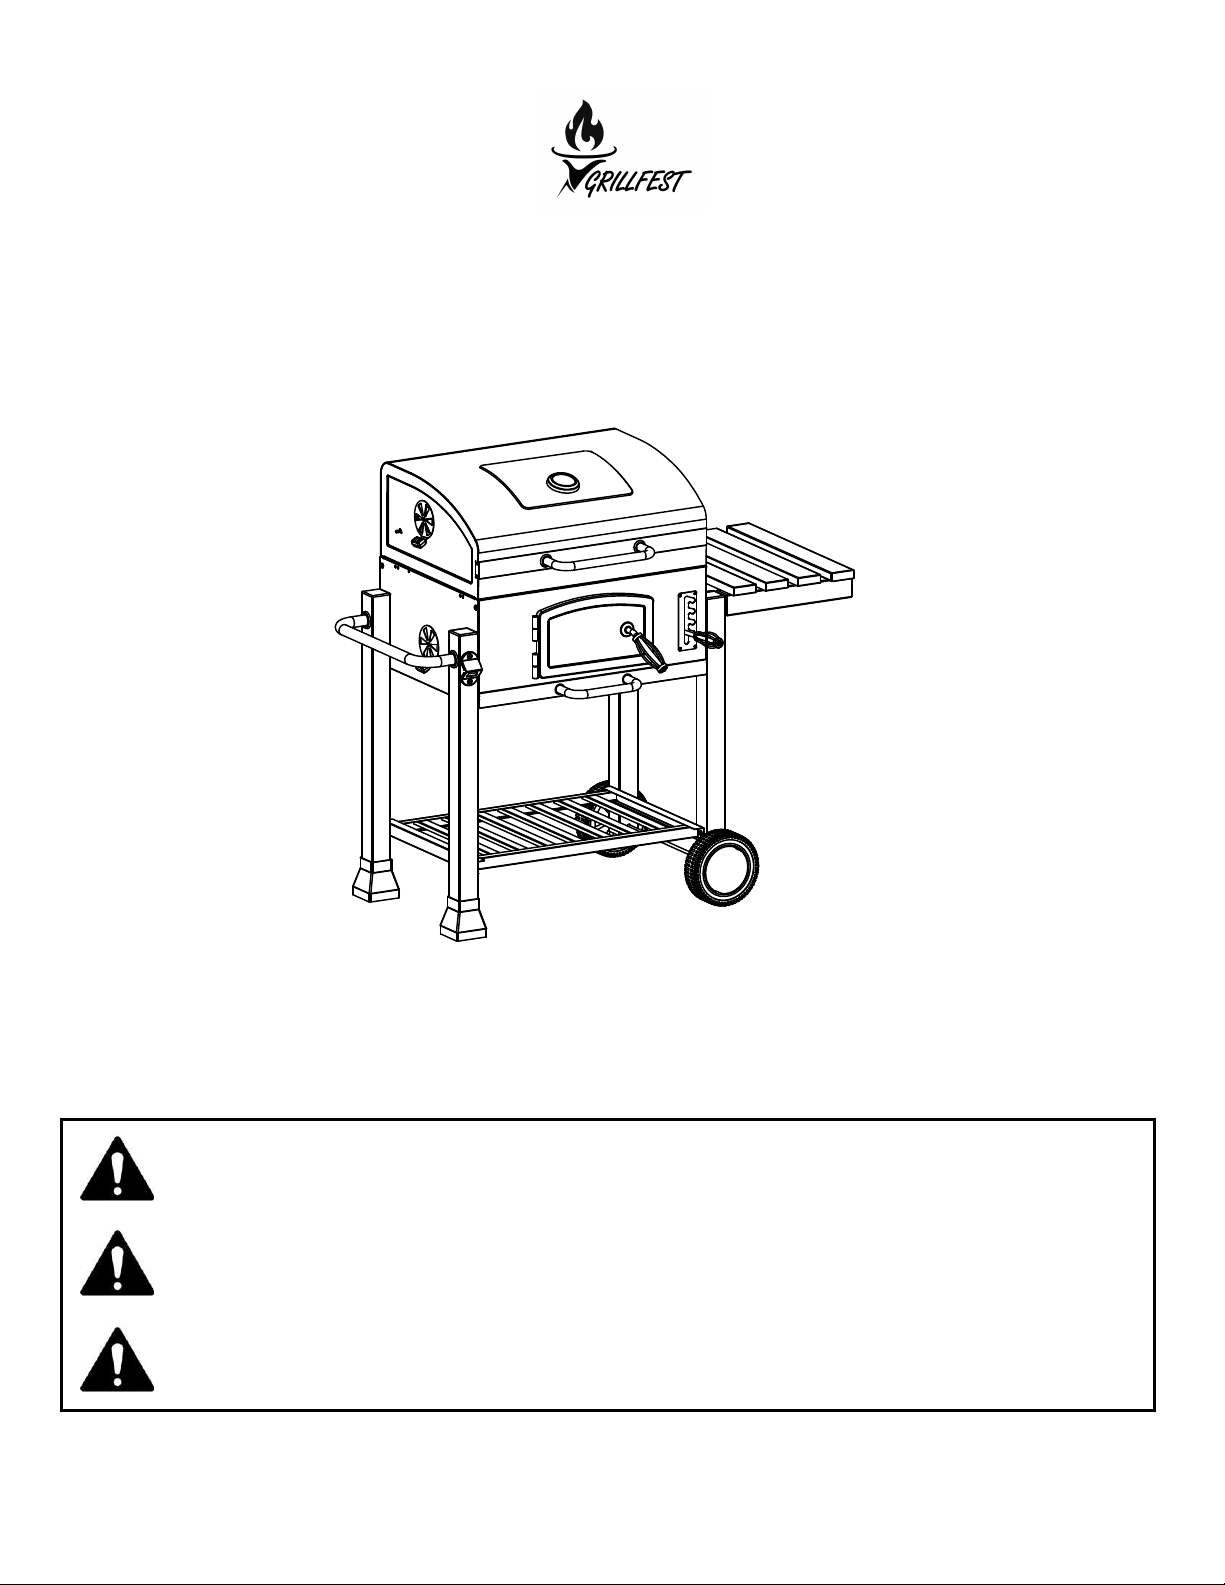
24" Charcoal Grill
Owner’s Manual
Model: SXC0546
5
4
3
2
1
Assembly Required
The following common tools (not included) are required for assembly:
Phillips screwdriver, and an adjustable wrench, or pliers
OUTDOOR USE ONLY! NEVER USE INDOORS!
Read and follow all of these manufacturer instructions before beginning assembly or
operation. Failure to do so could result in fire, burns, or other serious personal injury.
Keep this owner’s manual for future reference. If you sell or give this product to someone
else, make sure this manual accompanies this product.
Page 2

Contents
Hardware List …………………………………………………………………………………………….
8
Important Safety Information and Warnings ….…………………………………………………..... 3
Carbon Monoxide Warning …..…………………………………………………………… 3
California Proposition 65 Warning ………………………………………………………… 3
Safe Grill Placement ………………………………………………………………………..... 3
Grill Preparation Safety ....…………………………………………………………………... 4
Charcoal Lighting Safety ……………………………………………………………………. 4
Grill Use Safety ……………………………………………………………………………….. 4
After Use Safety……………………………………………………………………………….. 5
Preparation ………………………………………………………………………………………………. 5
Parts List …………………………………………………………………………………………………. 6
Parts Diagram …………………………………………………………………………………………… 7
Assembly …………………………………………………………………………………………………. 8
Care and Maintenance …………………………………………………………………………………. 16
Limited Warranty ………………………………………………………………………………………... 17
Customer Service ……………………………………………………………………………..………… 17
Page 3
IMPORTANT SAFETY INFORMATION!
DANGER
CARBON MONOXIDE HAZARD!
Burning charcoal releases carbon monoxide, a toxic odorless gas which
can cause serious injury or death. NEVER burn charcoal inside
homes, inside vehicles, or inside any other enclosed areas! If used
indoors, toxic fumes, including carbon monoxide, will accumulate and
cause serious injury or death.
WARNING
OUTDOOR USE ONLY!
CALIFORNIA PROPOSITION 65
1) Combustible by-products produced when using this product contain chemicals known
to the State of California to cause cancer, birth defects, or other reproductive harm.
2) This product contains chemicals, including lead and lead compounds, known to the
State of California to cause cancer, birth defects, or other reproductive harm.
ALWAYS wash your hands after handling this product!
Safe Grill Placement
WARNING
This grill is for OUTDOOR USE ONLY! NEVER use this grill in an enclosed area or under an
overhead cover of any kind, including a tent, patio cover, or any other building or structure.
DO NOT use this grill within 10 feet (3.05 meters) of any combustible material, including,
but not limited to, bushes, trees, wood or treated-wood decks, fences, patios, porches,
walls, vehicles, gasoline, lighter fluid, or any other flammable liquids.
ONLY use this grill on a hard, level, non-combustible, stable surface (e.g., concrete) that is
able to support the weight of the grill. NEVER use on wood or other combustible surfaces.
NEVER use this grill where children or pets could come into contact with the grill.
DO NOT store or use grill near gasoline or other flammable liquids, gases or where
flammable vapors may be present.
Avoid fire. Keep a fire extinguisher nearby. Refer to your local authority to determine proper
size and type of fire extinguisher.
For residential use only! NOT for commercial use! DO NOT use this grill for other than its
intended purpose. Any commercial use voids all warranties.
Page 4
Grill Preparation Safety
WARNING
DO NOT use this grill without the ash catcher (if available), ash pan, or ash tray in place.
DO NOT use this grill unless all parts are in working condition and properly installed.
Use care when lifting or moving this grill to prevent strains and back injuries.
Charcoal Lighting Safety
WARNING
We recommend a charcoal chimney starter to avoid the dangers of charcoal starter fluid.
ALWAYS read and follow the chimney starter manufacturer’s instructions and warnings.
Failure to do so could result in serious injury.
If you use charcoal starter fluid, ONLY use starter fluid approved for lighting charcoal.
NEVER use gasoline, alcohol, kerosene, or any other highly flammable liquid. Use of any
of these or similar products could cause an explosion possibly leading to severe bodily injury.
Carefully read the charcoal and starter fluid manufacturer’s warnings and instructions
before using this grill. Failure to do so could result in serious injury.
ALWAYS clean up any starter fluid spills before lighting charcoal.
ALWAYS allow charcoal starter fluid to completely burn off prior to closing the grill lid
(approximately 20 minutes). Failure to do so could trap fumes in the grill and might result in a
flash fire or explosion when the lid is opened.
NEVER add charcoal starter fluid to hot or warm coals! Flare up could occur and cause burns.
ALWAYS store charcoal starter fluid safely away from grill. DO NOT store starter fluid or other
flammable liquids or materials under the grill.
Grill Use Safety
WARNING
DO NOT use the grill in windy conditions.
NEVER leave a hot grill unattended.
Grill is hot when in use. To avoid burns:
DO NOT attempt to move the grill while lit or still hot.
ALWAYS wear protective gloves or oven mitts.
DO NOT TOUCH any hot grill surfaces.
DO NOT wear loose clothing or allow hair to come in contact with grill.
NEVER add pre-soaked charcoal to hot or warm coals or ashes! Dangerous or explosive flare
ups could occur and result in bodily harm.
USE EXTREME CAUTION when adding charcoal and/or wood to the grill while cooking, as
Page 5
charcoal is still hot and can cause burns.
AVOID INJURY! ALWAYS wear oven mitts or grilling gloves when lifting the lid, adjusting the
grates, or in any other way touching the grill while it is hot.
Lids are heavy, and will be very hot during and after use.
Removable lid: NEVER set hot lid on grass, furniture, deck or combustible materials.
Hinged lid: ALWAYS open lid completely and secure to prevent unexpected closing.
Some grills have shelves. NEVER place more than 8 pounds (3.6 kg) on any shelf (if equipped).
DO NOT lean on any shelf. ALWAYS make sure shelves are attached securely to the grill.
NEVER raise or lower the charcoal grate when smoking with water as hot water may splash
onto the coals creating a burst of steam and hot ash.
When grilling, grease from food may drip onto the charcoal and cause a grease fire. If this
happens, close the lid to suffocate the flame. NEVER use water to extinguish grease fires!
Keep hands, face, and body a safe distance from the grill when opening the lid. Flare ups
may occur when flames or hot coals encounter increased airflow.
NEVER try to remove the ash catcher while coals are hot. Doing so could cause burns.
After Use Safety
WARNING
ALWAYS allow grill and all components to cool completely before handling.
DO NOT remove ashes or used coals from the grill until they are fully extinguished.
To extinguish charcoal, close all vents and place lid on grill until coals are completely out.
NEVER leave coals and ash unattended in the grill. All extinguished coals and ash must be
removed and carefully placed in a non-combustible metal container. Saturate coals and ash
with water and allow them to remain in the metal container for 24 hours before disposing.
Keep extinguished coals and ash safely away from combustible structures and materials.
Spray or douse the surfaces under and around the grill with water until completely wet to
extinguish any ashes, coals, or embers that may have fallen during grilling or cleaning.
Store the grill in a dry location out of reach of children and pets when not in use.
Preparation
Remove all parts and hardware from the carton and place them on a clean soft surface.
Compare the contents with the parts list and hardware list to make sure nothing is missing.
Dispose of all packaging materials properly.
Please recycle whenever possible.
Page 6
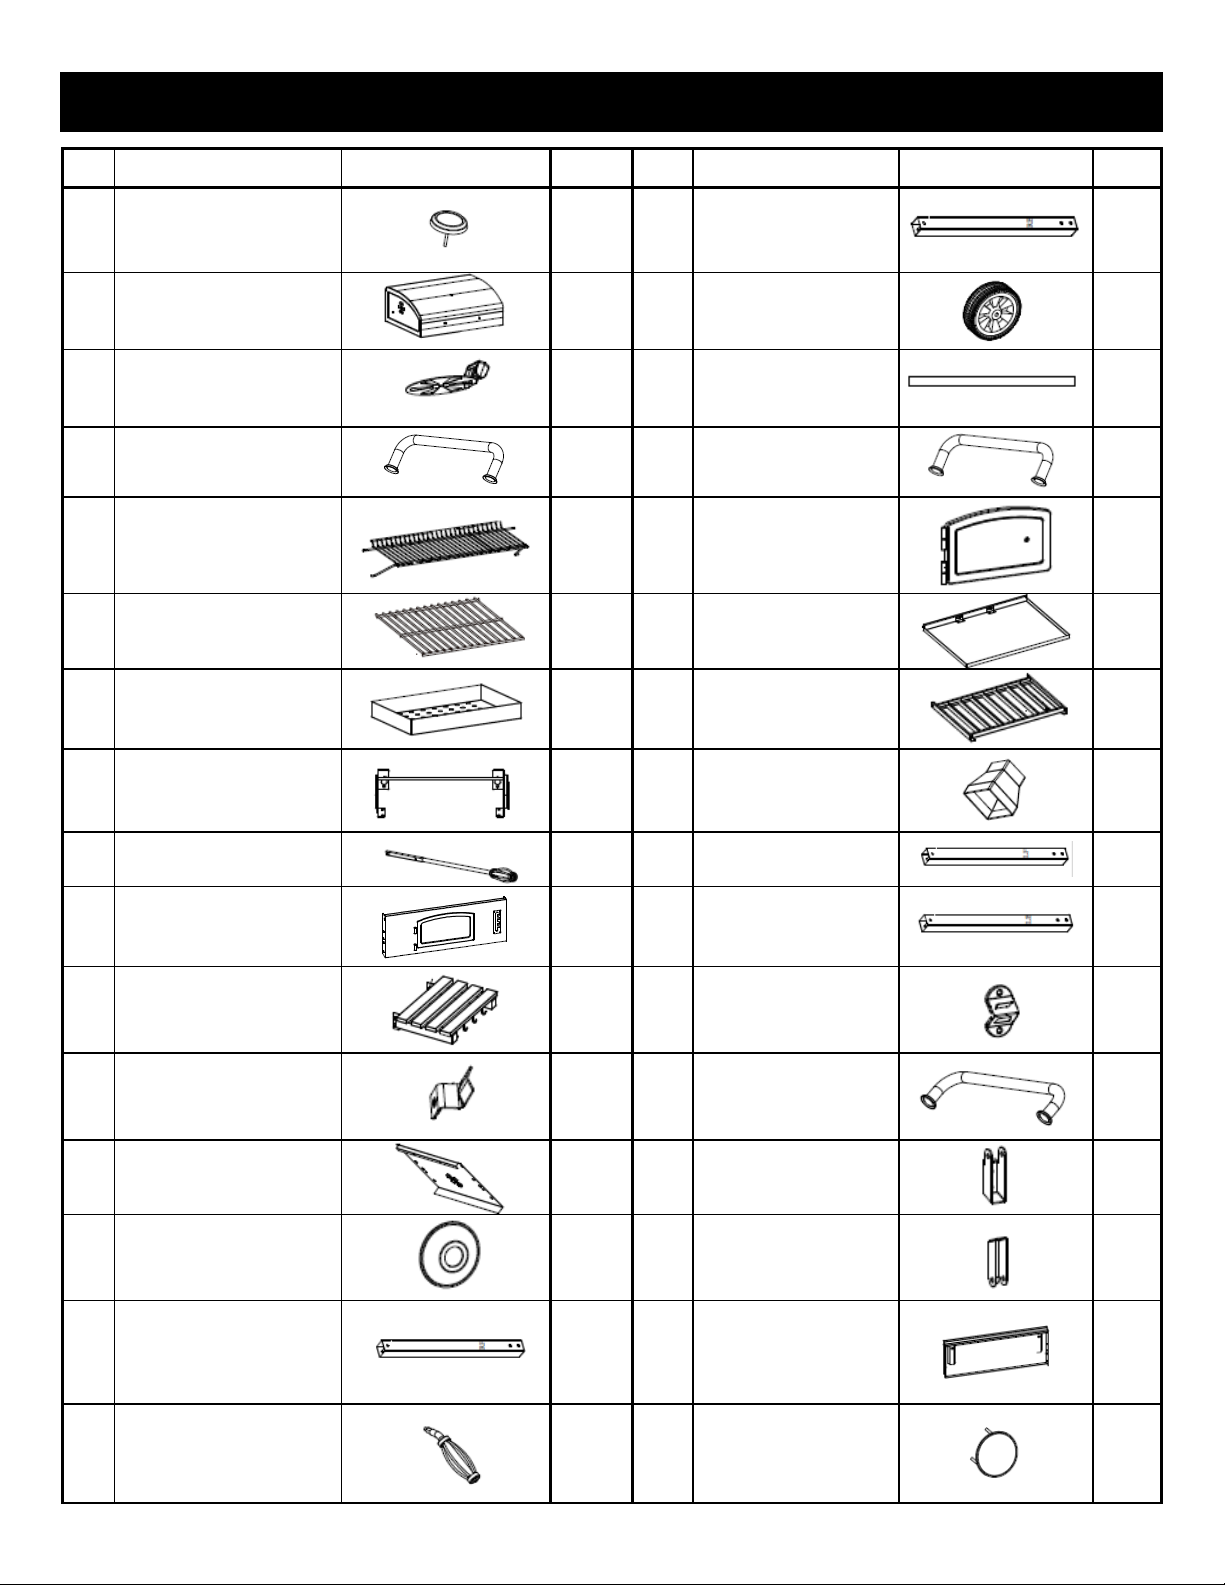
Part List
No.
Partes
Imagen
cant. No.
Partes
Imagen
1
1
17 1
2
1
18 2
3
4
19 1
4
1
20 1
5 1
21 1
6
22
7
23
8
24
9
25
10 1
26 1
11 1
27 1
12 1
28 1
13 2
29 2
14
1.
30 2
15 1
31 1
16 1
32 2
cant..
Thermometer
Grill lid
Air vent
Lid handle
Waming rack
Cooking grid
Charcoal tray
Charcoal tray
support
Right back leg
Wheels
Axle
Ash tray handle
Front door
2
Ash tray
1
Bottom shelf
1
Leg cap
1
1
2
Adjusting handle
Fire bowl
front panel
Side shelf
Front door
lock bracket
Fire bowl
side panel
Front door
thread mount
Right front leg
Front door handle
1
Left front leg
1
Left back leg
Bottle opener
Side handle
Lower hinge
Upper hinge
Fire bowl
back panel
Wheel cover
Page 7
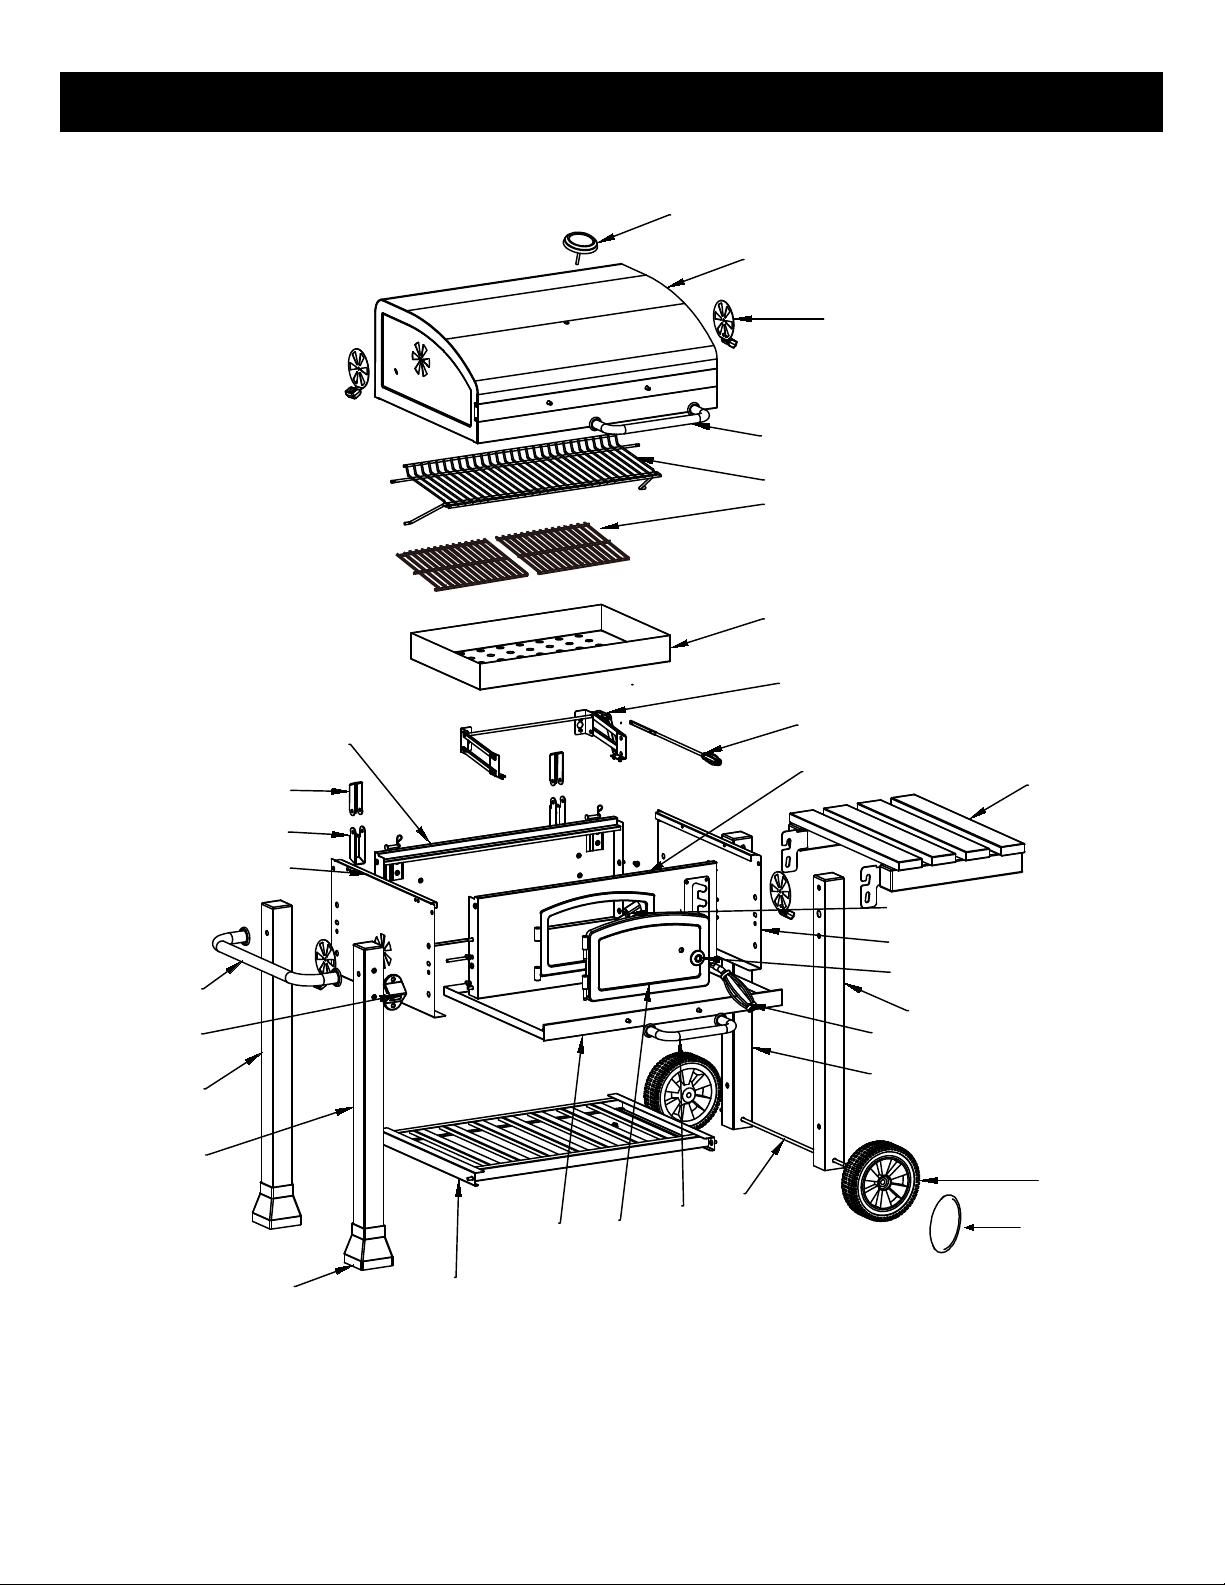
Parts
1
2
3
4
5
6
7
8
9
31
30
10
11
29
13
5
4
12
13
14
28
15
27
26
16
17
25
19
22
24
23
21
20
18
32
Page 8
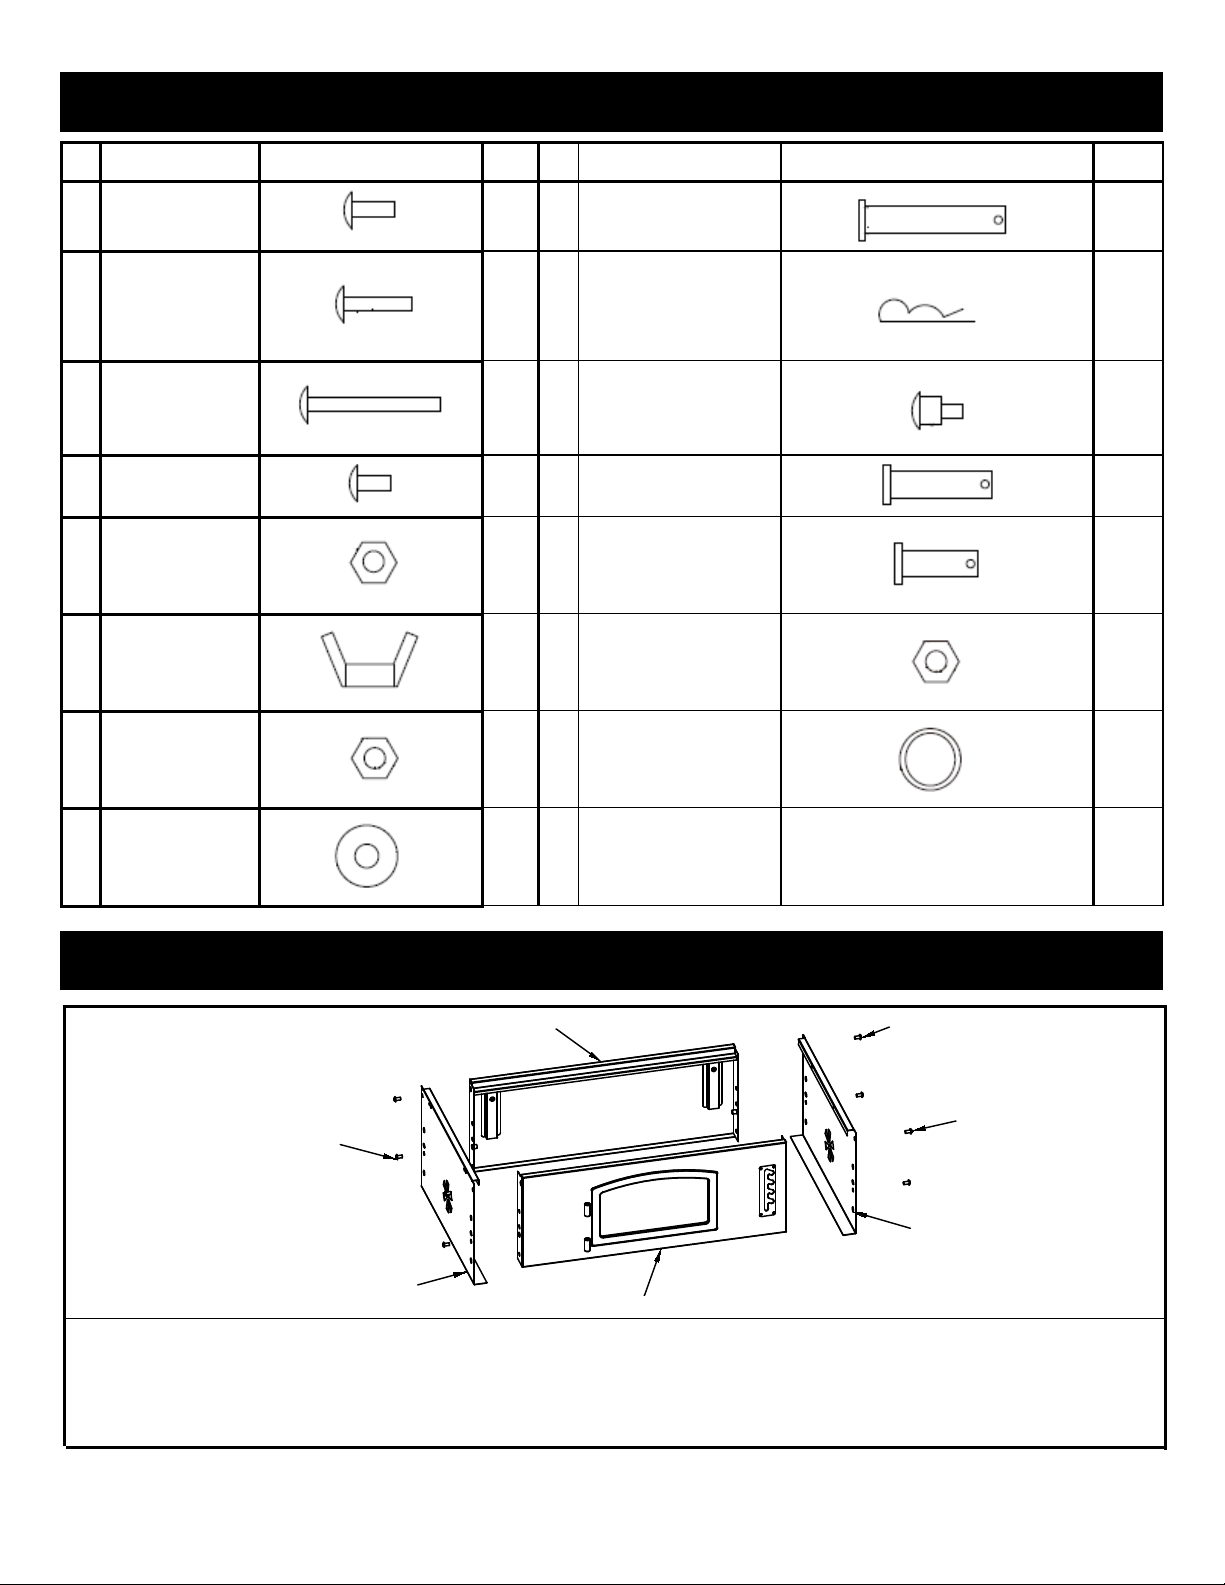
Hardware List
No.
Partes
Imagen
cant.
No.
Partes
Imagen
cant.
A
M6x12
34
I
5x30
2
B
M6x35
8
J
Clip
4
C
M6x65
2
K 4
D
M5x10
4
L
6x20
1
E
F
G
Nut M10
H 1
Hinge pin
Step screw
Hinge pin
Hinge pin
Nut M6
Screw
Screw
Screw
Screw
Nut M5
Butterfly nut
M6
Washer 6x18
Assembly
4 M
1 N
2 O
31
A
6x12
Washer 6.5x7
A
A
1
4
8
Step1.
Assemble Fire bowl front panel (10), Fire bowl back panel (31), and 2 pieces of Fire bowl side
panels (13) with Screw M6x12 (A).
13
13
10
Page 9
O
O
E
D
D
3
E
3
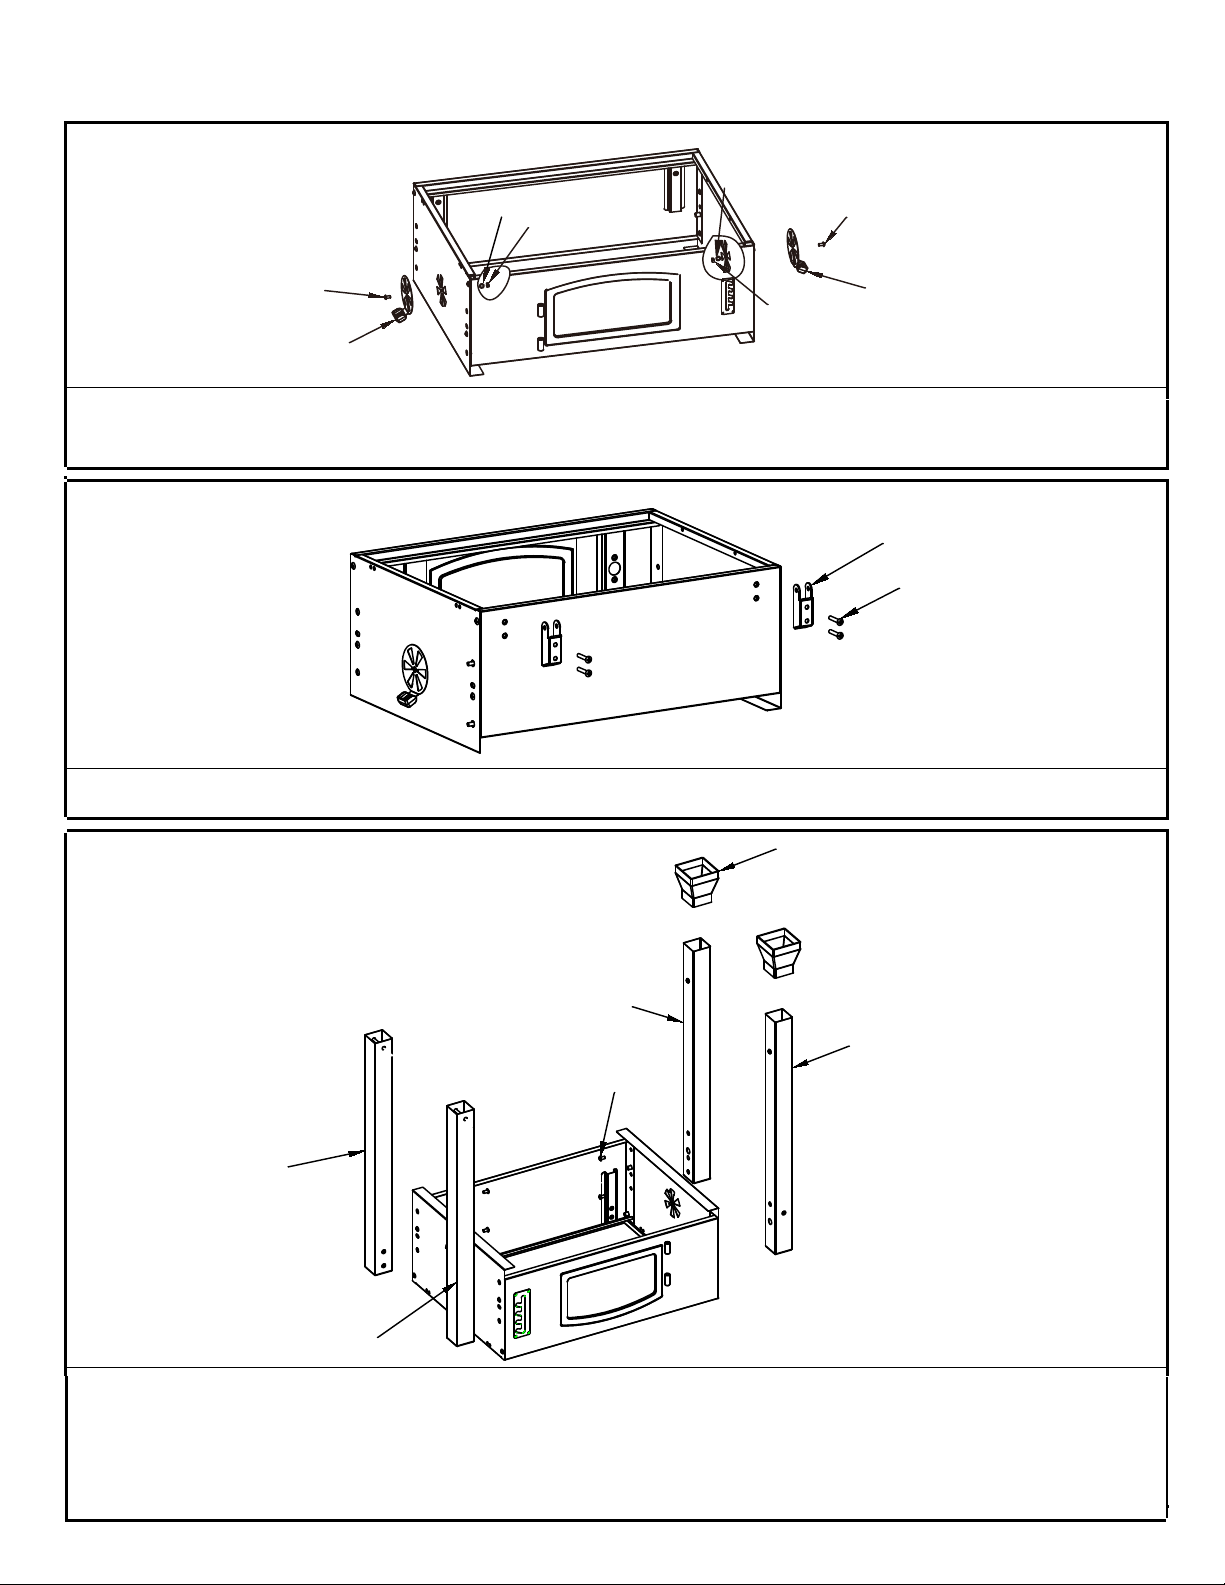
Step2.
Assemble 2 pieces of vent (3) with Screw M5x10 (D), Nut M5 (E) and Washer 6.5x7 (O).
29
B
Step3.
Assemble the Lower hinge (29) with Screw M6x35 (B).
24
26
25
A
LB
17
RB
RF
15
LF
Step4.
Assemble Left back leg (26), Left front leg (25), Right back leg (17) and Right front leg (15) with
Screw M6x12 (E).
Install Leg cap (24) onto the end of Left back leg (26) and Left front leg (25).
Page 10
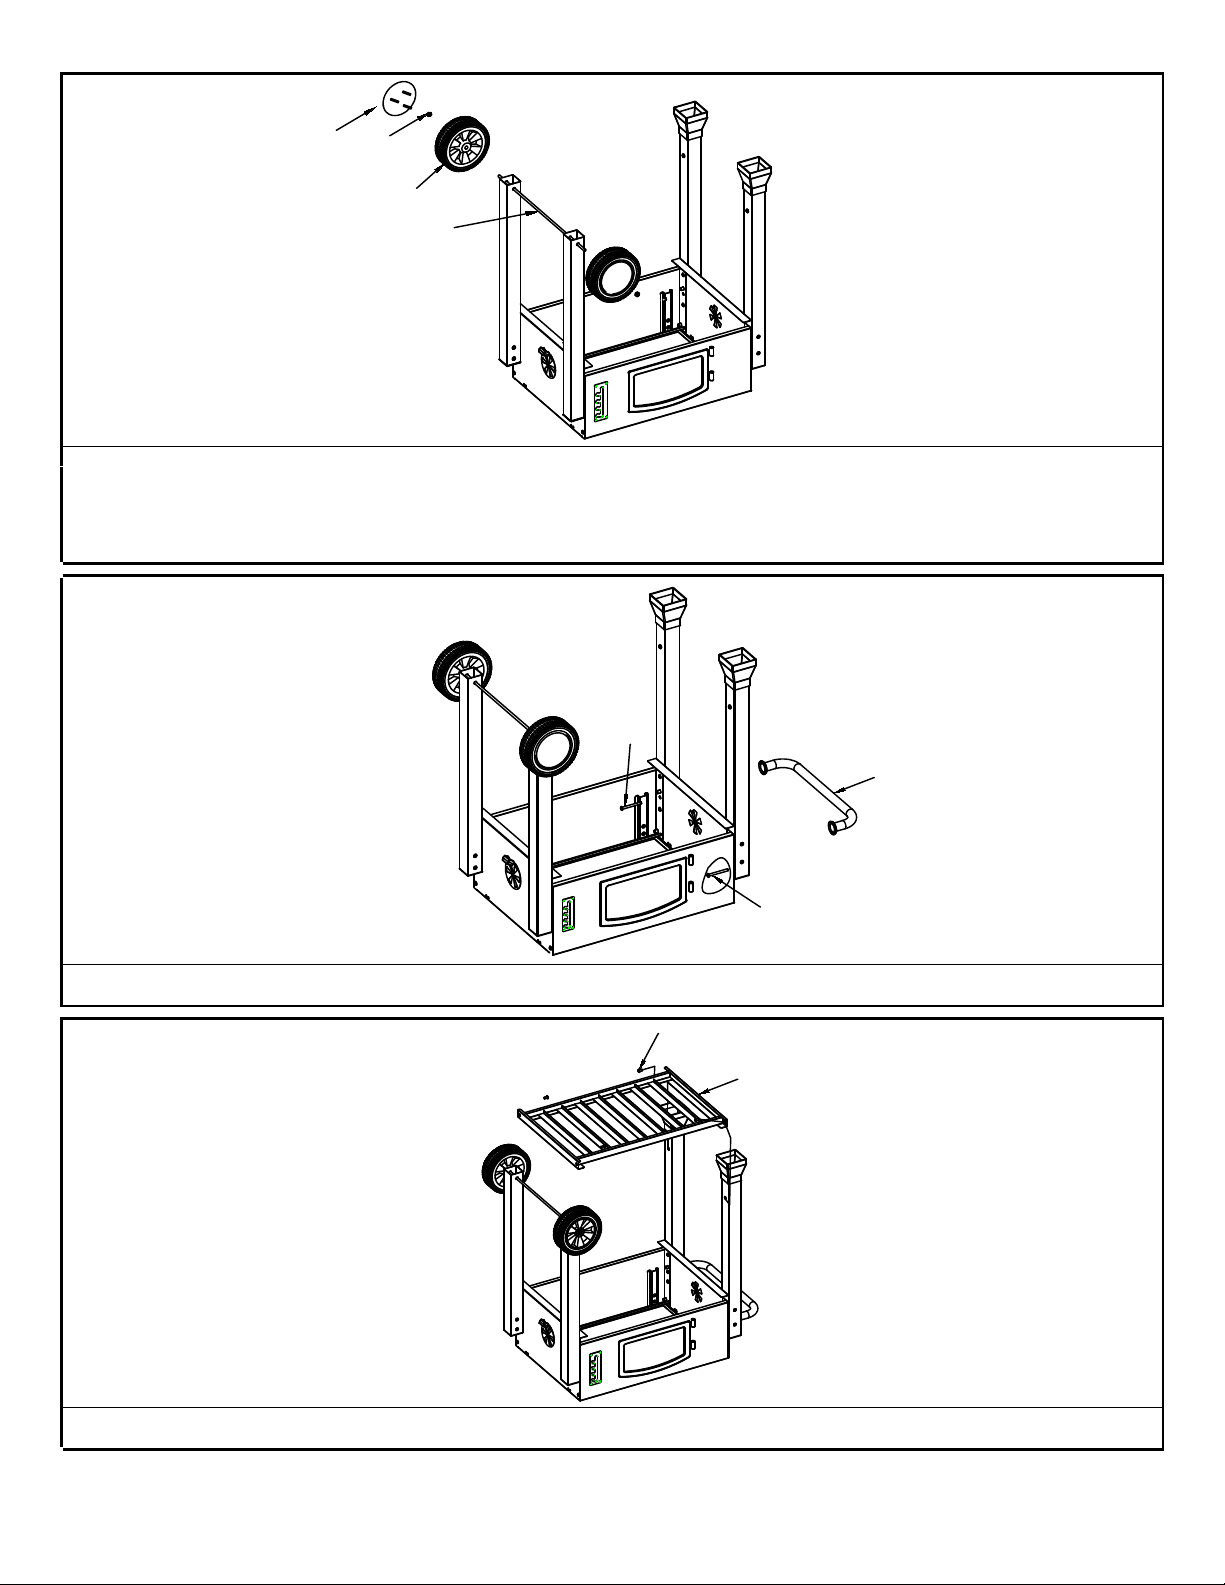
32
G
18
19
Step5.
Put the Axle (19) through the holes on the bottom of Right back leg (17) and Right front leg (15),
then install the wheels (18) to both ends of Axle (19), secure them with Nut M10 (G) and seal
them with Wheel cover (32).
C
28
C
Step6.
Install the side handle (28) as shown in the image, with Screw M6x65 (C).
A
23
Step 7.
Install the bottom shelf (23) with 4 pieces of Screws M6x12 (A).
Page 11
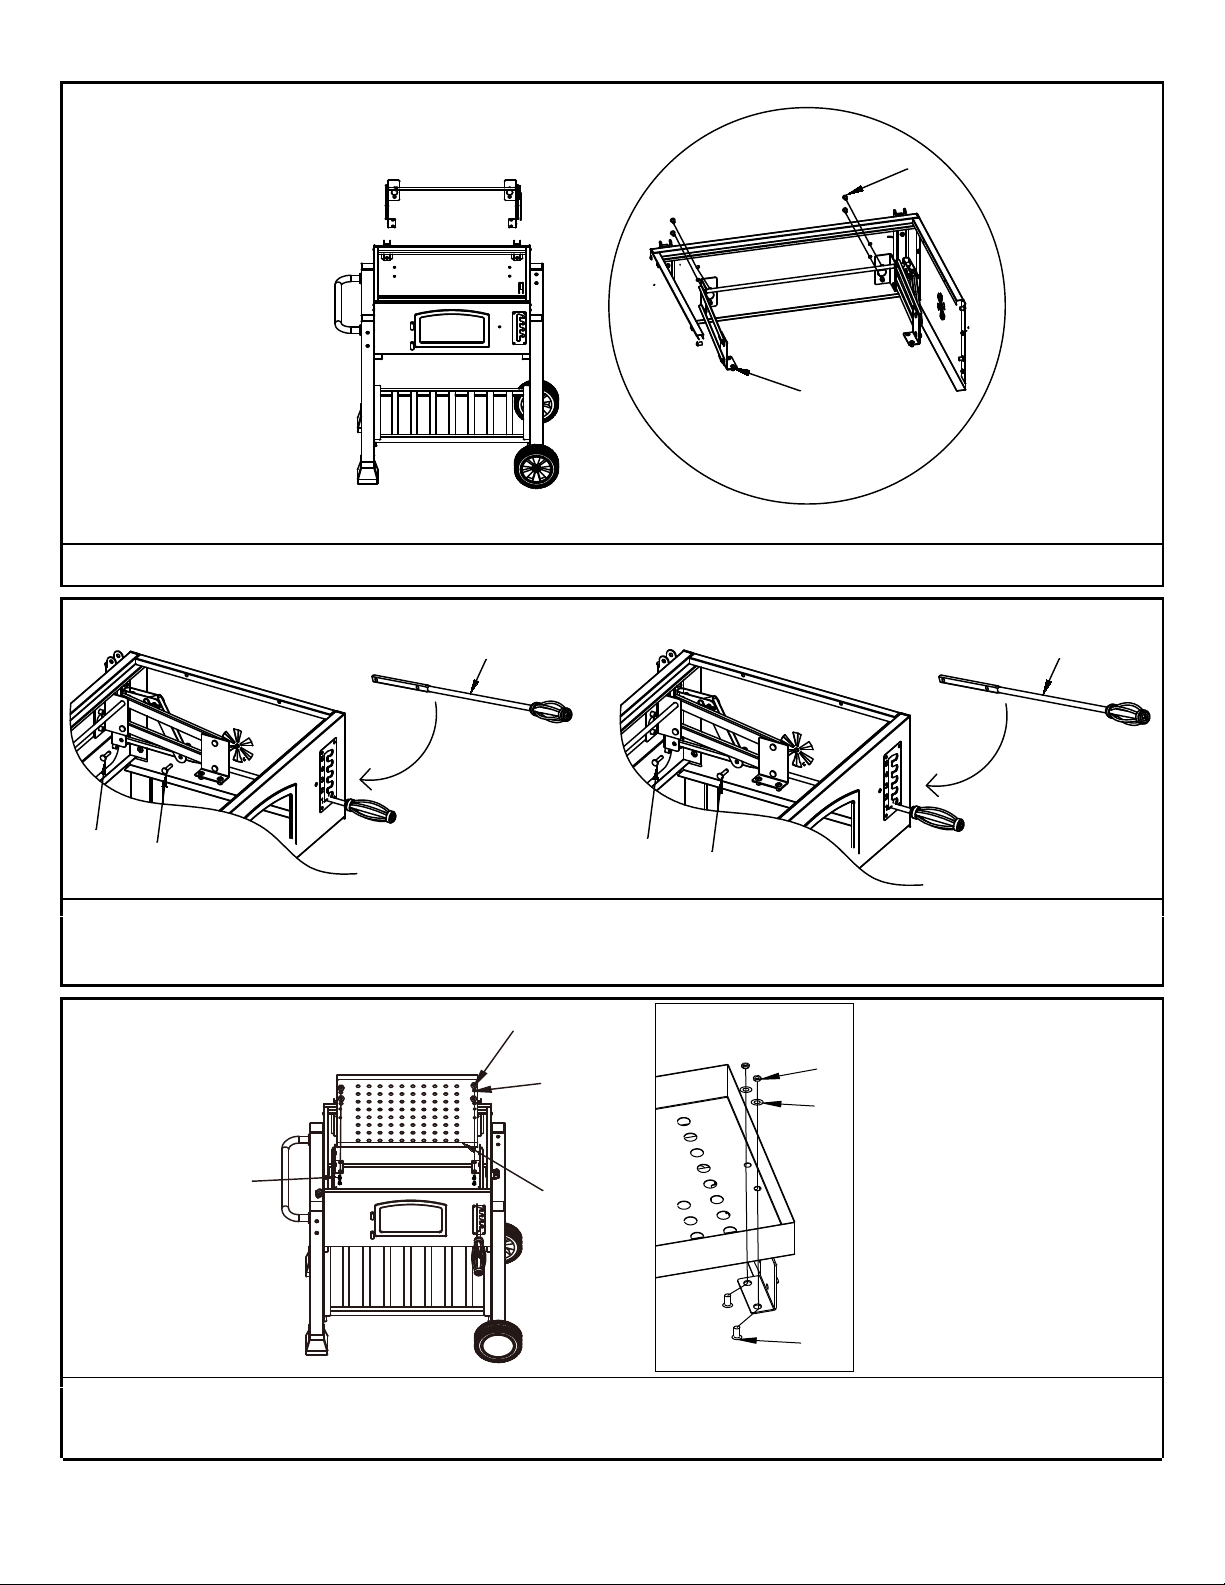
A
8
Step8.
Install the charcoal tray support (8) with 4 pieces of Screw M6x12 (A)
9
L
Step9.
M
9
L
M
Install the Adjusting handle(9) with Hinge pins 6x20 (L) and 6x12 (M) respectively following the
instruction in the illustration, and secure the pins with Clips (J)
N
O
N
O
A
7
A
Step 10.
To assemble Charcoal tray (7), apply with Screw M6x12 (A), Washer 6.5x7 (O) then secure with
Nut M6 (N).
Page 12
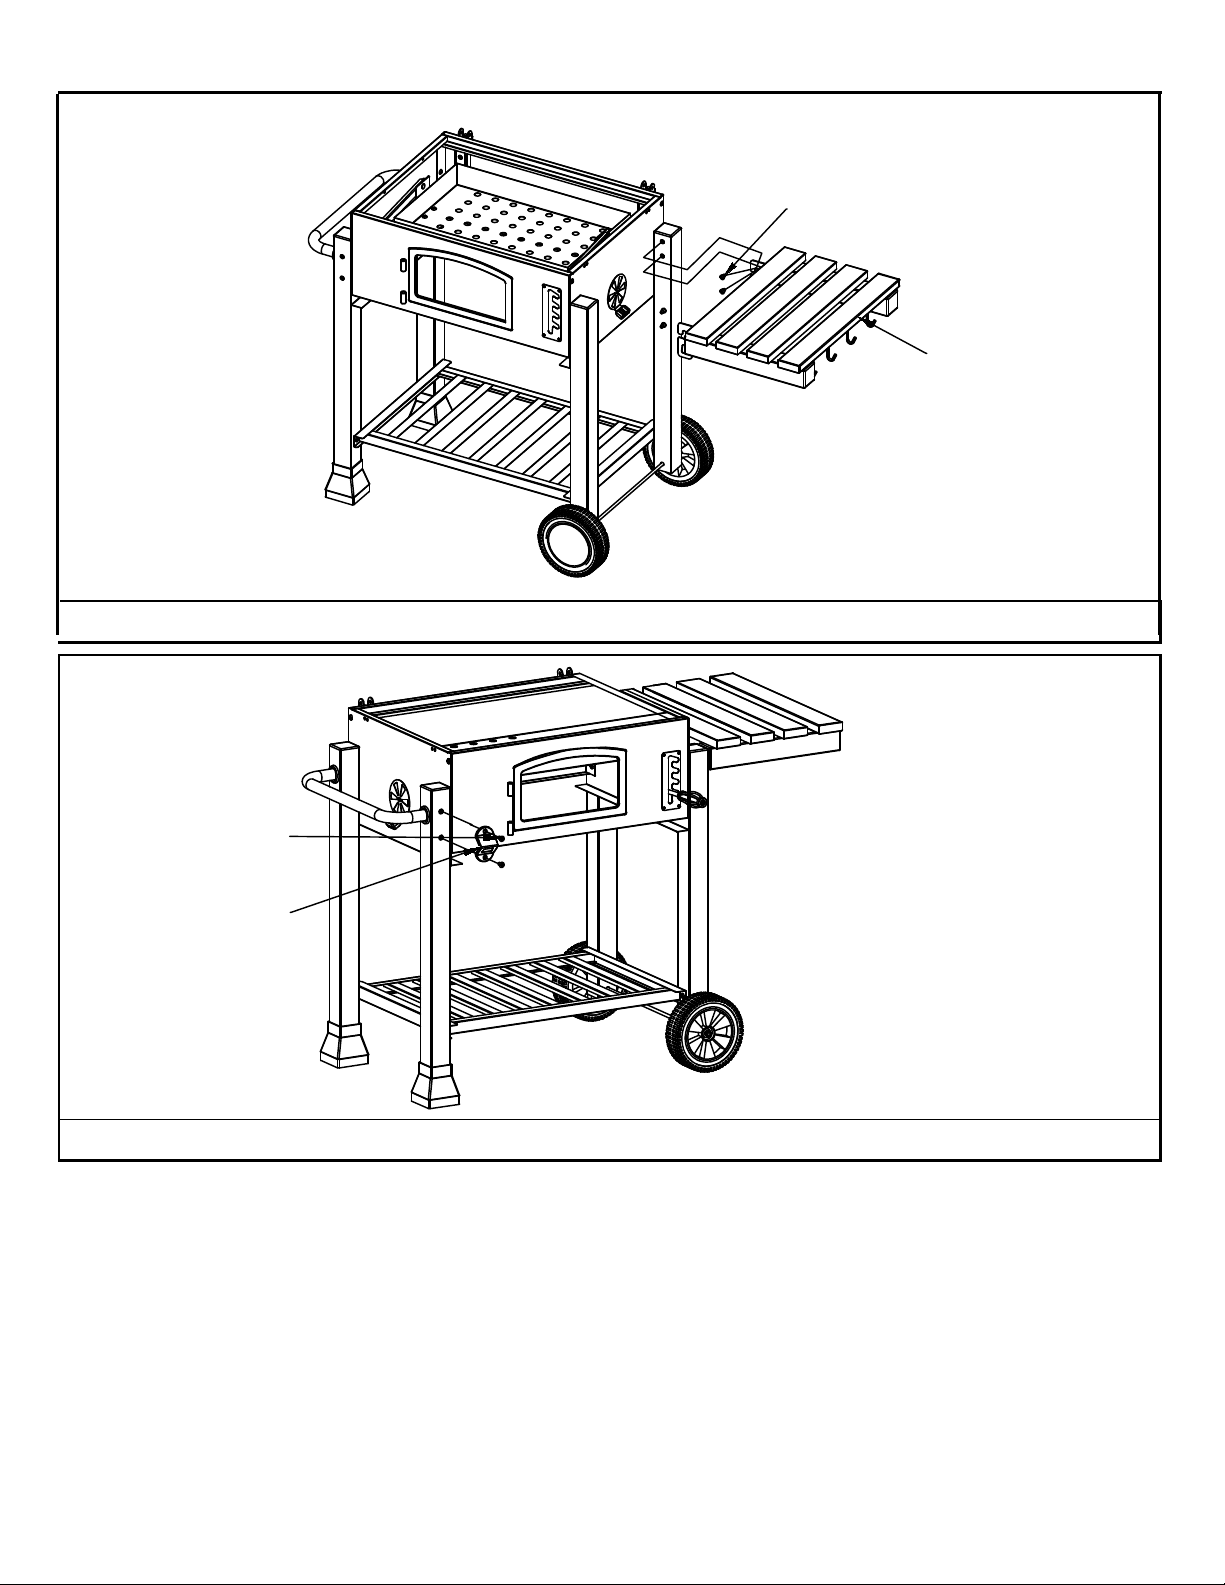
K
11
Step11.
Step12.
Install the side shelf (11) with Step screw (K).
5
4
3
2
1
A
27
Install Bottle opener (27) with 2 pieces of Screw M6x12 (A).
Page 13
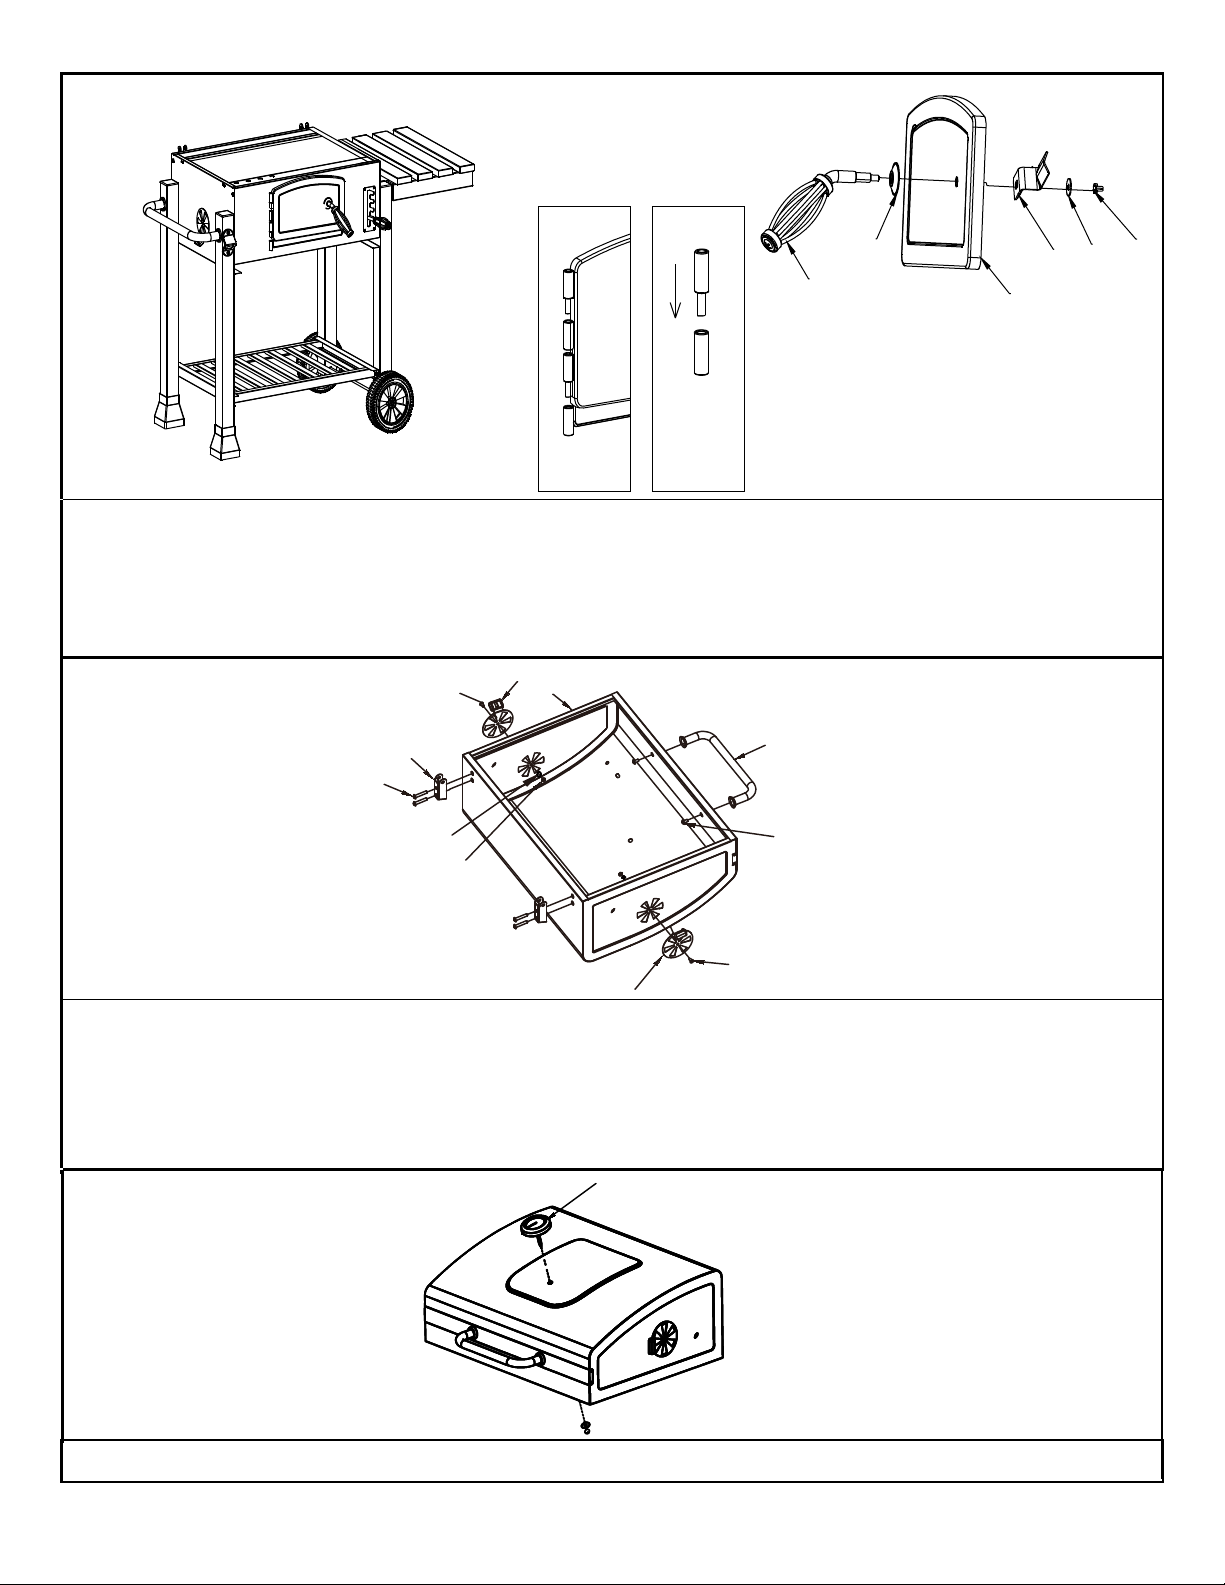
5
4
3
2
1
16
14
21
12
H
Step13.
Firstly, attach the Front door thread mount (14), and the assemble Front door handle (16), attach
the Front door lock bracket (12) from inside of the door, and secure them with Washer 6x18 (H)
and Butterfly
nut M6 (F).
Then hold the Front door (21) open and slide it in as shown in the illustration.
D
3
2
F
30
B
O
E
3
4
A
D
Step 14.
Install the Upper hinge (30) with Screw M6x35 (B).
Install the vent (3) with Washer 6.5x7 (O) and Nut M5 (E) from inside and secure them with
Screw M5x10 (D) from outside.
Install the Lid handle (4) with Screw M6x12 (A)
1
Step15.
Install the Thermometer (1) with pre-installed washer and nut.
Page 14
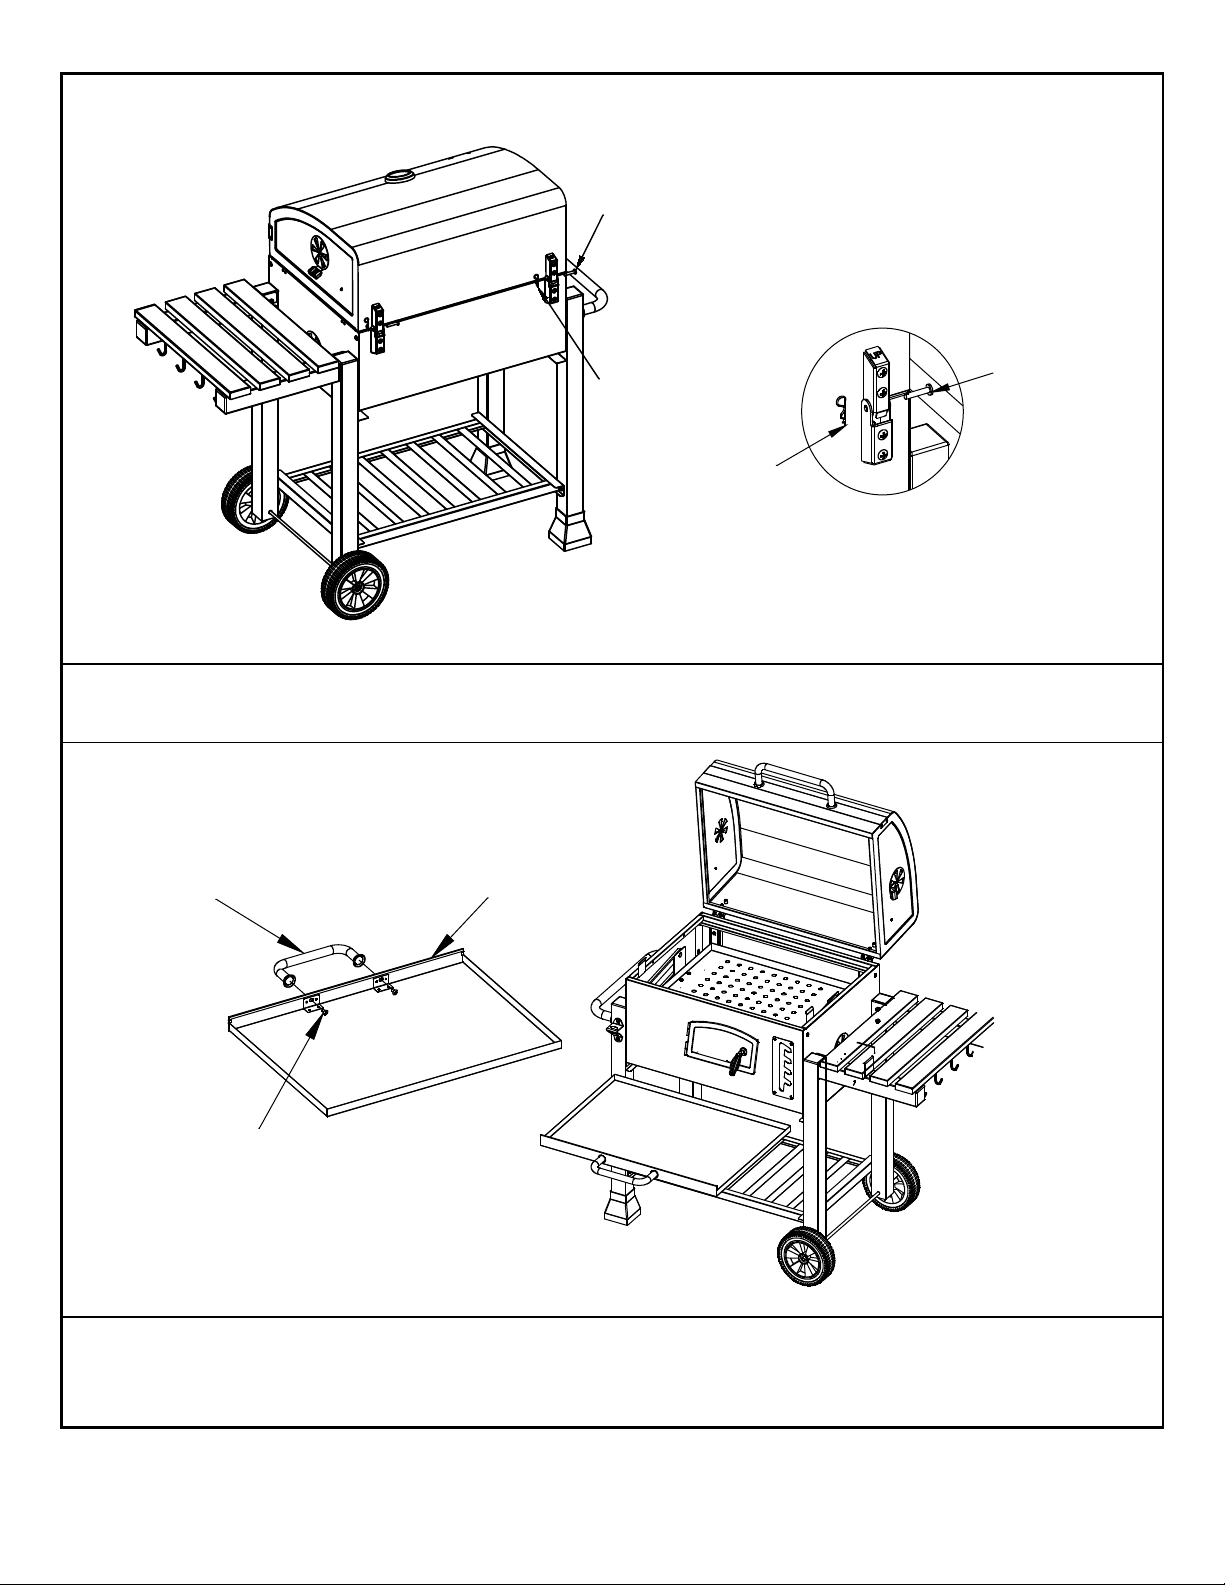
I
J
J
Step16.
Assemble the grill lid to the fire bowl with Hinge pin 5x30 (I) and secure them with clip (J).
20
22
I
A
Step17.
Assemble the Ash tray handle (20) onto Ash tray (22) with Screw M6x12 (A).
Slide the Ash tray (22) in along the rails under the fire bowl.
Page 15
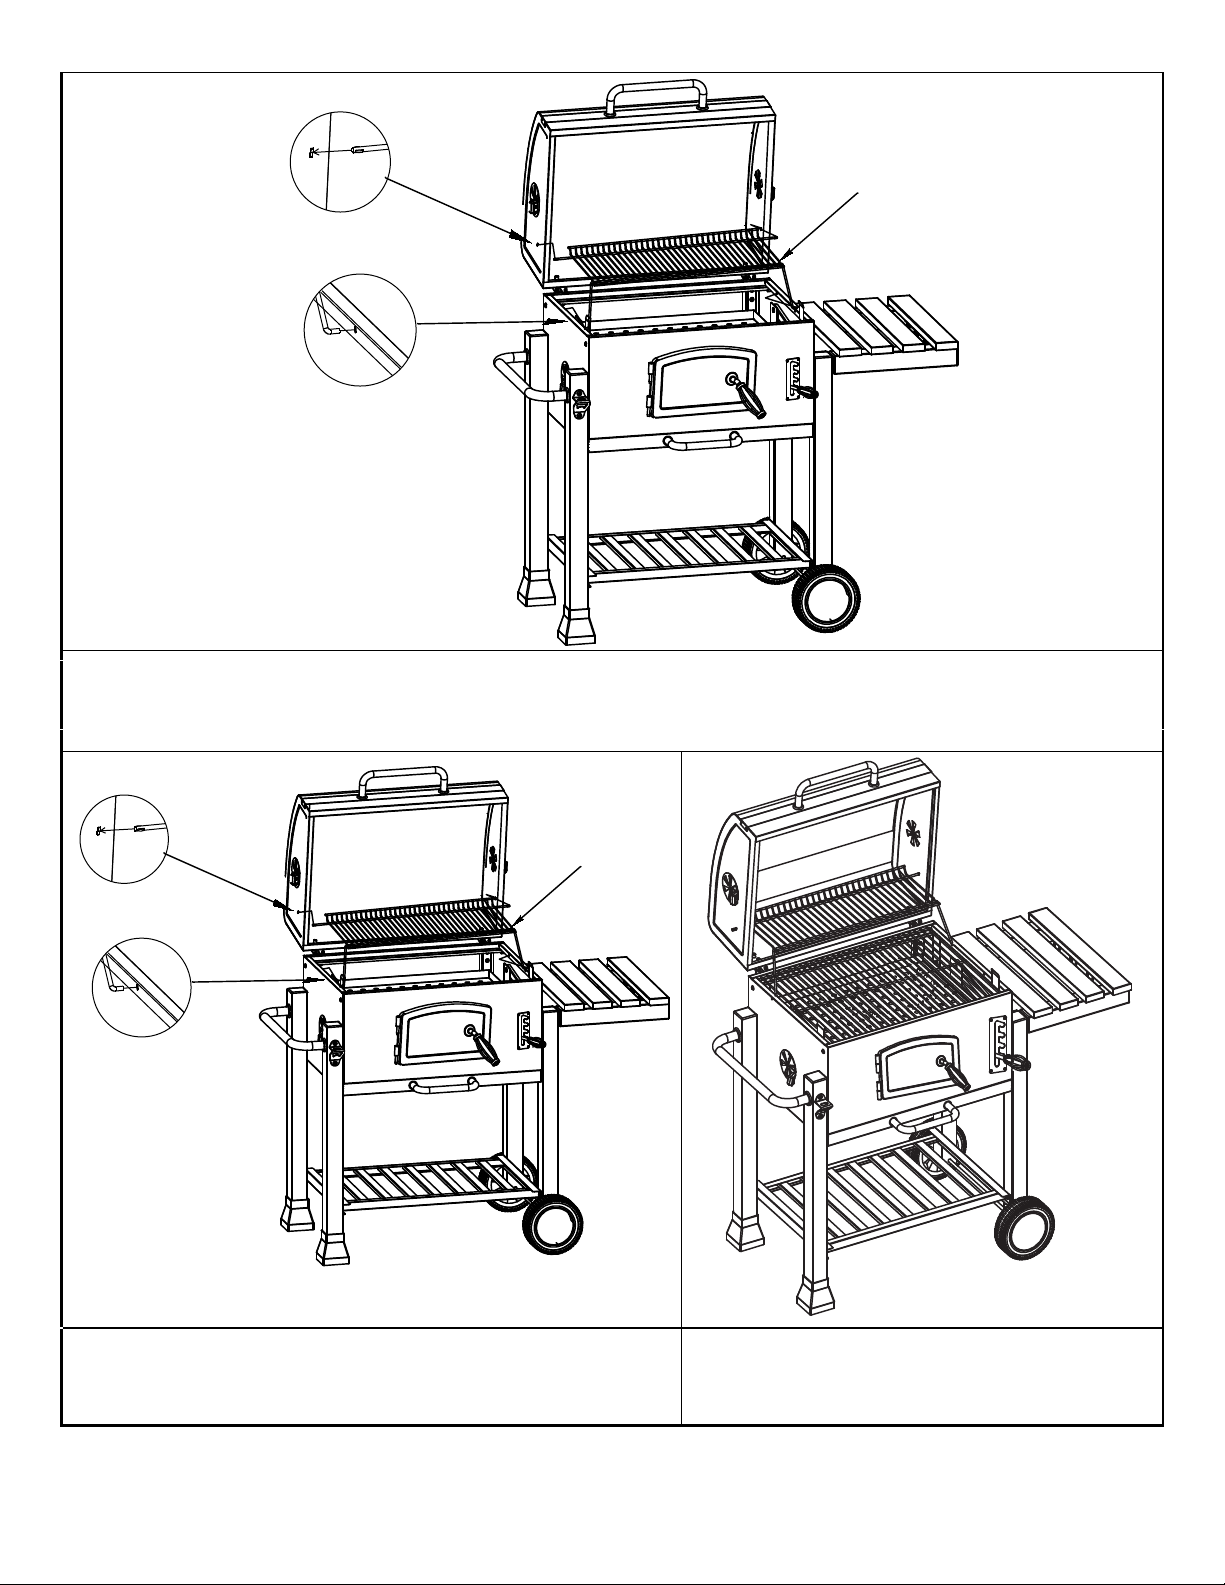
5
5
4
3
2
1
Step 18.
To install the Warming rack (5), plug the four ends of the warming rack into the relative holes on
lid and fire bowl respectively.
5
5
4
3
2
1
Step19.
Install 2 pieces of Cooking grid (6) into their position
steadily,
as shown in the illustration.
Step20.
Your grill is ready for use.
5
4
3
2
1
Page 16
Care and Maintenance
Wash cooking grids and charcoal grates with hot, soapy water. Rinse well and dry completely
with a towel. NEVER allow grates to drip dry, or dry in a dishwasher. They will rust.
After washing and drying, lightly coat grates and grids with vegetable oil or vegetable oil spray.
Clean the inside and outside of the grill by wiping it with a damp cloth. Apply a light coat of
vegetable oil or vegetable oil spray to the interior surfaces to prevent rusting.
If rust appears on the outside of your grill, clean and buff the affected area with steel wool or
fine grit emery cloth. Touch up spots with a good quality high-temperature-resistant paint.
NEVER apply paint to the interior surface. Doing so could cause a fire resulting in
serious bodily harm or property damage.
If rust appears on the interior surface of your grill, clean and buff the affected area with steel
wool or fine grit emery cloth. Coat the interior lightly with vegetable oil or vegetable oil spray.
Page 17

Dong Fang Jun Ma Trade Co., Ltd.(hereafter, DFJM) warranties that this Product shall be free
from defects in
purchase. Our
warranty period.
normal wear & tear such as paint loss, discoloration and rust on the Product and its parts or
components, and any
Product, use contrary to
warranty coverage is void if this grill is ever used for commercial or rental purposes; this warranty
is valid only in the USA. The warranty period of 1 year shall not be extended or renewed by the
repair or replacement of parts or compensation for the Product. If your Product is defective or
otherwise requires service or parts, please call DFJM Customer Service toll-free at MONDAY TO
FRIDAY, between 8:30 a.m. and 4:30 p.m. CST. Consumer is responsible for shipping, handling
and processing of warranty claims after 30 days of purchase date. As proof of
Purchase, a copy of your original purchase receipt must accompany any service request,
workmanship and materials, for a period of 1 Year from the date of original
obligation under this warranty shall be limited to replacement of parts during the
Our liability shall not extend beyond replacement of parts, This warranty excludes,
damage arising from any of the following: negligent use or misuse of the
this User’s Manual, or alteration by any one other than DFJM. All
LIMITATION OF REMEDIES AND LIABILITY
We shall not be liable for any incidental or consequential damages for breach of any express or
implied warranty on its Product. Except to the extent prohibited by applicable law, any implied
warranty or merchantability or fitness for a particular purpose on this Product shall be limited to the
duration of the above warranty. Neither us nor anyone else who has been involved in the creation,
production, or delivery of the Product shall be liable for damages of any type, including but not
limited to any lost profits, lost savings, loss of anticipated benefits, or other incidental or
consequential damages which may arise out of the purchase, use, or inability to use the Product,
whether arising out of contract, negligence, strict tort, or under any warranty, or otherwise, even if
you have been advised of the possibility of such damage or any other claim by any other party.
Our liability for any breach of warranty shall be limited to repair or replacement of the defective part
or parts as described above. Some states do not allow the exclusion or limitation of incidental or
consequential damages, so the above limitation or exclusion may not apply to you. The above
warranty gives you specific legal rights, and you may have other rights which vary from state to
state.
Thank you for purchasing this product! If you have questions about the assembly or operation of
this product, are missing parts, or have defective parts, please e-mail us at:
Or, call us toll free (M-F 8:30am to 4:30pm Central Time) at:
1-866-273-2284
Manufactured by:
Dong Fang Jun Ma
MADE IN CHINA
 Loading...