

GR-500-A
GrillaGrills.com R03172016
GR-500-A
Operators
Operation
Manual
Manual
wood
PELLET Grill
SAVE THIS MANUAL FOR FUTURE USE
SAFETY PRECAUTIONS
SAFETY NOTICE: FOR OUTDOOR USE ONLY!
WARNING: Electric shock can kill or result in serious injury. Precautions should
always be followed to reduce the risk of fire, electric shock, and injury.

OUR
STORY
True story: Two men on a fishing trip, chowin’ down at camp on a plate of ribs. One looks over
at the grill (he’s the industrial designer) and says, “Why do all those grills look the same, big ole
barrel cut in half?” The other, a metalsmith by trade, answers, “Because we haven’t built one.”
That’s when the lightbulb went off. Why not design and build a smoker grill that stands apart,
literally, from the crowd. Hundreds of design hours later, the Grilla was born.
Grilla takes advantage of convection smoking and grilling like no other, drawing cooking
heat over the food for a moist, lip-smacking result. What’s more, Grilla does it all with pellets,
assuring even cooking and options for flavor profiles. Add a two-tier grill and digital controls,
and you have one versatile Grilla.
Last but not least, all Grilla products are available direct to the hungry consumer. No fat in this
business model; just pure value meal after delicious meal. Not bad for two fishing buddies.
Enjoy!
GRILLA PELLET SMOKER GRILL OPERATION MANUAL2

TABLE OF CONTENTS
i n t r o d u c t i o n
Safety Information
Assembly
Grilla Features
o p e r a t i o n
Grilla 101: How to Operate Your Grilla
Getting Started
Operating Your Grilla
Controller Operation
Grilla Maintenance and Care
Approved Fuel: Wood Pellets
Parts Diagram
4
5
6
7
8
9
10
11
Troubleshooting and Frequently Asked Questions
Limited Warranty Information
failure to follow this operational manual
in its entirety will void all warranties
PROTECTED UNDER U.S. PATENT D666,453 OTHERS PENDING 3
13
14

SAFETY INFORMATION
sa f e t y n ot i c e
Please read the entire manual and all instructions before using your new Grilla. Failure to
follow instructions may result in property damage, bodily injury, or even death.
• Do not allow anyone to operate Grilla that is not
familiar with the proper and safe use of Grillas.
• Keep a fire extinguisher or water hose close
by for safety.
• Children should never use the Grilla, as parts of the
Grilla may be very hot. Keep children away while it is
in use. Never leave children unattended outside or near
the Grilla while in use. Close supervision is necessary
when any appliance is used by or near children.
• Do not store or use combustible materials
near this Grilla.
• Do not use the Grilla for indoor cooking or
heating. Not to be used in or on boats or
recreational vehicles.
• Do not touch hot surfaces. Use handles or knobs.
Use heat-resistant mitts or gloves, pot holders or
BBQ mittens when operating your Grilla.
• Extreme caution must be used when moving an
appliance containing hot oil or grease.
• Do not store or use gasoline or other flammable
vapors and liquids in the vicinity of this Grilla.
• This Grilla is for outdoor use only, and should
not be used in a building, garage or any
other enclosed area.
• Burning improper fuel (i.e. charcoal) can result in
carbon monoxide poisoning, which may lead to
sickness or death.
• Do not leave a lit Grilla unattended.
• Always use a meat thermometer to ensure food is
cooked to a safe temperature.
• The Grilla will become hot while in operation.
Keep children, clothing and furniture away from
all hot surfaces.
warn i ng: Direct contact with the Grilla fire chamber during operation may cause
severe burns to a person’s skin. Never put water into the Fire Pot; it will jam the Auger.
c a u t io n : Failure to follow the instructions in this operation manual may result in fire.
Please follow all operation and maintenance instructions.
warn i ng: Electric shock can kill or result in serious injury. When using electrical
appliances, basic safety precautions should always be followed to reduce the risk of
fire, electric shock and injury to persons, including the following:
• Do not operate Grilla in the rain.
• To prevent Grilla from being splashed on or falling
into water, do not use Grilla within 10 feet of
pool, pond or other body of water.
• Do not store or use combustible materials near Grilla.
• Shield electric digital Control Panel, keeping it
dry and out of rain at all times.
• Never remove grounding plug, or use with a
two-prong adapter.
• Do not use water or other liquid spray to clean
Grilla without first shutting off unit and unplugging.
• Do not operate any appliance with a damaged
cord or plug, after appliance malfunctions, or if it
has been damaged in any manner. Contact your
Grilla dealer for examination, repair or adjustment.
• Outdoor extension cords should be marked with
suffix letter W-A and with a tag stating “Suitable for
Use with Outdoor Appliances."
GRILLA PELLET SMOKER GRILL OPERATION MANUAL4
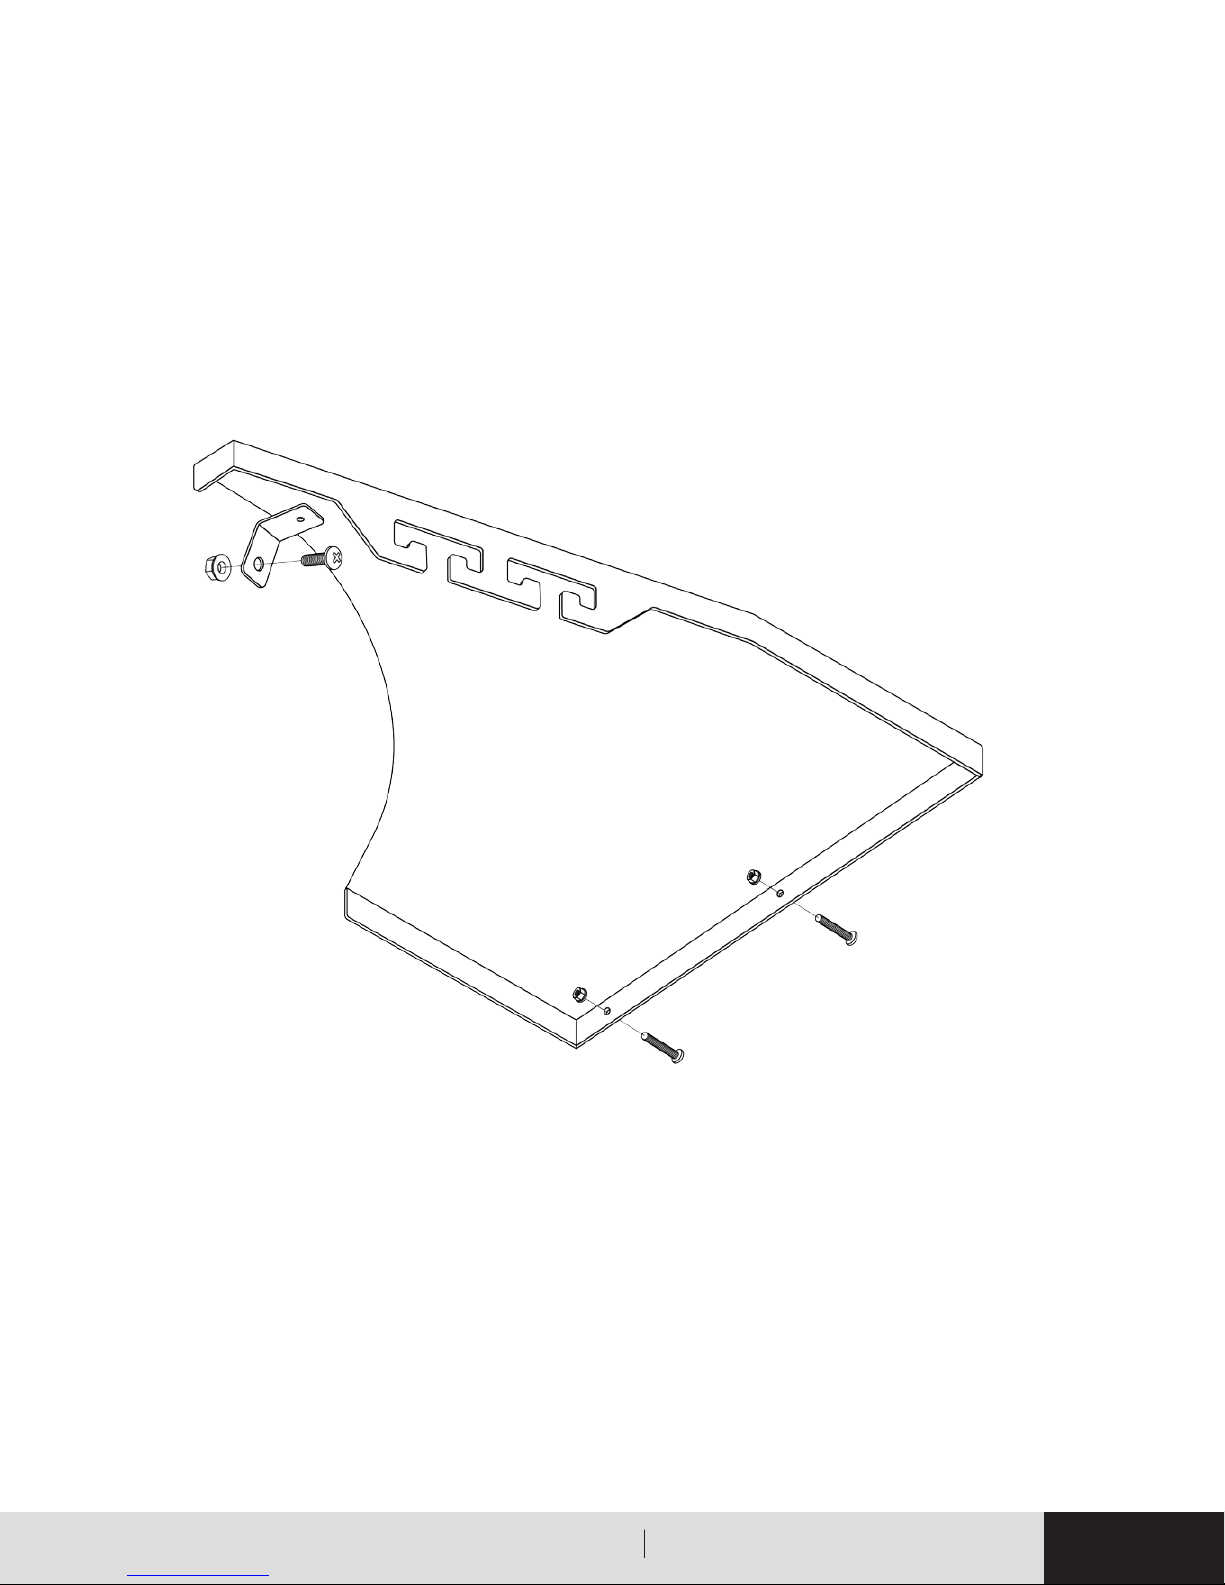
ASSEMBLY
Use the diagram below to assemble the Grilla side trays.
PROTECTED UNDER U.S. PATENT D666,453 OTHERS PENDING 5
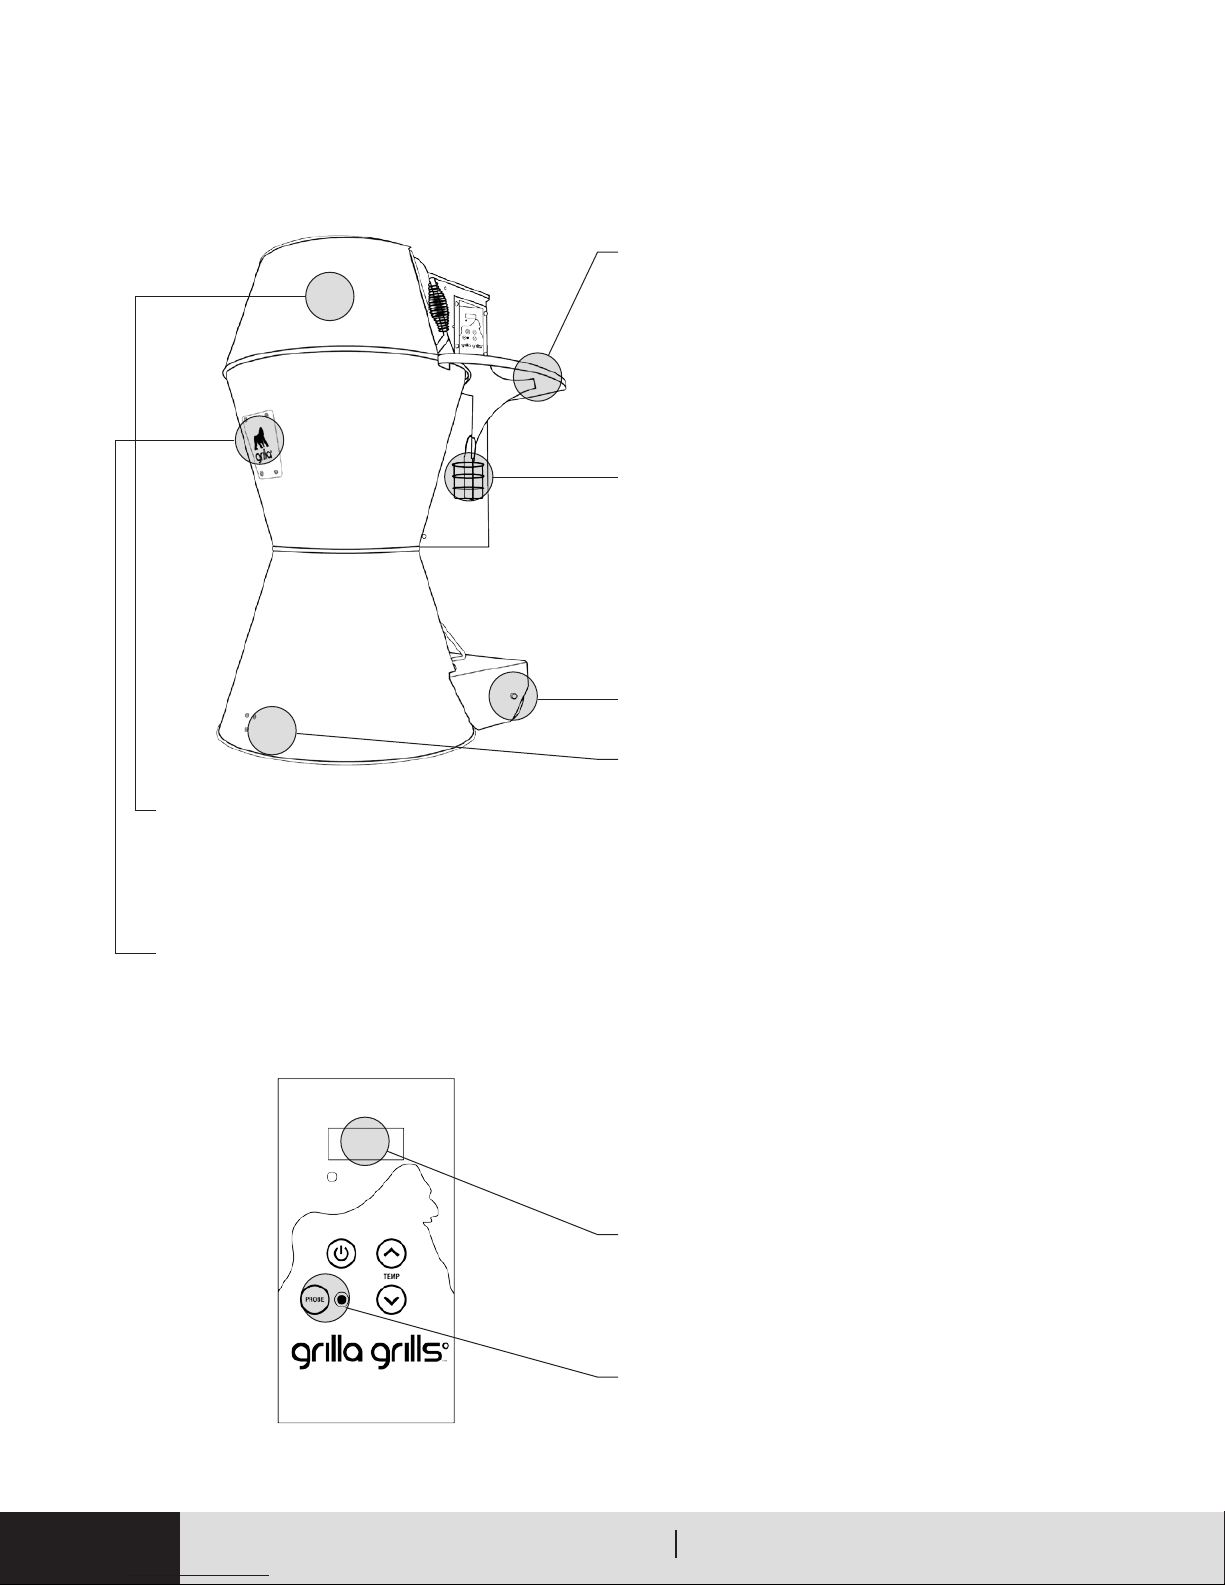
GRILLA FEATURES
Keep Heat Swing Lid
Keeps heat in when checking food and can be
left partially open without propping it open.
EZ Fuel Change Out
Switch pellets easily for different flavor profiles.
Viewing Glass
Quick and easy flame check and great visual
for evening grilling.
Stainless Steel Side Trays
Added surface for plates and grilling utensils; non-rusting.
18 Gauge Steel
Rock Solid, King of the Jungle Construction,
powder coated for a long-lasting finish.
Fire Pot
Made of 12 gauge steel, it removes easily and
cleans quickly.
Grease Catch Can Holder
Holds standard soup cans that can be disposed
of instead of cleaning buckets or pans.
Even Temp Hood
Round shape eliminates hot/cold corners.
Never Flare Flavor Disc
Prevents grease flare ups, keeps the flame
away from food.
5” Rubber Wheels
Rolls smoothly, even over rough terrain.
EZ Swivel Wheel
Hopper
20-lb pellet capacity.
Cord and Cord Wrap
“No mess” cord storage eliminates tangles and
keeps cords tucked away.
Lower and Upper Grilla Grates
A full 488 sq. in. of cooking surface, the upper grate
is ideal for large parties and pops out to make room
for whole chickens, turkeys and roasts.
GRILLA PELLET SMOKER GRILL OPERATION MANUAL6
Digital Control Panel
High-Temperature Safety Shutdown
If unit exceeds 615°F, shutdown is initiated and
an error will be displayed.
LED Screen
Displays current temperature and probe setting.
Low-Temperature Safety Shutdown
If unit drops below 110°F, shutdown is initiated
and an error will be displayed.
Probe
Measures the internal temperature of your meat.
GRILLA 101: How to Operate Your Grilla.
Follow these operating instructions exactly as stated to ensure safe and reliable operation.
Carefully read this manual in its entirety before starting your Grilla for the first time.
NOTE: BEFORE COOKING ON YOUR GRILLA FOR THE FIRST TIME, YOU WILL NEED TO CLEAN
AND “SEASON” YOUR GRILLA. Refer to “GETTING STARTED” below for further instructions.
The high-temperature paint on the Grilla may take up to 30 minutes to fully cure. During this initial start up and
seasoning, an odor that is not harmful may be evident.
Getting Started
You will need to season your Grilla before you cook on it for the first time:
1. Clean upper and lower cooking grates with
soap and water.
2. Fill hopper with approved cooking pellets.
3. Plug Grill into 110 Volt AC grounded outlet.
4. For your first start, remove the Grease Can
Holder (11), Lower Cooking Grate (16), and
Flavor Disc (29).
5. Turn Grill on, and the igniter rod should turn a light
red in 1 to 2 minutes (do not touch).
Operating Your Grilla
1. Check hopper for debris and add pellets as necessary.
2. Put an open mouth can in the holder (11) located
under the Right Tray (soup cans work well). This
works well since you simply throw these away when
full, eliminating messy clean ups!
Warning — remove the grease can before
movement of the grill to avoid spilling.
3. Close lid and turn on Grill.
4. Set to desired temperature (default is 350°F).
6. Once the pellets have traveled through the tube
and have started dropping (roughly 2 to 4 minutes),
turn OFF the grill.
7. Place components back in place, and restart the
grill by turning the grill on and leaving door slightly
open until unit begins to heat up.
8. This procedure is not necessary again unless
the grill runs out of pellets and it needs to have
the tube “re-primed."
5. Leave door open slightly until temperature starts
to rise then close.
6. When finished, turn off controller and let the
“Cooldown Cycle” complete before you unplug the
Grill if needed.
7. Once it’s cooled completely, cover Grilla or put
away to protect it from rain.
warn i ng: Do not attempt to move Grilla while running.
PROTECTED UNDER U.S. PATENT D666,453 OTHERS PENDING 7

CONTROLLER OPERATION
Power Button
• Starts “Ignition” Sequence
• Starts “Shutdown” Sequence
Temperature Setting Buttons
• Moves temperature setting up or down in 5-degree increments from 180 to 500°F. Holding for 2 seconds
will change temperature quickly. Default 350°F.
Probe Button
• When grill is on, pressing button will change readout to show the meat probe reading. This reading will
display for 5 seconds. Then it will return to show the current grill temperature.
Ignition Sequence
When Power button is pressed:
• Igniter turns on and runs for 4 minutes. At 4
minutes if temp is 150°F, it turns off. If temp is
below 150°F after 4 minutes, it stays on for 4
more minutes (8 total) then turns off.
• Auger turns on at 100% for 4 minutes then goes
to normal temperature control operation.
• Resets Error codes
• Fan runs continuously.
• Board displays current temperature. If below 110°F
(likely at startup) the display will be flashing until
above 110°F. It has 10 minutes (ERL requirement) to
get above this or it initiates ERL code.
Shutdown Sequence
When Power button is pressed:
• Auger turns off.
• Fan continues to run for 5 minutes.
ErL (low temp) Code
• Grill temp was below 110°F for more than 10 minutes.
RrH (high temp) Code
• Grill temp reached 615°F.
FHi (food high) Code
• Food probe is above 225°F. Removing probe from socket returns board to normal readout.
• Board displays C5, C4, C3, C2, C1 (minutes)
then goes blank.
GRILLA PELLET SMOKER GRILL OPERATION MANUAL8
GRILLA Maintenance and care
c a u t io n : Periodic maintenance should only be done while the Grilla is shut off and cold. Time
frames are suggestions only; maintenance frequency depends on fuel and the amount of use. Make sure
your Grilla is COMPLETELY COLD before performing any maintenance.
Auger Removal/Installation
1. Unplug Grilla.
2. Empty Hopper.
3. Remove Maintenance Cover (58).
4. Unplug Grill Auger Motor.
5. Remove Auger Strap (53).
6. Remove single screw at the bottom of the Auger
Screw Assembly (55).
Fire Pot Removal/Installation
1. Turn Grilla “Off."
2. Remove Lower Cooking Grate (16), Grease Can
Holder (11) and Flavor Disc (29).
3. Remove 4 screws.
7. Slide Auger Screw Assembly out.
8. Reverse steps for re-installation, ensuring Auger
Strap (53) is between the 12 o’clock and 2 o’clock
position when installed.
For more Grilla Maintenance and Care
information, visit GrillaGrills.com
4. Rotate Fire Pot 90° and lift up and out.
5. Reverse steps to install and ensure the Igniter goes
into the Fire Pot, exposing the Igniter in the Fire Pot.
Igniter Removal/Installation
1. Complete “FIRE POT REMOVAL/
INSTALLATION” above.
2. Pull wires out to expose connectors and unplug.
3. Loosen collar screw.
Cleaning
• Do not use oven cleaner, abrasive cleansers or abrasive cleaning pads on the outside Grilla surfaces.
Use warm soapy water to cut the grease.
Protecting Your Grilla
• Use a protective cover on your Grilla after each use.
Make sure Grilla is COMPLETELY COOL before
covering. A Grilla Cover is highly recommended!
• If the Grilla is stored outside, care should be
taken to ensure that water does not get into the
Hopper. Wood pellets, when wet, expand and
will jam the Auger.
4. Slide Cartridge Heater out.
5. Call Grilla Grills for replacement part.
6. Reverse steps for re-installation.
• Use touch-up paint to repair any scratches.
• Grilla Covers and touch-up paint are available
through GrillaGrills.com.
• You should thoroughly clean and inspect your
Grilla on a regular basis.
PROTECTED UNDER U.S. PATENT D666,453 OTHERS PENDING 9

APPROVED FUEL: wood pellets
Grilla is only approved for burning barbecue wood pellets. Wood pellets are small in size and
generate about 8,200 BTUs per pound with very little ash and moisture content.
There are more than 125 active pellet mill operations in the United States and Canada, producing millions of
pounds of pellets each year.
General specifications for barbecue pellets are:
• 100% hardwood
• 1” long or less in length
• ¼“ diameter
• Less than 2% ash content
There are different flavors of wood pellets for your Grilla.
Here is a table of wood pellet flavor suggestions and what they go best with:
Beef Chicken Fish Turkey Pork Lamb Buffalo Baking
Mesquite x x x x x
Hickory x x x x x
Apple x x x x
Alder x x x x x x x x
• Less than 2% fines
• Under 10% moisture content
• Approx. 8,200 BTU’s per lb.
• About 40 lbs per cubic ft. density
Mesquite Flavoring:
Mesquite, which means “the honey tree," gives a delicate, subtle, sweet flavor to grilled foods. It is especially
good with poultry and seafood.
Hickory Flavoring:
Hickory intensifies the flavor of food with a robust, tangy taste that is better suited to red meat than to
poultry or fish.
Apple or Fruitwoods Flavoring:
Apple or fruitwoods, many from orchards destroyed by fire or old age, are a big hit. Like its mesquite counterpart,
the heaviest branches of the apple tree are heated to kill insects, then chipped, made into pellets and
packaged for retail. Apple (or any fruitwood) adds a smoky, mild sweetness to everything you cook and is
also highly recommended for any baking.
Alder Flavoring:
Popular in the Northwest United States, alder produces a mild taste suited for salmon and other fish.
GRILLA PELLET SMOKER GRILL OPERATION MANUAL10

PARTS DIAGRAM
ITEM DESCRIPTION
1 Center Washer
2
3 Left Side Tray
4 #10-24 Black Zinc BHSS ½" long
5 RTD Probe
6
7 #8 x ½ Square Drive
8 Right Side Tray
9 Glass
10 Lid Gasket
11 Grease Catch Can Holder
12 #10-24 Black Zinc BHSS ¼" long
13 Hardened Wheel Washer
14 Lid Pivot
15 ¼-20 x ½ SS Button Head
16 Lower Cooking Grate
17 Top Glass Holder
5
⁄
x 1.25 Shoulder Bolt
16
5
⁄16 Washer
ITEM DESCRIPTION
18 Acorn Nut
19 ¼-20 Hex Nut
20 ½" x ½" Shoulder Bolt
21 5" Die Caster Wheel
22 Bottom Glass Holder
23 ¼" Lock Washer
24 Upper Cooking Grate
25
26 250 Ball Bearing
27 Window Flange
28 Fire Pot
29 Flavor Disc
30 Control Panel
31 Lid Handle
32 Foot Pedal
40 Igniter
3
⁄8-16 Nut
PROTECTED UNDER U.S. PATENT D666,453 OTHERS PENDING 11

Parts diagram (cont.)
ITEM DESCRIPTION
50 Cord Wrap
51 Grill Blower
52 #10-24 Black Zinc BHSS ½” Long
53 Auger Strap
54 6-32 x 750 Screw
55 Auger Screw Assembly
56 #8 x ½ Square Drive
57 Ash Pan Latch
58 Maintenance Cover
59 Auger Bushing
60 ¼-20 x 375 BHS
GRILLA PELLET SMOKER GRILL OPERATION MANUAL12
ITEM DESCRIPTION
61 Trap Door
62 Grill Auger Motor
63 #10-24 Nylon Lock Nut
64 6-32 Lock Nut
65 Hopper Lid
66 Trap Door Hinge
67 Hopper Handle
68 #8 Lock Washer
69 #8-32 Hex Bolt 1¾" Long
70 #8-32 Hex Nut
71 #8 2" Long Sheet Metal Screw

TROUBLESHOOTING and FAQ
For more Grilla Troubleshooting information visit GrillaGrills.com
The Grilla is very trouble-free in operation when properly maintained and quality fuel is used.
If the Grilla fails to operate properly, use the following to troubleshoot.
How do I remove the auger if it jams?
1. Unplug Grilla.
2. Empty Hopper and clean out Auger with vacuum as
necessary to remove any loose debris.
3. If Auger still will not turn, see “AUGER REMOVAL”
section on page 9 under “Grilla Maintenance
and Care."
4. Once Auger has been removed, clean tube and
Auger and re-install.
5. Plug Grilla in and turn “On”.
6. If the Auger still won’t turn, motor may need
replacing. Contact Grilla Grills.
Pellets are not being delivered into the
Fire Pot – why?
1. Verify pellets are in the Hopper.
2. If this is the initial firing or the Grilla has run out
of pellets, allow sufficient time for the pellets to
travel from the Hopper to the Fire Pot (may take
up to 5 minutes).
3. Once pellets begin to drop, turn the Grilla “Off”
and then back “On” to re-start Ignition Mode
(see step 3 and 4 in “GETTING STARTED”
section on page 6).
4. Ensure the Auger is turning by removing the Lower
Cooking Grate, Grease Catch Can Holder and
Never Flare Flavor Disc and visually checking the
Auger (removing cap may be necessary).
5. If Auger is not turning, see “How do I remove the
Auger if it jams?” section above.
Why won’t my Grilla light?
1. Check outlet and verify Control Panel is powering up.
2. If outlet is good and LED Screen is not coming on,
check fuse on back of Control Panel.
3. Turn Grilla “Off."
4. Remove Lower Cooking Grate (16), Grease Catch
Can Holder (11) and Flavor Disc (29).
5. Clean area of burned and unburned pellets.
6. Turn Grilla “On."
7. Verify Auger is turning and fuel is dropping into Fire
Pot. If Auger is not turning, see “How do I remove
the Auger if it jams?” section to the left.
8. If Auger is turning but pellets are not coming out,
ensure there are pellets in the Hopper. If it ran
empty or this is the first time for use, it will be
necessary to prime the Auger (see “GETTING
STARTED” section page 7 for directions). This will
ensure pellets are at the end of the tube and will
begin dropping once unit is turned on.
9. Igniter should begin to turn red within 1 to 2 minutes.
If not, see IGNITER REMOVAL / INSTALLATION
section on page 9.
Where do I get parts for my Grilla?
Be sure to be ready with your name, phone number,
address, Grilla model number and serial number, along
with the part identification number from the “Parts
Diagram” on page 11.
c a u t io n : Never squirt gel on a
burning or hot fire.
c a u t io n : During troubleshooting some
components are hot. Allow unit adequate time to
cool. Use gloves as needed.
PROTECTED UNDER U.S. PATENT D666,453 OTHERS PENDING 13

LIMITED WARRANTY INFO
fa h r e n h e i t t e c h n o l o g i e s , i n c .
Fahrenheit Technologies, Inc. extends a limited warranty for its products as described on this page.
What is the period of coverage?
This limited warranty covers defects in workmanship and materials for a period of four years from date
of first retail purchase.
What does this warranty cover?
During the warranty period, Fahrenheit Technologies, Inc. will replace or repair, at its sole option, any defective
Grilla returned to us by its original purchaser.
What does this warranty not cover?
This warranty does not cover problems that result from abuse, accident, misuse, problems with electrical
power or acts of God (such as a flood or storm). It does not cover uses not in accordance with this operation
manual. It does not cover commercial use of the product. It specifically excludes products for which
Fahrenheit Technologies, Inc. has not received payment.
How does State Law apply?
This warranty gives you specific legal rights, which may vary from state to state (province to province in
Canada). Fahrenheit Technologies, Inc. responsibility for defects in material and workmanship shall be limited
to repair and/or replacement as set forth in this warranty. All expressed and implied warranties, including
but not limited to, any implied warranties and warranties of merchantability or fitness for a particular purpose
are limited for a period of four years from the date of first retail purchase.
What will we not do?
We do not accept liability for incidental or consequential damages, or for any third party claims for damages.
Some states (provinces in Canada) do not allow the exclusion or limitation of incidental or consequential
damages, so this may not apply to you.
How do you get service?
To exercise your rights under this warranty, contact Grilla Grills (make sure you have your Grilla serial number
available), or call us at (616) 392-7410.
GRILLA PELLET SMOKER GRILL OPERATION MANUAL14

[ Page intentionally left blank ]
PROTECTED UNDER U.S. PATENT D666,453 OTHERS PENDING 15

save this manual for future use
GRILLA PELLET SMOKER GRILL OPERATION MANUAL16
 Loading...