

Page 1
www.Griffin-Stands.com
Double/Single
Kick Drum
Pedal
www.Griffin-Stands.com
www.Griffin-Stands.com
Griffin™ stands and accessories are manufactured
in several innovative factories responsible for
developing products that address the newest
needs and trends of the current market. We take
pride in the Griffin™ brand and endeavor to be on
the forefront of the musical stands and musical
and lighting accessoriesmarket.
Performance Issue, Uneven or Unstable- Make
sure all nuts and bolts are tight on the product. If they
are, then loosen all nuts and bolts 1 full turn counterclockwise, then go back and tighten each bolt only ½
turn tight. Then do a final tighten turn for another ½
turn tight. Next, Make sure there are not any missing
nuts or bolts. Third, ensure all parts on the product
are not broken or defective. Finally, Re-read the
assembly instructions or watch the product
demonstration video to ensure you have correctly
assembled or are using the product properly with
factory specifications.
Missing Parts- The pictures, videos and images
shown in this manual might have changed style or
count due to the product being redesigned. So in rare
cases the part may no longer be included or of a
different style. However, if you think you are missing
a part that is necessary to the assembly and use of
your product, then first carefully double check all
packaging for any parts you think are missing. Some
parts might be hiding in the packaging or loose in an
inner box.
Maintenance- ● Wipe clean with a cloth as needed.
● Lubricate the chain(s) and moving parts regularly to
prevent rust and maintain quality. ● Use caution
when using Floor Spikes(5)on hard surfaces. It is
highly recommended to use a mat or carpeted surface
beneath the Floor Spike(5)s/drum pedal to prevent
slippage and protect the underlyingflooring
User Manual
M od e l # P 1 0 0 0 / P 2 0 0
Griffin | 11408 Hwy 64 W, Tyler, TX 75704 |
info@griffin-stands.com | www.Griffin-
Stands.com
For current product specifications, please to go
www.griffin-stands.com and type the model number
into the search bar. Locate the product listing to view
the current factory specifications.
Thank you for purchasing the Griffin Double/Single
Kick Drum Pedal. Your product comes with a 1 year
factory warranty from purchase date. Please read all
assembly instructions prior to assembling your new
cart. Pictures that may aid in assembly can be found
by going to www.griffin-stands.com and typing
P1000/P200 into the searchbar.
Page 2
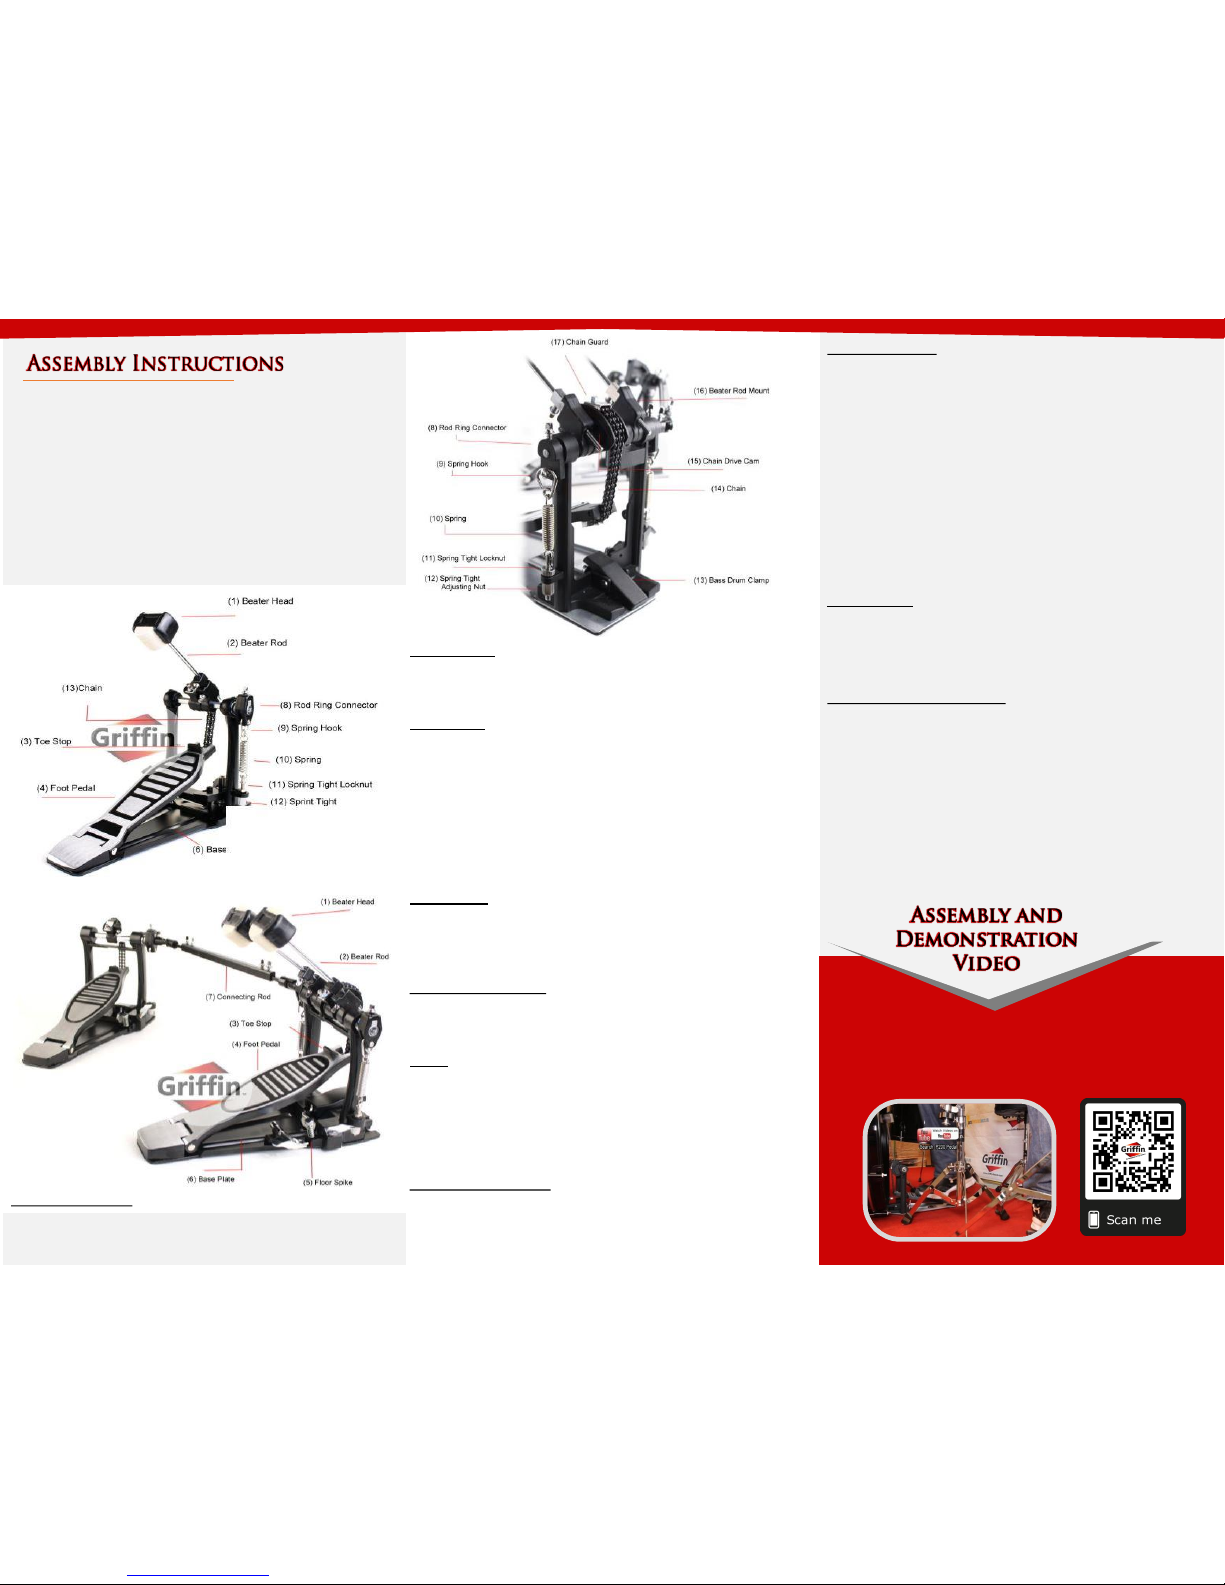
Parts List:
(1) Beater head
(2) Beater rod
(3) Toe Stop
(4) Foot Pedal
(5) Floor Spike
(6) Base Plate
(7) Connecting Rod
(8) Rod Ring Connector
Beater head Each beater head(1) is a quad sided beater
head(1). The sides are as follows: felt tip vertical, felt tip
horizontal, hard surface vertical, and hard surface
horizontal.
Beater rod By changing the angle of the beater rod(2), you
can personalize your bass drum sound. Different sounds are
created depending on not only the size of the angle the
beater travels before striking the drum head but also the
angle at which the beater head(1) contacts the drum head.
When the beater head(1) travels a farther distance to the
drum head, the resulting sound is louder. To adjust the
beater rod(2), unscrew the beater rod(2) bolt and rotate the
rod so that your desired beater head(1) is facing your drum
head.
Floor Spike Finally, after tightening all other parts of the
drum pedal and the pedal is in the position where you need
it for your musical performance, tighten the bolts to anchor
the Floor Spikes(5) and stabilize your drum pedal(s),
preventing slippage.
Rod Ring Connector Use the Rod Ring Connector(8) to
change the depth/angle of your beater rod(2) by moving
the bolt to one of the three available predrilled holes. The
drum pedal default position has the bolt in the middle hole.
Chain Adjusting the chain(14) will affect the height of your
Foot Pedal(4) and may also be used to adjust the beater
rod(2) angle. (Note that the beater rod(2) angle may also be
adjusted independently of the chain.) Find the bolt at the
top of the chain guard. Remove the bolt and the chain
guard, and then move the chain until you find the angle you
desire. Replace the chain guard (17)and bolt and tighten.
Spring Tight Locknut To change the spring’s(9) tension,
adjust the Spring Tight Locknut(11) simultaneously with the
Spring Tight adjusting Nut(12). See (12) Spring Tight
adjusting Nut(12) for more information.
Please scan the QR Code below for the product
demonstration video. Or go to the URL shown here and find
the product video. www.Griffin-Stands.com/Videos
Connecting Rod First, attach the rod to each pedal. To
attach the Connecting Rod(7) to the left pedal, visually
inspect the Connecting Rod(7) and attachment point of
the pedal. You will notice a flat/straight area in the
circumference. Insert the Connecting Rod(7) using the flat
surfaces as a guide so that the Connecting Rod(7) easily
slides into the drum pedal connection. Use the included
drum key to tighten the flat-headed bolt. Repeat the
process to connect the drive shaft/Connecting Rod(7) to
the right drum pedal. Again, use the drum key to tighten
the flat-headed bolt connection point. Then, determine
the distance you desire between the two bass drum
pedals, and adjust the Connecting Rod(7) to the
appropriate length needed. Tighten the bolts on each side
of the drive shaft/Connecting Rod(7) to set the connection
rod length.
Spring Hook Loosen or tighten the spring locknuts and
spring adjustment nuts located on the bottom of each
spring(9). A tighter spring(9) will require greater effort
upon striking the drum pedal, but the resulting sound is
louder and the beater head(1) will return more quickly to
its starting position.
Spring Tight adjusting Nut Tightening this along with the
Spring Tight Locknut(11) will make the spring tension
greater, making the pedal feel heavier. The “heavier” the
pedal feels from tighter spring(9) tension means the
beater will return more quickly to its original position
although it also creates more resistance for the drummer.
Loosening the Spring Tight Locknut(11) and the Spring
Tight adjusting Nut(12) will make the spring looser.
Drummers with dual pedals need to pay special attention
to ensure their spring tension is even between the two
pedals. You want to ensure consistent playing by not
allowing one leg to become faster than the other leg.
(9) Spring Hook
(10) Spring
(11) Spring Tight Locknut
(12) Spring Tight adjusting Nut
(13) Bass Drum Clamp
(14) Chain
(15) Chain Drive Cam
(16) Beater rod Mount
(17) Chain Guard
Bass Drum Clamp Tighten the turn-knob bolt on the Bass
Drum Clamp(13) to connect the drum pedal to your bass
drum.
 Loading...