

Page 1
AirClickUSB Quick Start Manual
What Do I Need?
To use AirClickUSB, you‘ll need the following:
• A Macintosh running Mac OS X or
a PC running Windows XP
• An available USB port
• CD-ROM Drive
What Is All This Stuff?
AirClick USB features two key pieces: the Remote
Control and the Receiver Module. Let‘s take a look:
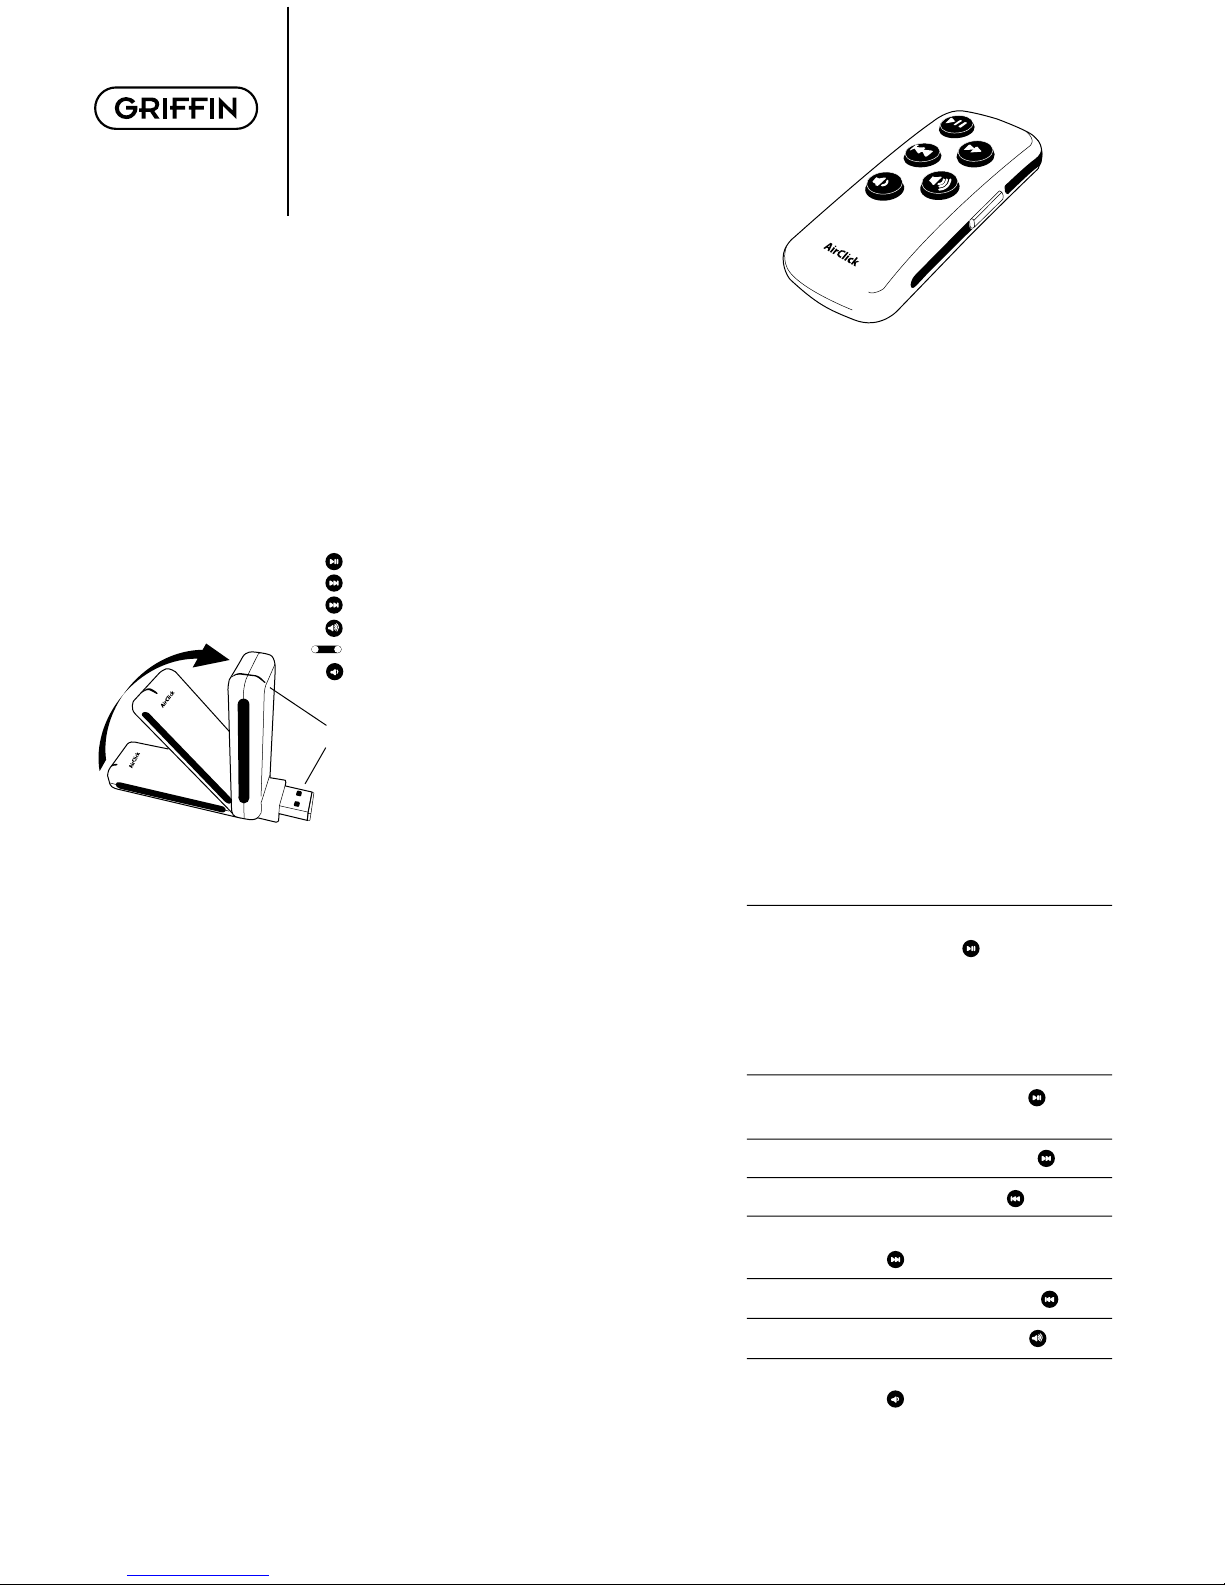
Remote Control
Play/Pause
Next/Fast Forward
Previous/Rewind
Volume Up
Hold Switch (Orange = Hold)
Volume Down
Receiver Module
• LED (illuminates when receiving a command)
• USB Plug (connect to your Mac or PC)
• Pairing Switch (Back of unit. See PAIRING)
Let‘s Install it.
Hardware Installation: Simply plug the Receiver
Module into any USB port on your Mac or PC.
Software Installation: AirClickUSB requires the
installation of a small software application on your
computer. Just follow the instructions for your type
of computer, below.
Mac: Insert the included CD into your Mac, and
double-click the AirClickUSB installer.
The AirClickUSB application will be installed
into your Applications folder.
Windows: Insert the included CD into your PC.
The AirClickUSB installer will launch automatically.
Follow the prompts to install the AirClick application.
Using AirClickUSB with iTunes – An Example
Select iTunes in the AirClickUSB Application
Mac: Double-Click the AirClickUSB icon in your
Applications folder to launch the AirClickUSB
software. Click the AirClickUSB icon that appears
in your menu bar to display the list of AirClick-
controllable applications. Select iTunes in this list
to choose it as the application you wish to control.
Windows: Right-Click the AirClickUSB icon that appears
in your System Tray to display the list of AirClickcontrollable applications. Select iTunes in this list to
choose it as the application you wish to control.
Open iTunes: Pressing any button on the Remote
Control will open iTunes.
Using AirClickUSB is as simple as using iTunes.
The buttons on the Remote Control are very
similar to the controls in iTunes.
Play a Song: If a song is paused, pressing the
Play/Pause ( ) Button will play
that song. Note : If no song has
been selected or is paused,
pressing the Play/Pause button
will cause iTunes to start playing all
of the music in the iTunes Library.
Pause a Song: Press the Play/ Pause (
while a song is playing.
Go to Next Song: Press the Fast For ward (
)Button
) Button.
How Do I Use It?
AirClickUSB works with a variety of popular
applications, such as iTunes, QuickTime Player, and
PowerPoint. We‘ll show you how to use AirClickUSB
by showing how it works with iTunes. Other applications will work in a similar manner, and you can fi nd a
full, up-to-date listing of all compatible applications
and their controls by visiting our Support website at:
http://www.griffi ntechnology.com/ support/airclick
Go to Previous Song: Press the Rewind ( ) Button.
Fast Forward Song: Press/Hold the Fast Forward
( ) Button.
Rewind Song: Press/Hold the Rewind ( )Button.
Increase Volume: Press the Volume Up ( ) Button.
Decrease Volume: Press the Volume Down
( ) Button.
Page 2

Pairing
By default, all AirClicks work on the same “channel.” If you
have more than one AirClick Remote within range of an
AirClick Receiver Module, the Receiver will happily take
commands from both Remotes. Since you probably don’t
want this to happen, you can tell the Receiver to accept
commands only from a specifi c AirClick Remote through
a process called Pairing. Use Pairing whenever more than
one AirClick Remote will be used in the same area.
Can I use this AirClick Remote with an AirClick for iPod?
Absolutely. The AirClick Remote can control Receiver
Modules for AirClick, AirClick mini, and AirClickUSB.
Can I use multiple AirClicks in the same room/house?
Yes, but you‘ll want to “Pair” the AirClicks to prevent
unwanted commands from being sent or received.
(See Pairing.)
Turn Pairing On:
• Press the Pairing Switch on the Receiver Module
by inserting a straightened paper clip or similar
device. The LED on the Receiver will light up
• Press any button on the Remote within
fi ve seconds
• The LED on the Receiver will fl ash rapidly for
one second, indicating that Pairing was
successful
You‘ll fi nd the pairing button on the back of your receiver.
Turn Pairing Off:
To reverse the process, allowing the Receiver Module
to once again be controlled by any Remote Control,
simply use a straightened paper clip or similar device
to press the Pairing Switch on the Receiver Module. DO
NOT press any buttons on the Remote Control. After fi ve
seconds, the LED on the Receiver will turn off, and it will
again respond to any AirClick Remote Control.
Frequently Asked Questions
My AirClickUSB doesn’t seem to be accepting commands.
What can I do? First, make sure you have the AirClickUSB
software installed. Next, make sure that the application
you want to control is selected in the AirClickUSB application (see How Do I Use It?). If you have the Receiver
Module plugged into a USB port on a keyboard or hub,
try plugging it into a built-in USB port on your
Mac or PC.
Will I need to replace the battery? With normal use, the
AirClick Remote’s battery should last for the life of the
product. Should the battery need to be replaced, open
the Remote Control unit by removing the three
small screws, and replace with a CR2032-type
battery or equivalent.
Remote Control Technical Specifi cations
• Transmission: R adio Frequency
• Frequency: 433.92MHz
• Operating Range: Up to 60ft
• Battery: CR2032 3V
• Dimensions: 2.75"x 1.25" x 0.5"
(0.75” max depth including belt clip)
• Weight (including battery): 0.8 oz
FCC COMPLIANCE: This device complies with part 15
of the FCC rules. Operation is subject to the following
two conditions: (1) this device may not cause harmful
interference, and (2) this device must accept any interference received, including interference that may cause
undesired operation. CAUTION: Changes or modifi cations not expressly approved by the party responsible
for compliance could void the user’s authority to operate
the equipment.
WARRANTY: Griffi n Technology offers a one year limited
warranty on all products sold. We warrant our retail
hardware products to be free of defects in materials and
workmanship that result in failure during normal usage.
This warranty extends to the original end-user purchaser
from the time of retail purchase. The limited warranty
does not cover misuse, unauthorized modifi cations, and
external causes, such as acts of nature. This limited warranty is the sole and exclusive remedy and is in lieu of
all other warranties, expressed or implied. Griffi n will not
be liable for any indirect, incidental, or punitive damages
arising from use of this product.
Questions?
http://www.griffi ntechnology.com/support/
615-399-7000 (M-F 9-6 CST)
©2005 Griffi n Technology • www.griffi ntechnology.com • Patents Pending • Made in China
 Loading...