

Page 1

Contents
Welcome
1-2
In the Box
3-8
Set Up
Connecting Evolve to your Home Media Center
Evolve to Go
Specifications
Troubleshooting
9-24
25-32
33-34
35-40
41-46
Safety Information
Warranty Information
47-52
53-59
Warranty Registration
60-61
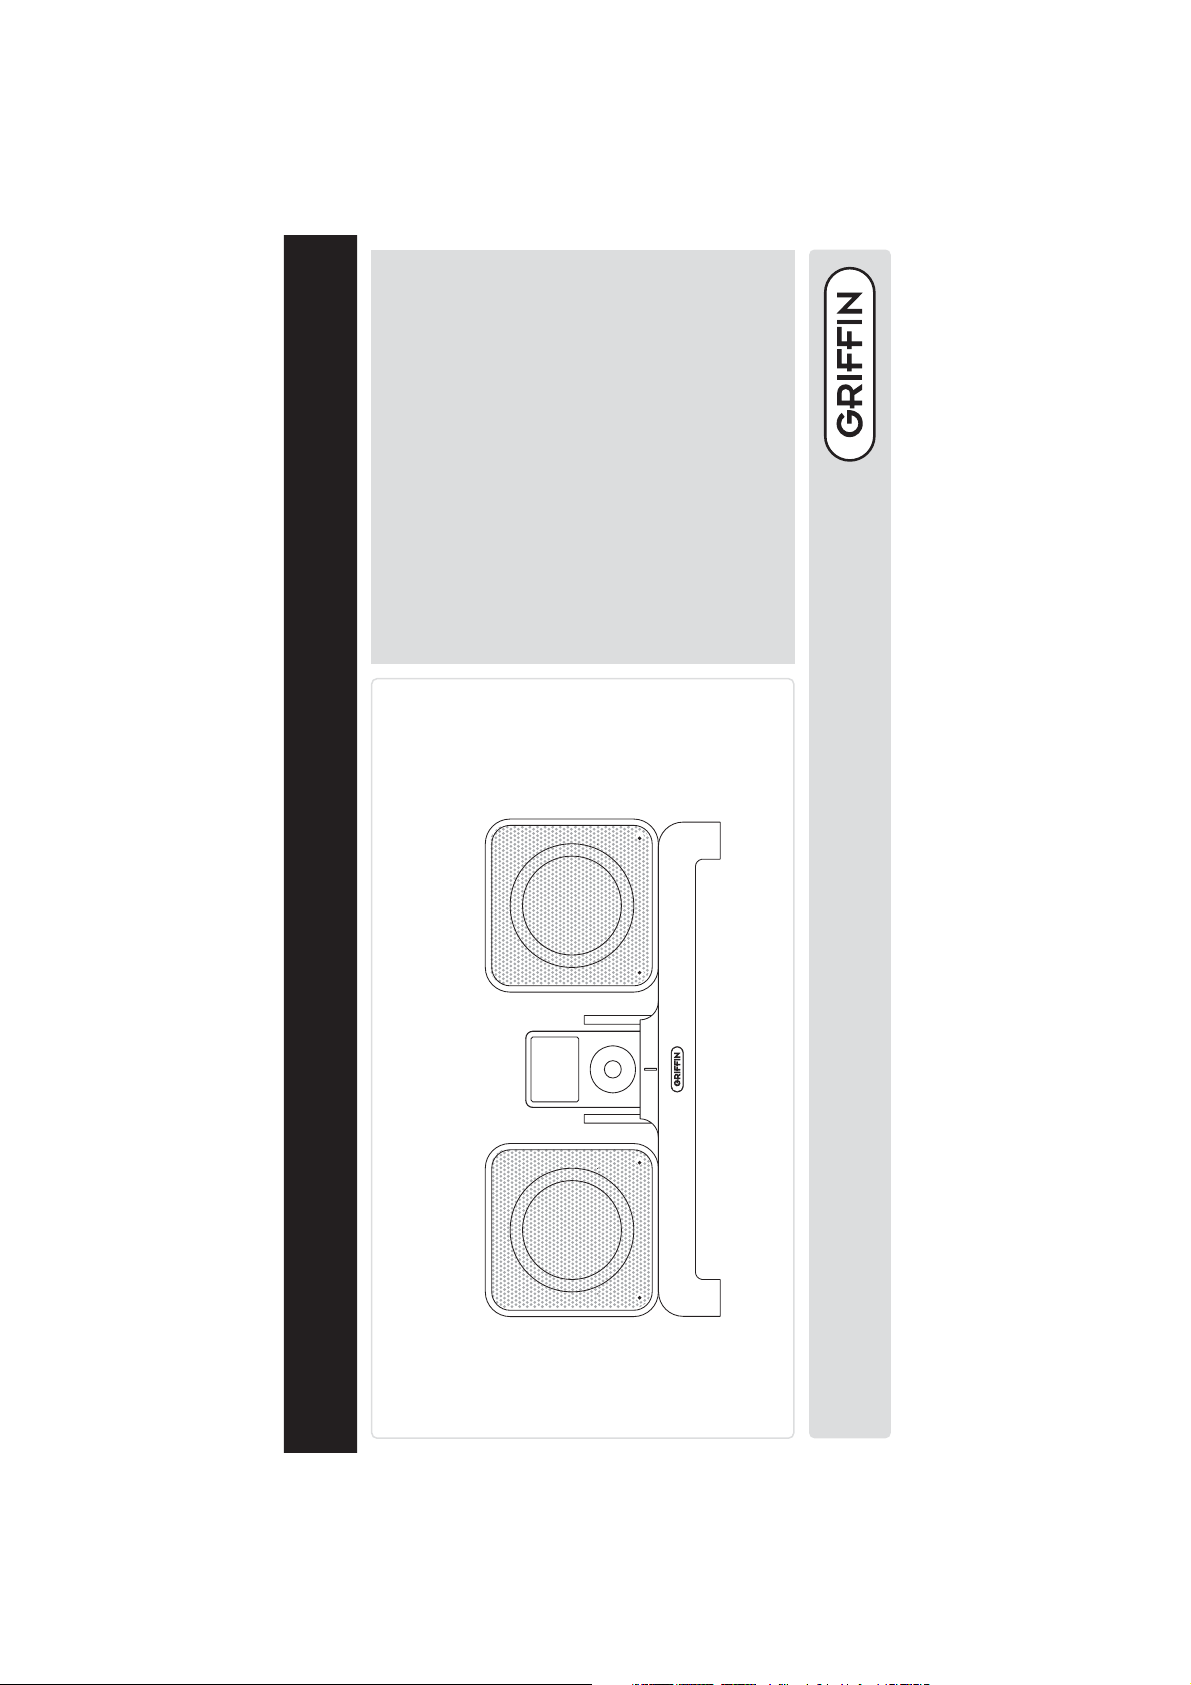
Page 2
1
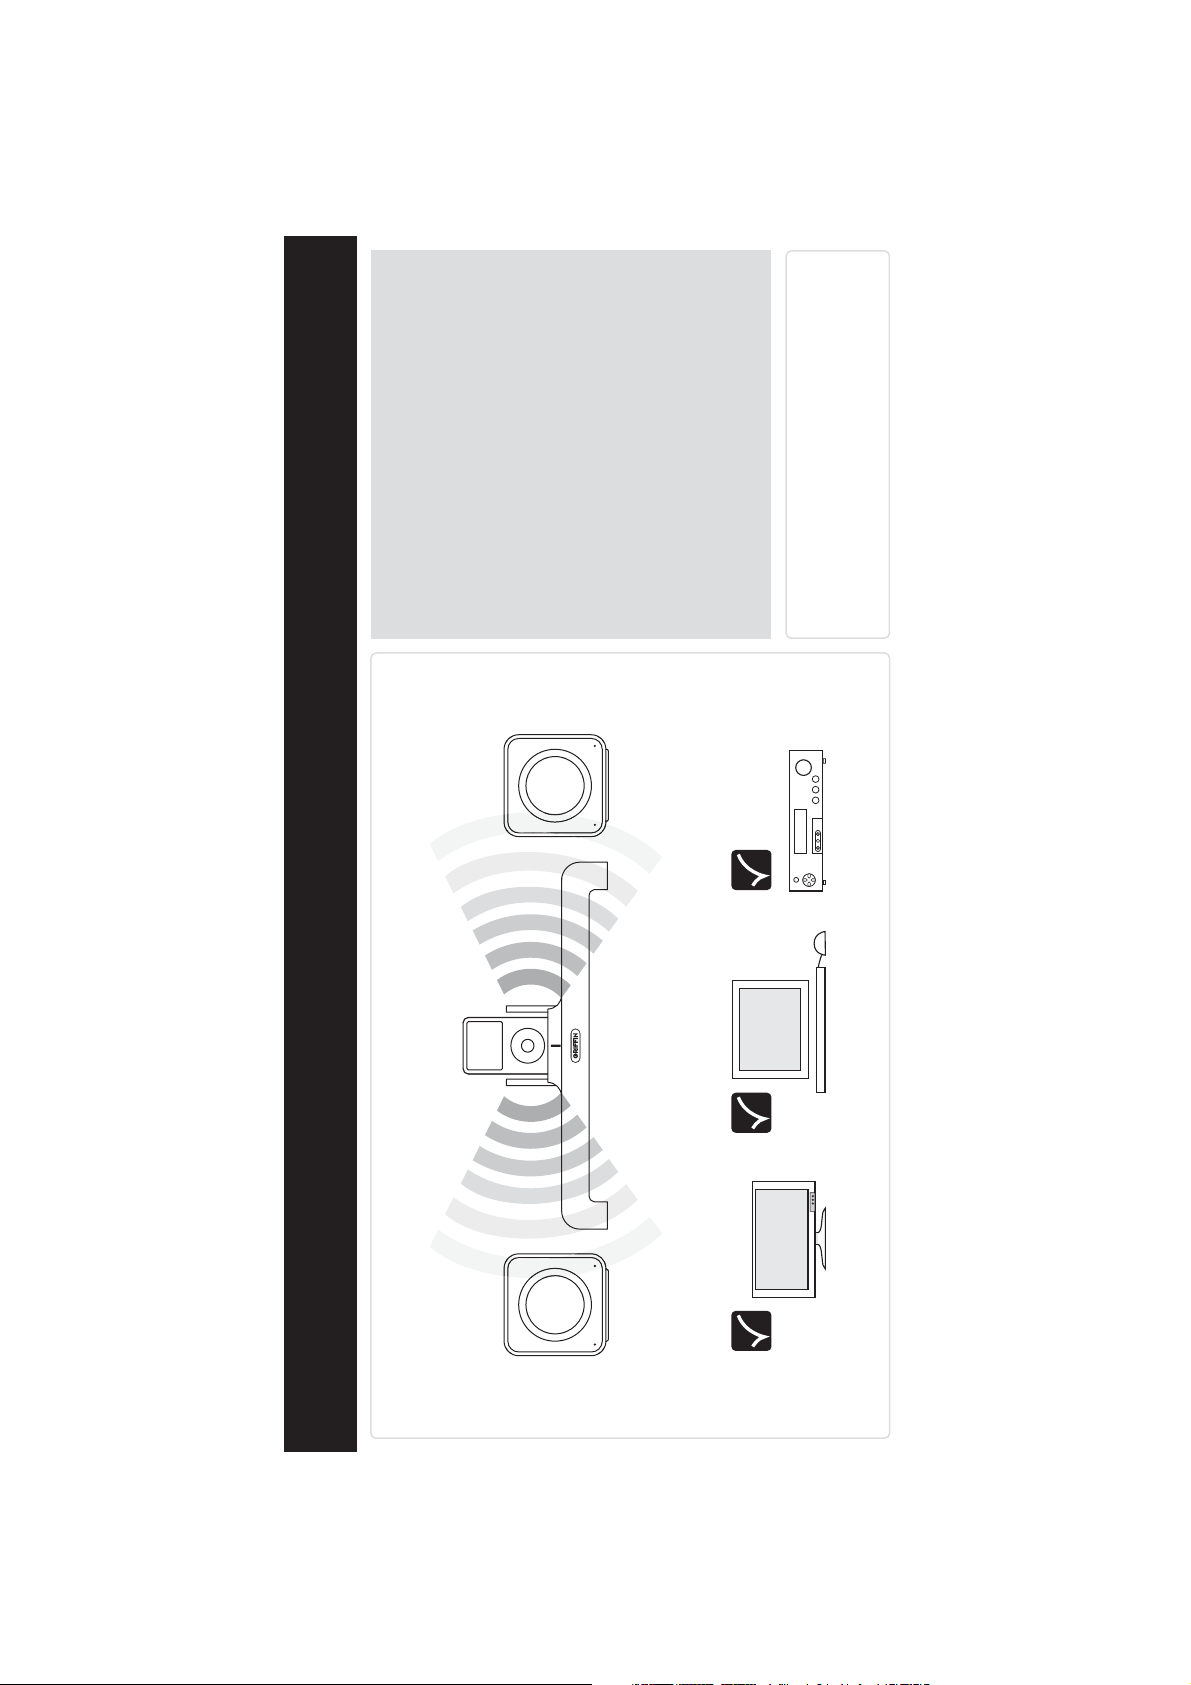
It’s time to cut the cord…
your home stereo has evolved.
wireless sound system.
™
Welcome to the no-wires freedom of
Evolve uses wireless digital transmission
the Evolve
to play your music wherever you want it.
Rechargeable wireless speakers move
from porch to kitchen, media room to
patio effortlessly.
Your iPod is ready. Your music is waiting.
It’s time to Evolve.
Welcome
Page 3

2
Es hora de cortar
È ora di eliminare i fili…
el cable… el equipo
estéreo para el hogar
ha evolucionado.
il vostro impianto stereo
si è evoluto.
Benvenuti nella libertà
Bienvenido a la libertad sin
senza fili dell'impianto
cables del sistema de
.
™
stereo Evolve
™
.
sonido inalámbrico Evolve
Evolve emplea una
Grazie a un sistema di
trasmissione digitale
transmisión digital
senza fili, Evolve vi consente
inalámbrica para reproducir
di riprodurre ovunque la
la música donde desee.
Los altavoces inalámbricos
recargables pueden
vostra musica.
Gli altoparlanti ricaricabili
senza fili possono essere
trasladarse fácilmente del
salón a la cocina o del
estudio a la terraza.
Su iPod está preparado.
spostati dalla veranda alla
cucina, dal soggiorno
multimediale al patio,
senza alcuno sforzo.
Su música está esperando.
Il vostro iPod è pronto,
Es hora de evolucionar.
la musica attende.
È il momento di Evolve.
Soundsystems.
™
Ab sofort sind Kabel
überflüssig… Ihre Stereoanlage
hat sich weiterentwickelt.
Genießen Sie die
kabellose Freiheit des
Evolve
.
™
Il est temps de couper le
cordon... votre chaîne
stéréo a évolué.
Bienvenue dans le monde
de liberté du système
audio sans fil Evolve
Het is de hoogste tijd om
de kabel door te knippen…
uw thuisstereo is
geëvolueerd.
Welkom bij de kabelloze
vrijheid van het draadloze
Mithilfe der digitalen
Funkübertragung von
Evolve können Sie überall
Evolve utilise la transmission
numérique sans fil pour
vous permettre d’écouter
.
™
geluidssysteem van Evolve
Evolve maakt gebruik van
draadloze digitale transmissie
Musik hören, wo Sie wollen.
Die wiederaufladbaren
Funklautsprecher sind
votre musique là où vous
le souhaitez.
Ses haut-parleurs sans
om uw muziek af te spelen
waar u dat ook wilt.
De oplaadbare draadloze
tragbar und können problemlos
im Wohnzimmer, in der Küche,
im Arbeitszimmer oder auf
der Terrasse genutzt werden.
Ihr iPod ist einsatzbereit.
fil rechargeables se
transportent sans effort
d’une pièce à l’autre de
la maison.
Votre iPod est prêt. Votre
luidsprekers gaan probleem-
loos mee van de veranda
naar de keuken en van de
mediaruimte naar het terras.
Uw iPod is er klaar voor.
Ihre Musik wartet auf Sie.
Zeit für Evolve!
musique est en attente.
Il est temps d’évoluer.
Uw muziek wacht op uw teken.
Het is tijd voor Evolve.
Page 4
3
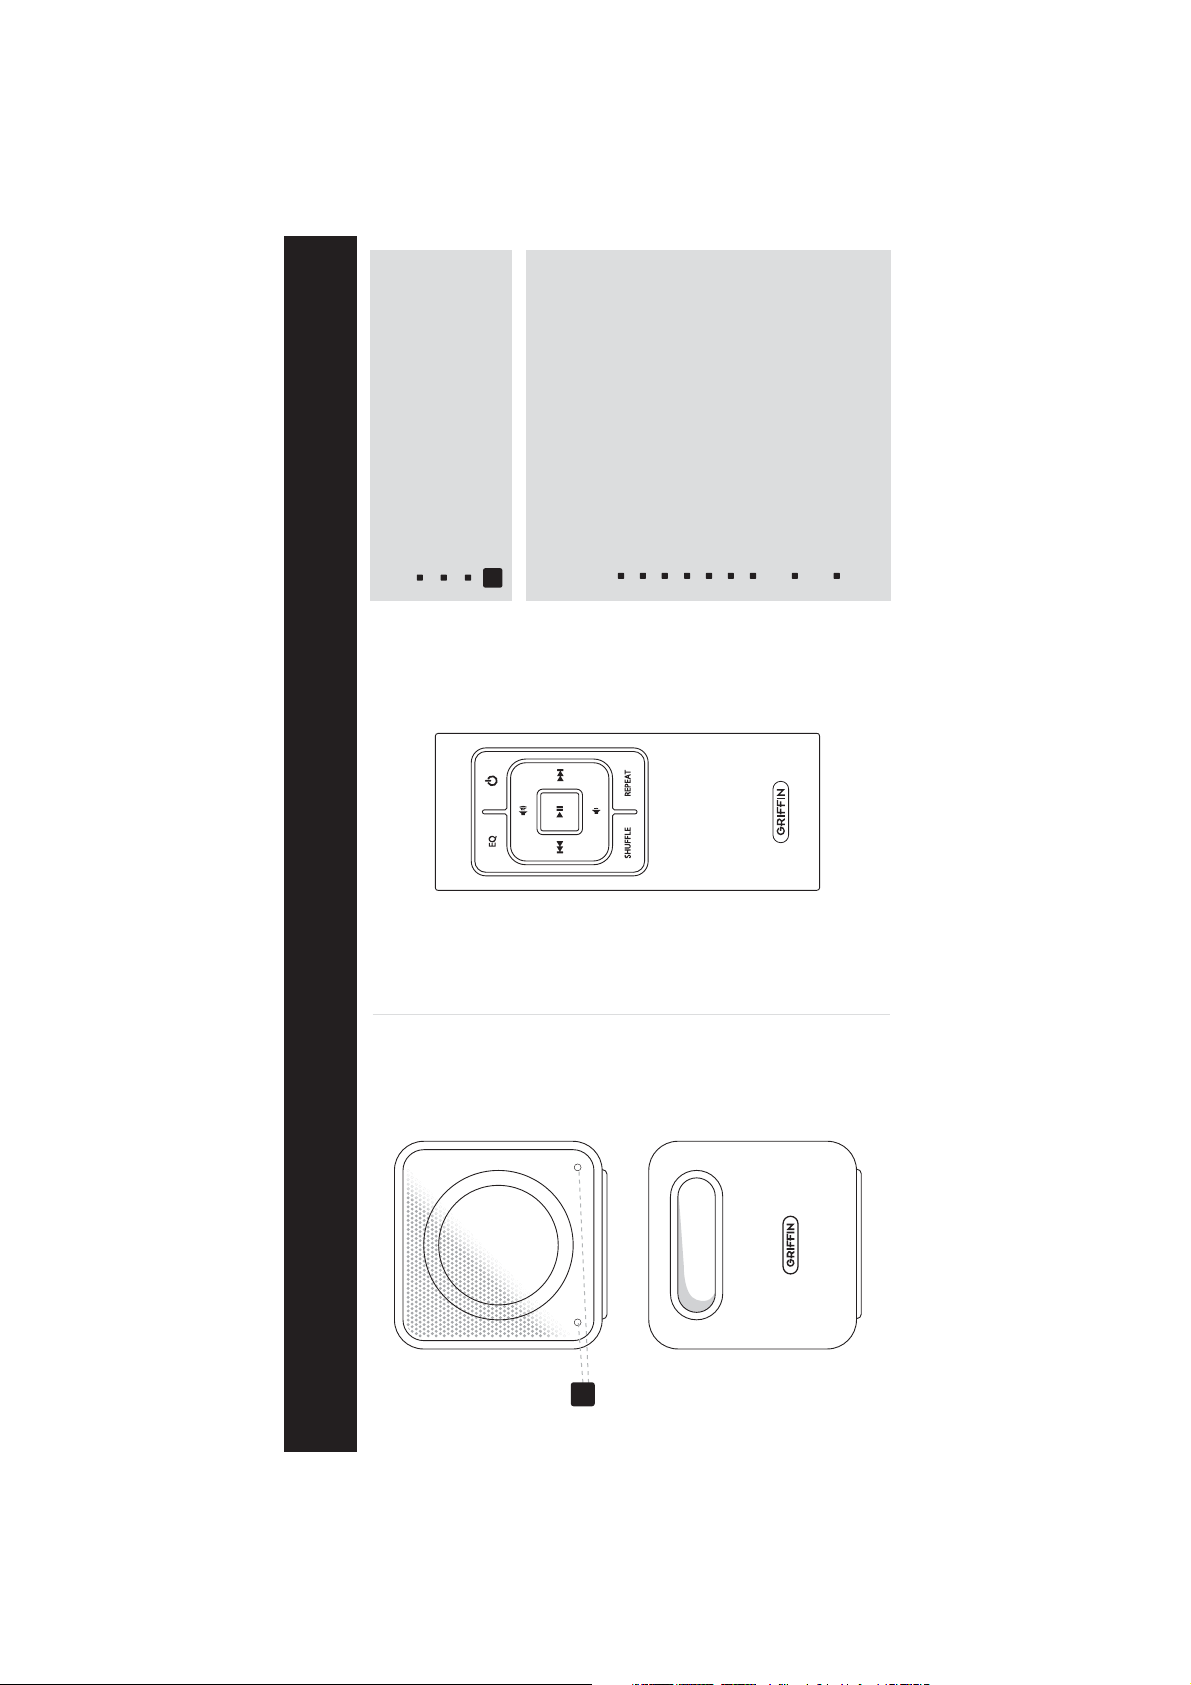
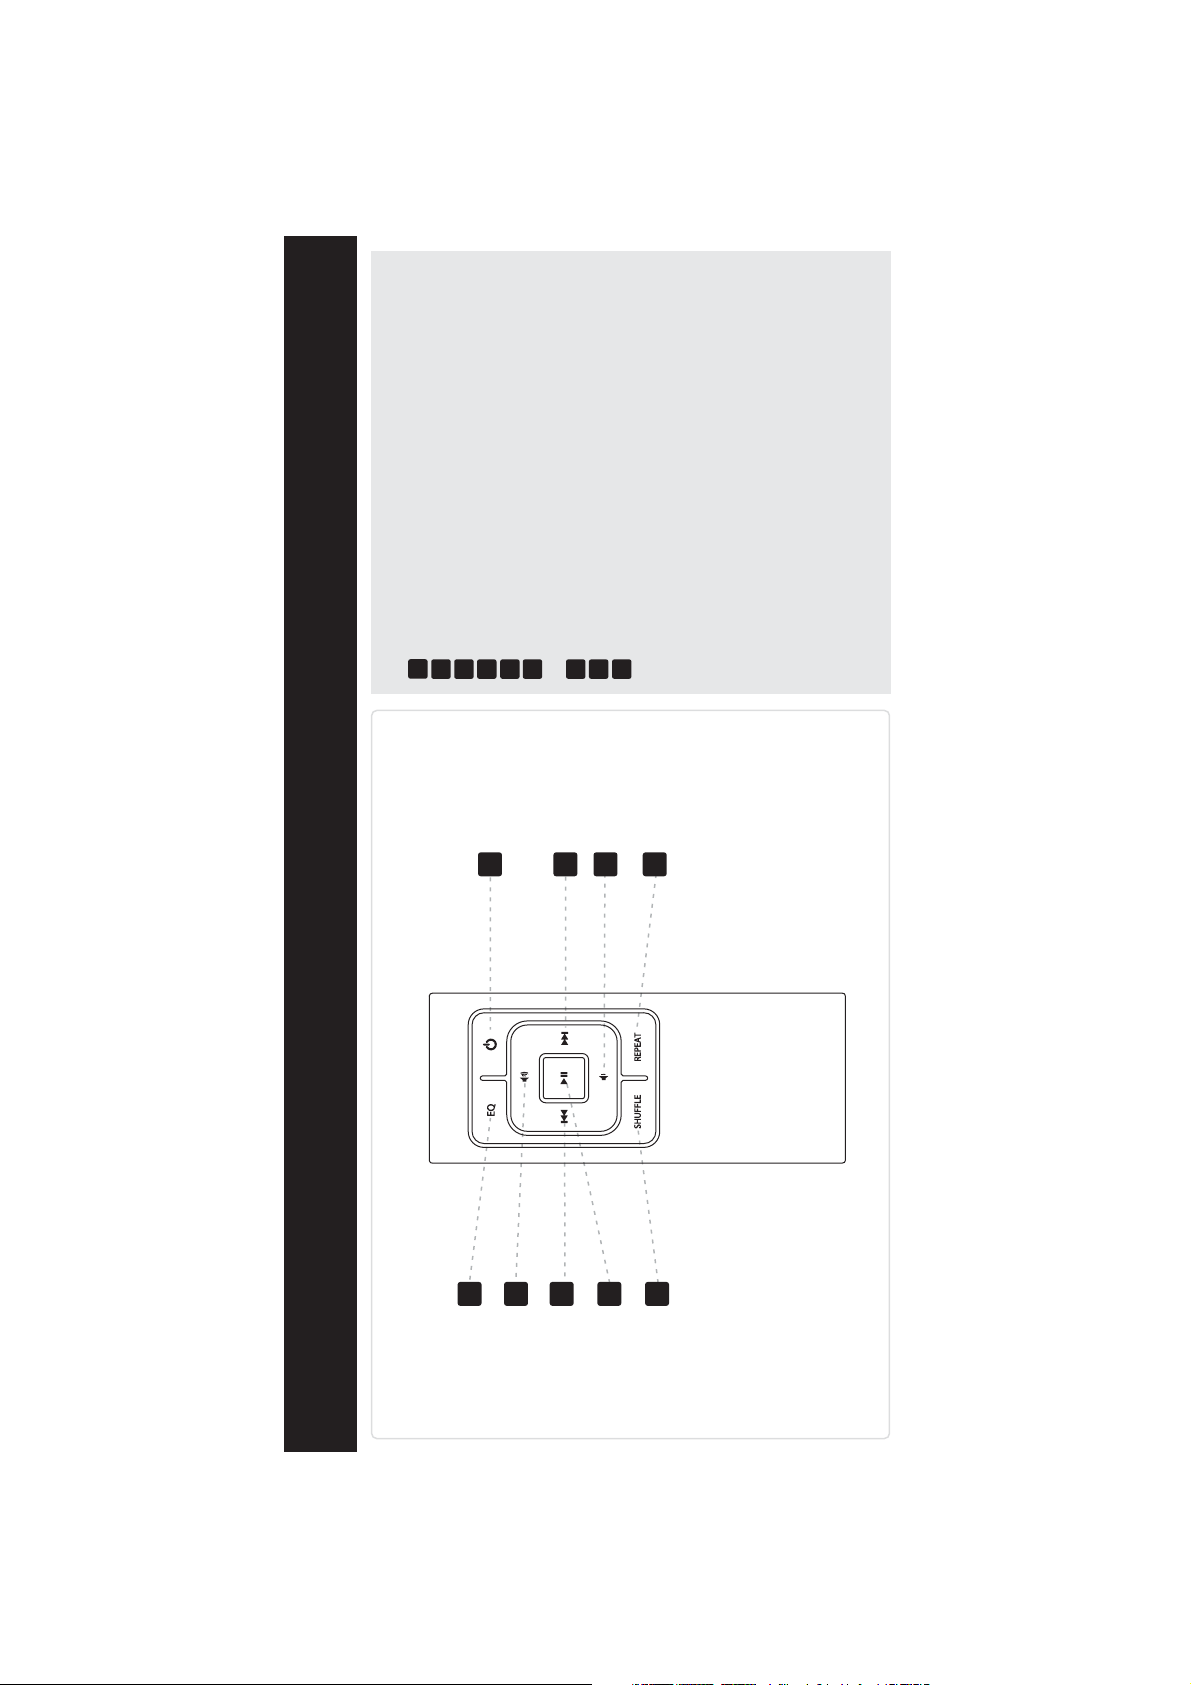
Wireless Remote
150’ range
Commands
Play/Pause
Volume Up
Volume Down
Next Track/Fast Forward
Previous Track/Fast Rewind
Shuffle Songs, Albums, Off (iPod Only)
Repeat One Song, All Songs,
Off (iPod Only)
EQ – Press to cycle through
iPod equalizer settings
System Power – Press once to
2 Wireless Speakers
4-inch driver
1
High-efficiency lithium-ion battery
Digital receiver
Lit LED indicates Left or Right channel
power on, again to power off
FRONT
BACK
1
In the Box
Page 5

4
2 altavoces inalámbricos
Cono de 4 pulgadas
Batería de iones de litio
de alta eficacia
Receptor digital
2 altoparlanti senza fili
Cono da 10 cm
Batteria agli ioni di litio ad
alto rendimento
Ricevitore digitale
Mando a distancia
1
Indicador luminoso de
1
LED luminoso che indica il
inalámbrico
canal izquierdo o derecho
Telecomando senza fili
Raggio di azione di 45,7 m
canale destro o sinistro
Alcance de 45,7 metros
Comandos
Comandi
Riproduzione/Pausa
Reproducción / Pausa
Subir volumen
Aumento volume
Riduzione volume
Bajar volumen
Pista siguiente / Avance rápido
Pista anterior / Rebobinado
Traccia successiva/
Avanzamento rapido
Traccia precedente/
Reproducción aleatoria:
canciones / álbumes /
desactivado (sólo iPod)
Repetir: una canción / todas
las canciones / desactivado
Riavvolgimento rapido
Brani Shuffle, album,
disattivazione (solo per iPod)
Ripetizione di un brano, di tutti
i brani, disattivazione
(sólo iPod)
Ecualizador: pulse para
desplazarse entre los ajustes
de ecualización del iPod
Alimentación: pulse una vez
(solo per iPod)
EQ: per visualizzare in sequenza
le impostazioni di equalizzazione
dell'iPod
Accensione del sistema:
para encenderlo y pulse
de nuevo para apagarlo
premete una volta per accendere,
una seconda volta per spegnere
2 Funklautsprecher
4 Zoll-Treiber
Moteur de 10,16 cm
2 haut-parleurs sans fil
2 draadloze luidsprekers
4" aandrijving
Hochleistungsfähige
Lithium-Ionen-Batterie
Digitalreceiver
Batterie de longue durée
au lithium-ion
Récepteur numérique
Zeer efficiënte lithium-
ionbatterij
Digitale ontvanger
Kabellose Fernbedienung
45,7 m Reichweite
Befehle
1
LED-Anzeige für linken
oder rechten Kanal
Télécommande sans fil
1
Voyant lumineux indiquant
le canal gauche ou droit
Draadloze
1
Opgelichte LED geeft het
linker- of rechterkanaal aan
Abspielen / Anhalten
Portée de 45,7 m
Commandes
Lecture/Pause
afstandsbediening
Bereik van 45,7 m
Bedieningselementen
Lautstärke +
Lautstärke -
Augmentation du volume
Diminution du volume
Piste suivante/Avance rapide
Afspelen / Pauzeren
Volume hoger
Volume lager
Nächster Titel /
Schneller Vorlauf
Letzter Titel /
Schneller Rücklauf
Piste précédente/Retour rapide
Lecture aléatoire des
morceaux, des albums, arrêt
(iPod uniquement)
Volgend nummer /
Snel vooruitspoelen
Vorig nummer /
Snel terugspoelen
Zufällige Wiedergabe: Musiktitel /
Alben / Aus (nur iPod)
Répétition d’un morceau,
de tous les morceaux, arrêt
Schakelen tussen Nummers,
Erneut abspielen: ein Lied /
alle Lieder / Aus (nur iPod)
EQ: Mit dieser Taste können
Sie die Equalizereinstellungen
(iPod uniquement)
Égalisation (EQ) – Appuyez sur
le bouton pour faire défiler les
Albums en Uit (alleen iPod)
Eén nummer herhalen, Alle
nummers herhalen, Uit
(alleen iPod)
für den iPod vornehmen
Ein/Ausschaltknopf: Durch
einmaliges Betätigen schalten
Sie das Gerät ein, durch nochmaliges
réglages d’égalisation prédéfinis
de votre iPod
Système d’alimentation –
Appuyez une fois pour allumer
l’appareil et appuyez à nouveau
EQ - Indrukken om door de
equalizerinstellingen te navigeren
Systeemvoeding - Druk eenmaal
om in te schakelen en opnieuw
Betätigen schalten Sie es aus
pour l’éteindre
om uit te schakelen
Page 6
5
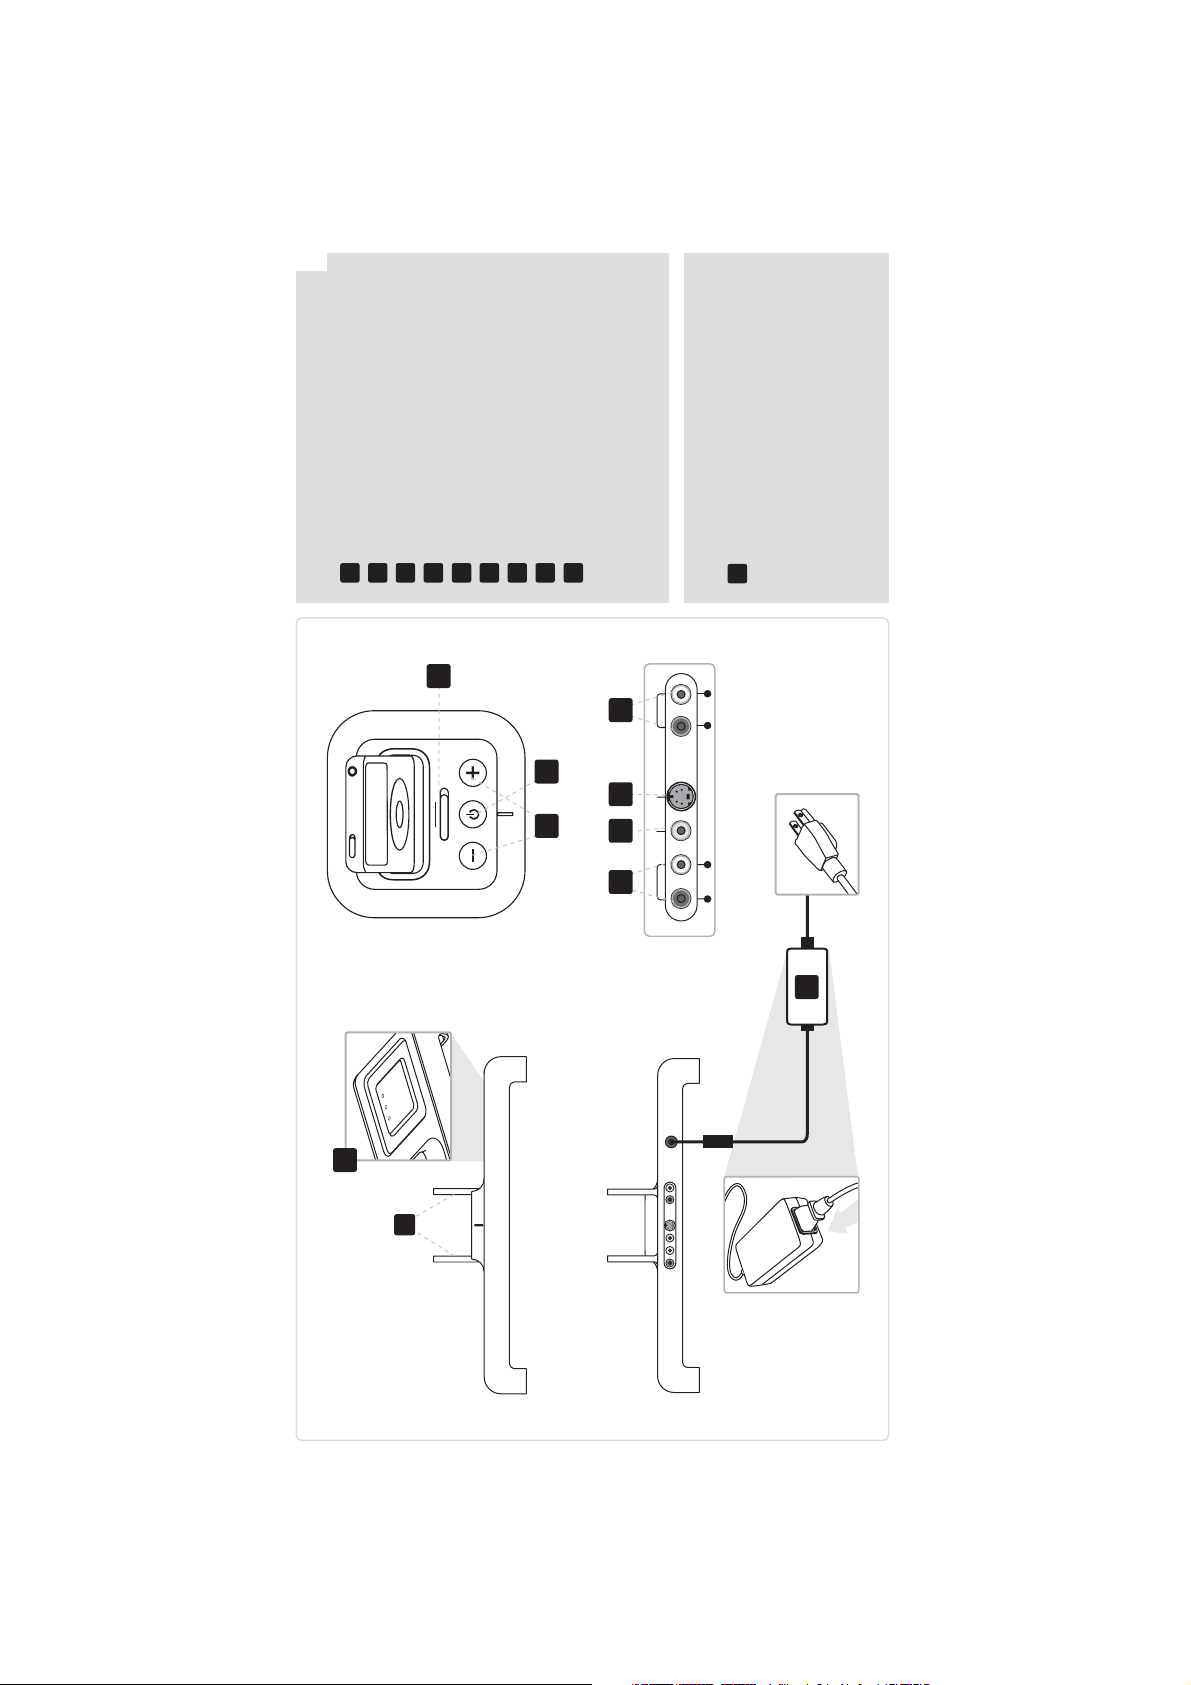
1
Base Unit
Dual Antennas
2
Charging Pads
3
4
5
6
7
8
Base Unit Volume Control
System Power Button
Stereo/Mono Switch
Audio Out (Right/Left)
9
iPod Composite Video Out
iPod S-Video Out
Auxiliary Audio In (Right/Left)
10
Power Supply
2-piece country-specific
cord and power adapter
5
L
R
4
STEREO
MONO
3
876 9
Video Out S-Video Audio In
L
Audio Out
R
RED WHITE WHITEREDYELLOW
10
2
1
FRONT
BACK
Page 7

6
Unidad base
Base
1
Antenas duales
1
Doppia antenna
2
Soportes de recarga
2
Piastrine di ricarica
3
Control de volumen
3
Controllo del volume
4
Botón de encendido
y apagado
4
Pulsante di accensione
del sistema
5
Conmutador estéreo / mono
5
Interruttore modalità
de la unidad base
della base
6
7
Salida de audio
(derecha / izquierda)
Salida de vídeo
6
stereo/mono
Uscita audio
(destro/sinistro)
8
compuesto del iPod
Salida de S-Vídeo del iPod
7
8
Uscita video composito iPod
Uscita S-Video iPod
9
Entrada de audio auxiliar
9
Ingresso audio
(derecha / izquierda)
supplementare
(destro/sinistro)
Alimentación de corriente
Alimentazione
Cable de 2 piezas
10
específico para cada
país y adaptador
10
Cavo in due parti con
spina nazionale e
adattatore di corrente
de corriente
1
2
Basiseinheit
Dual-Antennen
Ladeständer
1
2
Base
Antennes doubles
Connecteurs de charge
1
2
Basiseenheid
Dubbele antenne
Oplaadblokken
3
Lautstärkeregelung
Basiseinheit
3
Contrôle du volume
de la base
3
Volumeregeling
basiseenheid
4
5
6
Ein/Ausschaltknopf
Stereo/Mono-Schalter
Audioausgang (rechts / links)
4
5
Bouton d’alimentation
du système
Commutateur Stéréo/Mono
4
5
6
Systeemvoedingsknop
Schakelaar stereo/mono
Audio-uitgang (rechts/links)
7
8
Composite-Videoausgang
für den iPod
S-Videoausgang für
6
7
Sortie audio
(canal droit/gauche)
Sortie vidéo composite iPod
7
8
iPod Composiet
video-uitgang
iPod S-Video-uitgang
9
den iPod
Zusätzlicher Audioeingang
8
9
Sortie S-Vidéo iPod
Entrée audio auxiliaire
9
Hulpingang audio
(rechts/links)
(rechts / links)
(canal droit/gauche)
Voeding
10
Netzteil
Zweiteiliges
länderspezifisches
10
Alimentation électrique
Câble et adaptateur
secteur adaptés au pays
10
2-delige landspecifieke
kabel en voedingsadapter
Kabel und Netzadapter
Page 8
7
20 GB
20 GB
20 GB
30 GB
40 GB
6
20 GB
iPod with
iPod photo
Color Display
iPod with
Click Wheel
iPod with
Click Wheel
4th Generation
4th Generation
4th Generation
6
2 GB
4 GB
8 GB
iPod nano
2nd Generation
60 GB
30 GB
1 GB
80 GB
2 GB
4 GB
5th Generation
iPod with video
5th Generation
iPod with video
1st Generation
iPod nano
8 9 10 11
6
4 GB
6 GB
iPod mini
1st/2nd Generation
345
Adapter Compatibility
Nine dock adapters are included to custom fit your iPod to Evolve’s dock. Use the chart below to choose the right adapter for your iPod. The nine
dock adapter inserts included (numbered 3 - 11) follow Apple, Inc.'s numbering system, and will ensure a proper fit for your supported iPod model.
In the Box
Dock Adapters
iPod mini – 4GB & 6GB
6
4G iPod & U2 iPod – 20GB
4G iPod – 40GB
iPod Photo and
Color U2 iPod – 20GB & 30GB
40 GB
60 GB
3 4 5
60 GB
iPod photo
7
8
iPod with Color Display – 20GB
iPod Photo – 40GB & 60GB
9
iPod with Color Display – 60GB
iPod nano – 1GB, 2GB, & 4GB
5G iPod and
U2 iPod with Video – 30GB
7
4th Generation
iPod with
Color Display
11
10
5G iPod with Video – 60GB & 80GB
2G iPod nano – 2GB, 4GB, 8GB
Page 9

8
Adaptadores dock
Se incluyen 9 adaptadores dock
para acoplar el iPod al dock de
Evolve. Utilice la tabla siguiente
para elegir el adaptador adecuado
Adattatori dock
Sono compresi nove adattatori dock
che consentono di inserire nel dock
di Evolve qualunque modello di iPod.
Utilizzate l'illustrazione in alto per
a su iPod. Los 9 adaptadores
dock incluidos (numerados del
3 al 11 según el sistema de
numeración de Apple Inc.)
scegliere l'adattatore maggiormente
adatto per il vostro iPod. I nove
adattatori dock inclusi (dall'illustrazione
3 all'illustrazione 11) seguono il
3
4
5
6
7
8
Compatibilidad del adaptador
iPod mini: 4 GB y 6 GB
iPod de 4ª generación
y iPod U2: 20 GB
iPod de 4ª generación: 40 GB
iPod photo y iPod U2 Color:
20 GB y 30 GB iPod con
pantalla en color: 20 GB
aseguran un ajuste perfecto
para su modelo compatible
de iPod.
iPod di quarta generazione
da 40 GB
3
4
sistema di numerazione di Apple,
Inc. e garantiscono il corretto
Compatibilità degli adattatori
inserimento del modello
di iPod supportato.
5
iPod mini da 4 GB e 6 GB
iPod di quarta generazione
e iPod U2 da 20 GB
iPod photo: 40 GB y 60 GB
iPod con display a colori da 20 GB
6
iPod photo e iPod U2 a colori
da 20 GB e 30 GB
9
iPod con pantalla en color: 60 GB
iPod nano: 1 GB, 2 GB y 4 GB
iPod de 5ª generación y
iPod U2 con vídeo: 30 GB
iPod nano da 1 GB, 2 GB e 4 GB
7
8
iPod photo da 40 GB e 60 GB
9
iPod con display a colori da 60 GB
iPod di quinta generazione
11
10
iPod de 5ª generación con
vídeo: 60 GB y 80 GB
iPod nano de 2ª generación:
2 GB, 4 GB y 8 GB
generazione da 2 GB, 4 GB e 8 GB
11
10
e iPod U2 con video da 30 GB
iPod di quinta generazione con
video da 60 GB e 80 GB
iPod nano di seconda
Dock-Adapter
Es werden 9 Dock-Adapter zum
Anschluss Ihres iPod an den Evolve
Dock mitgeliefert. Bitte entnehmen
Sie aus der unten stehenden
Adaptateurs Dock
Neuf adaptateurs Dock sont inclus
pour vous permettre d’adapter
votre iPod au Dock d’Evolve. Utilisez
le tableau ci-dessus pour choisir
Dock-adapters
Er zijn negen dock-adapters
bijgeleverd om uw iPod aan te
passen aan het dock van de Evolve.
Gebruik de onderstaande tabel
Tabelle, welcher Adapter für Ihren
iPod geeignet ist. Mithilfe der 9
mitgelieferten Dock-Adaptereinsätze
(nach dem Nummerierungsystem
l’adaptateur adéquat pour votre
iPod. Les neuf adaptateurs Dock
fournis (numérotés de 3 à 11 suivant
le système de numérotation d’Apple,
om de juiste adapter voor uw iPod
te kiezen. De negen voorziene
dock-adaptersleuven (genummerd
van 3 tot 11) volgen het nummer-
von Apple, Inc. durchnummeriert
von 3 – 11) können Sie Ihr kompatibles
iPod-Modell korrekt anschließen.
Inc.) vous garantissent la
compatibilité avec votre modèle d’iPod.
systeem van Apple, Inc. en
garanderen een geschikte
aanpassing voor uw ondersteund
iPod-model.
3
4
Adapter-Kompatibilität
iPod mini: 4GB und 6GB
iPod 4. Generation und
345
Compatibilité des adaptateurs
iPod mini – 4 Go et 6 Go
iPod 4G et iPod U2 – 20 Go
345
iPod mini – 4GB & 6GB
Adaptercompatibiliteit
4G iPod & U2 iPod – 20GB
iPod Photo und U2 iPod Color:
5
6
U2 iPod: 20GB
iPod 4. Generation: 40GB
20GB und 30GB
6
iPod 4G – 40 Go
iPod Photo et iPod Color U2 –
20 Go et 30 Go, iPod avec écran
couleur – 20 Go
iPod Photo en iPod met kleurendis-
6
4G iPod – 40GB
play U2 iPod – 20GB & 30GB iPod
met kleurendisplay – 20GB
7
8
iPod mit Farbdisplay: 20 GB
iPod Photo: 40GB und 60GB
7
iPod Photo – 40 Go et 60 Go
iPod avec écran couleur – 60 Go
7
iPod Photo – 40GB & 60GB iPod
met kleurendisplay – 60GB
9
iPod mit Farbdisplay: 60 GB
iPod nano: 1GB, 2GB und 4GB
iPod 5. Generation und U2
iPod mit Video: 30GB
8
9
iPod nano – 1 Go, 2 Go et 4 Go
iPod 5G et iPod U2 avec
vidéo – 30 Go
8
9
iPod nano – 1GB, 2GB, & 4GB
5G iPod en U2 iPod
met video – 30GB
iPod nano 2. Generation:
11
10
iPod 5. Generation mit Video:
60GB und 80GB
2GB, 4GB und 8GB
11
10
60 Go et 80 Go
iPod 5G avec vidéo –
iPod nano 2G – 2 Go, 4 Go, 8Go
11
10
5G iPod met video
60GB & 80GB
2G iPod nano – 2GB, 4GB, 8GB
Page 10
9
Evolve makes it easy to play your
music just about anywhere. Evolve
sends digital signals from its Base
Unit to the speakers, so you can
put your speakers wherever you
want the music, without wires.
Evolve’s speakers are magnetically
shielded and can be safely used near
television sets, computer monitors,
radios and other electronics.
NOW LET’S GET YOUR
EVOLVE SYSTEM SET UP
AND PLAYING MUSIC.
Set-up
88.1
Page 11

10
Evolve facilita la repro-
ducción de música en
cualquier lugar. Evolve envía
señales digitales de la
unidad base a los altavoces
para que pueda colocar los
altavoces donde desee
escuchar música, sin cables.
Los altavoces de Evolve
tienen protección magnética
y pueden utilizarse sin
peligro cerca de televisores,
monitores de ordenador,
radios y otros aparatos
electrónicos.
AHORA YA PODEMOS
CONFIGURAR EL
SISTEMA EVOLVE Y
REPRODUCIR MÚSICA
.
Evolve consente di ascoltare
la vostra musica preferita
ovunque, senza difficoltà.
Evolve invia segnali digitali
dalla base agli altoparlanti,
in modo che possiate
collocare gli altoparlanti
ovunque desideriate
ascoltare musica, senza
bisogno di fili.
Gli altoparlanti di Evolve
sono schermati magneti-
camente e possono essere
sistemati in tutta sicurezza
in prossimità di televisori,
monitor di computer, radio
e altri dispositivi elettronici.
E ORA PROCEDIAMO
CON L'IMPOSTAZIONE
E L'UTILIZZO
DELL'IMPIANTO
STEREO EVOLVE
Mit Evolve können Sie überall
Musik hören. Evolve sendet
digitale Signale von der
Basiseinheit zu den
Lautsprechern. So können
Evolve vous permet
d’écouter facilement votre
musique où que vous soyez.
Evolve envoie des signaux
numériques aux haut-
Evolve maakt het u gemak-
kelijk om uw muziek
nagenoeg overal af te spelen.
Evolve zendt digitale signalen
uit vanaf zijn basiseenheid
Sie Ihre Lautsprecher immer
genau dort aufstellen, wo
Sie gerade Musik hören
möchten - ohne Kabel.
parleurs depuis sa base,
ce qui vous permet de placer
vos haut-parleurs là où bon
vous semble sans
naar de luidsprekers, zodat
u uw luidsprekers overal
kunt plaatsen waar u de
muziek kunt horen, draadloos.
Die Evolve-Lautsprecher sind
magnetisch abgeschirmt und
können problemlos in der
Nähe von Fernsehgeräten,
Computerbildschirmen,
utiliser de câbles.
Les haut-parleurs Evolve
sont magnétiquement
blindés et peuvent être
utilisés sans risque près
De luidsprekers van
de Evolve zijn magnetisch
beschermd en kunnen
veilig worden gebruikt in
de buurt van televisietoe-
Radios und anderen
des téléviseurs, des écrans
stellen, computermonitors,
elektronischen Geräten
verwendet werden.
d'ordinateur, des radios et
autres appareils électroniques.
radio's en andere
elektronische apparatuur.
KONFIGURIEREN SIE
JETZT IHR EVOLVE
SOUNDSYSTEM, UM
MUSIK ZU HÖREN.
COMMENT CONFIGURER
VOTRE SYSTÈME EVOLVE
ET ÉCOUTER VOTRE
MUSIQUE
LATEN WE NU UW
EVOLVE-SYSTEEM
INSTELLEN EN
MUZIEK AFSPELEN
Page 12

11
Plug in the Power Supply
Attach Evolve’s Power Supply to the Base Unit
first, then to any 100 - 240V AC power source.
1
STEREO
MONO
To minimize the chances of power spikes
and surges damaging your Evolve unit, we
Power up the Base Unit
recommend the use of a quality surge protector.
& charge your speakers
Turn Base Unit on by pressing the Power Button,
2
then place the speakers on the Charge Pads.
LEDs will illuminate on each speaker and on
the Base Unit, indicating that Evolve is on, and
that your speakers are paired and charging.
Custom-fit your iPod with the
3
3
correct dock adapter
Choose an iPod adapter that best fits
your iPod model. (see page 4)
Set-up
1 2
Page 13

12
Conecte el cable
1
de alimentación
Primero, conecte el cable de
alimentación de Evolve a la
unidad base. A continuación,
conéctelo a una toma de
corriente de 100-240 V.
Para minimizar el riesgo de
que posibles picos y subidas
de tensión dañen la unidad
Collegate l'alimentatore
1
Innanzitutto, collegate l'alimen-
tatore di Evolve alla base, quindi
a una sorgente di alimentazione
a corrente alternata da 100 - 240 V.
Per ridurre al minimo la
possibilità di sbalzi di tensione
che possono danneggiare la
vostra unità Evolve, consigliamo
di utilizzare un limitatore di
Schließen Sie das Netzteil an
1
Verbinden Sie zuerst das Evolve-
Netzteil mit der Basisstation.
Schließen Sie es dann an eine
Steckdose mit 100 – 240 V AC an.
Um das Risiko möglicher
Spannungsspitzen und
Überspannungen, die Ihr
Evolve-Soundystem beschädigen
könnten, möglichst gering zu
halten, empfehlen wir Ihnen
Encienda la unidad base
2
un protector eléctrico de calidad.
y cargue los altavoces
Pulse el botón de encendido
para encender la unidad base
Evolve, le recomendamos usar
Accendete la base e
2
caricate gli altoparlanti
sovratensione di buona qualità.
Accendete la base premendo il
pulsante di accensione, quindi
sistemate gli altoparlanti sulle
Schalten Sie die Basiseinheit
2
ein, um die Lautsprecher
die Verwendung eines
hochwertigen Überspannungs-
schutzgerätes.
aufzuladen.
Betätigen Sie hierzu den
y coloque los altavoces en los
soportes de recarga. Se encen-
derán los indicadores luminosos
de la unidad base para indicar
piastrine di ricarica. I LED si
illumineranno su ciascun
altoparlante e sulla base,
indicando in tal modo che
que Evolve está encendido y
Evolve è acceso e che gli
altoparlanti sono accoppiati
que los altavoces están
acoplados y cargándose.
e in carica.
3
Adapte su iPod con el
adaptador dock adecuado
per il vostro iPod utilizzando
il corretto adattatore dock
3
Personalizzate il sistema
Schließen Sie Ihren iPod
Einschaltknopf der Basiseinheit
und setzen Sie dann die
Lautsprecher in die Ladeständer.
Die LEDs auf den beiden
Lautsprechern und auf der
Basiseinheit zeigen an, dass
3
Evolve eingeschaltet ist und
dass die Lautsprecher angemeldet
sind und geladen werden.
über den entsprechenden
Elija el adaptador de iPod que
Scegliete l'adattatore per iPod
Dock-Adapter an.
mejor se ajuste a su modelo
de iPod. (consulte la página 4)
più adatto al vostro modello
(vedere pag. 4).
Wählen Sie den iPod-Adapter
aus, der am besten zu Ihrem
iPod-Modell passt. (s. S. 4)
Branchez le câble
1
d’alimentation électrique.
Connectez d’abord le câble
d’alimentation Evolve à la base,
puis à une source d’alimentation
CA 100 - 240V.
Sluit de voeding aan
1
Sluit eerst de voeding van de
Evolve aan op de basiseenheid
en vervolgens op een 100 - 240V
wisselstroombron.
Branchez la base et chargez
Pour réduire les risques de
surtension et de pics pouvant
endommager votre unité Evolve,
nous vous recommandons
2
d’utiliser un limiteur de
surtension de qualité.
Schakel de basiseenheid in
Om de mogelijkheid dat stroom-
pieken en -schommelingen uw
Evolve-eenheid beschadigen,
te minimaliseren raden wij u
aan een spanningsbeveiliging
van goede kwaliteit te gebruiken.
2
vos haut-parleurs.
Allumez la base en appuyant
sur le bouton d’alimentation,
puis placez les haut-parleurs
sur les connecteurs de charge.
en laad uw luidsprekers op
Schakel de basiseenheid in
door op de voedingsknop te
drukken en plaats de luidsprekers
vervolgens op de laadblokken.
Les voyants s’allument sur
chaque haut-parleur et sur la
base indiquant qu’Evolve est
allumé et que vos haut-parleurs
sont jumelés et en charge.
De LED's zullen oplichten op elke
luidspreker en op de basiseenheid.
Deze LED's geven aan dat de Evolve
is ingeschakeld en dat uw
luidsprekers zijn gekoppeld
en worden opgeladen.
3
Adaptez votre iPod avec
l’adaptateur Dock adéquat.
Choisissez l’adaptateur iPod
le mieux adapté à votre modèle
d’iPod (voir page 4).
3
Pas uw iPod aan met
de juiste dock-adapter
Kies een iPod-adapter die het
best past voor uw iPod-model.
(zie pagina 4)
Page 14
13
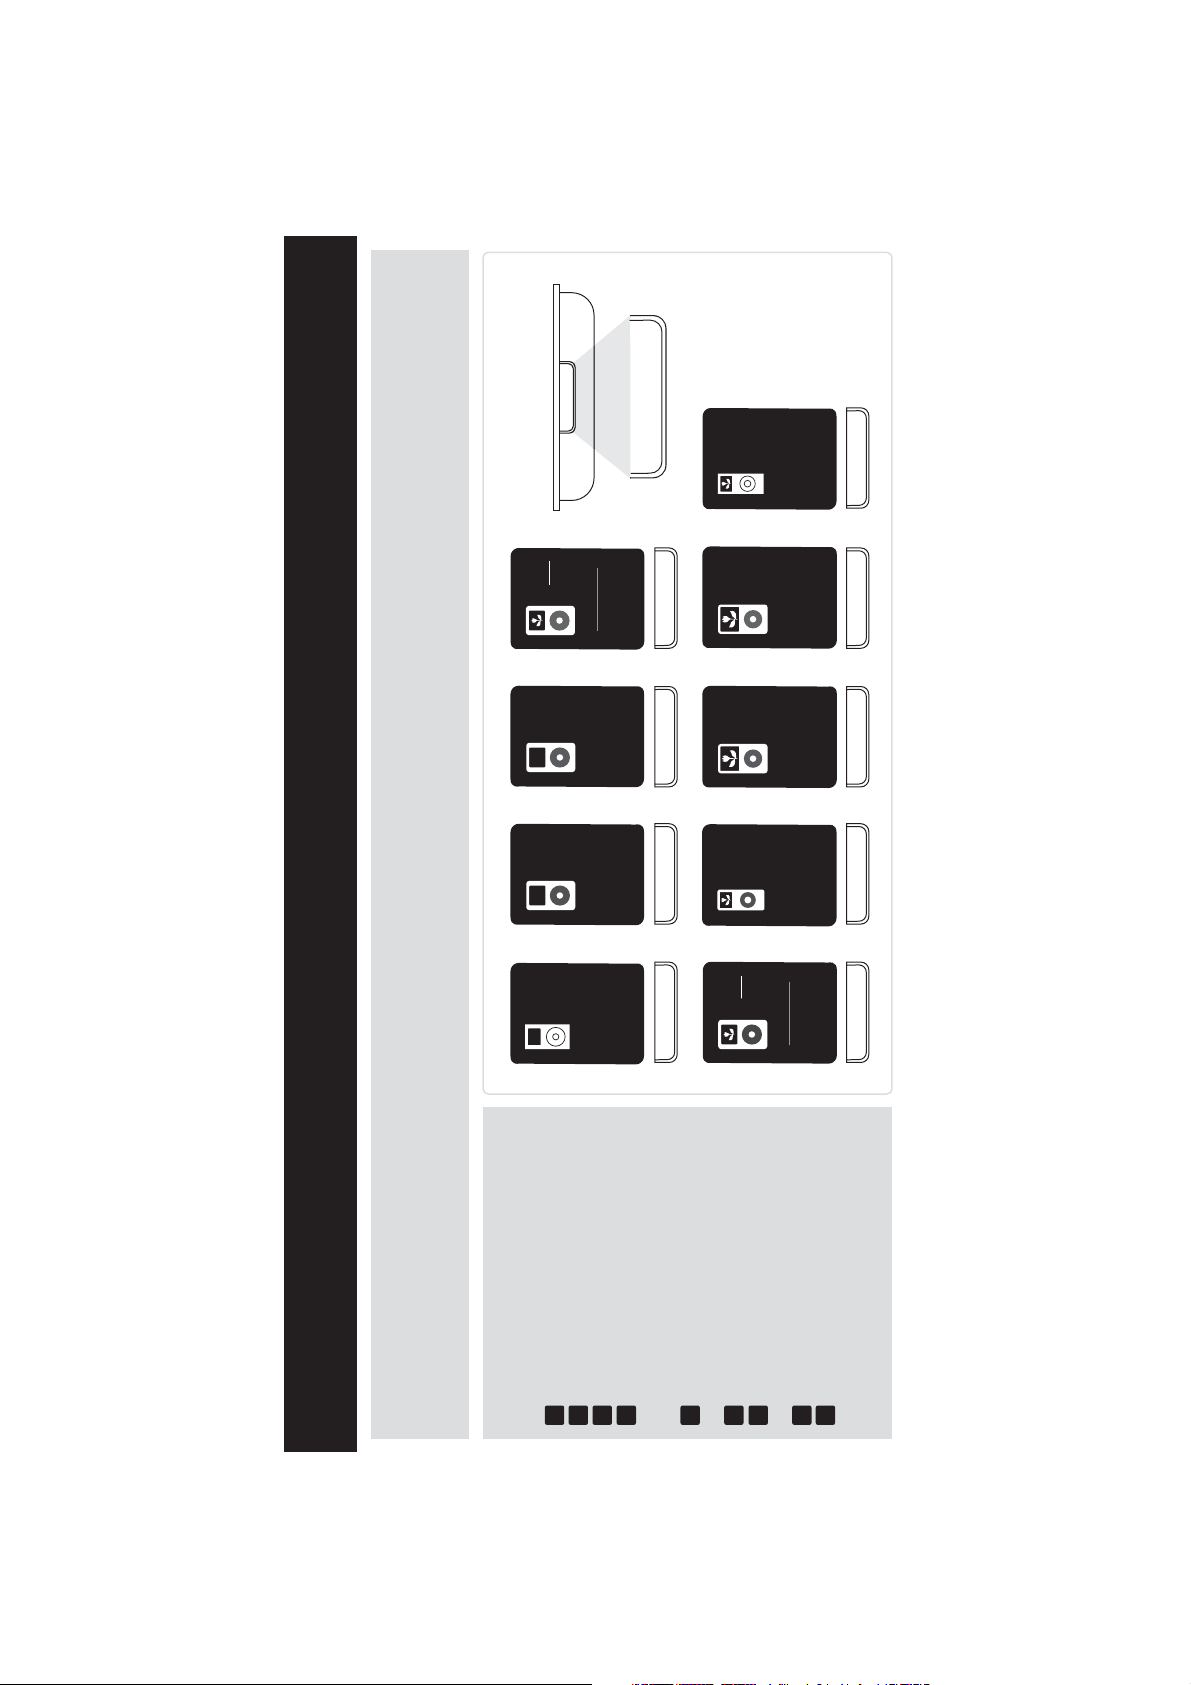
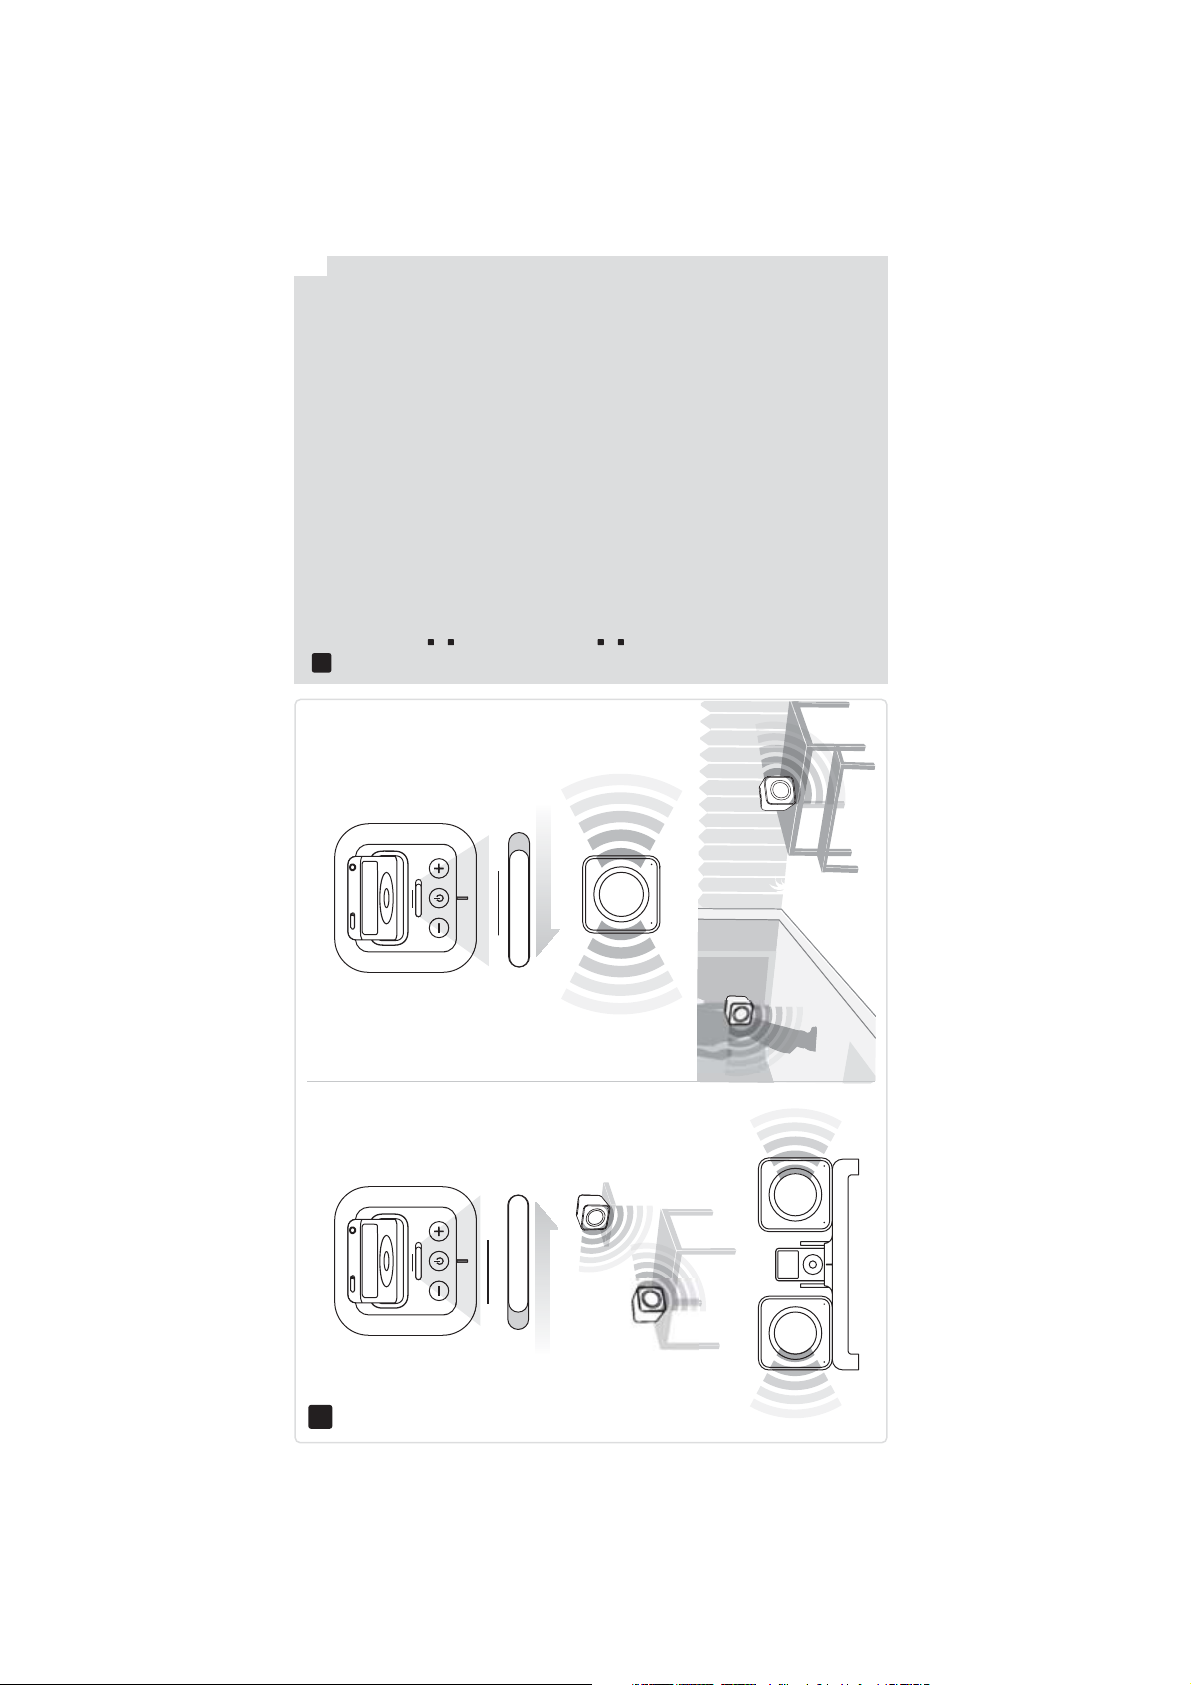
Using the Stereo/Mono Switch
Stereo delivers the music in separated
Right and Left Audio channels.
Select Stereo when:
Using the speakers in the same room
Using the speakers as they sit on the
4
Charge Pads
Mono combines Right and Left Audio
channels to deliver the complete audio
signal through a single speaker.
Select Mono when:
Listening to podcasts or audio books
Using speakers in two different rooms
MONO
STEREO
4
MONO STEREO
MONO STEREO
MONO STEREO
MONO STEREO
Page 15

14
Cómo utilizar
el conmutador
estéreo / mono
4
Utilizzo
dell'interruttore di
modalità stereo/mono
4
El estéreo reproduce la
La modalità stereo
música en canales derecho
e izquierdo separados.
consente di ascoltare la
musica con i canali audio
Seleccione estéreo para:
Utilizar los altavoces en
la misma habitación
Utilizar los altavoces
destro e sinistro separati.
Selezionate la modalità
stereo quando:
Utilizzate gli altoparlanti
acoplados a los
nella stessa stanza.
conectores de carga
El mono combina los
Utilizzate gli altoparlanti
mentre sono collocati
canales de audio derecho
e izquierdo para reproducir
toda la señal de sonido a
través de un solo altavoz.
sulle piastrine di ricarica.
La modalità mono combina
i canali audio destro e sinistro
per offrire un segnale audio
Seleccione mono para:
Escuchar podcasts
o libros de audio
completo attraverso un
unico altoparlante.
Selezionate la modalità
mono quando:
Utilizar los altavoces
en dos habitaciones
diferentes
Ascoltate podcast
o libri audio
Utilizzate gli altoparlanti
in due stanze differenti
Benutzung des
Im Stereo-Modus wird die
Musik getrennt über den
Stereo/Mono-Schalters
4
Utilisation du
La stéréo émet la musique
commutateur
Stéréo/Mono
4
De schakelaar stereo/
Stereo levert de muziek in
gescheiden audiokanalen
mono gebruiken
4
rechten und linken Audiokanal
abgespielt.
Wählen Sie Stereo, wenn Sie:
dans des canaux audio
droit et gauche séparés.
Sélectionnez Stéréo pour :
rechts en links.
Selecteer Stereo wanneer:
De luidsprekers in
die Lautsprecher in nur
einem Raum verwenden.
die Lautsprecher
Utiliser les haut-parleurs
dans la même pièce.
Utiliser les haut-parleurs
dezelfde kamer worden
gebruikt
De luidsprekers worden
verwenden, während sie
sich auf den Ladeständern
befinden.
Bei Mono werden der rechte
lorsqu’ils sont en charge
sur les connecteurs.
Le mode Mono utilise à la
fois les canaux audio droit
gebruikt terwijl ze op
de laadblokken staan
Mono combineert de audio-
kanalen rechts en links om
und der linke Kanal kombiniert,
um das gesamte Audiosignal
an jeden einzelnen
Lautsprecher zu senden.
Wählen Sie Mono, wenn Sie:
et gauche pour émettre
le signal audio complet à
travers un seul haut-parleur.
Sélectionnez Mono pour :
.
het volledige audiosignaal
via één luidspreker te leveren
Selecteer Mono wanneer:
Podcasts of audioboeken
Podcasts oder
Audiobücher hören.
Écouter des podcasts
ou des livres audio ;
Utiliser vos haut-
worden beluisterd
U de luidsprekers
gebruikt in twee
die Lautsprecher in
zwei verschiedenen
Räumen verwenden.
parleurs dans deux
pièces différentes.
verschillende kamers
Page 16
15
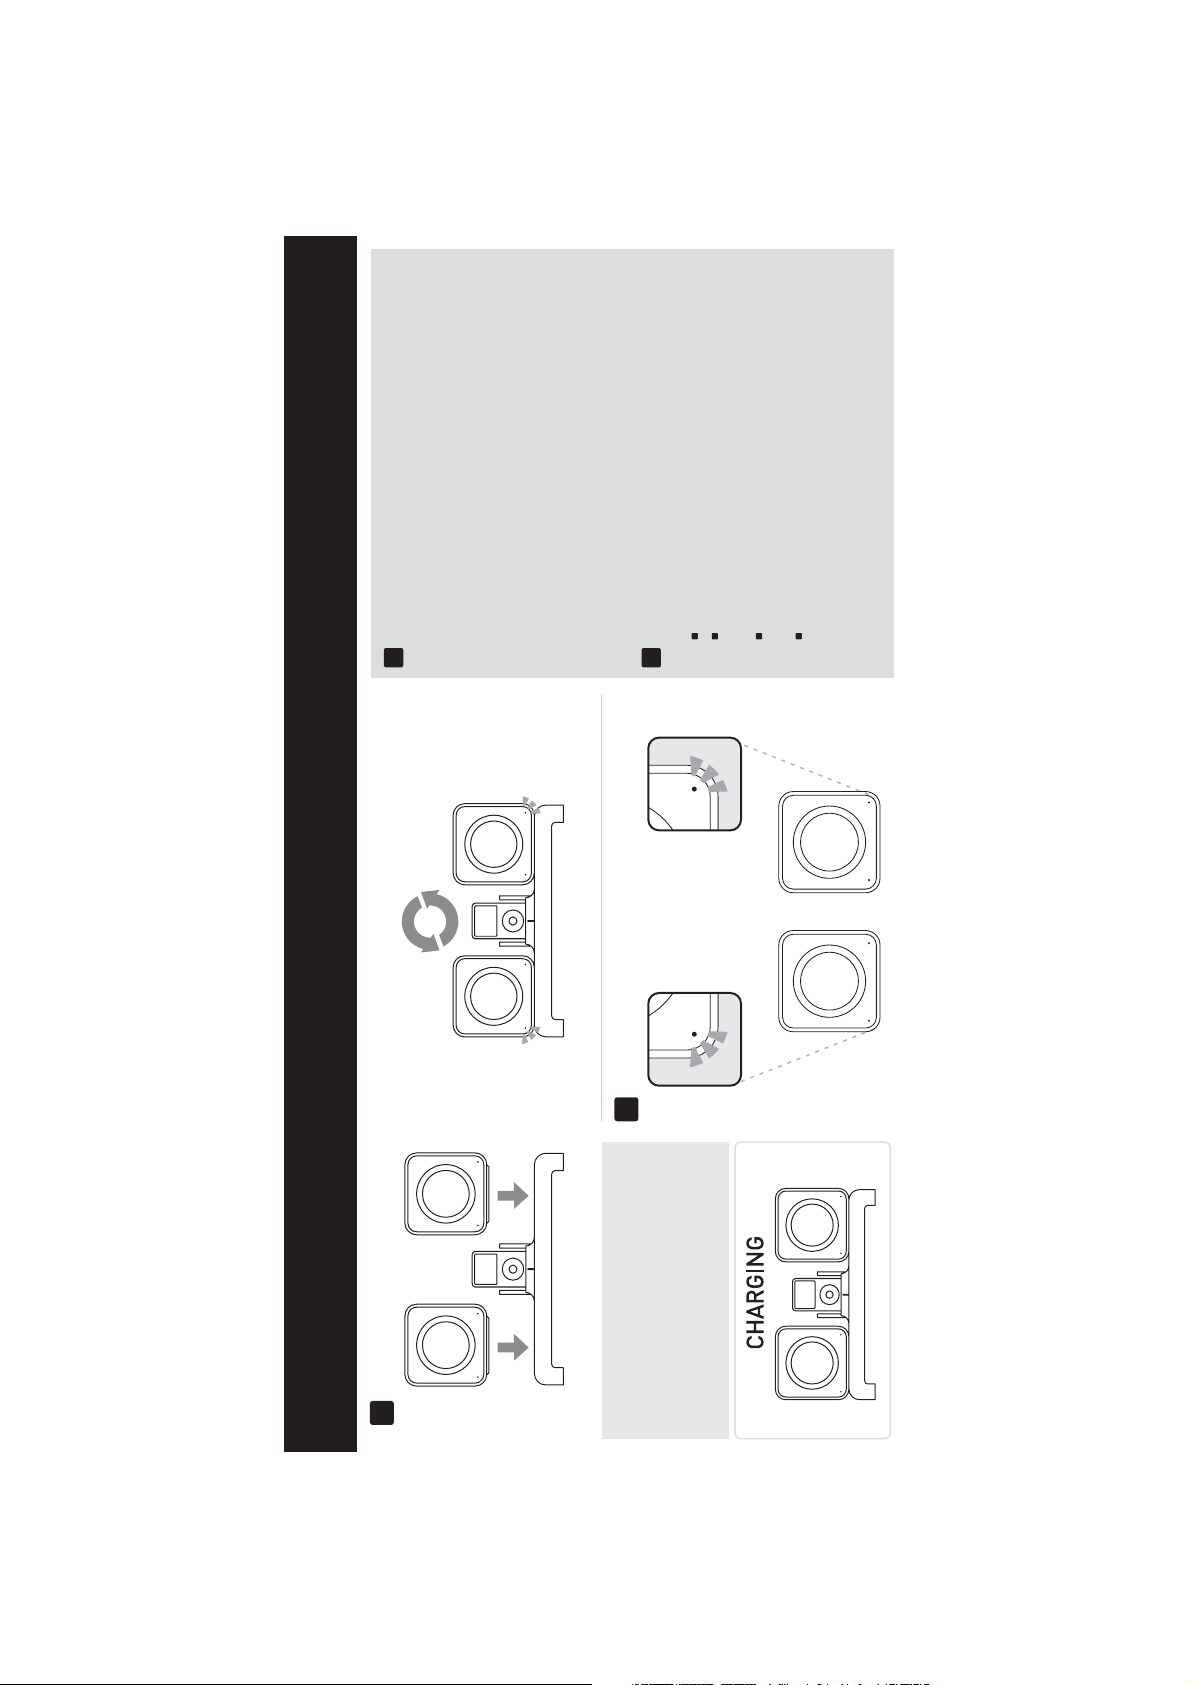
On Base – Speakers are charging. They
1
Pairing Your Evolve Speakers
Place the speakers on the Base Unit. They
will automatically pair with the Base Unit
and be assigned to Right or Left channels,
so that your music will play with proper
stereo separation.
NOTE: You can place either speaker on
either Charge Pad. Evolve will re-assign the
Right and Left channel to each speaker
2
automatically. The LED on the speaker will
indicate Right and Left channels.
LED Indicators
GREEN
Speakers are properly paired.
Speakers are operational and in use.
2
ORANGE
will return to GREEN when fully charged.
Off Base – Batteries are low. Recharge
the speakers as soon as possible.
1
Set-up – Base Unit Play
NOTE:
You can use Evolve while the
speakers are charging on their
Charging Pads.
Page 17

16
1
Emparejamiento de
los altavoces de Evolve
Coloque los altavoces en la
unidad base. Los altavoces se
emparejarán automáticamente
con la unidad base y se asignarán
a los canales derecho e izquierdo
para que la música se reproduzca
con la separación estéreo adecuada.
NOTA: Puede colocar cualquier
altavoz en cualquiera de los
cargadores. Evolve reasignará
los canales derecho e izquierdo
Indicadores luminosos
Los altavoces están
2
a cada altavoz automáticamente.
El indicador luminoso del altavoz
indica los canales derecho
e izquierdo.
emparejados correctamente.
VERDE
Los altavoces están
operativos y en uso.
NARANJA
En la unidad base: los altavoces
se están cargando. Volverán
al VERDE cuando estén
completamente cargados.
Fuera de la unidad base:
batería baja. Recargue los
altavoces lo antes posible.
Accoppiamento degli
1
Sistemate gli altoparlanti sulla
base. In questo modo si accop-
pieranno automaticamente con
altoparlanti Evolve
la base e verrà loro assegnato
Anmeldung der
1
Setzen Sie die Lautsprecher auf
die Basiseinheit. Diese werden
automatisch an der Basiseinheit
angemeldet und dem rechten
Evolve-Lautsprecher
bzw. linken Kanal zugeordnet,
Jumelage de vos haut-
1
Placez les haut-parleurs sur la
base. Ils sont automatiquement
jumelés avec la base et affectés
parleurs Evolve
au canal droit ou gauche, ce qui
il canale destro o sinistro,
cosicché la musica potrà essere
riprodotta con l'appropriata
separazione stereo.
so dass Ihre Musik mit der
korrekten Stereotrennung
abgespielt wird.
HINWEIS: Sie können jeden
Lautsprecher in jeden beliebigen
permet la séparation stéréo
adéquate des canaux pour
émettre la musique.
Remarque : vous pouvez placer
NOTA: potete posizionare uno
qualsiasi degli altoparlanti su
una qualsiasi piastrina di carica.
Ladeständer setzen. Evolve ordnet
den rechten bzw. linken Kanal
jedem Lautsprecher automatisch
les haut-parleurs indifféremment
sur un connecteur ou l'autre.
Evolve réaffecte automatiquement
Evolve assegnerà nuovamente
il canale destro e sinistro a
ciascun altoparlante in modo
automatico. Il LED sull'altoparlante
indicherà i canali destro e sinistro.
LED-Anzeigen
neu zu. Der rechte bzw. linke
les canaux droit et gauche à
2
Kanal wird auf jedem Lautsprecher
durch die LED angezeigt.
chaque haut-parleur. Les voyants
des haut-parleurs indiquent les
canaux droit et gauche.
Indicatori LED
2
VERDE
Gli altoparlanti sono
GRÜN
Die Lautsprecher sind
korrekt angemeldet.
Die Lautsprecher sind
VOYANTS
Les haut-parleurs sont
2
VERT
correctement jumelés.
Sulla base: gli altoparlanti
correttamente accoppiati.
Gli altoparlanti sono
operativi e in uso.
ARANCIONE
sono in carica. Ritorneranno
Auf der Basiseinheit: Die
betriebsbereit und in Gebrauch.
Lautsprecher werden geladen.
Bei voller Ladung leuchten die
ORANGE
Les haut-parleurs sont
opérationnels et en
Anzeigen GRÜN.
Sur la base – Les haut-parleurs
ORANGE
fonctionnement.
sont en charge. Le voyant
a essere di colore VERDE
quando del tutto ricaricati.
Fuori dalla base: le batterie
sono scariche. Ricaricate gli
altoparlanti quanto prima.
Außerhalb der Basiseinheit:
Niedriger Batteriestand. Laden
Sie die Lautsprecher so bald
wie möglich auf.
Hors base – Les batteries sont
redevient VERT lorsque la
charge est terminée.
faibles. Rechargez les haut-
parleurs dès que possible.
1
De luidsprekers van
de Evolve koppelen
Plaats de luidsprekers op de
basiseenheid. Ze worden auto-
matisch gekoppeld met de
basiseenheid en toegewezen
aan het rechter- of linkerkanaal
zodat uw muziek met de geschikte
stereoscheiding wordt afgespeeld.
OPMERKING: u kunt elke luid-
spreker op elk laadblok plaatsen.
Evolve zal het rechter- en
linkerkanaal automatisch
opnieuw toewijzen aan elke
luidspreker. De LED op de luid-
spreker zal het rechter- of
linkerkanaal aangeven.
2
GROEN
De luidsprekers zijn
goed gekoppeld.
LED-indicators
Op basis - De luidsprekers
De luidsprekers zijn
operationeel en in gebruik.
ORANJE
worden opgeladen. Wanneer
ze volledig zijn opgeladen
Niet op basis - Het batterij-
luidsprekers zo snel mogelijk op.
GROEN.
worden de LED's opnieuw
vermogen is laag. Laad de
Page 18
17
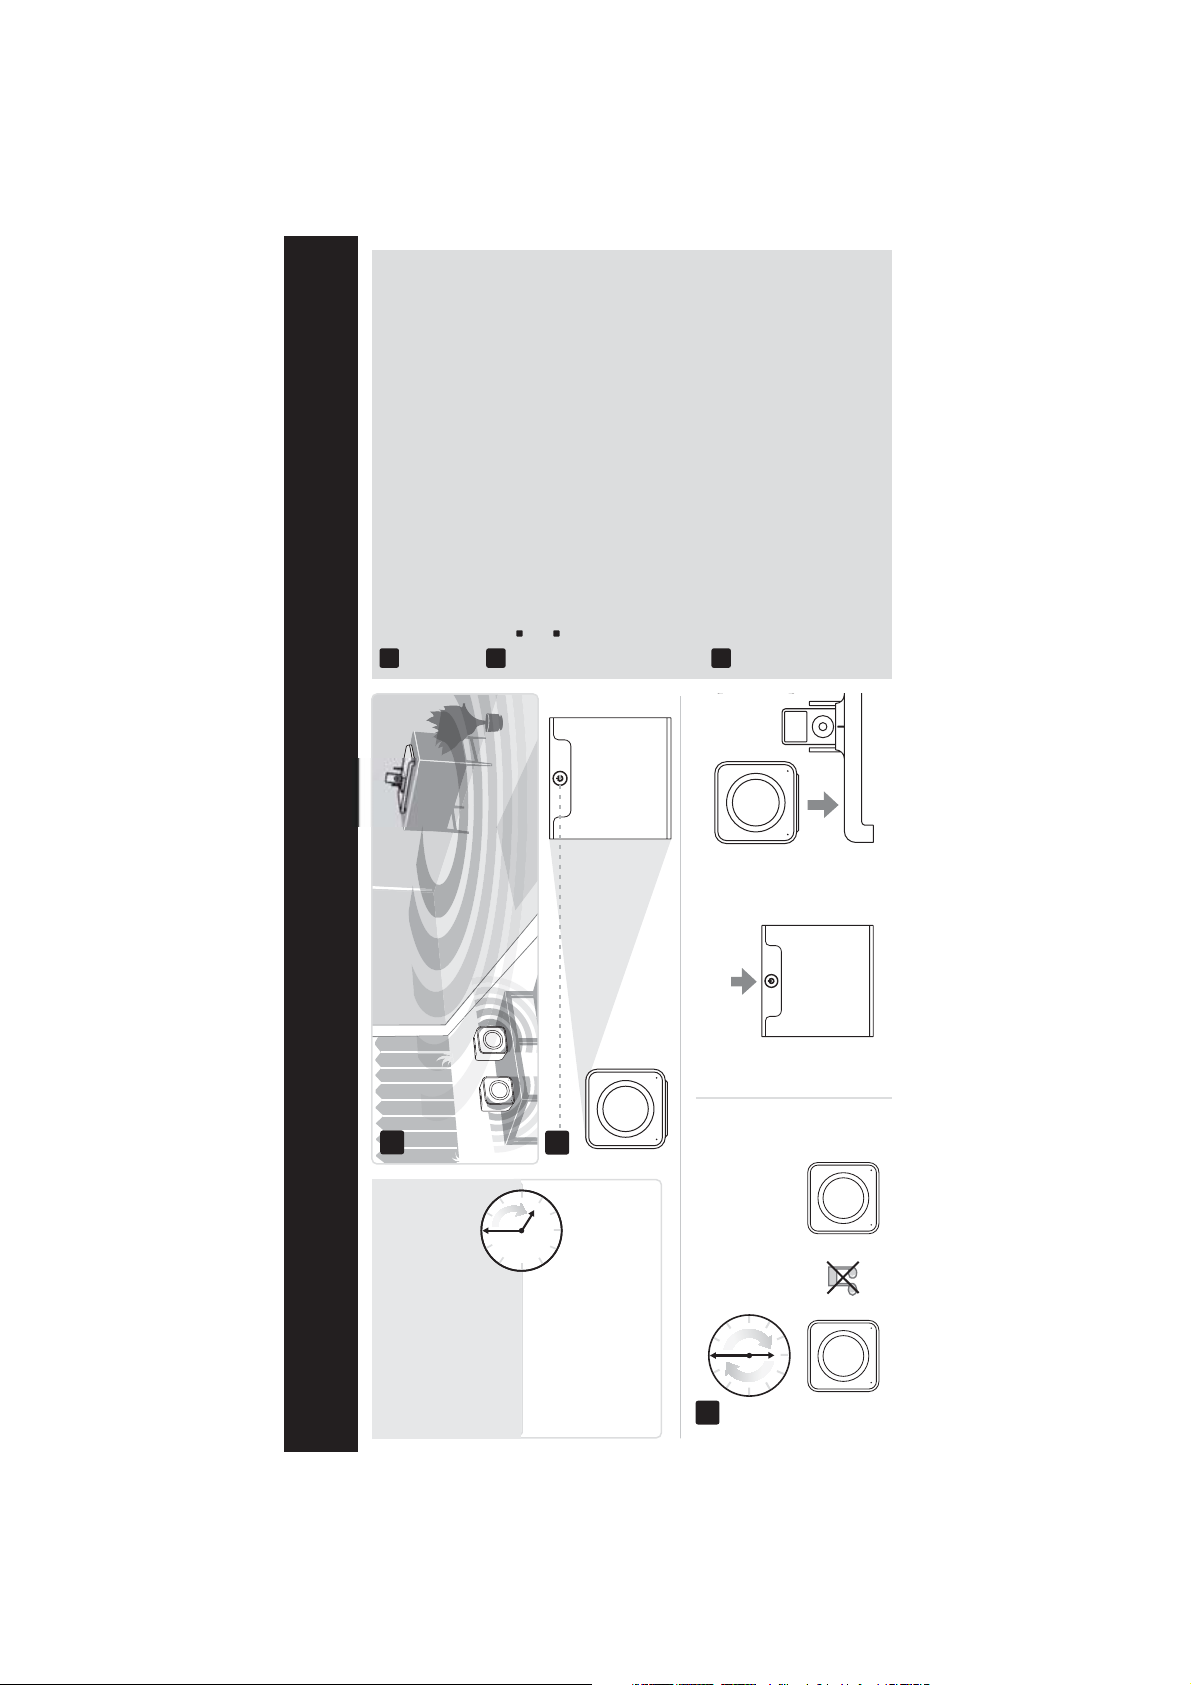
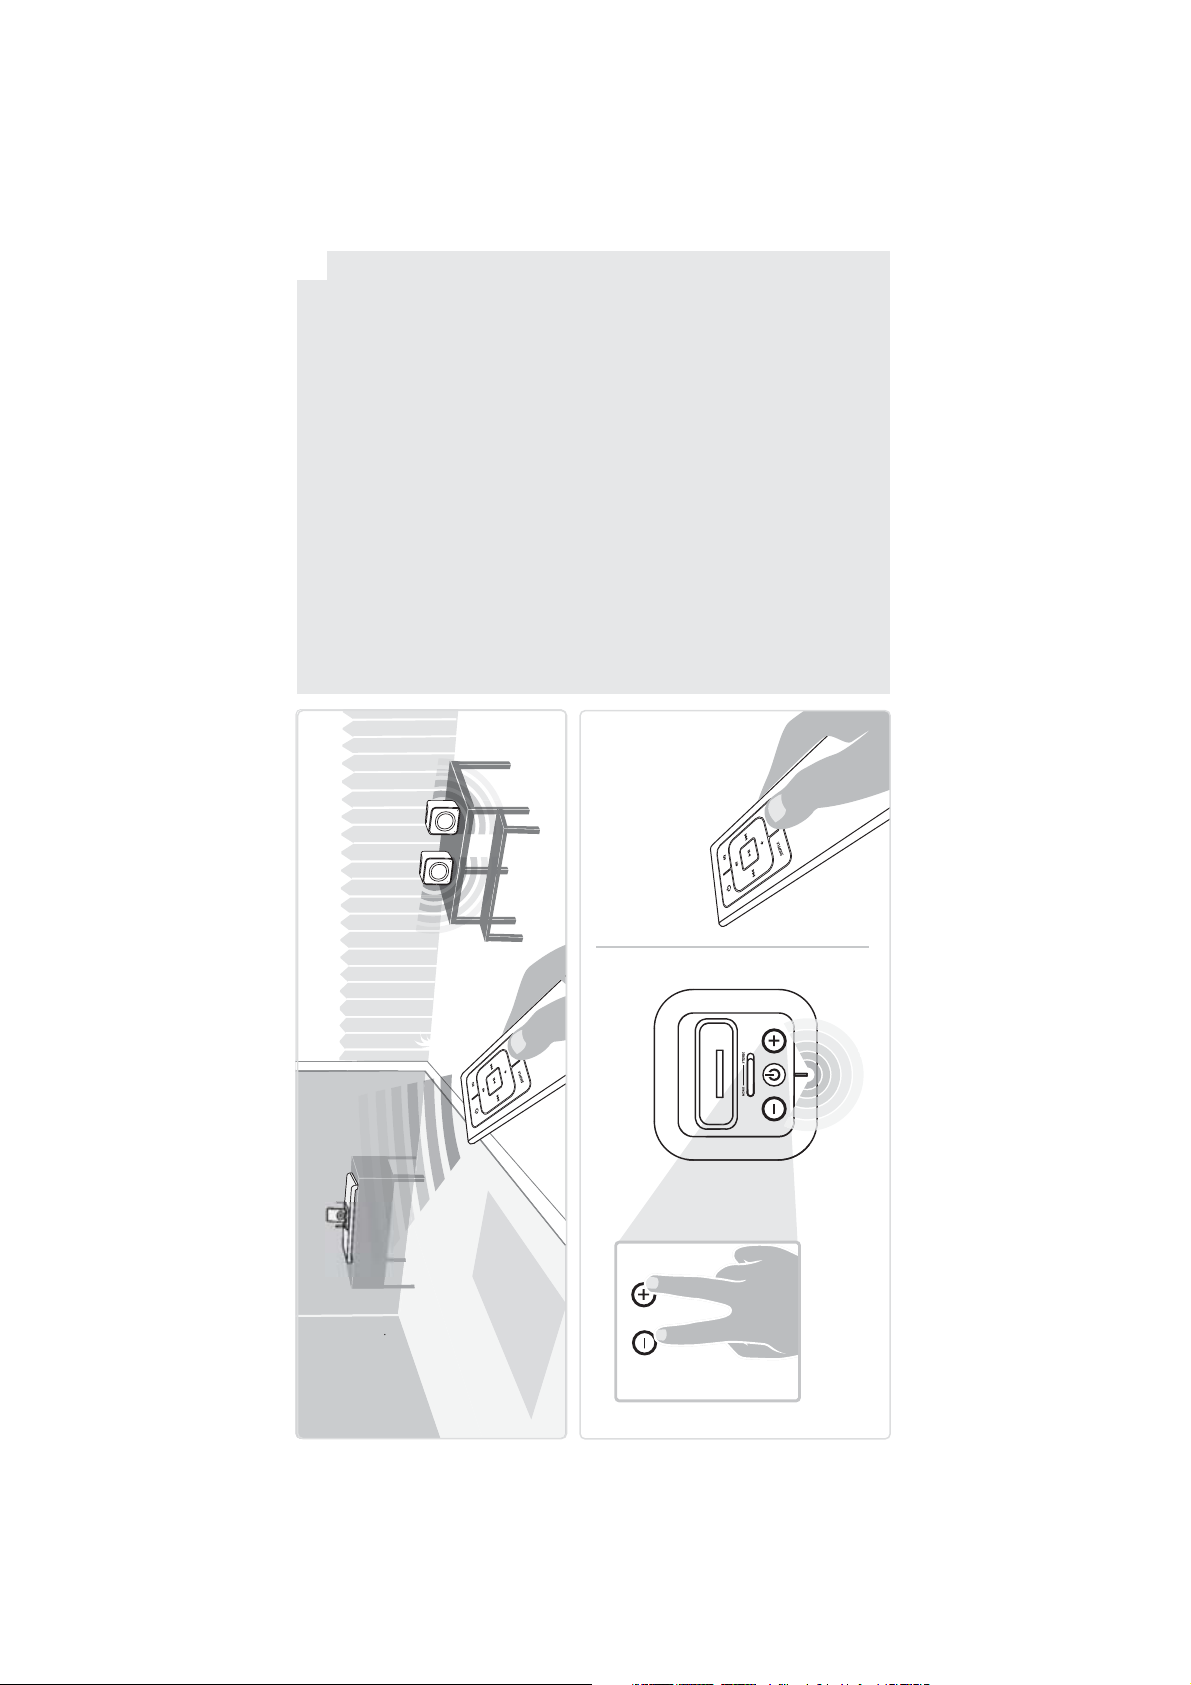
Placing your Speakers
You can move and place your speakers just
about anywhere within 150’ (45.7m) of the
Base Unit. Beyond 150 feet, your speakers
may be unable to receive a signal.
Power on each Speaker
Press the Power button on the top
1
of each speaker.
2
Wait approximately 10 seconds and music
will begin playing.
Adjust Evolve’s volume at the Base Unit or
by remote control.
The speaker power switch is used to power
down the speakers when not in use. The
switches are only enabled when the speakers
are removed from the Base Unit.
TOP VIEW
Speaker Timeout
Speakers include an auto-off feature to preserve
battery life when not in use. The speakers will
3
remain on and operational for 60 minutes with
no music playing. After 60 minutes without
music, the speakers power down.
Re-activate the Speakers by pressing the
speakers’ Power button or by placing them
on the Base Unit.
Set-up – Wireless Play
1
First charge
Before first wireless use,
we recommend charging
each speaker for about
4 hours.
-OR-
TOP VIEW
RE-ACTIVATE
2
Powers down
after 60 minutes
AUTO-OFF
1ST CHARGE 4 hrs
1STE KEER OPLADEN 4 uur
1re CHARGE 4 heures
ERSTES AUFLADEN 4 Stunden
PRIMA CARICA 4 ore
PRIMERA CARGA 4 horas
3
without music
Page 19
18
Colocar los altavoces
Puede mover y colocar los
altavoces en cualquier lugar
hasta 45,7 metros de la unidad
1
Sistemazione degli
altoparlanti
Potete spostare e collocare i
vostri altoparlanti praticamente
1
Aufstellen der Lautsprecher
1
Sie können die Lautsprecher an
einem beliebigen Ort bis zu 45,7
Meter von der Basiseinheit entfernt
aufstellen. Bei einer größeren
Encender los dos altavoces
base. Más allá de esta distancia,
puede que los altavoces
no reciban señal.
Pulse el botón de encendido
de la parte superior de
2
Accendete ciascun
altoparlanti potrebbero non
ricevere più il segnale.
altoparlante
2
ovunque nel raggio di 45,7 m dalla
base. Oltre questa distanza, gli
Schalten Sie beide
2
nicht mehr korrekt empfangen
werden.
Lautsprecher ein
Entfernung könnte das Signal
los altavoces.
Espere unos 10 segundos
y la música empezará a
reproducirse.
Ajuste el volumen de Evolve en
la unidad base o con el mando
a distancia.
Los interruptores de encendido
Premete il pulsante di accensione
posto nella parte superiore di
ciascun altoparlante.
Attendete circa 10 secondi,
quindi inizierà la riproduzione
della musica.
Regolate il volume di Evolve dalla
base o mediante il telecomando.
Betätigen Sie den
Einschaltknopf oben auf
jedem Lautsprecher.
Nach etwa 10 Sekunden
beginnt die Musikwiedergabe.
Die Lautstärke von Evolve kann an
der Basiseinheit oder über die
Fernbedienung geregelt werden.
Mithilfe der Ein/Ausschaltknöpfe
de los altavoces sirven para
apagarlos cuando no se utilicen.
Estos interruptores sólo se
activan si los altavoces no están
acoplados a la unidad base.
Los altavoces tienen una función
de los altavoces
3
Modalità di sospensione
Apagado automático
L'interruttore di accensione degli
altoparlanti serve a spegnere gli
altoparlanti quando non sono in
uso. Gli interruttori si attivano
esclusivamente quando gli
altoparlanti vengono rimossi
dalla base.
degli altoparlanti
3
Timeout Lautsprecher
auf den Lautsprechern können
Sie diese ausschalten, wenn Sie
sie nicht verwenden. Die Ein/
3
Ausschaltknöpfe sind nur aktiv,
wenn die Lautsprecher sich nicht
auf der Basiseinheit befinden.
Die Lautsprecher verfügen über
eine automatische Abschaltfunktion,
de apagado automático para
ahorrar energía de la batería
cuando no se utilicen. Los altavoces
permanecerán encendidos y
Gli altoparlanti sono dotati della
funzione di spegnimento automatico,
che consente di preservare la durata
della batteria quando questi non sono
um Batterien zu sparen, wenn sie
nicht verwendet werden. Die
Lautsprecher bleiben bis zu 60
Minuten nach Abspielen des
operativos durante 60 minutos
cuando no se reproduzca música.
Tras 60 minutos sin música, los
altavoces se apagan.
Puede volver a activar los altavoces
pulsando el botón de encendido de
los altavoces o colocándolos en
la unidad base.
in uso. Anche senza riproduzione
della musica, gli altoparlanti restano
accesi e in funzione per 60 minuti.
Dopo 60 minuti di silenzio, gli
altoparlanti si spengono.
Per riattivare gli altoparlanti,
premete il pulsante di accensione
degli stessi o collocateli sulla base.
letzten Musiktitels eingeschaltet
und betriebsbereit. Danach schalten
sie sich automatisch ab.
Sie können die Lautsprecher wieder
einschalten, indem Sie die
Einschaltknöpfe oben auf den
Lautsprechern betätigen oder die
Lautsprecher wieder auf die
Basiseinheit stellen.
Mise en place de vos
haut-parleurs
Vous pouvez déplacer et installer
vos haut-parleurs là où bon vous
1
Uw luidsprekers plaatsen
U kunt uw luidsprekers nagenoeg
overal binnen een bereik van
45,7 m van de basiseenheid
1
semble, dans un rayon de 45,7 m
de la base. Au-delà, vos haut-
parleurs pourraient ne plus
recevoir de signal.
Schakel elke luidspreker in
verplaatsen. Buiten dit bereik
zullen de luidsprekers mogelijk
geen signaal kunnen ontvangen.
2
Appuyez sur le bouton
Alimentation de chaque
d’alimentation situé en haut
de chaque haut-parleur.
Comptez environ 10 secondes
pour que la lecture soit lancée.
Réglez le volume d’Evolve sur la
haut-parleur
2
Druk op de voedingsknop op de
bovenkant van elke luidspreker.
Wacht ongeveer 10 seconden
en het afspelen van de muziek
wordt gestart.
base ou à l’aide de la télécommande.
Regel het volume van de Evolve
op de basiseenheid of via de
afstandsbediening.
De voedingsschakelaar van de
luidspreker wordt gebruikt om de
Le commutateur d’alimentation
des haut-parleurs permet de les
éteindre lorsqu’ils ne sont pas
utilisés. Les commutateurs ne
sont activés que lorsque les haut-
luidspreker uit te schakelen
wanneer deze niet wordt gebruikt.
De schakelaars worden alleen
geactiveerd wanneer de luid-
sprekers worden verwijderd van
Arrêt automatique
parleurs sont retirés de la base.
des haut-parleurs
Les haut-parleurs sont dotés d’une
fonction d’arrêt automatique qui
3
Time-out luidspreker
de basiseenheid.
De luidsprekers beschikken over
een functie voor automatisch
uitschakelen om batterijvermogen
3
te sparen wanneer ze niet worden
permet de préserver l’autonomie
de la batterie lorsqu’ils ne sont
pas utilisés. Les haut-parleurs
restent allumés et opérationnels
gebruikt. De luidsprekers blijven
gedurende 60 minuten operationeel
en ingeschakeld zonder dat er
muziek wordt afgespeeld. Na 60
pendant 60 minutes d’inactivité.
Ils s’éteignent après 60 minutes
d’inactivité.
Pour réactiver les haut-parleurs,
appuyez sur leur bouton
minuten zonder muziek, worden
de luidsprekers uitgeschakeld.
Activeer de luidsprekers opnieuw
door op de voedingsknop van de
d’alimentation ou placez-les
sur la base.
luidsprekers te drukken of door
ze op de basiseenheid te plaatsen.
Page 20
19
19
1
23456
Remote Commands
EQ – Press to cycle through iPod equalizer settings
Volume Up
Previous Track/Fast Rewind
Play/Pause
Shuffle Songs, Albums, Off (iPod Only)
System Power – press once to
789
power on, again to power off
Next Track/Fast Forward
Volume Down
Repeat One Song, All Songs, Off (iPod Only)
6
1
7
2
3
9
8
5
4
Set-up – Using the Remote
Page 21

20
Ecualizador: pulse para
1
Comandos a distancia
234
desplazarse entre los ajustes
de ecualización del iPod
Subir volumen
EQ: per visualizzare in
1
Comandi del telecomando
EQ: Mit dieser Taste können
1
Befehle der Fernbedienung
sequenza le impostazioni
di equalizzazione dell'iPod
Sie die Equalizereinstellungen
2
für den iPod vornehmen.
Lautstärke +
2
Aumento volume
Pista anterior / Rebobinado
5
Reproducción / Pausa
Reproducción aleatoria:
canciones / álbumes /
desactivado (sólo iPod)
Traccia precedente/
3
4
5
Riavvolgimento rapido
Riproduzione/Pausa
Brani Shuffle, album,
disattivazione
Letzter Titel /
3
4
5
Schneller Rücklauf
Abspielen / Anhalten
Zufällige Wiedergabe:
Musiktitel / Alben /
Aus (nur iPod)
6
Alimentación: pulse
una vez para encenderlo
y pulse de nuevo para
apagarlo
6
(solo per iPod)
Accensione del sistema:
premete una volta per
accendere, una seconda
6
Ein/Ausschaltknopf:
Durch einmaliges
Betätigen schalten Sie
das Gerät ein, durch
nochmaliges Betätigen
7
8
Avance rápido
Bajar volumen
7
Traccia successiva/
Avanzamento rapido
7
Nächster Titel /
Schneller Vorlauf
9
Repetir: una canción /
8
Riduzione volume
8
Lautstärke -
Pista siguiente /
volta per spegnere
schalten Sie es aus.
todas las canciones /
desactivado (sólo iPod)
di tutti i brani, disattivazione
9
Ripetizione di un brano,
(solo per iPod)
9
Erneut abspielen: ein
Lied / alle Lieder / Aus
(nur iPod)
Égalisation (EQ) – Appuyez
1
Commandes de
la télécommande
sur le bouton pour faire
défiler les réglages
d’égalisation de votre iPod.
234
Augmentation du volume
EQ - Indrukken om door
1
Bedieningselementen
afstandsbediening
2
de equalizerinstellingen
te navigeren
Volume hoger
Piste précédente/Retour rapide
5
Lecture/Pause
Lecture aléatoire des
morceaux, des albums,
Vorig nummer /
3
4
5
Snel terugspoelen
Afspelen / Pauzeren
Schakelen tussen
Nummers, Albums en
Alimentation du système –
6
arrêt (iPod uniquement)
Appuyez une fois pour
allumer l’appareil et
appuyez à nouveau pour
l’éteindre.
6
Uit (alleen iPod)
Systeemvoeding - druk
7
eenmaal om in te
schakelen en opnieuw
om uit te schakelen
Volgend nummer /
Piste suivante/Avance rapide
789
Diminution du volume
8
Snel vooruitspoelen
Volume lager
Répétition d’un morceau,
de tous les morceaux,
arrêt (iPod uniquement)
9
Eén nummer herhalen,
Alle nummers herhalen,
Uit (alleen iPod)
Page 22
21
Using the Remote Control
Evolve’s remote control will transmit up
to 150 feet. You do not need to be within
sight of the Base Unit.
Your remote automatically pairs with your
Evolve Base Unit the first time you use it.
In situations where multiple Base Units
are operating (a dorm, an apartment or a
multi-Evolve household), you may want to
lock your unit out from receiving remote
signals from any remote control but yours.
Hold down the volume up/down buttons
on the Base Unit until the LED flashes
(about 2 seconds). Then, press any button
on your Evolve remote. The base will then
be paired to that remote. To unpair, repeat
the procedure but don’t press a button on
the remote. This will reset the base to its
default mode, in which it will listen to all
Evolve remotes in range.
2 seconds
Page 23

22
Cómo usar el mando
a distancia
El mando a distancia de Evolve
transmite hasta a 45 metros. No es
necesario estar en la línea de visión
de la unidad base.
El mando se empareja
automáticamente con la unidad base
de Evolve la primera vez que se utiliza.
En situaciones en las que hay varias
Utilizzo del telecomando
Il telecomando di Evolve trasmette nel
raggio di 45 metri. Non è necessario
essere in prossimità della base.
Il telecomando può essere accoppiato
alla base al primo utilizzo. In caso di
funzionamento di più basi (in case dello
studente, condomini o case provviste
di più dispositivi Evolve), potete
unidades base en funcionamiento (en
dormitorios, apartamentos o en casas
con varias unidades Evolve), se
recomienda bloquear la unidad para
evitar que capte señales remotas de
cualquier mando a distancia que no
bloccare la ricezione del segnale dei
vari telecomandi e limitarla al vostro.
Tenete premuti i pulsanti di aumento/
riduzione volume sulla base fino a che
il LED non inizierà a lampeggiare
(dopo circa 2 secondi). Quindi, premete
sea el suyo.
Mantenga pulsados los botones subir
volumen/bajar volumen de la unidad
base hasta que el indicador luminoso
un pulsante qualsiasi sul telecomando
Evolve. La base sarà accoppiata con
quel telecomando. Per annullare
l'accoppiamento, ripetete la procedura
parpadee (unos 2 segundos). A
continuación, pulse cualquier botón
del mando a distancia de Evolve y la
base se emparejará a ese mando.
Para desemparejar la unidad, repita
el mismo procedimiento pero sin
pulsar ningún botón del mando. Esto
reiniciará la base a su modo
predeterminado, en el que captará
las señales de todos los mandos de
Evolve que se encuentren al alcance.
senza premere alcun pulsante sul
telecomando. La base verrà così
reimpostata alla modalità predefinita,
la quale consente la ricezione da tutti i
telecomandi presenti all’interno del
raggio d’azione.
So verwenden Sie
die Fernbedienung
Die Fernbedienung von Evolve hat eine
Reichweite von bis zu 45 Metern. Sie
müssen sich nicht in direkter
Sichtverbindung mit der Basiseinheit
befinden.
Utilisation de
la télécommande
La télécommande Evolve émet jusqu’à
45 mètres. Il n’est pas nécessaire d’être
dans la ligne de mire de la base pour
l’utiliser.
Votre télécommande est automatiquement
De afstandsbediening
gebruiken
De afstandsbediening van de Evolve
heeft een bereik tot 45 m. U hoeft niet
binnen de gezichtslijn van de
basiseenheid te blijven.
Bij het eerste gebruik wordt uw
Ihre Fernbedienung paart sich
automatisch mit Ihrer Evolve-Basiseinheit,
wenn Sie diese das erste Mal verwenden.
Sollten mehrere Basiseinheiten verwendet
werden (beispielsweise in einem
Studentenwohnheim, einem Apartement
oder in einem Haushalt, in dem es
mehrere Evolves gibt), dann sollten sie
jumelée avec votre base Evolve lorsque
vous l’utilisez pour la première fois. Si
plusieurs bases sont utilisées dans le
même environnement (un foyer
d’étudiants, un appartement ou un
ménage contenant plusieurs Evolve), il est
conseillé de verrouiller votre appareil, afin
qu’il ne réponde qu’aux signaux émis par
afstandsbediening automatisch
gekoppeld met de basiseenheid van
uw Evolve. In situaties waar meerdere
basiseenheden worden gebruikt (een
slaapzaal, een appartement of een
huishouden met meerdere Evolve-
toestellen), kunt u uw eenheid
blokkeren tegen het ontvangen van
Ihre Einheit für den Empfang von Signalen
anderer Fernbedienungen sperren.
Halten Sie hierzu die Tasten für die
Lautstärkeregelung auf der Basiseinheit
gedrückt, bis die LED aufleuchtet (etwa
zwei Sekunden lang). Drücken Sie dann
mettent à clignoter (environ 2 secondes).
votre télécommande.
Maintenez les boutons d’augmentation/
externe signalen van andere
afstandsbedieningen dan uw exemplaar.
Appuyez ensuite sur n’importe quel
diminution de volume de la base enfoncés
jusqu’à ce que les voyants lumineux se
Houd de knoppen voor de
volumeregeling op de basiseenheid
ingedrukt tot de LED knippert
(ongeveer 2 seconden). Druk vervolgens
eine beliebige Taste auf Ihrer Evolve-
Fernbedienung. Die Basis wird daraufhin
mit der Fernbedienung gepaart. Wenn Sie
die Paarung wieder aufheben möchten,
wiederholen Sie den Vorgang, aber
drücken Sie keine Taste auf der
bouton de votre télécommande Evolve.
La base sera alors jumelée avec cette
télécommande. Pour annuler le jumelage,
recommencez la procédure, mais sans
appuyer sur un bouton de la
télécommande. Cela permet de rétablir
op een willekeurige knop op de
afstandsbediening van uw Evolve. De
basiseenheid wordt vervolgens
gekoppeld met die afstandsbediening.
Om de koppeling op te heffen, herhaalt
u de procedure maar drukt u niet op de
Fernbedienung. So wird die Basis in den
Standardmodus zurückgesetzt und
empfängt Signale aller Evolve-
Fernbedienungen, die sich in
Reichweite befinden.
le mode par défaut de la base (elle peut
alors recevoir les signaux de toutes les
télécommandes Evolve se trouvant à sa
portée).
knop op de afstandsbediening. Hiermee
wordt de basiseenheid opnieuw
ingesteld naar de standaardmodus
waarbij het apparaat zal luisteren naar
alle Evolve-afstandsbedieningen binnen
het bereik.
Page 24

23
Utilisez la télécommande pour contrôler le
volume et l’alimentation d’Evolve.
Contrôlez les fonctions de lecture de votre iPod
en regardant vos vidéos : Lecture/Pause, Arrêt,
Écouter de la musique
Gebruik de afstandsbediening om het volume en de
Muziek afspelen
Retour/Précédent et Avance/Suivant.
voedingsstatus van de Evolve aan te passen.
Bedien de afspeelfuncties van de iPod terwijl u een video
bekijkt. U beschikt over Afspelen/Pauzeren, Stoppen,
Terugspoelen/Vorige en Vooruitspoelen/Volgende.
Regardez des vidéos (modèles iPod compatibles vidéo).
Video's afspelen (video-ondersteunende iPod-modellen)
Effectuez l’une des configurations vidéo (p. 13-14).
Utilisez la télécommande pour contrôler le volume
et l’alimentation d’Evolve.
Voltooi een van de video-instellingen. (p. 13-14)
Gebruik de afstandsbediening om het volume en de
voedingsstatus van de Evolve aan te passen.
Regardez des diaporamas avec ou sans musique
Contrôlez les fonctions de lecture de votre iPod en
regardant vos vidéos : Lecture/Pause, Arrêt, Retour/
Précédent et Avance/Suivant.
Bedien de afspeelfuncties van de iPod terwijl u een video
bekijkt. U beschikt over Afspelen/Pauzeren, Stoppen,
Terugspoelen/Vorige en Vooruitspoelen/Volgende.
Speel diavoorstellingen af met of zonder muziek
Pour écouter de la musique en accompagnement de
vos diaporamas, veillez à respecter l’une des
configurations vidéo (p. 13-14).
(modèles iPod compatibles avec les diaporamas).
Om muziek af te spelen als de achtergrondmuziek
(iPod-modellen met ondersteuning voor diavoorstellingen)
voor uw diavoorstellingen, moet u een van de
video-instellingen hebben voltooid. (p. 13-14)
Kies de diavoorstelling die u wilt bekijken in het menu
Sélectionnez le diaporama que vous souhaitez regarder
dans le menu Photos de votre iPod.
Photos (Foto's) op uw iPod.
Utilisez la télécommande pour contrôler le volume et
l’alimentation de votre Evolve, pour démarrer, arrêter,
avancer ou revenir en arrière dans vos diaporamas.
Gebruik de afstandsbediening om het volume en het
vermogen van de Evolve aan te passen en om uw
diavoorstelling te starten, te stoppen en vooruit of
terug te spoelen.
Suivez les instructions de la section « Ajouter un
lecteur CD ou un autre appareil audio » (p. 15).
Écouter d’autres sources audio
Voltooi de instelling "Een cd-speler of ander
Andere audio afspelen
audio-apparaat toevoegen". (p. 15)
Zorg dat uw iPod niet bezig is met afspelen.
Assurez-vous que votre iPod n’est pas en cours de lecture.
Écoutez votre lecteur MP3, votre lecteur CD, un lecteur
de cassette, une radio portable ou tout autre appareil.
Pour optimiser la qualité du son, réglez le volume de
votre appareil sur 75% maximum.
Utilisez la télécommande pour contrôler le volume et
l’alimentation d’Evolve.
Start het afspelen van uw MP3-speler, cd-speler,
cassettedeck, radio of een ander audio-apparaat. Stel
het volume van de speler niet hoger in dan 75% voor
de beste geluidskwaliteit.
Gebruik de afstandsbediening om het volume en het
vermogen van de Evolve aan te passen.
Use the Remote Control to adjust Evolve’s volume
and power.
Control iPod playback functions including Play/Pause,
Play Music
Complete one of the Video set-ups. (pp. 13-14)
Use the Remote Control to adjust Evolve’s volume
and power.
Control iPod playback functions while watching your
video, including Play/Pause, Stop, Rewind/Previous
Stop, Rewind/Previous and Forward/Next, Shuffle,
Repeat and EQ.
Play Videos (video-capable iPod models)
and Forward/Next.
To play music as a background to your Slideshows,
ensure that you have completed one of the Video
set-ups. (pp. 13-14)
Pick the slide show you wish to view from the Photos
menu on your iPod.
Use the remote to control to adjust Evolve’s volume
and power, as well as starting, stopping and moving
Play Slideshows with or without music
(slideshow- capable iPod models)
forward and backward in your Slideshow.
Complete the "Add a CD Player or Other Audio Device"
set-up. (p. 15)
Ensure that your iPod is not playing.
Play your MP3 player, CD player, tape deck, radio or
Play Other Audio
other audio device. For best sound quality, set your
player’s volume to no more than 75%.
Use the Remote Control to to adjust Evolve’s volume
and power.
Page 25

24
(modelos de iPod compatibles con vídeo)
Utilice el mando a distancia para ajustar el volumen y
encender o apagar Evolve.
Controle las funciones de reproducción del iPod mientras
Reproducir música
Utilizzate il telecomando per regolare il volume e l'accensione di Evolve.
Riproduzione della musica
Il telecomando consente di controllare le funzioni di riproduzione
dell'iPod mentre guardate il video, tra cui riproduzione e pausa,
Realice una de las configuraciones de vídeo. (páginas 13-14)
reproduce vídeo: Reproducción / Pausa, Detener,
Rebobinado / Anterior y Avance rápido / Siguiente.
Reproducir vídeos
Effettuate una delle impostazioni video (pagg. 13 - 14).
Riproduzione dei video (per modelli di iPod che supportano i video)
interruzione, riavvolgimento/traccia precedente e avanzamento/
traccia successiva.
Utilice el mando a distancia para ajustar el volumen y
encender o apagar Evolve.
Controle las funciones de reproducción del iPod mientras
reproduce vídeo: Reproducción / Pausa, Detener,
Utilizzate il telecomando per regolare il volume e l'accensione di Evolve.
Il telecomando consente di controllare le funzioni di riproduzione
dell'iPod mentre guardate il video, tra cui riproduzione e pausa,
interruzione, riavvolgimento/traccia precedente e avanzamento/
Para reproducir música de fondo en una presentación,
Rebobinado / Anterior y Avance rápido / Siguiente.
Reproducir presentaciones con o sin música
(modelos de iPod compatibles con presentaciones)
compruebe que ha realizado una de las configuraciones
Per riprodurre la musica come sottofondo alle diapositive, accertatevi
traccia successiva.
Riproduzione delle presentazioni di diapositive con o senza musica
(per i modelli di iPod che supportano questa funzione)
di aver eseguito una delle impostazioni video (pagg. 13 - 14).
de vídeo. (páginas 13-14)
Elija la presentación que desea ver en el menú Fotos
del iPod.
Utilice el mando a distancia para ajustar el volumen y
Scegliete dal menu fotografico del vostro iPod la presentazione di
diapositive che desiderate visualizzare.
Utilizzate il telecomando per regolare il volume e l'accensione di
Evolve, nonché per avviare, interrompere e avanzare o tornare
Realice la configuración indicada en “Añadir un
encender o apagar Evolve, así como para iniciar, detener
y hacer avanzar o retroceder la presentación.
Reproducir audio de otras fuentes
Effettuate l'impostazione "Aggiunta di un lettore CD o di un altro
indietro nella presentazione.
Riproduzione di altri dispositivi audio
reproductor de CD u otro dispositivo de audio”. (página 15)
Compruebe que el iPod no esté reproduciendo nada.
Reproduzca su reproductor de MP3, de CD, de casete,
radio u otro dispositivo de audio. Para obtener la mejor
calidad de sonido, ajuste el volumen del reproductor al
75% como máximo.
Utilice el mando a distancia para ajustar el volumen y
dispositivo audio" (pag. 15).
Assicuratevi che l'iPod non stia effettuando la riproduzione.
Riproducete il vostro lettore MP3, CD, audiocassette, la radio o un
altro dispositivo audio. Per una migliore qualità sonora, fate in modo
che il volume del vostro lettore non superi il 75%.
Utilizzate il telecomando per regolare il volume e l'accensione di Evolve.
encender o apagar Evolve.
Musik abspielen
Mithilfe der Fernbedienung können Sie die Lautstärke
regeln und Evolve ein- oder ausschalten.
Steuern Sie den iPod-Abspielmodus, während Sie sich
Videos anschauen: Abspielen / Pause, Stopp, Zurück /
Rücklauf und Vorwärts / Weiter.
Videos abspielen (videokompatible iPod-Modelle)
Führen Sie eines der Video-Setups durch. (S. 13-14)
Mithilfe der Fernbedienung können Sie die Lautstärke
regeln und Evolve ein- oder ausschalten.
Steuern Sie den iPod-Abspielmodus, während Sie sich
Zur Wiedergabe von Hintergrundmusik bei Diashows
müssen Sie eines der Video-Setups durchgeführt haben.
Videos anschauen: Abspielen / Pause, Stopp, Zurück /
Rücklauf und Vorwärts / Weiter.
Wiedergabe von Diashows mit oder ohne Musik
(S. 13-14)
(Diashow-kompatible iPod-Modelle)
Wählen Sie aus dem Menü „Fotos“ Ihres iPods die
Diashow aus, die Sie ansehen möchten.
Mithilfe der Fernbedienung können Sie die Lautstärke
regeln, Evolve ein- oder ausschalten und die Diashow
Führen Sie das Setup „CD-Player oder anderes
starten, anhalten und vor- und zurückbewegen.
Audiogerät hinzufügen“ durch. (S. 15)
Gehen Sie sicher, dass der iPod keine Musik abspielt.
Spielen Sie Musik von Ihrem MP3-Player, CD-Player,
Audio aus einer anderen Quelle abspielen
Kassettenrekorder, Radio oder einem anderen Audiogerät
ab. Die beste Abspielqualität erhalten Sie, wenn Sie die
Lautstärke Ihres Players auf maximal 75% einstellen.
Mithilfe der Fernbedienung können Sie die Lautstärke
regeln und Evolve ein- oder ausschalten.
Page 26

RED WHITE
25
You’ll need:
Right (Red) Left (White) RCA Audio Cable
Stereo receiver that accepts audio inputs
Complete the basic Evolve Set-up.
(pages 6-8)
Connect R/L Audio Out from Evolve to
your receiver’s R/L Audio In (may also
be labeled AUX Audio on your receiver).
Place your speakers for ideal listening.
1
2
for additional information. Some of these set-ups will use widely available cables and adapters not included with your Evolve system.
Connect Evolve to your stereo
Evolve is flexible, linking seamlessly with your TV, your existing home entertainment system or with other A/V electronic components. Here are the
Connecting Evolve to Your Home Media Center
most common set-ups. These diagrams are meant as suggestions only. You should also consult the owner’s manuals for your existing components
1
Red White
2
Page 27

26
Evolve es flexible: se integra a la
Evolve è estremamente flessibile
perfección con el televisor, el
sistema de entretenimiento para
el hogar o con otros componentes
electrónicos de audio y vídeo. A
e si integra perfettamente con il
vostro televisore, con l'impianto
di intrattenimento domestico o
con gli altri componenti video. Di
continuación describimos las
configuraciones más habituales.
Estos diagramas son tan solo
sugerencias de conexión. Consulte
los manuales de usuario de sus
componentes para obtener más
información. Algunas de estas
configuraciones emplean cables
seguito sono indicate le imposta-
zioni più comuni. Queste illustra-
zioni sono a scopo puramente
esemplificativo. È inoltre bene
consultare il manuale del produt-
tore relativo ai componenti esistenti
per ottenere ulteriori informazioni.
Alcune di queste impostazioni
richiederanno cavi e adattatori
y adaptadores fácilmente dispo-
nibles en el mercado que no están
molto diffusi sul mercato che
non sono in dotazione con Evolve.
incluidos con el sistema Evolve.
Conecte Evolve al equipo
Collegate Evolve all'impianto stereo
Necesitará:
Cable de audio RCA derecho
de música
Sarà necessario:
Cavo RCA audio destro (rosso)
e sinistro (bianco)
(rojo) / izquierdo (blanco)
Receptor estéreo que acepte
Ricevitore stereo che supporta
l'ingresso audio
Realice la configuración
(páginas 6-8)
básica de Evolve.
entradas de audio
(pagg. 6 - 8).
Effettuate l'installazione
Collegate l'uscita audio D/S
di base di Evolve
Conecte la salida de audio
D/I de Evolve a la entrada
de audio D/I del receptor
(o a la entrada de audio
1
da Evolve all'ingresso audio
D/S del ricevitore, che sul
dispositivo potrebbe anche
essere denominato audio
1
AUX (supplementare).
AUX del receptor).
Coloque los altavoces para
obtener el mejor sonido.
2
Sistemate gli altoparlanti
in modo da ottenere un
ascolto ottimale.
2
Evolve ist flexibel: Es passt sich
perfekt an Ihr Fernsehgerät, Ihr
vorhandenes Home Entertainment-
System oder an andere elektro-
nische Audio-/Video-Komponenten
Evolve est un produit adaptable
qui se connecte sans problème
à votre téléviseur, à votre système
audiovisuel domestique existant
ou à d’autres composants
Evolve is flexibel en kan probleem-
loos worden gekoppeld met uw
tv, uw bestaand home-entertain-
mentsysteem of andere elektro-
an. Im Folgenden werden die
häufigsten Konfigurationen be-
schrieben. Diese Schaubilder
dienen nur als Empfehlung.
Zusätzliche Informationen zu den
einzelnen Komponenten finden
Sie in den Benutzerhandbüchern.
électroniques audio/vidéo. Voici
les configurations les plus
courantes. Ces schémas ne sont
donnés qu'à titre indicatif. Pour
plus d’informations, nous vous
invitons à consulter également
les guides d’utilisation de vos
appareils actuels. Certaines de
nische A/V-componenten. Dit zijn
de meest gebruikelijke instellingen.
Deze schema's zijn alleen bedoeld
als suggestie. Raadpleeg de
gebruikershandleiding van uw
bestaande componenten voor
aanvullende informatie. Sommige
Für einige dieser Konfigurationen
sind nicht in Ihrem Evolve-
Soundsystem enthaltene Kabel
und Adapter notwendig, die
problemlos im Handel erhältlich sind.
Schließen Sie Evolve an Ihre
ces configurations utilisent des
câbles et des adaptateurs
largement disponibles dans le
commerce et non fournis avec
votre système Evolve.
Connexion d’Evolve à votre
van deze instellingen zullen
algemeen verkrijgbare kabels en
adapters gebruiken die niet bij
uw Evolve-systeem zijn inbegrepen.
Evolve aansluiten op uw stereo
Rechtes (rotes) / linkes (weißes)
Sie benötigen:
RCA-Audiokabel
Stereo-Receiver, der Audioein-
Stereoanlage an
Matériel nécessaire :
chaîne stéréo
gänge akzeptiert
Un câble audio RCA droite
(rouge) et gauche (blanc),
Un récepteur stéréo qui accepte
les entrées audio.
Voltooi de basisinstelling
U zult het volgende nodig hebben:
RCA-audiokabel rechts (rood)
links (wit)
Stereo-ontvanger die audio-
invoer accepteert
(S. 6-8)
Verbinden Sie den Evolve-
Receiver auch als „AUX Audio“
Audioausgang (R/L) mit dem
Audioeingang (R/L) Ihres
Führen Sie die Evolve-
Basiskonfiguration durch.
(pages 6-8)
Effectuez la configuration
Evolve de base
(p. 6-8)
van de Evolve.
Receivers (evtl. auf Ihrem
1
Connectez la sortie audio
D/G d’Evolve à l’entrée audio
D/G de votre récepteur
(également dénommée AUX
1
Sluit de audio-uitgangen R/L
van de Evolve aan op de audio-
ingangen R/L op uw ontvanger
(kan ook het label AUX Audio
1
gekennzeichnet).
Stellen Sie die Lautsprecher
so ein, dass Sie den besten
Hörgenuss erzielen.
2
l’emplacement d’écoute idéal.
Audio sur les récepteurs).
Placez vos haut-parleurs à
2
hebben op uw ontvanger).
Plaats uw luidsprekers voor
optimaal luistergenot.
2
Page 28

RED WHITE YELLOW
27
Right (Red) / Left (White) RCA
Audio Cable with a third cable
for Video (often yellow)
Complete the basic Evolve Set-up.
(pages 6-8)
Connect Composite Video Cable (usually
the yellow RCA connector) from Evolve to
the Video In port of your TV or receiver.
Connect Right and Left Audio Out from Evolve
to your TV’s R/L Audio In (may also be labeled
You’ll need: Composite Video Cable
1
AUX Audio on your TV or receiver).
Place your speakers for ideal listening.
2
Please see page 18 for information
about wireless delay.
2
Connect Evolve to home media center or your TV for
sound and video using Evolve’s Composite Video Port
1
Red White Yellow
Red White Yellow
Page 29

28
Conecte Evolve al centro
de entretenimiento para
el hogar o al televisor para
reproducir sonido y vídeo
Collegate Evolve all'im-
pianto multimediale do-
mestico o al vostro televisore
se desiderate riprodurre
(páginas 6-8)
Realice la configuración
básica de Evolve.
Conecte el cable de vídeo
compuesto (normalmente,
(pagg. 6 - 8).
di base di Evolve
1
Collegate il cavo video
1
composito (generalmente
utilizando la salida de vídeo
compuesto de Evolve.
Effettuate l'installazione
audio e video mediante la
porta video composito di
cui è dotato Evolve
el conector RCA amarillo)
il connettore RCA giallo)
de Evolve a la entrada de
vídeo del televisor o receptor.
da Evolve alla porta di
ingresso video del tele-
visore o del ricevitore.
Conecte la salida de audio
D/I de Evolve a la entrada de
audio D/I del televisor (o a la
entrada de audio AUX del
televisor o receptor).
Collegate l'uscita audio
D/S da Evolve all'ingresso
audio D/S del televisore,
che sul dispositivo po-
trebbe anche essere deno-
Consulte la página 18 para
Coloque los altavoces para
obtener el mejor sonido.
2
minato audio AUX
(supplementare).
obtener más información
Sistemate gli altoparlanti
in modo da ottenere un
2
ascolto ottimale.
sobre el retraso inalámbrico.
Vedere pag. 18 per infor-
mazioni relative al ritardo
del segnale senza fili.
Schließen Sie Evolve zur
Wiedergabe von Ton- und
Videoaufnahmen über den
Composite-Video-Port von
Evolve an Ihr Home Media
Center oder Ihr
Fernsehgerät an.
Connectez Evolve à votre
système audiovisuel
domestique ou à votre
téléviseur pour écouter
de la musique ou
regarder des vidéos en
utilisant le port vidéo
Sluit de Evolve aan op het
thuismediacentrum of uw
tv voor geluid en video via
de Composiet video-poort
van de Evolve.
Führen Sie die Evolve-
(S. 6-8)
Basiskonfiguration durch.
(pages 6-8)
Effectuez la configuration
Evolve de base
composite d’Evolve.
(p. 6-8)
Voltooi de basisinstelling
van de Evolve.
1
Sluit de Composiet video-
kabel (doorgaans de gele
1
Schließen Sie das Com-
posite-Videokabel (normal-
erweise die gelbe RCA-
Verbindungsbuchse) von
Evolve an den Videoeingang
des Fernsehgerätes oder
1
Connectez le câble vidéo
composite (généralement
le connecteur RCA jaune)
RCA-aansluiting) van de
Evolve aan op de video-
Receivers an.
d’Evolve au port d’entrée
vidéo de votre téléviseur
ou de votre récepteur.
Connectez les sorties
ingang van uw tv of ontvanger.
Sluit de audio-uitgangen R/L
van de Evolve aan op de audio-
ingangen R/L van uw tv (kan
Verbinden Sie den Evolve-
Audioausgang (R/L) mit
dem Audioeingang (R/L)
audio droite et gauche
d’Evolve aux entrée audio
D/G de votre téléviseur
ook het label AUX Audio
hebben op uw tv of ontvanger).
„AUX Audio“ gekennzeichnet).
Ihres Fernsehgerätes (evtl.
auf Ihrem Fernsehgerät
oder Receiver auch als
(également dénommées
AUX Audio sur les télévi-
seurs ou les récepteurs).
Plaats uw luidsprekers voor
optimaal luistergenot.
2
Stellen Sie die Lautsprecher
so ein, dass Sie den besten
2
Placez vos haut-parleurs
à l’emplacement
2
Zie pagina 18 voor meer
informatie over draadloze
Informationen über die
Hörgenuss erzielen.
Funkverzögerung finden
Sie auf S. 18.
Veuillez consulter la page
d’écoute idéal.
18 pour en savoir plus sur
le délai de la synchroni-
sation sans fil.
vertraging.
Page 30

RED WHITE
29
RCA Audio Cable
You’ll need: S-Video Cable -AND-
Right (Red) and Left (White)
Complete the basic Evolve Set-up.
(pages 6-8)
Connect S-Video cable from Evolve to
1
either your television’s S-Video In port
OR your receiver’s S-Video In port.
Connect Right and Left Audio Out from
Evolve to your receiver’s R/L Audio In (may
be labeled AUX Audio on your receiver).
2
Place your speakers for ideal listening.
3
Please see page 18 for information
about wireless delay.
3
S-Video from Evolve
Connect Evolve to home media center or your TV for sound
Connecting Evolve to Your Home Media Center
and video using Evolve’s S-Video Port and RCA Audio Ports
1
to TV -OR-
audio receiver
S-Video
-OR-
from Evolve
Red White
2
to receiver
Red White
Page 31

30
Conecte Evolve al centro
de entretenimiento para
el hogar o al televisor
para reproducir sonido y
vídeo utilizando la salida
Collegate Evolve
all'impianto multimediale
domestico o al vostro
televisore se desiderate
riprodurre audio e video
Schließen Sie Evolve zur
Wiedergabe von Ton- und
Videoaufnahmen über
den S-Video-Port und die
RCA-Audioports an Ihr
(páginas 6-8)
Realice la configuración
básica de Evolve.
Conecte el cable de
S-Vídeo de Evolve a la
de S-Vídeo y la salida de
audio RCA de Evolve.
mediante le porte S-Video
e audio RCA di cui è
dotato Evolve
Führen Sie die Evolve-
Home Media Center oder
Ihr Fernsehgerät an.
1
Effettuate l'installazione
(pagg. 6 - 8).
di base di Evolve
Collegate il cavo S-Video
1
(S. 6-8)
Schließen Sie das S-Video-
durch.
kabel von Evolve entweder
1
Basiskonfiguration
entrada de S-Vídeo
del televisor o del receptor.
Conecte la salida de audio
derecha e izquierda de
Evolve a la entrada de
2
da Evolve alla porta di
ingresso S-Video del
televisore O del ricevitore.
Collegate l'uscita audio
destro e sinistro da Evolve
all'ingresso audio D/S del
ricevitore, che sul
2
an den S-Videoeingang
Ihres Fernsehgerätes
oder Ihres Receivers an.
Verbinden Sie den Evolve-
Audioausgang (R/L) mit
dem Audioeingang (R/L)
2
audio D/I del receptor
(o a la entrada de audio
dispositivo potrebbe
essere denominato audio
AUX (audio supplementare).
Ihres Receivers (evt. auf
Ihrem Receiver auch als
AUX del receptor).
Coloque los altavoces
3
Sistemate gli altoparlanti
in modo da ottenere un
3
„AUX Audio“ gekennzeichnet).
Stellen Sie die Lautsprecher
3
Consulte la página 18 para
para obtener el mejor
sonido.
obtener más información
ascolto ottimale.
Vedere pag. 18 per
informazioni relative
Informationen über die
so auf, dass Sie den besten
Hörgenuss erzielen.
sobre el retraso inalámbrico.
al ritardo del segnale
senza fili.
Funkverzögerung finden
Sie auf S. 18.
Connectez Evolve à votre
système audiovisuel
domestique ou à votre
téléviseur pour écouter
de la musique ou regarder
Sluit de Evolve aan om het
thuismediacentrum of uw
tv voor geluid en video via
de S-Video-poort en de
RCA-audiopoorten van
des vidéos en utilisant le
port S-Vidéo et les ports
audio RCA d’Evolve.
Voltooi de basis-
instelling van de Evolve.
de Evolve.
(pages 6-8)
Effectuez la configur-
ation Evolve de base
(p. 6-8)
Sluit de S-Videokabel van
1
Connectez le câble S-Vidéo
d’Evolve au port d’entrée
S-Vidéo de votre téléviseur
OU au port d’entrée S-Vidéo
1
de Evolve aan op de S-Video-
ingang van uw tv OF de
de votre récepteur.
S-Video-ingang van uw
ontvanger.
Sluit de audio-uitgangen
2
Connectez les sorties audio
droite et gauche d’Evolve
aux entrées audio D/G de
votre récepteur (également
dénommées AUX Audio sur
2
R/L van de Evolve aan op
de audio-ingangen R/L
les récepteurs).
op uw ontvanger (kan ook
het label AUX Audio hebben
op uw ontvanger).
Plaats uw luidsprekers
3
Placez vos haut-parleurs à
3
l’emplacement d’écoute idéal.
voor optimaal luistergenot.
Veuillez consulter la page
18 pour en savoir plus sur
le délai de la synchronisation
Zie pagina 18 voor meer
informatie over draadloze
vertraging.
sans fil.
Page 32

RED WHITE RED WHITE
31
Complete the basic Evolve Set-up.
(pages 6-8)
Connect Evolve’s Audio In Right and Left to
your device’s Audio Out Right and Left jacks.
- OR -
You’ll need: Stereo mini-to-RCA “Y” Cable
- OR -Right (Red) and Left (White)
RCA Audio Cable
1
Connect Evolve’s Audio In Right and Left
2
to your device’s 1/8" (3.5mm) stereo mini
headphone jack.
Place your speakers for ideal listening.
3
3
-OR-
Connect Stereo Receiver
Add a CD player or other audio device
1
Connect CD Player
2
Page 33

32
(páginas 6-8)
Realice la
configuración básica
Añadir un reproductor
de CD u otro dispositivo
de audio
Aggiunta di un lettore
CD o di un altro
dispositivo audio
CD-Player oder anderes
Audiogerät hinzufügen
de Evolve.
(pagg. 6 - 8).
Effettuate
l'installazione di base
di Evolve
(S. 6-8)
Führen Sie die Evolve-
Basiskonfiguration
durch.
Conecte la entrada de
audio derecha e
izquierda de Evolve a
1
Schließen Sie den
1
los conectores de salida
Collegate gli spinotti di
uscita audio destro e
sinistro del dispositivo
all'ingresso audio destro
1
rechten und linken
Audioeingang von Evolve
an die Audioeingangs-
buchsen (R/L) Ihres
izquierdos del dispositivo.
de audio derechos e
e sinistro di Evolve.
Gerätes an.
O BIEN
Conecte la entrada de
2
- O -
Collegate lo spinotto
mini stereo delle cuffie
2
ODER
Schließen Sie den
2
rechten und linken
audio derecha e
izquierda de Evolve al
da 3,5 mm all'ingresso
Audioeingang von Evolve
audio destro e sinistro
an die 3,5 mm Stereo-
miniconector estéreo
di Evolve.
Minibuchse Ihres
de auriculares
de 3,5 mm.
Sistemate gli altoparlanti
3
Kopfhörers an.
Coloque los altavoces
3
in modo da ottenere
un ascolto ottimale.
Stellen Sie die
Lautsprecher so ein,
3
para obtener el mejor
sonido.
dass Sie den besten
Hörgenuss erzielen.
Effectuez la
Ajouter un lecteur CD ou
un autre appareil audio
Een cd-speler of
ander audio-apparaat
toevoegen
configuration
Evolve de base
Voltooi de
(pages 6-8)
Connectez les entrées
audio droite et gauche
1
(p. 6-8)
Sluit de audio-ingang
basisinstelling van
de Evolve.
1
d’Evolve aux sorties
audio droite et gauche
de votre appareil
- OU -
R/L van de Evolve aan
op de audio-uitgangen
R/L van uw apparaat.
- OF -
Connectez les entrées
audio droite et gauche
d’Evolve à la mini prise
de sortie casque stéréo
de 3,5 mm de votre
2
Sluit de audio-ingang
R/L van de Evolve aan op
de 3,5 mm stereo mini-
2
appareil.
Plaats uw luidsprekers
hoofdtelefoonaansluiting.
3
Placez vos haut-parleurs
3
voor optimaal
luistergenot.
à l’emplacement
d’écoute idéal.
Page 34

33
Reminder: You should charge the speakers
Evolve’s speakers can be used with another
Base Unit to share the music at a party or
anytime you want music where you are. You
4 hours before the first wireless use.
can add as many Evolve speakers as you like.
Pair your speakers with the other Base Unit
by placing them on that unit’s Charging Pads.
The speakers’ green LEDs will light, indicating
that pairing is successful. Repeat this step for
all the Evolve speakers you plan on using.
Place the speakers where you want to
use them.
When you get ready to take your speakers with
1
2
you, preserve the battery charge. Power down
each speaker by pressing the Power button on
top of each speaker enclosure. (see page 9)
When you take your speakers home after the
festivities, don't forget to place them on the
Charging Pads to recharge and to pair them
with your Base Unit.
Evolve to Go
Use your speakers with someone else’s Base Unit
1 2
Page 35

34
Los altavoces de Evolve pueden
utilizarse con otra unidad base
para compartir la música en una
fiesta o siempre que desee
escuchar música donde esté.
Puede añadir tantos altavoces
Gli altoparlanti di Evolve
possono essere utilizzati con
un'altra base per condividere
la musica a una festa o
ogniqualvolta desideriate
ascoltare musica, ovunque
vi troviate. Potete aggiungere
tutti gli altoparlanti Evolve
Die Evolve-Lautsprecher
können mit einer anderen
Basiseinheit verwendet
werden, um Musik zum
Beispiel auf einer Party
oder wann immer Sie
möchten gemeinsam mit
anderen zu hören. Dabei
Conecte los altavoces a la
Evolve como desee.
otra unidad base colocándolos
en los conectores de carga de
dicha unidad. Los indicadores
1
Per effettuare l'accoppia-
che desiderate.
mento degli altoparlanti con
l'altra base, sistemateli sulle
piastrine di carica di tale base.
1
Melden Sie Ihre Lautsprecher
wie Sie wollen.
1
an der anderen Basiseinheit
können Sie so viele Evolve-
Lautsprecher hinzufügen,
luminosos verdes de los
altavoces se encienden para
indicar que la conexión se ha
realizado correctamente.
Repita este paso para todos
los altavoces Evolve que
vaya a utilizar.
I LED verdi degli altoparlanti
si accenderanno, indicando
che l'accoppiamento è
avvenuto correttamente.
Ripetete questo passaggio
per tutti gli altoparlanti
Evolve che intendete utilizzare.
an, indem Sie sie in die
betreffenden Ladeständer
einsetzen. Wenn die LEDs
auf den Lautsprechern grün
leuchten, war die Anmeldung
erfolgreich. Führen Sie
diesen Schritt mit allen
Evolve-Lautsprechern durch,
die Sie verwenden möchten.
Coloque los altavoces donde
desee utilizarlos.
Cuando prepare los altavoces
para llevárselos, conserve la
2
Sistemate gli altoparlanti
dove preferite.
Una volta pronti a portare
con voi gli altoparlanti,
2
Stellen Sie die Lautsprecher
2
preservate la carica della
dort auf, wo Sie sie
verwenden möchten.
Nutzen Sie die Batterie-
sparfunktion, wenn Sie die
de la parte superior de los
altavoces.
(consulte la página 9)
nella parte superiore degli
stessi (vedere pag. 9).
oben auf den Lautsprechern,
um diese auszuschalten.
(s. S. 9)
Al volver a casa, no olvide colocar
Una volta tornati a casa, non
dimenticate di posizionare
Bitte denken Sie daran, die
carga de la batería. Apague
los altavoces pulsando el
botón de encendido/apagado
batteria: spegnete ciascun
altoparlante premendo il
pulsante di accensione posto
Lautsprecher wieder
mitnehmen. Betätigen Sie
hierzu den Ein/Ausschaltknopf
los altavoces en los cargadores y
conectarlos a la unidad base.
gli altoparlanti sulle piastrine
di carica, per ricaricarli e
accoppiarli con la vostra base.
Lautsprecher zu Hause auf die
Ladeständer zu setzen, um sie
zu laden und an Ihrer Basiseinheit
anzumelden.
Les haut-parleurs Evolve
peuvent être utilisés avec
une autre base pour partager
de la musique à une soirée,
par exemple, ou écouter de
De luidsprekers van de
Evolve kunnen met de
basiseenheid van iemand
anders worden gebruikt om
muziek te delen op een
feestje of tijdens een andere
la musique où que vous soyez.
Vous pouvez ajouter autant
de haut-parleurs Evolve que
vous le souhaitez.
gelegenheid. U kunt zoveel
Koppel uw luidsprekers met
Evolve-luidsprekers
toevoegen als u wilt.
Jumelez vos haut-parleurs
avec l’autre base en les
plaçant sur les connecteurs
de charge de cette base. Les
voyants verts des haut-
parleurs s’allument une fois
eenheid te zetten. De groene
le jumelage effectué.
gelukt is. Herhaal deze stap
LED's van de luidsprekers
zullen oplichten om aan te
geven dat het koppelen
1
de andere basiseenheid door
ze op de laadblokken van die
1
Répétez cette étape pour
tous les haut-parleurs Evolve
que vous avez l’intention
voor alle Evolve-luidsprekers
die u wilt gebruiken.
d’utiliser.
Placez les haut-parleurs
comme bon vous semble.
Lorsque vous emmenez vos
haut-parleurs, préservez
l’autonomie de la batterie.
Wanneer u zich klaarmaakt
om de luidsprekers mee te
nemen, moet u zorgen dat
u het batterijvermogen
behoudt. Schakel elke
Plaats de luidsprekers waar
u ze wilt gebruiken.
2
2
Éteignez chaque haut-
parleur en appuyant sur le
bouton d’alimentation situé
en haut de l’enceinte de
chaque haut-parleur
(voir page 9).
luidspreker uit door op de
voedingsknop op de
Wanneer u de luidsprekers
bovenkant van de behuizing
van elke luidspreker te
drukken. (zie pagina 9)
terug mee naar huis neemt
Lorsque vous rapportez vos
haut-parleurs, n’oubliez pas
de les placer sur les connecteurs
de charge afin de les recharger
et de les jumeler avec votre base.
koppelen met uw basiseenheid.
na de feestelijkheden, mag u
niet vergeten ze terug te
plaatsen op de laadblokken
om ze op te laden en te
Page 36

35
Operating temperature: 32˚to 95˚F (0˚ to 35˚C)
Nonoperating/Storage temperature: 14˚ to 140˚F (-10˚ to 60˚C)
Relative humidity: 5% to 95% non-condensing
Environmental Limits
Temporary MAX. operating altitude: 10,000 feet (3000 m)
Wireless Delay
NOTE:
When using Evolve to play video or slideshows with music on your
TV or home media center, Griffin recommends using either your
wired speakers or Evolve's wireless speakers but not both at the
same time. If you use both sets of speakers at the same time, you
may notice that the sound and the performer's mouth movements
are slightly out of sync.
Our quality testing shows this time difference can be most apparent
when watching performers sing or talk. This is not a defect with
Evolve, your iPod or your home media center. All wireless sound
transmission creates a certain amount of delay. Griffin has
minimized the delay to no more than 20 milliseconds from iPod to
speaker. In real-world terms, 20 milliseconds is the time it takes
for sound to travel about 23 feet (70˚F/21˚C).
Remote
4.01" (102mm) long X 1.64" (42mm) wide X
.39" (10mm) thick
Range: 150’ (45.7m)
Specifications
Base Unit
15.7" (400mm) wide X 5.1" (140mm) deep
4.7" (120mm) tall without speakers in place
Total height 7.5" (190 mm) with speakers in place
RF - transmits to 150’ (45.7m) at 433MHz
Functions: Play/Pause, Volume Up/Volume Down,
Next/Fast Forward, Previous/Fast Rewind, Shuffle,
Repeat, EQ, System Power
Power: Button cell type CR2032 3V lithium-ion battery
Outputs
Composite Video Out (iPod Only)
Right/Left Audio Out (female RCA connectors)
S-Video Out (iPod Only)
Inputs
iPod Universal Dock with inserts accommodates all
AC Power: 100-240V AC, 12V/5A
DC Power: 3.7v/5.2Ah
Speaker Batteries: High-efficiency Internal lithium-ion
batteries with overcharge/undercharge circuitry
10 hours operation at normal listening volume.
Batteries charge when placed on Base Unit’s
Power Supply
iPod models with dock connector
Speakers
Right/Left Auxiliary Audio In – female RCA connectors
Effective range: 150’ (45.7m) from Base Unit
Charging Pads.
5.1" X 5.1" X 5.1" (140mm X 140mm X 140mm)
Broadcast Transmission latency (”wireless delay”) < 20ms.
Internal lithium-ion battery, rechargeable - 3.7v/5.2Ah
Hours of operation at normal listening volume: 10 hours
Page 37

36
Bedrijfstemperatuur: 0 tot 35°C
Niet-bedrijfs-/opslagtemperatuur: -10 tot 60°C
Relatieve vochtigheid: 5% tot 95% niet-condenserend
Omgevingsbeperkingen
Tijdelijke MAX. bedrijfshoogte: 3.000 m
Draadloze vertraging
OPMERKING:
Wanneer u de Evolve gebruikt om video's of diavoorstellingen met
muziek af te spelen op uw tv of thuismediacentrum, raadt Griffin u
aan bekabelde luidsprekers of de draadloze luidsprekers van Evolve
te gebruiken, maar niet beide typen tegelijkertijd. Als u beide sets
luidsprekers tegelijkertijd gebruikt, zult u mogelijk merken dat het
geluid en de bewegingen van de mond van de persoon op het scherm
niet helemaal synchroon zijn.
Onze kwaliteitstests hebben aangetoond dat dit tijdverschil vooral
duidelijk wordt wanneer u artiesten die zingen of praten bekijkt.
Dit is geen defect van de Evolve, uw Ipod of uw thuismediacentrum.
Alle draadloze geluidstransmissies zorgen voor een bepaalde
vertraging. Griffin heeft de vertraging geminimaliseerd tot slechts
20 milliseconden van de iPod naar de luidspreker. In begrijpelijke
taal betekent dit dat het geluid 20 milliseconden nodig heeft om
een afstand van ongeveer 7 m af te leggen (21°C).
Afstandsbediening
102mm lang x 42mm breed x 10mm dik
Bereik: 45,7 m
Specificaties
Basiseenheid
400mm breed x 140mm diep
120 mm hoog zonder geplaatste luidsprekers
RF - zendt uit tot 45,7m aan 433MHz
Functies: Afspelen/pauzeren, Volume hoger/lager,
Volgende/snel vooruitspoelen, Vorige/Snel terugspoelen,
Willekeurig, Herhalen, EQ, Systeemvoeding
Voeding: knoopceltype lithium-ionbatterij CR 2032 3V
Totale hoogte 190 mm met geplaatste luidsprekers
Uitgangen
Composiet video-uitgang (alleen iPod)
Audio-uitgang rechts/links (vrouwelijke RCA-aansluitingen)
S-Video-uitgang (alleen iPod)
Ingangen
Universele dock iPod met sleuven, voorzien voor alle
Voeding
iPod-modellen met dockconnector
Wisselstroom: 100-240V AC, 12V/5A
Gelijkstroom: 3,7v/5,2Ah
Luidsprekerbatterijen: interne lithium-ionbatterijen met
Luidsprekers
Hulpingang audio rechts/links - vrouwelijke RCA-aansluitingen
een hoge efficiëntie en schakelschema voor te hoge/te
lage belasting
10 bedrijfsuren bij normaal luistervolume.
De batterijen worden opgeladen wanneer ze op de
laadblokken van de basiseenheid worden geplaatst.
Effectief bereik: 45,7 m vanaf basiseenheid
140mm x 140mm x 140mm
Latentie broadcast-transmissie
("draadloze vertraging") < 20ms.
Interne lithium-ionbatterij, oplaadbaar - 3,7V/5,2Ah
Bedrijfsuren bij normaal luistervolume: 10 uur
Page 38

37
Contraintes environnementales
Température de fonctionnement : 0° à 35°C
Température de stockage/non fonctionnement -10° à 60°C
Humidité relative : 5 % à 95 % sans condensation
Altitude de fonctionnement temporaire MAX. : 3 000 m
Télécommande
102 mm de longueur X 42 mm de largeur X
10 mm d’épaisseur
Portée : 45,7 m
RF – transmet jusqu’à 45,7 m à 433 MHz
Délai de la synchronisation sans fil
Fonctions : Lecture/Pause, Augmentation/diminution du
volume, Suivant/Avance rapide, Précédent/Retour rapide,
Lecture aléatoire, Répétition, Égalisation, Alimentation
du système.
Alimentation : Pile bouton au lithium-ion CR2032 3 V
Remarque :
Si vous utilisez Evolve pour regarder des vidéos ou des diaporamas
Alimentation électrique
avec de la musique sur votre téléviseur ou votre système audiovisuel
domestique, Griffin vous conseille d'utiliser soit vos haut-parleurs
câblés, soit les haut-parleurs sans fil d’Evolve, mais pas les deux en
même temps. Si vous utilisez les deux types de haut-parleurs en
même temps, le son et le mouvement des lèvres des acteurs
Alimentation CA : CA 100-240 V, 12 V/5 A
Alimentation CC : 3,7 V/5,2 Ah
Batteries des haut-parleurs : batteries de longue durée
pourront vous paraître légèrement désynchronisés.
Nos tests qualitatifs démontrent que cet écart de synchronisation
au lithium-ion avec circuit de surtensions/sous-tensions.
est d’autant plus visible lorsque les acteurs parlent ou chantent. Il
ne s’agit pas d’un défaut provenant d’Evolve, de votre iPod ou de
10 heures de fonctionnement à un volume d’écoute normal.
Les batteries se rechargent sur les connecteurs de la base.
votre système audiovisuel domestique. Toutes les transmissions
acoustiques sans fil créent un certain délai. Griffin a réduit ce délai
à 20 millièmes de seconde entre l’iPod et le haut-parleur. En termes
plus concrets, 20 millièmes de seconde équivalent à la vitesse que
le son met pour parcourir environ 7 mètres (à 21°C).
Spécifications
Base
400 mm de largeur X 140 mm de profondeur
Hauteur 120 mm sans les haut-parleurs
Hauteur totale 190 mm avec les haut-parleurs
Sorties
Sortie vidéo composite (iPod uniquement)
Sortie audio droite/gauche (connecteurs RCA femelles)
Sortie S-Vidéo (iPod uniquement)
Entrées
Dock iPod universel avec adaptateurs, compatible avec tous
les modèles d’iPod dotés d'un connecteur Dock.
Haut-parleurs
Entrée audio auxiliaire droite/gauche (connecteurs
RCA femelles)
Portée effective : 45,7 m de la base
140 mm x 140 mm x 140 mm
Temps de latence de la diffusion (« délai de synchronisation
sans fil ») < 20 ms.
Batterie interne rechargeable au lithium-ion (3,7 V/5,2 Ah)
Nombre d’heures de fonctionnement à un volume d’écoute
normal : 10 heures.
Page 39

38
Umgebungseinschränkungen
Betriebstemperatur: 0 °C bis 35 °C
Lagerungstemperatur: -10 °C bis 60 °C)
Relative Feuchtigkeit: 5 bis 95 % ohne Kondensierung
Maximale temporäre Betriebshöhe: 3.000 m
Fernbedienung
102 mm Länge x 42 mm Breite x 10 mm Stärke
Reichweite: 150’ 45,7 m
RF: Übertragung bis zu 45,7 m bei 433 MHz
Funktionen: Abspielen / Pause, Lautstärke + / Lautstärke -,
Funkverzögerung
Weiter / Schneller Vorlauf, Zurück / Schneller Rücklauf,
Zufallswiedergabe, Erneut abspielen, EQ, An-/Aus
Stromzufuhr: Lithium-Ionen-Knopfzelle Typ CR2032 mit 3 V
HINWEIS:
Wenn Sie mit Evolve Videos oder Diashows mit Musik auf Ihrem
Fernsehgerät oder Home Media Center wiedergeben, empfiehlt
Griffin, hierzu entweder Ihre Kabellautsprecher oder die
Netzteil
Evolve-Funklautsprecher zu verwenden, nicht jedoch beide
gleichzeitig. Bei der gleichzeitigen Verwendung beider
Lautsprechersets kann es zu einem leichten zeitlichen Versatz
zwischen Ton und Mundbewegungen des Interpreten kommen.
Unsere Qualitätskontrollen haben ergeben, dass dieser zeitliche
Versatz deutlicher spürbar ist, wenn der Interpret singt oder
spricht. Dies ist kein Fehler von Evolve, Ihrem iPod oder Ihrem
Home Media Center. Jede kabellose Tonübertragung findet mit
einem gewissen zeitlichen Versatz statt. Griffin ist es gelungen,
diesen Versatz vom iPod zu den Lautsprechern auf maximal 20
AC-Stromzufuhr: 100-240 V AC, 12 V/5 A
DC-Stromzufuhr: 3.7 V/5.2 Ah
Lautsprecherbatterien: Hochleistungsfähige interne
Lithium-Ionen-Batterien mit Ladeschutz-Schaltkreis
zum Schutz vor Über/-Unterladung
10 Betriebsstunden bei normaler Hörlautstärke.
Die Batterien werden geladen, wenn sie sich in den
Ladeständern der Basiseinheit befinden.
Millisekunden zu verringern. Unter realen Bedingungen benötigt
der Ton 20 Millisekunden, um etwa 7 Meter bei 21 °C zurückzulegen.
Spezifikationen
Basiseinheit
400 mm Breite x 140 mm Tiefe
120 mm Höhe ohne Lautsprecher
190 mm Gesamthöhe mit Lautsprechern
Ausgänge
Composite-Videoausgang (nur iPod)
Rechter / linker Audioausgang (RCA-Verbindungsbuchsen)
S-Videoausgang (nur iPod)
Eingänge
Universeller iPod Dock mit Adaptereinsätzen für alle
iPod-Modelle mit Dock Connector
Lautsprecher
Rechter / linker zusätzlicher Audioeingang
(RCA-Verbindungsbuchsen)
Effektive Reichweite: 45,7 m von der Basiseinheit
140 mm x 140 mm x 140 mm
Übertragungslatenz („Funkverzögerung“) < 20 ms.
Interne wiederaufladbare Lithium-Ionen-Batterie mit 2,7 V
und 5,2 Ah
Betriebsstunden bei normaler Hörlautstärke: 10 Stunden
Page 40

39
Limiti ambientali
Temperatura operativa: da 0° a 35°C
Temperatura non operativa/in magazzino: da -10° a 60°C
Umidità relativa: dal 5% al 95% in ambiente privo di condensa
Altitudine operativa massima temporanea: 3000 m
Telecomando
Lunghezza: 102 mm; larghezza: 42 mm; spessore: 10 mm
Raggio d'azione: 45,7 m
RF: trasmette a una distanza di 45,7 m a una frequenza
di 433 MHz
Ritardo del segnale senza fili
Funzioni: riproduzione/pausa, aumento e riduzione del
volume, traccia successiva/avanzamento veloce, traccia
precedente/riavvolgimento veloce, shuffle, ripetizione,
equalizzazione, accensione/spegnimento
Alimentazione: batteria a bottone agli ioni di litio
CR2032 da 3 V
NOTA:
Quando utilizzate Evolve per riprodurre video o presentazioni
di diapositive con la musica sul vostro televisore o sull'impianto
multimediale domestico, Griffin consente di utilizzare sia gli
altoparlanti con fili sia gli altoparlanti senza fili di Evolve, ma
Alimentazione
Alimentazione CA: 100 - 240 V CA, 12 V/5 A
consiglia di non utilizzare entrambi contemporaneamente.
Qualora utilizziate entrambi i set di altoparlanti nello stesso
momento, potrebbe verificarsi un leggero sfalsamento di
sincronizzazione tra la musica e le immagini.
Le prove di qualità condotte da Griffin dimostrano che tale
asincronia diventa ancora più evidente se l'immagine è
rappresentata da qualcuno che canta o parla. Questo non è un
difetto di Evolve, del vostro iPod o dell'impianto multimediale
Alimentazione CC: 3,7 V/5,2 Ah
Batterie degli altoparlanti: batterie interne agli ioni di
litio ad alto rendimento con circuiteria in grado di gestire
la carica eccessiva o insufficiente
10 ore di funzionamento al normale volume di ascolto.
Le batterie si ricaricano attraverso le piastrine di carica
della base.
domestico. La trasmissione sonora senza fili crea un certo ritardo.
Griffin ha ridotto al minimo il ritardo tra iPod e altoparlante a
meno di 20 millisecondi, equivalente, in termini pratici, al tempo
necessario affinché un suono possa viaggiare per 7 metri, con una
temperatura di 21°C.
Specifiche
Larghezza: 400 mm ; profondità: 140 mm
Base
Altezza: 120 mm (senza altoparlanti)
Altezza totale: 190 mm(con altoparlanti)
Uscite
Uscita video composito (solo per iPod)
Uscita audio destro/sinistro (connettori RCA femmina)
Uscita S-Video (solo per iPod)
Ingressi
Gli adattatori dock universali per iPod consentono
l'alloggiamento di tutti i modelli di iPod dotati di
connettore dock
Ingresso audio supplementare destro/sinistro
(connettori RCA femmina)
Raggio d'azione effettivo: 45,7 m dalla base
Altoparlanti
140 mm x 140 mm x 140 mm
Latenza di trasmissione ("ritardo del segnale senza fili")
inferiore a 20 ms.
Batteria agli ioni di litio interna, ricaricabile, da 3,7 V/5,2 Ah
Ore di funzionamento al normale volume di ascolto: 10 ore
Page 41

2440
Límites ambientales
Temperatura de funcionamiento: de 0 °C a 35 °C
Mando a distancia
102 mm (largo) x 42 mm (ancho) x 10 mm (grosor)
Temperatura de almacenamiento: de -10 °C a 60 °C
Humedad relativa: del 5 al 95% sin condensación
Altitud máxima temporal para el funcionamiento: 3.000 m
Alcance: 45,7 m
Radiofrecuencia: transmisión hasta 45,7 metros a 433 MHz
Funciones: Reproducción/Pausa, Subir volumen/Bajar
volumen, Siguiente/Avance rápido, Anterior/Rebobinado,
Reproducción aleatoria, Repetir, Ecualización,
Encendido/Apagado
Retraso inalámbrico
NOTA:
Cuando se utilice Evolve para reproducir vídeo o presentaciones
con música en el televisor o centro de entretenimiento para el
hogar, Griffin recomienda utilizar los altavoces con cable o los
inalámbricos de Evolve pero no los dos a la vez. Si utiliza los dos
altavoces simultáneamente, puede ocurrir que el sonido y los
movimientos de la boca del intérprete estén ligeramente
desincronizados.
Nuestras pruebas de calidad demuestran que esta diferencia de
tiempo puede ser más obvia cuando el intérprete canta o habla.
No se trata de un defecto de Evolve ni del iPod ni del centro de
entretenimiento para el hogar. Toda transmisión de sonido
inalámbrica crea un cierto grado de retraso. Griffin ha minimizado
tipo botón
Alimentación de corriente
Alimentación CA: 100-240 V CA, 12 V/5 A
Alimentación DC: 3,7 V/5,2 Ah
Baterías de los altavoces: baterías internas de iones de
litio de alta eficacia con circuito de sobrecarga/infracarga.
10 horas de autonomía a un volumen de sonido normal..
Las baterías se recargan cuando están colocadas en los
cargadores de la unidad base.
Alimentación: Pila de iones de litio CR2032 de 3 V de
dicho retraso a menos de 20 milisegundos del iPod al altavoz. En
términos prácticos, 20 milisegundos es el tiempo que tarda el
sonido en viajar unos 7 metros a 21 °C.
Especificaciones
400 mm (ancho) x 140 mm (fondo)
Unidad base
120 mm de altura sin altavoces conectados
190 mm de altura total con altavoces conectados
Salidas
Salida de vídeo compuesto (sólo iPod)
Salida de audio derecha/izquierda (conectores RCA hembra)
Salida de S-Vídeo (sólo iPod)
Entradas
Dock universal de iPod con adaptadores para todos los
modelos de iPod con dock
Entrada de audio auxiliar derecha/izquierda (conectores
RCA hembra)
Altavoces
Alcance óptimo: 45,7 metros desde la estación base
140 mm x 140 mm x 140 mm
Latencia de transmisión (“retraso inalámbrico”) < 20 ms.
Batería interna recargable de iones de litio de 3,7 V y 5,2 Ah
Horas de autonomía a un volumen de sonido normal: 10 horas
Page 42
41
Are you within 150’ of the Base Unit?
The number and construction of the walls between you and the
Evolve Base Unit can interfere with the Remote Control’s signals.
No Remote!
The battery of the remote may be expired. Replace the battery.
The battery used by Evolve’s remote control should last a year
or more under normal use. Should your remote start working
erratically, replace the battery with a button cell, type CR2032 3V
lithium-ion battery, available at electronics stores and retailers.
You haven’t dealt with my issue here!
First, please check our published support information
available at www.griffintechnology.com/support/evolve.
CALL us. Griffin Technology Customer Support is available from
9 a.m. to 6 p.m. Central Time Monday through Thursday, and
from 9 a.m. to 5 p.m. on Friday at 615-399-7000.
Troubleshooting
No Sound!
Base Unit plugged in? Base Unit ON?
iPod fully seated in the Base Unit’s dock?
All audio connections secure? (If connecting
Evolve to a home entertainment system.)
iPod is playing audio?
If trying to play from auxiliary audio source, make sure iPod
and auxiliary audio sources are not playing at the same time.
Speakers charged and properly paired with the Base Unit? (See page 8.)
The number and construction of the walls between Evolve’s Base Unit
and speakers can interfere with Evolve’s wireless signal.
(For video and slideshow-capable iPod models only)
Base Unit plugged in? Base Unit On?
iPod fully seated in Evolve Base Unit’s dock?
All video connections between Evolve and TV secure?
TV is set to show external video? Consult your TV’s manual for details.
iPod is playing video or slideshow?
No Picture!
iPod set to “TV Out”?
Page 43

42
Bevindt u zich binnen het bereik van 45,7 m vanaf de basiseenheid?
Het aantal muren en de samenstelling van de muren tussen u en de basiseenheid
van de Evolve kunnen de signalen van de afstandsbediening storen.
Geen afstandsbediening.
De batterij van de afstandsbediening is mogelijk leeg. Vervang de batterij.
De batterij die door de afstandsbediening van de Evolve wordt gebruikt, zou bij normaal
gebruik minstens 1 jaar moeten meegaan. Als de afstandsbediening een onjuiste werking
vertoont, vervang de batterij dan door een knoopceltype lithium-ionbatterij CR 2032 3V.
Dit type kunt u aanschaffen bij elektronicazaken en kleinhandelaars.
Mijn probleem komt hier niet aan de orde.
Raadpleeg eerst onze gepubliceerde ondersteuningsinformatie op
www.griffintechnology.com/support/evolve.
BEL ons. U kunt de klantenondersteuning van Griffin Technology van
maandag tot donderdag van 9 tot 18 uur en op vrijdag van 9 tot 17 uur
bereiken op het nummer 615-399-7000.
Problemen oplossen
Is de basiseenheid aangesloten op de netstroom? Is de basiseenheid INGESCHAKELD?
Zit de iPod volledig in het dock van de basiseenheid?
Zijn alle audio-aansluitingen goed uitgevoerd? (Als u de Evolve aansluit op een
home-entertainmentsysteem.)
Speelt de iPod audio af?
Als u probeert af te spelen van een hulpaudiobron moet u ervoor zorgen dat de iPod en
de hulpaudiobronnen niet tegelijkertijd afspelen.
Zijn de luidsprekers opgeladen en correct gekoppeld met de basiseenheid? (Zie pagina 8.)
Geen geluid.
(Alleen voor iPod-modellen met ondersteuning
voor video's en diavoorstellingen)
Het aantal muren en de samenstelling van de muren tussen de basiseenheid van de Evolve
en de luidsprekers, kunnen het draadloze signaal van de Evolve storen.
Is de basiseenheid aangesloten op de netstroom? Is de basiseenheid ingeschakeld?
Zit de iPod volledig in het dock van de basiseenheid van de Evolve?
Zijn alle video-aansluitingen tussen de Evolve en de tv goed uitgevoerd?
Is de tv ingesteld om externe video weer te geven? Raadpleeg de handleiding van uw tv
voor meer informatie.
Speelt de iPod video's of diavoorstellingen af?
Is de iPod ingesteld op "Tv-uitgang"?
Geen beeld.
Page 44

43
Vous trouvez-vous dans un rayon de 45,7 m de la base ?
La télécommande ne marche pas !
Le nombre et le type de construction des murs situés entre vous et la
base d’Evolve peuvent interférer avec les signaux de la télécommande.
La pile de la télécommande doit peut-être être remplacée. Remplacez la pile.
La pile de la télécommande d’Evolve a une durée d’un an ou plus dans des conditions
normales d’utilisation. Si votre télécommande fonctionne de façon aléatoire, remplacez
la pile par une pile bouton de type lithium-ion CR2032 3 V disponible dans les magasins
Consultez d’abord nos pages d’aide sur le site
www.griffintechnology.com/support/evolve.
APPELEZ-nous. Le service d’assistance Griffin Technology est
disponible de 9 h à 18 h du lundi au jeudi et de 9 h à 17 h le vendredi
d’électronique et chez les revendeurs.
Vous n’avez pas abordé mon problème !
au 1 615-399-7000 (heures locales aux États-Unis, GMT-5).
Dépannage
La base est-elle branchée ? La base est-elle allumée ?
Aucun son !
L’iPod est-il correctement placé sur le Dock de la base ?
Les câbles audio sont-ils tous fermement connectés ? (Si vous avez connecté
Evolve à un système audiovisuel domestique.)
L’iPod est-il en lecture audio ?
Si vous essayez d’écouter de la musique provenant d’une source audio auxiliaire,
assurez-vous que votre iPod et vos sources audio auxiliaires ne sont pas en mode
lecture en même temps.
Les haut-parleurs sont-ils chargés et correctement jumelés avec la base (voir page 8) ?
Le nombre et le type de construction des murs situés entre la base d’Evolve et les
haut-parleurs peuvent interférer avec le signal sans fil d’Evolve.
(uniquement pour les modèles iPod compatibles
avec la vidéo et les diaporamas) !
La base est-elle branchée ? La base est-elle allumée ?
L’iPod est-il correctement placé sur le Dock de la base Evolve ?
Aucune image
Les câbles vidéo entre Evolve et votre téléviseur sont-ils tous fermement connectés ?
Votre téléviseur est-il réglé pour diffuser des vidéos externes ? Consultez le manuel
de votre téléviseur pour en savoir plus à ce sujet.
Votre iPod est-il en lecture vidéo ou diaporamas ?
Votre iPod est-il réglé sur « Sortie TV » ?
Page 45

44
Sind Sie weniger als 45,7 Meter von der Basiseinheit entfernt?
Je nach Anzahl und Material der Wände zwischen Ihnen und der
Evolve-Basiseinheit kann es zu Störungen des Fernbedienungssignals kommen.
Bitte prüfen Sie, ob die Batterie der Fernbedienung leer ist. In diesem Fall
ersetzen Sie die Batterie bitte.
Die Batterie der Evolve-Fernbedienung sollte unter normalen Benutzungsbedingungen
mindestens ein Jahr lang halten. Sollte Ihre Fernbedienung nur noch unregelmäßig
funktionieren, ersetzen Sie die Batterie durch eine im Elektrohandel erhältliche
Die Fernbedienung funktioniert nicht.
Lithium-Ionen-Knopfzelle Typ CR2032 mit 3 V.
Bitte lesen Sie zuerst die unter www.griffintechnology.com/support/evolve
verfügbaren Supportinformationen.
Rufen Sie uns an. Die Kundenunterstützung von Griffin Technology ist Montag
bis Donnerstag von 9 h bis 18 h und Freitag von 9 h bis 17 h (GMT-06:00) unter
Mein Problem wurde hier nicht behandelt.
der Telefonnummer +1 615-399-7000 erreichbar.
Ist die Basiseinheit angeschlossen? Ist die Basiseinheit eingeschaltet?
Sitzt der iPod fest im Dock der Basiseinheit?
Problembehandlung
Der Ton funktioniert nicht.
Sind alle Audioverbindungen korrekt angeschlossen? (beim Anschluss von
Evolve an ein Home Entertainment-System)
Spielt der iPod Audiodateien ab?
Bei der Wiedergabe von einer anderen Audioquelle aus gehen Sie sicher,
dass der iPod und die andere Audioquelle nicht gleichzeitig Musik abspielen.
(nur für Video- und Diashow-kompatible
iPod-Modelle)
Ist die Basiseinheit angeschlossen? Ist die Basiseinheit eingeschaltet?
Sitzt der iPod fest im Dock der Evolve-Basiseinheit?
Sind alle Video-Verbindungen zwischen Evolve und dem Fernsehgerät korrekt angeschlossen?
Ist das Fernsehgerät so eingestellt, dass es externe Videos anzeigt? Informationen hierzu
Sind die Lautsprecher geladen und korrekt an der Basiseinheit angemeldet? (s. S. 8)
Je nach Anzahl und Material der Wände zwischen der Evolve-Basiseinheit und den
Lautsprechern kann es zu Störungen des Funksignals von Evolve kommen.
finden Sie in der Gebrauchsanweisung Ihres Fernsehgerätes.
Die Bildwiedergabe funktioniert nicht.
Gibt der iPod Videos oder Diashows wieder?
Ist der iPod auf „TV-Ausgang“ eingestellt?
Page 46

45
Siete nel raggio dei 45,7 m dalla base?
Il numero dei muri interposti tra voi e la base di Evolve e il modo in
cui sono costruiti può interferire con il segnale del telecomando.
La batteria del telecomando potrebbe essere esaurita. Sostituitela.
Se il telecomando viene utilizzato normalmente, la batteria dovrebbe
Il telecomando non funziona.
durare almeno un anno o più. Se il telecomando funziona in modo poco
soddisfacente, sostituite la batteria con una batteria a bottone agli ioni
di litio CR2032 da 3 V, disponibile presso i rivenditori di componenti elettrici.
Riscontro un problema diverso da quelli esposti.
Innanzitutto, consulta le informazioni di assistenza pubblicate
all'indirizzo www.griffintechnology.com/support/evolve.
CHIAMACI. Il servizio di assistenza clienti di Griffin Technology è
disponibile al numero +1 615-399-7000 dalle 9 alle 18 (GMT+6) da
lunedì a giovedì, e dalle 9 alle 17 il venerdì.
Risoluzione dei problemi
La base è collegata alla presa di corrente? È accesa?
L'iPod è sistemato correttamente nel dock della base?
Non viene riprodotto alcun suono.
Tutti i collegamenti audio sono protetti? (in caso di connessione di Evolve all'impianto
di intrattenimento domestico).
L'iPod sta riproducendo audio?
Se provate a riprodurre l'audio da una fonte supplementare, accertatevi che iPod e fonti
audio supplementari non stiano effettuando la riproduzione contemporaneamente.
Gli altoparlanti sono carichi e correttamente accoppiati con la base? (vedere pag. 8).
Il numero dei muri interposti tra gli altoparlanti e la base di Evolve e il modo in cui
sono costruiti può interferire con il segnale senza fili trasmesso da Evolve.
(solo per i modelli di iPod che supportano
video e presentazioni di diapositive).
La base è collegata alla presa di corrente? È accesa?
L'iPod è sistemato correttamente nel dock della base di Evolve?
Tutti i collegamenti video tra Evolve e il televisore sono protetti?
Il televisore è impostato per la riproduzione di video esterno? Consultare il
manuale del televisore per maggiori dettagli.
L'iPod sta effettuando la riproduzione del video o della presentazione?
L'iPod è impostato su "Uscita TV"?
Non vengono visualizzate immagini
Page 47

46
¿Está a menos de 45,7 metros de la unidad base?
El número de paredes (y sus materiales) entre la unidad base
Evolve puede interferir con la señal del mando a distancia.
El mando a distancia no funciona.
Es posible que la pila del mando esté agotada. Sustitúyala.
La pila del mando a distancia de Evolve debería durar un año o más
en condiciones de uso normales. Si el mando a distancia funciona
de forma irregular, cambie la pila por otra de iones de litio CR2032
de 3 V de tipo botón, que puede adquirir en tiendas de electrónica.
En primer lugar, consulte nuestra información de soporte
publicada en www.griffintechnology.com/support/evolve.
Mi problema no es ninguno de los descritos.
Llámenos por teléfono. El servicio de soporte de Griffin Technology
está disponible de 9 a 18 h de lunes a jueves y de 9 a 17 h (GMT-06:00)
el viernes en el teléfono +1 615-399-7000.
Solución de problemas
¿Está conectada la unidad base? ¿Está encendida la unidad base?
¿Está el iPod totalmente acoplado al dock de la unidad base?
¿Están bien acopladas todas las conexiones de audio? (En el caso de
que conecte Evolve a un sistema de entretenimiento para el hogar.)
No hay sonido.
¿Está reproduciendo audio el iPod?
Si está utilizando una fuente de audio auxiliar, compruebe que
el iPod y la fuente no estén reproduciendo al mismo tiempo.
¿Están los altavoces cargados y correctamente conectados a la unidad base?
(consulte la página 8) El número de paredes (y sus materiales) entre la unidad
base Evolve y los altavoces puede interferir con la señal inalámbrica de Evolve.
(Sólo para los modelos de iPod que aceptan vídeo y presentaciones.)
¿Está conectada la unidad base? ¿Está encendida la unidad base?
¿Está el iPod totalmente acoplado al dock de la unidad base de Evolve?
¿Están bien acopladas todas las conexiones de vídeo entre Evolve y el televisor?
¿Está ajustado el televisor para mostrar vídeo externo?
No hay imagen.
Consulte el manual del televisor para obtener más detalles.
¿Reproduce el iPod vídeo o una presentación?
¿Está ajustado el iPod a “Salida TV”?
Page 48

47
Do not expose to direct sunlight.
Unplug this apparatus during lightning storms
or when unused for long periods of time.
This product is intended to be used only with
the power supply provided.
Keep the remote control battery away from
children. It may cause a fire or chemical burn
if mishandled. Do not recharge, disassemble,
heat above 212˚F (100˚C), or incinerate.
Dispose of used batteries promptly and properly,
observing all local regulations. Replace only with
a battery of the correct type and model number.
Remember: Listening to music at loud levels
can cause permanent hearing loss. Please
listen responsibly! We want you to enjoy Evolve’s
great sound for many happy years to come.
Unless otherwise noted, this product contains no user serviceable parts. Read all instructions before using this product.
Safety Information
Do not attempt to service this product yourself. Refer all servicing to qualified service personnel.
Do not use this device near water
or moisture.
This product is NOT weatherproof.
Clean only with a dry lint-free cloth.
Unplug this product before cleaning.
Do not use any chemicals or cleaners.
The speakers may be carried outside
and used temporarily in situations
where they won’t be exposed to excessive
temperature or moisture beyond the
specifications outlined on page 18.
Evolve is neither designed nor tested
for extended use outdoors, or in
recreational vehicles or boats.
Do not install or use near any open
flame or heat sources, such as radiators,
heat registers, stoves, grills, or other
apparatus that produces heat.
Page 49

48
Niet blootstellen aan direct zonlicht.
Koppel dit apparaat los tijdens onweer of wanneer u
het gedurende lange tijd niet gebruikt.
Dit product mag alleen worden gebruikt met de
bijgeleverde voeding.
Houd de batterij van de afstandsbediening uit de buurt
van kinderen. Verkeerd gebruik kan brand of chemische
brandwonden veroorzaken. U mag de batterij niet opladen,
demonteren, verwarmen boven 100°C of verbranden. Gooi
lege batterijen onmiddellijk weg en houd hierbij rekening
met alle lokale voorschriften. Vervang de batterij alleen
door een batterij van het correcte type en modelnummer.
Denk eraan: het beluisteren van muziek aan een hoog
volume kan permanent gehoorverlies veroorzaken.
Luister verantwoord! Wij willen dat u nog jarenlang kunt
genieten van het fantastische geluid van uw Evolve.
Veiligheidsinformatie
Tenzij anders vermeld, bevat dit product geen onderdelen die door de gebruiker kunnen worden onderhouden of gerepareerd. Lees alle instructies
voordat u dit product gebruikt. Probeer het product niet zelf te repareren. Laat alle onderhoud en reparaties over aan bevoegd onderhoudspersoneel.
Gebruik dit apparaat niet in de buurt van
water of vocht.
Dit product is NIET weerbestendig.
Alleen reinigen met een droge, vezelvrije doek.
Koppel dit product los van de voeding voordat
u het reinigt. Gebruik geen chemische of
reinigingsmiddelen.
De luidsprekers kunnen buitenshuis worden
gebracht en tijdelijk worden gebruikt in situaties
waarbij ze niet worden blootgesteld aan
omstandigheden met extreme temperaturen
of een hoge vochtigheidsgraad die buiten het
bereik vallen van de specificaties die op pagina
18 zijn uiteengezet.
De Evolve is niet ontwikkeld of getest voor langdurig
gebruik buitenshuis of in pleziervoertuigen of boten.
Niet installeren of gebruiken in de buurt van open
vlammen of warmtebronnen, zoals radiators,
schoorstenen, kachels, grills of andere apparaten
die warmte produceren.
Page 50

49
N’exposez pas directement l’appareil aux rayons du soleil.
Débranchez cet appareil pendant les orages ou si
vous ne comptez plus l’utiliser pendant une période
de temps prolongée.
Cet appareil est conçu pour être utilisé uniquement
avec le boîtier d’alimentation inclus.
Conservez la pile de la télécommande hors de portée des
enfants. Tout usage abusif risque de provoquer un incendie
ou des brûlures chimiques. Évitez de recharger la pile, de
la démonter, de l’exposer à des températures supérieures
à 100°C ou de l’incinérer. Éliminez rapidement les piles
usagées en respectant les règlements locaux en matière
d’environnement. N’utilisez que des piles de remplacement
du même type et du même modèle.
Rappel : écouter de la musique à des niveaux sonores
élevés peut provoquer la perte définitive de l’audition.
Écoutez votre musique de manière responsable ! Nous
souhaitons que vous puissiez profiter du son exceptionnel
d’Evolve pendant de très nombreuses années.
N’utilisez jamais cet appareil à proximité
d’une source d’eau ou d’humidité.
Ce produit n’est PAS intempérisé.
Sauf mention contraire, ce produit ne contient pas de pièce réparable par l’utilisateur. Lisez attentivement toutes les instructions
Informations concernant la sécurité
avant d’utiliser cet appareil. N’essayez jamais de réparer cet appareil vous-même. Faites appel à du personnel qualifié pour toute réparation.
Servez-vous uniquement d’un tissu sec non
pelucheux pour nettoyer l’appareil. Débranchez
l’appareil avant de le nettoyer. N’utilisez ni
produits chimiques ni détergents.
Les haut-parleurs peuvent être transportés à
l’extérieur et utilisés temporairement dans des
situations où ils ne sont pas exposés à des
températures excessives ni à l’humidité au-delà
des spécifications mentionnées page 18.
Evolve n’est pas conçu ni testé pour une utilisation
prolongée en plein air, dans un véhicule de camping
ou sur un bateau.
N’installez pas l’appareil et ne l’utilisez pas à côté
d’une flamme ou d’une source de chaleur telle
qu’un radiateur, qu’une grille de registre, qu’une
cuisinière, qu’un grill ou tout autre appareil capable
de générer de la chaleur.
Page 51

50
Nicht direktem Sonnelicht aussetzen.
Trennen Sie dieses Gerät während eines Gewitters oder
wenn es für einen längeren Zeitraum nicht verwendet
wird von der Stromzufuhr.
Dieses Produkt sollte nur mit dem mitgelieferten
Netzteil verwendet werden.
Halten Sie die Batterie der Fernbedienung von Kindern
fern. Wenn sie missbräuchlich verwendet wird, kann sie
Feuer oder einen chemischen Brand verursachen. Die
Batterie darf nicht wiederaufgeladen, auseinander gebaut,
über 100 °C erhitzt oder verbrannt werden. Entsorgen Sie
verwendete Batterien sofort und ordnungsgemäß und
beachten Sie dabei alle lokalen Bestimmungen. Ersetzen
Sie die Batterie nur durch eine Batterie des richtigen Typs
und mit der richtigen Modellnummer.
Wichtiger Hinweis: Das Anhören sehr lauter Musik kann
zu einem dauerhaften Gehörverlust führen. Bitte hören
Sie Musik verantwortungsbewusst! Wir möchten, dass
Sie noch viele Jahre lang Freude an dem hervorragenden
Sound von Evolve haben.
Vorbehaltlich gegenteiliger Angaben enthält dieses Produkt keine Teile, die vom Benutzer gewartet werden können. Lesen Sie alle Anleitungen, bevor Sie dieses
Sicherheitsinformationen
Produkt verwenden. Versuchen Sie nicht, dieses Produkt selbst zu warten. Lassen Sie alle Wartungsarbeiten von qualifiziertem Wartungspersonal ausführen.
Nur mit einem trockenen Tuch reinigen. Trennen
Sie dieses Produkt von der Stromzufuhr, bevor
Sie es reinigen. Verwenden Sie keine Chemikalien
oder Reinigungsmittel.
Die Lautsprecher können im Freien aufgestellt und
vorübergehend dort verwendet werden, solange
sie dabei nicht höheren Temperaturen oder einer
höheren Feuchtigkeit ausgesetzt werden als auf
S. 18 angegeben.
Evolve wurde weder für einen dauerhaften
Verwenden Sie dieses Gerät nicht in der Nähe
von Wasser oder Feuchtigkeit.
Dieses Produkt ist NICHT wasserfest.
Betrieb im Freien noch für die Verwendung in
Freizeitfahrzeugen oder auf Booten entwickelt
und getestet.
Nicht in der Nähe von offenem Feuer oder
Heizquellen (z.B. Radiatoren, Heizungen, Öfen,
Grillöfen oder andere Geräte, die Wärme erzeugen)
aufstellen oder verwenden.
Page 52

51
Non sottoponete l'impianto all'esposizione solare diretta.
Scollegate l'impianto durante temporali o quando non
deve essere utilizzato per lunghi periodi di tempo.
Il prodotto è progettato per essere utilizzato
esclusivamente con l'alimentatore in dotazione.
Tenete le batterie del telecomando lontane dalla portata
dei bambini. Se maneggiate erroneamente, possono
incendiarsi o provocare ustione chimica. Non ricaricatele,
non smontatele, non surriscaldatele oltre 100°C e non
date loro fuoco. Smaltite in modo tempestivo e corretto
le batterie utilizzate, rispettando tutte le normative locali.
Sostituite solo con batterie del tipo e modello corretto.
Ricordate: ascoltare la musica ad alto volume può causare
danni permanenti all'udito. Ascoltate la vostra musica in
modo responsabile. Desideriamo che possiate godere delle
elevate prestazioni sonore di Evolve il più possibile.
Informazioni di sicurezza
Salvo diversamente indicato, questo prodotto non contiene parti riparabili dall'utente. Leggete tutte le istruzioni prima di utilizzare il prodotto.
Non tentate di riparare il prodotto da voi. Per la riparazione, rivolgetevi a personale qualificato.
Non utilizzate il dispositivo vicino ad acqua
o in ambienti umidi.
Il prodotto NON è resistente all'acqua.
Pulite esclusivamente con un panno asciutto.
Scollegate il dispositivo prima di pulirlo. Non
utilizzate prodotti chimici o detersivi.
Potete portare temporaneamente gli altoparlanti
all'esterno, purché le condizioni ambientali non
superino i valori di temperatura e umidità indicati
a pag. 18.
Evolve non è progettato né quantomeno collaudato
per l'utilizzo prolungato all'esterno o su camper
o barche.
Non collocate o utilizzate l'impianto in prossimità
di fiamme vive o fonti di calore, come dissipatori di
calore o dispositivi affini, stufe, griglie o altri impianti
che generano calore.
Page 53

52
No lo exponga a la luz solar directa.
Desconecte el dispositivo durante las tormentas eléctricas
o si no va a utilizarlo durante un largo periodo de tiempo.
Este producto está fabricado para ser utilizado únicamente
con el alimentador de corriente suministrado.
Mantenga la pila del mando a distancia fuera del alcance
de los niños. Puede provocar incendios o quemaduras
químicas si se maneja indebidamente. No la recargue,
ni la desmonte, ni la caliente por encima de 100 °C y no
la incinere. Deshágase de las pilas gastadas correcta y
puntualmente respetando toda la legislación aplicable.
Sustitúyala únicamente por una del tipo y número de
modelo correctos.
Recuerde: Escuchar música a un volumen elevado puede
ocasionar pérdidas auditivas permanentes. Por favor, ¡sea
responsable! Deseamos que pueda disfrutar del gran
sonido del Evolve por muchos años.
A menos que se indique algo distinto, este producto no contiene piezas que el usuario pueda reparar. Lea todas las instrucciones
Información sobre seguridad
antes de utilizar este producto. No intente reparar este producto por su cuenta. Confíe la asistencia técnica a personal cualificado.
No utilice este dispositivo cerca del agua
o en un lugar con mucha humedad.
Este producto NO es resistente al agua.
Límpielo exclusivamente con un paño
seco que no suelte pelusa. Desconecte el
dispositivo antes de limpiarlo. No utilice
productos químicos ni limpiadores.
Los altavoces pueden colocarse en el exterior
y utilizarse temporalmente en situaciones
en las que no queden expuestos a una
temperatura o humedad excesivas, superiores
a las especificadas en la página 18.
Evolve no está diseñado ni probado para su
uso continuado en exteriores ni en vehículos
o embarcaciones de recreo.
No lo instale ni utilice cerca de llamas vivas
o fuentes de calor, como radiadores, cocinas,
estufas, parrillas o cualquier aparato que
genere calor.
Page 54

53
This device complies with Part 15 of the FCC Rules.
Operation is subject to the following two conditions:
(1) this device may not cause harmful interference, and
(2) this device must accept any interference received,
including interference that may cause undesired operation.
Griffin Technology
1201-CUBES2
This product is a short range transmitter and should not be used in some countries without a
broadcasting licence. Broadcasting licences are not normally available to consumers. This product
may only be operated without a licence in certain European countries. See packaging for details.
CH DE IS NO PT GB ES FI
The WEEE symbol indicates separate collection for electrical
The manufacturer is not responsible for any radio or tv interference caused by unauthorized modifications
and electronic equipment.
to this equipment. Such modifications could void the user’s authority to operate the equipment.
© 2007 Griffin Technology. www.griffintechnology Evolve is a
trademark of Griffin Technology, Inc. iPod is a trademark of
Apple, Inc., registered in the U.S. and other countries. Made in
China. Designed in Tennessee.
"Made for iPod" means that an electronic accessory has been designed
to connect specifically to iPod and has been certified by the developer to
meet Apple performance standards. Apple is not responsible for the
operation of this device or its compliance with safety and regulatory standards.
Product Returns
Before contacting customer support, check our
Warranty Information
1 YEAR ARRA
support pages at www.griffintechnology.com/suppport.
If your problem is still not resolved, call our technical
support at 615-399-7000. If at that point you still
require a replacement, our support team will provide
instructions for sending back your unit for replacement.
We at Griffin will always work hard to solve any
problem you might have with one of our products.
We offer a one year limited warranty on all products
sold. We warrant our retail hardware products to be
free of defects in materials and workmanship that
All returns must be shipped to Griffin prepaid and must
have an RMA . We do not accept unsolicited returns.
Griffin will at its discretion replace the unit and ship it
to you postage paid.
result in failure during normal usage. This warranty
is extended to the original end-user purchaser,
beginning at the time of retail purchase. This limited
warranty does not cover misuse, unauthorized
modifications, and external causes such as acts
On Refunds
If you purchased a product directly from the Griffin
Technology website, we offer a 30 day refund based
on your original method of payment. All products
must be packed in the original packaging, including
any accessories, manuals, and documentation that
shipped with the product. All other refunds are at the
discretion of the individual retailer where the product
of nature. This limited warranty is the sole and
exclusive remedy, offered in lieu of all other
warranties, expressed or implied. Griffin will not
be liable for any indirect, incidental, or punitive
damages arising from use of this product.
was purchased.
CAUTION: Risk of Explosion if Battery is replaced by an Incorrect Type.
ATTENTION:Risque d'explosion en cas de remplacement de la batterie par une batterie de type inadéquat.
Eliminez vos batteries usagées conformément aux instructions.
Dispose of Used Batteries According to the Instructions.
Page 55

54
Dit product is een zender met kort bereik en mag niet worden gebruikt in sommige landen
zonder zendvergunning. Zendvergunningen zijn normaal niet beschikbaar voor consumenten.
Zonder vergunning mag dit product alleen worden gebruikt in bepaalde Europese landen.
Zie verpakking voor details.
CH DE IS NO PT GB ES FI
Het WEEE-symbool geeft aan dat dit product afzonderlijk moet
worden verwijderd in overeenstemming met de voorschriften voor
elektrische en elektronische apparatuur.
© 2007 Griffin Technology. www.griffintechnology.com Evolve is een
handelsmerk van Griffin Technology, Inc. iPod is een handelsmerk van
Apple, Inc., gedeponeerd in de V.S. en andere landen. Gemaakt in China.
Ontworpen in Tennessee.
"Gemaakt voor iPod" betekent dat een elektronisch accessoire specifiek
werd ontworpen om te worden gecombineerd met de iPod en dat het door
de ontwikkelaar werd gecertificeerd als conform de Apple-prestatienormen.
Apple is niet aansprakelijk voor de werking van dit apparaat of voor de
naleving door dit apparaat van de veiligheids- en regelgevende standaarden.
Terugsturen van producten
Raadpleeg onze ondersteuningspagina's op
Garantie-informatie
1 JAAR ARA
www.griffintechnology.com/support voordat u contact
opneemt met de klantenondersteuning. Als uw probleem
nog steeds niet is opgelost, kunt u onze technische
ondersteuning bellen op 615-399-7000. Als u op dat
ogenblik nog steeds een vervanging wenst, zal ons
ondersteuningsteam u de instructies geven om uw
apparaat terug te sturen voor vervanging. Alle
retourzendingen moeten vooruitbetaald naar Griffin
worden gestuurd en moeten een RMA-nummer hebben.
Bij Griffin zetten wij ons altijd volledig in om eventuele
problemen die u met een van onze producten kunt
hebben, op te lossen. Wij bieden 1 jaar beperkte
garantie op alle verkochte producten. Wij garanderen
dat onze hardwareproducten voor de kleinhandel vrij
zijn van fouten in materiaal en vakmanschap die
defecten kunnen veroorzaken tijdens normaal gebruik.
Deze garantie reikt tot de originele eindgebruiker die
het product heeft aangekocht en dit vanaf de datum
Wij accepteren geen ongevraagde retourzendingen.
Volgens haar voorkeur zal Griffin het apparaat vervangen
en het portvrij naar u verzenden.
Over terugbetalingen
Als u een product rechtstreeks op de website van Griffin
Technology hebt aangeschaft, bieden wij u gedurende 30
dagen een optie voor terugbetaling op basis van uw
van aankoop bij de kleinhandelaar. Deze beperkte
garantie dekt geen misbruik, onrechtmatige wijzigingen
en externe oorzaken, zoals weersomstandigheden.
Deze beperkte garantie is het enige en exclusieve
verhaal en vervangt alle andere garanties, uitdrukkelijk
of impliciet. Griffin zal niet aansprakelijk zijn voor enige
directe of incidentele schade of enige schadevergoeding
originele betaalmethode. Alle producten, inclusief alle
accessoires, handleidingen en documentatie die bij het
product werden geleverd, moeten in de originele
die voortvloeit uit het gebruik van dit product.
verpakking worden verpakt. Alle andere terugbetalingen
zullen worden bepaald door de individuele kleinhandelaar
waar het product werd aangeschaft.
CAUTION: Risk of Explosion if Battery is replaced by an Incorrect Type.
ATTENTION:Risque d'explosion en cas de remplacement de la batterie par une batterie de type inadéquat.
Eliminez vos batteries usagées conformément aux instructions.
Dispose of Used Batteries According to the Instructions.
Page 56

55
Cet appareil est un émetteur de courte portée dont l'utilisation est soumise à une autorisation
de diffusion dans certains pays. Ces autorisations ne sont généralement pas accordées aux particuliers.
L'utilisation de cet appareil sans autorisation est limitée à certains pays européens. Pour plus de détails,
référez-vous à l'emballage.
CH DE IS NO PT GB ES FI
Le symbole WEEE indique que ce produit doit être éliminé
conformément aux normes de tri sélectif des déchets électriques
et électroniques.
© 2007 Griffin Technology www.griffintechnology Evolve est une marque
déposée de Griffin Technology, Inc. iPod est une marque d’Apple, Inc.,
déposée aux États-Unis et dans d’autres pays.Fabriqué en Chine.
Conçu au Tennessee.
L’expression “Conçu pour l’iPod” désigne un accessoire électronique conçu
pour se connecter spécifiquement à un iPod et ayant reçu du fabricant un
certificat de conformité aux normes de fonctionnement Apple. Apple n’est en
aucun cas responsable du fonctionnement de cet appareil ni de sa conformité
aux règlements et aux normes de sécurité.
Informations concernant la garantie
Retour du produit
Avant de contacter notre service d’assistance, consultez nos
pages d’aide à l’adresse www.griffintechnology.com/suppport.
ARA D’UN AN
Nous nous efforçons chez Griffin de résoudre tout
Si votre problème n’est toujours pas résolu, appelez notre
problème que vous pourriez rencontrer avec l’un de
service d’assistance au 615-399-7000 (États-Unis). Si vous
souhaitez alors que votre produit soit remplacé, notre équipe
vous fournira les informations nécessaires pour nous le
retourner. Tous les retours doivent être expédiés à Griffin
nos produits. Nous offrons un an de garantie limitée
sur tous les produits vendus. Tous nos produits
matériels vendus en détail sont garantis contre tout
défaut de matériau et de fabrication susceptible de
prépayés avec un numéro d’autorisation de retour d’article.
Nous n’acceptons pas les retours non sollicités. Griffin
remplacera l’unité à sa seule discrétion et vous l’expédiera
en port payé.
Remboursements
Si vous avez acheté votre produit sur le site Web de Griffin
provoquer des pannes lors d’un usage normal. Cette
garantie est effective dès le moment de la vente et est
accordée à l’utilisateur final original. Cette garantie
limitée ne couvre pas l’utilisation inadéquate, les
modifications non autorisées et les causes externes
telles que les catastrophes naturelles. Cette garantie
limitée constitue le recours unique et exclusif en cas de
Technology, nous vous proposons un remboursement à 30
jours selon le moyen de paiement utilisé. Tous les produits
doivent être retournés dans leur emballage d’origine, y
compris les accessoires, les guides d’utilisation et la
documentation les accompagnant. Tous les autres
remboursements sont à la discrétion du revendeur auprès
de qui le produit a été acheté.
litige et remplace toutes les autres garanties expresses
ou implicites. Griffin exclut toute responsabilité pour
les dommages-intérêts indirects, accessoires ou
punitifs découlant de l’utilisation de ce produit.
CAUTION: Risk of Explosion if Battery is replaced by an Incorrect Type.
ATTENTION:Risque d'explosion en cas de remplacement de la batterie par une batterie de type inadéquat.
Eliminez vos batteries usagées conformément aux instructions.
Dispose of Used Batteries According to the Instructions.
Page 57

56
Das WEEE-Symbol zeigt an, dass dieses Produkt entsprechend
der gültigen Vorgaben für elektrische und elektronische Geräte
entsorgt werden muss.
© 2007 Griffin Technology . www.griffintechnology Evolve ist ein
Warenzeichen der Firma Griffin Technology, Inc. iPod ist ein in den
USA und anderen Ländern eingetragenes Warenzeichen der
Dieses Produkt ist ein Kurzwellen-Sender und sollte in einigen Ländern nicht ohne Sendelizenz
verwendet werden. Sendelizenzen werden üblicherweise nicht an Konsumenten vergeben. Dieses
Produkt sollte nur in bestimmten europäischen Ländern ohne Lizenz betrieben werden. Weitere
Informationen erhalten Sie in der Verpackung.
CH DE IS NO PT GB ES FI
Firma Apple, Inc. Hergestellt in China. Entwickelt in Tennessee.
"Entwickelt für den iPod" bedeutet, dass ein elektronisches Zubehör so
entwickelt wurde, dass es speziell mit dem iPod verbunden werden kann.
Zudem wurde vom Entwickler zertifiziert, dass es den Apple-Leistungsstandards
entspricht. Apple ist nicht verantwortlich für den Betrieb dieses Geräts oder
die Erfüllung der Sicherheits- und Kontrollstandards.
Rücksendung von Produkten
Bevor Sie sich mit der Kundenunterstützung in Verbindung
setzen, lesen Sie bitte zuerst unsere Supportseiten unter
www.griffintechnology.com/support. Wenn Ihr Problem hier
1 JAHR ARA
Garantieinformationen
Bei Griffin sind wir bemüht, Ihnen bei möglichen
nicht gelöst werden kann, rufen Sie unsere technische
Kundenunterstützung unter +1 615-399-7000 an. Bei
unserem Support-Team erhalten Sie gegebenenfalls die
notwendigen Informationen zu Rücksendung und Austausch
des Produkts. Alle Rücksendungen müssen mit einer
RMA-Nummer versehen an Griffin geschickt werden. Wir
akzeptieren keine Rücksendungen ohne ausdrückliche
Problemen mit einem unserer Produkte zu
helfen. Wir bieten für alle verkauften Produkte
eine eingeschränkte Garantie über einen Zeitraum
von einem Jahr. Wir garantieren, dass unsere
Hardware-Produkte für den Einzelhandel frei von
Material- und Verarbeitungsschäden sind, die zu
einer Fehlfunktion beim normalen Gebrauch führen.
Diese Garantie wird mit Beginn des Kaufdatums im
Anforderung. Griffin wird das Produkt nach seinem billigen
Ermessen austauschen und es Ihnen portofrei zuschicken.
Rückerstattung des Kaufpreises
Bei einem Direktkauf über die Griffin Technology Website
bieten wir Ihnen die Möglichkeit einer Rückerstattung des
Kaufpreises innerhalb von 30 Tagen über die von Ihnen
gewählte Zahlungsmethode. Alle Produkte müssen sich
in der Originalverpackung befinden, einschließlich des
mitgelieferten Zubehörs, der Handbücher und der
Einzelhandel auf den ersten Käufer als Endverbraucher
erweitert. Diese eingeschränkte Garantie gilt nicht
bei Missbrauch, unerlaubten Veränderungen und
betriebsfremden Ursachen, wie höhere Gewalt. Diese
eingeschränkte Garantie stellt das alleinige und
ausschließliche Rechtsmittel dar und steht an Stelle
aller anderen ausdrücklichen oder stillschweigenden
Garantien. Griffin ist für keinerlei mittelbare, beiläufig
entstandene oder für Schadensersatzforderungen mit
Dokumentation. Alle sonstigen Rückerstattungen
entsprechen dem billigen Ermessen des betreffenden
Einzelhändlers, bei dem das Produkt erworben wurde.
Strafcharakter verantwortlich, die durch den Gebrauch
dieses Produktes entstehen.
CAUTION: Risk of Explosion if Battery is replaced by an Incorrect Type.
ATTENTION:Risque d'explosion en cas de remplacement de la batterie par une batterie de type inadéquat.
Eliminez vos batteries usagées conformément aux instructions.
Dispose of Used Batteries According to the Instructions.
Page 58

57
'%%,<g^[[^cIZX]cdad\nlll#\g^[[^ciZX]cdad\n#Xdb:kdakZjc
bVgX]^dgZ\^higVidY^<g^[[^cIZX]cdad\n!>cX#^EdYjcbVgX]^dY^
Apple, Inc., registrato negli Stati Uniti e in altri Paesi. Fabbricato in
Il simbolo WEEE indica che il prodotto deve essere smaltito in
conformità con le normative in vigore in materia di apparecchiature
Questo prodotto è un trasmettitore a corto raggio e in alcuni stati non può essere utilizzato senza
un'apposita licenza di trasmissione. Normalmente, le licenze di trasmissione non sono disponibili per
i consumatori. Questo prodotto può essere utilizzato senza licenza solo in alcuni stati europei.
Consultare i dettagli sulla confezione.
CH DE IS NO PT GB ES FI
elettriche ed elettroniche.
Cina. Progettato in Tennessee.
“Creato per l’iPod” significa che un accessorio elettronico è stato
progettato per essere collegato specificamente all’iPod e che lo
sviluppatore certifica che risponde agli standard di prestazione di Apple.
Apple non è responsabile del funzionamento di questo dispositivo
o della sua idoneità a standard normativi e di sicurezza.
Informazioni di garanzia
Restituzione del prodotto
Prima di contattare l'assistenza clienti, consultate
le pagine relative all'assistenza all'indirizzo
www.griffintechnology.com/suppport. Se il problema
1 ANNO DI ARA A
Presso Griffin conduciamo un intenso lavoro
dovesse persistere, contattate l'assistenza al numero
+1 615-399-7000. Se, a tal punto, avete ancora necessità
di sostituire il dispositivo, il nostro team di assistenza vi
fornirà istruzioni sulla restituzione dell'unità per la
sostituzione. Le spese di spedizione devono essere
finalizzato alla risoluzione di qualsiasi problema
potreste riscontrare con i nostri prodotti. Offriamo un
anno di garanzia limitata su tutti i prodotti. Garantiamo
che i nostri prodotti hardware sono privi di difetti nei
materiali e nella lavorazione che possano impedirne il
corretto funzionamento in condizioni normali. Questa
sostenute dall'utente ed è necessario fornire il numero
di autorizzazione per la restituzione del prodotto. Non
accettiamo restituzioni di cui non ne sia stata richiesta
autorizzazione. Griffin effettuerà la sostituzione dell'unità
garanzia è estesa all’acquirente finale originale a
decorrere dal momento dell’acquisto. La garanzia
limitata non copre il cattivo utilizzo, le modifiche non
a sua discrezione e sosterrà le spese di questa spedizione.
Rimborsi
Se avete acquistato un prodotto direttamente dal sito Web
autorizzate e le cause esterne, quali i fenomeni naturali.
Questa garanzia limitata è l’unico ed esclusivo rimedio
dell’utente e sostituisce tutte le altre garanzie, espresse
di Griffin Technology, offriamo la possibilità di rimborso
entro 30 giorni dall'acquisto, a seconda del metodo di
o implicite. Griffin non potrà essere considerato
responsabile per danni indiretti, accidentali o punitivi
derivanti dall’utilizzo del prodotto.
pagamento utilizzato. Tutti i prodotti devono essere restituiti
con la confezione originale e tutti gli accessori, manuali e
documentazione in dotazione con il prodotto. Tutti gli altri
rimborsi sono a discrezione del singolo rivenditore presso
CAUTION: Risk of Explosion if Battery is replaced by an Incorrect Type.
ATTENTION:Risque d'explosion en cas de remplacement de la batterie par une batterie de type inadéquat.
Eliminez vos batteries usagées conformément aux instructions.
Dispose of Used Batteries According to the Instructions.
cui è stato acquistato il prodotto.
Page 59

58
El símbolo WEEE indica que el producto debe desecharse de
acuerdo con la normativa específica vigente para equipos eléctricos
y electrónicos.
© 2007 Griffin Technology. www.griffintechnology. Evolve es una marca
comercial de Griffin Technology, Inc. iPod es una marca comercial de
Apple, Inc., registrada en EE UU y otros países. Fabricado en China.
Este producto es un transmisor de corto alcance y no puede utilizarse en algunos países sin la
correspondiente licencia de emisión. Las licencias de emisión no suelen estar disponibles para los
consumidores. Este producto sólo se puede utilizar sin licencia en algunos países europeos. Vea la
caja para obtener información detallada.
CH DE IS NO PT GB ES FI
Diseñado en Tennessee.
"Diseñado para iPod" significa que un accesorio electrónico se ha diseñado
para conectarse específicamente al iPod y el desarrollador ha certificado
que cumple las pautas de funcionamiento de Apple. Apple no es responsable
del funcionamiento del dispositivo ni de que cumpla las normas de seguridad
y de regulación.
Información sobre la garantía
Devolución del producto
Antes de ponerse en contacto con el servicio de
soporte, consulte nuestras páginas de soporte
en www.griffintechnology.com/suppport. Si no
resuelve su problema, llame a nuestro servicio
ARA ÍA DE UN AÑO
En Griffin trabajamos sin parar para solucionar cualquier
problema que pueda surgir con alguno de nuestros
de soporte técnico al teléfono +1 615-399-7000.
Si después de esto sigue necesitando un recambio,
nuestro equipo de soporte le dará instrucciones
para enviar su unidad a reparar. Todas las
devoluciones deben enviarse a Griffin y deben tener
un número de autorización de devolución (RMA).
No aceptamos devoluciones no solicitadas. Griffin
productos. Ofrecemos una garantía limitada de un año
en todos los productos que vendemos. Garantizamos
que nuestros productos de hardware de venta al público
no presentan defectos por materiales ni mano de
obra que provoquen fallos durante el uso normal del
producto. Esta garantía se extiende al usuario final
comprador original desde el momento de la compra.
Esta garantía limitada no cubre el mal uso, las
reparará la unidad a su discreción y se la enviará
con portes pagados.
Acerca de los reembolsos
Si ha adquirido un producto directamente en el sitio
web de Griffin Technology, le ofrecemos la posibilidad de
reembolso en un plazo de 30 días mediante el método de
pago utilizado originalmente. Todos los productos deben
modificaciones sin autorización y las causas externas,
como catástrofes naturales. Esta garantía limitada
es el remedio único y exclusivo y sustituye cualquier
otra garantía, explícita o implícita. Griffin no será
responsable de ninguna indemnización punitiva por
daños indirectos, accidentales o de otra índole derivados
estar empaquetados en su caja original, incluyendo los
accesorios, manuales y documentación suministrados
con el producto. Todos los demás reembolsos son a
del uso de este producto.
CAUTION: Risk of Explosion if Battery is replaced by an Incorrect Type.
Dispose of Used Batteries According to the Instructions.
discreción del distribuidor concreto donde se adquirió
el producto.
ATTENTION:Risque d'explosion en cas de remplacement de la batterie par une batterie de type inadéquat.
Eliminez vos batteries usagées conformément aux instructions.
Page 60

59
Cet appareil est conforme à la section 15 des règles FCC. Le fonctionnement de l’appareil est soumis aux deux
conditions ci-dessous :
1. Cet appareil ne peut pas provoquer d’interférences nuisibles.
2. Cet appareil doit accepter toutes les interférences reçues, y compris les interférences susceptibles de provoquer
un fonctionnement anormal.
Déclaration FCC (Federal Communications Commission).
Cet équipement a été testé et respecte les limites établies pour les appareils numériques de catégorie B,
conformément à la section 15 des règlements FCC. Ces limites ont été conçues pour fournir une protection
raisonnable contre les interférences nuisibles au sein d’une installation résidentielle. Cet équipement génère, utilise
et peut émettre de l’énergie de radiofréquence. Il peut en outre provoquer des interférences nuisibles aux
communications radio s’il n’est pas installé et utilisé conformément aux instructions fournies. Il n’existe néanmoins
aucune garantie quant à l’absence totale d’interférences dans des conditions d’installation particulières. Si cet
équipement provoque des interférences nuisibles à la réception d’émissions de radio ou de télévision, ce qui peut
être déterminé en désactivant puis en réactivant l’équipement, nous conseillons à l’utilisateur d’essayer d’éliminer
ces interférences en prenant l’une ou l’autre des mesures suivantes :
- Réorienter ou déplacer l’antenne de réception.
- Augmenter la distance séparant l’équipement et le récepteur.
- Brancher l’équipement sur une prise électrique située sur un circuit différent de celui sur lequel est branché
le récepteur.
- Consulter le vendeur ou un technicien radio/TV expérimenté pour obtenir de l’aide.
Déclaration FCC relative à l’exposition aux rayonnements RF :
1. Cet émetteur ne peut être installé au même endroit que d’autres types d'antennes ou d'émetteurs, ni fonctionner
conjointement avec ces derniers.
2. Cet équipement est conforme aux limites d'exposition aux rayonnements RF établies par la FCC en ce qui
concerne les environnements non contrôlés. Cet équipement doit être installé et doit fonctionner en respectant
une distance minimale de 20 cm entre le radiateur et votre corps.
REMARQUE IMPORTANTE : S'il s'avère impossible de respecter l'ensemble de ces conditions (pour certaines
configurations d'ordinateurs portables ou en cas d'installation avec un autre émetteur par exemple), l'autorisation
FCC ne pourra plus être considérée valide et la marque FCC ne pourra être utilisée sur le produit final. Dans ce cas,
l'assembleur de matériel d'origine sera tenu responsable de la réévaluation du produit final (y compris de
l'émetteur) et de l'obtention d'une autorisation FCC séparée.
Autre remarque importante :
Tout changement ou modification qui n’est pas expressément approuvé par la partie responsable du respect des
règles risque d’annuler l’autorité de l’utilisateur à faire fonctionner cet équipement.
FCC Information Informations FCC
This device complies with Part 15 of the FCC Rules. Operation is subject to the following two conditions:
1. This device may not cause harmful interference.
2. This device must accept any interference received; including interference that may cause undesired operation.
Federal Communications Commission (FCC) Statement.
This Equipment has been tested and found to comply with the limits for a Class B digital device, pursuant to
Part 15 of the FCC rules. These limits are designed to provide reasonable protection against harmful interference
in a residential installation. This equipment generates uses and can radiate radio frequency energy and if not
installed and used in accordance with the instructions, may cause harmful interference to radio communications.
However, there is no guarantee that interference will not occur in a particular installation. If this equipment
does cause harmful interference to radio or television reception, which can be determined by turning the
equipment off and on, the user is encouraged to try to correct the interference by one or more of the
following measures:
- Reorient or relocate the receiving antenna.
- Increase the separation between the equipment and receiver.
- Connect the equipment into an outlet on a circuit different from that to which the receiver is connected.
- Consult the dealer or an experienced radio/TV technician for help.
FCC RF Radiation Exposure Statement:
1. This Transmitter must not be co-located or operating in conjunction with any other antenna or transmitter.
2. This equipment complies with FCC RF radiation exposure limits set forth for an uncontrolled environment.
This equipment should be installed and operated with a minimum distance of 20 centimetres between the
radiator and your body.
IMPORTANT NOTE: In the event that these conditions can not be met (for example certain laptop configurations
or co-location with another transmitter), then the FCC authorization is no longer considered valid and the
FCC ID can not be used on the final product. In these circumstances, the OEM integrator will be responsible for
re-evaluating the end product (including the transmitter) and obtaining a separate FCC authorization.
Other important note:
Changes or modifications not expressly approved by the party responsible for compliance could void the user's
authority to operate the equipment.
Page 61

60
email
EVOLVE WARRANTY REGISTRATION
Please take just a minute to register your Evolve wireless sound system.
updates and quick Technical Support. We’ll ask you to enter the serial number
Visit www.evolvespeakers.com and register your Evolve unit for product
found on the Base Unit or on the outside of the box as shown below.
range, your pet’s hobbies or the last five songs played on your MP3 player. And
We’ll also ask for your name and ZIP code. We will not ask you for your income
because we dislike spam as much as you do, we won’t sell or publish your
, and we’ll always ask you if you’re interested in receiving email from us
before we send it.
address
Thank you from Griffin Technology and Happy Listening!
Page 62

61
REGISTRO DE GARANTÍA EVOLVE
Le rogamos que dedique unos
instantes a registrar su sistema de
sonido inalámbrico Evolve.
Visite www.evolvespeakers.com y registre
su unidad Evolve para obtener actual-
izaciones del producto y un servicio de
soporte técnico rápido. Le pediremos que
REGISTRAZIONE GARANZIA EVOLVE
Vi preghiamo di dedicare un minuto
di tempo alla registrazione del vostro
sistema audio senza fili Evolve.
Visitate www.evolvespeakers.com e
registrate la vostra unità Evolve per
ricevere aggiornamenti per il prodotto e
assistenza tecnica rapida. Vi chiediamo
introduzca el número de serie que aparece
en la unidad base o en el exterior de la caja,
di inserire il numero seriale che troverete
sulla base dell’unità o sull’esterno della
como se muestra a continuación.
También le pediremos su nombre y código
postal. No le haremos preguntas acerca de
scatola come mostrato sotto.
Vi chiediamo anche nome e codice postale.
Non vi chiediamo la vostra fascia di reddito,
su salario, los pasatiempos de su mascota
o las cinco últimas canciones que escuchó
en el reproductor MP3. Y como nos
desagrada el spam tanto como a usted, no
venderemos ni publicaremos su dirección
de correo electrónico y siempre le
preguntaremos si está interesado en recibir
gli hobby del vostro animale domestico o le
ultime cinque canzoni che avete ascoltato
sul lettore MP3. E poiché lo spam ci
disturba quanto a voi, non venderemo o
pubblicheremo il vostro indirizzo e-mail,
e vi chiederemo sempre se siete interessati
a ricevere posta elettronica da noi prima
correspondencia de nuestra parte antes
de enviársela.
¡En nombre de Griffin Technology, gracias
di inviarla.
Grazie da Griffin Technology e buon ascolto!
y que disfrute del equipo!
EVOLVE-GARANTIEREGISTRIERUNG
Nehmen Sie sich bitte eine Minute
Zeit, um Ihr kabelloses Evolve-
Sound System zu registrieren.
Besuchen Sie www.evolvespeakers.com
und registrieren Sie Ihr Evolve-Gerät. Sie
erhalten dann Produktaktualisierungen
und schnelle technische Unterstützung.
Wir bitten Sie, die Seriennummer
einzugeben, die sich auf der Unterseite
des Geräts oder außen auf dem Karton
ENREGISTREMENT DE LA
GARANTIE EVOLVE
Enregistrez votre système audio
sans fil Evolve. Cela ne vous
prendra que quelques minutes !
Visitez le site www.evolvespeakers.com
et enregistrez votre unité Evolve pour
bénéficier des mises à jour et d’une
assistance technique rapide. Nous vous
demanderons de saisir le numéro de série
figurant sur la base ou sur l’extérieur de
EVOLVE GARANTIEREGISTRATIE
Wij verzoeken u even de tijd te
nemen om uw Evolve draadloos
geluidssysteem te registreren.
Bezoek www.evolvespeakers.com en
registreer uw Evolve-toestel voor product-
updates en snelle technische onder-
steuning. Wij zullen u vragen het
serienummer in te voeren. Dit nummer
vindt u op de basiseenheid of op de
buitenkant van de doos, zoals hieronder
befindet, wie unten abgebildet.
Wir fragen auch nach Ihrem Namen und
Ihrer Postleitzahl. Wir fragen Sie nicht
la boîte, comme illustré ci-dessous.
Nous vous demanderons aussi de nous
indiquer votre nom et votre code postal.
Nous ne vous demanderons pas de nous
weergegeven.
Wij zullen u ook vragen uw naam en
postcode op te geven. Wij zullen u niet
vragen naar uw inkomen, uw favoriete
nach Ihrer Einkommenshöhe, den Hobbies
Ihres Haustiers oder den letzten fünf
Songs, die auf Ihrem MP3-Player
abgespielt wurden. Und da wir Spam
genau so wenig mögen wie Sie, werden
wir Ihre E-Mail-Adresse nicht verkaufen
oder veröffentlichen und wir werden Sie
immer fragen, ob Sie E-Mails von uns
erhalten möchten, bevor wir diese
losschicken.
indiquer votre tranche de revenu, les
hobbys de votre chat ni les cinq derniers
morceaux enregistrés sur votre lecteur
MP3. Et comme nous détestons les spams
tout autant que vous, nous nous
engageons à ne pas vendre ni publier
votre adresse électronique et nous vous
demanderons toujours si vous souhaitez
recevoir des messages électroniques de
hobby’s of de laatste vijf nummers die u
op uw MP3-speler hebt afgespeeld.
En omdat we een even grote hekel als
u aan spam hebben, zullen wij uw
e-mailadres niet verkopen of publiceren.
We zullen u bovendien altijd vragen of u
geïnteresseerd bent om e-mail van ons
te ontvangen voordat we deze verzenden.
Griffin Technology bedankt sich bei Ihnen
und wünscht Ihnen viel Spaß beim Zuhören!
notre part avant de vous les envoyer.
Griffin Technology vous remercie et vous
souhaite une bonne écoute !
Griffin Technology bedankt u en wenst u
veel luisterplezier.
Page 63

Page 64

 Loading...