


Pedal Jeanie™
Pedal Jeanie Jr™
User Manual
Copyright ©2009-2011 by Grid 1 Audio LLC.
This document is protected by copyright and all rights are reserved.
Pedal Jeanie is a trademark of Grid 1 Audio LLC.
2/08/11
Pedal Jeanie Introduction
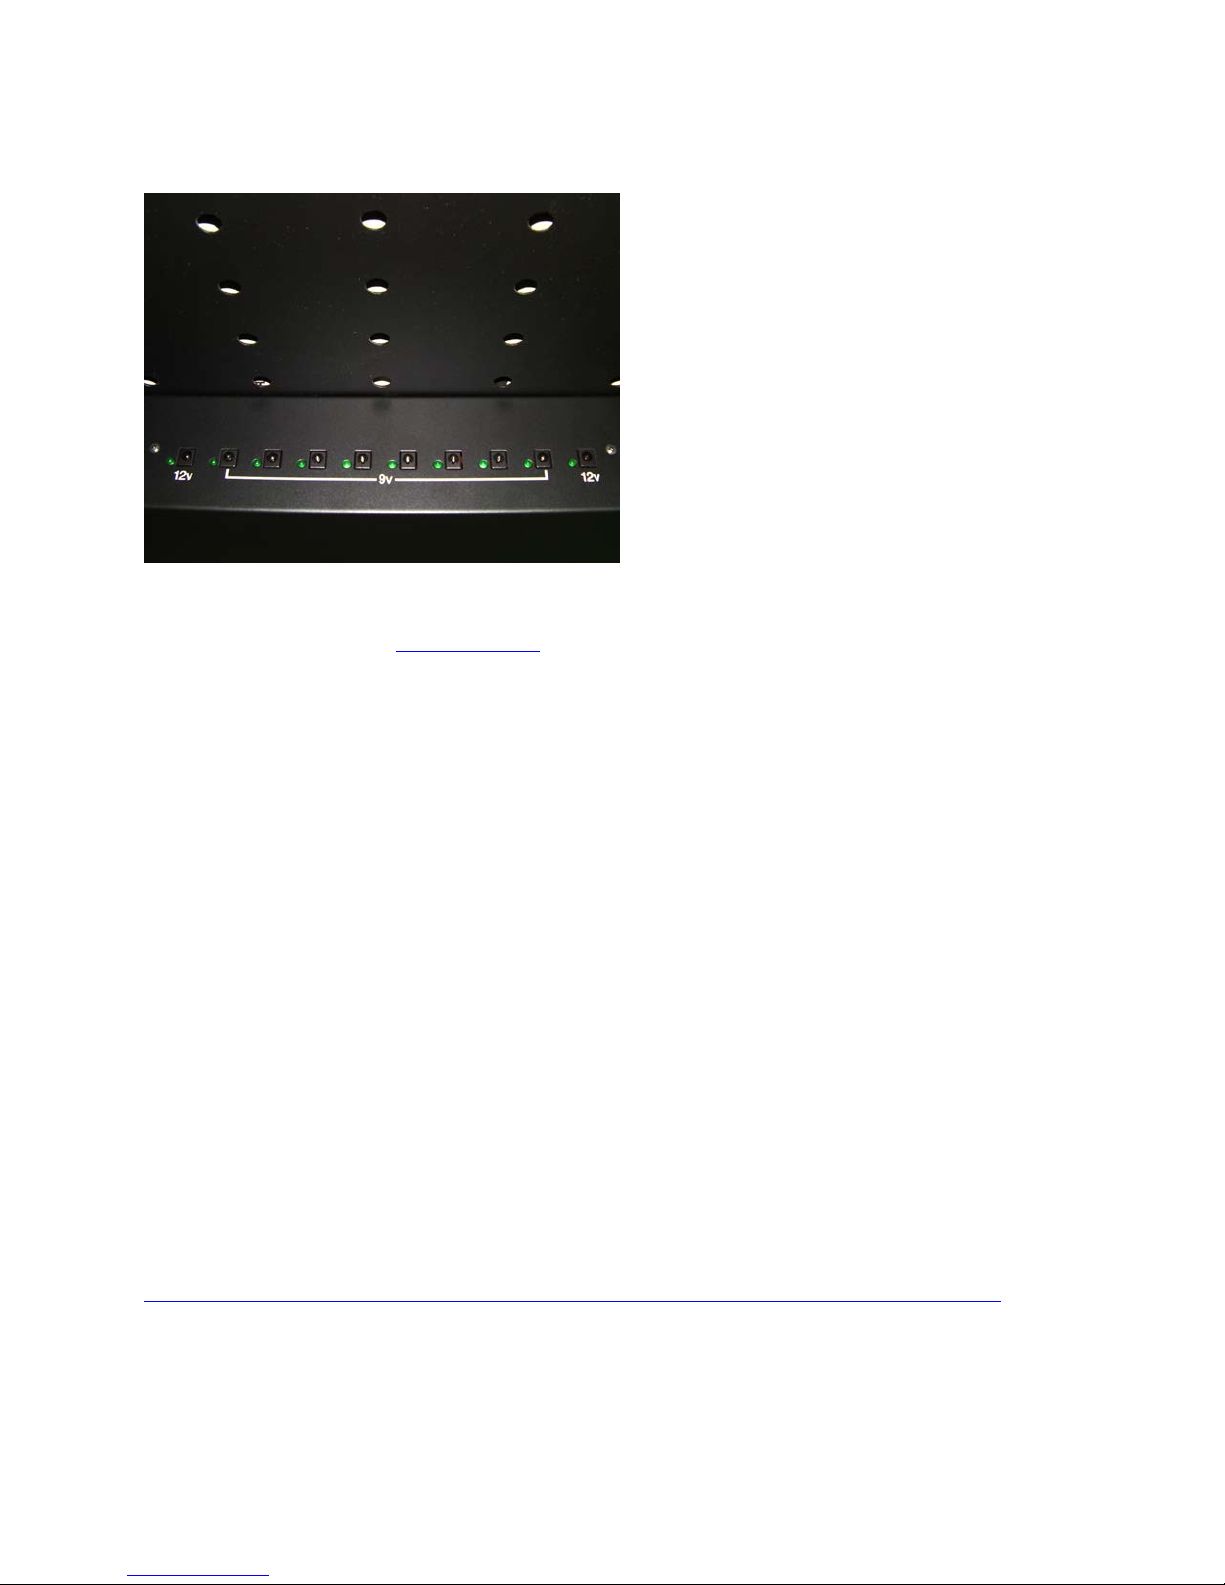
The Pedal Jeanie is a rechargeable batterypowered pedalboard with a DC panel built-in
under the chassis and will power up to 10 9v
effect pedals simultaneously. All DC cables, tie
wraps, and battery charger are included in the
box. The Pedal Jeanie was designed to be clean
and quiet. When we say clean we mean all your
cables (DC and audio) can be run through the
supplied holes on top of the Pedal Jeanie and
connected underneath on the DC panel. This
keeps the top of your pedalboard free from cable
clutter. See images on our website for examples.
Each 9v DC connection is regulated and fused for independent operation. There is also an LED next to
every connection that will glow green to show you have connectivity. We will be posting wiring and setup videos on our website at www.grid1.com
, so check back often for tips, how-to’s, and set-up
examples.
Recommendation: We highly recommend you plug in the supplied battery charger to the barrel
connection located on the back of the Pedal Jeanie just under the handle to charge the internal batteries
back to full capacity. We charge every Pedal Jeanie prior to shipping them out, but if they have been in a
dealer warehouse or stored for a long period they may need to be re-charged prior to your first use. The
charger will light green when the batteries are fully charged. You cannot over-charge the batteries as
there is overcharge protection built in. Additional wall chargers and optional car chargers are available
from Grid 1.
Pedal Jeanie Set-up
The first thing you should do is check if any of your effect pedals, stomp boxes, or tuners have standard
9v connectors (do they run on a 9v battery). Then check the polarity of your effect unit’s input jack. The
cables that are provided with the Pedal Jeanie support a standard 9v connection of positive (+) barrel
and negative (-) center. If your effects unit is configured differently, or if you’re not sure, you should
wait to install those pedals until you check the rest of this manual for polarity and AC pedal connectivity
issues. We will also be updating our website with supported and unsupported pedals.
Another good thing to do is check the voltage requirement of each of your effect pedals. The Pedal
Jeanie supports eight 9V connections and two 12v connections. If you have 18v or 24 volt DC pedals you
should get this ISO Pump cable:
http://www.godlyke.com/power-all/godlyke-power-all-accessories/iso-pump-voltage-converter
Ten DC power cords are included with the Pedal Jeanie and six cables with the Pedal Jeanie Jr. Each
cable has a 5.5mm x 2.1mm standard plug for your effects. One side of the cable has a right angle
connection, and the other end has a straight barrel connection. The straight barrel fits through the hole
for easy connectivity under the pedalboard. If the right angle does not fit well on your pedal, you can

flip the cable and use the straight barrel on the effect pedal (bear in mind you will need to run the DC
cable from under the pedalboard if you are connecting the straight barrel to a pedal as the right angle
does not fit through the hole).
Connecting your Effect Pedals
We recommend setting your pedals on
your board prior to installing any DC or
audio cables. Do a mental check of how
you want the signal path to flow. Take time
to experiment with layout and signal path.
The holes on top of the pedal board are
set-up evenly and will act as a guide when
lining up your pedals. Position your pedals
between the nearest holes so they are easy
to tie down. This will also help when you
are ready to run your power cables down
to the DC panel.
Before mounting your pedals you should remove any 9v batteries that are loaded in your pedals. The
Pedal Jeanie is all the power you will need. Mounting your effect pedals securely will make it easy to
transport your Pedal Jeanie without damaging your precious effect pedals. We include 10 ultra long
cable ties to start you on your way. You can also use Dual lock or Power Grip double sided Velcro hooks
as an alternative to the cable ties. Either way you want your pedals to be held on as secure as possible
to eliminate movement and shifting which can damage the cables and or jacks on your effect pedals.
Audio cables should be as short as possible. You can use short audio patch cords, or even better, make
your own using George L cables supplied on our website at www.grid1.com. We recommend George L
audio patch cables if you want to have a cable free pedalboard. Once the cables are all neatly
assembled, just tie them down neatly under the Pedal Jeanie with the supplied cable ties. Grid 1 can
supply you with many accessories including Power Grip Pedal tape, DC cable adapters, audio connectors,
car charger, and other professional wiring accessories. Contact us for pricing and availability.
The Grid 1 supplied DC cables will connect most standard 9v pedals to your Pedal Jeanie. This is the
standard polarity and virtually all pedals are wired this way. Some pedals have their power jacks wired
for “center positive”. If you have a reverse polarity pedal you will need an optional connector cable
which is available from dealers and the Grid 1 website.
Once you have connected your pedals to the battery-powered DC panel under the Pedal Jeanie, and all
your audio connections are complete, it is time to turn on your Pedal Jeanie. You will notice a stomp
style start button on the top panel of the Pedal Jeanie. Stepping on the start button will turn the power
on the Pedal Jeanie and the green LED next to the start button will light up. Underneath on the DC
panel you should see a bright green LED lit up next to every pedal connection. If an LED is not on next to
a connected DC cable, you may have a shorted pedal, or loose connection.

Reverse Polarity Pedals
Center negative barrel jack for power is considered the industry standard polarity. There are some
manufacturers who decided to use barrel jacks wired for center positive. These pedals are called
reversed polarity. You can power reversed polarity effects with a Pedal Power by using the correct
reversed polarity cable. It doesn’t matter that the effect is negative ground or positive ground, both
types can be wired for either polarity.
Power Consumption / Powering 9VAC Pedals
Many pedal manufacturers do not state the power consumption of their effects. All pedals that can be
powered by a single 9V battery can be powered by any 9v connection on the Pedal Jeanie. Actually you
can run any device that is powered by a 9v battery on any 9v connection on the Pedal Jeanie. There are
some effects that use a 9VAC power supply. Typically a device that operates from 9VAC should use
12VDC as 9VAC devices need about 40% more power when running on DC. We tested a Line 6 LM4
Looper that required 9VAC and connected it to one of our dedicated 12VDC connections on the Pedal
Jeanie and it worked perfectly. Some manufacturers are releasing products that are designed to
operate from AC only, and these products will not work on any DC powered product.
Battery Information: 6v 4.5 amp hour sealed lead acid batteries (x2)
The batteries have a shelf life of about 8 months to 1 year and possibly longer with moderate use or low
pedal draw. The good thing is they are not very expensive and readily available. You can get these
batteries at many local battery stores, or on amazon (best price). Basically any 4.5 amp hour 6volt
battery will work as they all seem to have the same case size. We use 2ea 6v batteries to get 12v on our
power supply. It is best to replace them as a set to ensure best performance. These batteries offer a
huge savings versus standard 9 volt batteries as the equivalent 9v batteries would cost many hundreds
of dollars over 1 years’ time, and constantly need changing. Our replacement batteries cost around $12
per battery. Here are a few examples on amazon.
http://www.amazon.com/Powersonic-PS-640F1-Battery-Fast-Connector/dp/B0002ILK4K
http://www.amazon.com/volt-4-5-Rechargeable-Battery-Electronics/dp/B002QGVW3K
Watch this step by step video for replacing the Pedal Jeanie Batteries:
http://www.youtube.com/watch?v=slVKkRvC6iU

Pedal Jeanie Specifications:
Product Description
Rechargeable DC Pedalboard
Product Name
Pedal Jeanie™ / Pedal Jeanie Jr™
Charging Time
Approx. 6 hours (after red LED shuts off / green goes on)
Input
AC 100V to 240V (using universal AC charger)
Output
8 DC 9V ports and 2 DC 12v port (circuit protected)
Dimensions
23” (w) x 19.5” (d) x 3.5” (h)
Built-in Batteries
(Voltage/capacity)
Power LED Indicator
Auto shut-off less than 30% remaining (Battery Save Mode)
One Pedalboard
One User Manual – Also Online
12v/18v/24v switchable in-line module
Padded gig bag
Remaining Power indicator
Two 6v Lead Acid Batteries (Total 12v, 4.5 Ah)
Green: Over 60% remaining
Orange: 40% to 60% remaining
Red: 30% to 40% remaining
Package Contents
Options
Weight: Pedal Jeanie – 14 lbs
Two Rechargeable DC Batteries
One Universal Battery Charger
Ten 2.5ft DC Barrel Cables 5.5mm O.D 2.1mm I.D
Ten cable ties
Six/Six Cables/Ties for Pedal Jeanie Jr.
Flight Case
Pedal Jeanie Jr – 12 lbs
 Loading...