

Page 1
DataFast™ D-10 1
Hand Held Duplication Unit
User’s Manual
GREYSTONE PERIPHERALS INC., 150 Knowles Drive, Los Gatos, CA 95030
TEL: (408) 871-4000 FAX: (408) 871-4100
E-Mail: grystone@gr ystone.com Web Page: http://www.grystone.com
A PubliCARD, Inc. Company
Page 2

LIMITED 1 YEAR WARRANTY
Greystone Peripherals Inc. warrants to the original buyer of this product that the
hardware is free of defects in materials and workmanship for a period of one (1)
year from the date of purchase. Should this product fail to be in good working
order during the warranty period, the Company, at its sole option, will repair or
replace the defective product with an identical product or product having similar
features and functionality as determined by Greystone Peripherals, Inc.
LIFE SUPPORT/MEDICAL SYSTEM USE DISCLAIMER:
DO NOT USE FOR MEDICAL PURPOSES
Greystone Peripherals, Inc. products may not be used as critical components in life
support devices, life support systems or medical systems.
Life support devices or life support systems or medical devices are devices or systems
which (a) are intended for surgical implant in the body, or (b) which support or
sustain life and whose failure to perform, when properly used in accordance with the
instructions provided in the labeling, can reasonably be expected to result in injury.
A critical component is any component in a life support device or life support system
or medical system whose failure to perform can be reasonably expected to contribute
to the failure or malfunction of the life support device or system or may be expected
to affect the safety or effectiveness of such life support device or system.
Greystone Peripherals, Inc. cannot, and does not, assume the responsibility or risk of
any injury or death related to any defect, error, failure or malfunction of the hardware,
software or manuals which, taken together, comprise the Greystone product.
PROPRIETARY NOTICE
Greystone Peripherals Inc. makes no warranty of any kind with regard to this
material, including, but not limited to, the implied warranties of merchantability
and fitness for a particular purpose. Greystone Peripherals shall not be liable for
errors contained herein or for incidental or consequential damages in connection
with the furnishing, performance, or use of this material.
This document contains proprietary information which is protected by copyright.
All rights are reserved. No part of this document may be photocopied, reproduced,
or translated to another language without the written consent of Greystone
Peripherals, Inc. The information contained in this document is subject to
change without notice.
DataFast is a trademark of Greystone Peripherals Inc.
Pentium is a registered trademark of Intel Corporation.
Copyright 1999 by Greystone Peripherals, Inc. All rights reserved.
D-UMAN0018 11/99B
Page 3

Chapter 1: Introduction
1-1 Introduction...........................................................1-1
1-2 Features..................................................................1-2
1-3 Specifications ..........................................................1-3
Chapter 2: Setting Up Your D-101
2-1 Unpacking Your D-101 .........................................2-1
2-2 Setting Up Your D-101..........................................2-2
Chapter 3: Operation
3-1 Using the LCD Menu & Keypad...........................3-1
3-2 Main Menu Screen................................................. 3-2
3-2.1 Changing the Source and Target Drives .....3-2
3-2.2 Starting a Job.............................................. 3-3
3-2.3 Standard Jobs..............................................3-3
Smart Copy................................................. 3-4
Job Completion Status Display............. 3-5
Mirror Copy ...............................................3-6
Disk Test ....................................................3-7
Wipe Disk ..................................................3-8
3-2.4 SRCE=IN TARGET=EXT.........................3-8
Set System Options.....................................3-9
Maintenance Menu................................... 3-10
System Statistics menu........................3-10
View Log File......................................3-11
Set Time & Date ................................ 3-11
Update Software .................................3-11
Chapter 4: Remote Operation
4-1 Setup for Remote Operation ..................................4-1
4-2 Using the Remote Software Utility.........................4-2
4-2.1 Begin Drive 0 Operations with D-101 .......4-4
4-2.2 Select Remote Drive....................................4-5
4-2.3 Upload New Software to D-101 ................. 4-6
Contents
Page 4

Page 5
D-101 DataFast User’s Manual 1-1
Introduction
Chapter 1
Introduction
1-1 Intr oduction
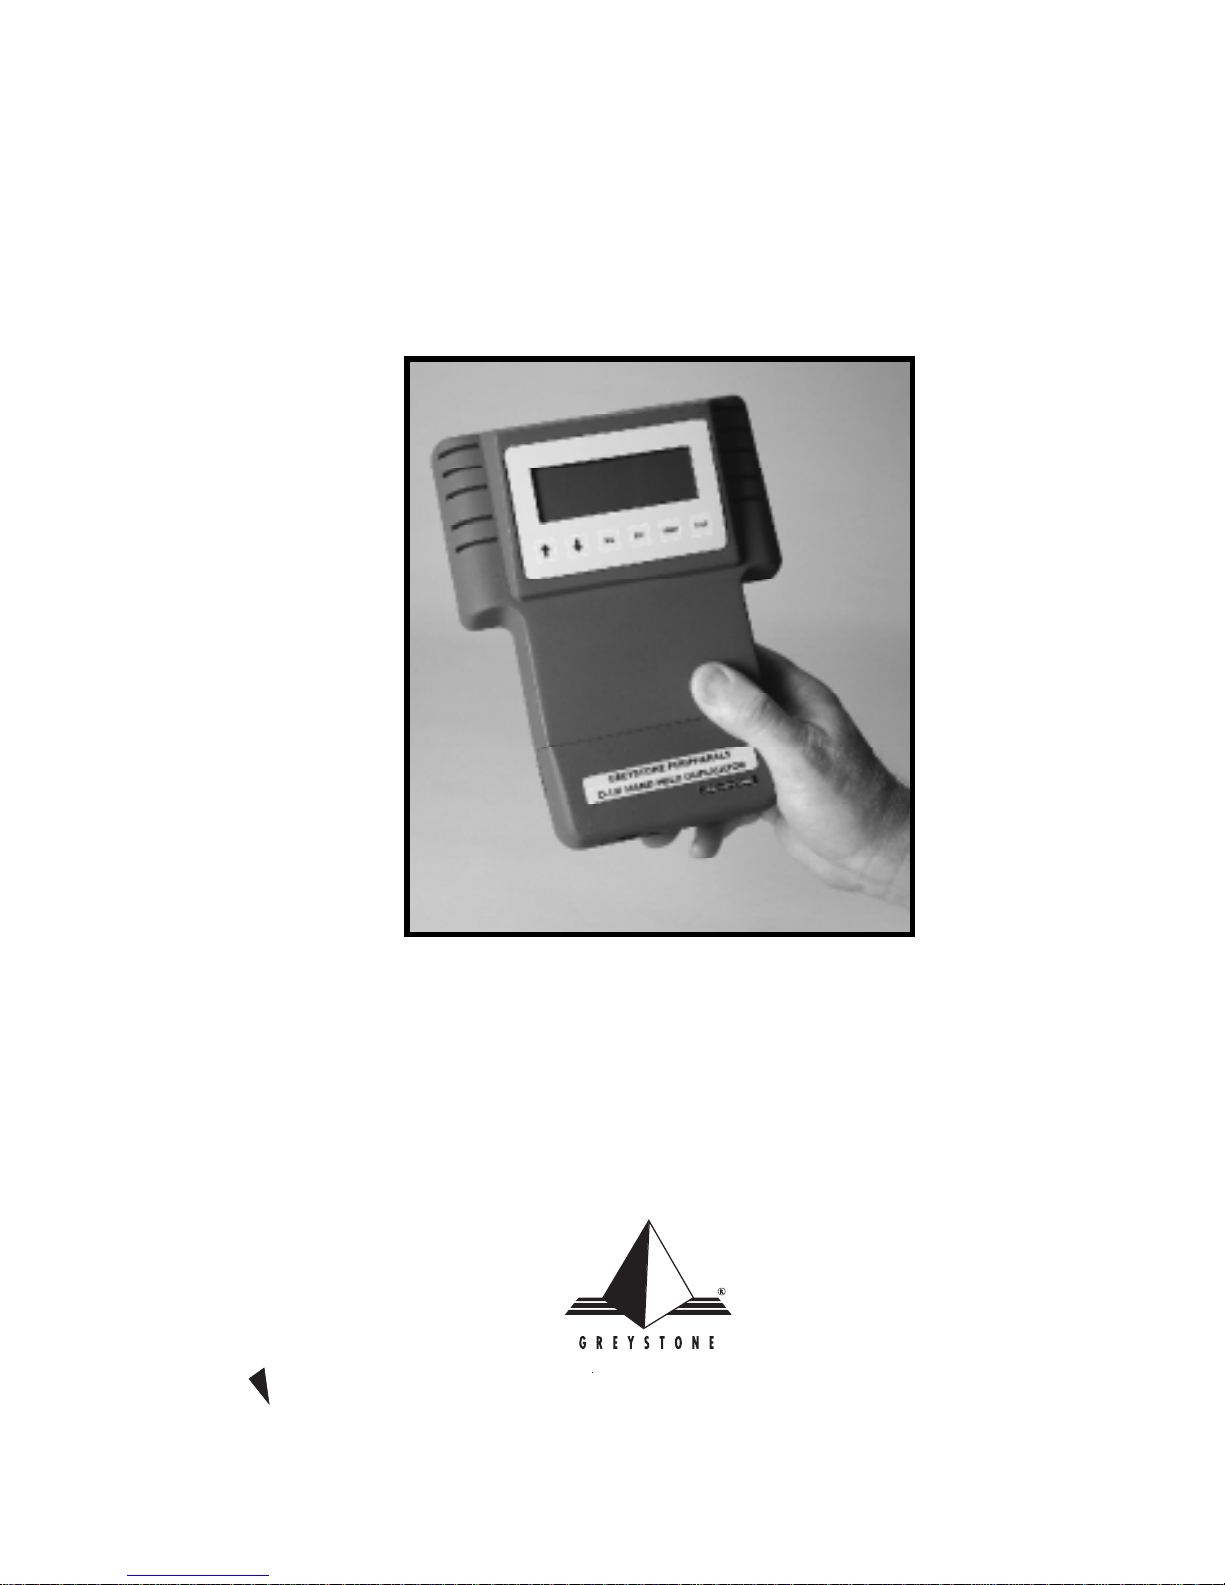
Congratulations on your purchase of the D-101 DataFast™ handheld
disk duplication unit from Greystone Peripherals, Inc. The
D-101 is the smallest, lightest and fastest duplication/diagnostic tool on
the market today. Designed for the computer professional that needs a
powerful portable solution, this hand held unit is the answer. Just place
your master drive in the unit and you can take it anywhere—and with the
D-101's bi-directional copy capability you can copy to or from a target
drive, whatever the job requires.
The D-101 unit allows you to selectively copy program software and data
from a master source drive to a target disk drive. Target drives that are
identical to the source drive may be “mirrored”, or duplicated exactly,
sector by sector. A ‘Smart Copy’ mode is used for faster copying, or for
dissimilar drives using a FAT16, FAT32, or NTFAT file system. The
D-101 is ideal for applications that require portability.
Prior to execution, copying jobs are set up according to the type (physical
details) of the source and target disk, selective or complete copying, and
mode of copying. Setup and execution of copy jobs is accomplished using
a six button keypad and a 4-line by 20-character LCD display. A menu
guides you easily through setup and copy jobs.
D-101 DataFast Handheld Duplicator Unit
Page 6

1-2 D-101 DataFast User’s Manual
Introduction
1-2 Featur es
• Duplicates software from a master disk to a target disk drive
• Supports Ultra DMA ATA/EIDE/IDE drives
• Data transfer speeds over 400 MB/min through IDE
interface
• Copies all operating systems
• Bi-directional copying
• Copies Compaq and Winbook maintenance partitions
• Smart Copy mode duplicates only files, not unused space or
deleted files (all FAT file systems)
• Mirror mode copies even unknown file systems to drives
with identical cylinder, head and sector counts
• Duplicates drives larger than 8 GB
• Supports LBA, CHS addressing and Read/Write Multiple
modes
• Automatic parameter translation option to keep logical
cylinder count below 1024
• Wipeout mode fills each sector on disk with zeroes
• Verify option reads back copied data and compares with
original
• Data logging tracks job results
• Cooling fan to prevent over-heating and ensure data integrity
• Parallel port allows copy operations between D-101 drive
and a PC with IDE drives
Page 7

D-101 DataFast User’s Manual 1-3
Introduction
1-3 Specifications
• Power Requirements: 110/220 Vac 1A 47-63Hz
• Dimensions: 6.5"(W) x 8.0" (D) x 1.85" – 2.75" (H)
• Weight: 1.5 lb
Serial Port
The serial port is reserved for factory test and technical support of the
D-101. A D-101 unit can connect to an ASCII terminal or to a host PC
by a serial port to serial port cable. The D-101 serial port is configured as:
• DOS COM1
• 9600 baud, 8-bit data, 1-stop bit, no parity
• IBM PC/AT-compatible DB-9 connector
Parallel Port
The parallel port is used to connect the D-101 to a host PC through a
standard IEEE-1284 parallel interface. A PC bootable floppy containing
remote software utilities is provided to enable copying between the
D-101 and a PC, and for D-101 software upgrades. The D-101 parallel
port is configured as:
• IEEE-1284 compatible
• DOS LPT1
• EPP mode (if supported by the connected PC.
Otherwise, bi-directional mode is used.)
Page 8

1-4 D-101 DataFast User’s Manual
Introduction
Page 9

D-101 DataFast User’s Manual 2-1
Setting Up Your D-101
Chapter 2
Setting Up Your D-101
This chapter will guide you through the easy procedures for setting up
your D-101 hand held disk duplication unit. It includes the following
sections:
• Unpacking your D-101
• Setting up the system for operation
Once you have completed the setup procedures detailed in this chapter,
refer to Chapter 3 for operating instructions to get you up and running
quickly.
2-1 Unpacking Your D-101
Before setting up the D-101, verify that you have received all the items for
the system configuration you ordered. Please consult your dealer or
Greystone Peripherals if any item is damaged or missing.
1. One D-101 unit
2. One 40-pin data cable
3. One 4-pin power cable
4. One IEEE 1284 parallel cable
5. One AC power adapter
6. 3.5" D-101 utilities diskette
7. Registration card
8. User’s manual
Record the D-101 Serial Number
Now is a good time to record the serial number and date of purchase.
Locate the serial number on the unit and write it down in the space below
for future reference if needed.
D-101 Serial No.: _______________________________
Date of Purchase: _______________________________
Page 10
2-2 D-101 DataFast User’s Manual
Setting Up Your D-101
2-2 Setting Up Your D-101
Proceed with the following instructions for easy set up of your D-101 disk
duplicating system.
SPECIAL NOTE
All drives, both master and target drives must be set
(following the drive manufacturer’s instructions) as
MASTER DRIVES. They must not be set as slave
drives, or set to cable select.
NOTE
The D-101 supports bi-directional copying. You can
designate the internal drive to be either the source
(master) or the target (destination) drive.
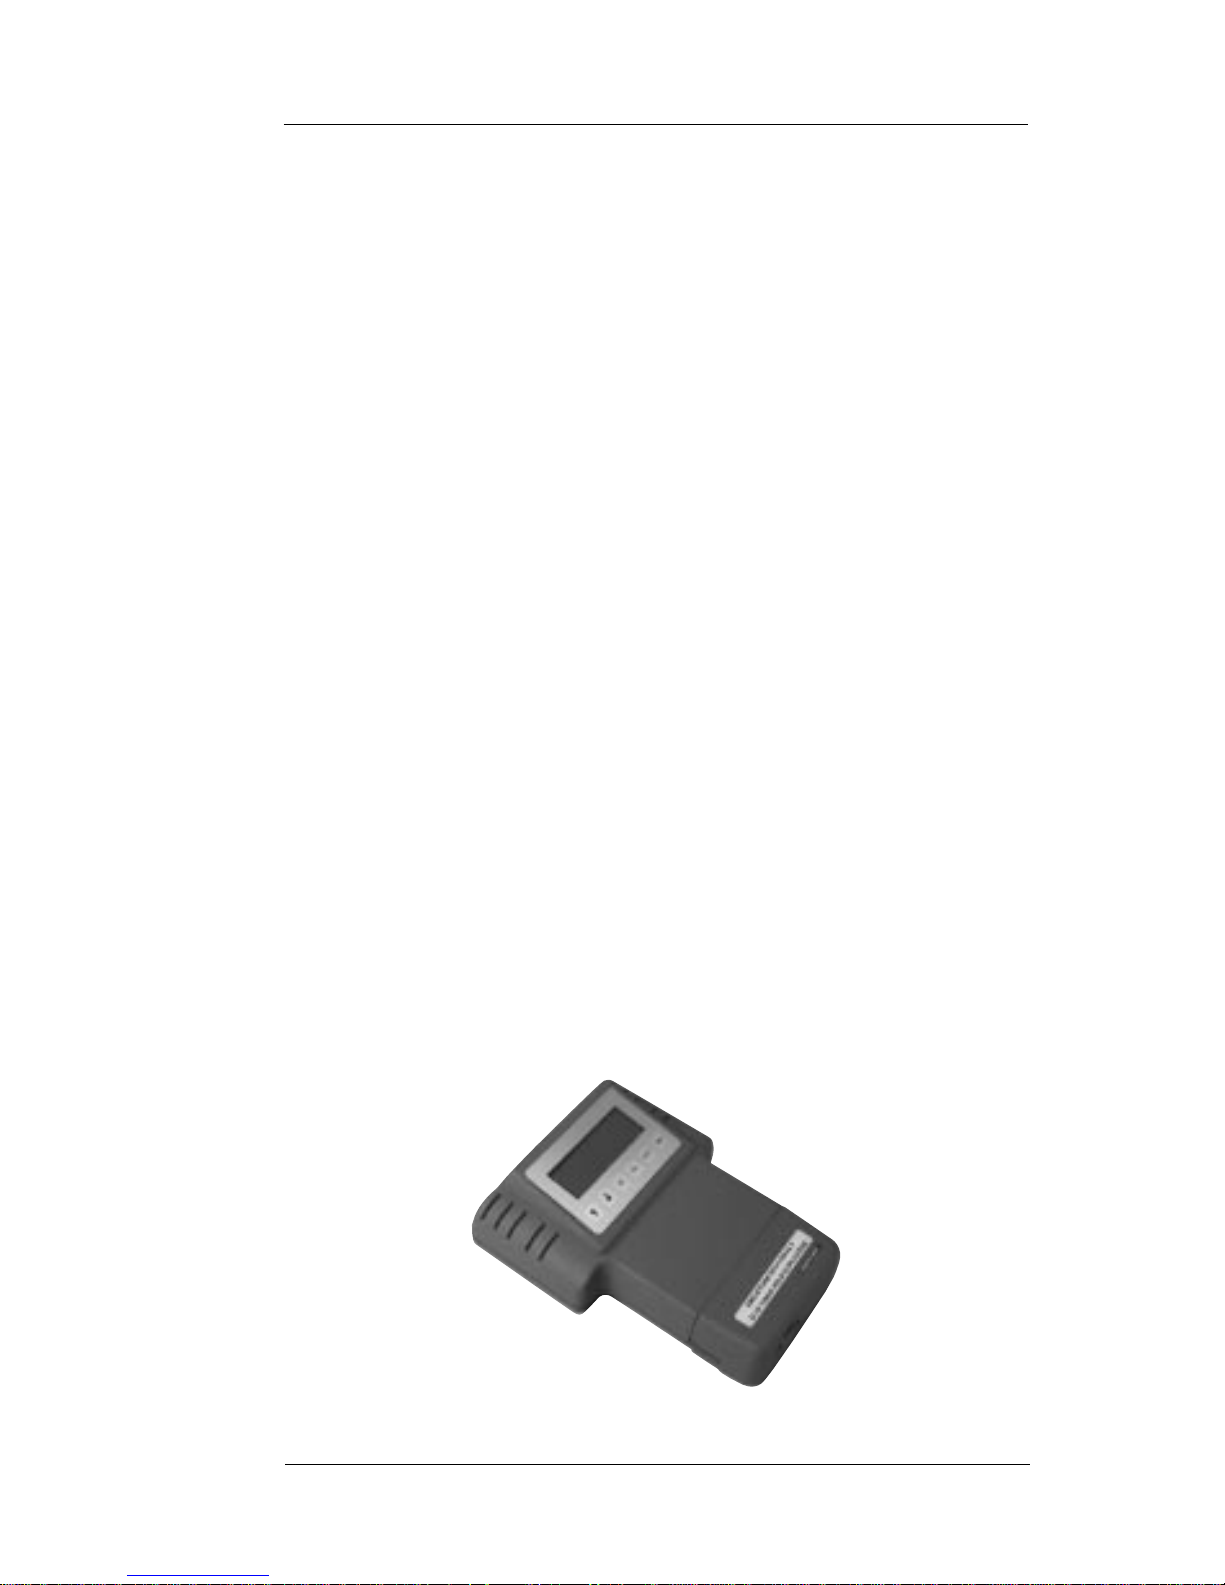
Target Drive
IDE Data
Ethernet
Power IN
D-101 Connector and Feature Locations
Target Drive
Power
Parallel Port
Serial Port
Cover to
Master Drive
Compartment
LCD Menu Display
Keypad
Page 11
D-101 DataFast User’s Manual 2-3
Setting Up Your D-101
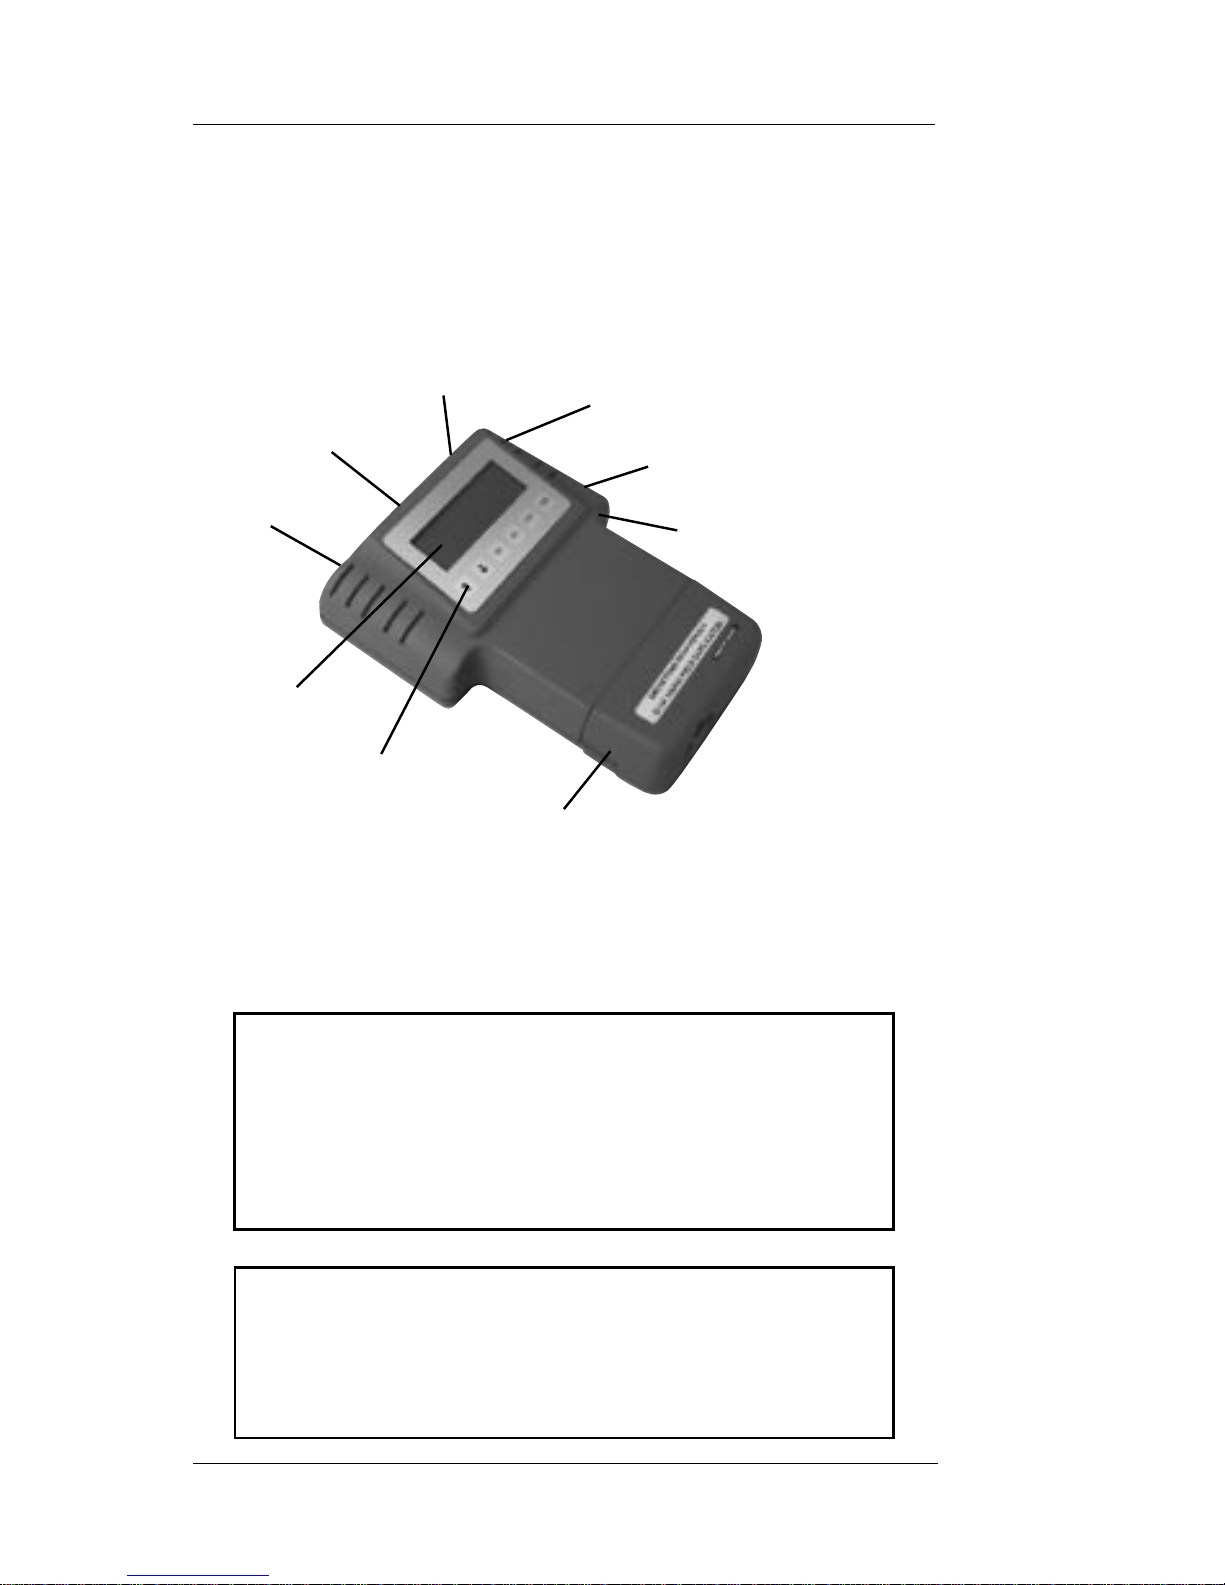
1. Carefully remove the master drive compartment cover from the
D-101. Note that the cover must remain attached to the unit
because of the cooling fan wire connection.
2. Slide the master drive into the D-101 case with the data and power
connectors accessible from the open end.
Cover
Cooling Fan
Wire Connection
Remove the Master Drive Compartment Cover
Master Drive
Data & Power
Connectors
Slide Master Drive into Drive Compartment
Page 12

2-4 D-101 DataFast User’s Manual
Setting Up Your D-101
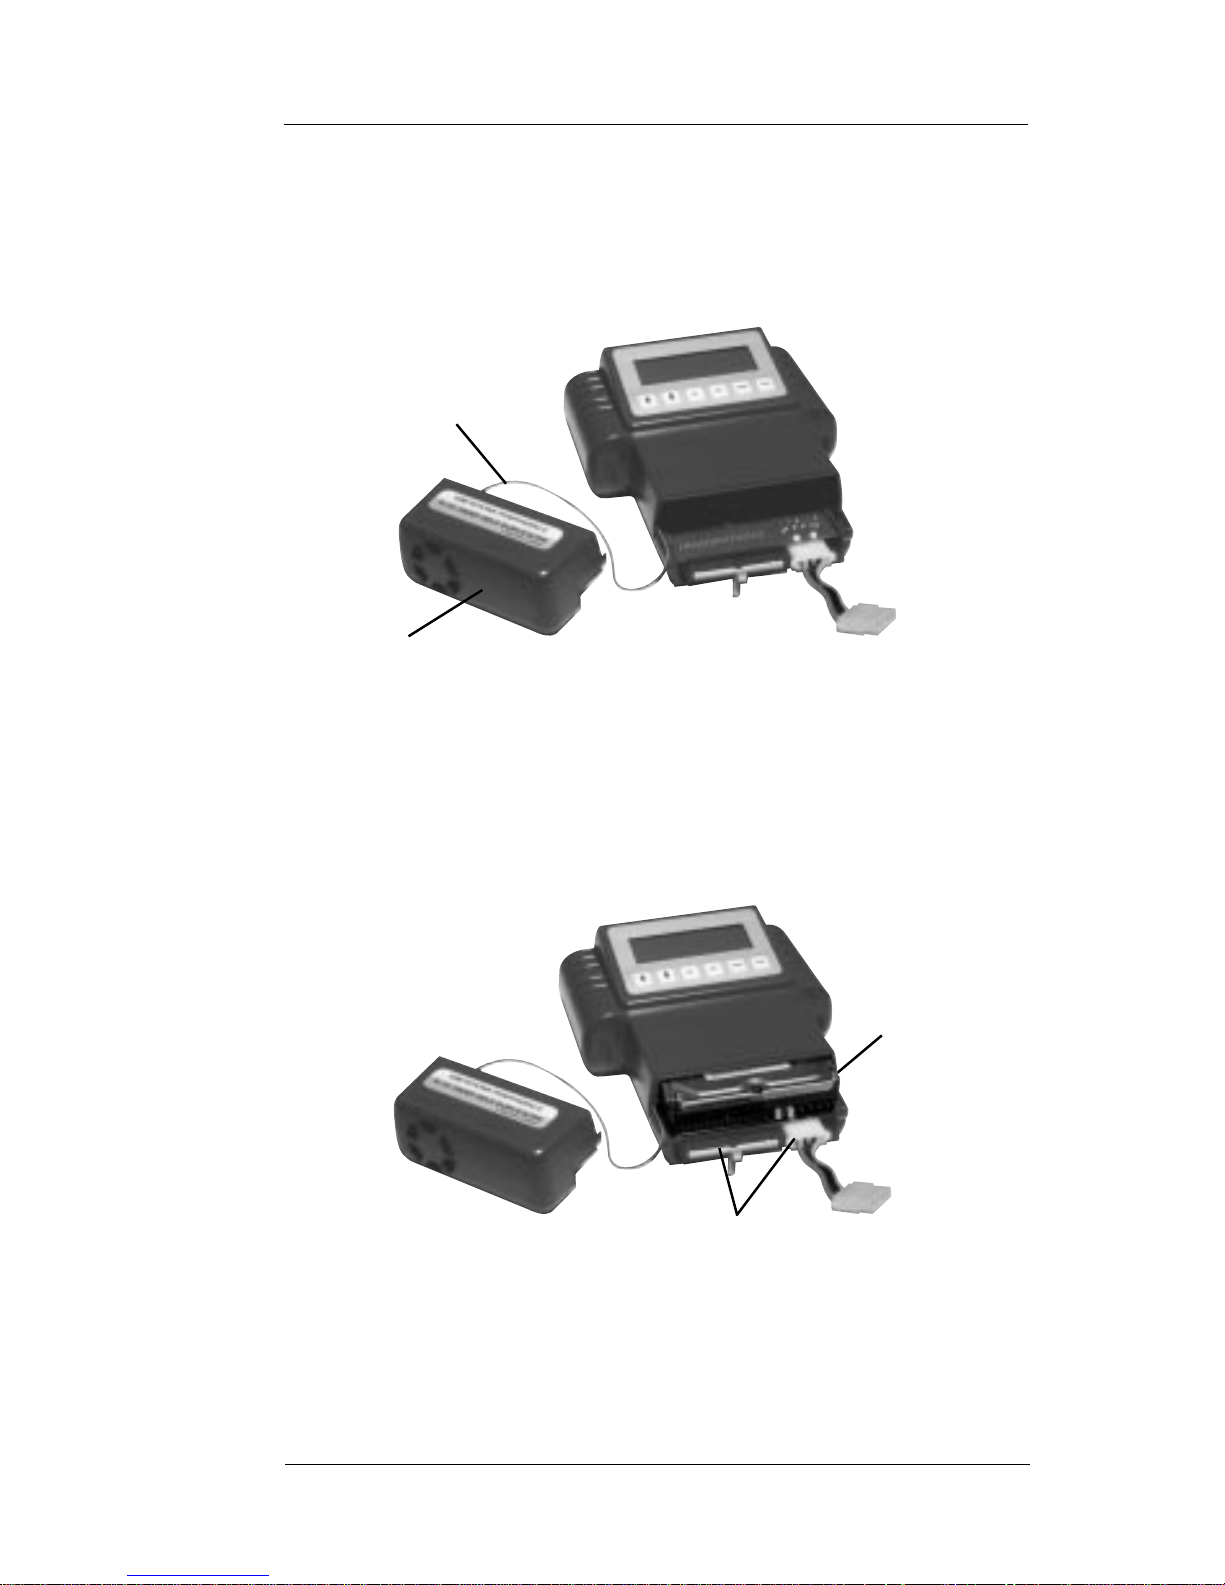
3. Connect the 4-pin power and 40-pin data cables attached to the
D-101's motherboard to their respective connectors on the master
drive. The connectors are keyed for proper insertion.
4. Replace the cover.
5. Plug the round, single-prong end of the AC power adapter into the
power-IN connector on the D-101 unit.
Connect the Data and Power Connector Cables
Power IN
AC Power
Connection
Connect the AC Power Adapter
AC Power
Adapter
40-pin Data Cable
Connections
4-pin Power Cable
Connections
Page 13

D-101 DataFast User’s Manual 2-5
Setting Up Your D-101
6. Plug the two-pronged end of the power adapter into an AC power
source. The D-101 will go through a self-test and display the
following LCD power-on screen.
GREYSTONE D1 0 1 V 1 . 0 0
SYSTEM LOADI NG
SELF TEST ERROR nn
If a self-test failure occurs, the type of self-test failure will be
displayed. Otherwise, “A SELF TEST PASSED” message will be
displayed. The self-test completion status will be visible during
system loading before the main menu is displayed.
7. Attach the external target drive after the following “Main Menu”
is displayed.
MAI N MENU
ST ANDARD JOBS
SRCE=I NT TARGET =EXT
SEL=SELECT
Use the 4-pin power and 40-pin data cables (included with the
unit) to connect the data and power connectors on the target drive
to their respective connectors on the D-101. The connectors are
keyed for proper insertion.
Page 14

2-6 D-101 DataFast User’s Manual
Setting Up Your D-101
Target Drive
Power Cable
Attach the Target Drive
8. Your D-101 is ready to perform the selected functions from the
program menu screens. Next, refer to Chapter 3 for the operation
of your D-101.
NOTE
The method for turning your D-101 unit ON
or OFF is by unplugging the AC power
source.
Data
Cable
Page 15

D-101 DataFast User’s Manual 3-1
Operation
Chapter 3
Operation
This chapter will guide you through the quick and easy operation of your
D-101 handheld duplication system. The menu options presented in this
chapter describe the available functions. These screens are factory set for
safe, automatic execution; you cannot change any of the job settings.
Please note that the terms “source” and “master” are used interchangeably
throughout this document.
3-1 Using the LCD Menu & Keypad
The D-101 control panel consists of an LCD menu screen (4-lines by
20-characters) and six navigation keys. The first menu title line and fourth
keypad prompt line are static and do not scroll.
MAI N ME NU
ST ANDARD JOBS
SRCE=I NT TARGET =EXT
SEL=SELECT
éêSEL ESC ST AR T STOP
The user keypad consists of six keys assigned the following functions:
é Up key: Moves the cursor up, or increment
a number field
ê Down key: Moves the cursor down, or decrement
a number field
SEL: Selects a menu setting or submenu
ESC: Exits a submenu or a setting change
START: Starts a disk operation
STOP: Stops a disk operation
Page 16

3-2 D-101 DataFast User’s Manual
Operation
3-2 Main Menu Screen
The following sections describe the options that are available through the
“Main Menu”. Use the
é
ê
keys to move the cursor, then press the “SEL”
button to select.
3-2.1 Changing the Source and Target Drives
The D-101 allows you to select either the internal or external drive, or the
parallel port as the source drive. The default is for the internal drive to be
the source and the external drive the target. To change this, position the
cursor on the “SRCE=INT TARGET=EXT” line and press “SEL” .
To change the source master drive, select “Source Port” and press “SEL”.
Use the
é
ê
keys to toggle between INT (internal drive port), EXT
(external drive port), or PAR (parallel port). Press “SEL” to set the
desired option. This changes the configuration and returns to the “Select
Port” menu. The target port can be changed using the same procedure.
MAI N ME NU
ST ANDARD JOBS
SRCE=I NT TARGET =EXT
SEL=SELECT
SELECT PORTS MENU
SOURCE PORT=I NT
TARGET PORT=EXT
ESC=EXI T SEL=CHANGE
Page 17

D-101 DataFast User’s Manual 3-3
Operation
3-2.2 Starting a Job
To start a copy, test, or wipe disk job, select “Standard Jobs” by using the
é
ê
keys to position the cursor on the “Standard Jobs” line and then press
<SEL>. Standard jobs include Smart Copy, Mirror Copy, Disk Test and
Wipe Disk. The basic rules for choosing “Smart Copy” or “Mirror Copy”
mode are:
• If you have dissimilar drives (different makes, models,
cylinders, head and sectors), select the “Smart Copy” mode
to invoke the disk duplicating process from the master to the
connected target drive.
• If both drives are of the same manufacturer and model, with
the same cylinders, heads and sectors, select “Mirror Copy ”
Mode, or “Smart Copy” mode.
The following sections describe how to run copy jobs from the “Standard
Job” menu.
3-2.3 Standard Jobs
The following describe the options that are available through the
“Standard Jobs” screen.
Use the
é
ê
keys to scroll line three for more “Standard Jobs” options:
STANDARD JOBS MENU
SMART COPY
MI RROR COPY
ESC=EXI T SEL=SELECT
DI SK TEST
WI PE DI SK
ESC=EXI T SEL=SELECT
Page 18

3-4 D-101 DataFast User’s Manual
Operation
Smart Copy
Smart Copy mode copies the entire source master drive to the target
drive, keeping the basic source’s partition structure intact. If the file
system of a source partition is unknown and the source and target drive
has matching heads and sector/track configuration, the target partition
size will be set equal to the source partition, and the contents will be
“partition mirror” copied. If the file system is known (with FAT12,
FAT16, FAT32, NTFAT, or NTFS), the target partition size will be
automatically adjusted, based on the ratio of the capacity of the source
drive to the capacity of the target drive. Data will be copied file-by-file,
adjusting target FAT size, and cluster size as needed.
The first line can be “Smart Copy” plus additional text “Vfy n%”, if
verify has been specified. Selecting the submenu options enables you to
view the source and target drive information. If either the source or target
drive is not detected, the manufacturer and serial number data will be
replaced with a NO DRIVE indication and the missing drive info will be
displayed as zeros.
To start “Smart Copy”, press “START”. The next screen will prompt you
to confirm the action to start. Press “START” again.
The next screen will display a progress bar showing % completed in 5%
increments or the file name during the copy process, the transfer speed and
estimated time remaining.
If “STOP” is pressed during a copy operation, the screen will display an
“Are you sure” question. To reduce the possibility of an accidental stop,
the “STOP” button must be pressed twice to cancel the operation. If
“Smart Copy” is cancelled, the operation will be logged, if logging is on,
and the job completion status will be displayed.
“ESC” returns to the Standard Jobs menu.
SMART COPY+VFY 1 00%
SOURCE DRI VE I NFO
MF G=
ESC=EXI T START=START
Page 19

D-101 DataFast User’s Manual 3-5
Operation
Job Completion Status Display
Each job terminates with the following display. It lists the job that was run,
the reason for completion, MBs copied, and the elapsed time.
The user has the option to press “SEL” to view the log data, or hit “ESC”
to return to the job menu where the job originated. Job completion will
power down the drives.
The following lists the additional status statements that can be seen in line
2 of the job completion status display.
CANCEL BY USER
SOURCE DRI VE ERROR
TARGET DRI VE ERROR
SMART COPY+VFY
OPERATI ON COMPL E TE
nnnnnnMB ET=hh: mm: ss
ESC=EXI T SEL=VI EWLOG
Page 20

3-6 D-101 DataFast User’s Manual
Operation
Mirror Copy
The disk Mirror Copy mode is valid only for target drives which have the
same number of cylinders, heads and sectors per track as the source drive.
For Mirror Copy mode, the maximum number of megabytes to be copied
must be defined. To duplicate identical drives, zero (0) for the back
megabytes, and 65535 (maximum) for the front megabytes is normally
set. This ensures that the entire drive is copied sector for sector.
The first line can be “Mirror Copy” plus additional text “Vfy n%” if verify
has been specified. The second and third lines are used to set the Front
(begin) and Back (end) parameters to limit the copy to specific parts of the
source drive. By default, the Front is set to the total size of the Source drive
in megabytes. To change the settings, press “SEL” to select front or back
and use the
é
ê
keys to change the values in 100 MB increments.
To start “Mirror Copy”, press “START”. The next screen will prompt
you to confirm the action to start. Press “START” again.
The next screen will display a progress bar showing % completed in 5%
increments or the file name during the copy process, the transfer speed and
estimated time remaining.
You can press “STOP” any time to discontinue the copy process. The
screen will display an “Are you sure” question. To reduce the possibility
of an accidental stop, “STOP” must be pressed twice to cancel the
operation. If “Mirror Copy” is cancelled, the operation will be logged, if
logging is on, and the job completion status will be displayed.
MI RROR COPY+VFY 100%
FRONT=nnnnn
BACK=0
ESC=EXI T START=START
Page 21

D-101 DataFast User’s Manual 3-7
Operation
Disk T est
Use this mode to test the integrity of the readability and writeability of the
target drive. This mode will read blocks of data from the target drive, save
the data in RAM, write a test pattern to the same area of the target disk,
read back and verify the test pattern, write the original data back to the
disk, and verify that the original data was written back correctly. If any
errors occur, the process will be stopped and the errors reported. The test
process will be repeated for successive blocks on the disk. The front MB
and back MB fields will specify what portion of the disk will be tested in
this manner. The default values are set to test the full disk: Front MB =
65535 and Back MB = 0. If you only want to test a portion of the drive,
you can specify different Front (begin) and Back (end) parameters to test.
The second and third lines are used to set the Front and Back parameters
to limit the test operation to specific parts of the target disk. By default,
the Front is set to the total size of the drive in megabytes. To change the
settings, press “SEL” to select front or back and use the
é
ê
keys to change
the values in 100 MB increments.
To start “Disk Test”, press the “START” key. The next screen will prompt
you to confirm the action to start. Press “START” again.
The next screen will display a progress bar showing % completed in 5%
increments or the file name during the copy process, the transfer speed and
estimated time remaining.
If “STOP” is pressed during a copy operation, the screen will display an
“Are you sure” question. To reduce the possibility of an accidental stop,
the “STOP” button must be pressed twice to cancel the operation.
DI SK TEST
FRONT=nnnnn
BACK=0
ESC=EXI T START=START
Page 22

3-8 D-101 DataFast User’s Manual
Operation
Wipe Disk
This mode is used to erase the target drive by filling each sector with zeroes.
The “Wipe Disk” option enables you to allocate the area of the drive you
want to be erased. The default values are set for the full disk: Front MB
= 65535 and Back MB = 0. If you only want a portion of it erased, you
can specify different Front (begin) and Back (end) parameters. To change
the settings, press “SEL” to select front or back and use the
é
ê
keys to
change the values in 100 MB increments.
To start “Wipe Disk”, press “START”. The next screen will prompt you
to confirm the action to start. Press “START” again.
The next screen will display a progress bar showing % completed in 5%
increments or the file name during the copy process, the transfer speed and
estimated time remaining.
You can press “STOP” at any time do discontinue the Wipe Disk process.
Press “ESC” to return to the Wipe Disk menu. To view the copy log for
more details about the job, press “SEL”.
3-2.4 SRCE=INT TARGET=EXT
This section describes the settings that are available through the
“SRCE=INT TARGET=EXT” option in the “Main Menu”.
Use the
é
ê
keys to scroll line three for the available options.
WI PEDI SK
FRONT=nnnnn
BACK=0
ESC=EXI T START=START
MAI N MENU
ST ANDARD JOBS
SRCE=I NT TARGET =EXT
SEL=SELECT
Page 23

D-101 DataFast User’s Manual 3-9
Operation
Set System Options
The D-101 allows you to set several global parameters that are common
to all jobs.
Use the arrow keys to scroll line three of the “Set System Options” menu.
“VERIFY FIRST n%” has selections of 100%, 80%, 60%, 40%, 20%,
1% or 0%. The selection of 0% will disable the verify operation.
Selecting drive “PWR SETTLING” time or drive “CMD TIMEOUT”
allows the ‘seconds field’ to increment or decrement by using the arrow
keys. The indicated values are default.
SET SYSTEM OPTI ONS
VERI FY FI RST100 %
ENABLE LBA XLATE X
ESC=EXI T SEL=SELECT
ENABLE I NT13 XLATE
PWR SETTLI NG=05 SEC
CMD TI MEOUT=15 S EC X
LOG ALL JOBS X
LOG FAI LED JOBS
LOG DETAI LS X
SHOW SMTCOPY FNAMSX
R/ W ML TPL SECTORS X
ENABL CABLE SELECTX
SOURCE= I NT T ARGET=EXT
SET SYSTEM OPTI ONS
MAI NTENANCE MENU
ESC=EXI T SEL=SELECT
Page 24

3-10 D-101 DataFast User’s Manual
Operation
“LOG ALL JOBS” and “LOG FAILED JOBS” are also mutually
exclusive. Both can be off, but turning on one will turn the other off. An
‘X’ in the last column indicates active selection and can be changed by
selecting the menu item and using either arrow key to toggle the setting.
“LOG DETAILS” can be enabled or disabled for either of the above
selections. An ‘X’ in the last column indicates active selection and can be
changed by selecting the menu item and using either arrow key to toggle
the setting.
“ESC” returns to Main Menu.
Maintenance Menu
Use the arrow keys to scroll line three of the Maintenance menu.
System Statistics menu
Use the arrow keys to scroll line three of the System Statistics menu.
SET TI ME & DATE
UPDATE SOFT WARE
MAI NTENANCE MENU
SYSTEM STATI STI CS
VI EW LOG FI LE
ESC=EXI T SEL=SELECT
SYSTEM STATI STI CS
JOBS RUN=nnn
TOTAL MB=nnnnnn
ESC=EXI T
FAI LED COPI ES=nnnn
VERI FY ERRORS=n nnn
Page 25

D-101 DataFast User’s Manual 3-11
Operation
View Log File
The D-101 stores a record of the last 1000 jobs run. You can choose
to view the log at the end of each job or through the Maintenance
Menu. Each job is assigned a serial log number, where 1 is always the
number of the job just completed, number 2 is the previous job, etc.
You can tailor the log to record all of the jobs or only the filed jobs.
You can also set the log to provide details of the source and target
disks.
Set Time & Date
“SEL” selects a line and the arrow keys increment/decrement the
value. “ESC” or “SEL” stops the change, preserving the setting. The
Time mode will toggle from AM to PM to 24 to AM again. The
changes, if any, are not set until exiting up to the Maintenance menu.
LOG ENTRY #00001
12:04PM 06/ 07/ 1999
SMART COPY+VRY 100%
ESC=EXI T
OPERATI ON COMPL ETE
MB=655355
ELAPSED TM=00: 3 5: 00
FI NI SHED 12: 39PM
SET TI ME & DATE
MONT H = mm
DAY =dd
ESC=EXI T SEL=CHANGE
Page 26

3-12 D-101 DataFast User’s Manual
Operation
UPDATE SOFTWARE
WAITING FOR REMOTE
ESC=EXI T
YEAR =yyyy
HOUR =hh
MI NUTE = mm
MODE = AM
Use the arrow keys to scroll line three of the Set Time & Date menu.
Update Software
This function allows you to easily update your software as new
features become available. To update your software, install the new
software in your PC and set up the parallel connection from the PC
to the D-101.
Proceed to the “Maintenance Menu” and select “Update Software”.
When you enter this menu, the D-101 will attempt to connect,
through the parallel port, to a connected PC running the Remote
Software. After the connection is made, the second line will change
to “CONNECTED”. When the update operation is started through
the Remote Software, the second line will change to “UPDATING”.
While updating, the keypad is inactive to prevent accidental interruption. If the update transfer is successful, the D-101 will reboot to
implement the new software update. If the update was not successful,
due to transmission or other errors, the third line will display
“UPDATE FAILED”. The keypad prompt will reappear on the
fourth line of the display and the second line will display either
“WAITING FOR REMOTE” or “CONNECTED”.
Page 27

D-101 DataFast User’s Manual 4-1
Remote Operation
Chapter 4
Remote Operation
This chapter will guide you through the quick setup for remote operation
using the provided Remote Software Utility with any Pentium-class PC.
The connection to the PC is made through the parallel port of the PC
operating in EPP mode. The Remote Software Utility enables you to do
the following:
• Copy directly between the D-101 and a PC
• Select a local IDE hard drive on a PC for operations with
the D-101
• Update the D-101 application software
4-1 Setup for Remote Operation
Your D-101 was shipped with a Remote Software Utility diskette and
6-foot IEEE 1284-compatible cable with DB25-P male connectors at
both ends. Proceed with the following steps to set up your D-101 for
remote operation.
1. Connect one end of the supplied parallel port cable to the 25-pin
connector on the D-101 as shown below.
2. Connect the other end to the parallel port on the PC. Refer to the
PC documentation for location of parallel port 1. The parallel port
must be set for EPP mode.
DB25 Parallel
Connector Cable
D-101
Parallel Port
D-101 Parallel Port-to-Parallel Cable Connection
To PC
Page 28

4-2 D-101 DataFast User’s Manual
Remote Operation
3. Connect power to the D-101. The D-101 will display the main
menu:
D-101 Display:
The D-101 is now ready for remote operation. Continue to the next
section to run the remote software utility on your PC.
4.2 Using the Remote Software Utility
The floppy diskette provided with the D-101 is a bootable diskette. To
run the utility from this disk, place it in the A: drive. If Windows is
currently running, select “Shutdown” and then “Restart” from the Start
menu. If the PC is powered down, turn it ON and the system will boot
automatically from the floppy diskette and display the following screen
on the PC while attempting to establish communication with
the D-101.
PC Screen:
A:\>remote
Establish a connection with the D-101
Waiting for D-101
Press ESCAPE to exit._
MAI N ME NU
ST ANDARD JOBS
SRCE=I NT TARGET =EXT
SEL=SE L ECT
Page 29

D-101 DataFast User’s Manual 4-3
Remote Operation
If a connection cannot be established, the cause may be:
• The D-101 is not set up correctly.
• The cable is not connected properly.
• The supplied parallel port cable was not used. The cable must be an
IEEE 1284 parallel port cable – not a standard printer cable or a
serial cable.
• The parallel port BIOS setting in the remote computer is not set
correctly. The BIOS setting for the parallel port should be set to
“EPP” mode.
When connection to the D-101 is successful, the main screen for remote
operation is displayed on the PC screen. Initially local IDE hard drive 0,
usually referred to as the C: drive, will be selected for remote operations
with the D-101. A submenu is provided to allow for selection of one of
four different local IDE hard drives. The current selected drive number
is shown in the drive operation menu line.
PC Screen:
A status line at the bottom of the PC screen keeps you informed of the
status of remote operations. Select the desired operation by using the
arrow keys to highlight the operation, and then pressing <Enter>. The
three options are described in the following sections.
Greystone D-101 Remote VG.3
Use cursor keys to highlight activity.
Press <F1> or <ENTER> to make selection.
Press <Alt> to exit program.
D-101 Information
Software Vers: 0.4 Ser# 12345
Greystone D-101 Remote Options:
Begin drive 0 operations with D-101
Select drive for remote operations
Upload new software for D-101
Fri, 09 Jul 1999 09:15:29 AM
Status: Select job using cursor keys
Page 30

4-4 D-101 DataFast User’s Manual
Remote Operation
4-2.1 Begin Drive 0 Operations with D-101
When you select this option, the local IDE hard drive becomes either
the source or target drive, depending upon how you set up the D-101.
All D-101 disk drive operations can be performed on the selected drive
without the need to physically remove the drive and cable it to the D-101.
The current selected local drive is displayed in the menu heading. Once
you have selected this option, return to the D-101 and run jobs just as you
normally would.
PC Screen:
D-101 Screen:
Use the SRCE/TARGET selection from the D-101 main menu to select
either the source or the target to PAR, to establish communication
through the parallel port to the remote computer. Select the desired
operation using the STANDARD JOBS selection on the D-101 MAIN
MENU. Then begin the job using the START key.
Remote Drive 0 Operation
Press <ESC> to exit
-----------------------------------------
------
Fri, 09 Jul 1999 09:35:27 AM
Status: Disk is free... Press <ESC> to Exit
MAIN MENU
* STANDARD J OBS
SRCE=I NT TARGET=EXT
SEL=SELECT
Page 31

D-101 DataFast User’s Manual 4-5
Remote Operation
The status line on the PC screen displays “Disk is free,” “Disk is idle,”
“Disk is reading,” or “Disk is writing,” depending upon current job status.
You can return to the main remote menu whenever the “Disk is free” by
pressing the <Esc> key. The <Esc> key is disabled whenever a D-101
disk operation has reserved the current selected local hard drive and the
drive is reading, writing, or is idle.
4-2.2 Select Remote Drive
When the remote software is started, it will default to use local IDE hard
drive 0 for remote operation with the D-101. Normally drive C: is
connected to primary IDE port 0 as the master drive, while the DOS letter
assigned to other drives are not predictable. This menu allows the user to
select one of four local physical hard drives that may be cabled to the
internal IDE ports.
PC Screen:
Select a drive by using the arrow keys to highlight the desired drive
number, then press <Enter>. Press <Esc> to return to the main menu and
retain the displayed selection.
Select Remot Drive
Use cursor keys to highlight activity.
Press <F1> or <ENTER> to make selection.
-----------------------------------------
Drive 0 (Master on primary IDE 0) Selected
Drive 1 (Slave on primary IDE 0)
Drive 2 (Master on secondary IDE 1)
Drive 3 (Slave on secondary IDE 1)
Fri, 09 Jul 1999 09:35:27 AM
Status: Select using cursor keys Press <ESC> to Exit.
Page 32

4-6 D-101 DataFast User’s Manual
Remote Operation
4-2.3 Upload New Software to D-101
To update the software, insert the D-101 software distribution diskette
into the PC's A: drive.
PC Screen:
With the new distribution diskette in the A: drive of the remote
PC, press any key. From the D-101's main menu , use the arrow and
Select keys to navigate to the MAINTENANCE, then UPDATE
SOFTWARE menu. The following will be displayed on the D-101:
D-101 Display:
UPDATE SOFTWARE
ESC=EXI T
Upload New Software
Press <F1> to begin, or <ESC> to cancel.
Handheld Information
Software Version G.3 Serial# 1462
Press any key when the distribution diskette
is in drive A
Fri, 09 Jul 1999 09:35:27 AM
Status: Press <ESC> to abort.
Page 33

D-101 DataFast User’s Manual 4-7
Remote Operation
With the new distribution diskette in the drive, press <F1> to begin
uploading the new software files. A series of ‘+’ signs will be displayed
as each file is transferred to the D-101.
When the software upload is complete, the PC screen displays
“SUCCESS!” The D-101 performs a reset to initialize and use the new
software, and the remote software returns to the main menu. If any
errors occur during the upload process, both the remote software and the
D-101 will display error messages and the D-101 will discard the
updated software.
Page 34

4-8 D-101 DataFast User’s Manual
Remote Operation
Page 35

Page 36

For Technical Support call: (408) 871-4039
Monday - Friday
9:00 a.m. to 5:00 p.m. PST
For Sales, call toll free: (800) 600-5710 or (408) 871-4000
To order by Fax call: (408) 871-4100
World Wide Web: http://www.grystone.com
http://www.greystoneperipherals.com
Fax-Back: (408) 871-4100
 Loading...