

Page 1

User’s Guide
For additional technical information,
please visit our website at
http://www.greyfox.com
C AT 5 INTERCOM S YSTEM
P/N R1707v1
For Technical Support, call toll free 877-GREYFOX
or 412-920-6100
Page 2

Cat 5 Intercom System
Congratulations! Your new home has been equipped with the Cat 5 Intercom
System - which gives you the power of instant communication throughout your
home. From its contemporary and discreet appearance, to its ease of use, your
Cat 5 Intercom System was designed with you in mind!
This guide is designed to help you use your new Cat 5 Intercom System to its
greatest potential, as well as to assist you in diagnosing and solving any problems
that you may encounter with the system. Greyfox offers a dedicated team of
technical support representatives to answer any of your questions that may not
be addressed in this guide. Please call your local Greyfox installer, or call us direct
at toll free 1-877-GREYFOX.
Your Cat 5 Intercom System has been installed by a qualified Greyfox Installer.
The Cat 5 Intercom System includes a one-year limited warranty.
Technical Support
Call your Greyfox Installer
or Toll Free 1-877-GREYFOX
www.greyfox.com
Read all instructions carefully and completely before using the
Greyfox Cat 5 Intercom System.
Safety Instructions - Please read before operating your unit.
• Read & Retain this USER’S GUIDE – All operating instructions should be read
before the Cat 5 Intercom System is operated & retained for future use.
• Cleaning – Use only a damp cloth to clean the cover plates of the system
components.
Do not use vacuum cleaners, liquid or aerosol cleaners.
• Liquid Entry – Do not expose any Cat 5 Intercom System component that was
designed for indoor use to moisture. Doing so can create electrical hazards or
render the component unusable. Exposure to moisture will also void the
warranty on the system.
• Servicing – The user should not attempt to service the unit beyond those
means described in this USER’S GUIDE.
• Modifications – Only use Greyfox Systems authorized components, modules,
and devices with the Cat 5 Intercom System. Not doing so will void the
warranty of the system.
Save these instructions for future reference.
Cat 5 Intercom System User’s Guide
www.greyfox.com
©2004 1-877-GREYFOX
1
Important Safety Precautions
Table of Contents
Introduction . . . . . . . . . . . . . . . . . . . . . . . . . . . . . . . . . . . . . . . . . . . . . . . . . . . . . . . 1
Important Safety Precautions. . . . . . . . . . . . . . . . . . . . . . . . . . . . . . . . . . . . . . 1
System Components Overview. . . . . . . . . . . . . . . . . . . . . . . . . . . . . . . . . . . . . 2
Required Components . . . . . . . . . . . . . . . . . . . . . . . . . . . . . . . . . . . . . . . . . . . . 2
Optional Components . . . . . . . . . . . . . . . . . . . . . . . . . . . . . . . . . . . . . . . . . . . . 3
Cat 5 Intercom System Operational Overview. . . . . . . . . . . . . . . . . . . . . . 3
Main Console Unit . . . . . . . . . . . . . . . . . . . . . . . . . . . . . . . . . . . . . . . . . . . . . . 3
Indoor Room Unit . . . . . . . . . . . . . . . . . . . . . . . . . . . . . . . . . . . . . . . . . . . . . . 5
Door Unit . . . . . . . . . . . . . . . . . . . . . . . . . . . . . . . . . . . . . . . . . . . . . . . . . . . . . 7
Troubleshooting Guide. . . . . . . . . . . . . . . . . . . . . . . . . . . . . . . . . . . . . . . . . . . . . 8
Warranty. . . . . . . . . . . . . . . . . . . . . . . . . . . . . . . . . . . . . . . . . . . . . . . . . . . . . . . . . . 9
IMPORTANT NOTICE
• DO NOT MODIFY THIS UNIT beyond those means described in this user’s
manual.This product, when installed as indicated in the instructions contained in
this manual, meets FCC requirements. Modifications not expressly approved by
Greyfox may void your warranty and authority to use the product.
• When connecting this product to accessories and/or other products, use only
high quality cables. Follow all instructions.
• This product has been tested and found to comply with the requirements listed
in FCC Regulations, Part 15 for class B devices. Compliance with these
requirements provides a reasonable level of assurance that your use of this
product in a residential environment will not result in harmful interference with
other electronic devices.
Page 3
Cat 5 Intercom System User’s Guide
www.greyfox.com
2 1-877-GREYFOX
3
System Components Overview
Required Components
The following three components (in addition to a suitable power transformer or
power distribution module) are required in order to have a functional Cat 5
Intercom System.
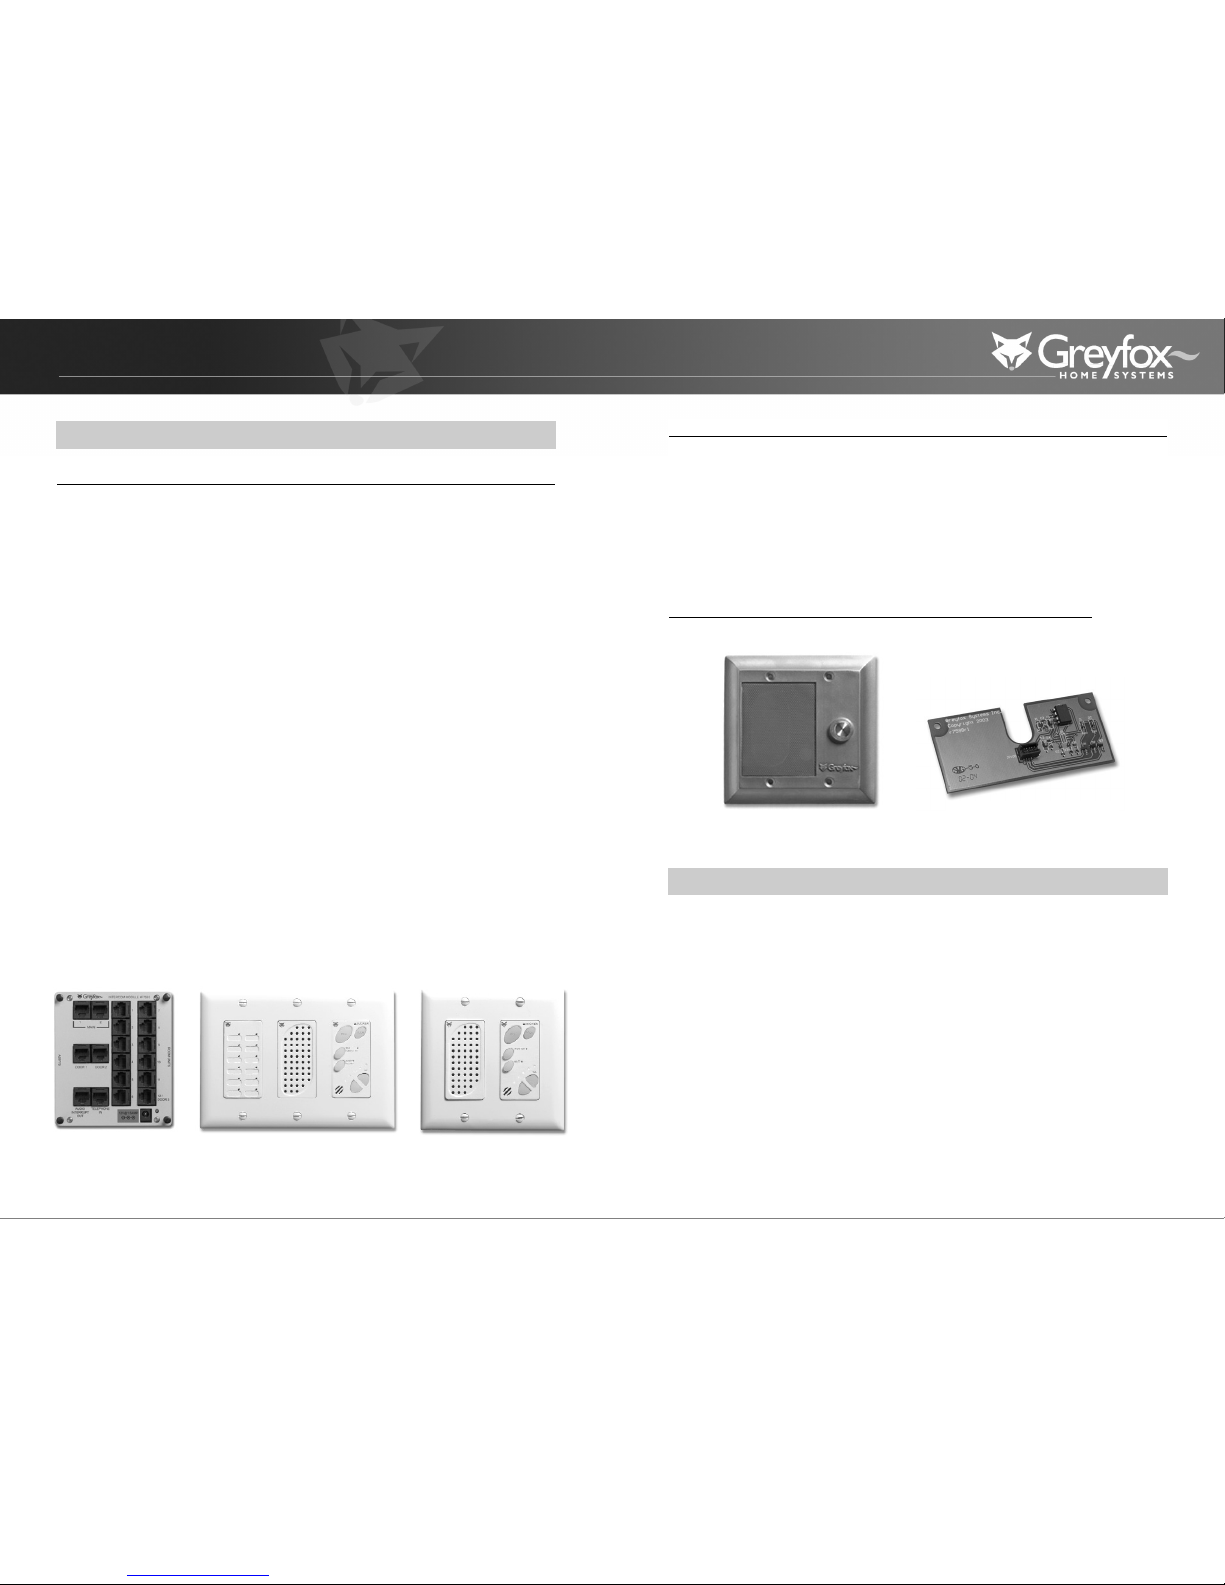
Intercom Module: This module is typically installed in a Greyfox Enclosure and
can be considered the “brains” of the system. All other Room Units, Door Units,
and the Main Console Unit are connected directly to this module via “home run”
Cat 5 cabling.The module also supplies power to the entire Cat 5 Intercom
System.This module is the only component of the system that requires an
appropriate power transformer or power distribution module.This module
should only be serviced by an authorized Greyfox Systems installer.
Main Console Unit: In addition to providing typical intercom features found
with Room Units, this unit includes a bank of status LEDs which show, at a
glance, which Room Units are talking, muted, or in monitor mode. It also includes
a dedicated door release button (functional only if a door release device is
installed), and talk hands free button. Only one Main Console Unit, per system,
can be installed.
Room Unit: This unit provides basic intercom communication functions such as
talk, talk to door (if Door Unit is installed), monitor, and mute. Up to 12 room
units can be installed per system.
Optional Components
The following components are optional to the Cat 5 Intercom System.When
added, these components will enable communications with visitors to the home.
Door Unit: This unit allows a visitor to the home to press the door chime
button on the unit to notify the occupants of their presence (requires Door
Chime to be installed).The occupants can then initiate two way communication
with the visitor and open the door (requires door release device, not included).
Door Chime: This component installs as an add-on to the Intercom Module. It
enables a chime to be heard on all units throughout the Cat 5 Intercom System.
Without this component, no chime will be heard through the system.
The following section explains the various functions and operational features of
each component of the Cat 5 Intercom System.
Main Console Unit
The Main Console Unit acts as the central point of communication in the Cat 5
Intercom System.The Main Console Unit utilizes LEDs to show all room activity
among other enhanced intercom features.
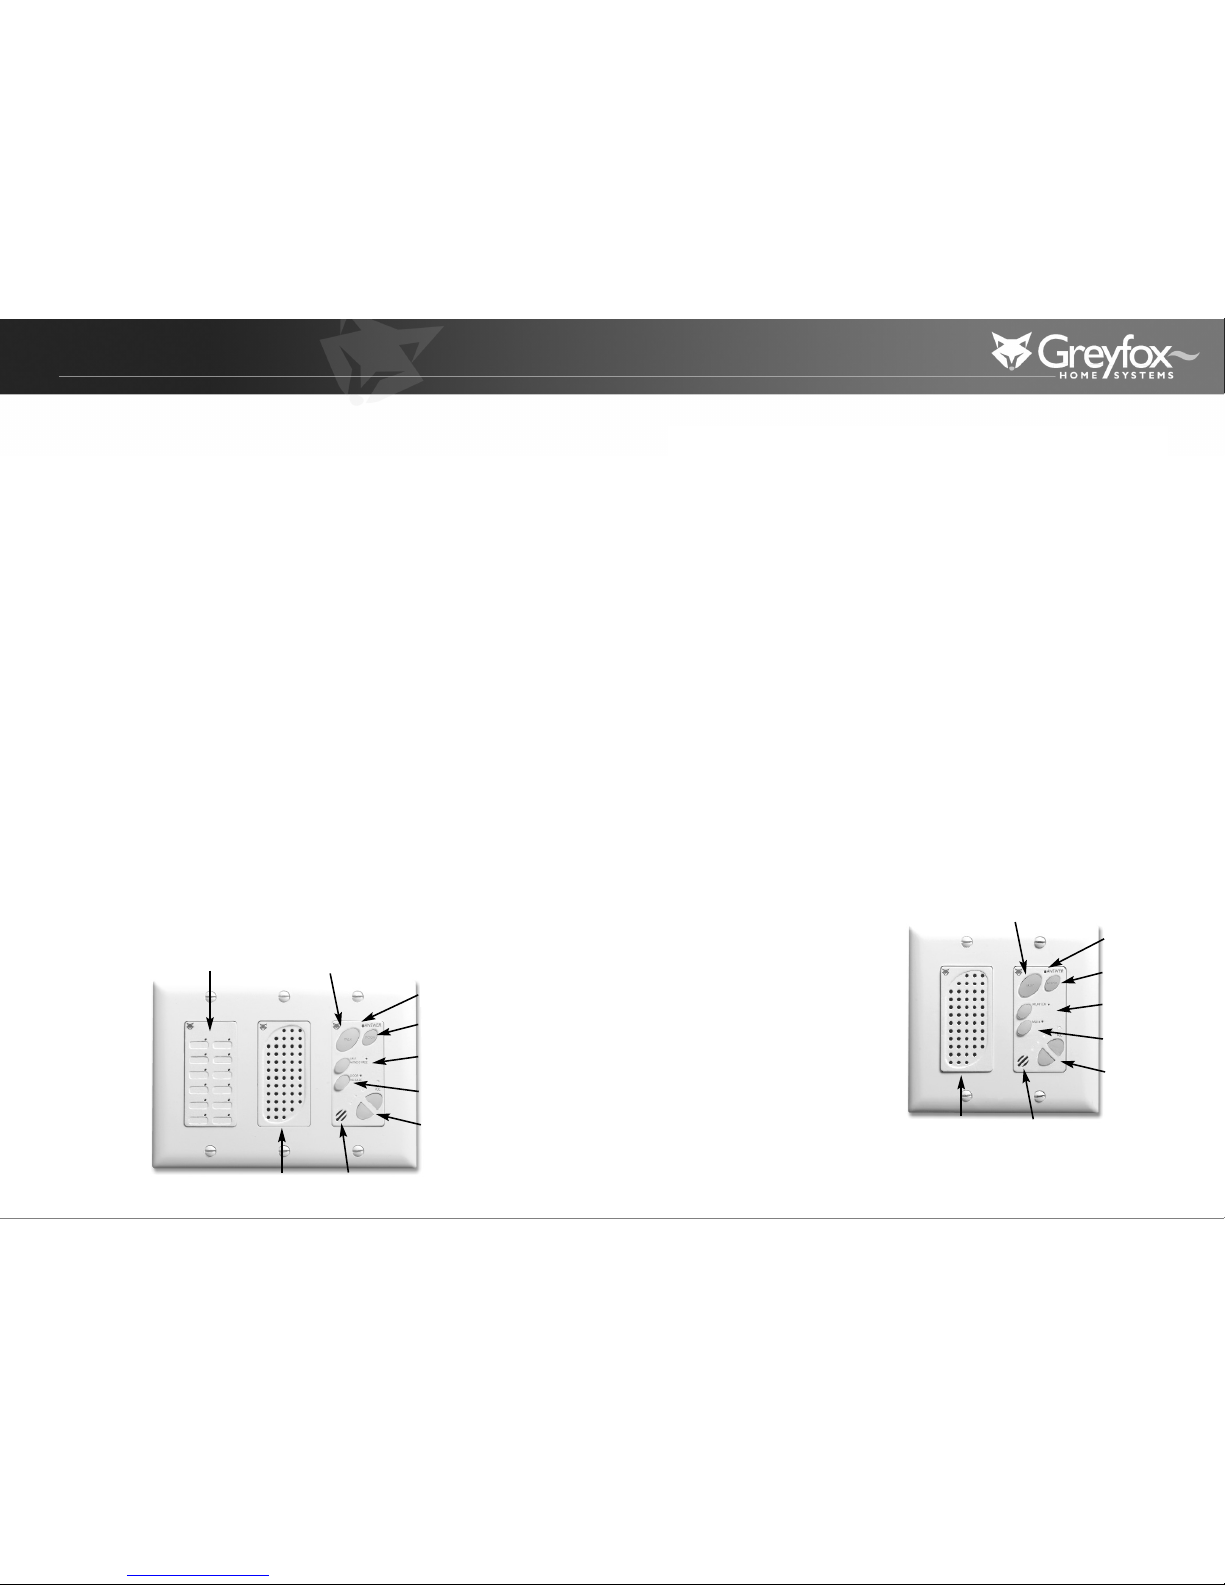
STATUS LEDS - Each LED indicates the status of each Room Unit in the system.
A GREEN light indicates that the Room Unit’s Talk or Door button are currently
depressed and someone is talking with the unit.A RED light indicates that the
Room Unit is in Mute mode and that all speaker and microphone functions of
the unit are disabled.An ORANGE light indicates that the unit is in MONITOR
mode and its microphone is currently active.
Main Console Unit
Intercom Module
Indoor Room Unit
Door Unit
Door Chime
Cat 5 Intercom System Operational Overview
Page 4
Cat 5 Intercom System User’s Guide
www.greyfox.com
4 1-877-GREYFOX
5
TALK - Depressing this button will allow you to communicate with all other
active units. Hold in the TALK button while speaking and let it go when you are
done.Your voice will be heard on any active Room Unit within the system.
DOOR - Depressing this button will allow you to communicate with all Door
Units that are a part of your system. Hold in the DOOR button while speaking
and let it go when you are done.Your voice will be heard on any active Room
Unit and all Door Units within the system.When you let go, the Door Unit’s
microphone stays active for 20-30 seconds allowing you to hear the visitor.
ANSWER LED - This LED is located at the top of the keypad of the Main
Console Unit.When lit this LED indicates that the microphone in the unit is
active and anything you say will be communicated through the system.This LED
will light when you are depressing the TALK or DOOR button.
TALK HANDS FREE - Depressing this button will allow you to communicate
with all active Room Units in the system. Hold in the TALK HANDS FREE button
while speaking and let it go when you are done.Your voice will be heard on any
active Room Unit within the system and every Room Unit’s microphone will be
activated which will enable other intercom users in the home to respond without
requiring them to press the TALK button on their Room Unit.You will hear
anyone responding to you in any room of the home where a Room Unit is active
(not in mute mode).The Room Unit’s microphone stays active for 20-30 seconds
unless the TALK HANDS FREE button at the Main Console Unit is activated
again within this time period.This feature allows for hands free communication
from the Room Units to the Main Console and is useful because no action is
required by anyone on the receiving end (Room Units).
DOOR RELEASE - Depressing this button will engage the door release device
(not included in the Cat 5 Intercom System) if a door release device is installed
in conjunction with the Cat 5 Intercom System. Holding in this button will open
the door which the door release device controls. Once you let go of the button,
the door release device will disengage which will lock the door again.
VOL - There are two volume control keys with an associated volume level LED
bar.There are 64 different volume levels which are adjusted up and down using
these two buttons. Pressing the volume up button will increase the volume one
level higher.You may not see the LEDs change until you press the volume up or
down multiple times (approximately every 6th button press).You can also hold in
the volume up or down button until you have reached the desired volume level.
It is recommended that you keep the volume level in the middle position (3 LEDs
lit) for optimum sound quality.
Room Unit
The Room Unit acts a point of communication in the Cat 5 Intercom System.
There may be up to twelve total Room Units in the Cat 5 Intercom System.The
Room Unit provides typical intercom features which enable quick communication
throughout the home.
TALK - Depressing this button will
allow you to communicate with all
other active units. Hold in the TALK
button while speaking and let it go
when you are done.Your voice will
be heard on the Main Console Unit
as well as any active Room Unit
within the system.
Talk
Talk Hands
Free
Door
Release
Answer
LED
Volume
Door
Status LEDs
Speaker Microphone
Talk
Monitor
Mute
Answer
LED
Volume
Door
Speaker Microphone
Page 5
Cat 5 Intercom System User’s Guide
www.greyfox.com
6 1-877-GREYFOX
7
DOOR - Depressing this button will allow you to communicate with all Door
Units that are a part of your system. Hold in the DOOR button while speaking
and let it go when you are done.Your voice will be heard on any active Room
Units, the Main Console Unit, and all Door Units within the system.
ANSWER LED - This LED is located at the top of the keypad of the Room Unit.
When lit this LED indicates that the microphone in the unit is active and anything
you say will be communicated through the system.This LED will light when you
are depressing the TALK or DOOR button.This LED will be constantly lit when
the unit is in MONITOR mode.
MONITOR - Press this button once to put the Room Unit in MONITOR mode.
Press the button again to return the Room Unit back to normal mode.While in
MONITOR mode, the microphone is constantly active, the speaker is disabled
and any voice or noise within the room will be heard throughout the system. The
LED to the right of the MONITOR button will glow green. Multiple Room Units
can be in MONITOR mode at the same time.This function is useful for baby
monitoring or other types of situation which require any voice or noise in a
room to be heard throughout the system.
MUTE - Press this button once to put the Room Unit in MUTE mode. Press the
button again to return the Room Unit back to normal mode.While in MUTE
mode, both the speaker and microphone of the unit will be inactive and the LED
to the right of the MUTE button will glow red. MUTE mode is useful for
maintaining privacy in a particular room. Multiple rooms can be in MUTE mode at
the same time.
DOOR RELEASE - There is no specific button on the Room Unit for the DOOR
RELEASE function. However, by depressing both the TALK and the DOOR
buttons and the same time, the Room Unit will engage the door release device
(not included in the Cat 5 Intercom System) if a door release device is installed
in conjunction with the Cat 5 Intercom System. Holding in the TALK and the
DOOR button simultaneously will open the door using the door release device.
Once you let go of the buttons, the door release device will be disengaged which
will lock the door again.
VOL - There are two volume control keys with an associated volume level LED
bar.There are 64 different volume levels which are adjusted up and down using
these two buttons. Pressing the volume up button will increase the volume one
level higher.You may not see the LEDs change until you press the volume up or
down multiple times (approximately every 6th button press).You can also hold in
the volume up or down button until you have reached the desired volume level.
It is recommended that you keep the volume level in the middle position (3 LEDs
lit) for optimum sound quality.
Door Unit
The Door Unit acts as a point of communication between the occupants of the
home and visitors to the home.There may be up to three total Door Units in
the Cat 5 Intercom System.The Door Unit provides a doorbell button which
enables the occupants to be notified of a visitor via the Door Chime feature.The
Door Unit features a weather resistant integrated microphone and speaker
which allows communication with visitors before allowing them into your home.
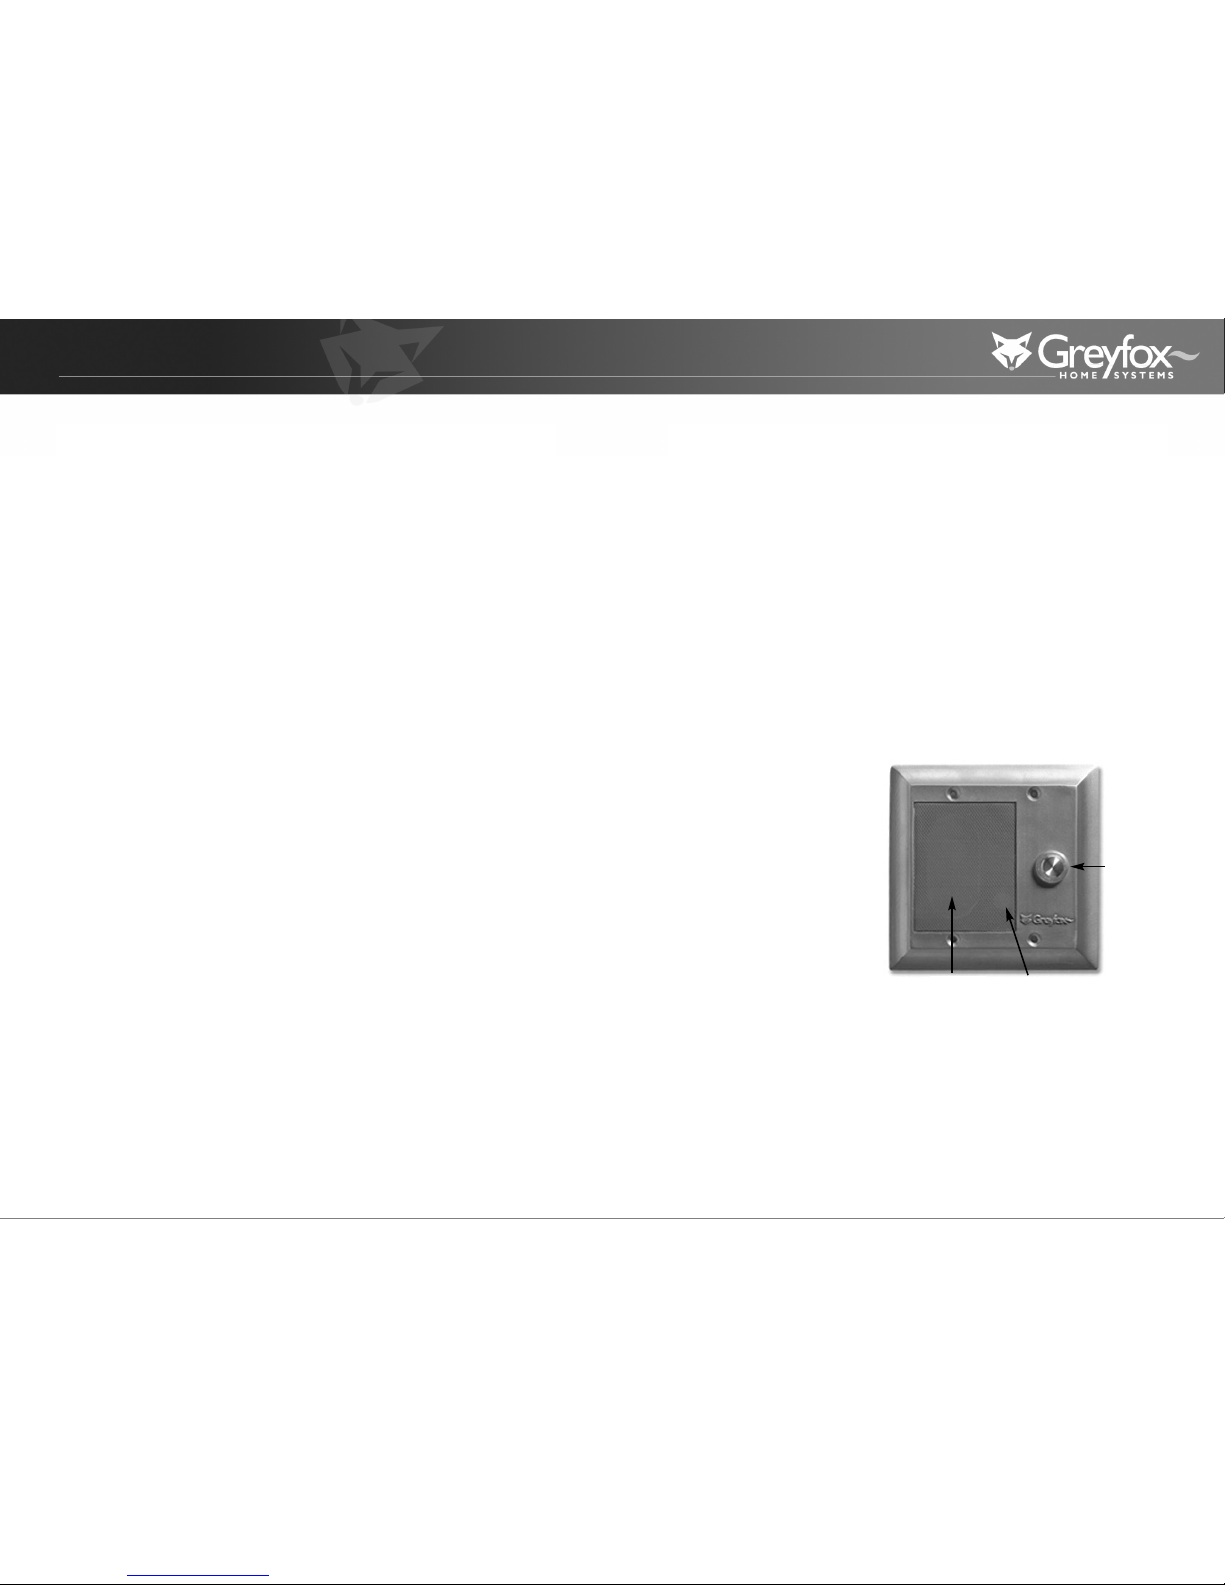
DOORBELL BUTTON - When
a visitor pushes this button, the
Door Chime will be heard
throughout the home at each
active intercom unit.The
occupants of the home can
then press the DOOR button
at any intercom unit to answer
the door.The visitor will hear
the occupant and will be able to
announce who they are.
Door Bell
Button
Speaker
Microphone
Page 6
Cat 5 Intercom System User’s Guide
www.greyfox.com
8 1-877-GREYFOX
9
Greyfox Systems 12 Month Limited Warranty
GREYFOX SYSTEMS warrants to the original or subsequent purchasers only that
this product shall be free from defects in workmanship or materials, under
normal use, for twelve (12) months following the date of its original purchase.
THIS WARRANTY CONTAINS THE ONLY REMEDIES AVAILABLE TO
PURCHASER.
DEFECTIVE PR
ODUCT: If GREYFOX SYSTEMS determines that the
product is defective, GREYFOX SYSTEMS shall, at is option, repair or replace the
product. GREYFOX SYSTEM’S total liability under the terms of this Warranty
shall not exceed the cost of the product to the original purchaser.
EXCLUSIONS: This Warranty excludes damage to the product caused by: (1)
negligent care, maintenance, or operation; (2) attempted or completed
unauthorized servicing or modification; (3) occurrences beyond GREYFOX
SYSTEMS’S control (i.e. vandalism, acts of God,etc.); (4) the failure of any part of
the structure in which the product is installed, or of any materials not supplied by
GREYFOX SYSTEMS; and (5) moisture entering any component through an
adjacent source.
DISCLAIMERS: GREYFOX SYSTEMS EXPRESSLY DISCLAIMS ALL EXPRESS
WARRANTIES NOT CONTAINED HEREIN AND ALL IMPLIED WARRANTIES,
INCLUDING THE IMPLIED WARRANTIES OF MERCHANTABILITY AND
FITNESS FOR A PARTICULAR PURPOSE. UNDER NO CIRCUMSTANCES
SHALL GREYFOX SYSTEMS BE LIABLE FOR ANY CONSEQUENTIAL OR
INCIDENTAL DAMAGES FOR BREACH OF THIS OR ANY OTHER
WARRANTY, EXPRESSED OR IMPLIED.
If any provision of this Warranty is held to be unenforceable by any court or
competent jurisdiction, such provision shall be severed and the remainder of this
Warranty shall remain in full force and effect.
If, during the limited warranty period, it appears as though the product contains a
defect which is covered by this limited warranty, call our Technical Support
department before dismantling the product (1-877-GREYFOX).
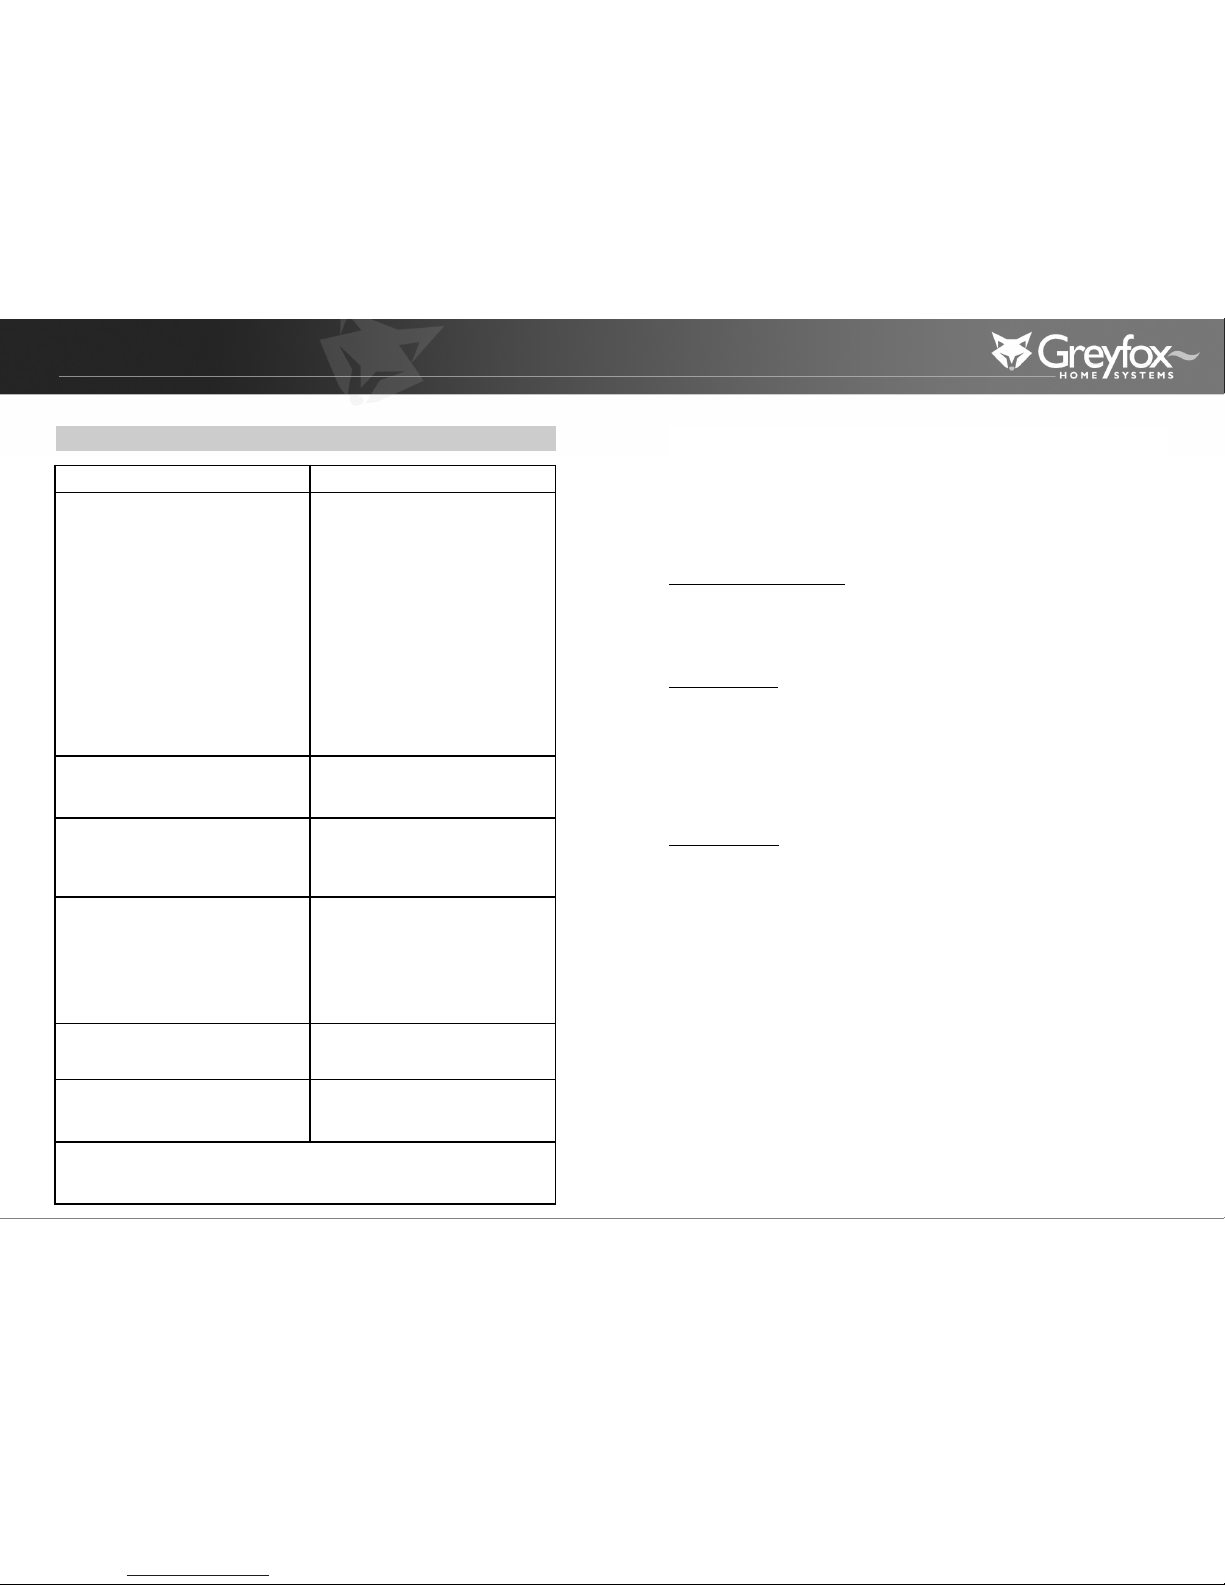
Problem Solution
No power to any intercom unit
- Check Intercom Module power LED to
verify that it is lit. If not lit, make sure
power transformer or power distribution
module is plugged in.
- Verify that you are using the correct 12 V
power supply or power distribution
module for your system by obtaining the
model number of your power
transformer and calling your Greyfox
Systems installer or Greyfox Technical
Support. If you are not using a 12V power
transformer that supplies enough current
to the system then the unit may not
power on.
No power to a specific Room Unit, Door
Unit, or Main Console Unit
- Call your Greyfox Systems installer or
Greyfox Technical Support for assistance.
Feedback or squeal noise from
Main Console Unit, Room Unit,
Door Unit speaker.
- Feedback issues can normally be
eliminated by adjusting the volume of a
unit from a high level to a medium level.
No audio can be heard from a
Room Unit
- Verify that the Room Unit is not in MUTE
mode.When a Room Unit is in MUTE
mode, no audio will be heard through the
unit’s speaker.
- Adjust the volume up until at least 3 LEDs
on the volume light bar are lit.
No audio can be heard from the Main
Console Unit.
- Adjust the volume up until at least 3 LEDs
on the volume light bar are lit.
A button on any intercom unit is not
working properly.
- Call your Greyfox Systems installer or
Greyfox Technical Support for assistance.
Greyfox Systems Technical Support
1-877-GREYFOX www.greyfox.com
Troubleshooting Guide
 Loading...