

Operating Manual SL1
English
Operating Manual
SL1
Greiner Vibrograf AG
Mittelstrasse 2
CH-4900 Langenthal
Schweiz / Switzerland
Tel : +41 (0)62 916 60 80
Fax : +41 (0)62 916 60 81
e-mail: info@greinervibrograf.ch
www.greinervibrograf.ch

Operating Manual SL1
1. Contents
2. Introduction
3. Scope of supply
4. Safety instructions
5. Warning and safety stickers
5.1 Information on the device
5.2 Information in the
Operating Manual
6. Technical data
6.1 Technical data list
6.2 Speed table, stepless adjustment
6.3 Device overview
7. Before putting into service
8. Operation
8.1 Fitting the adaptor
8.2 Changing the belt
8.3 Control panel
8.4 Drive motor
8.5 Speed indicator
8.6 Emergency stop button
9. Disposal
10. EC – Declaration of conformity
Page 2
Page 3
Page 4
Page 5
Page 6
Page 7 - 8
Page 9
Page 10 - 17
Page 18
Page 19
Page 2
1. Contents

Operating Manual SL1
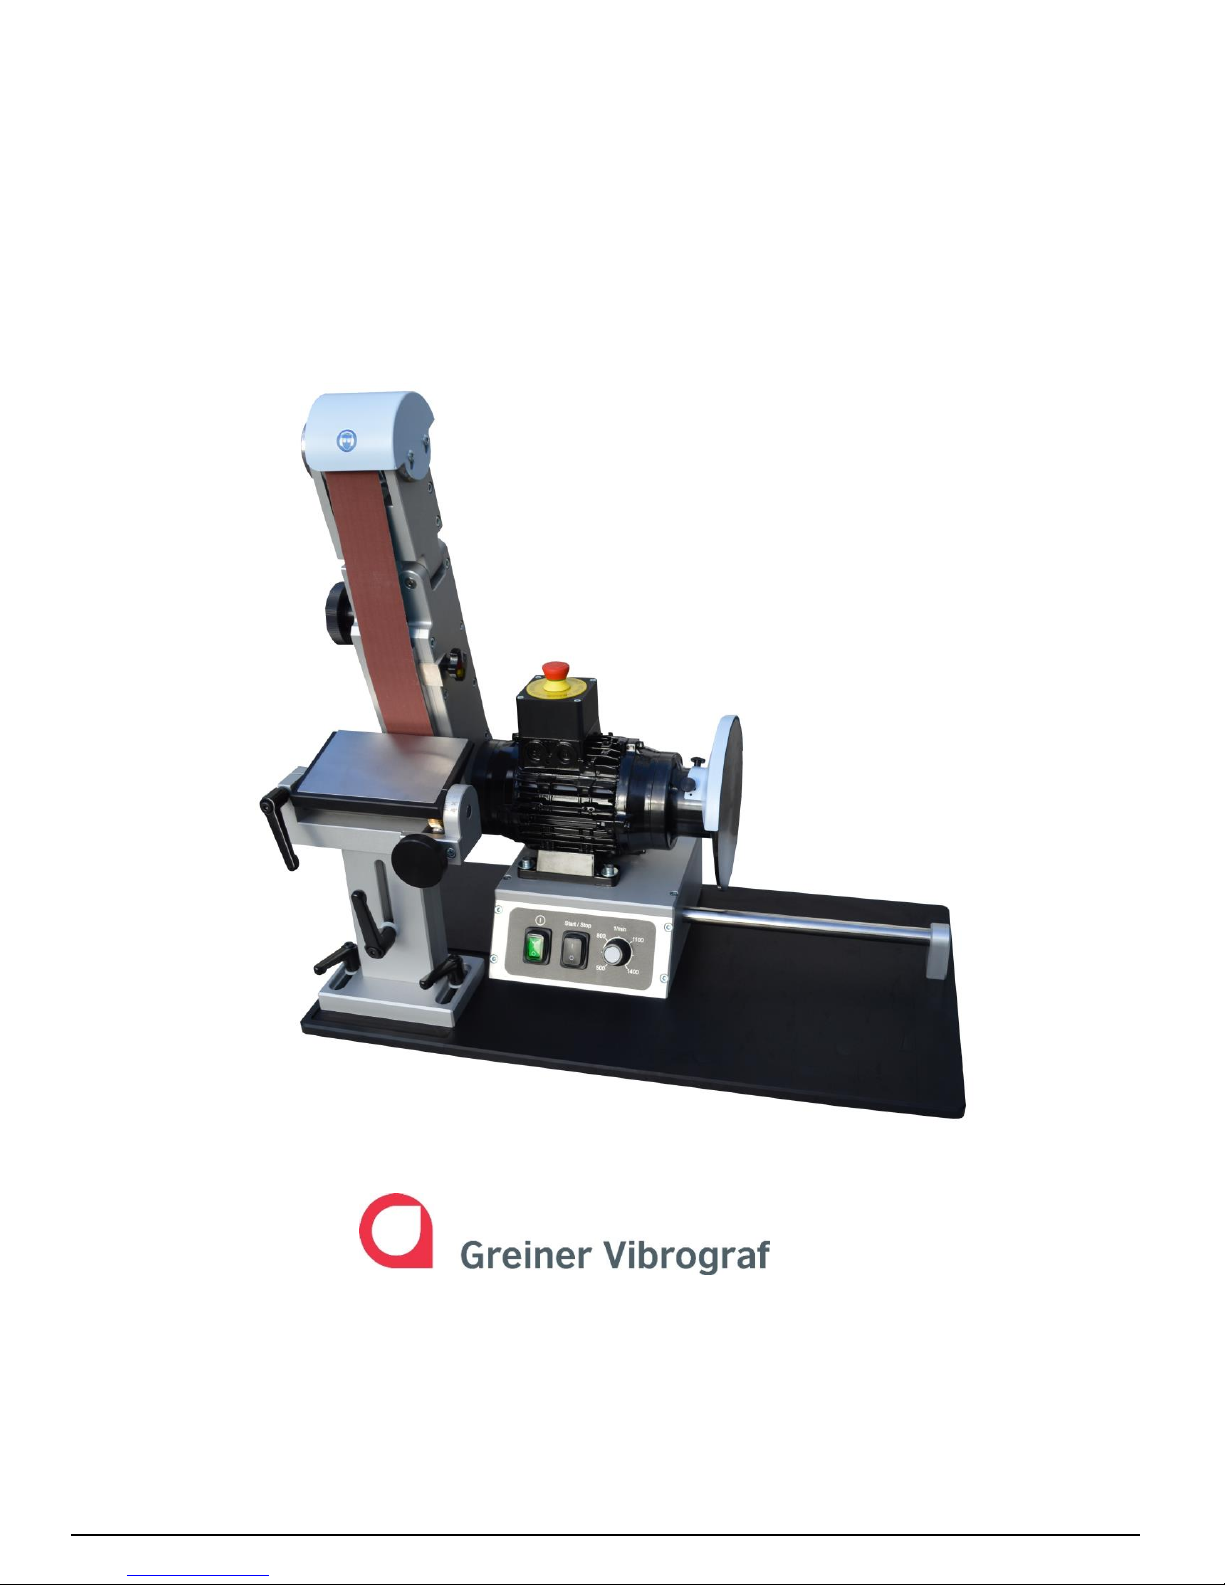
Our SL1 grinding machine with polishing disc is a further development with various
technical refinements distinguish it substantially from other similar devices.
This device was developed as a logical continuation of the following thought:
EFFICIENCY THANKS TO SOLID, COMPACT EQUIPMENT DESIGN.
With the SL1, all grinding and polishing jobs are possible under professional
conditions and, as usual, we guarantee performance, reliability and a long service
life. We congratulate you on your purchase of this high-performance device.
Please take the time to read this Operating Manual. It includes important
information about the use and application of the device.
Please make yourself and the personnel who will be working with the unit familiar
with the SL1and make sure all comply with the safety instructions given below.
Carry out the necessary maintenance and cleaning work at regular intervals, as this
is the only way that safe and effective operation can be guaranteed.
Please keep the Operating Manual close to the device and accessible at all times.
We would also ask you to kindly keep the original packaging.
Please read and comply with all safety instructions ! They should simplify
appropriate operation of the device and help to prevent any misunderstandings, as
well as material or immaterial damage.
All illustrations, instructions and technical specifications in this Operating Manual
are based on the current state-of-the-art machine construction. As the product is
being continually further developed, we reserve the right to make modifications to it.
Greiner Vibrograf AG
Mittelstrasse 2
CH–4900 Langenthal
Tel.: +41 (0) 62 916 60 80
Fax: +41 (0) 62 916 60 81
info@greinervibrograf.ch
www.greinervibrograf.ch
Page 3
2. Introduction

Operating Manual SL1
Page 4
Belt grinding machine with SL1 polishing disc Ready to plug in
1 x Operating Manual
1 x Quick unpacking instructions
1 x Original packaging Packaging set + pallet
3. Scope of supply
3. Scope of supply

Operating Manual SL1
This device is built according to state-of-the-art, recognised safety regulations. However, when in use
dangers can arise to the life and limb of those operating it or third parties, and/or adverse effects to
the device and other property.
For this reason, we would ask you to please comply with the safety instructions below:
(1) The device must only be used in technically perfect condition in accordance with its designated use and
the instructions set out in the operating manual, and only by safety-conscious persons who are fully
aware of the risks involved in operating the unit. No claims under guarantee can be entertained in the
event of operator error or lack of maintenance.
(2) Before putting into service, check the information on the type plate on the rear of the device. The device
is designed for a 115 or 230 V power supply and may only be connected to mains sockets of this type.
(3) In the event of any faults that could also have a detrimental impact on safety, have them repaired by the
manufacturer immediately, as the unit will otherwise not be covered by any guarantee or liability for
defects.
(4) The device is intended exclusively for grinding, milling, scratching and polishing with approved tools. Any
other use or use above and beyond the specifications will be regarded as improper use. The
manufacturer cannot accept any liability for damage resulting from such improper use.
The risk will be borne entirely by the user.
(5) As an additional security equipment the polishing machine is inclusive an emergency stop button.
(6) Always keep the Operating Manual carefully to hand at the location where the device is used.
(7) Supplementary to the Operating Manual, all generally valid statutory and other binding regulations
relating to accident prevention and environmental protection must be observed and communicated to
others.
(8) Personnel entrusted with the operation of the device must, before starting work, have read the Operating
Manual and in particular the Safety instructions chapter.
This is especially important in the case of personnel who only work with the device occasionally.
(9) DO NOT WEAR any jewellery, ties or loose clothing. Loose clothing can get caught up in rotating
parts and cause severe injuries. Use appropriate protection if you have long hair.
(10) Protect the mains cable from heat and sharp objects and install it in such a way that it cannot be
damaged. When not in use, before maintenance, tool changing or repairs, DISCONNECT THE
MAINS PLUG. When disconnecting the mains plug, be sure not to pull by the cable, but by the plug.
If the cable has to be extended, make sure it is in perfect condition and, before use, ensure correct
current carrying capacity.
(11) Never use the device in a humid environment or close to combustible liquids or gases.
(12) The device must NOT be used for wet grinding jobs.
(13) Do not overload the device and clean thoroughly after use.
(14) In the event of damage to the polisher, disconnect the mains plug immediately. It may not be used
again until it has been repaired. Faulty mains cables must be replaced immediately.
(15) Always wear safety goggles with shatter-proof clear lenses.
(16) Spare parts must comply with the technical requirements specified by the manufacturer. This can
only be guaranteed in the case of original spare parts from Helmut Klein company.
(17) Work on/with the device may only be carried out by qualified, appropriately trained and assigned
personnel.
Be sure to observe the legally permitted minimum age !
(18) Store the Operating Manual carefully.
Page 5
4. Safety instructions
Operating Manual SL1
Page 6
5. Warning instructions and safety stickers
5.1 Information on the device
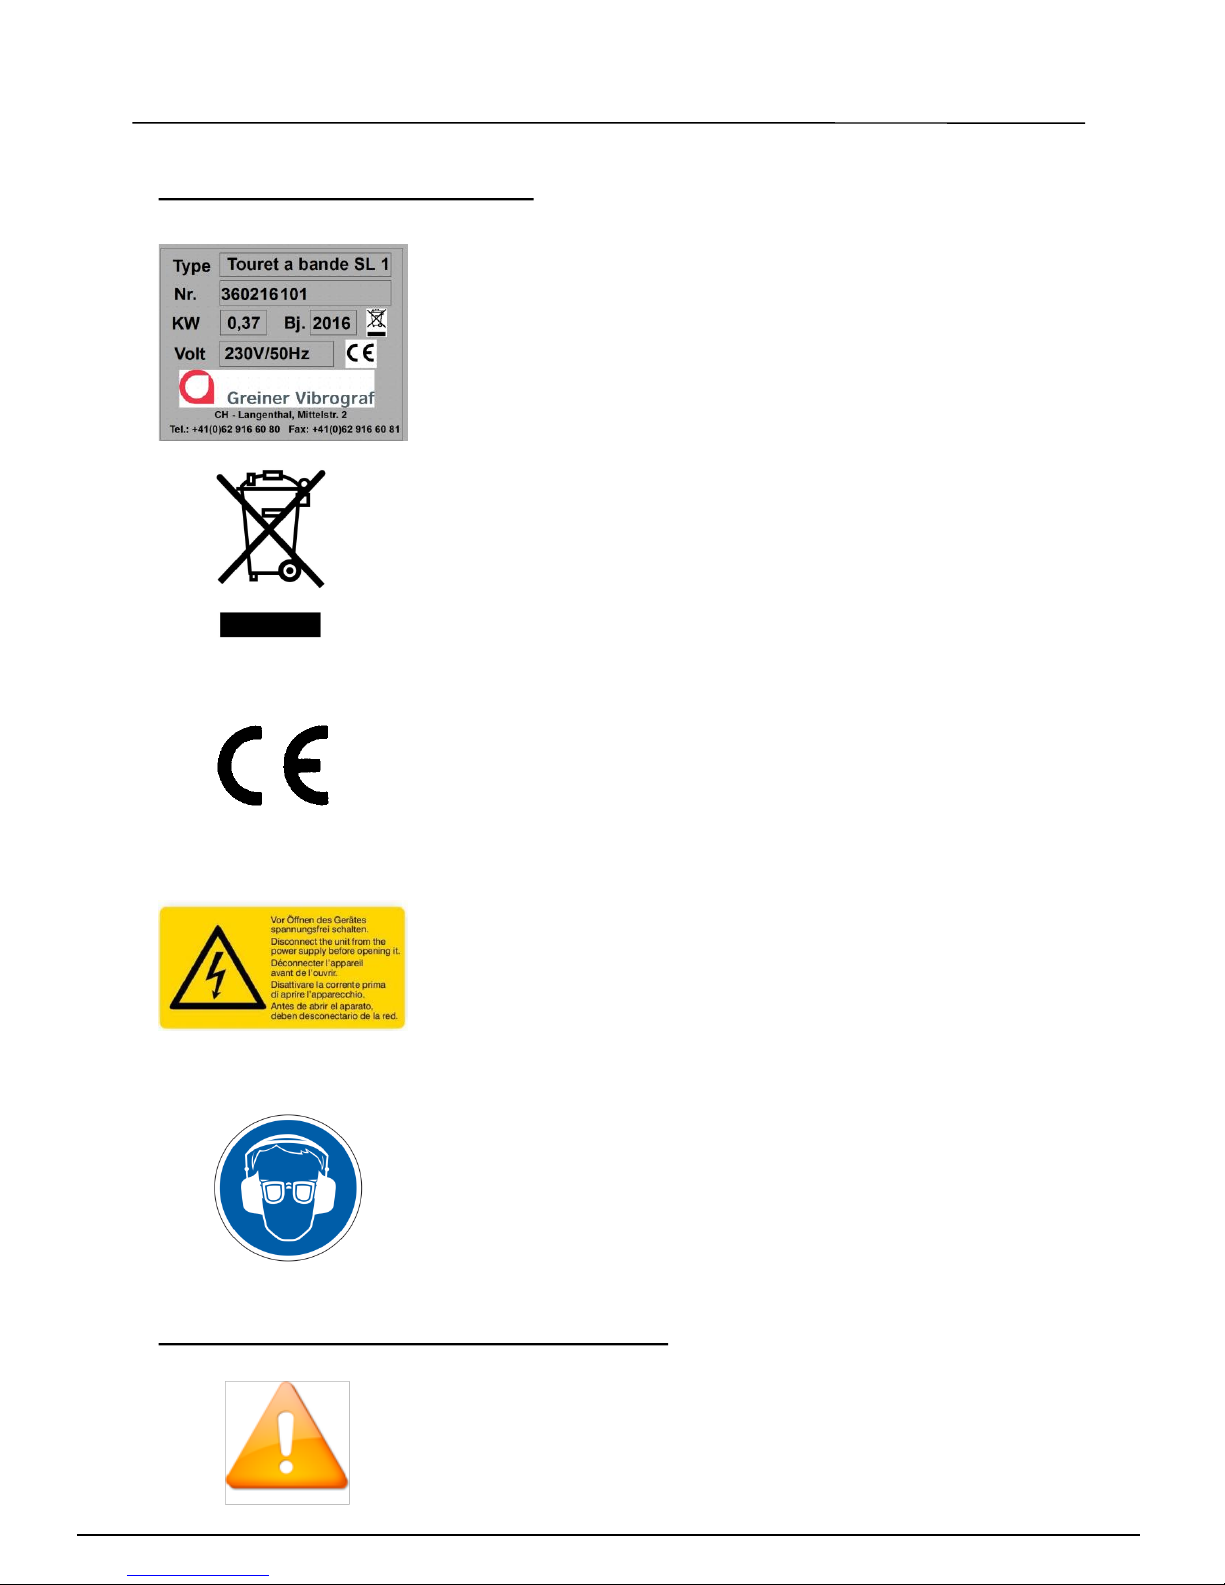
“Type plate”
This sticker includes the device description, serial
number, year of construction and most important
technical data. This sticker is located at the back, next to
the mains socket.
Do not dispose of electrical waste with household waste!
Directive 2002/96/EC on waste electrical and electronic
equipment, see also Page 16
This symbol can be found on the type plate.
This CE symbol indicates the product responsibility of the
manufacturer. With the CE symbol they are declaring that
their product satisfies all currently-valid EU-wide
harmonised standards (as per EU Regulation 765/2008)
This symbol can be found on the type plate.
This yellow safety symbol is a combination of warning
symbol and warning text. Please be especially careful, as
these devices are permanently energised.
This sticker can be found on the left-hand side of the unit.
“Wear hearing and eye protection!”
This sticker indicates that, when working with the device,
you must wear hearing protectors and protective
glasses/goggles with splinterproof, clear lenses.
This sticker is located at the front on the abrasive belt
safety cover.
This symbol identifies safety measures and information of
equal importance, as well as useful instructions on use.
This symbol can be found in the Operating Manual.
5.2 Information in the Operating Manual

Operating Manual SL1
Page 7
6. Technical data
Belt grinding machine with SL1 polishing disc
Article No.: 36000
Power supply: 230 V~/50 Hz or 115 V~/60 Hz
Motor output: 0.37 kW (0.5 HP)
Current consumption: 1.9A (230~V) or 3.8A (115~V)
Typical speed: 500 - 1400 rpm
Belt speed: 1.870 m/sec. - 5.237 m/sec.
Dimensions of abrasive belt: 1,000 x 50 mm
Diameter of polishing disc: 180 mm
Dimensions: W 630 / D 330 / H 600 mm
Weight: 32 kg net (minus packaging)
49 kg gross (incl. packaging)
6.1 Technical data
6.2 Adjusting the speed of the belt grinding machine with SL1 polishing disc
Stepless speed adjustment from typically 500 to 1400 rpm is carried out
using the speed adjusting knob and scale on the control panel
Setting: Speed:
Start = Min. 500 1/min.
Max. 1,400 1/min.

Operating Manual SL1
(5)
(6)
(9)
(10)
(7)
(2)
(3) (4)
(11)
(1)
(8)
6. Technical data
(1) Abrasive belt
(2) Abrasive belt safety cover
(3) Belt grinding arm
(4) Emergency stop button
(5) Drive motor
(6) Polishing disc
(7) Guide rod for sleeve
(8) Baseplate
(9) Control panel
(10) Workbench,
height-adjustable and to the
right tilt setting as per scale
(11) Belt adjusting screw
6.3 Overview of device
Page 8

Operating Manual SL1
7. Before putting into service
Before unpacking, check the packaging for any signs of external damage. Lift up the
cardboard carton and remove the cardboard sections from top to bottom and pull the
transport sleeve off. Remove the Operating Manual and the mains cable.
Carefully lift the machine out and remove the polystyrene foam packaging. Please
keep all the original packaging, including the device protection, for any return
shipments.
The belt grinding machine with its polishing disc is basically to be transported in an
upright position.
Check the device and packaging for any damage or shortcomings. If damage has
occurred during transportation, we would ask for documentation of the damaged
packaging and notification of any defects to the transport company, as well as
immediate contact with the supplier, otherwise claims for replacement due to
damage cannot be considered.
During assembly and equipment or modification of the
device, we would ask you to make sure the mains plug is
disconnected and green rocker switch 1 (see Chapter 6,
Control panel) is in the “Zero position”.
Remove the protective film from the workbench (10) and baseplate (8), see Chapter
5.3. Any residues of adhesive film are easily removed with suitable alcohol-based
cleaning agents.
Connect the mains cable at the rear of the device and make sure that the mains
voltage indicated on the type plate matches the mains voltage where you are
working. Only then should you plug the mains cable into the socket.
Protect the connecting cable from heat and sharp edges
and lay it in such a way that it cannot become damaged.
In the event of cable extensions, make sure in perfect
condition and check current carrying capacity before use.
The machine is now ready to use!
Page 9

Operating Manual SL1
Page 10
8. Operation
Configuration of belt grinder on delivery:
8.1 Fitting the adaptor
The adaptor must be fitted firstly to operate with a grinding belt:
Unscrew mounting angle with
knurled-head screw…
View of grinding arm
with mounting angle but
without adaptor.

Operating Manual SL1
Page 11
8. Operation
…and screw onto the adaptor
using the two countersunk
screws.
Then screw the mounting angle
with the adaptor attached back
onto the grinding arm.
The grinding belt can now be
operated with the adaptor
mounted on the belt grinding
machine.

Operating Manual SL1
Page 12
8. Operation
When changing the belt, as well as during maintenance and repair work, effective
disconnection of the power supply must be guaranteed (pull the mains plug out!)
Changing the belt is effected as described below:
8.2 Changing the belt
Rotate the belt adjusting screw to
the left until the head of the belt
adjuster is in the left-hand position
illustrated.

Operating Manual SL1
Page 13
8. Operation
When changing the belt be certain to pay attention to the
arrows on the inner side of the belt.
The arrows indicate the running direction of the belt.
Incorrect running direction will quickly lead to the
disintegration of the grinding belt..
In this position of the belt adjusting head, the
grinding belt can be removed and replaced.
Put the belt in place as shown in the picture,
then …
… press the upper belt cover together
with the roller downwards into the spring
system and push the belt onto the upper
roller in the middle position.

Operating Manual SL1
Page 14
8. Operation
Now rotate the belt adjusting screw
to the right until the adjusting head is
in line with the grinding arm.
Fine adjustment of the belt is carried
out with the belt motor running at its
slowest speed (500 rpm)
After changing the belt, carry out a 1-
minute trial run. If behaving
abnormally, switch the machine off
immediately!
Grinding belts must be
changed at regular
intervals!
Clean the belt grinder once every 20 hours of operation!

Operating Manual SL1
Page 15
8. Operation
Before putting into service, test the individual switches on the control panel and
make yourself familiar with the device.
Rocker switch1 Mains switch for turning on the supply voltage. If device
switched on, switch 1 lights up in green
This switch does not start up the motor.
Rocker switch 2 Start/Stop switch
To start the motor, check whether the mains switch (1) is
on setting 1 (= ON) and the emergency stop button has
not been pressed.
Then adjust the switch from 0 to 1.
This secures the restart protection of the machine, both in
the event of a power outage and if the emergency stop
button has been pressed and disengaged again.
The time between switching on the green mains switch (1)
and moving the motor swtiching knob (2) from 0 to 1 takes
at least 2 seconds for safety reasons. If the start button is
pressed only briefly, the motor will not start up.
Knob 3 Rotary knob for drive motor
This knob is used to adjust the speed of the motor from
500 to 1,400 rpm. The grinding belt and polishing disc
rotate simultaneously.
1
2
3
8.3 Control panel

Operating Manual SL1
Page 16
8. Operation
Important! Any defects or malfunctions must be remedied
by the manufacturer, Greiner Vibrograf AG. Noncompliance means that all warranty and liability
guarantees become null and void.
8.4 Drive motor
Your SL1 belt grinding machine with polishing disc is equipped with the most powerful
2-spindle electric motor in its class (0.5 HP). In spite of its power, this motor is
characterised by its extremely quiet running and optimal torque. The motor is
maintenance-free and based on our experience we can confirm it can be used for a
long time without any problems.
We would point out that, in the event of continuous use
over a long period, the motor can heat up to as much as
85°C. This is normal and does not influence either the
performance or durability of the motor.
The motor is started by turning the Start-Stop switch (2) from setting 0 to 1, (see Page
13, Chapter 6.1, Rocker switch 2)
You can adjust the speed at any time when the motor is running by rotating the knob.
You can see the selected speed on the speed setting knob scale.
Caution! The drive motor starts running
at the set speed immediately.

Operating Manual SL1
8.5 Emergency stop switch
Page 17
8. Operation
Regulation of the speed takes place steplessly
by rotating the speed setting knob in a clockwise
direction. The speed is indicated by the scale.
(See Chapter 6.1 Control panel, Page 8)
Once the emergency stop button has been
pressed, the grinding/polishing machine
continues running for up to 3 seconds!
8.5 Speed indicator
This is used to bring the motor of the device
quickly to a standstill in the event of danger or to
prevent a potential danger.
The motor can be stopped at any time during the
working process by pressing the emergency stop
button.
The motor can only be switched on again once
the emergency stop button has been unlocked.
To do this, reset the switch to its original position
by rotating in the direction of the arrow. The drive
motor can be set in motion again by turning the
Start/Stop switch from setting 0 to 1
(see also Chapter 6.1 Control panel, Page 11).

Operating Manual SL1
Page 18
9. Disposal
The German Electrical and Electronic Equipment Act (Elektrogesetz, ElektroG)
implements, amongst other things, the European WEEE
Directive 2002/96/EC in German law. It imposes on manufacturers of electrical and
electronic equipment the responsibility for an environmentally-friendly equipment
design and an obligation to accept returns of old equipment for correct disposal.
The manufacturer has been registered for many years and responsibly reports its
devices annually. We do everything possible to keep recycling costs to a minimum, in
order to pass the resulting benefits on to our customers and to society in general.
For this reason, we would also ask you, once you reach the point of having to dispose
of this device, not to put into the general waste, but to deliver it to the disposal centre
responsible for old electrical equipment.
Thank you !
WEEE Reg. No.: DE51617604
We hope you enjoy using your new device !

Operating Manual SL1
Page 19
10. EC - Declaration of conformity
 Loading...