

Page 1
Page 2
14
Page 3
PRE-USED USE
This wireless device for trimming the branches of the company Greenworks Tools is designed for
pruning trees. This product is for household use only.
The Greenworks Tools charger was designed to charge batteries . Greenworks Tools of the type that
comes with this tool.
3
mm
Page 4

SAFETY INSTRUCTIONS
General precautions for safety when working with power tools.
Warning! Safety precautions should be read and all instructions. Failure to follow all warnings
and instructions may result in a shock.electric shock, fire and serious injury.
Keep all warnings and instructions for future reference.
The term "power tool" in cautions refers to the manual (connected to the wire)
power tools or cordless (cordless) power tools.
1. Safety in the workplace
a. Keep the workplace clean and well-lit. Disorder or
dark places lead to accidents.
b. Do not operate power tools in explosive atmospheres, such as
which are present in flammable liquids, gases or dust. Power tools generate
Sparks that can ignite the dust or emitted gases.
c. Do not allow the presence of children and unauthorized persons while working with
power tools. You can get distracted and lose control.
2. Electrical safety
a. The power tool plug must match the outlet. It is forbidden by any
Modify the plug. Do not use the adapter plugs when operating
with grounded (closed to the ground) power tools. Unmodified plugs
and sockets reduce the risk of electric shock.
b. It is necessary to avoid contact of the body with earthed surfaces, such as pipes,
radiators, cookers and refrigerators. There is an increased risk of impact
electric current if your body is grounded.
c. Do not expose power tools to rain or wet conditions.
Water entering a power tool will create a risk of electric shock.
d. Do not use the power cord for other purposes. It is forbidden to use
power cord for carrying, moving or disconnecting the power tool plug from
supply network. Do not allow the power cord to come into contact with heat, oil,
objects with sharp edges or moving parts. Damaged or tangled
cords increase the risk of electric shock.
e. When working with electric tools on the street, use an extension cord suitable for
work in the open air. Use of a cable suitable for outdoor use
air, reduces the risk of electric shock.
3. Personal security
a. It is necessary to remain vigilant, to observe what is happening and to use
common sense when working with power tools. It is forbidden to use
Power tools if you are tired or under the influence of drugs, alcohol
or drugs. Deterioration of attention while working with power tools can lead to
serious injury.
b. It is necessary to use personal protective equipment. Always wear protective equipment
eye. Protective equipment, such as a dust mask, non-skid shoes,
protective helmet or hearing protection will reduce the risk of injury if used
properly.
c. Prevents accidental triggering. Make sure that the switch is
in the off position, before connecting the power source and / or battery, and
also when lifting or carrying the tool. Transfer of power tools when the finger
Page 5

is on the switch, or power is supplied to power tools whose switch
is included, leads to accidents.
d. It is necessary to remove adjustment devices or a wrench before switching on
the electrotool. The wrench or device remaining attached to the rotating part
power tool may result in injury.
e. Do not go too far when working. It is necessary to maintain all the time
the right rack and balance. This provides better control of the power tool in
unforeseen situations.
f. Correctly dress. Do not wear loose clothing or jewelry. Should
pick up your hair, remove clothes and gloves away from moving parts. Free
clothing, jewelry or long hair can get into moving parts.
g. If the devices are intended for connection to devices for removing and collecting dust,
you need to make sure that the devices are connected and properly used.
Using a dust collection device will reduce the likelihood of hazards,
connected with dust.
4. Using and servicing the power tool
a. Do not overload the power tool. Use the power tool to
purpose. A good power tool will do the job better and safer at
speed for which it was designed.
b. Do not use the power tool if the circuit breaker does not work. Any
An electric tool that can not be controlled by a switch is dangerous and must
be repaired.
c. Unplug the power tool from the power source before performing any
adjustments, replacement of accessories or storage of power tools. Such
preventive safety measures reduce the risk of accidental activation
power tools.
d. Keep electric tools out of the reach of children. it is forbidden to work with
power tools to people unfamiliar with it or with these instructions to
power tools. Power tools are dangerous in the hands of inexperienced users.
e. Servicing of power tools is required. Check mismatch
or jamming of moving parts, breakage of parts or other situations that may
to influence the work of power tools. If the power tool is damaged,
must be repaired before use. Many accidents have occurred because of
poor maintenance of power tools.
f. Maintain sharpening and cleanliness of cutting tools. Cutting tools that
correctly serviced, in which sharp cutting edges are less often clamped and lighter
are controlled.
g. It is necessary to use electric tools, accessories, insert cutters, etc. at
in accordance with these instructions, taking into account the conditions and work performed.
Use of power tools for operations that differ from intended
use, can lead to a dangerous situation.
5. Using the Battery Tool and Maintaining It
a. Recharge only with the charger indicated
manufacturer. A charger that is suitable for one type of battery,
may create a fire hazard when used with a different battery.
b. Only use power tools with specially designed power tools.
batteries. Any other battery
create a risk of injury and fire.
c. When the battery is not in use, it must be kept away from others
Metal objects such as paper clips, coins, keys, nails, screws or other
small metal objects that can form a single connection
Page 6

terminals to the other. Shorting the battery contacts may result in burns or
fire.
d. If not properly used, the battery may leak liquid; in this case
avoid contact. In case of accidental contact, flush with plenty of
soapy water. If liquid enters the eyes, seek medical advice immediately
help. Liquid leaking from the battery may cause irritation or burns.
6. Maintenance
a. Service your power tool from a qualified service technician using
only identical spare parts. This ensures safety
power tools.
Additional precautions for working with power tools
Warning! Additional safety instructions for use with
trimming devices.
The intended use is described in this instruction manual. Not allowed
use the tool for unforeseen purposes; for example, it is forbidden to use the tool
felling trees. Use of any accessory or accessory or
any operation that differs from the one recommended in this
instructions for use, poses a risk of injury.
◆ Keep the power tool only for insulated, designated for this purpose
surface, as the cutting tool can touch the concealed wiring. Contact with
wires under current can transfer voltage to open metal parts
electric tools, which can lead to electric shock to the operator.
◆
Wear well-fitting protective clothing, including a protective helmet with a visor / goggles, protective
headphones, non-slip safety shoes, protective overalls and durable leather
gloves.
◆ Always stay out of the trajectory of the falling branches.
◆ The safe distance between the cut branch and strangers, buildings and other objects
must be at least 2½ times the length of the branch. Any strangers, building or
an object within this distance is exposed to the risk of being hit by a falling branch.
◆ Plan out a safe departure from falling trees or branches in advance. Make sure that
The route of departure is free from obstacles that can impede the movement or make it
impossible. Remember that wet grass and freshly cut bark are slippery.
◆ Make sure that someone is nearby (but at a safe distance) just in case.
◆ Do not use the instrument while standing on a tree or on a ladder, or on any other
unstable surface.
◆ Always keep the right rack and balance.
◆
Hold the tool firmly in both handles when the motor is running.
◆ Do not allow the moving chain to contact any object on the tip of the guide
canvases.
◆ Start cutting only when the chain is moving at full speed.
◆ Do not attempt to insert the saw into the previous notch. Always start a new file.
◆ Watch for shifting branches or other forces that can close the nail and clamp
chain, or hit it.
◆ Do not attempt to saw the branches when the diameter of the branch exceeds the cutting length of
the tool.
◆ Always remove the battery from the tool and put the chain casing on the chain when storing or
transportation of the tool.
Page 7

◆ Keep the saw chain sharp and tight. Check the voltage with regular
intervals.
◆ Before any adjustment, care or maintenance is carried out,
let the chain stop and remove the battery.
◆ Use only genuine spare parts and accessories.
◆ Transfer the bar tackle by the handle with the cut blade cut off. When
transporting or storing the rod pruner, the casing must always be installed
cutter and disassemble the tool into components. Proper handling of
The barbell pruner will reduce the likelihood of injury and reduce the incidence of injury
other persons.
Security of others
• This appliance is not intended for use by persons (including children) with limited
physical, sensory or mental abilities, or lacking knowledge and
experience, unless they are under supervision, or have received instructions concerning
use of the device, on behalf of the person responsible for their safety.
• Children should be supervised to ensure that they do not play with the appliance.
Vibration
The values of vibration indicated in the technical data and declaration of conformity were measured
in
according to the standard test method given in EN 60745, and can
used to compare one tool to another. The specified vibration value can also be
used for preliminary impact assessment.
Caution ! The vibration value in actual use of the power tool may
differ from the indicated value depending on the way the tool is used. Level
vibration may exceed the specified level.
When assessing the impact of vibration for determining the safety measures required in accordance
with
Directive 2002/44 / EC for the protection of persons regularly using electric
professional activity, the assessment of the impact of vibration should take into account the actual
conditions
use and method of using the tool, including taking into account all stages of the work cycle, such as
periods of instrument shutdown and tool idle periods, in addition
to the activation time of the trigger.
Pruning
Before attempting to prune the branches on a tree, it is necessary to make sure that there are no bylaws
or norms that would prohibit or control felling of trees.
◆
Make sure the direction that the branch can fall. Take into account all the conditions that can
influence the direction of the fall, including:
length and weight of the cut branch
envisaged fall direction
any unusual structure or rot in the branches of a tree
the presence of surrounding trees and obstacles, including power lines
interweaving with other branches
wind speed and direction.
◆
Take into account access to the tree branch.
Page 8

The branches of the trees can move toward the trunk. In addition, there is a danger of
blow a branch for the user, any unauthorized person, building or object under the branch.
Warning Characters
The following symbols are on the instrument:
Caution ! To reduce the risk of injury, the user must
read and guide the operator.
Do not expose to rain or moisture.
It is necessary to wear gloves when using a chain saw
Beware of falling objects. Keep strangers away.
Danger of electric shock. Stay at least 10 m away
from overhead transmission lines.
It is necessary to wear a protective helmet and eye protection.
Always wear non-slip safety shoes.
Always wear safety goggles when using a chain saw.
Always wear protective headphones when using a chain saw.
Direction of rotation of the chain.
Warning! Do not touch the chain at the chip ejection points.
Residual risks
There may be additional residual risks when using a tool that can not be
are included in the safety rules described herein. These risks can arise from incorrect
or prolonged use of the product, etc.
Even with the application of appropriate safety regulations and the use of safety
devices, you can not avoid some residual risks. These include:
• Injuries caused by touching rotating / moving parts.
• Injuries related to the replacement of parts, cutting blades or accessories.
• Injuries caused by prolonged use of the tool. When using any
tool for a long time make sure that you regularly take breaks ..
• Impairment of hearing.
• Health hazards associated with inhaling dust when using a tool (example: - work
with wood, in particular, with oak, beech and wood-fiber plates).
Additional safety instructions for batteries and chargers
Rechargeable batteries
◆ Never attempt to open the batteries under any pretext.
◆ Do not expose the battery to water.
◆ Do not expose the battery to heat.
◆ Do not store batteries in locations where the temperature may be too high.
exceed 40 ° C.
◆ Charge the batteries only at an ambient temperature between 10 ° C and 40 ° C.
◆ Charge the batteries only with the charger provided
delivery of the device. Using the wrong charger may result in
shock and overheating of the battery.
◆ When disposing of batteries, follow the instructions,
given in the section "Protection of the environment".
◆ Do not damage or deform the battery by puncturing
or shock, as this may result in a risk of injury
or fire.
Page 9

◆ Do not charge damaged batteries.
◆ In extreme conditions, a leak from the battery may occur. If you notice
liquid on batteries, gently wipe the liquid with a cloth. Avoid contact with
skin.
◆ In case of contact with skin or eyes, the following
instructions.
Warning! Liquid from the battery may cause injury or
damage to property. In case of contact with skin, wash immediately this area
water. If redness, pain or irritation develops, consult a doctor immediately. AT
In case of contact with eyes, rinse immediately with clean water and seek
medical care.
Charging device
The charger was designed for a certain voltage. Always necessary
make sure that the mains voltage corresponds to the voltage indicated on the passport
nameplate.
Warning! Under no circumstances should you try to replace the charger
mains plug.
◆ Use the Greenworks tools charger only to charge the battery
device, in the delivery set of which it is included. Other batteries may explode,
causing injuries and damage.
◆ Do not attempt to recharge disposable batteries.
◆ If the power cord is damaged, it must be replaced by the manufacturer or
Authorized Greenworks tools service center to avoid danger.
◆ Do not expose the charger to water.
◆ Do not open the charger.
◆ Never place objects in the charger.
◆ The charger must be kept in a well-ventilated place during charging
indoors.
Symbols on the charger
The following symbols are on the charger:
The charger has double insulation, so no grounding
the wire. Always make sure that the mains voltage corresponds to the voltage
on the nameplate. Do not attempt to replace the charger with a network
plug.
If the power cord is damaged, it must be replaced by the manufacturer or
Authorized Greenworks tools service center to avoid danger.
The charger is designed for indoor use only.
Read the manual before using the appliance.
CHARACTERISTICS
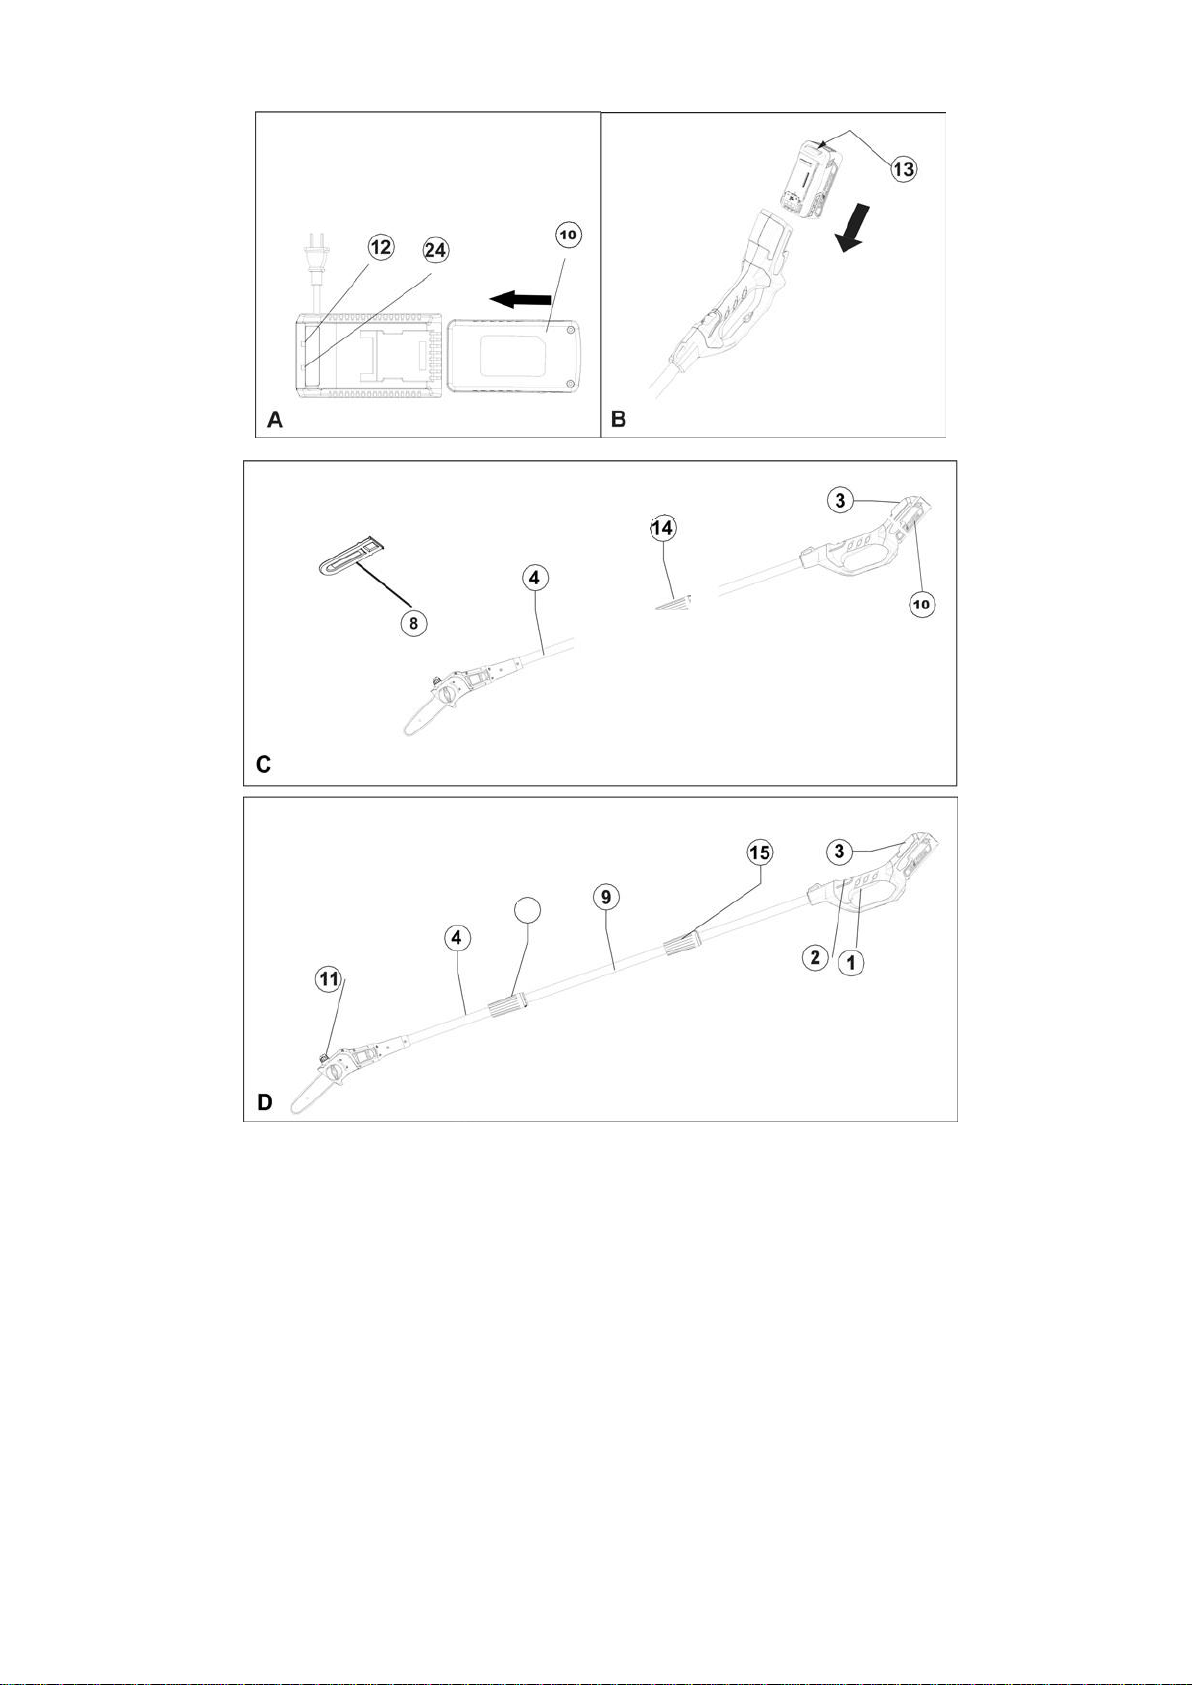
1. Switch on / off.
2. Unlock button
3. The main handle
4. Saw head
5. Sprocket cover
6. Guiding cloth
7. The chain
8. Chain cover
9. Sliding rod
10. Battery
Page 10

11. The oil reservoir
Fig. A
12. Battery Charger
Assembly
Caution ! Before assembling, it is necessary to remove the battery from the device.
Installing and Removing the Battery Pack (Figure B)
◆ To install the battery (11), align it with the seat on the tool. Paste
the battery into the seat and press until the battery
in place.
◆
To remove the battery, press the release button (13), simultaneously
pulling the battery out of the seat.
Warning! To prevent accidental operation, it must be ensured that
the battery is removed and that the blade cover is in place on the cutting blades, before
than to perform the following operations. Failure to observe this precaution could result in serious
injury.
Installation and saw heads (Figure C)
The saw head can be mounted directly on the handle to obtain standard coverage.
◆
Align the groove on the outside of the end of the handle coupling (3) with the tongue on the inside
end of the saw head coupling (4). Slide the saw head (4) onto the handle (3).
◆
Slide the ring (14) upwards and turn it anti-clockwise until it is
will be fully tightened.
Caution ! It is necessary to periodically check the connections to ensure that they are
tightening.
Extension of the saw head (figure D)
Maximum coverage can be achieved when installing the extension rod (9) between the saw head
(4) and the handle (3).
◆
Align the groove on the outside of the end of the handle coupling (3) with the tongue on the inside
end of the extension rod coupling (9).
◆
Slide the extension rod (9) onto the handle (3).
◆
Slide the ring (15) up and turn it anti-clockwise until it is
will be fully tightened.
◆
Align the groove on the outside of the end of the handle coupling (3) with the tongue on the inside
end of the saw head coupling (4).
◆
Slide the saw head (4) onto the handle (3).
◆
Slide the ring (14) upwards and turn it anti-clockwise until it is
will be fully tightened.
Caution ! It is necessary to periodically check the connections to ensure that they are
tightening.
Page 11

Dismantling the saw head (Figures C and D)
If the extension rod (9) is installed, the saw head must first be removed.
◆
To remove the saw head (4), leave the handle (3) on the ground, loosen the ring (14) and remove
the saw head.
Using
Warning! Give the instrument to work at its own pace. Do not overload
tool.
Charging the battery pack (Figure A)
You must charge the battery before first use, and also whenever it is not
generates enough energy for work with which he easily coped before.
The battery may become warm during charging; this is normal and does not indicate any problems.
Warning! Do not charge the battery at ambient temperatures below
10 ° C or above 40 ° C. Recommended charging temperature: approximately 24 ° C.
Note. The charger will not charge the battery if the cell temperature is lower
approximately 10 ° C or above 40 ° C.
◆
The battery must be left in the charger and the charger starts charging
automatically when the temperature of the element increases or decreases.
◆
To charge the battery (10), remove it from the instrument and insert it into the charger
(12). The battery is inserted in the charger in only one direction. Not allowed
to make an effort. Make sure that the battery is fully installed in the charger.
◆
Connect the charger to the mains.
◆ The charge indicator (24) will be on.
Charging is complete when the charge indicator (24) is permanently lit in green. Charger
device and battery can be left connected for an indefinite period with a burning
LED. The color of the LED will change to red (charging is in progress), if the charger is accidentally
stopped charging the battery. The charging indicator (24) will be lit while the battery is connected to
the
charger included.
◆
Charge the discharged batteries within 1 week. Battery life will be
much less if it is stored in a discharged state.
Remaining battery in the charger
The charger and the battery can remain connected for an indefinite period
with a burning LED. The battery charger will keep the battery fresh and
fully charged.
Charger Diagnosis
If the charger detects a weak or damaged battery, the charge indicator (24)
will flash rapidly in red. It is necessary to perform the following operations:
◆
Reinsert the battery (10).
◆
If the charging indicator continues to flash rapidly in red, use another
battery to determine if the charging process is working properly.
◆
If the replacement battery is charged correctly, the original battery is faulty, and
Page 12

it must be returned to the service center for recycling.
◆
If the new battery shows the same indication as the original battery,
Take the charger for testing to an authorized service center.
Note: It may take up to 60 minutes to determine if the battery is faulty.
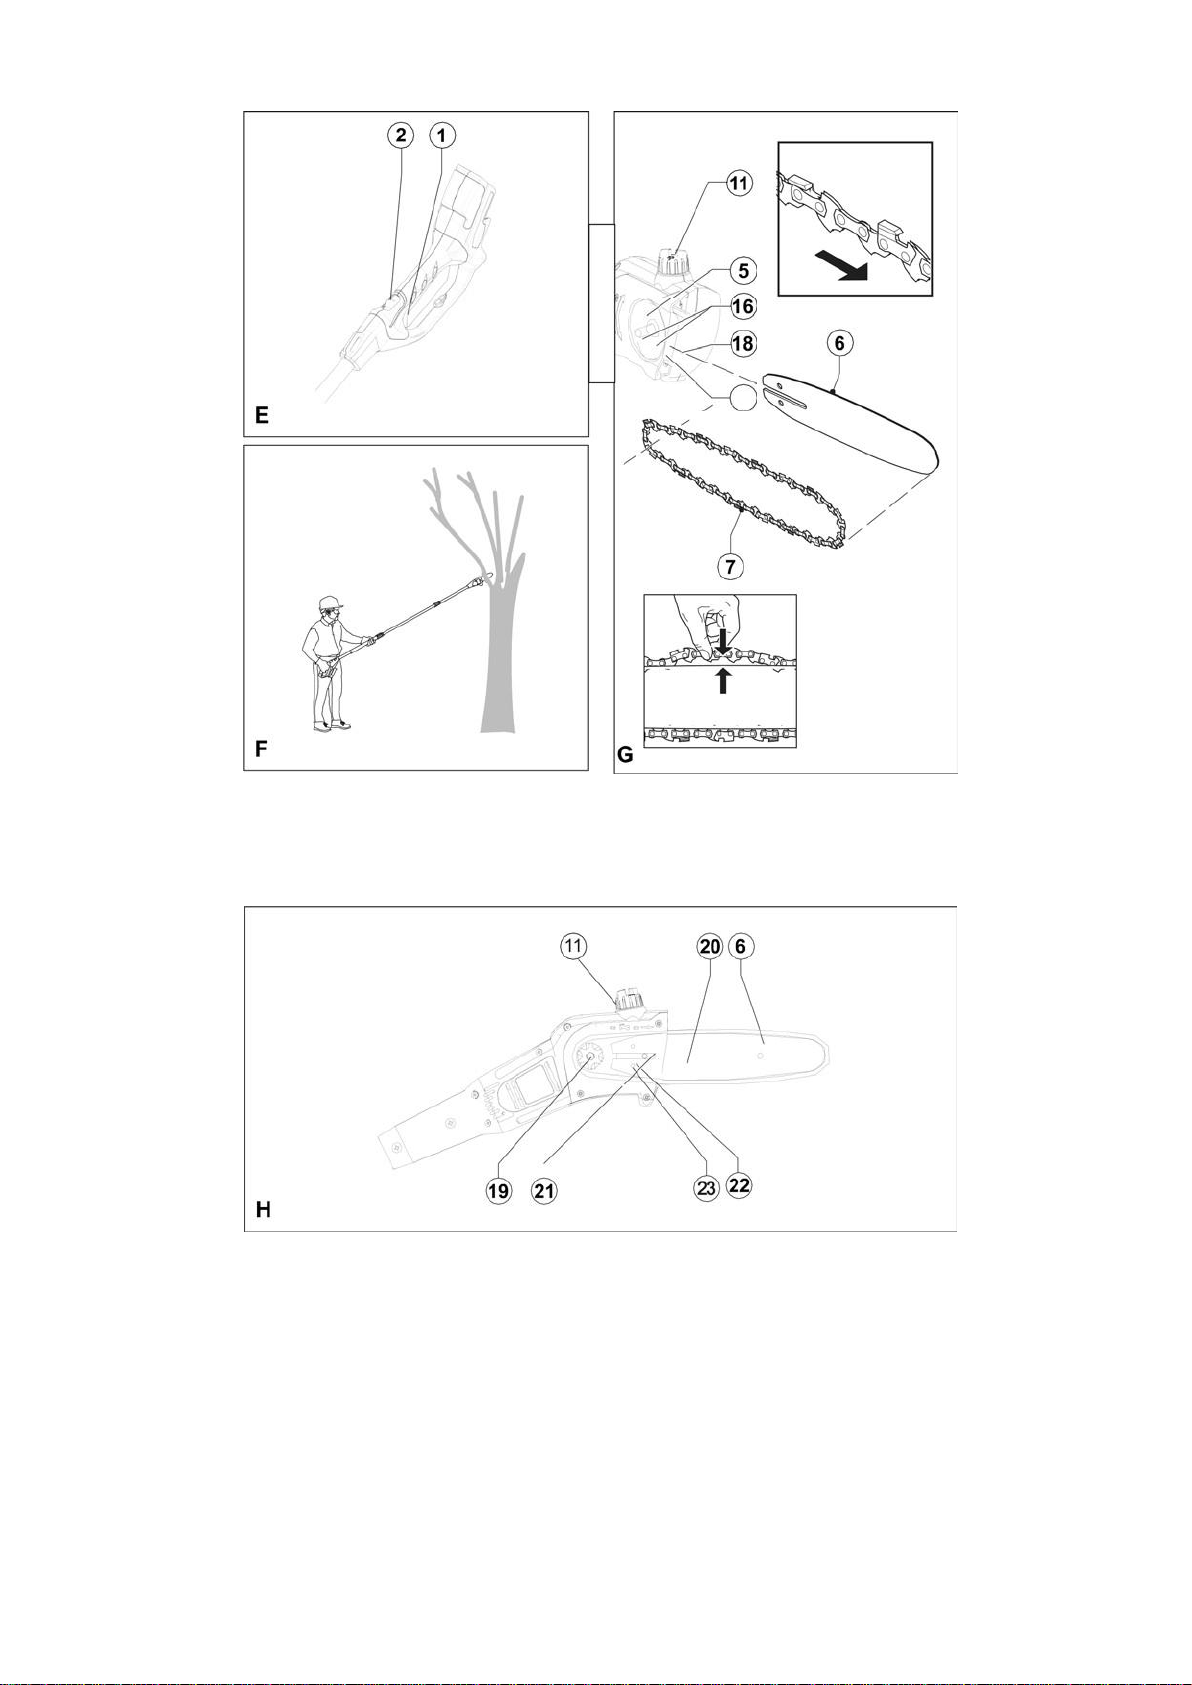
Turning on and off (Figure E)
For your safety, this tool is equipped with a dual switching system. This system
prevents accidental switching on the instrument.
Inclusion
◆
Press the release button (2) on the back with your thumb and simultaneously slide
on / off switch (1).
◆
Release the unlock button (2).
Disconnecting
• Release the on / off switch (1).
Caution ! Never attempt to lock the switch to the on position.
Pruning
◆
You need to make sure that the tool is running at full speed before you start trimming.
◆ Hold the tool firmly in place to avoid possible jerking or lateral
tool offsets.
◆
Guide the tool across the branches, lightly pressing. When pruning thick branches, where
Partial propyl can break and damage the tree, you must perform the following
operations:
-
Make the first cut in 15 cm from the trunk of the tree on the underside of the bough. Use the top
part of the guide web (6) for performing this cut.
-
Cutting one third of the diameter of a bitch. Then saw off the top.
Cleaning, maintenance and storage
Your wired / wireless appliance / tool from Greenworks tools was developed for
functioning for a long time with minimal maintenance.
Continuous satisfactory work depends on the proper care of the instrument and its regular
cleaning.
Caution ! Before performing any maintenance of wired / wireless power tools:
◆
Switch off and disconnect the appliance / tool.
◆
Or, disconnect and remove the battery from the instrument / instrument if the instrument /
instrument
is equipped with a separate battery.
◆
Or discharge the battery completely if it is built-in, and then
disable.
◆
Unplug the charger before cleaning it. The charger does not require
No maintenance, other than regular cleaning.
Regularly clean the ventilation slots on the device / tool / charger with
Page 13

soft brush or dry cloth.
Regularly clean the motor housing with a damp cloth. Do not use abrasive
a detergent or a detergent based on a solvent.
Regularly open the cartridge and turn it over to remove dust from the interior
(if installed).
After use and before storage
◆ Regularly clean the ventilation slots with a clean dry brush.
◆ Use only mild detergent and a damp cloth to clean the instrument. Not
Do not allow fluid to enter the instrument, and under no circumstances
immerse any part of the instrument into a liquid.
◆ Remove the debris with a hard brush.
◆ Lubricate the chain with engine oil.
Installation and dismantling of the saw chain (Figures G and H)
Warning! Always wear protective gloves when installing and removing the saw chain. Chain
The saw blade is sharp and can cut you when it does not work.
◆ Place the tool on a firm and stable surface.
◆ Loosen the screws (16).
◆ Remove the screws.
◆ Remove the sprocket cover (5).
◆ Turn the screw (18) counterclockwise so that the guide web (6) moves away, and
so that the saw chain tension (7) is reduced.
◆ Remove the old saw chain from the sprocket (19) and the guide web (6).
◆ Place the new saw chain in the guide groove and around the sprocket. Make sure that the teeth
are directed in the right direction by comparing the arrow to the chains of the saw with the arrow on
the body.
◆ Make sure that the groove (20) in the guide web is above the positioning pins
(21), and that the hole (22) under the groove is above the adjusting pin (23).
◆ Replace the sprocket cover (5) and the screws (16).
◆ Tighten the screws (16).
◆ Adjust the chain tension as described below.
Checking and adjusting the chain tension (figure G)
◆
Check the chain tension. The tension is correct when the saw chain (7)
bounces back after it was drawn 3 mm from the chain saw blade by a small
effort of the middle and big fingers. There should be no slack between the guide
(6) and saw chain (7) on the underside. To adjust the tension:
◆ Loosen the screws (16).
◆ Turn the screws (18) clockwise.
Warning! Do not over-tension the circuit, as this will lead to excessive
wear and shorten the service life of the blade and chain.
◆ Once the chain tension is correct, tighten the screws (16).
Warning! When the saw chain is new, it is often necessary to check the tension during the period
the first two hours of operation, since the new saw chain is slightly stretched.
Lubrication chain
The saw chain must be lubricated before each use and after cleaning; it is necessary
apply only the correct grade of engine oil (Cat. No. A6027).
◆ Evenly lubricate the entire saw chain (7).
Page 14

Storage
When the instrument is not used for several months, it is best to leave the battery
connected to the charger.
Otherwise, perform the following operations:
◆ Fully charge the battery.
◆ Remove the battery from the instrument.
◆ Keep the tool and battery in a safe and dry place.
◆ The storage temperature should always remain between + 10 ° C and + 40 ° C. Place
battery on a flat surface.
◆ Before using the tool after long-term storage, it is necessary to completely
charge the battery.
Environment protection
Separate collection. This product must not be disposed of with normal household waste.
If one day you find that your Greenworks tools product requires replacement, or if it no longer exists
can be useful for you, do not throw it away with household waste. Determine this product for
separate collection.
Separate collection of used products and packaging allows the processing of materials and their
reuse. Recycling of recycled materials allows
prevent pollution of the environment and reduce the need for raw materials.
Accumulators
At the end of its useful life, dispose of batteries with due care for the environment:
◆ Do not short-circuit the battery terminals.
◆ Do not incinerate the battery (s), as this may create a risk of injury or explosion.
◆
Completely drain the battery and then remove it from the instrument.
◆ The batteries are suitable for recycling. Place the battery (s) in a suitable
packing, which guarantees the absence of a short circuit. Rent them in any authorized
service center or local point of processing.
Technical data
2000107
Input voltage
24 V DC
Chain speed without load
6.67 min -1
Max. length of cut:
20 centimeters
The weight
5.7 kg
Capacity of the oil chain tank
50 ml
Battery
29697 and 29707
Voltage
24 V DC
Power
44/88 Wh
A type
Lithium
Charger
29687 and 29437
Input voltage
Page 15

100-240 VAC
Output voltage
24 V DC
Output current
2200 mA
Sound pressure level in accordance with EN ISO 11680-1:
Sound Pressure (LpA) 78 dB (A), Uncertainty (K) 3 dB (A)
Sound power level in accordance with EN ISO 3744:
Sound power (LWA) 98 dB (A), uncertainty (K) 3 dB (A)
The total vibration value (three-component sum of vectors) in accordance with standard EN 60745:
Cutting of recently felled coniferous species (ahW) = <2.5 m / s2,
uncertainty (K) 1.5 m / s2
TROUBLESHOOTING AND TROUBLESHOOTING
Malfunction
Possible reason
Corrective action
Bus and chain operation is accompanied by heating and smoke. Check for item excess chain tension.
Empty tire grease reservoir.
Pull the chain. Talk to list chain Tension earlier given in this guide. Check the oil reservoir tires.
The motor is running, but the circuit is not rotates. The chain is too tight. Check the assembly of the
guide tires and chains. Check the guide rail and chain for damage. Re-tension the chain. Refer to the
Tension section. chain , previously given in this guide. Refer to the Replacement section. tires and
chains , previouslygiven in this guide. Check the guide rail and chain.
DISPOSAL CONSIDERATIONS
Power tools and accessories contain a large number of valuable resources and plastics that
can be recycled. Defective electrical appliances must not be disposed of together with
household waste. Please dispose of them in specially equipped places. Please contact
waste management advice to the local administration or retailer.
EU DECLARATION OF CONFORMITY
Machinery Directive
2000107
Greenworks tools declares that the products described in the section "Technical Data"
comply with the provisions of the following documents:
2006/42 / EC, EN ISO 11680-1
These products also comply with Directive 2004/108 / EC.
For more information, contact Greenworks tools at the following
address.
The undersigned is responsible for the preparation of the technical documentation and does so
application on behalf of Greenworks tools.
Place, date: Chang Jou, 09/02/2012
Signed: Dennis Jacobson (Bachelor of Engineering, Dipl.-Ing., Member of the Institute of
Technology
Page 16

and technology)
Vice President of Engineering
GUARANTEE
Greenworkstools is confident in the quality of its products and offers outstanding warranty terms. it
the guarantee statement is additional, and in no case does not call into question your legal rights.
The guarantee is valid on the territory of the Member States of the European Union and the
European Free Zone
trade.
If the Greenworkstools product fails due to defects in materials, assembly or absence
compliance within 24 months from the date of purchase, Greenworkstools guarantees replacement
of defective parts,
repair of products that have undergone significant wear, or the replacement of such products in order
to ensure minimum
difficulties for the customer, if only:
◆ The product was not used for trade, professional or hired purposes.
◆ The product has not been handled improperly or negligently.
◆ The product has not been damaged by foreign objects, substances or as a result of an unfortunate
case.
◆ No attempt was made to perform repairs by persons who are not an authorized repair
personnel or service personnel of Greenworkstools.
To claim claims under the guarantee, you must provide proof of purchase to the seller or
Authorized service center. You can find out the location of the nearest authorized service center,
contact the local Greenworks office at the address specified in this manual. In addition, the list of
Authorized Greenworkstools service centers and complete information about our aftermarket
service and contacts is available on the Internet at: www.greenworkstools.com
Please visit our website www.greenworkstools.com , to register your new product
Greenworkstools and be constantly up to date with new products and special offers. Further
information on
brand Greenworkstools and the range of our products can be found at www.greenworkstools.com
 Loading...